We recently released Ernest, a rich text editor package for Umbraco that helps editors write clear and concise content by highlighting passages or words that might be a problem, and then offering suggestions as to why they might have issues. Ernest follows through our long-held philsophy that the key to a successful website is a well-designed back office that our clients can use with as little friction as possible, that aids them in their goals, and feels like it does exactly what they want.
Ernest also served as a testbed platform for Offroadcode to experiment with a project that we've been exploring for a while: using the React for custom property editors or other packages inside the Umbraco back office.
A natural question to ask is "Why?" After all, the Umbraco back office is built in Angular, and Angular controllers are expected for something as simple as a property editor, let alone more ambitious projects. Why not just use Angular?
Using Angular is great, and it works well for a lot of teams and is the standard for working in the Umbraco back office. But for a while now we've been wondering "What if?"
The first answer is that we use React as our library of choice when designing complex interactive modules or web apps for client websites. In the last twelve months alone I've literally authored or edited hundreds of thousands of lines of code in React.
Angular is a fairly intensive and highly opinionated framework that resembles the metaphorical purse with the kitchen sink in it. It's a lot. React, by comparison, is a library that does one thing and does it well: create interactive UIs. And it does it without making any assumptions about the rest of your technology stack.
As such, we find that React is the right size for our projects, giving us the flexibility to use it at a number of scales for a number of purposes. And with this institutional experience, we can much more quickly create views and interactions in a property editor or package using React over Angular. We don't have to relearn how to do the same thing a different way, and can more quickly onboard team members into a back office project.
Ernest uses Draft.js, a rich text editor framework based upon React. It's a powerful and flexible tool that allowed us to make exactly the editor experience we wanted without having to reinvent the wheel.
Although the faddishness of JavaScript libraries and frameworks over the past decade is a great source of jokes for programmers, especially in other parts of the stack, to make at one another's expense, right now React is in a dominant position over Angular in drawing the attention of developers. There's more coders making more tools, like Draft.js, for one another to use with React. And unlike Angular, React doesn't have a community split between incompatible versions to further dilute the user base (Angular 2, anybody?)
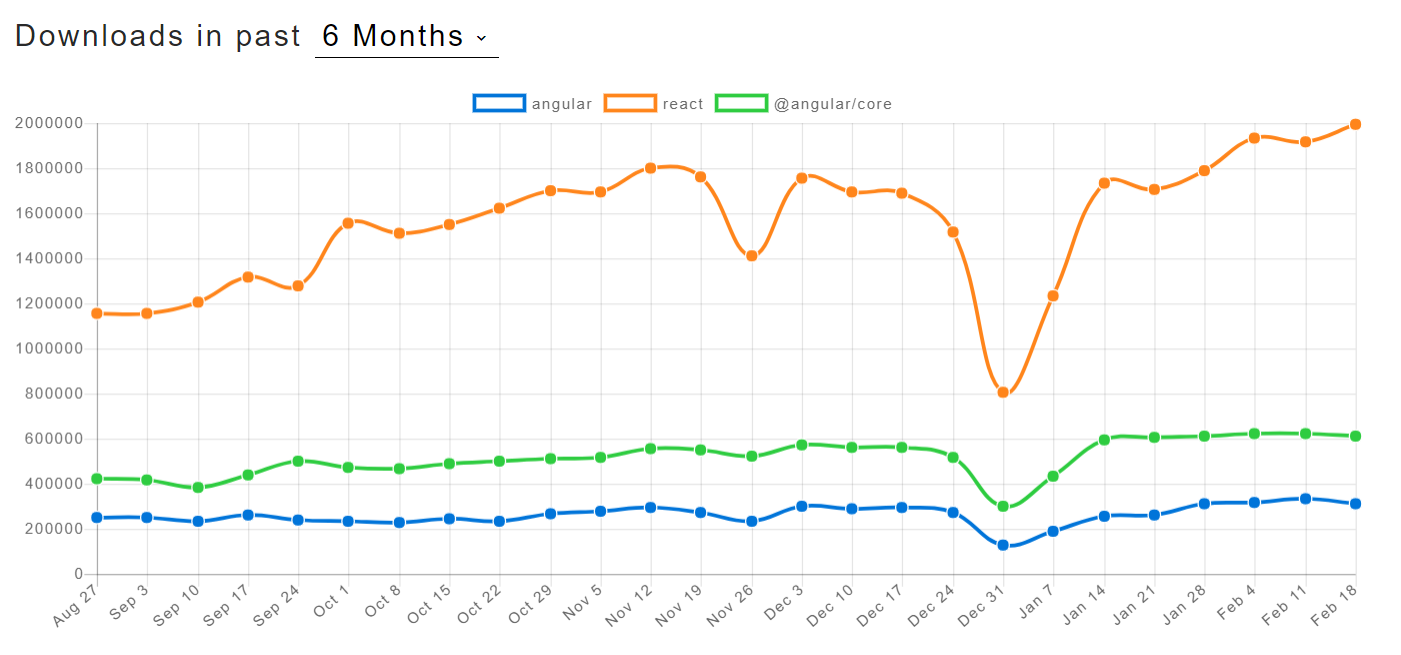
This difference in interest can be starkly illustrated by the amount of downloads each has seen in the last six months on npm, per npm trends.
By making React available to use in the back office, we've made it possible to take advantage of the contributions of these other developers, reducing the amount of work we need to bring a new project to life.
Once we decided to try to bring React into the back office, we needed to determine how we were going to do it. We explored a lot of different solutions that other developers have used to bring React into Angular or vice versa in other projects, such as ngReact and ngImport.
Ultimately we decided against using them, as we were already going to be utilizing React inside Angular inside the Umbraco back office module. The less complications we introduced into the code at the interface between the two libraries, the better. As such, we ended up utilizing React and Angular without any additional connective tissue from such a solution, and focused on keeping a small footprint on the communication between the two.
Here's how we did it:
The source code for Ernest can be found here on Github, for those curious to explore it. Before we made Ernest, though, I made a proof-of-concept minimal property editor to test what we were doing. Inspired by the chimeric nature of the codebase, I named the test project React Angular Chimera. The focus is on using as little code as possible to accomplish our aim, and code is heavily commented throughout. For the purposes of this article, I'll be referring to code in Chimera, and not Ernest.
I knew right away that I wanted to use Webpack for this project. Introducing React into a property editor brings the potential for a sizeable codebase in itself, as well as any potential modules (such as Draft.js in Ernest). Webpack would allow us to bundle it, and with the UglifyJS Webpack Plugin we would benefit from tree-shaking to help get the bundled script even smaller. Also, with my React experience I've become rather attached to utilizing various Babel/ES6 features that aren't always available yet on the browser without compiling first.
The goal for what we're doing is to keep the need to author Angular code to a minimum so we can leverage our React experience and ecosystem. If we stripped out comments, in total we're seeing less than thirty lines of Angular-related code at all. This is true not only in Chimera, but in the much more complex Ernest.
Because we're doing this all with Webpack, first we have our entry point into the JavaScript, which I've called app.js in the Chimera project:
import AngularWrapper from './controllers/AngularWrapper';

angular.module('umbraco').controller("ReactAngularChimera.AngularWrapper", AngularWrapper)
As you can see, there's virtually nothing there. We're importing the module from our Angular Wrapper (which will be detailed below) and injecting it into the Umbraco Angular module used by the back office.
Our Angular Wrapper module, which is the Angular controller called AngularWrapper.js, is by design also fairly barebones. You can see it here with comments stripped out:
import React from 'react';
import ReactDOM from 'react-dom';
import ReactLogic from '../components/ReactLogic/ReactLogic';

const AngularWrapper = function($scope, $element) {

    $scope.setVariables = function() {
        $scope.reactNode = $element[0].querySelector('.react-mount-node');
    };

    $scope.updateAngular = function(value) {
        $scope.model.value = value;
        $scope.$apply();
    }

    $scope.updateReact = function(newValue) {
        const value = newValue ? newValue : $scope.model.value;
        ReactDOM.render(<ReactLogic
            onValueChange={$scope.updateAngular}
            value={value}
        />, $scope.reactNode);
    }

    $scope.init = function () {
        $scope.setVariables();
        $scope.$watch('model.value', function(newValue) {
            $scope.updateReact(newValue);
        });
        $scope.updateReact();
    }
    $scope.init();
};

AngularWrapper.$inject = ['$scope', '$element'];

module.exports = AngularWrapper;
This looks a bit different from the normal controller declaration pattern because we're using Webpack and import/export declarations.
First we're declaring the controller:
const AngularWrapper = function($scope, $element) {
// snip - removed the content
};
Then we're injecting the Angular dependencies we'll need in it:
AngularWrapper.$inject = ['$scope', '$element'];
$scope is familiar to anyone who's had to make anything in Angular before. We're also using $element so we can take advantage of its functionality for finding something inside the view the controller was bound to.
Speaking of the view, let's look at that quickly before we come back to where the magic starts to happen. It's container.html, and it looks like this:
<div class="chimera-container" ng-controller="ReactAngularChimera.AngularWrapper">
    <div><strong>React in Angular Chimera Example</strong></div>
    <div class="react-mount-node"></div>
    <div>
        <strong>Angular-controlled span: </strong><span>{{model.value}}</span>
    </div>
</div>
We're binding our controller to it, and we'll be looking at it again in a moment.
To make our Angular controller utilize a React view, we need to do three things:
- We need to tell ReactDOM to render our React view somewhere inside the Angular's view.
- We need to be able to pass values from our Angular
$scopeinto the React view as props. - We need to watch for when changes inside our React view occur so they can be returned to our Angular
$scope.
We injected $element into our Angular controller so that we can, inside the Umbraco back office, locate the specific element that we want our React code to bind to the DOM inside. In $scope.setVariables() we do that with:
$scope.reactNode = $element[0].querySelector('.react-mount-node');
With $element[0] we get the view's container element that's bound to this controller, and then with vanilla JS's querySelector() we search for a child component with the class .react-mount-node. Inside container.html we have just that:
<div class="react-mount-node"></div>
This is where the React is going to mount and do its thing.
Now that we know where we'll be mounting the React, we need to have the properties that we'll be passing into it as props. Because we're making an Umbraco property editor, we know that in this case the value we want to keep synched is the $scope.model.value that the propery editor saves.
Inside $scope.init() we therefore set a watch on model.value, and we're going to use that to update our React:
$scope.$watch('model.value', function(newValue) {
    $scope.updateReact(newValue);
});
Now, whenever our Angular's $scope changes model.value, we can pass that into React. The function that does this, $scope.updateReact(), looks like this:
$scope.updateReact = function(newValue) {
    const value = newValue ? newValue : $scope.model.value;
    ReactDOM.render(<ReactLogic
        onValueChange={$scope.updateAngular}
        value={value}
    />, $scope.reactNode);
}
First, we're getting the value from the scope.
Then, using ReactDOM.render() we either mount or update our React component, passing in the value as a prop, mounting it to the node we assigned as $scope.reactNode.
At this point it's possible that you're wondering, "Wait... isn't it incredibly slow to re-mount the node using ReactDOM.render() every single time $scope.model.value updates?"
I was worried about that too, so I hunted down an answer. Thankfully, none other than Dan Abramov himself was able to supply me with the answer from an earlier tweet he'd made on that exact topic:
Misconception: calling ReactDOM.render() second time is very slow. Reality: it has the same performance as setState() on root component.
-Dan Abramov (@dan_abramov) on Twitter, 24 Jan 2016
Which is perfect, as this will make it easy for us to keep our React up to date with the changes to the $scope.
One property we're placing on the React component is onValueChange={$scope.updateAngular}, which helps us complete our list of needs in the Angular controller. Inside our React component, which we'll see shortly, whenever there is a change that we need to propogate up to the Angular, the passed in $scope.updateAngular() function is called.
The function looks like this:
$scope.updateAngular = function(value) {
    $scope.model.value = value;
    $scope.$apply();
}
And it takes the value placed into it, applies it to $scope.model.value, and insures that it's applied.
Now the loop is completed. Whenever we save our page, the property editor's value, passed up from the React component, properly saves with it.
With our wrapper above, we've made our Angular controller as simple as possible, reserving our React to handle any complex logic or other actions in addition to rendering the view, allowing us to have one source of truth.
In our Chimera example, our React component is kept similarly small, rendering an input textbox and handling changes to its value. Our file, ReactLogic.js looks like this with the comments stripped out:
import React from 'react';

class ReactLogic extends React.Component {
    constructor(props) {
        super(props);
    }

    onValueChange = (e) => {
        this.props.onValueChange(e.target.value);
    };

    render () {
        const props = this.props;

        return (<div>
            <strong>React-generated input: </strong>
            <input type="text" value={props.value} onChange={this.onValueChange} />
        </div>);
    }
};

module.exports = ReactLogic;
We're using the standard React.Component pattern for creating a React component with class ReactLogic extends React.Component {};. We have the construtor() with props being passed on it and making a call to super(props).
There's only two member functions. render() is required in a React component, and is responsible for returning the JSX that creates our view.
render () {
    const props = this.props;

    return (<div>
        <strong>React-generated input: </strong>
        <input type="text" value={props.value} onChange={this.onValueChange} />
    </div>);
}
In it we're taking this.props which was passed in from our Angular wrapper, and passing its value into the value of our textbox. Whenever our Angular wrapper updates, it will trigger its ReactDOM.render() call and send it down to the component, triggering a re-render.
Additionally, we've bound this.onValueChange to the onChange event of our input. This function is responsible for notifying our Angular wrapper that there's been a change, and looks like this:
onValueChange = (e) => {
    this.props.onValueChange(e.target.value);
};
this.props.onValueChange() is the $scope.updateAngular() function passed through from our Angular Wrapper. So the value of our textbox is passed up to the Angular $scope whenever a change is made. The watcher on our scope notices, and triggers the update back down into the React component, updating its props.
Now that we have all this code, I compile it down in my project by running npm run webpack (more instructions on setting up the Chimera repo and editing it exist in its README.MD file) which generates out bundle.js in a distribution folder. As a result, the package.manifest is fairly standard:
{
    propertyEditors: [{
        name: "React in Angular Chimera",
        alias: "ReactAngularChimera.Editor",
        icon: "icon-newspaper",
        group: "media",
        editor: {
            view: "~/app_plugins/ReactAngularChimera/views/container.html",
            valueType: "JSON"
        }
    }],
    javascript: [
        "~/app_plugins/ReactAngularChimera/js/bundle.js"
    ],
    css: [
        "~/app_plugins/ReactAngularChimera/css/styles.css"
    ]
}
In our Chimera example we don't need more complex Angular native functionality like $http or Umbraco back office resources like contentResource. In cases where this were so, we have a couple different ways we could interact with those.
For core Angular modules, we could inject them using something like ngimport. We can pass Umbraco services or resources into our component via AngularWrapper as props in our ReactDOM.render() call, or we could pass in another function in our wrapper into the component and have it deal with the resources directly in the wrapper.
Our Chimera example is a simple textbox, and as such there's no good reason to go through this much effort to make it with React inside Angular. But with Ernest, which is a good deal more complex and uses Draft.js, it's a fair question to ask: does doing things this way hurt our performance?
In my testing, and the testing of other projects that use React in Angular, I can say that the rendering and responsiveness does not suffer. There's also no noticeable lag to first render. I believe (but don't have benchmarks on hand as I write this post) that in fact, the rendering speed is improved with how React handles the virtual DOM versus Angular 1's method of redrawing.
The biggest outlier could be package script size. At present, after building with Webpack using treeshaking, Ernest's script runs around 500mb. I'm sure there's additional saving on size that could be done to reduce this, and I'm convinced that a reasonably complex rich text editor alternative that's Angular-only would be comparably sized once all of its assets are accounted for.
In the end, I felt that React and the tools around it have come to the point where it takes only minimal effort to include it in an Umbraco package as a replacement for Angular's view rendering. As someone who spends much more time with React due to our company's work on many complex front end applications, I believe that it's going to help reduce the development time needed to create more complex back office projects, as I have a fresh knowledge base, familiarity with its ecoystem of related products, and can escape some of Angular's opinionated behaviors that don't work for me.
If you'd like to give building a property editor or other complex project a shot, please feel free to look at the code inside React-Angular-Chimera on GitHub, which is as minimal of a use-case as I could think of, or take a deeper dive into Ernest for something more complex if you want to see examples in action.
Furthermore, if you have any questions about using React in this context in general, or Ernest in particular, please feel free to ask. I'm on Twitter as @cssquirrel, and you can always hit us up here at Offroadcode to chat or talk about any project by getting in touch.