A great way to get introduced to AngularJS is to work through this tutorial, which walks you through the construction of an AngularJS web app. The app you will build is a catalog that displays a list of Android devices, lets you filter the list to see only devices that interest you, and then view details for any device.
Follow the tutorial to see how Angular makes browsers smarter — without the use of native extensions or plug-ins:
- See examples of how to use client-side data binding to build dynamic views of data that change immediately in response to user actions.
- See how Angular keeps your views in synch with your data without the need for DOM manipulation.
- Learn a better, easier way to test your web apps, with Karma and Protractor.
- Learn how to use dependency injection and services to make common web tasks, such as getting data into your app, easier.
When you finish the tutorial you will be able to:
- Create a dynamic application that works in all modern browsers.
- Use data binding to wire up your data model to your views.
- Create and run unit tests, with Karma.
- Create and run end to end tests, with Protractor.
- Move application logic out of the template and into Controllers.
- Get data from a server using Angular services.
- Apply animations to your application, using ngAnimate.
- Identify resources for learning more about AngularJS.
The tutorial guides you through the entire process of building a simple application, including writing and running unit and end-to-end tests. Experiments at the end of each step provide suggestions for you to learn more about AngularJS and the application you are building.
You can go through the whole tutorial in a couple of hours or you may want to spend a pleasant day really digging into it. If you're looking for a shorter introduction to AngularJS, check out the Getting Started document.
The rest of this page explains how you can set up your machine to work with the code on your local machine. If you just want to read the tutorial then you can just go straight to the first step: Step 0 - Bootstrapping.
You can follow along with this tutorial and hack on the code in the comfort of your own computer. In this way you can get hands-on practice of really writing AngularJS code and also on using the recommended testing tools.
The tutorial relies on the use of the Git versioning system for source code management. You don't need to know anything about Git to follow the tutorial other than how to install and run a few git commands.
You can download and install Git from http://git-scm.com/download. Once installed you should have
access to the git command line tool. The main commands that you will need to use are:
git clone ...: clone a remote repository onto your local machinegit checkout ...: check out a particular branch or a tagged version of the code to hack on
Clone the angular-phonecat repository located at GitHub by running the following command:
git clone --depth=14 https://github.com/angular/angular-phonecat.git
This command creates the angular-phonecat directory in your current directory.
Change your current directory to angular-phonecat.
cd angular-phonecat
The tutorial instructions, from now on, assume you are running all commands from the
angular-phonecat directory.
If you want to run the preconfigured local web-server and the test tools then you will also need Node.js v0.10+.
You can download a Node.js installer for your operating system from http://nodejs.org/download/.
Check the version of Node.js that you have installed by running the following command:
node --version
Once you have Node.js installed on your machine you can download the tool dependencies by running:
npm install
This command will download the following tools, into the node_modules directory:
- Bower - client-side code package manager
- Http-Server - simple local static web server
- Karma - unit test runner
- Protractor - end 2 end test runner
Running npm install will also automatically run bower install, which will download the Angular
framework into the bower_components directory.
The project is preconfigured with a number of npm helper scripts to make it easy to run the common tasks that you will need while developing:
npm start: start a local development web-servernpm test: start the Karma unit test runnernpm run protractor: run the Protractor end 2 end testsnpm update-webdriver: install the drivers needed by Protractor
While Angular applications are purely client-side code, and it is possible to open them in a web browser directly from the file system, it is better to server them from a HTTP web server. In particular, for security reasons, most modern browsers will not allow JavaScript to make server requests if the page is loaded directly from the file system.
The angular-phonecat project is configured with a simple static web server for hosting the application during development. Start the web server by running:
npm start
This will create a local webserver that is listening to port 8000 on your local machine. You can now browse to the application at:
http://localhost:8000/app/index.html
We use unit tests to ensure that the JavaScript code in our application is operating correctly.
Unit tests focus on testing small isolated parts of the application. The unit tests are kept in the
test/unit directory.
The angular-phonecat project is configured to use Karma to run the unit tests for the application. Start Karma by running:
npm test # export CHROME_BIN=/usr/bin/comium-browser
This will start the Karma unit test runner. Karma will read the configuration file at
test/karma.conf.js. This configuration file tells Karma to:
- open up a Chrome browser and connect it to Karma
- execute all the unit tests in this browser
- report the results of these tests in the terminal/command line window
- watch all the project's JavaScript files and re-run the tests whenever any of these change
It is good to leave this running all the time, in the background, as it will give you immediate feedback about whether your changes pass the unit tests while you are working on the code.
We use End to End tests to ensure that the application as a whole operates as expected. End to End tests are designed to test the whole client side application, in particular that the views are displaying and behaving correctly. It does this by simulating real user interaction with the real application running in the browser.
The End to End tests are kept in the test/e2e directory.
The angular-phonecat project is configured to use Protractor to run the End to End tests for the application. Protractor relies upon a set of drivers to allow it to interact with the browser. You can install these drivers by running:
npm run update-webdriver
(You should only need to do this once.)
Since Protractor works by interacting with a running application, we need to start our web server:
npm start
Then in a separate terminal/command line window, we can run the Protractor test scripts against the application by running:
npm run protractor
Protractor will read the configuration file at test/protractor-conf.js. This configuration tells
Protractor to:
- open up a Chrome browser and connect it to the application
- execute all the End to End tests in this browser
- report the results of these tests in the terminal/command line window
- close down the browser and exit
It is good to run the end to end tests whenever you make changes to the HTML views or want to check that the application as a whole is executing correctly. It is very common to run End to End tests before pushing a new commit of changes to a remote repository.
You are now ready to build the AngularJS phonecat app. In this step, you will become familiar with the most important source code files, learn how to start the development servers bundled with angular-seed, and run the application in the browser.
In angular-phonecat directory, run this command:
git checkout -f step-0
This resets your workspace to step 0 of the tutorial app.
You must repeat this for every future step in the tutorial and change the number to the number of the step you are on. This will cause any changes you made within your working directory to be lost.
If you haven't already done so you need to install the dependencies by running:
npm install
To see the app running in a browser, open a separate terminal/command line tab or window, then
run npm start to start the web server. Now, open a browser window for the app and navigate to
http://localhost:8000/app/index.html
You can now see the page in your browser. It's not very exciting, but that's OK.
The HTML page that displays "Nothing here yet!" was constructed with the HTML code shown below. The code contains some key Angular elements that we will need as we progress.
app/index.html:
<!doctype html>
<html lang="en" ng-app>
<head>
  <meta charset="utf-8">
  <title>My HTML File</title>
  <link rel="stylesheet" href="../bower_components/bootstrap/dist/css/bootstrap.css">
  <link rel="stylesheet" href="css/app.css">
  <script src="../bower_components/angular/angular.js"></script>
</head>
<body>

  <p>Nothing here {{'yet' + '!'}}</p>

</body>
</html>-
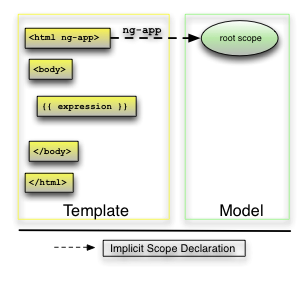
ng-appdirective:<html ng-app>The
ng-appattribute represents an Angular directive namedngApp(Angular usesname-with-dashesfor its custom attributes andcamelCasefor the corresponding directives which implement them). This directive is used to flag the html element that Angular should consider to be the root element of our application. This gives application developers the freedom to tell Angular if the entire html page or only a portion of it should be treated as the Angular application. -
AngularJS script tag:
<script src="../bower_components/angular/angular.js">This code downloads the
angular.jsscript and registers a callback that will be executed by the browser when the containing HTML page is fully downloaded. When the callback is executed, Angular looks for the ngApp directive. If Angular finds the directive, it will bootstrap the application with the root of the application DOM being the element on which thengAppdirective was defined. -
Double-curly binding with an expression:
Nothing here {{'yet' + '!'}}This line demonstrates the core feature of Angular's templating capabilities – a binding, denoted by double-curlies
{{ }}as well as a simple expression'yet' + '!'used in this binding.The binding tells Angular that it should evaluate an expression and insert the result into the DOM in place of the binding. Rather than a one-time insert, as we'll see in the next steps, a binding will result in efficient continuous updates whenever the result of the expression evaluation changes.
Angular expression is a JavaScript-like code snippet that is evaluated by Angular in the context of the current model scope, rather than within the scope of the global context (
window).As expected, once this template is processed by Angular, the html page contains the text: "Nothing here yet!".
Bootstrapping AngularJS apps automatically using the ngApp directive is very easy and suitable
for most cases. In advanced cases, such as when using script loaders, you can use
imperative / manual way to bootstrap the app.
There are 3 important things that happen during the app bootstrap:
-
The injector that will be used for dependency injection is created.
-
The injector will then create the root scope that will become the context for the model of our application.
-
Angular will then "compile" the DOM starting at the
ngApproot element, processing any directives and bindings found along the way.
Once an application is bootstrapped, it will then wait for incoming browser events (such as mouse click, key press or incoming HTTP response) that might change the model. Once such an event occurs, Angular detects if it caused any model changes and if changes are found, Angular will reflect them in the view by updating all of the affected bindings.
The structure of our application is currently very simple. The template contains just one directive and one static binding, and our model is empty. That will soon change!
Most of the files in your working directory come from the angular-seed project which
is typically used to bootstrap new Angular projects. The seed project is pre-configured to install
the angular framework (via bower) and tools for developing a typical web app (via npm).
For the purposes of this tutorial, we modified the angular-seed with the following changes:
- Removed the example app
- Added phone images to
app/img/phones/ - Added phone data files (JSON) to
app/phones/ - Added a dependency on Bootstrap in the
bower.jsonfile.
-
Try adding a new expression to the
index.htmlthat will do some math:<p>1 + 2 = {{ 1 + 2 }}</p>
Now let's go to step 1 and add some content to the web app.
In order to illustrate how Angular enhances standard HTML, you will create a purely static HTML page and then examine how we can turn this HTML code into a template that Angular will use to dynamically display the same result with any set of data.
In this step you will add some basic information about two cell phones to an HTML page.
- The page now contains a list with information about two phones.
app/index.html:
  <ul>
    <li>
      <span>Nexus S</span>
      <p>
        Fast just got faster with Nexus S.
      </p>
    </li>
    <li>
      <span>Motorola XOOM™ with Wi-Fi</span>
      <p>
        The Next, Next Generation tablet.
      </p>
    </li>
</ul>-
Try adding more static HTML to
index.html. For example:<p>Total number of phones: 2</p>
This addition to your app uses static HTML to display the list. Now, let's go to step 2 to learn how to use AngularJS to dynamically generate the same list.
Now it's time to make the web page dynamic — with AngularJS. We'll also add a test that verifies the code for the controller we are going to add.
There are many ways to structure the code for an application. For Angular apps, we encourage the use of the Model-View-Controller (MVC) design pattern to decouple the code and to separate concerns. With that in mind, let's use a little Angular and JavaScript to add model, view, and controller components to our app.
- The list of three phones is now generated dynamically from data
In Angular, the view is a projection of the model through the HTML template. This means that whenever the model changes, Angular refreshes the appropriate binding points, which updates the view.
The view component is constructed by Angular from this template:
app/index.html:
<html ng-app="phonecatApp">
<head>
...
<script src="../bower_components/angular/angular.js"></script>
<script src="js/controllers.js"></script>
</head>
<body ng-controller="PhoneListCtrl">
<ul>
<li ng-repeat="phone in phones">
{{phone.name}}
<p>{{phone.snippet}}</p>
</li>
</ul>
</body>
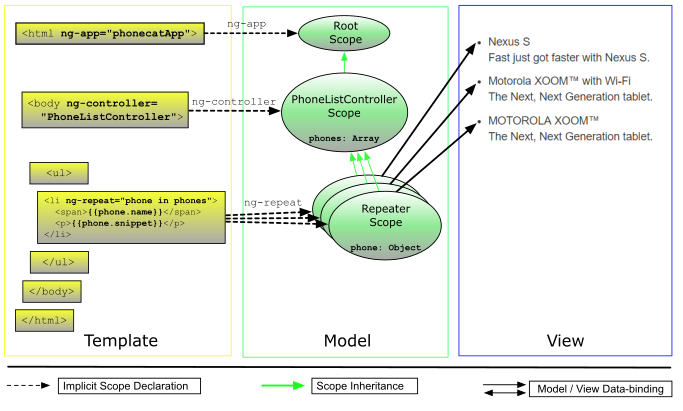
</html>We replaced the hard-coded phone list with the ngRepeat directive and two Angular expressions:
- The
ng-repeat="phone in phones"attribute in the<li>tag is an Angular repeater directive. The repeater tells Angular to create a<li>element for each phone in the list using the<li>tag as the template. - The expressions wrapped in curly braces (
{{phone.name}}and{{phone.snippet}}) will be replaced by the value of the expressions.
We have added a new directive, called ng-controller, which attaches a PhoneListCtrl
controller to the DOM at this point:
- The expressions in curly braces (
{{phone.name}}and{{phone.snippet}}denote bindings, which are referring to our application model, which is set up in ourPhoneListCtrlcontroller.
The data model (a simple array of phones in object literal notation) is now instantiated within
the PhoneListCtrl controller. The controller is simply a constructor function that takes a
$scope parameter:
app/js/controllers.js:
var phonecatApp = angular.module('phonecatApp', []);

phonecatApp.controller('PhoneListCtrl', function ($scope) {
  $scope.phones = [
    {'name': 'Nexus S',
     'snippet': 'Fast just got faster with Nexus S.'},
    {'name': 'Motorola XOOM™ with Wi-Fi',
     'snippet': 'The Next, Next Generation tablet.'},
    {'name': 'MOTOROLA XOOM™',
     'snippet': 'The Next, Next Generation tablet.'}
  ];
});
Here we declared a controller called PhoneListCtrl and registered it in an AngularJS
module, phonecatApp. Notice that our ng-app directive (on the <html> tag) now specifies the phonecatApp
module name as the module to load when bootstrapping the Angular application.
Although the controller is not yet doing very much, it plays a crucial role. By providing context for our data model, the controller allows us to establish data-binding between the model and the view. We connected the dots between the presentation, data, and logic components as follows:
-
The ngController directive, located on the
<body>tag, references the name of our controller,PhoneListCtrl(located in the JavaScript filecontrollers.js). -
The
PhoneListCtrlcontroller attaches the phone data to the$scopethat was injected into our controller function. This scope is a prototypical descendant of the root scope that was created when the application was defined. This controller scope is available to all bindings located within the<body ng-controller="PhoneListCtrl">tag.
The concept of a scope in Angular is crucial. A scope can be seen as the glue which allows the template, model and controller to work together. Angular uses scopes, along with the information contained in the template, data model, and controller, to keep models and views separate, but in sync. Any changes made to the model are reflected in the view; any changes that occur in the view are reflected in the model.
To learn more about Angular scopes, see the angular scope documentation.
The "Angular way" of separating controller from the view, makes it easy to test code as it is being
developed. If our controller is available on the global namespace then we could simply instantiate it
with a mock scope object:
describe('PhoneListCtrl', function(){

  it('should create "phones" model with 3 phones', function() {
    var scope = {},
        ctrl = new PhoneListCtrl(scope);

    expect(scope.phones.length).toBe(3);
  });

});
The test instantiates PhoneListCtrl and verifies that the phones array property on the scope
contains three records. This example demonstrates how easy it is to create a unit test for code in
Angular. Since testing is such a critical part of software development, we make it easy to create
tests in Angular so that developers are encouraged to write them.
In practice, you will not want to have your controller functions in the global namespace. Instead,
you can see that we have registered it via an anonymous constructor function on the phoneCatApp
module.
In this case Angular provides a service, $controller, which will retrieve your controller by name.
Here is the same test using $controller:
test/unit/controllersSpec.js:
describe('PhoneListCtrl', function(){

  beforeEach(module('phonecatApp'));

  it('should create "phones" model with 3 phones', inject(function($controller) {
    var scope = {},
        ctrl = $controller('PhoneListCtrl', {$scope:scope});

    expect(scope.phones.length).toBe(3);
  }));

});- Before each test we tell Angular to load the
phonecatAppmodule. - We ask Angular to
injectthe$controllerservice into our test function - We use
$controllerto create an instance of thePhoneListCtrl - With this instance, we verify that the phones array property on the scope contains three records.
Angular developers prefer the syntax of Jasmine's Behavior-driven Development (BDD) framework when writing tests. Although Angular does not require you to use Jasmine, we wrote all of the tests in this tutorial in Jasmine v1.3. You can learn about Jasmine on the Jasmine home page and at the Jasmine docs.
The angular-seed project is pre-configured to run unit tests using Karma but you will need
to ensure that Karma and its necessary plugins are installed. You can do this by running
npm install.
To run the tests, and then watch the files for changes: npm test.
-
Karma will start a new instance of Chrome browser automatically. Just ignore it and let it run in the background. Karma will use this browser for test execution.
-
You should see the following or similar output in the terminal:
  info: Karma server started at http://localhost:9876/
  info (launcher): Starting  browser "Chrome"
  info (Chrome 22.0): Connected on socket id tPUm9DXcLHtZTKbAEO-n
  Chrome 22.0: Executed 1 of 1 SUCCESS (0.093 secs / 0.004 secs)
Yay! The test passed! Or not...
-
To rerun the tests, just change any of the source or test .js files. Karma will notice the change and will rerun the tests for you. Now isn't that sweet?
-
Add another binding to
index.html. For example:<p>Total number of phones: {{phones.length}}</p>
-
Create a new model property in the controller and bind to it from the template. For example:
$scope.name = "World";Then add a new binding to
index.html:<p>Hello, {{name}}!</p>Refresh your browser and verify that it says "Hello, World!".
-
Update the unit test for the controller in ./tests/unit/controllersSpec.js to reflect the previous change. For example by adding:
expect(scope.name).toBe('World'); -
Create a repeater that constructs a simple table:
    <table>
      <tr><th>row number</th></tr>
      <tr ng-repeat="i in [0, 1, 2, 3, 4, 5, 6, 7]"><td>{{i}}</td></tr>
    </table>
Now, make the list 1-based by incrementing
iby one in the binding:<table> <tr><th>row number</th></tr> <tr ng-repeat="i in [0, 1, 2, 3, 4, 5, 6, 7]"><td>{{i+1}}</td></tr> </table> -
Make the unit test fail by changing the
toBe(3)statement totoBe(4).
You now have a dynamic app that features separate model, view, and controller components, and you are testing as you go. Now, let's go to step 3 to learn how to add full text search to the app.
We did a lot of work in laying a foundation for the app in the last step, so now we'll do something simple; we will add full text search (yes, it will be simple!). We will also write an end-to-end test, because a good end-to-end test is a good friend. It stays with your app, keeps an eye on it, and quickly detects regressions.
- The app now has a search box. Notice that the phone list on the page changes depending on what a user types into the search box.
We made no changes to the controller.
app/index.html:
  <div class="container-fluid">
    <div class="row-fluid">
      <div class="span2">
        <!--Sidebar content-->

        Search: <input ng-model="query">

      </div>
      <div class="span10">
        <!--Body content-->

        <ul class="phones">
          <li ng-repeat="phone in phones | filter:query">
            {{phone.name}}
            <p>{{phone.snippet}}</p>
          </li>
        </ul>

      </div>
    </div>
  </div>
We added a standard HTML <input> tag and used Angular's
filter function to process the input for the
ngRepeat directive.
This lets a user enter search criteria and immediately see the effects of their search on the phone list. This new code demonstrates the following:
-
Data-binding: This is one of the core features in Angular. When the page loads, Angular binds the name of the input box to a variable of the same name in the data model and keeps the two in sync.
In this code, the data that a user types into the input box (named
query) is immediately available as a filter input in the list repeater (phone in phones | filter:query). When changes to the data model cause the repeater's input to change, the repeater efficiently updates the DOM to reflect the current state of the model.
-
Use of the
filterfilter: The filter function uses thequeryvalue to create a new array that contains only those records that match thequery.ngRepeatautomatically updates the view in response to the changing number of phones returned by thefilterfilter. The process is completely transparent to the developer.
In Step 2, we learned how to write and run unit tests. Unit tests are perfect for testing controllers and other components of our application written in JavaScript, but they can't easily test DOM manipulation or the wiring of our application. For these, an end-to-end test is a much better choice.
The search feature was fully implemented via templates and data-binding, so we'll write our first end-to-end test, to verify that the feature works.
test/e2e/scenarios.js:
describe('PhoneCat App', function() {

  describe('Phone list view', function() {

    beforeEach(function() {
      browser.get('app/index.html');
    });


    it('should filter the phone list as user types into the search box', function() {

      var phoneList = element.all(by.repeater('phone in phones'));
      var query = element(by.model('query'));

      expect(phoneList.count()).toBe(3);

      query.sendKeys('nexus');
      expect(phoneList.count()).toBe(1);

      query.clear();
      query.sendKeys('motorola');
      expect(phoneList.count()).toBe(2);
    });
  });
});
This test verifies that the search box and the repeater are correctly wired together. Notice how easy it is to write end-to-end tests in Angular. Although this example is for a simple test, it really is that easy to set up any functional, readable, end-to-end test.
Even though the syntax of this test looks very much like our controller unit test written with Jasmine, the end-to-end test uses APIs of Protractor. Read about the Protractor APIs at https://github.com/angular/protractor/blob/master/docs/api.md.
Much like Karma is the test runner for unit tests, we use Protractor to run end-to-end tests.
Try it with npm run protractor. End-to-end tests are slow, so unlike with unit tests, Protractor
will exit after the test run and will not automatically rerun the test suite on every file change.
To rerun the test suite, execute npm run protractor again.
-
Display the current value of the
querymodel by adding a{{query}}binding into theindex.htmltemplate, and see how it changes when you type in the input box. -
Let's see how we can get the current value of the
querymodel to appear in the HTML page title.You might think you could just add the
{{query}}to the title tag element as follows:<title>Google Phone Gallery: {{query}}</title>However, when you reload the page, you won't see the expected result. This is because the "query" model lives in the scope, defined by the
ng-controller="PhoneListCtrl"directive, on the body element:<body ng-controller="PhoneListCtrl">If you want to bind to the query model from the
<title>element, you must move thengControllerdeclaration to the HTML element because it is the common parent of both the body and title elements:<html ng-app="phonecatApp" ng-controller="PhoneListCtrl">Be sure to remove the
ng-controllerdeclaration from the body element.While using double curlies works fine within the title element, you might have noticed that for a split second they are actually displayed to the user while the page is loading. A better solution would be to use the ngBind or ngBindTemplate directives, which are invisible to the user while the page is loading:
<title ng-bind-template="Google Phone Gallery: {{query}}">Google Phone Gallery</title> -
Add the following end-to-end test into the
describeblock withintest/e2e/scenarios.js:it('should display the current filter value within an element with id "status"', function() { var statusElement = element(by.id('status')); expect(statusElement.getText()).toMatch(/Current filter:\s*$/); element(by.model('query')).sendKeys('nexus'); expect(statusElement.getText()).toMatch(/Current filter: nexus\s*$/); //alternative version of the last assertion that tests just the value of the binding expect(element(by.binding('query')).getText()).toMatch(/Current filter: nexus\s*$/); });
Re-run
npm run protractorto see the test fail. To make the test pass, edit theindex.htmltemplate to add adivorpelement withid"status"and content with thequerybinding, prefixed by "Current filter:". For instance:<div id="status">Current filter: {{query}}</div>
We have now added full text search and included a test to verify that search works! Now let's go on to {@link step_04 step 4} to learn how to add sorting capability to the phone app.
In this step, you will add a feature to let your users control the order of the items in the phone list. The dynamic ordering is implemented by creating a new model property, wiring it together with the repeater, and letting the data binding magic do the rest of the work.
- In addition to the search box, the app displays a drop down menu that allows users to control the order in which the phones are listed.
app/index.html:
  Search: <input ng-model="query">
  Sort by:
  <select ng-model="orderProp">
    <option value="name">Alphabetical</option>
    <option value="age">Newest</option>
  </select>


  <ul class="phones">
    <li ng-repeat="phone in phones | filter:query | orderBy:orderProp">
      {{phone.name}}
      <p>{{phone.snippet}}</p>
    </li>
  </ul>
We made the following changes to the index.html template:
- First, we added a
<select>html element namedorderProp, so that our users can pick from the two provided sorting options.

- We then chained the
filterfilter withorderByfilter to further process the input into the repeater.orderByis a filter that takes an input array, copies it and reorders the copy which is then returned.
Angular creates a two way data-binding between the select element and the orderProp model.
orderProp is then used as the input for the orderBy filter.
As we discussed in the section about data-binding and the repeater in step 3, whenever the model changes (for example because a user changes the order with the select drop down menu), Angular's data-binding will cause the view to automatically update. No bloated DOM manipulation code is necessary!
app/js/controllers.js:
var phonecatApp = angular.module('phonecatApp', []);

phonecatApp.controller('PhoneListCtrl', function ($scope) {
  $scope.phones = [
    {'name': 'Nexus S',
     'snippet': 'Fast just got faster with Nexus S.',
     'age': 1},
    {'name': 'Motorola XOOM™ with Wi-Fi',
     'snippet': 'The Next, Next Generation tablet.',
     'age': 2},
    {'name': 'MOTOROLA XOOM™',
     'snippet': 'The Next, Next Generation tablet.',
     'age': 3}
  ];

  $scope.orderProp = 'age';
});-
We modified the
phonesmodel - the array of phones - and added anageproperty to each phone record. This property is used to order phones by age. -
We added a line to the controller that sets the default value of
orderProptoage. If we had not set a default value here, theorderByfilter would remain uninitialized until our user picked an option from the drop down menu.This is a good time to talk about two-way data-binding. Notice that when the app is loaded in the browser, "Newest" is selected in the drop down menu. This is because we set
orderPropto'age'in the controller. So the binding works in the direction from our model to the UI. Now if you select "Alphabetically" in the drop down menu, the model will be updated as well and the phones will be reordered. That is the data-binding doing its job in the opposite direction — from the UI to the model.
The changes we made should be verified with both a unit test and an end-to-end test. Let's look at the unit test first.
test/unit/controllersSpec.js:
describe('PhoneCat controllers', function() {

  describe('PhoneListCtrl', function(){
    var scope, ctrl;

    beforeEach(module('phonecatApp'));

    beforeEach(inject(function($controller) {
      scope = {};
      ctrl = $controller('PhoneListCtrl', {$scope:scope});
    }));

    it('should create "phones" model with 3 phones', function() {
      expect(scope.phones.length).toBe(3);
    });


    it('should set the default value of orderProp model', function() {
      expect(scope.orderProp).toBe('age');
    });
  });
});
The unit test now verifies that the default ordering property is set.
We used Jasmine's API to extract the controller construction into a beforeEach block, which is
shared by all tests in the parent describe block.
You should now see the following output in the Karma tab:
Chrome 22.0: Executed 2 of 2 SUCCESS (0.021 secs / 0.001 secs)
Let's turn our attention to the end-to-end test.
test/e2e/scenarios.js:
...
    it('should be possible to control phone order via the drop down select box', function() {

      var phoneNameColumn = element.all(by.repeater('phone in phones').column('{{phone.name}}'));
      var query = element(by.model('query'));

      function getNames() {
        return phoneNameColumn.map(function(elm) {
          return elm.getText();
        });
      }

      query.sendKeys('tablet'); //let's narrow the dataset to make the test assertions shorter

      expect(getNames()).toEqual([
        "Motorola XOOM\u2122 with Wi-Fi",
        "MOTOROLA XOOM\u2122"
      ]);

      element(by.model('orderProp')).findElement(by.css('option[value="name"]')).click();

      expect(getNames()).toEqual([
        "MOTOROLA XOOM\u2122",
        "Motorola XOOM\u2122 with Wi-Fi"
      ]);
    });...
The end-to-end test verifies that the ordering mechanism of the select box is working correctly.
You can now rerun npm run protractor to see the tests run.
-
In the
PhoneListCtrlcontroller, remove the statement that sets theorderPropvalue and you'll see that Angular will temporarily add a new "unknown" option to the drop-down list and the ordering will default to unordered/natural order. -
Add an
{{orderProp}}binding into theindex.htmltemplate to display its current value as text. -
Reverse the sort order by adding a
-symbol before the sorting value:<option value="-age">Oldest</option>
Now that you have added list sorting and tested the app, go to step 5 to learn about Angular services and how Angular uses dependency injection.
Enough of building an app with three phones in a hard-coded dataset! Let's fetch a larger dataset
from our server using one of Angular's built-in services called $http. We will use Angular's dependency
injection (DI) to provide the service to the PhoneListCtrl controller.
- There are now a list of 20 phones, loaded from the server.
The app/phones/phones.json file in your project is a dataset that contains a larger list of phones
stored in the JSON format.
Following is a sample of the file:
[
 {
  "age": 13,
  "id": "motorola-defy-with-motoblur",
  "name": "Motorola DEFY\u2122 with MOTOBLUR\u2122",
  "snippet": "Are you ready for everything life throws your way?"
  ...
 },
...
]We'll use Angular's $http service in our controller to make an HTTP
request to your web server to fetch the data in the app/phones/phones.json file. $http is just
one of several built-in Angular services that handle common operations
in web apps. Angular injects these services for you where you need them.
Services are managed by Angular's DI subsystem. Dependency injection helps to make your web apps both well-structured (e.g., separate components for presentation, data, and control) and loosely coupled (dependencies between components are not resolved by the components themselves, but by the DI subsystem).
app/js/controllers.js:
var phonecatApp = angular.module('phonecatApp', []);

phonecatApp.controller('PhoneListCtrl', function ($scope, $http) {
  $http.get('phones/phones.json').success(function(data) {
    $scope.phones = data;
  });

  $scope.orderProp = 'age';
});
$http makes an HTTP GET request to our web server, asking for phones/phones.json (the url is
relative to our index.html file). The server responds by providing the data in the json file.
(The response might just as well have been dynamically generated by a backend server. To the
browser and our app they both look the same. For the sake of simplicity we used a json file in this
tutorial.)
The $http service returns a promise object with a success
method. We call this method to handle the asynchronous response and assign the phone data to the
scope controlled by this controller, as a model called phones. Notice that Angular detected the
json response and parsed it for us!
To use a service in Angular, you simply declare the names of the dependencies you need as arguments to the controller's constructor function, as follows:
phonecatApp.controller('PhoneListCtrl', function ($scope, $http) {...}
Angular's dependency injector provides services to your controller when the controller is being constructed. The dependency injector also takes care of creating any transitive dependencies the service may have (services often depend upon other services).
Note that the names of arguments are significant, because the injector uses these to look up the dependencies.

You can create your own services, and in fact we will do exactly that in step 11. As a naming
convention, Angular's built-in services, Scope methods and a few other Angular APIs have a $
prefix in front of the name.
The $ prefix is there to namespace Angular-provided services.
To prevent collisions it's best to avoid naming your services and models anything that begins with a $.
If you inspect a Scope, you may also notice some properties that begin with $$. These
properties are considered private, and should not be accessed or modified.
Since Angular infers the controller's dependencies from the names of arguments to the controller's
constructor function, if you were to minify the JavaScript code for
PhoneListCtrl controller, all of its function arguments would be minified as well, and the
dependency injector would not be able to identify services correctly.
We can overcome this problem by annotating the function with the names of the dependencies, provided as strings, which will not get minified. There are two ways to provide these injection annotations:
-
Create a
$injectproperty on the controller function which holds an array of strings. Each string in the array is the name of the service to inject for the corresponding parameter. In our example we would write:function PhoneListCtrl($scope, $http) {...} PhoneListCtrl.$inject = ['$scope', '$http']; phonecatApp.controller('PhoneListCtrl', PhoneListCtrl);
-
Use an inline annotation where, instead of just providing the function, you provide an array. This array contains a list of the service names, followed by the function itself.
    function PhoneListCtrl($scope, $http) {...}
    phonecatApp.controller('PhoneListCtrl', ['$scope', '$http', PhoneListCtrl]);
Both of these methods work with any function that can be injected by Angular, so it's up to your project's style guide to decide which one you use.
When using the second method, it is common to provide the constructor function inline as an anonymous function when registering the controller:
phonecatApp.controller('PhoneListCtrl', ['$scope', '$http', function($scope, $http) {...}]);From this point onward, we're going to use the inline method in the tutorial. With that in mind,
let's add the annotations to our PhoneListCtrl:
app/js/controllers.js:
var phonecatApp = angular.module('phonecatApp', []);

phonecatApp.controller('PhoneListCtrl', ['$scope', '$http',
  function ($scope, $http) {
    $http.get('phones/phones.json').success(function(data) {
      $scope.phones = data;
    });

    $scope.orderProp = 'age';
}]);test/unit/controllersSpec.js:
Because we started using dependency injection and our controller has dependencies, constructing the
controller in our tests is a bit more complicated. We could use the new operator and provide the
constructor with some kind of fake $http implementation. However, Angular provides a mock $http
service that we can use in unit tests. We configure "fake" responses to server requests by calling
methods on a service called $httpBackend:
describe('PhoneCat controllers', function() {

  describe('PhoneListCtrl', function(){
    var scope, ctrl, $httpBackend;

    // Load our app module definition before each test.
    beforeEach(module('phonecatApp'));

    // The injector ignores leading and trailing underscores here (i.e. _$httpBackend_).
    // This allows us to inject a service but then attach it to a variable
    // with the same name as the service.
    beforeEach(inject(function(_$httpBackend_, $rootScope, $controller) {
      $httpBackend = _$httpBackend_;
      $httpBackend.expectGET('phones/phones.json').
          respond([{name: 'Nexus S'}, {name: 'Motorola DROID'}]);

      scope = $rootScope.$new();
      ctrl = $controller('PhoneListCtrl', {$scope: scope});
    }));
Note: Because we loaded Jasmine and angular-mocks.js in our test environment, we got two helper
methods module
and inject that we'll
use to access and configure the injector.
We created the controller in the test environment, as follows:
-
We used the
injecthelper method to inject instances of $rootScope, $controller and $httpBackend services into the Jasmine'sbeforeEachfunction. These instances come from an injector which is recreated from scratch for every single test. This guarantees that each test starts from a well known starting point and each test is isolated from the work done in other tests. -
We created a new scope for our controller by calling
$rootScope.$new() -
We called the injected
$controllerfunction passing the name of thePhoneListCtrlcontroller and the created scope as parameters.
Because our code now uses the $http service to fetch the phone list data in our controller, before
we create the PhoneListCtrl child scope, we need to tell the testing harness to expect an
incoming request from the controller. To do this we:
-
Request
$httpBackendservice to be injected into ourbeforeEachfunction. This is a mock version of the service that in a production environment facilitates all XHR and JSONP requests. The mock version of this service allows you to write tests without having to deal with native APIs and the global state associated with them — both of which make testing a nightmare. -
Use the
$httpBackend.expectGETmethod to train the$httpBackendservice to expect an incoming HTTP request and tell it what to respond with. Note that the responses are not returned until we call the$httpBackend.flushmethod.
Now we will make assertions to verify that the phones model doesn't exist on scope before
the response is received:
    it('should create "phones" model with 2 phones fetched from xhr', function() {
      expect(scope.phones).toBeUndefined();
      $httpBackend.flush();

      expect(scope.phones).toEqual([{name: 'Nexus S'},
                                   {name: 'Motorola DROID'}]);
});-
We flush the request queue in the browser by calling
$httpBackend.flush(). This causes the promise returned by the$httpservice to be resolved with the trained response. -
We make the assertions, verifying that the phone model now exists on the scope.
Finally, we verify that the default value of orderProp is set correctly:
    it('should set the default value of orderProp model', function() {
      expect(scope.orderProp).toBe('age');
    });
You should now see the following output in the Karma tab:
Chrome 22.0: Executed 2 of 2 SUCCESS (0.028 secs / 0.007 secs)
-
At the bottom of
index.html, add a{{phones | json}}binding to see the list of phones displayed in json format. -
In the
PhoneListCtrlcontroller, pre-process the http response by limiting the number of phones to the first 5 in the list. Use the following code in the$httpcallback:$scope.phones = data.splice(0, 5);
Now that you have learned how easy it is to use Angular services (thanks to Angular's dependency injection), go to step 6, where you will add some thumbnail images of phones and some links.
In this step, you will add thumbnail images for the phones in the phone list, and links that, for now, will go nowhere. In subsequent steps you will use the links to display additional information about the phones in the catalog.
- There are now links and images of the phones in the list.
Note that the phones.json file contains unique ids and image urls for each of the phones. The
urls point to the app/img/phones/ directory.
app/phones/phones.json (sample snippet):
[
  {
    ...
    "id": "motorola-defy-with-motoblur",
    "imageUrl": "img/phones/motorola-defy-with-motoblur.0.jpg",
    "name": "Motorola DEFY\u2122 with MOTOBLUR\u2122",
    ...
  },
  ...
]app/index.html:
...
        <ul class="phones">
          <li ng-repeat="phone in phones | filter:query | orderBy:orderProp" class="thumbnail">
            <a href="#/phones/{{phone.id}}" class="thumb"><img ng-src="{{phone.imageUrl}}"></a>
            <a href="#/phones/{{phone.id}}">{{phone.name}}</a>
            <p>{{phone.snippet}}</p>
          </li>
        </ul>
...
To dynamically generate links that will in the future lead to phone detail pages, we used the
now-familiar double-curly brace binding in the href attribute values. In step 2, we added the
{{phone.name}} binding as the element content. In this step the {{phone.id}} binding is used in
the element attribute.
We also added phone images next to each record using an image tag with the
ngSrc directive. That directive prevents the
browser from treating the Angular {{ expression }} markup literally, and initiating a request to
invalid url http://localhost:8000/app/{{phone.imageUrl}}, which it would have done if we had only
specified an attribute binding in a regular src attribute (<img src="{{phone.imageUrl}}">).
Using the ngSrc directive prevents the browser from making an http request to an invalid location.
test/e2e/scenarios.js:
...
    it('should render phone specific links', function() {
      var query = element(by.model('query'));
      query.sendKeys('nexus');
      element(by.css('.phones li a')).click();
      browser.getLocationAbsUrl().then(function(url) {
        expect(url.split('#')[1]).toBe('/phones/nexus-s');
      });
    });
...
We added a new end-to-end test to verify that the app is generating correct links to the phone views that we will implement in the upcoming steps.
You can now rerun npm run protractor to see the tests run.
-
Replace the
ng-srcdirective with a plain oldsrcattribute. Using tools such as Firebug, or Chrome's Web Inspector, or inspecting the webserver access logs, confirm that the app is indeed making an extraneous request to/app/%7B%7Bphone.imageUrl%7D%7D(or/app/{{phone.imageUrl}}).The issue here is that the browser will fire a request for that invalid image address as soon as it hits the
imgtag, which is before Angular has a chance to evaluate the expression and inject the valid address.
Now that you have added phone images and links, go to step 7 to learn about Angular layout templates and how Angular makes it easy to create applications that have multiple views.
In this step, you will learn how to create a layout template and how to build an app that has multiple views by adding routing, using an Angular module called 'ngRoute'.
- When you now navigate to
app/index.html, you are redirected toapp/index.html#/phonesand the phone list appears in the browser. - When you click on a phone link the url changes to one specific to that phone and the stub of a phone detail page is displayed.
The routing functionality added by this step is provided by angular in the ngRoute module, which
is distributed separately from the core Angular framework.
We are using [Bower][bower] to install client side dependencies. This step updates the
bower.json configuration file to include the new dependency:
{
  "name": "angular-seed",
  "description": "A starter project for AngularJS",
  "version": "0.0.0",
  "homepage": "https://github.com/angular/angular-seed",
  "license": "MIT",
  "private": true,
  "dependencies": {
    "angular": "1.2.x",
    "angular-mocks": "~1.2.15",
    "bootstrap": "~3.1.1",
    "angular-route": "~1.2.15"
  }
}
The new dependency "angular-route": "~1.2.15" tells bower to install a version of the
angular-route component that is compatible with version 1.2.15. We must tell bower to download
and install this dependency.
If you have bower installed globally then you can run bower install but for this project we have
preconfigured npm to run bower install for us:
npm install
Our app is slowly growing and becoming more complex. Before step 7, the app provided our users with
a single view (the list of all phones), and all of the template code was located in the
index.html file. The next step in building the app is to add a view that will show detailed
information about each of the devices in our list.
To add the detailed view, we could expand the index.html file to contain template code for both
views, but that would get messy very quickly. Instead, we are going to turn the index.html
template into what we call a "layout template". This is a template that is common for all views in
our application. Other "partial templates" are then included into this layout template depending on
the current "route" — the view that is currently displayed to the user.
Application routes in Angular are declared via the $routeProvider, which is the provider of the $route service. This service makes it easy to wire together controllers, view templates, and the current URL location in the browser. Using this feature we can implement deep linking, which lets us utilize the browser's history (back and forward navigation) and bookmarks.
As you noticed, dependency injection (DI) is at the core of AngularJS, so it's important for you to understand a thing or two about how it works.
When the application bootstraps, Angular creates an injector that will be used for all DI stuff in
this app. The injector itself doesn't know anything about what $http or $route services do, in
fact it doesn't even know about the existence of these services unless it is configured with proper
module definitions. The sole responsibilities of the injector are to load specified module
definition(s), register all service providers defined in these modules, and when asked, inject
a specified function with dependencies (services) that it lazily instantiates via their providers.
Providers are objects that provide (create) instances of services and expose configuration APIs
that can be used to control the creation and runtime behavior of a service. In case of the $route
service, the $routeProvider exposes APIs that allow you to define routes for your application.
Angular modules solve the problem of removing global state from the application and provide a way of configuring the injector. As opposed to AMD or require.js modules, Angular modules don't try to solve the problem of script load ordering or lazy script fetching. These goals are totally independent and both module systems can live side by side and fulfil their goals.
For deepen your understanding of DI on Angular, see Understanding Dependency Injection.
The $route service is usually used in conjunction with the ngView
directive. The role of the ngView directive is to include the view template for the current
route into the layout template. This makes it a perfect fit for our index.html template.
app/index.html:
<!doctype html>
<html lang="en" ng-app="phonecatApp">
<head>
...
  <script src="../bower_components/angular/angular.js"></script>
  <script src="../bower_components/angular-route/angular-route.js"></script>
  <script src="js/app.js"></script>
  <script src="js/controllers.js"></script>
</head>
<body>

  <div ng-view></div>

</body>
</html>
We have added two new <script> tags in our index file to load up extra JavaScript files into our
application:
angular-route.js: defines the AngularngRoutemodule, which provides us with routing.app.js: this file now holds the root module of our application.
Note that we removed most of the code in the index.html template and replaced it with a single
line containing a div with the ng-view attribute. The code that we removed was placed into the
phone-list.html template:
app/partials/phone-list.html:
<div class="container-fluid">
  <div class="row-fluid">
    <div class="span2">
      <!--Sidebar content-->

      Search: <input ng-model="query">
      Sort by:
      <select ng-model="orderProp">
        <option value="name">Alphabetical</option>
        <option value="age">Newest</option>
      </select>

    </div>
    <div class="span10">
      <!--Body content-->

      <ul class="phones">
        <li ng-repeat="phone in phones | filter:query | orderBy:orderProp" class="thumbnail">
          <a href="#/phones/{{phone.id}}" class="thumb"><img ng-src="{{phone.imageUrl}}"></a>
          <a href="#/phones/{{phone.id}}">{{phone.name}}</a>
          <p>{{phone.snippet}}</p>
        </li>
      </ul>

    </div>
  </div>
</div>
We also added a placeholder template for the phone details view:
app/partials/phone-detail.html:
TBD: detail view for {{phoneId}}Note how we are using the phoneId expression which will be defined in the PhoneDetailCtrl controller.
To improve the organization of the app, we are making use of Angular's ngRoute module and we've
moved the controllers into their own module phonecatControllers (as shown below).
We added angular-route.js to index.html and created a new phonecatControllers module in
controllers.js. That's not all we need to do to be able to use their code, however. We also have
to add the modules dependencies of our app. By listing these two modules as dependencies of
phonecatApp, we can use the directives and services they provide.
app/js/app.js:
var phonecatApp = angular.module('phonecatApp', [
  'ngRoute',
  'phonecatControllers'
]);

...
Notice the second argument passed to angular.module, ['ngRoute', 'phonecatControllers']. This
array lists the modules that phonecatApp depends on.
...

phonecatApp.config(['$routeProvider',
  function($routeProvider) {
    $routeProvider.
      when('/phones', {
        templateUrl: 'partials/phone-list.html',
        controller: 'PhoneListCtrl'
      }).
      when('/phones/:phoneId', {
        templateUrl: 'partials/phone-detail.html',
        controller: 'PhoneDetailCtrl'
      }).
      otherwise({
        redirectTo: '/phones'
      });
  }]);
Using the phonecatApp.config() method, we request the $routeProvider to be injected into our
config function and use the $routeProvider.when()
method to define our routes.
Our application routes are defined as follows:
-
when('/phones'): The phone list view will be shown when the URL hash fragment is/phones. To construct this view, Angular will use thephone-list.htmltemplate and thePhoneListCtrlcontroller. -
when('/phones/:phoneId'): The phone details view will be shown when the URL hash fragment matches '/phone/:phoneId', where:phoneIdis a variable part of the URL. To construct the phone details view, Angular will use thephone-detail.htmltemplate and thePhoneDetailCtrlcontroller. -
otherwise({redirectTo: '/phones'}): triggers a redirection to/phoneswhen the browser address doesn't match either of our routes.
We reused the PhoneListCtrl controller that we constructed in previous steps and we added a new,
empty PhoneDetailCtrl controller to the app/js/controllers.js file for the phone details view.
Note the use of the :phoneId parameter in the second route declaration. The $route service uses
the route declaration — '/phones/:phoneId' — as a template that is matched against the current
URL. All variables defined with the : notation are extracted into the
$routeParams object.
app/js/controllers.js:
var phonecatControllers = angular.module('phonecatControllers', []);

phonecatControllers.controller('PhoneListCtrl', ['$scope', '$http',
  function ($scope, $http) {
    $http.get('phones/phones.json').success(function(data) {
      $scope.phones = data;
    });

    $scope.orderProp = 'age';
  }]);

phonecatControllers.controller('PhoneDetailCtrl', ['$scope', '$routeParams',
  function($scope, $routeParams) {
    $scope.phoneId = $routeParams.phoneId;
  }]);
Again, note that we created a new module called phonecatControllers. For small AngularJS
applications, it's common to create just one module for all of your controllers if there are just a
few. As your application grows it is quite common to refactor your code into additional modules.
For larger apps, you will probably want to create separate modules for each major feature of
your app.
Because our example app is relatively small, we'll just add all of our controllers to the
phonecatControllers module.
To automatically verify that everything is wired properly, we wrote end-to-end tests that navigate to various URLs and verify that the correct view was rendered.
...
  it('should redirect index.html to index.html#/phones', function() {
    browser().navigateTo('app/index.html');
    expect(browser().location().url()).toBe('/phones');
  });
...

  describe('Phone detail view', function() {

    beforeEach(function() {
      browser.get('app/index.html#/phones/nexus-s');
    });


    it('should display placeholder page with phoneId', function() {
      expect(element(by.binding('phoneId')).getText()).toBe('nexus-s');
    });
  });
You can now rerun npm run protractor to see the tests run.
- Try to add an
{{orderProp}}binding toindex.html, and you'll see that nothing happens even when you are in the phone list view. This is because theorderPropmodel is visible only in the scope managed byPhoneListCtrl, which is associated with the<div ng-view>element. If you add the same binding into thephone-list.htmltemplate, the binding will work as expected.
hero = {{hero}}
` to all three of our templates (`index.html`, `phone-list.html`, and `phone-detail.html`). Open the app and you'll see scope inheritance and model property shadowing do some wonders.With the routing set up and the phone list view implemented, we're ready to go to step 8 to implement the phone details view.
In this step, you will implement the phone details view, which is displayed when a user clicks on a phone in the phone list.
- When you click on a phone on the list, the phone details page with phone-specific information is displayed.
To implement the phone details view we used $http to fetch our data, and we
fleshed out the phone-detail.html view template.
In addition to phones.json, the app/phones/ directory also contains one json file for each
phone:
app/phones/nexus-s.json: (sample snippet)
{
  "additionalFeatures": "Contour Display, Near Field Communications (NFC),...",
  "android": {
      "os": "Android 2.3",
      "ui": "Android"
  },
  ...
  "images": [
      "img/phones/nexus-s.0.jpg",
      "img/phones/nexus-s.1.jpg",
      "img/phones/nexus-s.2.jpg",
      "img/phones/nexus-s.3.jpg"
  ],
  "storage": {
      "flash": "16384MB",
      "ram": "512MB"
  }
}
Each of these files describes various properties of the phone using the same data structure. We'll show this data in the phone detail view.
We'll expand the PhoneDetailCtrl by using the $http service to fetch the json files. This works
the same way as the phone list controller.
app/js/controllers.js:
var phonecatControllers = angular.module('phonecatControllers',[]);

phonecatControllers.controller('PhoneDetailCtrl', ['$scope', '$routeParams', '$http',
  function($scope, $routeParams, $http) {
    $http.get('phones/' + $routeParams.phoneId + '.json').success(function(data) {
      $scope.phone = data;
    });
  }]);
To construct the URL for the HTTP request, we use $routeParams.phoneId extracted from the current
route by the $route service.
The TBD placeholder line has been replaced with lists and bindings that comprise the phone details.
Note where we use the Angular {{expression}} markup and ngRepeat to project phone data from
our model into the view.
app/partials/phone-detail.html:
<img ng-src="{{phone.images[0]}}" class="phone">

<h1>{{phone.name}}</h1>

<p>{{phone.description}}</p>

<ul class="phone-thumbs">
  <li ng-repeat="img in phone.images">
    <img ng-src="{{img}}">
  </li>
</ul>

<ul class="specs">
  <li>
    <span>Availability and Networks</span>
    <dl>
      <dt>Availability</dt>
      <dd ng-repeat="availability in phone.availability">{{availability}}</dd>
    </dl>
  </li>
    ...
  <li>
    <span>Additional Features</span>
    <dd>{{phone.additionalFeatures}}</dd>
  </li>
</ul>
We wrote a new unit test that is similar to the one we wrote for the PhoneListCtrl controller in
step 5.
test/unit/controllersSpec.js:
  beforeEach(module('phonecatApp'));

  ...

  describe('PhoneDetailCtrl', function(){
    var scope, $httpBackend, ctrl;

    beforeEach(inject(function(_$httpBackend_, $rootScope, $routeParams, $controller) {
      $httpBackend = _$httpBackend_;
      $httpBackend.expectGET('phones/xyz.json').respond({name:'phone xyz'});

      $routeParams.phoneId = 'xyz';
      scope = $rootScope.$new();
      ctrl = $controller('PhoneDetailCtrl', {$scope: scope});
    }));


    it('should fetch phone detail', function() {
      expect(scope.phone).toBeUndefined();
      $httpBackend.flush();

      expect(scope.phone).toEqual({name:'phone xyz'});
    });
  });
...
You should now see the following output in the Karma tab:
Chrome 22.0: Executed 3 of 3 SUCCESS (0.039 secs / 0.012 secs)
We also added a new end-to-end test that navigates to the Nexus S detail page and verifies that the heading on the page is "Nexus S".
test/e2e/scenarios.js:
...
  describe('Phone detail view', function() {

    beforeEach(function() {
      browser.get('app/index.html#/phones/nexus-s');
    });


    it('should display nexus-s page', function() {
      expect(element(by.binding('phone.name')).getText()).toBe('Nexus S');
    });
  });
...
You can now rerun npm run protractor to see the tests run.
- Using the Protractor API, write a test that verifies that we display 4 thumbnail images on the Nexus S details page.
Now that the phone details view is in place, proceed to step 9 to learn how to write your own custom display filter.
In this step you will learn how to create your own custom display filter.
- In the previous step, the details page displayed either "true" or "false" to indicate whether certain phone features were present or not. We have used a custom filter to convert those text strings into glyphs: ✓ for "true", and ✘ for "false". Let's see what the filter code looks like.
In order to create a new filter, you are going to create a phonecatFilters module and register
your custom filter with this module:
app/js/filters.js:
angular.module('phonecatFilters', []).filter('checkmark', function() {
  return function(input) {
    return input ? '\u2713' : '\u2718';
  };
});
The name of our filter is "checkmark". The input evaluates to either true or false, and we
return one of the two unicode characters we have chosen to represent true (\u2713 -> ✓) or false (\u2718 -> ✘).
Now that our filter is ready, we need to register the phonecatFilters module as a dependency for
our main phonecatApp module.
app/js/app.js:
...
angular.module('phonecatApp', ['ngRoute','phonecatControllers','phonecatFilters']).
...Since the filter code lives in the app/js/filters.js file, we need to include this file in our
layout template.
app/index.html:
...
 <script src="js/controllers.js"></script>
 <script src="js/filters.js"></script>
...
The syntax for using filters in Angular templates is as follows:
{{ expression | filter }}
Let's employ the filter in the phone details template:
app/partials/phone-detail.html:
...
    <dl>
      <dt>Infrared</dt>
      <dd>{{phone.connectivity.infrared | checkmark}}</dd>
      <dt>GPS</dt>
      <dd>{{phone.connectivity.gps | checkmark}}</dd>
    </dl>
...Filters, like any other component, should be tested and these tests are very easy to write.
test/unit/filtersSpec.js:
describe('filter', function() {

  beforeEach(module('phonecatFilters'));

  describe('checkmark', function() {

    it('should convert boolean values to unicode checkmark or cross',
        inject(function(checkmarkFilter) {
      expect(checkmarkFilter(true)).toBe('\u2713');
      expect(checkmarkFilter(false)).toBe('\u2718');
    }));
  });
});
We must call beforeEach(module('phonecatFilters')) before any of
our filter tests execute. This call loads our phonecatFilters module into the injector
for this test run.
Note that we call the helper function, inject(function(checkmarkFilter) { ... }), to get
access to the filter that we want to test. See angular.mock.inject().
You should now see the following output in the Karma tab:
Chrome 22.0: Executed 4 of 4 SUCCESS (0.034 secs / 0.012 secs)
-
Let's experiment with some of the built-in Angular filters and add the following bindings to
index.html:{{ "lower cap string" | uppercase }}{{ {foo: "bar", baz: 23} | json }}{{ 1304375948024 | date }}{{ 1304375948024 | date:"MM/dd/yyyy @ h:mma" }}
-
We can also create a model with an input element, and combine it with a filtered binding. Add the following to index.html:
<input ng-model="userInput"> Uppercased: {{ userInput | uppercase }}Now that you have learned how to write and test a custom filter, go to step 10 to learn how we can use Angular to enhance the phone details page further.
In this step, you will add a clickable phone image swapper to the phone details page.
- The phone details view displays one large image of the current phone and several smaller thumbnail images. It would be great if we could replace the large image with any of the thumbnails just by clicking on the desired thumbnail image. Let's have a look at how we can do this with Angular.
app/js/controllers.js:
...
var phonecatControllers = angular.module('phonecatControllers',[]);

phonecatControllers.controller('PhoneDetailCtrl', ['$scope', '$routeParams', '$http',
  function($scope, $routeParams, $http) {
    $http.get('phones/' + $routeParams.phoneId + '.json').success(function(data) {
      $scope.phone = data;
      $scope.mainImageUrl = data.images[0];
    });

    $scope.setImage = function(imageUrl) {
      $scope.mainImageUrl = imageUrl;
    }
  }]);
In the PhoneDetailCtrl controller, we created the mainImageUrl model property and set its
default value to the first phone image URL.
We also created a setImage event handler function that will change the value of mainImageUrl.
app/partials/phone-detail.html:
<img ng-src="{{mainImageUrl}}" class="phone">

...

<ul class="phone-thumbs">
  <li ng-repeat="img in phone.images">
    <img ng-src="{{img}}" ng-click="setImage(img)">
  </li>
</ul>
...
We bound the ngSrc directive of the large image to the mainImageUrl property.
We also registered an ngClick
handler with thumbnail images. When a user clicks on one of the thumbnail images, the handler will
use the setImage event handler function to change the value of the mainImageUrl property to the
URL of the thumbnail image.

To verify this new feature, we added two end-to-end tests. One verifies that the main image is set to the first phone image by default. The second test clicks on several thumbnail images and verifies that the main image changed appropriately.
test/e2e/scenarios.js:
...
  describe('Phone detail view', function() {

...

    it('should display the first phone image as the main phone image', function() {
      expect(element(by.css('img.phone')).getAttribute('src')).toMatch(/img\/phones\/nexus-s.0.jpg/);
    });


    it('should swap main image if a thumbnail image is clicked on', function() {
      element(by.css('.phone-thumbs li:nth-child(3) img')).click();
      expect(element(by.css('img.phone')).getAttribute('src')).toMatch(/img\/phones\/nexus-s.2.jpg/);

      element(by.css('.phone-thumbs li:nth-child(1) img')).click();
      expect(element(by.css('img.phone')).getAttribute('src')).toMatch(/img\/phones\/nexus-s.0.jpg/);
    });
  });
You can now rerun npm run protractor to see the tests run.
-
Let's add a new controller method to
PhoneDetailCtrl:$scope.hello = function(name) { alert('Hello ' + (name || 'world') + '!'); }and add:
<button ng-click="hello('Elmo')">Hello</button>to the
phone-detail.htmltemplate.
- Move the
hellomethod fromPhoneCatCtrltoPhoneListCtrland you'll see that the button declared inindex.htmlwill stop working, while the one declared in thephone-list.htmltemplate remains operational.
With the phone image swapper in place, we're ready for step 11 to learn an even better way to fetch data.
In this step, you will change the way our app fetches data.
- We defined a custom service that represents a RESTful client. Using this client we can make requests to the server for data in an easier way, without having to deal with the lower-level $http API, HTTP methods and URLs.
The RESTful functionality is provided by Angular in the ngResource module, which is distributed
separately from the core Angular framework.
We are using [Bower][bower] to install client side dependencies. This step updates the
bower.json configuration file to include the new dependency:
{
  "name": "angular-seed",
  "description": "A starter project for AngularJS",
  "version": "0.0.0",
  "homepage": "https://github.com/angular/angular-seed",
  "license": "MIT",
  "private": true,
  "dependencies": {
    "angular": "1.2.x",
    "angular-mocks": "~1.2.15",
    "bootstrap": "~3.1.1",
    "angular-route": "~1.2.15",
    "angular-resource": "~1.2.15"
  }
}
The new dependency "angular-resource": "~1.2.15" tells bower to install a version of the
angular-resource component that is compatible with version 1.2.15. We must tell bower to download
and install this dependency.
If you have bower installed globally then you can run bower install but for this project we have
preconfigured npm to run bower install for us:
npm install
Our custom resource service will be defined in app/js/services.js so we need to include this file
in our layout template. Additionally, we also need to load the angular-resource.js file, which
contains the {@link api/ngResource ngResource} module:
app/index.html.
...
  <script src="../bower_components/angular-resource/angular-resource.js"></script>
  <script src="js/services.js"></script>
...We create our own service to provide access to the phone data on the server:
app/js/services.js.
var phonecatServices = angular.module('phonecatServices', ['ngResource']);

phonecatServices.factory('Phone', ['$resource',
  function($resource){
    return $resource('phones/:phoneId.json', {}, {
      query: {method:'GET', params:{phoneId:'phones'}, isArray:true}
    });
  }]);
We used the module API to register a custom service using a factory function. We passed in the name
of the service - 'Phone' - and the factory function. The factory function is similar to a
controller's constructor in that both can declare dependencies to be injected via function
arguments. The Phone service declared a dependency on the $resource service.
The $resource service makes it easy to create a
RESTful client with just a few lines of code. This client can then be used in our
application, instead of the lower-level $http service.
app/js/app.js.
...
angular.module('phonecatApp', ['ngRoute', 'phonecatControllers','phonecatFilters', 'phonecatServices']).
...
We need to add the 'phonecatServices' module dependency to 'phonecatApp' module's requires array.
We simplified our sub-controllers (PhoneListCtrl and PhoneDetailCtrl) by factoring out the
lower-level $http service, replacing it with a new service called
Phone. Angular's $resource service is easier to
use than $http for interacting with data sources exposed as RESTful resources. It is also easier
now to understand what the code in our controllers is doing.
app/js/controllers.js.
var phonecatControllers = angular.module('phonecatControllers', []);

...

phonecatControllers.controller('PhoneListCtrl', ['$scope', 'Phone', function($scope, Phone) {
  $scope.phones = Phone.query();
  $scope.orderProp = 'age';
}]);

phonecatControllers.controller('PhoneDetailCtrl', ['$scope', '$routeParams', 'Phone', function($scope, $routeParams, Phone) {
  $scope.phone = Phone.get({phoneId: $routeParams.phoneId}, function(phone) {
    $scope.mainImageUrl = phone.images[0];
  });

  $scope.setImage = function(imageUrl) {
    $scope.mainImageUrl = imageUrl;
  }
}]);
Notice how in PhoneListCtrl we replaced:
$http.get('phones/phones.json').success(function(data) {
  $scope.phones = data;
});
with:
$scope.phones = Phone.query();
This is a simple statement that we want to query for all phones.
An important thing to notice in the code above is that we don't pass any callback functions when invoking methods of our Phone service. Although it looks as if the result were returned synchronously, that is not the case at all. What is returned synchronously is a "future" — an object, which will be filled with data when the XHR response returns. Because of the data-binding in Angular, we can use this future and bind it to our template. Then, when the data arrives, the view will automatically update.
Sometimes, relying on the future object and data-binding alone is not sufficient to do everything
we require, so in these cases, we can add a callback to process the server response. The
PhoneDetailCtrl controller illustrates this by setting the mainImageUrl in a callback.
We have modified our unit tests to verify that our new service is issuing HTTP requests and processing them as expected. The tests also check that our controllers are interacting with the service correctly.
The $resource service augments the response object
with methods for updating and deleting the resource. If we were to use the standard toEqual
matcher, our tests would fail because the test values would not match the responses exactly. To
solve the problem, we use a newly-defined toEqualData Jasmine matcher. When
the toEqualData matcher compares two objects, it takes only object properties into account and
ignores methods.
test/unit/controllersSpec.js:
describe('PhoneCat controllers', function() {

  beforeEach(function(){
    this.addMatchers({
      toEqualData: function(expected) {
        return angular.equals(this.actual, expected);
      }
    });
  });

  beforeEach(module('phonecatApp'));
  beforeEach(module('phonecatServices'));


  describe('PhoneListCtrl', function(){
    var scope, ctrl, $httpBackend;

    beforeEach(inject(function(_$httpBackend_, $rootScope, $controller) {
      $httpBackend = _$httpBackend_;
      $httpBackend.expectGET('phones/phones.json').
          respond([{name: 'Nexus S'}, {name: 'Motorola DROID'}]);

      scope = $rootScope.$new();
      ctrl = $controller(PhoneListCtrl, {$scope: scope});
    }));


    it('should create "phones" model with 2 phones fetched from xhr', function() {
      expect(scope.phones).toEqual([]);
      $httpBackend.flush();

      expect(scope.phones).toEqualData(
          [{name: 'Nexus S'}, {name: 'Motorola DROID'}]);
    });


    it('should set the default value of orderProp model', function() {
      expect(scope.orderProp).toBe('age');
    });
  });


  describe('PhoneDetailCtrl', function(){
    var scope, $httpBackend, ctrl,
        xyzPhoneData = function() {
          return {
            name: 'phone xyz',
            images: ['image/url1.png', 'image/url2.png']
          }
        };


    beforeEach(inject(function(_$httpBackend_, $rootScope, $routeParams, $controller) {
      $httpBackend = _$httpBackend_;
      $httpBackend.expectGET('phones/xyz.json').respond(xyzPhoneData());

      $routeParams.phoneId = 'xyz';
      scope = $rootScope.$new();
      ctrl = $controller(PhoneDetailCtrl, {$scope: scope});
    }));


    it('should fetch phone detail', function() {
      expect(scope.phone).toEqualData({});
      $httpBackend.flush();

      expect(scope.phone).toEqualData(xyzPhoneData());
    });
  });
});
You should now see the following output in the Karma tab:
Chrome 22.0: Executed 4 of 4 SUCCESS (0.038 secs / 0.01 secs)
With the phone image swapper in place, we're ready for step 12 (the last step!) to learn how to improve this application with animations.
In this final step, we will enhance our phonecat web application by attaching CSS and JavaScript animations on top of the template code we created before.
- Used the
ngAnimateto enable animations throughout the application. - Common
ngdirectives automatically trigger hooks for animations to tap into. - When an animation is found then the animation will run in between the standard DOM operation that
is being issued on the element at the given time (e.g. inserting and removing nodes on
ngRepeator adding and removing classes onngClass).
The animation functionality is provided by Angular in the ngAnimate module, which is distributed
separately from the core Angular framework. In addition we will use JQuery in this project to do
extra JavaScript animations.
We are using [Bower][bower] to install client side dependencies. This step updates the
bower.json configuration file to include the new dependency:
{
  "name": "angular-seed",
  "description": "A starter project for AngularJS",
  "version": "0.0.0",
  "homepage": "https://github.com/angular/angular-seed",
  "license": "MIT",
  "private": true,
  "dependencies": {
    "angular": "1.2.x",
    "angular-mocks": "~1.2.15",
    "bootstrap": "~3.1.1",
    "angular-route": "~1.2.15",
    "angular-resource": "~1.2.15",
    "jquery": "1.10.2",
    "angular-animate": "~1.2.15"
  }
}
"angular-animate": "~1.2.15"tells bower to install a version of the angular-animate component that is compatible with version 1.2.15."jquery": "1.10.2"tells bower to install the 1.1.2 version of JQuery. Note that this is not an Angular library, it is the standard JQuery library. We can use bower to install a wide range of 3rd party libraries.
We must tell bower to download and install these dependencies. If you have bower installed globally
then you can run bower install but for this project we have preconfigured npm to run bower install
for us:
npm install
To get an idea of how animations work with AngularJS, please read the AngularJS Animation Guide first.
The changes required within the HTML template code is to link the asset files which define the animations as
well as the angular-animate.js file. The animation module, known as {@link api/ngAnimate ngAnimate}, is
defined within angular-animate.js and contains the code necessary to make your application become animation
aware.
Here's what needs to changed in the index file:
app/index.html.
...
  <!-- for CSS Transitions and/or Keyframe Animations -->
  <link rel="stylesheet" href="css/animations.css">

  ...

  <!-- jQuery is used for JavaScript animations (include this before angular.js) -->
  <script src="../bower_components/jquery/jquery.js"></script>

  ...

  <!-- required module to enable animation support in AngularJS -->
  <script src="../bower_components/angular/angular-animate.js"></script>

  <!-- for JavaScript Animations -->
  <script src="js/animations.js"></script>

...Animations can now be created within the CSS code (animations.css) as well as the JavaScript code (animations.js).
But before we start, let's create a new module which uses the ngAnimate module as a dependency just like we did before
with ngResource.
app/js/animations.js.
angular.module('phonecatAnimations', ['ngAnimate']).
  // ...
  // this module will later be used to define animations
  // ...
And now let's attach this module to our application module...
app/js/app.js.
// ...
angular.module('phonecatApp', [
  'ngRoute',

  'phonecatAnimations',
  'phonecatControllers',
  'phonecatFilters',
  'phonecatServices',
]).
// ...
Now, the phonecat module is animation aware. Let's make some animations!
We'll start off by adding CSS transition animations to our ngRepeat directive present on the phone-list.html page.
First let's add an extra CSS class to our repeated element so that we can hook into it with our CSS animation code.
app/partials/phone-list.html.
<!--
  Let's change the repeater HTML to include a new CSS class
  which we will later use for animations:
-->
<ul class="phones">
  <li ng-repeat="phone in phones | filter:query | orderBy:orderProp"
      class="thumbnail phone-listing">
    <a href="#/phones/{{phone.id}}" class="thumb"><img ng-src="{{phone.imageUrl}}"></a>
    <a href="#/phones/{{phone.id}}">{{phone.name}}</a>
    <p>{{phone.snippet}}</p>
  </li>
</ul>
Notice how we added the phone-listing CSS class? This is all we need in our HTML code to get animations working.
Now for the actual CSS transition animation code:
app/css/animations.css
.phone-listing.ng-enter,
.phone-listing.ng-leave,
.phone-listing.ng-move {
  -webkit-transition: 0.5s linear all;
  -moz-transition: 0.5s linear all;
  -o-transition: 0.5s linear all;
  transition: 0.5s linear all;
}

.phone-listing.ng-enter,
.phone-listing.ng-move {
  opacity: 0;
  height: 0;
  overflow: hidden;
}

.phone-listing.ng-move.ng-move-active,
.phone-listing.ng-enter.ng-enter-active {
  opacity: 1;
  height: 120px;
}

.phone-listing.ng-leave {
  opacity: 1;
  overflow: hidden;
}

.phone-listing.ng-leave.ng-leave-active {
  opacity: 0;
  height: 0;
  padding-top: 0;
  padding-bottom: 0;
}
As you can see our phone-listing CSS class is combined together with the animation hooks that occur when items are
inserted into and removed from the list:
- The
ng-enterclass is applied to the element when a new phone is added to the list and rendered on the page. - The
ng-moveclass is applied when items are moved around in the list. - The
ng-leaveclass is applied when they're removed from the list.
The phone listing items are added and removed depending on the data passed to the ng-repeat attribute.
For example, if the filter data changes the items will be animated in and out of the repeat list.
Something important to note is that when an animation occurs, two sets of CSS classes are added to the element:
- a "starting" class that represents the style at the beginning of the animation
- an "active" class that represents the style at the end of the animation
The name of the starting class is the name of event that is fired (like enter, move or leave) prefixed with
ng-. So an enter event will result in a class called ng-enter.
The active class name is the same as the starting class's but with an -active suffix.
This two-class CSS naming convention allows the developer to craft an animation, beginning to end.
In our example above, elements expand from a height of 0 to 120 pixels when items are added or moved, around and collapsing the items before removing them from the list. There's also a nice fade-in and fade-out effect that also occurs at the same time. All of this is handled by the CSS transition declarations at the top of the example code above.
Although most modern browsers have good support for CSS transitions and CSS animations, IE9 and earlier do not. If you want animations that are backwards-compatible with older browsers, consider using JavaScript-based animations, which are described in detail below.
Next let's add an animation for transitions between route changes in {@link api/ngRoute.directive:ngView ngView}.
To start, let's add a new CSS class to our HTML like we did in the example above.
This time, instead of the ng-repeat element, let's add it to the element containing the ng-view directive.
In order to do this, we'll have to make some small changes to the HTML code so that we can have more control over our
animations between view changes.
app/index.html.
<div class="view-container">
  <div ng-view class="view-frame"></div>
</div>
With this change, the ng-view directive is nested inside a parent element with
a view-container CSS class. This class adds a position: relative style so that the positioning of the ng-view
is relative to this parent as it animates transitions.
With this in place, let's add the CSS for this transition animation to our animations.css file:
app/css/animations.css.
.view-container {
  position: relative;
}

.view-frame.ng-enter, .view-frame.ng-leave {
  background: white;
  position: absolute;
  top: 0;
  left: 0;
  right: 0;
}

.view-frame.ng-enter {
  -webkit-animation: 0.5s fade-in;
  -moz-animation: 0.5s fade-in;
  -o-animation: 0.5s fade-in;
  animation: 0.5s fade-in;
  z-index: 100;
}

.view-frame.ng-leave {
  -webkit-animation: 0.5s fade-out;
  -moz-animation: 0.5s fade-out;
  -o-animation: 0.5s fade-out;
  animation: 0.5s fade-out;
  z-index:99;
}

@keyframes fade-in {
  from { opacity: 0; }
  to { opacity: 1; }
}
@-moz-keyframes fade-in {
  from { opacity: 0; }
  to { opacity: 1; }
}
@-webkit-keyframes fade-in {
  from { opacity: 0; }
  to { opacity: 1; }
}

@keyframes fade-out {
  from { opacity: 1; }
  to { opacity: 0; }
}
@-moz-keyframes fade-out {
  from { opacity: 1; }
  to { opacity: 0; }
}
@-webkit-keyframes fade-out {
  from { opacity: 1; }
  to { opacity: 0; }
}

/* don't forget about the vendor-prefixes! */
Nothing crazy here! Just a simple fade in and fade out effect between pages. The only out of the ordinary thing
here is that we're using absolute positioning to position the next page (identified via ng-enter) on top of the
previous page (the one that has the ng-leave class) while performing a cross fade animation in between. So
as the previous page is just about to be removed, it fades out while the new page fades in right on top of it.
Once the leave animation is over then element is removed and once the enter animation is complete then the
ng-enter and ng-enter-active CSS classes are removed from the element rendering it to be position itself
with its default CSS code (so no more absolute positioning once the animation is over). This works fluidly so
that pages flow naturally between route changes without anything jumping around.
The CSS classes applied (the start and end classes) are much the same as with ng-repeat. Each time a new page is
loaded the ng-view directive will create a copy of itself, download the template and append the contents. This
ensures that all views are contained within a single HTML element which allows for easy animation control.
For more on CSS animations, see the Web Platform documentation.
Let's add another animation to our application. Switching to our phone-detail.html page,
we see that we have a nice thumbnail swapper. By clicking on the thumbnails listed on the page,
the profile phone image changes. But how can we change this around to add animations?
Let's think about it first. Basically, when you click on a thumbnail image, you're changing the state of the profile image to reflect the newly selected thumbnail image. The best way to specify state changes within HTML is to use classes. Much like before, how we used a CSS class to specify an animation, this time the animation will occur whenever the CSS class itself changes.
Whenever a new phone thumbnail is selected, the state changes and the .active CSS class is added to the matching
profile image and the animation plays.
Let's get started and tweak our HTML code on the phone-detail.html page first:
app/partials/phone-detail.html.
<!-- We're only changing the top of the file -->
<div class="phone-images">
  <img ng-src="{{img}}"
       class="phone"
       ng-repeat="img in phone.images"
       ng-class="{active:mainImageUrl==img}">
</div>

<h1>{{phone.name}}</h1>

<p>{{phone.description}}</p>

<ul class="phone-thumbs">
  <li ng-repeat="img in phone.images">
    <img ng-src="{{img}}" ng-mouseenter="setImage(img)">
  </li>
</ul>
Just like with the thumbnails, we're using a repeater to display all the profile images as a list, however we're
not animating any repeat-related animations. Instead, we're keeping our eye on the ng-class directive since whenever
the active class is true then it will be applied to the element and will render as visible. Otherwise, the profile image
is hidden. In our case, there is always one element that has the active class, and, therefore, there will always
be one phone profile image visible on screen at all times.
When the active class is added to the element, the active-add and the active-add-active classes are added just before
to signal AngularJS to fire off an animation. When removed, the active-remove and the active-remove-active classes
are applied to the element which in turn trigger another animation.
You may be thinking that we're just going to create another CSS-enabled animation.
Although we could do that, let's take the opportunity to learn how to create JavaScript-enabled animations with the animation() module method.
app/js/animations.js.
var phonecatAnimations = angular.module('phonecatAnimations', ['ngAnimate']);

phonecatAnimations.animation('.phone', function() {

  var animateUp = function(element, className, done) {
    if(className != 'active') {
      return;
    }
    element.css({
      position: 'absolute',
      top: 500,
      left: 0,
      display: 'block'
    });

    jQuery(element).animate({
      top: 0
    }, done);

    return function(cancel) {
      if(cancel) {
        element.stop();
      }
    };
  }

  var animateDown = function(element, className, done) {
    if(className != 'active') {
      return;
    }
    element.css({
      position: 'absolute',
      left: 0,
      top: 0
    });

    jQuery(element).animate({
      top: -500
    }, done);

    return function(cancel) {
      if(cancel) {
        element.stop();
      }
    };
  }

  return {
    addClass: animateUp,
    removeClass: animateDown
  };
});
Note that we're using jQuery to implement the animation. jQuery
isn't required to do JavaScript animations with AngularJS, but we're going to use it because writing
your own JavaScript animation library is beyond the scope of this tutorial. For more on
jQuery.animate, see the jQuery documentation.
The addClass and removeClass callback functions are called whenever an a class is added or removed
on the element that contains the class we registered, which is in this case .phone. When the .active
class is added to the element (via the ng-class directive) the addClass JavaScript callback will
be fired with element passed in as a parameter to that callback. The last parameter passed in is the
done callback function. The purpose of done is so you can let Angular know when the JavaScript
animation has ended by calling it.
The removeClass callback works the same way, but instead gets triggered when a class is removed
from the element.
Within your JavaScript callback, you create the animation by manipulating the DOM. In the code above,
that's what the element.css() and the element.animate() are doing. The callback positions the next
element with an offset of 500 pixels and animates both the previous and the new items together by
shifting each item up 500 pixels. This results in a conveyor-belt like animation. After the animate
function does its business, it calls done.
Notice that addClass and removeClass each return a function. This is an optional function that's
called when the animation is cancelled (when another animation takes place on the same element)
as well as when the animation has completed. A boolean parameter is passed into the function which
lets the developer know if the animation was cancelled or not. This function can be used to
do any cleanup necessary for when the animation finishes.
There you have it! We have created a web app in a relatively short amount of time. In the closing notes we'll cover where to go from here.
Our application is now complete. Feel free to experiment with the code further, and jump back to
previous steps using the git checkout command.
For more details and examples of the Angular concepts we touched on in this tutorial, see the Developer Guide.
When you are ready to start developing a project using Angular, we recommend that you bootstrap your development with the angular-seed project.
We hope this tutorial was useful to you and that you learned enough about Angular to make you want to learn more. We especially hope you are inspired to go out and develop Angular web apps of your own, and that you might be interested in contributing to Angular.
If you have questions or feedback or just want to say "hi", please post a message at (https://groups.google.com/forum/#!forum/angular).