For feedback on this guide, please visit #26092
This document outlines some of the upcoming Bitcoin Core 24.0 release changes and provides steps to help test them. This guide is meant to be the starting point for experimentation and further testing, but is in no way comprehensive! After running through the steps in this guide, you are encouraged to do your own testing.
This can be as simple as testing the same features in this guide but trying it a different way. Even better, think of features you use regularly and test that they still work as expected in the release candidate. You can also read the release notes(TOADD-LINK) to find something not covered in this guide. This is a great way to be involved with Bitcoin's development and helps keep Bitcoin running smoothly and bug-free! Your help in this endeavor is greatly appreciated.
Changes covered in this testing guide include:
- Using the GUI to restore a wallet from a backup file (#471)
- Peristent settings are now unified between bitcoind and the GUI. (#15936,#602)
- Using the new
migratewalletRPC to migrate legacy wallets to descriptor wallets. (#19602) - Wallet support for watchonly Miniscript descriptors. (#24148)
Current Release Candidate: [NA] (draft-release-notes)
There are two ways to grab the latest release candidate: pre-compiled binary or source code. The source code for the latest release can be grabbed from here: [NA]
If you want to use a binary, make sure to grab the correct one for your system.
If you grabbed a binary, skip this step
Before compiling, make sure that your system has all the right dependencies installed. As this guide utilizes the Bitcoin Core GUI, you must compile support for the GUI and have the qt5 dependency already installed. Since descriptor wallets are now the default, it is recommended that you compile with sqlite, so make sure you have installed the sqlite3 dependency.
To ensure we build in sqlite and gui support, pass the following options when configuring:
./autogen.sh
./configure --with-gui=yes --with-sqlite=yes --enable-suppress-external-warnings
# nproc does not exist on macOS so we create an alias for it if necessary
if ! command -v nproc &> /dev/null; then alias nproc="sysctl -n hw.physicalcpu"; fi
make -j "$(($(nproc)+1))"
For more information on compiling from source, here are some guides to compile Bitcoin Core for UNIX/Linux, macOS, Windows, FreeBSD, NetBSD, and OpenBSD.
If you plan to use the command line, below are a few environment variable to set.
First, create a temporary data directory
export DATA_DIR=/tmp/24-rc-test
mkdir $DATA_DIR
Next, specify the following paths. For source compiled, start from the root of your release candidate directory and run:
export BINARY_PATH=$(pwd)/src
export QT_PATH=$(pwd)/src/qt
For the downloaded binary, start from the root of the downloaded release candidate (cd ~/bitcoin-24.0rc1, for example) and run:
export BINARY_PATH=$(pwd)/bin
export QT_PATH=$BINARY_PATH
To avoid specifying the data directory (-datadir=$DATA_DIR) on each command, bellow are a few extra variables to set.
ℹ️ Note: If you are testing on signet, you can also include the
-signetflag
alias bitcoind="$(echo $BINARY_PATH)/bitcoind -datadir=$DATA_DIR"
alias cli="$(echo $BINARY_PATH)/bitcoin-cli -datadir=$DATA_DIR"
alias qt="$(echo $QT_PATH)/bitcoin-qt -datadir=$DATA_DIR"
The commands throughout the rest of the guide will look like:
cli [cli args]

# for starting bitcoin-qt
qt [cli args]Between sections in this guide, it's recommended to stop your node and wipe the data directory. You can use the commands provided below.
Stop node
cli stopWipe and recreate the directory
rm -r $DATA_DIR
mkdir $DATA_DIR
Start node
bitcoind -daemonIf you are testing on signet, you can use test coins for the tests in this guide. After IBD has completed (this process is relatively quick on signet), you can get some free corn from one of the signet faucets available, e.g. https://signetfaucet.com/. Generate a fresh address when needed, pop it into the faucet, and watch the signet coins flowing in.
When you're finished, please return your coins to a faucet in need before stopping your node and cleaning up your datadir.
If you're not comfortable with the command line, you can still test all of these changes in the GUI. Althought for some steps you might need to use the integrated RPC console (Window->Console).
To run bitcoin-qt, use:
qt [cli args]💡 You can use
bitcoin-clito talk tobitcoin-qtby startingbitcoin-qtwith the-serveroption.
Since you're starting from a fresh datadir, the first thing you should see is the progress screen of Initial Block Download (IBD). You can simply hide it at the bottom right and proceed with testing.
ℹ️ If you are running on signet, the window title should be "Bitcoin Core - [signet]". See this guide on how to switch to signet from within the GUI.
Restoring a wallet from a backup file in the GUI is now possible! Up until now, you could create a backup but the only option was to restore using the RPC interface. This change makes it easier for non-technical users to restore backups.
You can test this by trying to restore a backup you already have. If no backup is handy, you can always do some "cross testing" by using the resulting backup at the end of the Testing Migrating Legacy Wallets to Descriptor Wallets section.
Otherwise, create a new wallet as per your preferred settings, generate addresses, receive/send transactions. Feel free to experiment. In the end, make sure to create a backup and then restore from it.
💡 A slightly different testing scenario is to stop your node and clean the datadir between backup and restore. Or maybe move the backup file and restore to a different machine.
After restoring, make sure that your addresses, labels and balances are as expected.
Once the test is successful, don't forget to stop your node and clean the datadir.
Note: For this test you will also need bitcoind.
Previously, configuration changes made in the bitcoin GUI (such as the pruning setting, proxy settings, UPNP preferences) were ignored by bitcoind. Now, changes made in the GUI take precedence over bitcoin.conf values and therefore persist to bitcoind.
ℹ️ You can find the shared persistent settings at
$DATA_DIR/<chain>/settings.json. That's also where we account for wallets that load on startup.
For this test, we will select a configuration option that is available in the GUI, change that option in the GUI and verify that the change persists to bitcoind. We cannot cover all the options in this guide, it's encouraged to test further using other options.
Pruning is disabled by default. You can confirm that either from the GUI's options or by running the getblockchaininfo RPC and looking at the pruned and size_on_disk fields.
In order to test the persistent settings:
- Enable pruning in the GUI
- Open bitcoind and use
getblockchaininfoto verify that pruning is now enabled.
A different test is to enforce pruning by adding prune=x in bitcoin.conf, then change it in the GUI and verify that the GUI option takes precedence in bitcoind over what's set in bitcoin.conf.
ℹ️ The
-prunesetting is specified in MiB (2^20 bytes) while the GUI setting is specified in GB (10^9 bytes). So, in various cases rounded values will be displayed.
The spending of unconfirmed change is enabled by default. Therefore, creating a transaction and immediately using its unconfirmed change as input for another transaction should be allowed. Disable that from the Options and restart the client to activate changes.
Enable coin control before proceeding (Options->Wallet->Enable coin control features), otherwise inputs for transactions are automatically selected.
Use the "Send" tab and by clicking the "Inputs..." button select one of your available UTXOs.

Fill in the rest of the form. Make sure that you will create change by choosing an amount smaller than the value of the input. If you want to send to yourself, use the Receive tab, create a new receiving address and copy it at the "Pay To" field.
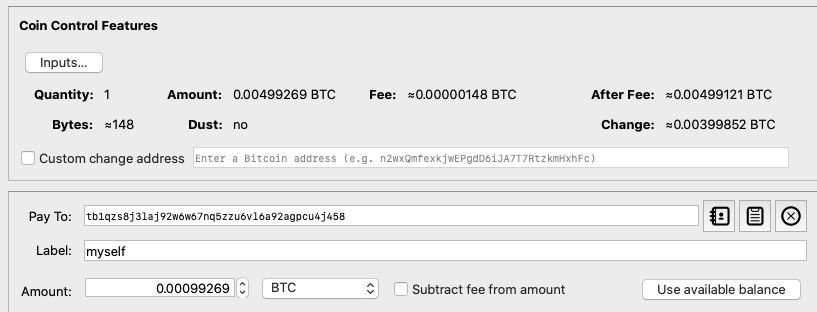
ℹ️ At this point you could use a low enough fee to make sure that the transaction will remain unconfirmed until you complete the next step. This is not applicable for signet.
Send the transaction. Observe that the transaction is accounted as "Pending balance" and the unconfirmed output is not available as input for a new transaction.
In order to test that prohibiting the spending of unconfirmed change persists to bitcoind:
- Open bitcoind and use the
getbalanceRPC. The available balance that returns as a result should match what's shown in the GUI. - Using the GUI, re-enable the spending of unconfirmed change and observe that the available balance (that now includes the unconfirmed change) is the same between the GUI and bitcoind.
ℹ️ If you are comfortable with bitcoin-cli, you could also try to create a transaction that includes the unconfirmed change.
Once the test is successful, don't forget to stop your node and clean the datadir.
Descriptor wallets were introduced with the Bitcoin Core 0.21 release and became the default wallet type with the Bitcoin Core 23.0 release. Descriptor wallets are ultimately a better design, that's why the legacy wallet type and BDB format will soon be unsupported, which creates the need for a migration mechanism.
🔦 Want to dive deeper into the changes? Check the PR Review Club Meeting for PR#19602
We are going to test this migration mechanism by using the new migratewallet RPC to migrate our legacy wallets. There is an extremely large number of possible configurations for the scripts that Legacy wallets can know about, be watching for, and be able to sign for. This guide cannot cover them all. Therefore testing configurations other than the testing scenarios of this guide is encouraged and could provide valuable feedback to strengthen this migration mechanism.
We will test the migratewallet RPC by creating a new legacy wallet and then migrating it. It is not required to have funds in it as the migration deals with keys and scripts, not really transactions. Even without funds, you can check that the keys and scripts were migrated correctly.
A new descriptor wallet creates 8 descriptors by default, 2 (external, internal) for each supported script type:
- P2PKH:
pkh([<fingerprint>/44'/1'/0']<xpub>/{0,1}/*)#<checksum> - P2SH(P2WPKH):
sh(wpkh([<fingerprint>/49'/1'/0']<xpub>/{0,1}/*))#<checksum> - P2WPKH:
wpkh([<fingerprint>/84'/1'/0']<xpub>/{0,1}/*)#<checksum> - P2TR:
tr([<fingerprint>/86'/1'/0']<xpub>/{0,1}/*)#<checksum>
ℹ️ You can verify that with the
listdescriptorsRPC on a new descriptor wallet. For more information on output descriptors, see doc/descriptors.md.
A legacy wallet with an HD chain has an HD seed. This seed is hashed according to the BIP32 specification to become the BIP32 master key which everything else is then derived from. We need to associate those addresses with a descriptor. Because of that, in addition to the above, the new migrant wallet is expected to have:
- A range combo descriptor for the external addresses:
combo(<xpub>/0'/0'/*')#<checksum> - A range combo descriptor for the internal addresses:
combo(<xpub>/0'/1'/*')#<checksum> - A combo descriptor for the hd seed:
combo(<hdseed>)#<checksum>
ℹ️ The HD seed is a valid key that could receive Bitcoin to it even though it's corresponding addresses would never be given out.
For wallets containing non-HD keys, each key will have its own combo descriptor.
After a successful migration, all the above descriptors will be part of a newly created Descriptor wallet named as the original wallet.
Create a legacy test-wallet. This is the wallet we will migrate later in the guide.
cli -named createwallet wallet_name=legacy descriptors=false
alias wallet="$(echo $BINARY_PATH)/bitcoin-cli -datadir=$DATA_DIR -rpcwallet=legacy"
Create a second helper-wallet. This one is quite helpful in allowing more configurations to be tested by exporting scripts and importing them to our test-wallet.
cli -named createwallet wallet_name=legacy_helper descriptors=false
alias helper="$(echo $BINARY_PATH)/bitcoin-cli -datadir=$DATA_DIR -rpcwallet=legacy_helper"
Generate receiving addresses for different address types (P2PKH, P2SH(P2WPKH), P2WPKH) to verify that after migration the wallet still has them.
legacy=$(wallet getnewaddress "my-P2PKH" legacy)
p2sh_segwit=$(wallet getnewaddress "my-P2SH(P2WPKH)" p2sh-segwit)
bech32=$(wallet getnewaddress "my-P2WPKH" bech32)For wallets containing non-HD keys, each key will have its own combo descriptor.
To test for this behavior, we will use the helper-wallet.
non_HD_address=$(helper getnewaddress)
non_HD_key=$(helper dumpprivkey $non_HD_address)
wallet importprivkey $non_HD_key "non-HD"Because Descriptor wallets do not support having private keys and watch-only scripts, there may be up to two additional wallets created after migration. The one that contains all of the watchonly scripts will be named <name>_watchonly.
ℹ️ Legacy wallets allow for private keys and watch-only to mix together because it used to not be possible to have different wallet files for different purposes. Multiwallet is relatively recent.
To test for this behavior, we will use the helper-wallet.
watch_address=$(helper getnewaddress)
wallet importaddress $watch_address "watch-me"
Solvable is anything we have any (public) keys for and we know how to spend it (e.g. a multisig for which we have one public key, and we know the other two because we have the full redeemscript). Because the user is not watching the corresponding P2(W)SH scripts when the wallet is a legacy wallet, it does not make sense to have them be in the <name>_watchonly wallet. Therefore, they are part of a second additional wallet named <name>_solvables.
ℹ️ The solvables wallet can update a PSBT with the UTXO, scripts, and pubkeys, for inputs that spend any of the scripts it contains. It basically backups the
redeemscript.
To test for this behavior, we will again use the helper-wallet to create a multisig with some keys that do not belong to this wallet.
address1=$(helper getnewaddress)
not_my_pubkey=$(helper getaddressinfo $address1 | jq -r ".pubkey")
my_address=$(wallet getnewaddress)

multisig_address=$(wallet addmultisigaddress 1 '''["'$my_address'", "'$not_my_pubkey'"]''' "multisig" | jq -r ".address")
💡 Multisigs are special,
addmultisigaddressadds aredeemscriptso it's solvable, but it's not marked watch-only. The net-effect of that is that we see the full script withgetaddressinfo, the wallet ignores transactions to it, but we can sign them. This may be useful if you're a co-signer and you don't want those transactions to show up.
Before migrating, use the getaddressinfo RPC and observe how the wallet understands your newly created addresses.
wallet getaddressinfo $legacyDo the same for p2sh_segwit, bech32, non_HD_address, watch_address, multisig_address. Pay attention to the ismine, solvable, iswatchonly and labels fields.
Run the migration and wait. If you are not running bitcoind as a daemon you can also see the related logging in your console.
wallet migratewalletIf you followed all the steps, at the end of the migration you should see something like:
{
  "wallet_name": "legacy",
  "watchonly_name": "legacy_watchonly",
  "solvables_name": "legacy_solvables",
  "backup_path": "/tmp/24-rc-test/signet/wallets/legacy/legacy-1663017338.legacy.bak"
}
This means that the migration was successful!
Things to observe:
- The new descriptor wallet has 12 descriptors, as explained in the "What to expect after the migration" section.
legacy,p2sh_segwit,bech32andnon_HD_addressbelong to thelegacywallet.watch_addressbelongs to thelegacy_watchonlywallet.multisig_addressbelongs to thelegacy_solvableswallet.
ℹ️ If you haven't already, why not use your legacy wallet backup for testing the GUI's Restore Wallet option?
Once the test is successful, don't forget to stop your node and clean the datadir.
By now, you have a better grasp of what goes into the migration process. Remember, this is meant to get you started on testing. Here are a few different ways to test the migration mechanism.
The migration is not yet supported for the GUI but it is still possible (and encouraged) to repeat the above steps from within the GUI and then use the integrated RPC console to run the migration.
If you are using legacy wallets, this is a good opportunity to test further by migrating one of your own legacy wallets. You don't have to worry about loss of funds as the migration process will create a backup of the wallet before migrating. In any case, feel free to create a backup beforehand using the backupwallet RPC.
The descriptor language has been extended to allow a Descriptor Wallet to handle tracking for a larger variety of scripts. You can now import Miniscript descriptors for P2WSH in a watchonly wallet to track coins, but you can't spend from them using the Bitcoin Core wallet yet.
🔦 Want to dive deeper into the changes? Check the PR Review Club Meeting for PR#24148
For this test, we will construct a Miniscript output descriptor, import it into our descriptor wallet, derive new addresses and detect funds sent to them.
Miniscript is a language for writing (a subset of) Bitcoin Scripts in a structured way, enabling analysis, composition, generic signing and more, allowing us to go further than just the few simple templates we have now in descriptors. Miniscript excites a lot of people. That being said, don't expect to fully understand Miniscript as part of this guide. Find more about Miniscript on the reference website.
There are four steps to go from our desired wallet locking conditions to the actual Miniscript output descriptor that we will import to our descriptor wallet:
- We start from our desired locking conditions.
I want to unconditionally lock the UTXO for 21 blocks, and then require a 2-of-3 multisig from Alice, Bob, or Carol.
- We then write them in a policy. Policy is intended to simplify designing Scripts for humans.
and(thresh(2,pk(key_a),pk(key_b),pk(key_c)),after(21))
- The policy language is then compiled into Miniscript. The resulting textual notation aka Miniscript exists to permit including Miniscript expressions inside output descriptors and easily communicate them.
and_v(v:multi(2,key_a,key_b,key_c),older(21))
- The
wsh()output descriptor is the one extended with Miniscript support. That's why we can only import Miniscript descriptors for P2WSH.wsh(and_v(v:multi(2,key_a,key_b,key_c),older(21)))
💡 Miniscript doesn't "compile" to Script (maybe the word works but it can lead to confusion), each Miniscript fragment maps to a specific Script.
In the previous section, key_* either refers to a fixed public key in hexadecimal notation, or to an xpub. Both can be used inside a descriptor. For more information on output descriptors, see doc/descriptors.md.
In this guide we will use miniscript.fun, an easy-to-use graphical playground for Miniscript, to create the spending policy for the example in the previous section. You can also construct Miniscripts using the Miniscript homepage (does not create keys) and https://min.sc/ (more advanced playground).
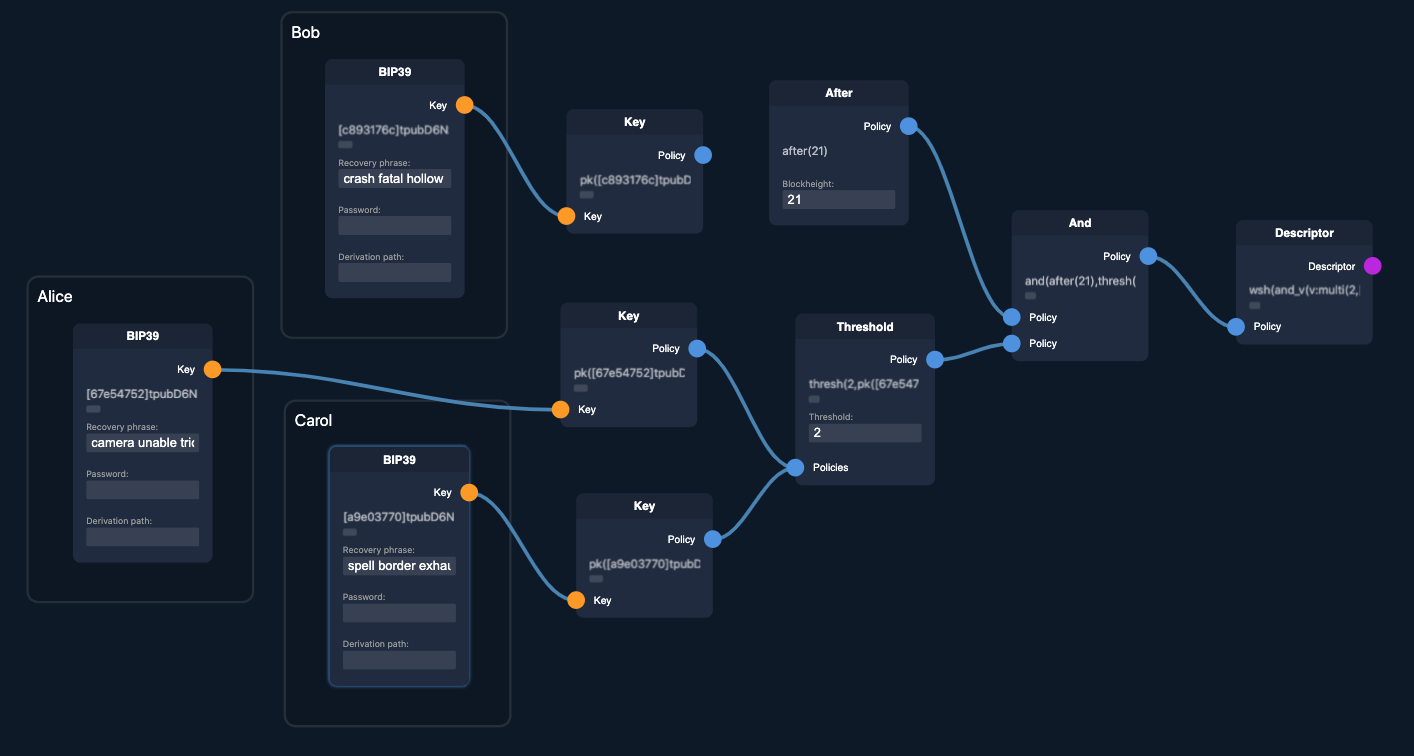
I want to unconditionally lock the UTXO for 21 blocks, and then require a 2-of-3 multisig from Alice, Bob, or Carol. (miniscript.fun-src)
Assign the resulting output descriptor to a variable.
descriptor="wsh(and_v(v:multi(2,[67e54752]tpubD6NzVbkrYhZ4YRJ9MTbmErYTvHdyph7n12fQvuBTozwGQC2LtT8aKbLGMs2jWC11Uj7dXsScu6bDyLdNPLFumAENDNDnaXA3p679HVimacv/0/*,[a9e03770]tpubD6NzVbkrYhZ4Ygoy6im7VLabzegPPSHVD4bY2q3jNkZumP48sK6EZoWuSwAEh4AsimdSXrrjxpuEWSD3k5P4WPcBVWJEVBuuCmMckhd5MbH/0/*),after(21)))#juwzr4jc"ℹ️ Note: If you decide to manually construct a descriptor, you will need a checksum. You can get that using the
getdescriptorinfoRPC.
💡 For testing purposes, you can use https://iancoleman.io/bip39/ to generate BIP39 Mnemonics, and xpubs for the miniscript.fun playground
Descriptor wallets do not allow both private keys and watch-only addresses in a single wallet, they can either always have private keys, or never have private keys. That's why we need to create a descriptor wallet with disabled private keys for this test.
cli -named createwallet wallet_name=miniscript_wo disable_private_keys=trueWe are going to test by importing the Miniscript descriptor that we have previously constructed. This guide tests against a specific Miniscript output descriptor but it's encouraged to follow the guide with your own spending policies.
cli importdescriptors '''[{"desc": "'$descriptor'", "active": true, "timestamp": "now"}]'''
Derive a new address from the new watch-only descriptor.
watch_address=$(cli getnewaddress)
Send coins to the watch_address and confirm that the wallet detects the funds.
cli listtransactions
BONUS change covered: Received coins are now tracked by parent descriptors (#25504)
Did you notice the parent_descs field in the result of the RPC command you just executed? Bitcoin Core allows us to track coins for multiple descriptors in a single wallet. This new field makes it easy to link a coin with a descriptor. In this case, you can see that the parent_desc contains the imported Miniscript descriptor.
Once the test is successful, don't forget to stop your node and clean the datadir.
Thank you for your help in making Bitcoin as robust as it can be. Please remember to add a comment on v24.0 testing issue detailing:
- Your hardware and operating system
- Which release candidate you tested and whether you compiled from source or used a binary (e.g. 24.0rc1 binary or 24.0rc1 compiled from source)
- What you tested
- Any other relevant findings
Don't be shy about leaving a comment even if everything worked as expected! We want to hear from you and so it doesn't count unless you leave some feedback.
Thanks for your contribution and for taking the time to make Bitcoin awesome. For feedback on this guide, please visit #26092