Complex c++ \blueprint based solution, that allows implementing slot based inventory functionality and creating items with custom behavior for any type of game you want.
Now this code assets offer
- Inventory functional.
- Context Menu functional.
- Looting and trading.
- Craft system.
- Doll Pawn widget.
- Spellbook widget.
- Palette widget (Inventory with infinity items, that you could drop. It could be the basis for the RTS build system).
- Drag\Drop\Throw away\Pick up functional.
- Disabling and Enabling Items.
- Fast slot functional with hotkeys.
- Custom drag and drop system.
- Localizable UI.
It's slot-based. Every item has dimensions, and weight, and stuff.
Solution have hardcoded default size = 64. You could customize this, by inherit InventoryInstanse class, set variable and then set as your GameInstance. Slot size measures in pixels.
Architecture of this solution based on separating data and presentation. Player could place items in metainventory, which includes inventories, and can switch between. So, playable character have InventoryComponent, that contains UInnerMetaInventory, that contains UInnerInventories, that contains UInnerItems. UI contains UInnerInventory, that contains UInventoryWidgets, and when we bind each other, UInventoryWidgets begin display UItems, widget we can iteract with. So, inner classes serves for contain pure data, and widget class display actual items.
Every items has three parts.
- InnerItem : data only blueprint, contains data, saved in characters component.
- ItemWidget : widget to display item to.
- PhysicItem : ADroppableActor class, represent item in the physics world. So, you create InnerItem, display ItemWidget, and could interact with DroppableActor
Inherit Inner Item class, then fill all necessary fields.

- Item image. Image that's display your item.
- Disabled Image. Image that will display your item if you disable it.
- Shadow Image. Image that's will be displayed during drag and drop.
- Height\Width. Size of your item in slots. So, 2x2 item will occupy 4 slots.
- Is stackable. Could this Item stacks? If it kind of potions, oblivious, its do, if it sword, its not.
- Max stack size. How many items could be in one stack.
- Physics Item. Item that represent Inner Item in 3D world. To create it, inherit the DroppableActor class and set it the way you want.
- Weight. The weight of Item. Sum of all items' weight will be calculated by Inventory.
- Short Name. This field will be used in case of trading or crafting.
- Description. More complex description of your item.
- IsInfinity. Flag thats indicates if item is consumable or infinity.
- Type. Any item is equippable, and thats field indicates what slot of doll widget is suitable.
- Owner Enum. Inherit from InventoryComponent. Shows how to own this item, player or NPC. ReadOnly.
Also, InnerItem have field, that accessible only in instance, its StackSize. Its represents how many of these item we have.
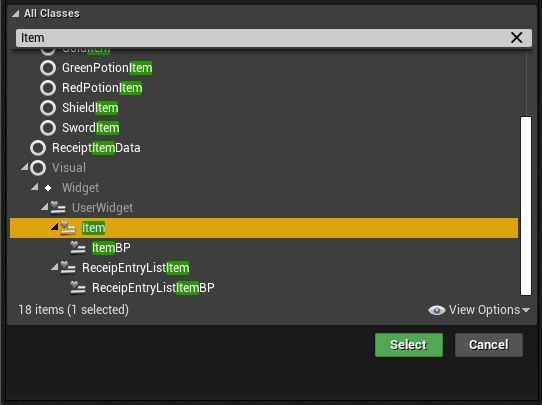
 Example Inner Image
Then, create a widget that will be common for all items that you create. Its subclass of UItem class. You could use already created ItemBP, or create your own.
Item widget has two parameters.
Shadow : widget that appears in drag and drop operation. Again, use precreated or create your own.
ArchetypeClass : InnerItem class. What item should we display? Class that will be used on preview. It will not be used in real behavior.
Inner Item have multiple functions. Example usage will be covered further on this documentation.
UInnerItem::AddToStack - function increase StackSize, or decrease, if the passed value is negative. Also updated StackNumberWidget from Item Widget.
UInnerItem::Return - return item widget to previous place, i.e place where it was before dragging.
UInnerItem::Use - broadcast UseDelegate
UInnerItem::AddMenuItem - add context menu entry data.
UInnerItem::Disable - change widget image to Disabled Image.
UInnerItem::Enable - change widget image to Item Image.
UInnerItem::Delete - totally delete the item. Inner Item will be removed from Inventory, widget destroyed.
UInnerItem::DeleteIfUsed - delete this item if StackSize <= 0
UInnerItem::Pressed - translate this item to drag and drop state.
You should inherit UItem class and then set correct behavior.
UItem require several widgets, we are covering them now.
Canvas: Canvas Panel, that hosts all other widgets. It will be automatically resized in game.
ItemImage : Image that will be displayed. Comes from UInnerItem::ItemImage.
StackNumberWidget : TextBlock, that displays the amount of item. Here goes StackSize of item.
DisabledImage: Image, that will be displayed in case of disabling Item.
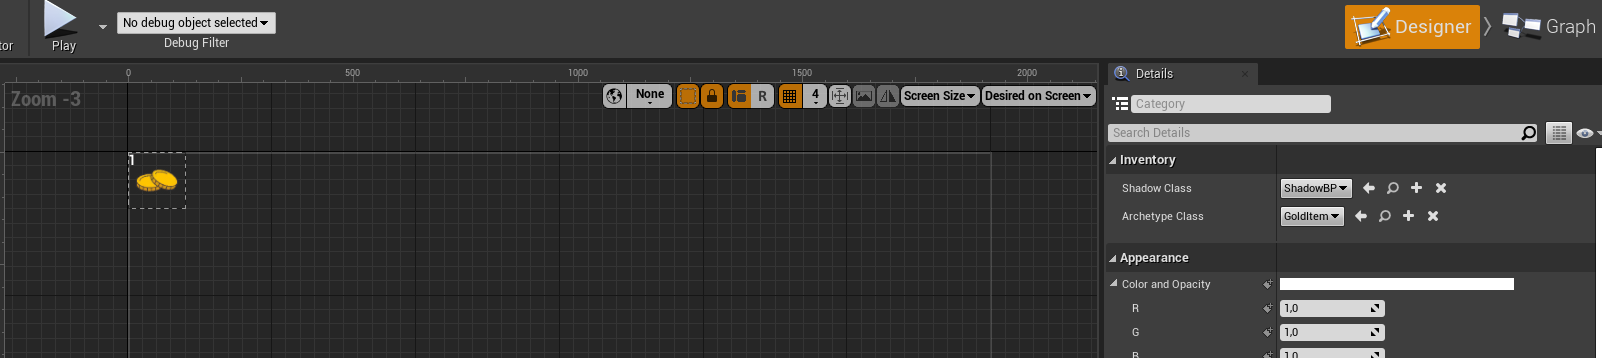
Example Item Widget. Image and size comes from class set in ArchetypeClass
First, override OnMouseButtonDown, call function DetectDragIfPressed. Then, check if RightMouseButton was pressed and, if true, call ContextMenu. Context menu function get offset as offset mouse cursor from widget coordinates.
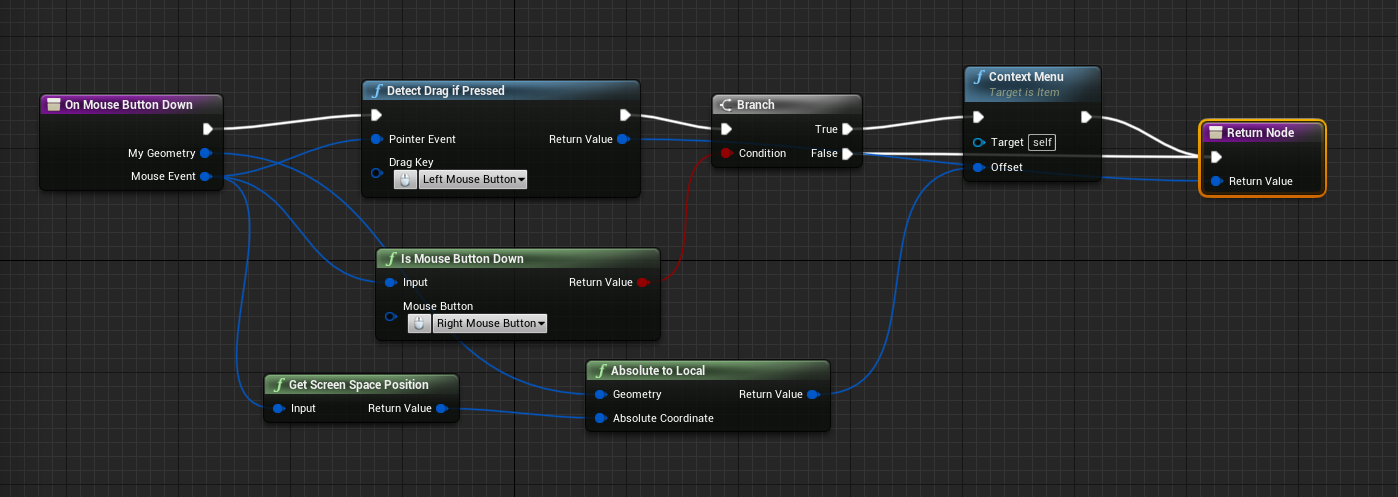 Example setup
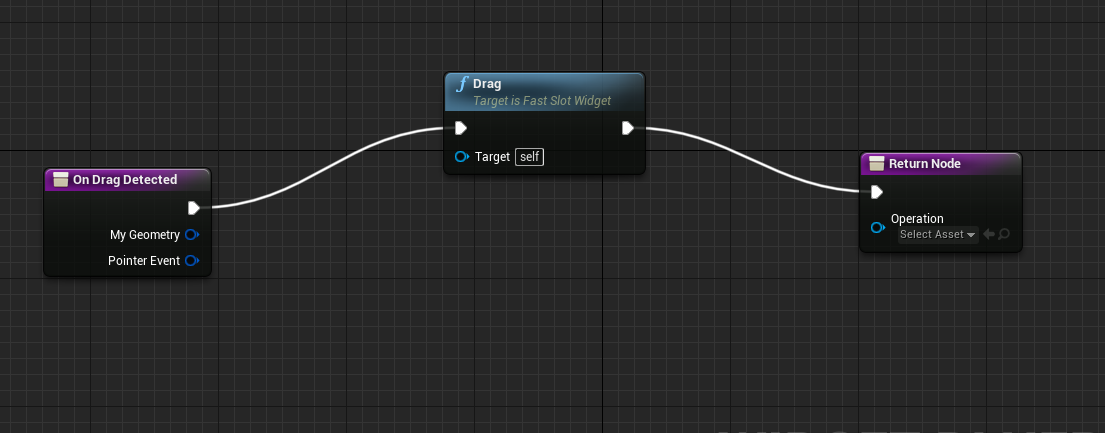
Then, override OnDragDetected, and call Pressed function with offset.
 Example setup
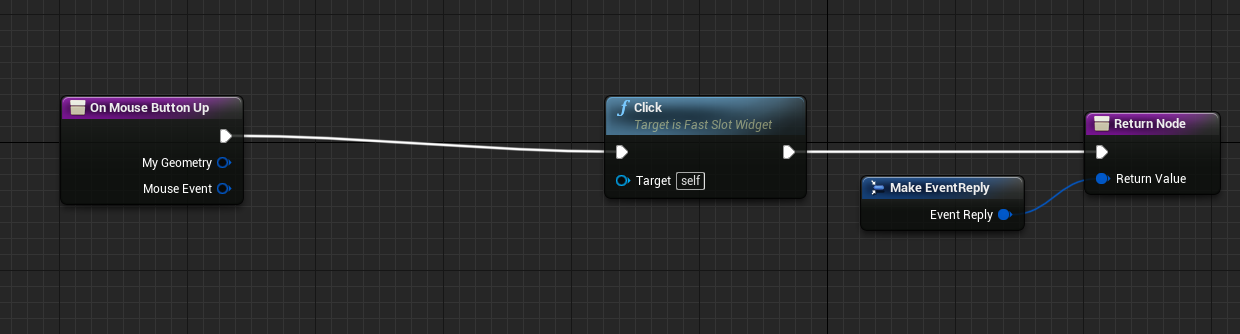
In OnMouseButtonUp call Click function.
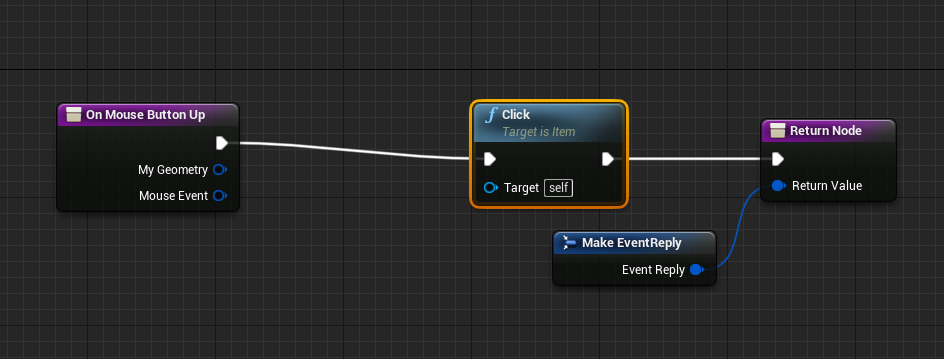
Example setup
Then, override OnMouseEnter and OnMouseLeave function, and bind UItem::Hover and UItem::HoverLeave respectively.

Example setup
!!Important: sometimes ue4 loses focus on the widget, so the widget fires clicking events every second time. To avoid this, reset input mode to Game and UI
DroppableActor it's just subclass of AActor.
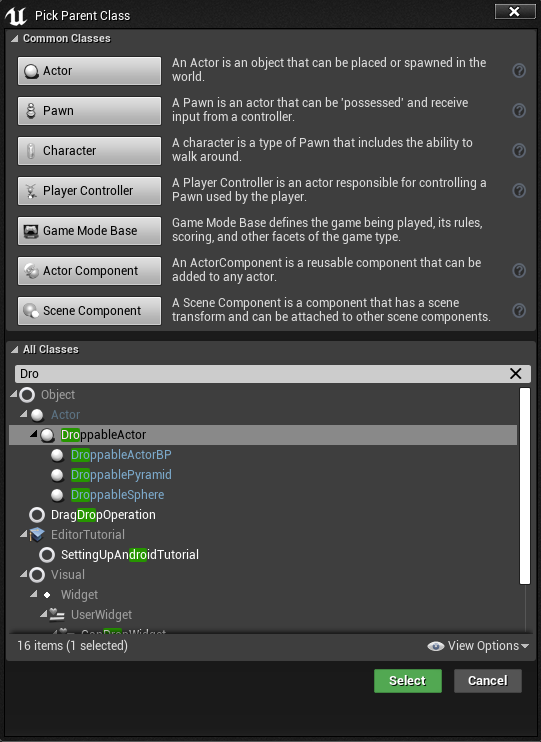
It has ADroppableActor::HandleClick function, and two field : Source and Blueprint source.
When you throw away item, new Droppable actor will be created from UInnerItem::PhysicItem, and InnerItem will preserve in Source. When you place Droppable in the world, i.e. we haven't InnerItem, provide Blueprint Source.
ADroppableActor::HandleClick return false if have InnerItem as Source, so you should just destroy actor then, and true when we construct Item from Blueprint Source. In this case you should add it by calling UInventoryComponent::AddInnerItemObject, transit item to drag and drop state by calling UInnerItem::Pressed, and then destoy actor.
!!Important. If you choose static mesh as represent droppable actor, enable click events in player controller


Pickup setup for ADroppableActor
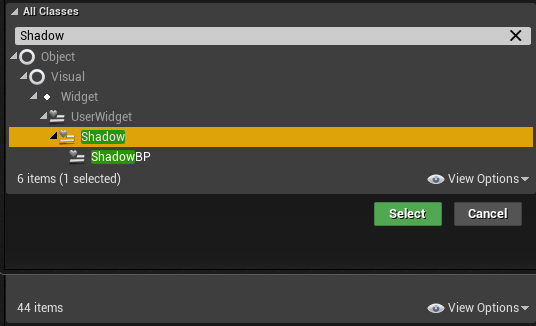
Shadow is just an image that will follow the mouse cursor during drag and drop.

Keep in mind that shadow will be resized to item size
ShadowImage : Image that will be displayed. During gameplay, comes from UInnerItem::ShadowImage. **!!Important: Shadow Image SHOULD be placed on canvas, to avoid editor crash **
Inherit Shadow class.
Then override OnMouseButtonUp function.
In function call Drop and RemoveFromParent.
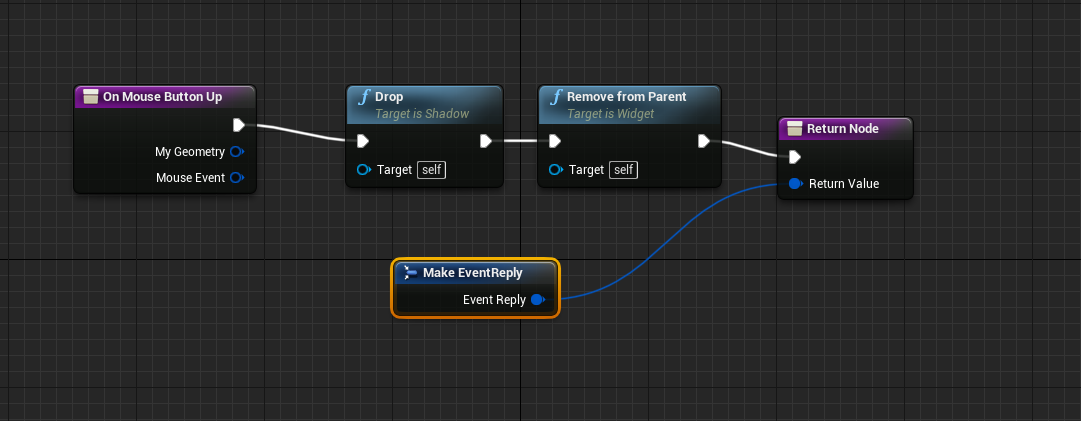
Example setup
Also override OnMouseMove and call Move.
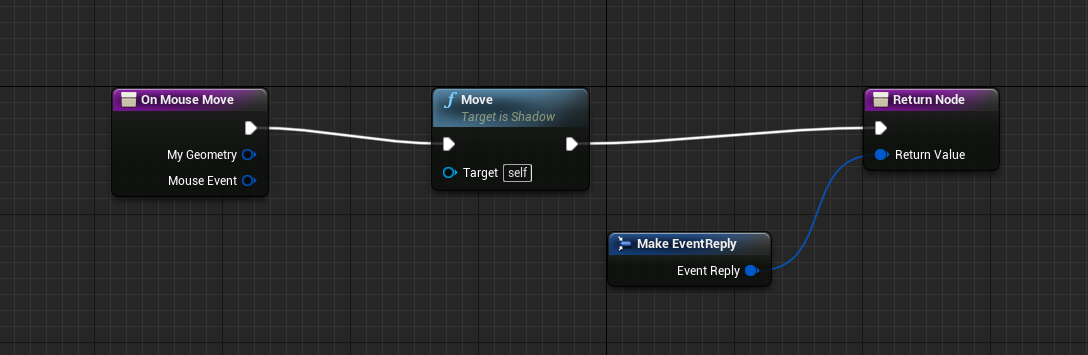
Example setup
Then, call EventTick event and bind UShadow::ItemTick

Example setup
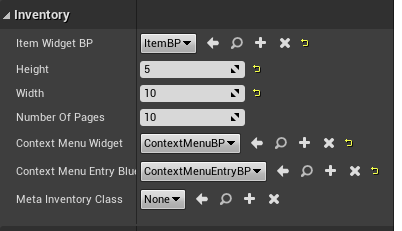
Add Inventory Component BP to playable character.
Set the variables of component.
Item widget BP : widget, that will be used to display your item.
Height\Width. : Size of inventory in slots unit.
Number of pages : Inventory has a set of pages, and you can toggle between them.
Context menu widget : Widget to hold context menu. Again, use precreated or create your own.
Context menu entry widget : Widget to represent single menu entry. You could create own or use precreated.
MetaInventoryHolder : MetaInventory in terms of this solution is inventory, and Inventory is one page of inventory. MetaInventory holder is a class that contains all metainventories and fire events to them. Also, its handle throws away behavior. If you want run custom code on item's throw away event, inherit MetaInventoryHolder class and override virtual bool HandleDrop(UInnerItem* Item); . If you leave this field blank, the default holder will be used. Default holder is Cpp class UMetaInventoryHolder, it is already ready to use in the game.
Example setup
UInventoryComponent : main class of the plugin, contains UMetaInventoryHolder, that cover throw away functional and translate drag n drop events on other widget, such as MetaInventories. To avoid unexpected behavior, use one instance of the player. This component offers next functions. UInventoryComponent::AddInnerItem : Create Inner Item instance from class, and add it to UInnerMetaInventory, class that contains all items of character. Also create an Item widget and store it inside Inner Item.
UInventoryComponent::AddInnerItemObject : Add item instance to inner inventory. Also create Item Widget. Use this when you already have item, but it didn't passed into metainventory, for example, while crafting.
These two functions also subscribe metainventory to all events that happen with widget that belong to Inner Item, like drag drop and more.
UInventoryComponent::PickUp : Put Item into inventory. Did not create a widget, did not subscribe metainvenrory. Supposed we did it before. Approach to just dropped Item.
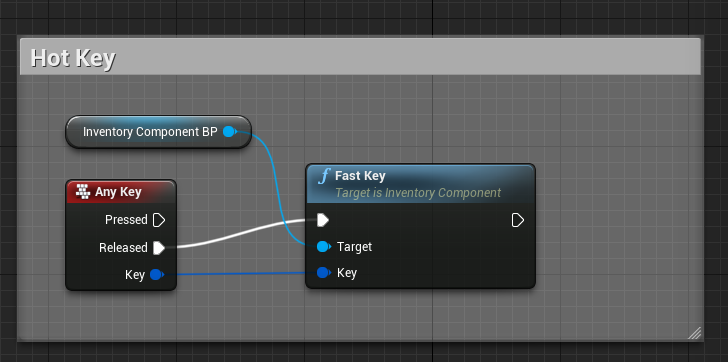
UInventoryComponent::FastKey : translate key events to registered fast slots. Trigger clicking fast slot if key matches fast slot hotkey. UInventoryComponent::RegisterDroppableWidget : register widget into component. Registered widget will listen to drag and drop events. HUD register all droppable widgets automatically.
UInventoryComponent::Register UInventoryComponent::RegisterAnother UInventoryComponent::Unregister : Bind Inner MetaInventory to MetaInventory widget. This topic will be covered later.
UInventoryComponent::SetContextMenu : Blueprint Implementable Event. Here you could set context menu entries for all items.
UInventoryComponent::Trade : trade some items. Call this function if you want to trade outside the drag and drop.
Example usage of all this function will be covered in this document.
UNPCInventoryComponent : class that just holds items. Mostly designed for NPC, such as chests or traders, but player characters also could have it, for example, for additional inventory with special items.
UNPCInventoryComponent::AddInnerItem : created item from class and put it into component's inventory.
UNPCInventoryComponent::AddItemObject : add already created items into inventory.
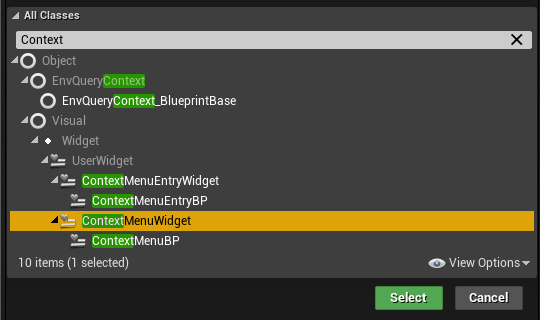
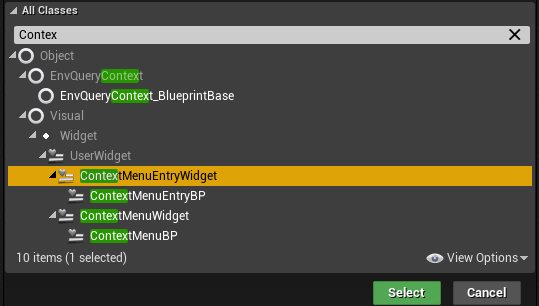
Inherit class UContextMenuWidget.
Box : Vertical box to hold UContextMenuEntryWidget
Context menu entry widget : Widget that represent context menu's entry. You could use precreated.
Inherit class UContextMenuEntryWidget.
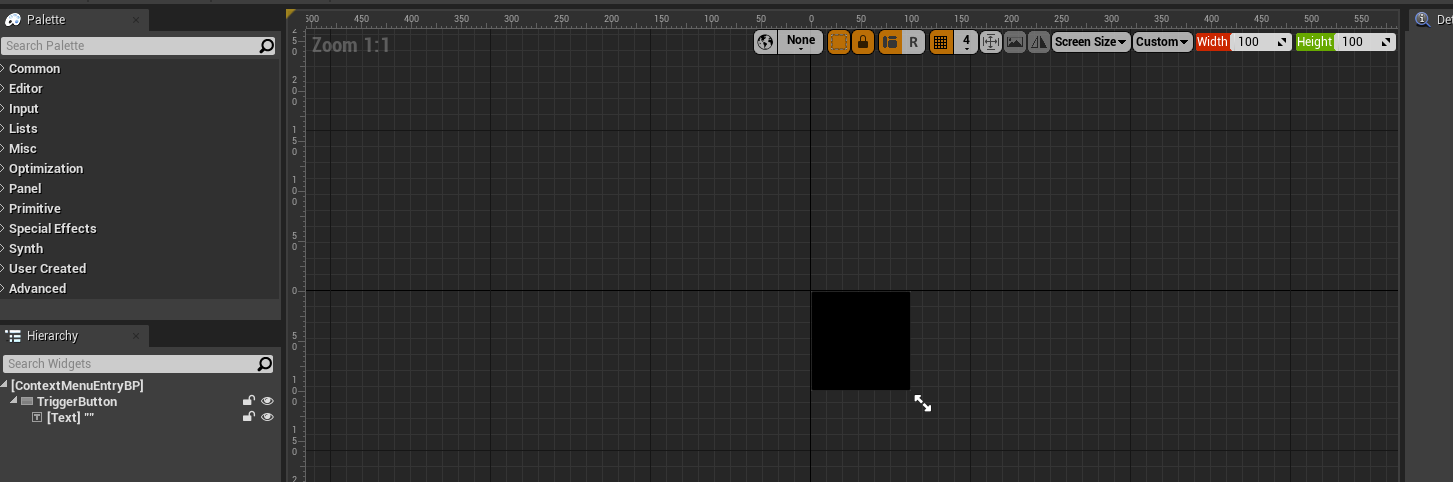
TriggerButton : Button that close context menu widget and fire context menu entry delegate. How to create a delegate described below.
Text : Context menu entry name. How to specify it described below.
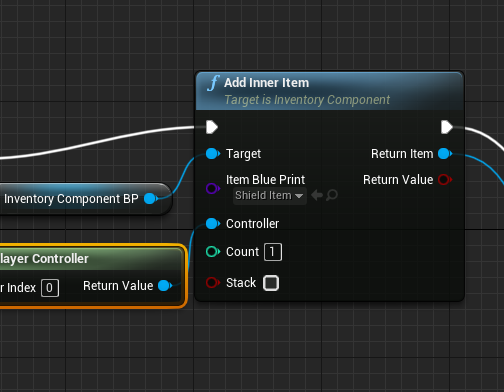
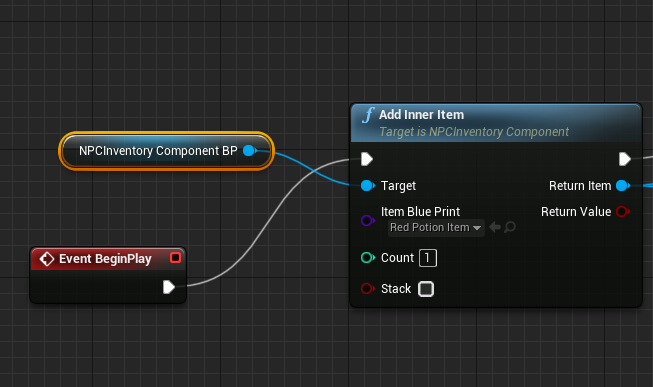
Call a function AddInnerItem from freshly added InventoryComponent.
This function get next variables:
Item blueprint : Class of InnerItem you want to create.
Controller : Controller, that will be owner of items widget.
Count : How many items will be created.
Stack : If set to true, the component will try to stack items.
And return two parameter:
Return Value : true if we successfully added an item, false if not. inventory overflowing.
Return Item : recently created item. Will be null if Return Value == false. Next we could set behavior on it, this topic will be covered below.
False will return in next cases:
- Inventory overflowing.
- Player Controller didnt pass in the parameter.
- InnerItem blueprint didnt pass in parameter.
- Item widget BP did specified.
- Invalid count, that means count less or equal 0.
Calling add item function
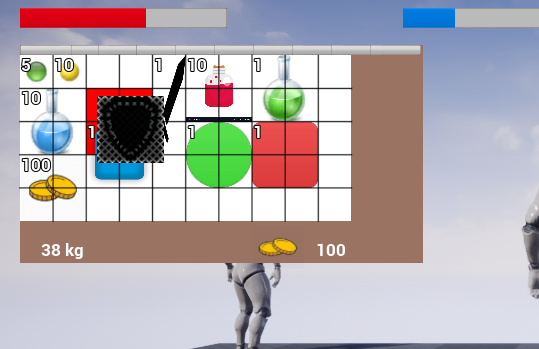
Item iterate over existing items and find items with the same type. If founding end successful, and sum of the StackSize <= MaxStackSize of items, then item stacking. If any of this conditions are not met, then item will be placed into next free area of inventory.
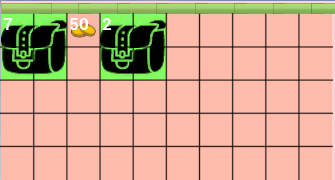
Green items are not stacking, MaxStackSize = 10
Green items are stacking. 2 + 7 = 9

Green items are stacking, but sum more than MaxStackSize.
Items will be placed on the MetaInventory widget. MetaInventory will listen drag and drop events if it will be registered in MetaInventoryHolder, contains in InventoryComponentBP.
There are two ways to do it.
-
Use HUDBP as main widget of your game, and set MetaInventoryHolder from InventoryComponent to HUD, and then call UHUDWidget::Init. This function iterate over all child with UDroppableWidget type placed in HUD and automatically register them.
 Setup HUD
 -
Manually register it buy calling UInventoryComponent::RegisterDroppableWidget.
So, HUD is just util widget that allow automatically register DroppableWidget, such as MetaInventory, or fast slots, or other.
Solution have prebuild HUDBP. That widget contain starter kit of all widgets, presented in plugin.

Progress Bars : used for demonstration purposes. Do nothing.
Fast Slot widget BP : single fast slot, with dedicated hotkey F1.
MetaInventoryBP : MetaInventory, supposed to display player inventory.
PaletteInventoryBP : MetaInventory, supposed to display a bunch of infinity items. Infinity items when thrown away spawn ADroppableActor, but stay in inventory, and can be used as some kind of palette.
LootMetaInventoryBP : MetaInventory, supposed to display outer inventories that player can loot, for example, chest.
TradeMetaInventoryBP : MetaInvnetory with type of blueprint class TradeMetaInventoryBP. TradeMetaInventoryBP has a visible BuySellWidget, so it can display the price of items.
CraftWidgetBP: widget to craft. Craft system will be described later.
Spellbook : widget to represent spellbook. How to create spellbook and spells will be described later.
DollBP : doll widget. Player could equip character in this.
Or, you could set up a custom HUD.
To do this, inherit UHUDWidget class.
####Bind widget

Canvas : Canvas to place other widget.
When you achieve HUD, use predefined MetaInventory, or place exist MetaInventoryBP widget on HUD, or create own MetaInventory Widget.
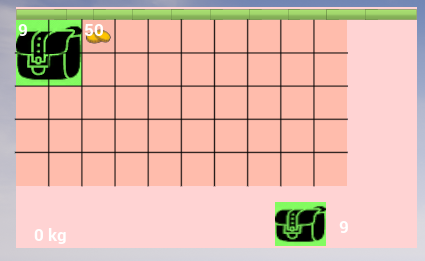
!!Important: Border of any droppable widget, such as MetaInventory, show exactly cover all droppable part of your widget, like on a picture
 Borders cover bookmarks and inventory widget
Inherit UMetaInventory class.
Then bind widget and setup variables.
Canvas : Canvas to place a widget on.
WeightWidget : Text Block to display common inventory weight.
BuySellWidget : Widget to display item price in case of trading.
CollectDataWidget : Widget displays how many items with concrete type you have in, for example, gold. You should set a class of item to collect. To do this, set Item to Collect variable.

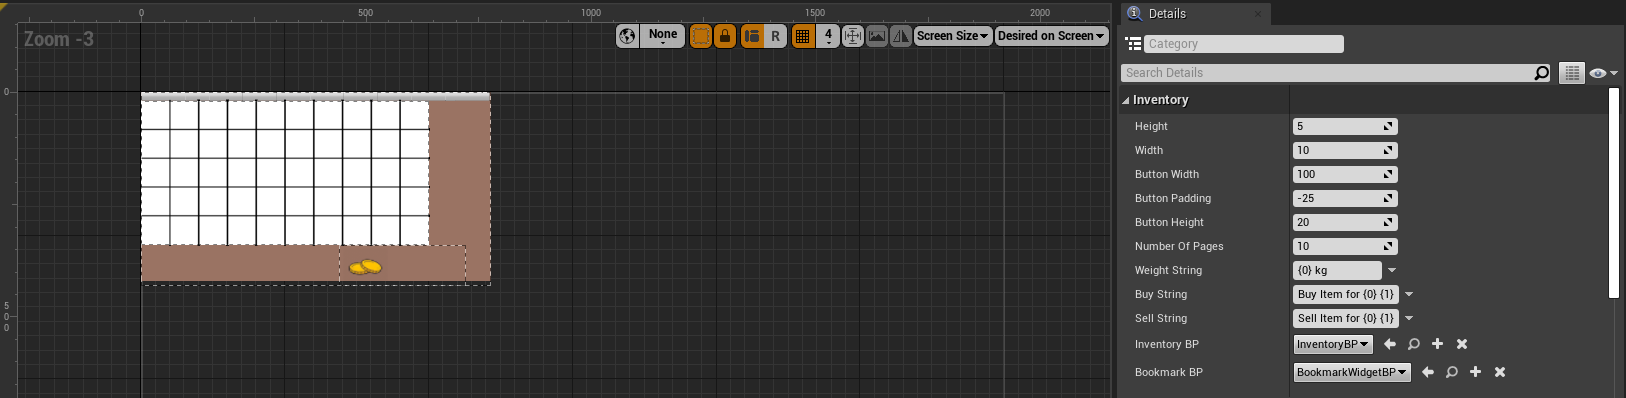
Example setup of Metainventory
Height\Width - Size of widget. It will be used only in previews! To set actual size, set variables in InventoryComponent.
Button Height\Width - Bookmark button size. Button used to toggle between Inventories.
Button Padding - Space between buttons. Could be negative.
Number of pages - How many inventories will be in MetaInventory. Again, used on preview only.
Weight String - String with placeholder to display weight. Should have placeholder, i.e {0} lb. Placeholder keeps weight variable.
Buy\Sell string - String to display item price. Should have placeholder, i.e Buy Item for {0} {1}. First placeholder keeps the cost of the item. Second display in which items cost are measured.
InventoryBP\BookmarkBP - widgets to use as Inventory\Bookmark. Inventory Widget is a single page of MetaInventory, Bookmarks is set of button placed at top of widget to toggle between. Also bookmarks toggle inventories when mouse hover it during drag n drop.
Inherit Bookmark class.
Then place a button widget on it.

TriggerButton : button that triggers toggling between inventories.
Inherit Inventory class, and then set variables.
Canvas : Canvas to place a widget on.
Background : Background Image.

SlotSize : size of slot. Used only in preview.
Height\Width - Size of widget. Used only in preview.
Could\Could not drop widget - Widget that will indicate the player could drop an item. Usually its simple red\green image. Use predefined or add your own.
How its look
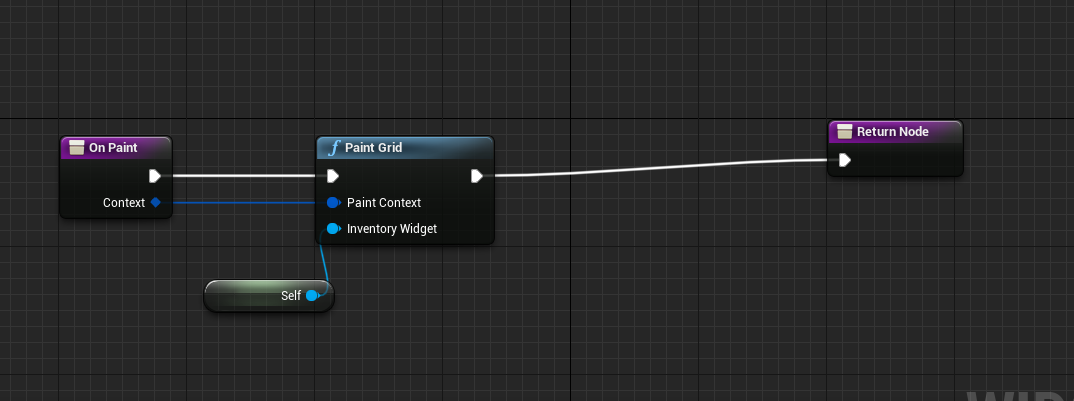
!!If you want to paint grid on widget, override function OnPaint and call UInventoryWidget::PaintGrid
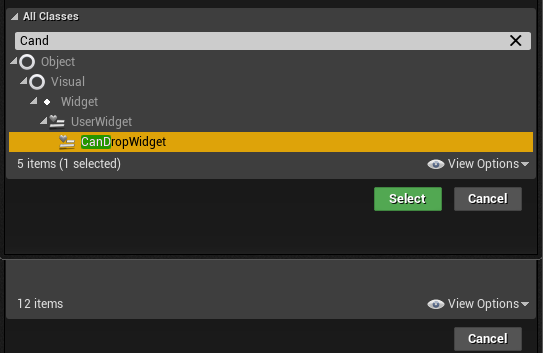
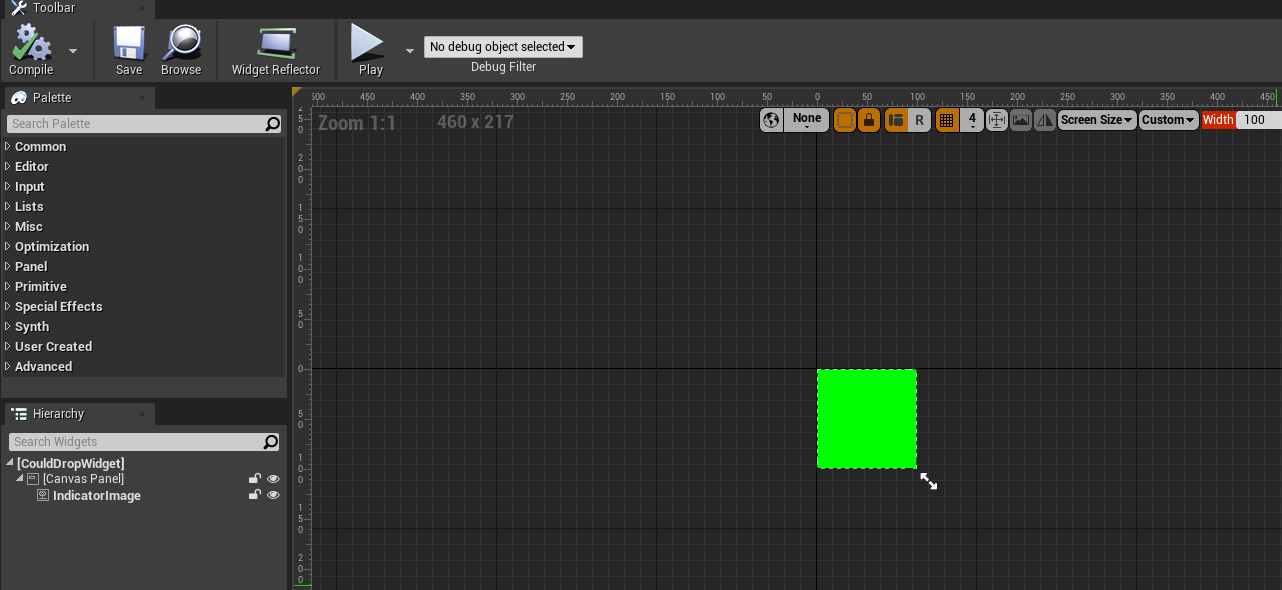
Inherit UCanDropWidget class.
Then place an image widget on it.
IndicatorImage : image that will appear under item during drag n drop if player can or cannot drop it.
So, we have Inventory Component, we have MetaInventory widget, it's time to connect each other.
Inventory components have a bunch of functions to do this.
UInventoryComponent::Register : Bind widget to Inventory Component inner inventory. So, we take each Inner Item from Component, create Item widget and place widgets to Inventory Widget.

Bind Widget
This function is designed to be called one time in game, so you should use a widget that will be the main character inventory.
UInventoryComponent::RegisterAnother : Bind widget to separate MetaInventory. It function will be used when your character loot or trade something. You should unregister it later.

Get component from actor and bind metainventory to widget
UInventoryComponent::Unregister : Unbind widget from Inventory.

Unregister widget. We will display another invetories, so we need unbind and clear it
For example, we want to bind InventoryComponent's MetaInventory to a widget, to see item that we created and added to Component before. So, need to call UInventoryComponent::Register function.
Now, set the Metainventory widget visible, and, if you do all this right, you could see your item, and drag and drop it.
When Item Widget dragged (that means Item set up correctly, could detect drag and drop attempt, and call UItem::Pressed in that case), Item Widget hide, and created new widget from class UItem::ShadowClass. This widget will follow the mouse cursor until the player releases the mouse button. If mouse is over inventory widget, another widget will appear from UInventoryWidget::Can\CanNotDropItemWidgetClass. If player could drop item, there will be UInventoryWidget::CanDropItemWidgetClass, and vice versa. Player could drop item in the following cases.
- There is free space under the cursor, big enough to fit.
- There is an item widget under the cursor, that represents the inner item, which is stackable (is stackable checkbox in inner item checked).
If player drop item, and there is free space under it, the next thing will happen.
- Can\Can not widgets disappear.
- Shadow widget disappears.
- Item widget shows up in place where it was drop, i.e. where indicator widget (from clause one) was. If a player drop item (let's name it "dropped item"), and there is an item with the same class and this item is stackable (let's name it "base item"), next behavior is supposed.
- Can\Can not widgets disappear.
- Shadow widget disappears.
- StackSize of base item will be equal to StackSize of dropped item + StackSize of base item, if this less than MaxStackSize, or MaxStackSize, if equal or more.
- New Item with StackSize equal remainder between StackSize of dropped item + StackSize of base item and MaxStackSize.
So, if MaxStackSize = 150 and we stack items with amount 100 and 100, base item amount will be equal 150 and new item with amount = 50 will appear. If the current (shown on display) inventory of metainventory could not fit this new item, it should appear on the next one.
This happens when we perform drag n drop with our own items, even between separate metainventories, for example while we loot something.
Looting and trading functional described below.
If a player drops an item outside any droppable widget, it will be thrown away. Item removed from inventory, if it is not infinity (is infinity checkbox in inner item blueprint).
New actor spawned from UInnerItem::PhysicItem.
Item widget and InnerItem preserve in it, and you could retrieve them again.
If you want to create own thrown away functional, you could override UMetaInventoryHolder::HandleDrop function in new subclass of UMetaInventoryHolder, and set this class in player's InventoryComponent
Every time when you add item in component, its call UInventoryComponent::SetContextMenu. Open existing InvenoryComponentBP and look at this function. It contain bunch of prebuilded context menu entries with defined behavior. Or you could create blueprint class based on InvenoryComponentBP and override this function on your own. You could set your own context menu entry. In function UInventoryComponent::SetContextMenu call UInnerItem::AddMenuItem, then create struct FMenuItem.
This struct has two field:
Name : Name of this context menu entry.
Delegate : Delegate that fired on click. Bind events to delegate and set any behavior you want.
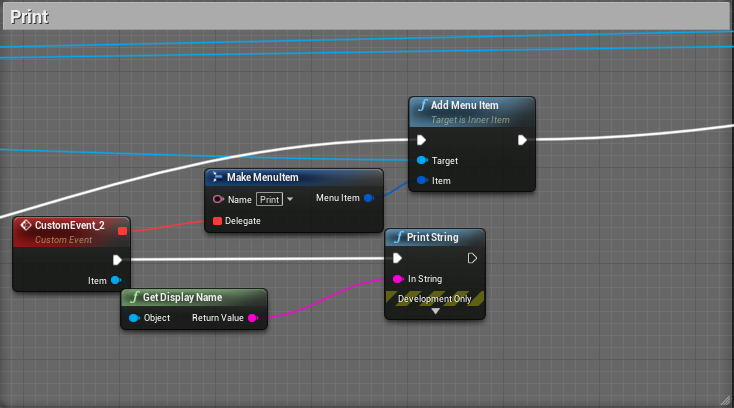
Very simple example, just print Item name
So, when player click on Item widget with mouse button, defined in widget, new widget with type UContextMenuWidget, defined in the inventory component created. This widget filled with widgets of subclass UContextMenuEntryWidget. Concrete class also defined in inventory component. When player click some entry, entire widget destoyed, and fire delegate defined for this entry in function UInventoryComponent::SetContextMenu.
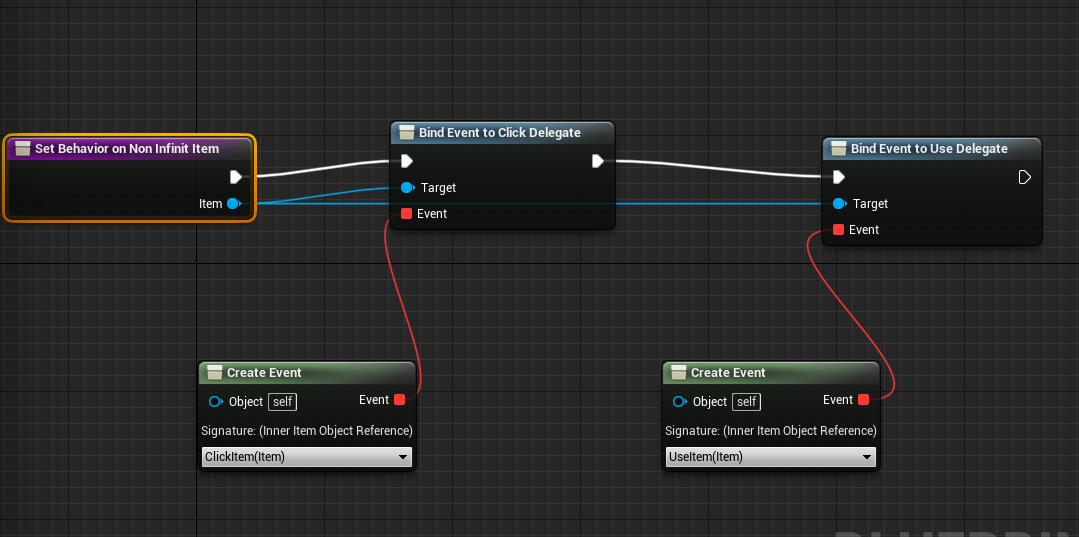
You could also set custom behavior when the player clicks an item.
InnerItem has two delegates. When you click item widget, InnerItem broadcast ClickDelegate. You could bind Use function, or set your own behavior, if you want to. When InnerItem calls Use function, its fire UseDelegate.
So, if you want set consumable item, bind some function to ClickDelegate. In this function, call function Use. Also bind some function to UseDelegate. In this function, call UInnerItem::AddToStack,pass there -1. After that, call UInnerItem::DeleteIfUsed. This function check if StackSize == 0, and delete item if true.


Example setup of consumable items
If you want an infinite item, don't decrement StackSize. If you want an item that is not a usable item, i.e. craft component, just leave it alone.
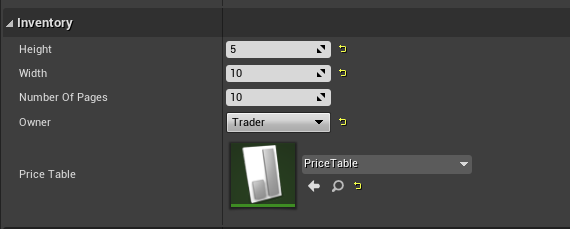
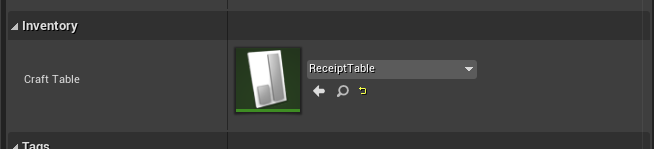
Create NPC, add NPC Inventory Component BP to it. Then, set it as InventoryComponent, it's described above. This component miss some parameters, and add only two own different parameter, Owner and PriceTable.
Setup for NPC inventory component of trading npc
OwnerEnum : Its description, are you own items of this component.
- Me : you own all items in this component. Set it when you loot something.
- Trader : you don't own these items. If you drop it on your inventory widget, the price of this item will be retrieved from your inventory.
PriceTable : Data table created from FItemPrice struct. Describe all prices for items. If a trading item is not present in the table, its return to trader inventory.
- FItemPrice struct description:
- Item : Item, which cost we describe.
- Cost : Cost, constist from two fields, cost int32 number of item and value, in which items we measure cost.

In this row we set Blue Potion Item price to 10 Gold
So, when we try to drop item from trading inventory, its check price table for proper record and extact items, set in value field, in quantity Cost stacksize of items. Or we can drop items to trading inventory, then cost will be retrieved from trading inventory and added to player inventory.
Then call UNPCInventoryComponent::AddInnerItem. Its same as InventoryComponent function, but you didn't provide a player controller parameter.
We add one Red Potion Item to trader inventory
And, communicate with NPC somehow, for example by calling SphereTraceByChannel, retrieve NPC Inventory Component BP calling GetComponentByClass, and call RegisterAnother function. MetaInventory is come from NPC Inventory Component BP, widget is a widget where you want to display npc's items. Item widget and context menu widgets would be taken from InventoryComponent of player character. Don't forget to unregister widget later. This topic described in Register Inner Inventories to widgets paragraph.
At first, create data table from FReceiptStruct. Its structure describes any receipt you will create.
- Result : what and how many we get.
- Costs : what and how much we spent.

Simple Receipt. One Green component and one Yellow component give as one Red component
Then, place CraftWidgetBP, or use predefined from HUDBP, or use your own. Don't forget to register it! Then, add CraftComponent to your playable character. Set the receipt table in it.
Craft component setup
Bind some key to as craft key, and on first pressing call UCraftComponent::Register function, and on second UCraftComponent::Unregister. Also you could show\hide player inventory widget.
 Setup of craft system
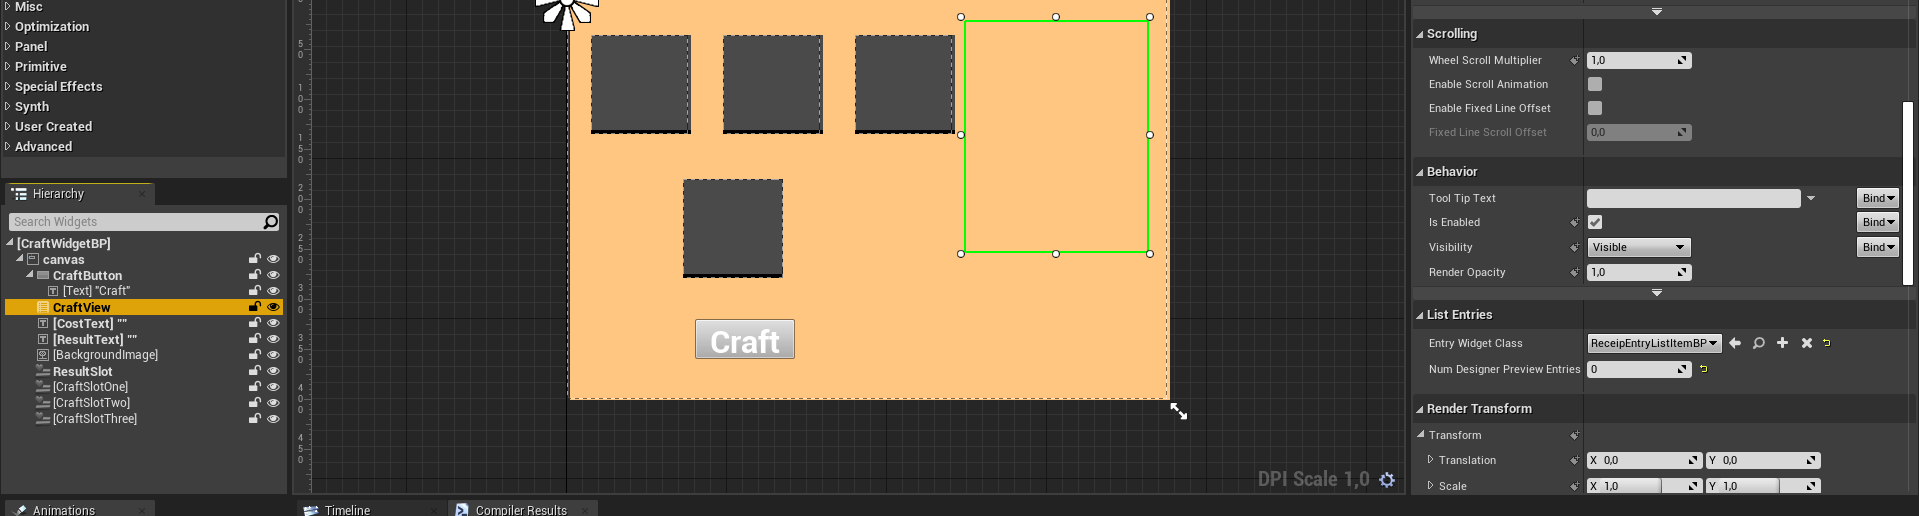
Inherit CraftWidget, and bind all necessary subwidgets.
- CraftView : View to display all available receipts from the receipt table. You should set EntryWidgetClass field of CraftView variable as ReceiptEntryListItemBP, or provide own subclass of UReceipEntryListItem.
ReceiptEntryListItemBP is a simple widget that allows the player to choose what receipt craft widget will craft.
2. Cost Text : What we need. Here the string will be represented like "1 green component + 1 yellow component". This string use for display ShortName field of item from receipt.
3. Result Text : What we receive. This string use for display ShortName field of item from receipt.
4. Result Slot : fast slot, supposed to hold a new created item.
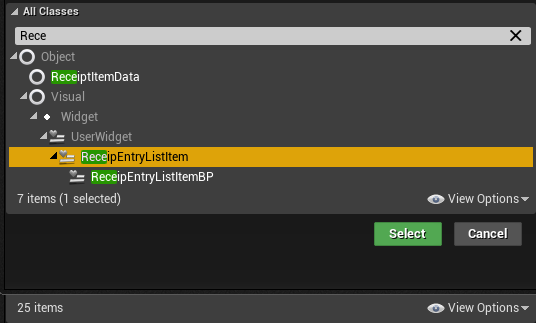
Inherit UReceiptEntryListItem
There is not any bind widget, but possible you need some, for example TextBlock to represent receipt, and button to trigger UCraftWidget::SetReceipt function.
Override Event on List Item Object Set. You will receive UReceiptItemData in it. This is simple class that contains next fields:
- FCostItem Result, represent result of the crafting
- UReceiptItemData::Costs, array, containg amount of consumables that will be spent during crafting.
- UReceiptItemData::CraftWidget : pointer to craft widget.
So, you could break Result struct, retrive class from it, call util function Get Short Name From Class, that extract short name from class, and put extracted value to create before text.
Also, you should somehow trigger function UCraftWidget::SetReceipt, for example, on buttons pressed.
 Example setup.
Craft widget should have several FastSlotWidgetBP widgets to drop your consumables.
Then, when all set properly, place button that trigger crafting and bind Craft function on it.
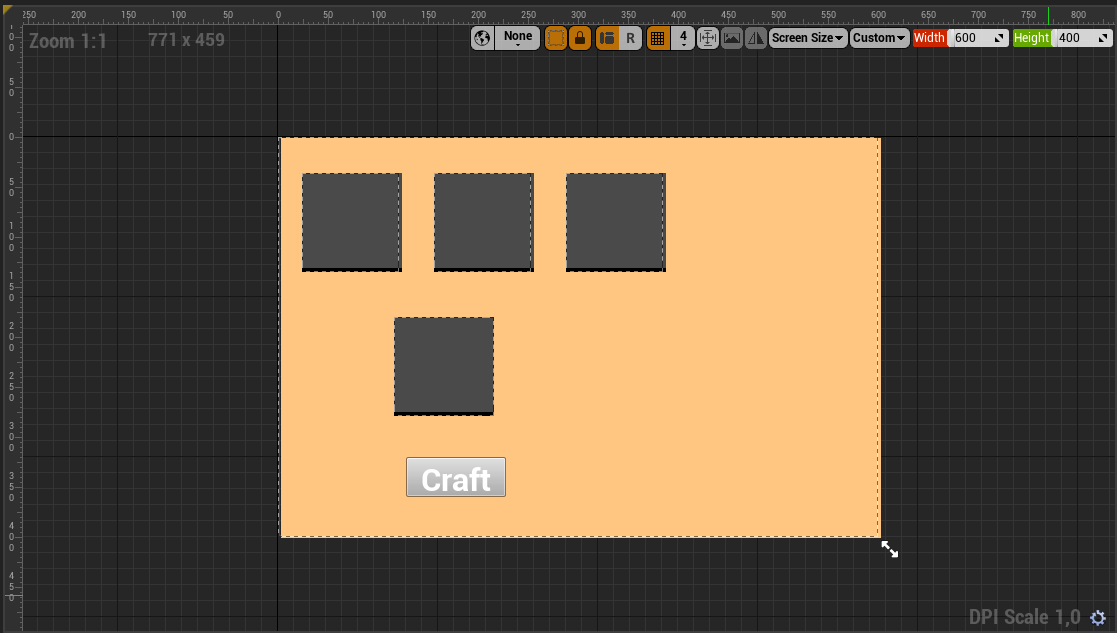

Example craft widget
Than, when craft button will pressed and if any receipt was chosen by calling UCraftWidget::SetReceipt, Craft Delegate of Craft Component will be broadcasted. If the receipt was not set, nothing will happen. Bind some event to it, in this event add Item to your inventory by calling UInventoryComponent::AddInnerItem and drop result item to ResultSlot
 Craft complete behavior
Drop fast slot widget to your main widget of HUD type, set FastKey variable, and register it as described above.
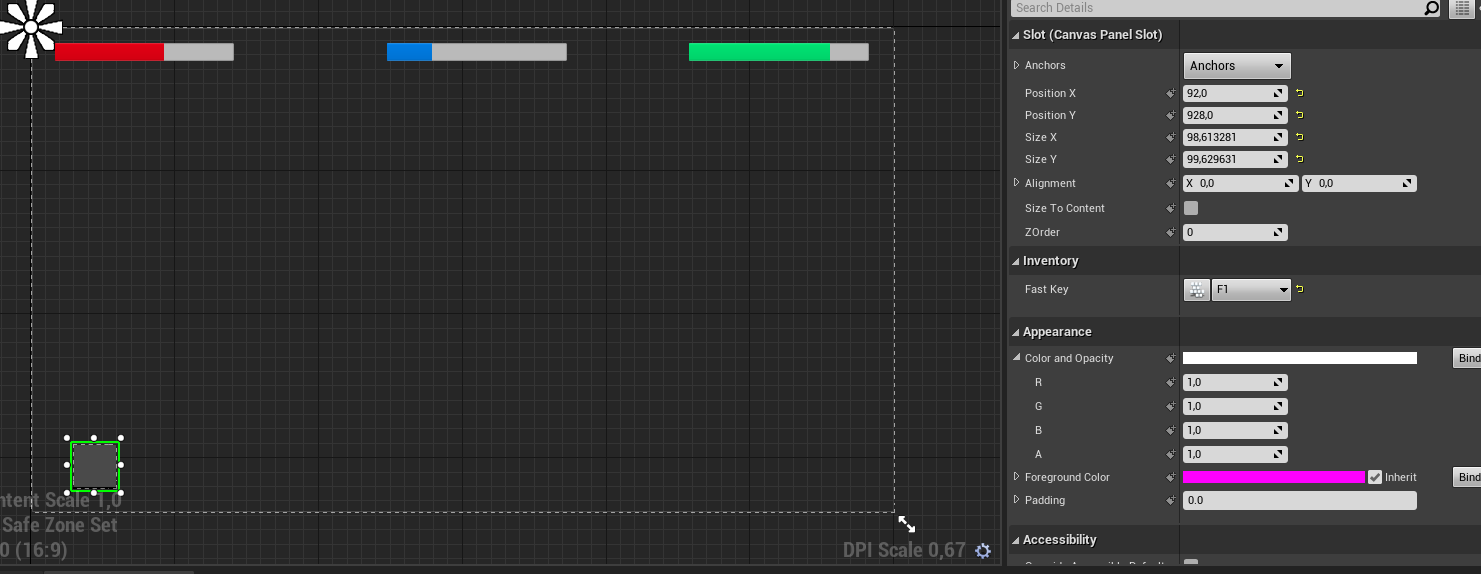
Single fast slot with bounded F1 key
Its designed as Item widget, except functions didn't take offset as parameter, and proxies all events, such as Click or Context Menu, to item in it. So, if you click on a fast slot, and there is an item in it, it runs click behavior, if it has one.

Sample Fast Slot setup
For some reason, you can not call DetectDragIfPressed, and create nondraggable fast slot, for example, for some kind of spellbook widget.
Fast Slot has a hot key variable. Translate event about any key pressed into InventoryComponent and, if the fast slot is properly registered, it will behave as if someone clicked it.
Doll Pawn Widget : widget with several DollFastSlotBP widgets. Doll Fast slot have field AsseptableType that shows what kind of item you could drop. Solution have three prebuild types : Left hand item, Right hand item, and Common Item. Every fast slot of type DollFastSlotBP have DollDropDelegate, that provide Name and PhysicsItem. Name is name of Socket where you bind item to, and Physics Item is subclass of ADroppableActor. Instance actor, build it to socket and remove it on RemoveDelegate. If you want to create own DollBP, don't forget to call UDollWidget::Init function. This function observe all fast slots and registers them in the widget.


Spellbook Widget : widget with nondraggable fast slot. Once you create an item, thats represents any spell, drop it into the slot, and, whem you click this slot, the spell will be casted.
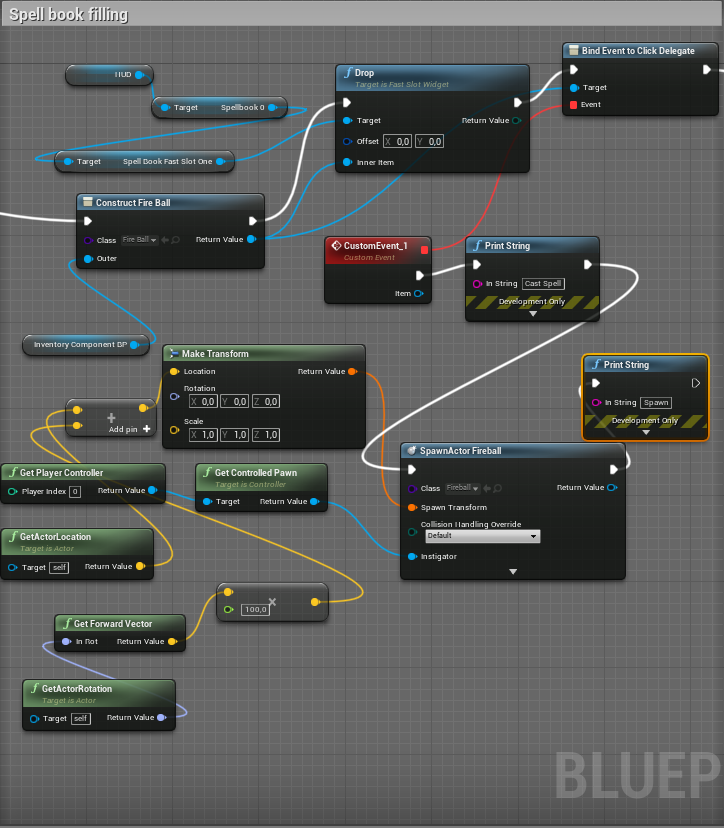
Create Item, drop it in slot and set click behavior
Extend DroppableWidget class, and override overridable functions.
UDroppableWidget::Drop : function called when a player drops an item to a widget. Offset is mouse cursor offset from this widget origin, InnerItem is dropeed Item. Return AddState
Add : Item succesfully dropped.
Not_add : Could not drop the item, the item should return to this place.
Stack : item stacked with other item.
UDroppableWidget::CheckIfInDropArea - calculate if the item in the drop area. Offset is widget offset, MousePosition is mouse position on viewport.
UDroppableWidget::MouseMove - call every time mouse move in widget, if UDroppableWidget::CheckIfInDropArea return true. Offset is widget offset, MousePosition is mouse position on viewport, InnerItem* is dropped Item.
UDroppableWidget::MouseLeave - call when mouse move outside widget, i.e UDroppableWidget::CheckIfInDropArea return false.
Cast Actor to Droppable Actor. Then check what kind of source it has. If it has a blueprint source, just create a new item as we did before. If not, that means we just throw this item away. Call UInventoryComponent::PickUp. This function adds already created items to inventory. Its supposed item was just dropped, i.e. its already bound to inventory.
 Example Setup
Solution provide simple description widget : DescriptionWidgetBP.
Create it, set text from your InnerItem, and add it to the viewport.

Setup Context Menu entry for description
Plugin have prebuild split widget.
Its has text input where the player should provide a number, how many we will split, and a button that starts the split process. For example, we will call this widget from the context menu.
Create this widget, add it to viewport, set description text, and bind event to SplitDelegate.
It will fire on the button pressed. Pass new Item in function UInventoryComponent::AddInnerItemObject. This function binds already created item to component. Split only happens when provided number less than InnerItem StackSize
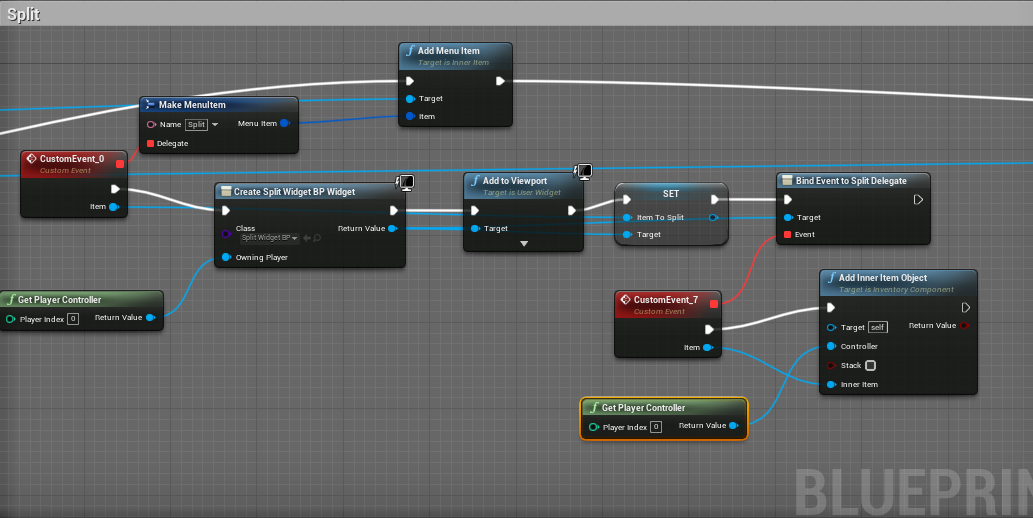
Example setup Context Menu entry for split
Yes. Create and set up a Split Widget. When you interact with NPC trader,
get from trader NPCInventoryComponentBP and pass it to TraderComponent variable of InventoryComponentBP. Then, when SplitDelegate fired, add created item in trader component by calling UNPCInventoryComponent::AddItemObject. Than, call function UInventoryComponent::Trade. Function returns true, if trading performed successfully, and false, if no. If false, return splitted number to the original item.

Trading setup
Just call function UInnerItem::Delete
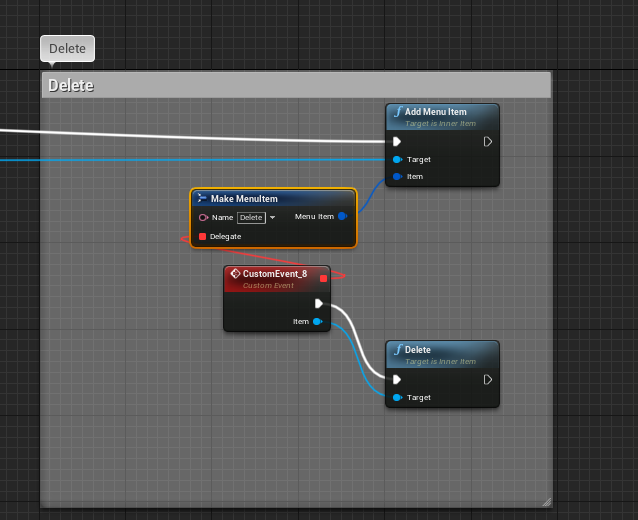
Deleting item
InnerItem have functions UInnerItem::Disable, UInnerItem::Enable.
Disable function set DisabledImage in Item widget. Enable function restore image.

Example behavior on throw away infinity item