Adding Bloom as a new post-processing effect for appleseed

Hey everyone! For the past 1~2 months I've been working on adding new post-processing stages to appleseed, as part of Google Summer of Code 2020.
Currently, a Vignette effect has already been merged, and Bloom is on the way to be included 🥳. Here's somewhat of an overview of its inner-workings...
Since this is a post-processing step, we already have the final image rendered, and work on top of it. Basically, bright pixels of the image are extracted and blurred, then blended back in, creating the effect of light extending from the brightest areas.
Usually, you'd use a (large) Gaussian filter for blurring. However, even though Gaussians are separable (i.e. we can execute them in O(n) instead of O(n^2)), the filter size needs to be very large for a visually pleasing effect, making it quite slow. Because of this, other methods are used to approximate the same result.
Most commonly, a smaller filter will be applied in multiple passes, alongside iteratively downsampling followed by upsampling of the original image, to decrease the computational cost of blurring.

Thus, the implemented algorithm consists of four main steps:
Prefiltering: A copy of the final image is created from a bright-pass filter (i.e. pixels darker than a given threshold are set to black, not to contribute to the final effect when compositing).
Our aim now is to blur this prefiltered image so that we can blend it with the original one. to obtain the bloom effect.
While one way to achieve blurring is by using a classic low-pass filter (e.g. Box blur, Gaussian blur), we can also do it by downscaling and then upscaling an image. However, this has the downsided that we will need "better filters" for scaling the images than we otherwise would if we operated on images with the source dimensions, as a simple Box Filter would lead to blocky artifacts when resampling.
Because of this, we have a trade-off between:
- Using small blurring filters – hence doing less pixel fetches, and so, spending less time on each convolution – but spending more time on each image as they are all "big"
- Using iteratively downscaled (and upscaled) images to have effectively less pixels to work with, but needing to use larger sampling filters for scaling without losing visual quality
Thus, the trade-off is basically: have more pixels but do less work per pixel vs. have less pixels but do more work per pixel (which in the end translates to a computation time trade-off). The implementation for appleseed uses the latter approach, more about it below 🙂:
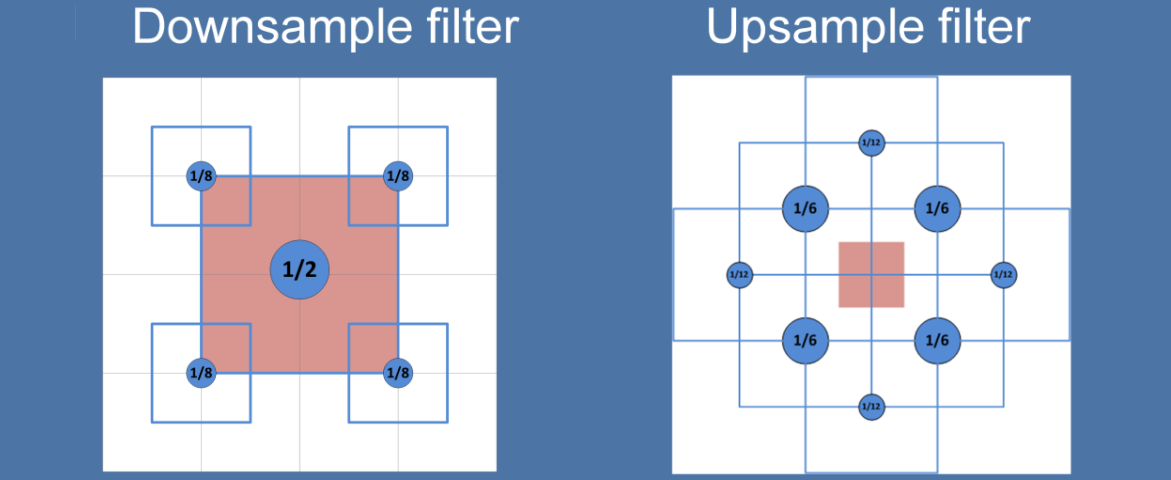
Downsampling: Both Unity and Blender's EEVEE use a 13-tap sampling filter (i.e. each pixel of the downsampled image is computed from 13 (bilinear) fetches) from a SIGGRAPH 2014 presentation by Jorge Jimenez, which focuses on temporal stability. Since we don't expect the post-processing effects to be used on animations, this isn't a big issue.
Hence, we use a slight modification of the "Dual filtering" method presented by Marius Bjørge at SIGGRAPH 2015, as it does less fetches and its results are pretty similar.
Upsampling + blending: Once again, Unity and EEVEE use the same 3x3 filter (also showcased in Jimenez's presentation). However, because we've decided to use "Dual filtering" – whose name comes from the fact that it uses different filtering kernels for the downsample and upsample passes – it didn't really make sense to use a filter other than its upsampling one. Also, the upsample filter perfoms 8-taps, instead of 9.
In addition to upsampling, each step also blends the resulting image with the downsampling of corresponding level (so that their dimensions match) for the light intensity to radially fall off. Note that, because of this, we have to keep two "image pyramids" (i.e. if we didn't blend them we could keep a single pyramid, reusing the images allocated for downsampling when we reached the upsampling stage).
Final compositing: Finally, the lastly blurred image is (upsampled and) blended with the original render, weighted by an intensity factor.
One of the biggest differences between the way bloom is implemented, compared to others you would see in image manipulation softwares with real-time preview of the effect (or games, for instance), is that it is all done in the CPU. The general algorithm is basically the same (given the trade-offs we can choose from, mentioned above).
What this means is that, most of the "heavy-lifting" is done by the GPU, usually written in GLSL / HLSL – i.e.: downscaling, upscaling and blending (the image processing bits).
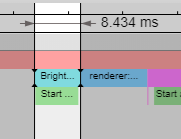
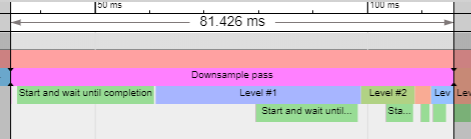
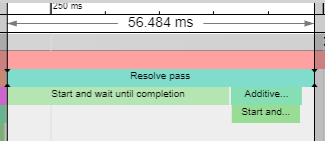
Here's a flame graph for the bloom stage of a 1024×1024 image (its actual content doesn't interfere in speed), using 4 threads on a Core i5-4670K (for more images, scroll to the end 👇):
 * Although the whole algorithm can't be executed in parallel, we can split it into parts that can (in the same way that would be necessary if we had mixed GLSL in). Thus, we create a job for applying these parts to each tile of the image (usually a 32×32 region), and run them in the available threads. That's what "Start and wait untill completion" is measuring.
In the image above, we have labeled:
- 1. The Prefiltering step, where we filter out dark pixels;
- 2. Creation of the two image pyramids in advance (instead of "just in time" for us to use them), based on the number of iterations set for blurring;
- 3. The Downsampling step.
- 4. The Upsampling + blending step.
- 5. Upscaling of the largest image in the upsampling buffer (by a factor of 2) to the dimension of the original image, in the Final compositing step.
- 6. Conclusion of the Final compositing step, by compositing the original image with the ultimate blurring of its prefiltering (as shown in the first image of this post ☝).
The main bottle-neck seems to be the sheer amount of pixels used for computing each down/up sampling value, as the following tests showed no noticible time improvements: performing a first downscale of the original image and only then doing 1.; merging the upsampling and blending parts of 4. into a single job; similarly, merging 5. and 6..
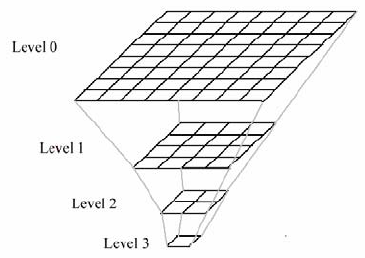
As noted, we are using a modified version of Bjørge's filters, as the original implementation (image below) showed visual artifacts. Namely, its upsample filter uses 4 "center" samples – which get a single pixel each – and 4 "corner samples" to use the GPU's hardware interpolation to get information from the four neighboring pixels. The former ones have been altered so that they are all sampling from the four nearest pixels.
One thing to note is that bilinear fetches are essentially free on the GPU, but they have to be implemented by hand on the CPU, making each sample point in the images above equivalent to four single-pixel fetches.
Thus, while there's still room for improvement in optimizing the algorithm's implementation, by simply using the GPU to leverage bilinear fetches we should already see a big speed boost difference.
If you are interested in digging further into the implementation, here it is: github.com/appleseedhq/appleseed/pull/2875 😉
P.S.: I'd love to hear feedback! And share your results if you try any of the effects 🤩
P.S. 2: Also, if you notice any mistakes (or have any improvement suggestions) be sure to ping me with a message 😅
It is really interesting to investigate the breadth of implementation options there are for implementing Bloom, and how many different tricks are involved in optimizing it, specially when you consider games nowadays have to run at 4K with over 200 FPS and use it.
If you are interested in reading more about this, these were my main references:
- http://developer.amd.com/wordpress/media/2012/10/Oat-ScenePostprocessing.pdf
- https://software.intel.com/content/www/us/en/develop/blogs/an-investigation-of-fast-real-time-gpu-based-image-blur-algorithms.html
- https://community.arm.com/cfs-file/__key/communityserver-blogs-components-weblogfiles/00-00-00-20-66/siggraph2015_2D00_mmg_2D00_marius_2D00_notes.pdf
- http://advances.realtimerendering.com/s2014/#_NEXT_GENERATION_POST
- https://catlikecoding.com/unity/tutorials/advanced-rendering/bloom/
- https://kalogirou.net/2006/05/20/how-to-do-good-bloom-for-hdr-rendering/
- https://www.iquilezles.org/www/articles/hwinterpolation/hwinterpolation.htm
- http://rastergrid.com/blog/2010/09/efficient-gaussian-blur-with-linear-sampling/
- https://uploadcare.com/blog/how-to-accelerate-image-resizing-without-screwing-up/
To better visualize the flame graph, simply download flamegraph.json (attached below) and open it inside of chrome://tracing, in Google Chrome.
Obs.: If you want to reproduce my results, my fork of appleseed has a bloom/perf branch that is already set up for outputting this file.
Simply build it and run appleseed.cli with the following commands, inside of path/to/appleseed/sandbox/tests/test scenes/bloom:
--resolution 1024 1024 --threads 4 --output out.png "09 - railings.appleseed".