
When applications are running in production, they become black boxes that need to be traced and monitored. One of the simplest, yet main, ways to do so is logging. Logging allows us - at the time we develop our software - to instruct the program to emit information while the system is running that will be useful for us and our sysadmins.
There is no worse situation than trying to figure out why an application is not working without having any information about what is going on inside it. Sometimes, it is not even possible to know whether the system is working as designed at all.
The same way we document code for future developers, we should be mindful and instruct the software we are building to generate adequate logs for developers and sysadmins. Logs are a critical part of the system "documentation" about the runtime status of an application. When instrumenting your software with logs, think about it as writing documentation for developers and sysadmins who will maintain the system in the future.
Some purists argue that a disciplined developer who uses logging and testing, should hardly need an interactive debugger. If we cannot reason about our application at development time with verbose logging, it will be even harder to do it when our code is running in production.
This article aims to take the reader through the logging module of Python, its design, and examples on how to adapt it for more complex use cases.
As a disclaimer, this writing should not to be used as documentation for developers, but as a story or guide to help understand how the Python logging module is built in order to encourage those curious enough to delve into its official documentation and how-to guide.
Why not use simple print statements, a developer might argue.
The logging module offers multiple benefits, including:
- Multi-threading support
- Categorization via different levels of logging
- Flexibility and configurability
- Separation of the
howfrom thewhat
This last point, the actual separation of the 'what' we log from the 'how' we log enables the collaboration between different parts of the software. As an example, it allows the developer of a framework or library to add logs and let the sysadmin or person in charge of the runtime configuration decide what should be logged at a later point. We will see more on this later in the article.
The logging module beautifully separates the responsibility of each of its parts (following the approach of the Apache log4j API). Lets see how a log line travels around the code of this module and explore the different parts of it.
Loggers are the objects a developer usually interacts with. They are the main API that we use to indicate 'what' we want to log.
Given an instance of a Logger, we can categorize and ask for messages to be emitted
without worrying about how or where it will be emitted.
Therefore, when we write logger.info("Stock was sold at %s", price) we have
the following model in mind:

We request a line and we assume some code is executed in the logger that makes that line appear in the console/file. But what is actually happening inside?
Log records are packages that the logging module uses to pass all required information around. They contain information about the function where the log was requested, the string that was passed, arguments, call stack information, etc.
These are the objects that are actually being logged. Every time we invoke our loggers, we are creating instances of these objects. But how do objects like these get serialized into a stream? Via handlers!
Handlers are what emit the log records into any output. They take log records and handle them in function of what they were built for.
As an example, a FileHandler will take a log record and append it to a file.
The standard logging module already comes with multiple built-in handlers like:
- Multiple file handlers (TimeRotated, SizeRotated, Watched) that can write to files
- StreamHandler can target a stream like stdout or stderr
- SMTPHandler allows us to send log records via email
- With SocketHandler, we can send LogRecords to a streaming socket
- Others like SyslogHandler, NTEventHandler, HTTPHandler or MemoryHandler
With this in mind, we have now a that's model closer to reality:

But most handlers work with simple strings (SMTPHandler, FileHandler, etc.), so the reader might be wondering how those structured LogRecords are transformed into easy-to-serialize bytes.
Let me present the Formatters! Formatters are in charge of serializing those
metadata rich LogRecords into strings. There is a default formatter if none
is provided.
The generic formatter class provided by the logging library takes a template and style
as input. We can then declare placeholders for all the attributes that a LogRecord object has.
As an example: '%(asctime)s %(levelname)s %(name)s: %(message)s' will generate
logs like 2017-07-19 15:31:13,942 INFO parent.child: Hello EuroPython
Note that the attribute message is the result of interpolating the log's original template with
the arguments provided. (e.g., for logger.info("Hello %s", "Laszlo") the message will
be "Hello Laszlo").
All default attributes can be found in the logging documentation.
OK, now that we know about formatters, this willl leave the diagram as:

The last objects to mention in our logging toolkit are filters.
Filters allow for finer grain control of which logs should be emitted. Multiple filters can be attached to both loggers and handlers. For a log to be emitted, all filters should allow the record to pass.
Users can declare their own filters as objects using a filter method that takes
a record as input and returns True/False as output.
With this in mind, we can think of the logging workflow as:

At this point, you might be impressed by the amount of complexity and configuration that the module is hiding so nicely for you, but there is even more to talk about.
I am referring to the logger hierarchy. So far, we haven't seen how to create a
logger. We can do it via logging.getLogger(<logger_name>). The string passed
as an argument to getLogger can define a hierarchy by separating the elements
using dots.
As an example, logging.getLogger("parent.child") will create a logger child
with a parent logger named "parent". Loggers are global objects managed by
the logging module, so they can be retrieved conveniently anywhere during our project.
Logger instances are also known as channels. The hierarchy allows the developer to define the channels and the hierarchy between them.
In our diagram, after having passed the log record to all the handlers within
the logger, the handlers of the parents will be called recursively until we reach
the top logger (defined as empty string) or when a logger has configured
propagate = False. We can see it in the updated diagram:

Note, it is not that the parent logger is called: only its handlers. This means that filters and other code in the logger class won't be executed on the parents. This is a common pitfall when adding filters to loggers.
We can see the split in responsibility and how well we can fine-tune log filtering. But there are two other attributes we haven't mentioned yet:
- Loggers can be disabled, thereby not allowing any record to be emitted from them
- Both loggers and handlers can have an effective level configured
As an example, when a logger has configured a level of INFO, only INFO levls and above
will be passed. The same rule applies to handlers.
With all this in mind, the final diagram looks like this:

The reader should now be able to understand the flow diagram in the logging documentation.
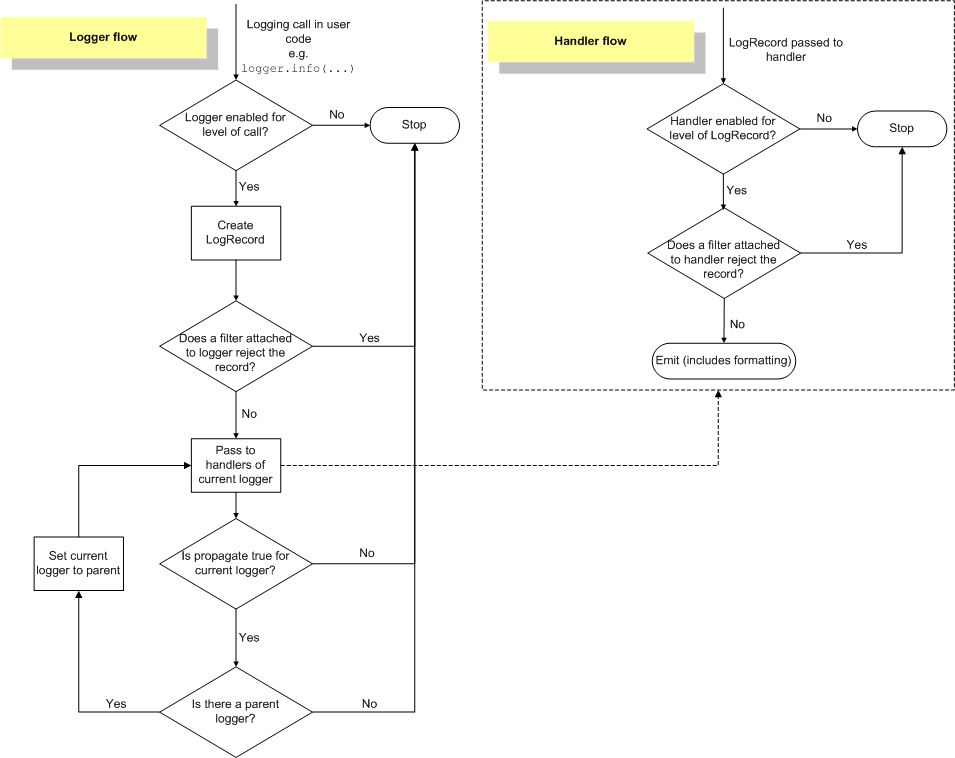
We have now grasped all parts and the design of the logging module, but how does a developer interact with it? Let's see a code example:
import logging

def sample_function(secret_parameter):
    logger = logging.getLogger(__name__)  # __name__=projectA.moduleB
    logger.debug("Going to perform magic with '%s'",  secret_parameter)
    ...
    try:
        result = do_magic(secret_parameter)
    except IndexError:
        logger.exception("OMG it happened again, someone please tell Laszlo")
    except:
        logger.info("Unexpected exception", exc_info=True)
        raise
    else:
        logger.info("Magic with '%s' resulted in '%s'", secret_parameter, result, stack_info=True)
To start with, we can see how a logger is created using the module __name__.
This plays nicely since it will create channels and hierarchies based on
the project structure, as Python modules are concatenated with dots.
Our logger variable references the logger "moduleB", having "projectA" as a parent which has "root" as its parent as well.
On line 5, we see how to perform calls to emit logs. We can use one of the
methods debug, info, error or critical to log using the appropriate level.
When logging a message, besides the template arguments, we can pass keyword
arguments with specific meaning. The most interesting being exc_info
and stack_info. These will add information about the current exception
and the stack frame respectively. For convenience, a method exception is
available in the logger objects, which is the same as calling error with
exc_info=True.
These are the basics about how to use it ʘ‿ʘ. But it is also worth mentioning some usage approaches that are usually considered bad practices:
Using loggger.info("string template {}".format(argument)) should be avoided
whenever possible in favor of logger.info("string template %s", argument). This is
a better practice, as the actual string interpolation will be used only if the log
is going to be emitted. Not doing so can lead to wasted cycles when we are logging
on a level over INFO, as the interpolation will still occur.
Quite often, we want to log information about the exception in a catch block and it might feel intuitive to use:
try:
    ...
except Exception as error:
    logger.info("Something bad happened: %s", error)
But that code can give us log lines as Something bad happened: 'secret_key'.
This is not that useful. If we use exc_info as illustrated previously, the following
will be produced:
try:
    ...
except Exception:
    logger.info("Something bad happened", exc_info=True)
Something bad happened
Traceback (most recent call last):
File "sample_project.py", line 10, in code
inner_code()
File "sample_project.py", line 6, in inner_code
x = data["secret_key"]
KeyError: 'secret_key'
This not only contains the exact source of the exception, but also the type.
We saw how easy it is to instrument our software, but we need to configure the logging stack and specify how those records are going to be emitted.
There are multiple ways to configure the logging stack:
This is by far the simplest way to configure logging. By just doing
logging.basicConfig(level="INFO"), this is going to set up a basic StreamHandler
that will log everything on INFO and levels above to console. There are a some arguments
to customize this basic configuration. Some of them are:
| Format | Description | Example |
|---|---|---|
| filename | Specifies that a FileHandler should be created, using the specified filename, rather than a StreamHandler | /var/logs/logs.txt |
| format | Use the specified format string for the handler | "'%(asctime)s %(message)s'" |
| datefmt | Use the specified date/time format | "%H:%M:%S" |
| level | Set the root logger level to the specified level | "INFO" |
This is a simple and practical way to configure small scripts.
Note, basicConfig only works the first time it is called in a runtime.
If you have already configured your root logger, calling basicConfig will have
no effect.
The configuration for all elements and how to connect them can be specified as a dictionary. The dictionary should have different sections for loggers, handlers and formatters, as well as with some basic global parameters.
As an example see:
config = {
    'disable_existing_loggers': False,
    'version': 1,
    'formatters': {
        'short': {
            'format': '%(asctime)s %(levelname)s %(name)s: %(message)s'
        },
    },
    'handlers': {
        'console': {
            'level': 'INFO',
            'formatter': 'short',
            'class': 'logging.StreamHandler',
        },
    },
    'loggers': {
        '': {
            'handlers': ['console'],
            'level': 'ERROR',
        },
        'plugins': {
            'handlers': ['console'],
            'level': 'INFO',
            'propagate': False
        }
    },
}
import logging.config
logging.config.dictConfig(config)
When invoked, dictConfig will disable all existing loggers, unless
'disable_existing_loggers' is set to False. This is usually the
desired behavior, as many modules declare a global logger that will
be instantiated at import time, before dictConfig is called.
You can see the schema that can be used for the dictConfig method here.
Quite often, this configuration is stored in a YAML file and configured from there. Many developers often prefer this over using fileConfig, for it offers better support for customization.
Thanks to the the way it is designed, the logging module is easy to extend. Lets see some examples:
If desired, we can log JSON by creating a custom formatter that transforms the log records into a JSON-encoded string:
import logging
import logging.config
import json
ATTR_TO_JSON = ['created', 'filename', 'funcName', 'levelname', 'lineno', 'module', 'msecs', 'msg', 'name', 'pathname', 'process', 'processName', 'relativeCreated', 'thread', 'threadName']
class JsonFormatter:
    def format(self, record):
        obj = {attr: getattr(record, attr)
                  for attr in ATTR_TO_JSON}
        return json.dumps(obj, indent=4)

handler = logging.StreamHandler()
handler.formatter = JsonFormatter()
logger = logging.getLogger(__name__)
logger.addHandler(handler)
logger.error("Hello")On the formatters, we can specify any attribute that the log record has.
We can inject attributes in multiple ways. In this example we abuse filters to enrich the records.
import logging
import logging.config
GLOBAL_STUFF = 1

class ContextFilter(logging.Filter):
    def filter(self, record):
        global GLOBAL_STUFF
        GLOBAL_STUFF += 1
        record.global_data = GLOBAL_STUFF
        return True

handler = logging.StreamHandler()
handler.formatter = logging.Formatter("%(global_data)s %(message)s")
handler.addFilter(ContextFilter())
logger = logging.getLogger(__name__)
logger.addHandler(handler)

logger.error("Hi1")
logger.error("Hi2")
This effectively adds an attribute to all of the records that go through that logger. The formatter will then include it in the log line.
This impacts all log records in your application, including libraries or other frameworks that you might be using and for which you are emitting logs. It can be used to log things like a unique request ID on all log lines to track requests or to add extra contextual information.
Starting with Python 3.2, you can use the logRecord factory to capture all log record creation and inject extra information.
The extra attribute and the LoggerAdapter class may also be of the interest of the reader.
Sometimes, we wish we could have had access to debug logs when an error happened. This is feasible by creating a buffered handler that will log the last debug messages once an error occurred. See the following code as a non-curated example:
import logging
import logging.handlers

class SmartBufferHandler(logging.handlers.MemoryHandler):
    def __init__(self, num_buffered, *args, **kwargs):
        kwargs["capacity"] = num_buffered + 2  # +2 one for current, one for prepop
        super().__init__(*args, **kwargs)

    def emit(self, record):
        if len(self.buffer) == self.capacity - 1:
            self.buffer.pop(0)
        super().emit(record)

handler = SmartBufferHandler(num_buffered=2, target=logging.StreamHandler(), flushLevel=logging.ERROR)
logger = logging.getLogger(__name__)
logger.setLevel("DEBUG")
logger.addHandler(handler)

logger.error("Hello1")
logger.debug("Hello2")  # This line won't be logged
logger.debug("Hello3")
logger.debug("Hello4")
logger.error("Hello5") # As error will flush the buffered logs, the two last debugs will be loggedThis guide aimed to introduce readers to the flexibility and configurability of the logging library, so that they would appreciate the beauty of how its design splits concerns, and to give them a solid foundation to be able to follow the logging documentation and the how-to guide.
Check how to configure logging in a library from "The Hitchhiker's Guide to Python".
The effective level of the logger will then be defined recursively by its parents.
Formatters are the answer! You need to set the converter attribute of your
formatter to generate UTC times. Use converter = time.gmtime