This guide uses the one-click-masternode setup feature. This is an optional feature for those that wish to have a more hands-off experience with the setup of their masternode. This Poseidon feature automatically configures your CentOS7 linux server to be a Pirl Masternode. Updates will be applied automatically. All you have to do is monitor your server to ensure it stays operational. This is as simple as rebooting the server, should it go offline. Manual installation instructions are also provided for those that want a bit more control of the system.
- a VPS with minimum 4GB RAM and enough storage to run the masternode (minimum 20GB, recommended 60GB)
- a JSON wallet address or a hardware wallet compatible with https://wallet.pirl.io. You may import your JSON wallet from Nautilus if you so choose.
- a Poseidon account on https://poseidon.pirl.io
- 20001 Pirl available in your wallet.
Go to the web wallet and choose the "Send Ether & Tokens" tab.

Send a small amount of Pirl from your wallet account that holds 20001 Pirl to your Poseidon address. My screenshots show that I sent 0.1 Pirl, although officially, 0.5 Pirl is recommended. Any small amount should do. Save the Tx hash - you will need this later.
CAUTION: Users have confused the Tx hash with the block hash in the past. The block hash will not work - you must get the transaction hash!

Go to the web wallet and choose the "Contracts" tab.

From the "Select Existing Contract" drop-down box, select "Masternode Administration"

You should see the ABI / JSON Interface populate.

Click the "Access" button, then "Read / Write Contract" will come up.

Select "nodeRegistration" from the "Select a function" drop-down box.

Choose the method in which you will access your wallet.

Select the wallet address that contains your stake, and click the "Unlock your Wallet" button.

A message should quickly flash on the bottom of the screen, saying "Wallet successfully decrypted". Don't worry if you miss the message - it's just a confirmation, and it doesn't show you any new information.
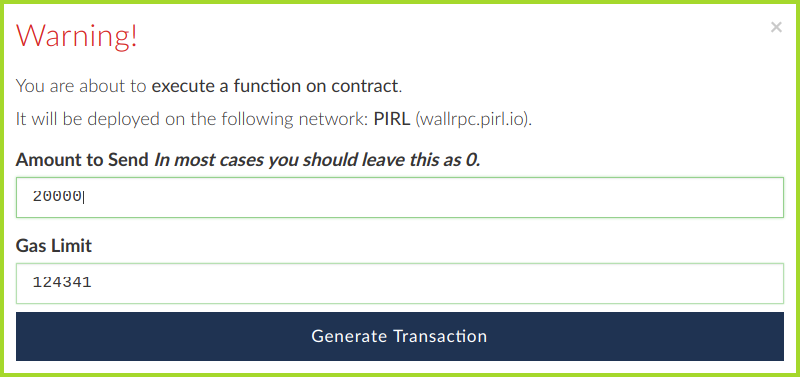
To send 20000 Pirl to the masternode smart contract, click the "WRITE" button.

The "execute function on contract" dialog box will appear. Fill in your stake amount (20000) and make sure the Gas Limit is high enough, then click "Generate Transaction"
Confirm the transaction on your hardware wallet

Click "Yes, I am sure! Make transaction."

Notice the transaction flash on the bottom. Don't worry if you miss it - you don't need to capture any of this information

Go back to Poseidon and choose "Masternodes" from the left menu, then "Create masternode".

Name the masternode whatever you like. The wallet ID must match the wallet address you used for your stake.
Enter the saved Tx hash from earlier in the box labeled, "Tx hash validation".
You will now see the newly created masternode entry under "My Masternodes".
Before moving forward, you must wait for poseidon to issue a masternode token. If you are using the "One-Click Install" you dont have to wait.
Verify that the server meets the appropriate specifications as noted in the Pirl Masternode Setup Tutorial
The server must run the CentOS 7 Linux distribution if you plan to use the "One-Click Masternode Setup".
Record of the static public IP address of the server as well as the root password. We do recommend logging into that server once to ensure the root credentials work. It is not necessary to take any other actions on the server after that. In fact, it's preferred that you don't make any other adjustments, at all.
Now proceed to either the "One-Click Masternode Setup" or the "Manual Masternode Setup". (One-Click is recommended)
Ensure that you know the public static IP address and root credentials before proceeding.
Login to Poseidon. On the left menu, choose Masternodes -> My Masternodes. You should see the following:

Click the "One-Click MN Setup" button and complete all fields.

After returning to the "My Masternodes" screen, observe that the masternode's "Managed by Poseidon" field is set to True

Please allow 30 minutes for the process to complete. You may click the "details" button to monitor the status.
-or-
If you prefer a manual setup rather than using the "One-Click MN Setup" Guide, follow the next steps.
Login as root and update the system, then install dependencies:
yum update
sudo yum install wget systemd -y
Set up firewall rules:
firewall-cmd --zone=public --add-port=22/tcp --permanent
firewall-cmd --zone=public --add-port=30303/tcp --permanent
firewall-cmd --zone=public --add-port=30303/udp --permanent
firewall-cmd  --reload
Create a pirl user and add it to the systemd-journal group:
adduser pirl && passwd pirl
usermod -aG systemd-journal pirl
Download the masternode binary:
wget http://release.pirl.io/downloads/masternode/linux/pirl-linux-amd64
Mark it executable, and change its owner to pirl:pirl:
chmod 755 pirl-linux-amd64
chown pirl:pirl pirl-linux-amd64
Move the binary to /usr/sbin/pirl-geth:
mv pirl-linux-amd64 /usr/sbin/pirl-geth
Create a system service file:
vi /etc/systemd/system/pirlnode.service
Press the i button to enter insertion mode, then add the following. Be sure to add your own MASTERNODE and user TOKEN to the Environment under the [Service] section:
[Unit]
Description=Pirl Client -- masternode service
After=network.target

[Service]
Environment=MASTERNODE=YoUR MaSTErNodE ToKEn GoES HeRE
Environment=TOKEN=YoUR UsER ToKEn GoES HeRE

User=pirl
Group=pirl
Type=simple
Restart=always
RestartSec=30s
ExecStart=/usr/sbin/pirl-geth

[Install]
WantedBy=default.target
Enable and start the new service:
systemctl enable pirlnode
systemctl restart pirlnode
Watch the masternode process synchronize with the blockchain:
journalctl -f
Once messages like the following are displayed, your masternode is now synchronized and contributing to the network.
######## masternode sending proof of activity for block 2051449 please check poseidon.pirl.io for details #########
We don't encourage active access on the server. If, however, you wish to check the status, log into your server and issue the following command:
journalctl -f
Monitor the status of your masternode by checking the Poseidon Masternode Details page. A functioning node should appear as follows, although the version may be different than what is shown in the screen shot below.

Michael Ira Krufky is a Senior Systems Engineer at Vimeo in New York. He has been an active open source developer for years, contributing to projects such as nodejs/nan, video4linux, linux-dvb, linux-kernel, libdvbpsi and his own digital video capture and streaming middleware solution, dvbtee.
THANK You!