Wave Function Collapse (WFC) by @exutumno is a new algorithm that can generate procedural patterns from a sample image. It's especially exciting for game designers, letting us draw our ideas instead of hand coding them. We'll take a look at the kinds of output WFC can produce and the meaning of the algorithm's parameters. Then we'll walk through setting up WFC in javascript and the Unity game engine.

The traditional approach to this sort of output is to hand code algorithms that generate features, and combine them to alter your game map. For example you could sprinkle some trees at random coordinates, draw roads with a brownian motion, and add rooms with a Binary Space Partition. This is powerful but time consuming, and your original vision can sometimes get lost during the process.
Using WFC (specifically the Overlap model) makes this sort of generation intuitive, you draw an example and get infinite variations of it. There's also an aspect of collaboration with the machine, as the resulting output can be surprising and sometimes lead you to change your design.
WFC is especially exciting for the game jam community, where time is limited. Once you're set up, you'll be able to create a variety of procedural pattern types in minutes.
WFC consists of two parts, an input Model and a constraint Solver.
- The
Simple Tiled Modeluses an xml document which declares legal adjacencies for different tiles. - the
Overlap Modelbreaks an input pattern up into pattern chunks. It's similar to a 2D markov chain.
NOTE: For this tuturial, we'll be focusing on the Overlap Model, as it's easier to create input for.
WFC's special approach to constraint solving is a process of elimination. Each grid location holds an array of booleans for what tiles it can and cannot be. During the observation phase, one tile is selected and given a single random solution from the remaining possibilities. This choice is then propagated throughout the grid, eliminating adjacent possibilities that don't match the input model.
The final feature is backtracking. If an observation & propagation result in an unsolvable contradiction, they're reverted and a different observation is attempted.
NOTE: Oskar Stålberg's interactive web demo is a great way to get a feel for how the algorithm works. It let's you play the part of the observation phase and animates the propagation after you select a grid value.
First task is to find a port of WFC in your language of choice. The original algorithm was written in C#, but there's many implementations in other languages. (If you're interested in porting WFC to a new language and would like a mentor get in touch)
After you've included the WFC code in your project and made sure it compiles, you're ready to test some input. Most WFC versions work with some sort of image format, for both input and output.
The workflow usually consists of:
- constructing a new model instance from input and parameters
- calling
model.Runto solve an output pattern - saving or reading the output image and making use of it
-
name/inputinput data. The type of this parameter is usually implementation specific. For the original algorithm it's a string representing a file name ($"samples/{name}.png") -
width,depth (int)dimensions of the output data -
N (int)represents the width & height of the patterns that the overlap model breaks the input into. As it solves, it attempts to match up these subpatterns with each other. A higher N will capture bigger features of the input, but is computationally more intensive, and may require a larger input sample to achieve reliable solutions. -
periodic input (bool)represents whether the input pattern is tiling. If true, when WFC digests the input into N pattern chunks it will create patterns connecting the right & bottom edges to the left & top. If you use this setting, you'll need to make sure your input "makes sense" accross these edges. -
periodic output (bool)determines if the output solutions are tilable. It's usefull for creating things like tileable textures, but also has a surprising influence on the output. When working with WFC, it's often a good idea to toggle Periodic Output on and off, checking if either setting influences the results in a favorable way. -
symmetry (int)represents which additional symmetries of the input pattern are digested.1is just the original input,2-8adds mirrored and rotated variations. These variations can help flesh out the patterns in your input, but aren't necessary. They also only work with unidirectional tiles, and are undesirable when your final game tiles have direction dependent graphics or functionality. -
ground (int)when not0, this assigns a pattern for the bottom row of the output. It's mainly useful for "vertical" words, where you want a distinct ground and sky separation. The value corresponds to the overlap models internal pattern indexes, so some experimentation is needed to figure out a suitable value.
-
seed (int)all internal random values are derived from this seed, providing0results in a random number. -
limit (int)is how many iterations to run, providing0will run until completion or a contradiction.
Download a copy of wfc.js into your project folder. We're using a modified version of kchapelier's javascript port, which has been edited into a single file to make things a little quicker to set up.
Now create an index.html file like:
<!DOCTYPE html>
<html>
  <head>
    <script src='wfc.js'></script>
    <style>
      canvas{
        border:1px solid black;
        image-rendering: pixelated;}
    </style>
  </head>
  <body>
    <canvas id="output" width="48" height="48"></canvas>
    <script>

    </script>
  </body>
</html>
The js version uses ImageData for input and ouput. We'll start with a function that loads an image element, draws it to a temporary canvas, and extracts the ImageData. Since loading an image source is not instant, we'll use a callback function that is invoked when the data has been loaded.
var img_url_to_data = function(path, callback){
  var img = document.createElement("img")
  img.src = path
  img.onload = function(e){
    console.log(this.width, this.height)
    var c = document.createElement("canvas")
    c.width = this.width
    c.height = this.height
    var ctx = c.getContext("2d")
    ctx.drawImage(this,0,0)
    callback(ctx.getImageData(0,0,this.width,this.height))
  }
}
With an image editor, create a small input image, and save it as test.png in your project directory. A good starting image is something like:

Load your index in a browser, then open the developer console and test the img_url_to_data function:
> img_url_to_data("test.png", console.log)
ImageData {data: Uint8ClampedArray(1024), width: 16, height: 16}
If you'd opened the index.html file directly in your browser, then at this point you'll see an error message like:
index.html:25 Uncaught DOMException: Failed to execute 'getImageData' on 'CanvasRenderingContext2D':
The canvas has been tainted by cross-origin data.
This is because it's a security violation for javascript to have access to resources from outside the same domain. You can get around this problem by either uploading your project somewhere, or running a local server on your computer. With python, this can be as simple as opening a terminal in the project directory and running python3 -m http.server 8999 or python2 -m SimpleHTTPServer 8999. Your can now load your index with the url http://localhost:8999
Now let's feed the ImageData into an OverlappingModel
var start = function(id){
  output = document.getElementById("output")
  ctx = output.getContext("2d")
  imgData = ctx.createImageData(48, 48)
  // input, width, height, N, outputWidth, outputHeight, periodicInput, periodicOutput, symmetry, ground
  model = new OverlappingModel(id.data, id.width, id.height, 2, 48, 48, true, false, 1, 0)
  //seed, limit
  var success = model.generate(Math.random, 0)
  model.graphics(imgData.data)
  ctx.putImageData(imgData, 0, 0)
  console.log(success)
}
Finally, call img_url_to_data with your image url and the start callback:
img_url_to_data("test.png", start)If everything works, you should now see your output drawn to the canvas:

NOTE: Depending on the input pattern, it's possible that WFC will not be able to finish solving an output. In our demo, this will result in a blank canvas, and the success var being false. While you can tweak your input to increase the chances for full solutions, another strategy is to retry the algorithm until it can complete. We can add a feature for this at the end of the start function like so:
if (success == false){start(id)}WFC usually creates some sort of image data type for it's output. This is great for quick inspection or texture generation, but for a game project we usually have a specific data format we like to work with to describe our worlds. Let's try this out for our demo, converting the ImageData into a simple array of arrays, which hold a single number representing their tile type.
First, add this function to get a pixel value from the ImageData:
function get_pixel(imgData, x, y) {
  var index = y*imgData.width+x
  var i = index*4, d = imgData.data
  return [d[i],d[i+1],d[i+2],d[i+3]]
}
Next let's make a lookup table to translate from a color value to a single integer. Because js maps can only have string keys, we'll assume the color array has been joined with ":"
var colormap = {
  "0:0:0:255":1, //black
  "255:255:255:255":0 //white
}
Finally in our start function we construct an array of arrays the same dimensions as our ImageData, pushing the integer code for each pixel:
  if (success == false){
    start(id)
  } else {
    var world = []
    for (var y = 0; y < 48; y++) {
      var row = []
      for (var x = 0; x < 48; x++) {
        var color = get_pixel(imgData, x, y).join(":")
        row.push(colormap[color])
      }
      world.push(row)
    }
    console.log(world)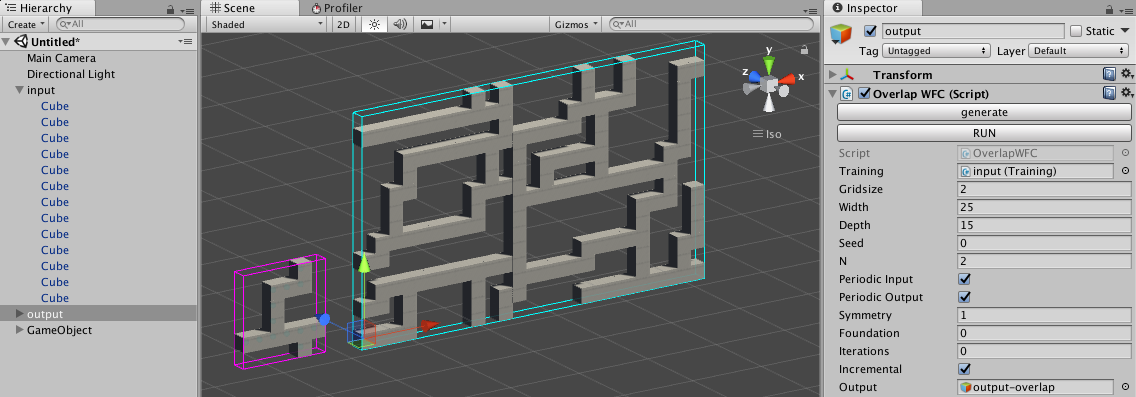
}Let's take a quick look at using WFC with the Unity game engine using unity-wave-function-collapse. Instead of using image files for input and output, it works with arrangements of prefab GameObjects. It's also configured with components, so there's no code required for basic use.
Start a new unity project and either import the .unitypackage or clone the github repository into the Assets directory. We'll also need a Resources directory for our tile objects.
Now we'll need a tileset. For simplicity, we'll just create a cube and drag it into the resources directory to turn it into a prefab. UnityWFC requires that it's tiles have an orientation with vertical Y and horizontal X, so if you're importing 3D assets you may have to reconfigure the mesh export.
Create an empty named input and add a Training component to it. Child prefabs that are placed within the Training bounds will be read by the algorithm. Drag prefabs onto the object on the heirarchy window. Depending on your tile dimensions, you may have to change the Gridsize property on the Training component. You should see a round blue gizmo at the center of every tile within it's bounds.

NOTE: The Tile Painter component can speed up input creation, letting you click and draw tiles from a palette of prefabs. Adding prefabs to it's palette property will display them below the image area, where they can be sampled by clicking them with the S key. You can even drag a folder of prefabs onto it's palette property to load them all at once.
Create an empty named output and add an Overlap WFC component to it. It's Training component should hook up to the input you've created. You can now enter play mode and it will generate output for the given dimensions. You can also click the generate and RUN buttons to see the output in edit mode.
As you start using WFC, you'll start to get a feel for how it transforms input patterns into output. While I encourage you to explore the relation between input and output, there are a few tricks discovered by the community that can give you more control on the results.
In this example, we would like to have mario style coin features, a few tiles above the platforms. Because the spacing is larger than our N setting, all the algorithm knows is that coins are surrounded by empty space, and our output has a random scattering of coins.

Using empty tile variants, we can coerce the desired structure. Viewed through the lense of the overlaps N pattern chunks, the algorithm knows that sometimes variant1 is above a platform tile, variant2 is always above variant1, and a coin is always above variant2.

This trick also works for the general structure of your patterns. If you're designing a dungeon, floor variants can be included to encourage the emergence of larger rooms.
Hey, nice tutorial! What the difference between a 2D markov chain and Wave-Function-Collapse though? I'm not sure I quite understand that bit.