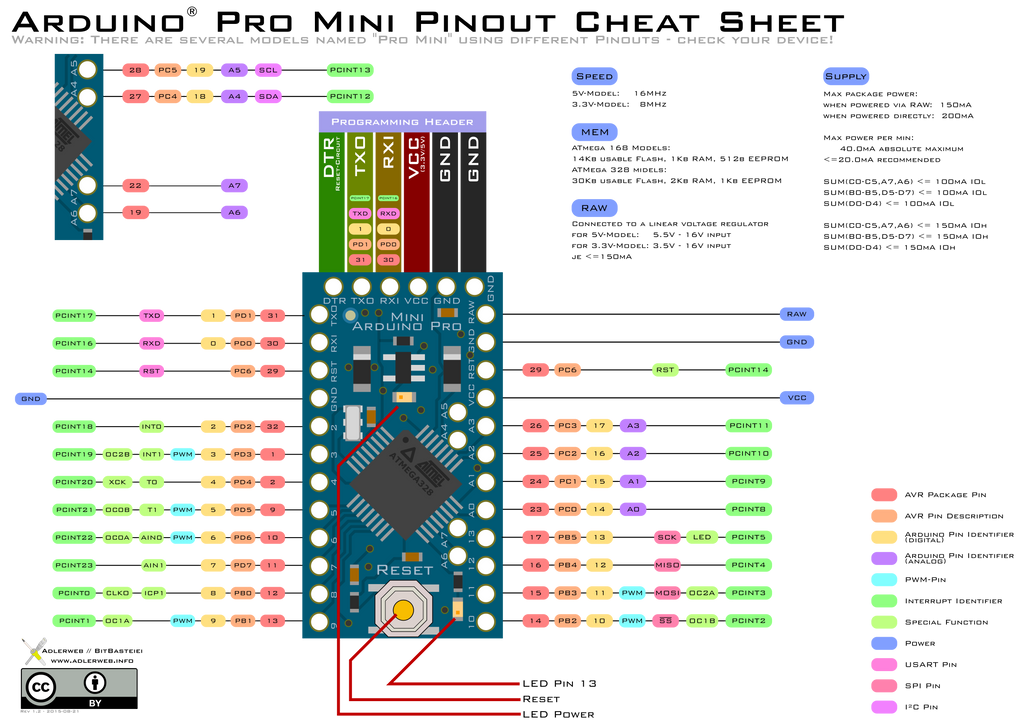
This is Chinese a clone of an Arduino Pro Mini dev board. It uses the 8-bit Atmel AVR ATmega328p microcontroller. Like the STM32 this is a harvard architecture, but it's a much simpler, older and slower microcontroller. It has a 16MHz clock (in this case), 32KB of program memory, 2KB of SRAM and 1KB of EEPROM for persistent storage.
The datasheet is much nicer than the STMicro ones (in my opinion anyway). All of the registers are described fully along with the electrical details in this single datasheet, and it's very well written. Anything you can do with this micro is described in there.
Atmel was founded by some guys who wanted to make microcontrollers easier to use (iirc), and it shows.
This is an Arduino IDE compatible board loaded with the Arudino bootloader that allows programming over serial (USART). Normally this chip needs an AVR ISP external programmer like the STM32's STLink, but this bootloader allows programming without one. This bootloader adds a 1-2 second pause after reset, then your program runs normally.
Since this is an Arduino board, you can generally Google "Arduino [do thing]" and you'll usually find example code, videos, demos etc. It's a very popular platform for people new to hardware, but the editor is pretty limited; it is great to grab examples, test them and fiddle with parameters though.
PlatformIO is an alternative ecosystem which looks like it has nicer tools, or you can just write in plain C or C++ using the AVR headers.
Unlike the STM32 board, the AVR headers can be installed from the package manager along with the toolchain. This should be available in most distros:
# Debian
sudo apt-get install avrdude gcc-avr avr-libc
This is a much simpler device (plus the AVRC library is very good), so blinky is simple:
#include <avr/io.h>
#include <util/delay.h>

int main(void)
{
    // PB5 as output
    DDRB |= (1<<5);

    for (;;) {
        // Toggle the LED pin
        // _BV here is a macro from the AVR library equivalent to (1<<PB5)
        // PB5 is just naming helper defined as 5
        PORTB ^= _BV(PB5);

        _delay_ms(500);
    }
}
Manually building and flashing looks like this:
# Compile
avr-gcc -g -Wall -DF_CPU=16000000 -mmcu=atmega328p -Os -o main.o -c main.c
avr-gcc -g -mmcu=atmega328p -o main.elf main.o
rm -f main.hex
avr-objcopy -j .text -j .data -O ihex main.elf main.hex

# Show used program and RAM (data)
avr-size --format=avr --mcu=atmega328p main.elf

# Disassemble
avr-objdump -d main.elf | less

# Program
avrdude -c arduino -P /dev/ttyUSB0 -b57600 -p atmega328p -U flash:w:main.hex:i
The normal Makefile I use for AVR projects is below. I've set this up to work with the Arudino-style program-over-serial bootloader:
make flash
Here's an example of printing text over the serial port (without printf):
#include <avr/io.h>
#include <avr/interrupt.h>

void init_usart(void)
{
    // Disable interrupts
    cli();

    // Set baud rate to 9600 @ 16MHz clock
    // Based on "Examples of Baud Rate Setting" (page 243 in the datasheet)
    UBRR0H = (uint8_t)(103 >> 8);
    UBRR0L = (uint8_t)(103);

    // Enable receiver and transmitter
    UCSR0B = _BV(RXEN0) | _BV(TXEN0);

    // Set frame format: 8 data, 1 stop bit
    UCSR0C = (3<<UCSZ00);
    UCSR0C &= ~(1<<USBS0);

    // Enable interrupts
    sei();
}

void usart_transmit(uint8_t data)
{
    // Wait for empty transmit buffer
    while ( !( UCSR0A & (1<<UDRE0)) );

    // Put data into buffer, sends the data
    UDR0 = data;
}

uint8_t usart_receive(void)
{
    // Wait for data to be received
    while ( !(UCSR0A & (1<<RXC0)) );

    // Get and return received data from buffer
    return UDR0;
}

void print(char* string)
{
    uint8_t i = 0;
    while (string[i] != '\0') {
        usart_transmit(string[i]);
        ++i;
    }
}

void println(char* string)
{
    print(string);
    usart_transmit('\n');
}

int main(void)
{
    // Select minimal prescaler (max system speed)
    CLKPR = 0x80;
    CLKPR = 0x00;

    init_usart();

    println("Hello world");

    return 0;
}
Under Linux you can use screen or socat (among others) to view the serial port:
socat /dev/ttyUSB0,raw,b9600 stdout