My whole setup is now versioned in a public dotfiles repository. You can either follow this guide and install everything manually, however i do recommend that you fork the repo and tweak with your own preferences.
Instead of using the macOS stock terminal, i prefer to have a more powerful terminal emulator. Below is listed a couple of features that i make daily use of. If you'd like to see the full documentation, refer to https://www.iterm2.com/documentation.html
The default configuration for iTerm is pretty good, but there's a couple caveats i like to tweak myself.
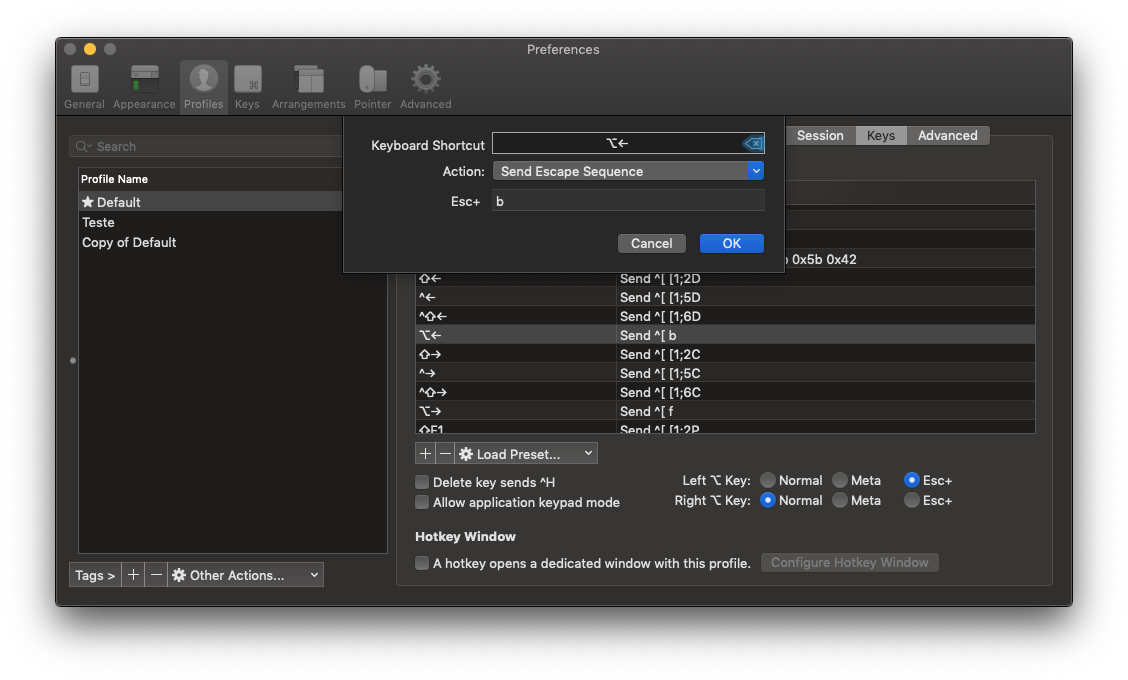
Jumping between words: If you want to jump between words and get faster to the middle of your line, you can use option (⌥) + arrows to quickly reach the middle of a long line of commands.
Go to preferences (⌘ + ,) Profiles and select the 'Keys' tab. Search for ⌥← entry and double click to edit. Select 'Send Escape Sequence' as Action and 'Esc+ b' for left. Repeat the process for right arrow and use 'Esc+f' as escape sequence.
Unlimited Scrollback: It is pretty annoying when you're trying to scroll up to see some message on the logs but the buffer size is too small and already cleaned what you were trying to see. To fix this, i go to preferences (⌘ + ,) Profiles and select the 'Terminal' tab. Just tick the 'Unlimited scrollback' option and we're good to go.

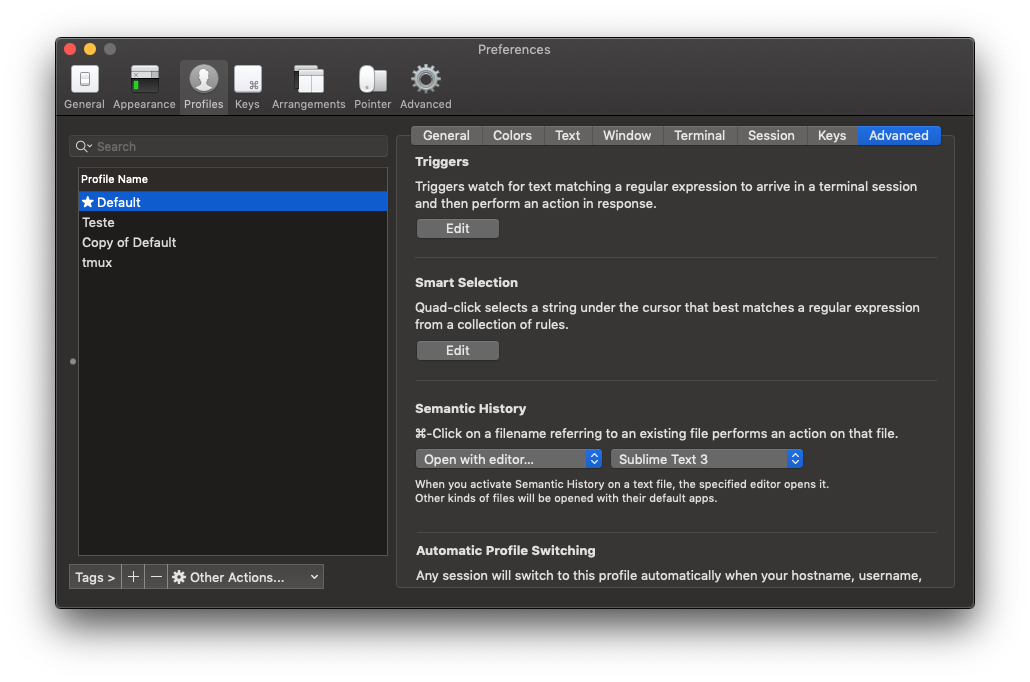
Semantic History This is a really handy feature that allows you to ⌘-Click a file and open with your default text editor, or default application, if any.
You can use: ⌘+D split vertically ⌘+⇧+D split horizontally You can also maximize and minimize your current pane using: ⌘+⏎
Markers Use ⌘+⇧+M to set a marker. This is particularly useful when you have a huge output with errors and you want to run that same command again. Instead of opening another pane and navigating all the way to that directory, you can set a marker, run again, check errors, then move back to you marker and keep fixing them. Use ⌘+⇧+J to go back the marker you have set.
Watchers Watchers are a nice way of being notified when a long script has finished. Set a watch for your current command by pressing ⌘+⌥+A. You'll get a growl notification when a carriage is returned.
Restoring a window arrangement iTerm also offers the possibility of restoring a pane/window layout. In case you work with multiple panes, you can save your session and restore on the next startup by pressing ⌘+R. Save your session layout by pressing ⌘+⇧+S.
You can have multiple arrangements saved and iTerm also saves the current directories you're in.
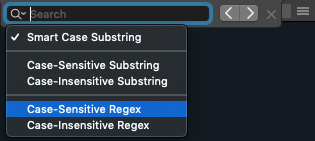
Regex search
By pressing ⌘+F a search menu bar will open. You can click on the magnifying glass icon and select Case-* regex.
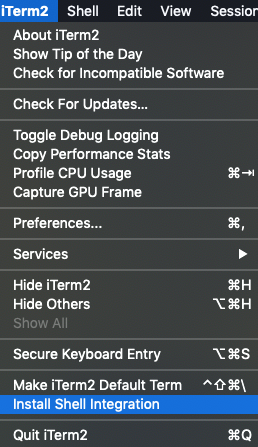
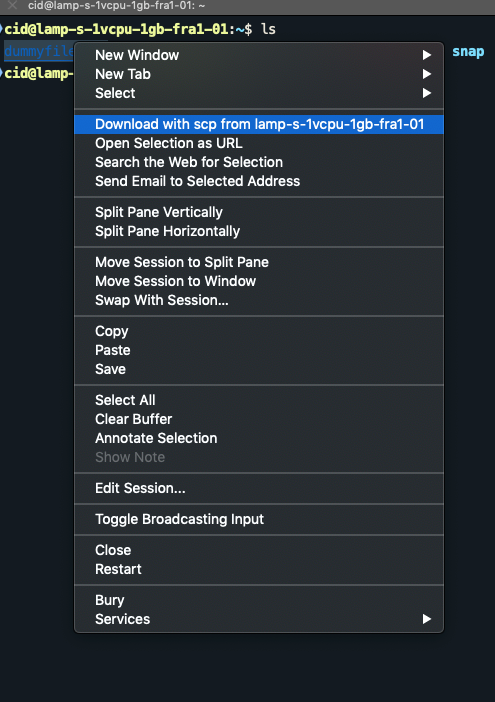
If you'd like to easily download files via SCP from a host machine, you can easily do it by installing the shell integration tools located at:
 You'll need to do so on both machines.
After having the integration installed, reload you shell and you already can use it.
Simply ⌘+Right Click any listed file and you'll see a Download with scp option in the context menu. The files will be at your ~/Downloads directory.
It's also possible to drag and drop files to upload via scp. Simply hold ⌥ key, drag and drop the file into the pane.
More info here: https://www.iterm2.com/documentation-shell-integration.html
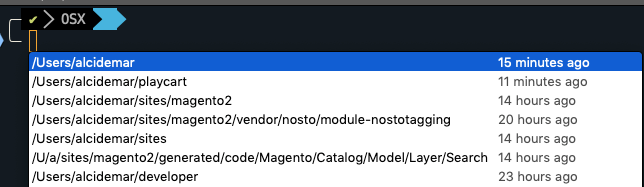
Use ⌘+⌥+/ and a context menu will pop up with your most recent directories.
iTerm2 is tightly integrated with tmux. So if you like to have a single session for all your windows that you can easily detach/restore you can do so by starting tmux with tmux -CC. Or if you're often using SSH, you can restore your session after getting disconnected/changing between networks.
Make sure you have tmux install with brew install tmux
If you'd like to start every SSH connection with a native tmux window, you can use the following alias (kudos to Jani 🤠):
# Use tmux sessions
ssh(){ /usr/bin/ssh -A -t "$@" "tmux -CC attach || tmux -CC";}
Find more information here: https://www.iterm2.com/documentation-tmux-integration.html
If you are not familiar with tmux, refer to this cheatsheet for a concise view of shortcuts:
https://gist.github.com/MohamedAlaa/2961058
If you also like to use the native tmux instead of the integrated one, you may wanna have a look at my tmux.conf file:
https://gist.github.com/supercid/a7c5ff46a1b26ad3ae70eff90f243de5
If you have been using bash, you might wanna try z-shell. It's a modern shell packed with many interesting features that will increase your productivity and overall CLI experience.
z-shell comes by default with macOS, however being an outdated version, it is recommended that you update to at least version 5.
Use brew install zsh to upgrade your zsh, and zsh --version to check your version.
Also make sure to set zsh as your default terminal application by running chsh -s $(which zsh). You can check it by running echo $SHELL. The output should be /bin/zsh.
-
Tab completion and case insensitiveness zsh can autocomplete most commands. Take for instance the common
cdoperation. By pressing tab twice, he'll list all the directories in the current path and you can navigate using the arrows and pressing ⏎. This is also non case-sensitive, so you no longer have to worry about figuring out if the directory is capitalised or not.- Shorthand completion
zsh allows you to type only some chars of the path you need to
cdorls after pressing tab, he will autocomplete the full path

- Shorthand completion
zsh allows you to type only some chars of the path you need to
-
Arrow history with autocomplete
If you only remember the beginning of a command, or if you forgot the parameters, you can start typing and press arrow up to scroll through the history filtering that command.

Also, you may want to read the fzf section of this document //@TODO link here
-
Process kill smart completion zsh gives you the possibility of killing a process without actually knowing his PID. Type
killand press tab to open the dropdown menu. You can also start typing the process name to filter.
-
git aliases and repository status at the bar If you choose to use oh-my-zsh as your zsh framework, many of the built-in themes have a git status on the terminal carriage. You can configure them to show status, current branch, different colours if you have modified/unstaged files, stashes, if you're in the middle of a rebase/merge operation etc.
-
Editing long commands //@TODO
oh-my-zsh is my preferred framework to bundle with zsh. It has a massive community and a bunch of useful plugins and themes you can choose from. If you wanna check screenshots of themes, go here Installation Official guide here Or just run:
sh -c "$(curl -fsSL https://raw.githubusercontent.com/robbyrussell/oh-my-zsh/master/tools/install.sh)"
and follow the onscreen setup.
After installing, restart your terminal and you will be prompted with this screen:

This is the default theme robbyrussell and there ain't much special about it. Let's tweak it a little bit a more.
— Powerlevel9k setup and Powerline fonts installation
There is no sense in covering this part here since they are prone to change over time, so i will link the guides below with some comments.
- PowerLevel9k Repository
- PowerLevel9k Installation for macOS -> Install for Oh-My- ZSH
- Installing Powerline Fonts -> Option 1 - Install Powerline Fonts
- Next step is to make it the default font on iTerm2:
Go to Preferences(⌘+,) -> Profiles -> Text -> Change Font and i like to use
Meslo LG L DZ for Powerline, but you can choose any font as long as they have thePowerlinesuffix. Those fonts have some special chars that we will use at our theme.

Now let's change the theme and customise it a little bit.
Open your .zshrc file. It is located at your home directory. Replace your theme with:
ZSH_THEME="powerlevel9k/powerlevel9k"
Here is my powerlevel configuration:
POWERLEVEL9K_MODE='awesome-patched'
POWERLEVEL9K_SHORTEN_DIR_LENGTH=3
POWERLEVEL9K_SHORTEN_STRATEGY='truncate_middle'
POWERLEVEL9K_SHORTEN_DELIMITER='..'
POWERLEVEL9K_DIR_PATH_SEPARATOR=" $(print_icon "LEFT_SUBSEGMENT_SEPARATOR") "
POWERLEVEL9K_DIR_OMIT_FIRST_CHARACTER=true
POWERLEVEL9K_PROMPT_ON_NEWLINE=true
POWERLEVEL9K_OS_ICON_BACKGROUND="black"
POWERLEVEL9K_OS_ICON_FOREGROUND="249"
POWERLEVEL9K_STATUS_OK_BACKGROUND="black"
POWERLEVEL9K_STATUS_OK_FOREGROUND="green"
POWERLEVEL9K_STATUS_ERROR_BACKGROUND="black"
POWERLEVEL9K_STATUS_ERROR_FOREGROUND="red"
POWERLEVEL9K_LEFT_PROMPT_ELEMENTS=('status' 'os_icon' 'dir' 'vcs')
POWERLEVEL9K_RIGHT_PROMPT_ELEMENTS=('php_version' 'time')
If everything went correctly, you terminal should look like this now:

I'm a PHP developer, so i've chosen to display the PHP version on the right side. You can tweak it for you own preference selecting NVM, Java, Pyenv, or whatever suits your needs from this list. Keep in mind that the more you have, longer it will take to load.
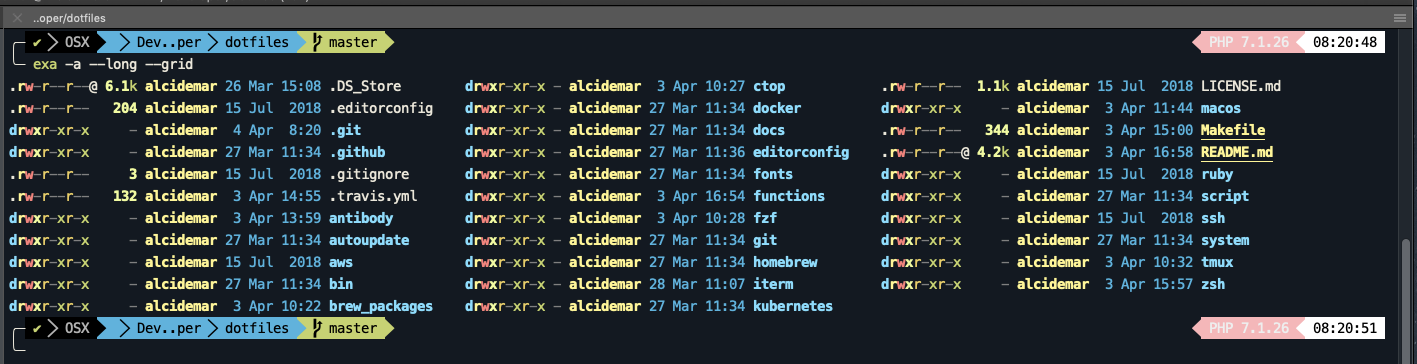
Exa is a ls replacement. I use an alias (l) for when i want to see more info on my files being listed.

Bat is a cat replacement. Instead of outputting raw text to the screen, he uses syntax highlighting and pipe the contents to less if doesn't fit the screen, so you can view the whole file in a nice way. I use it so often that i have an alias to override cat with it

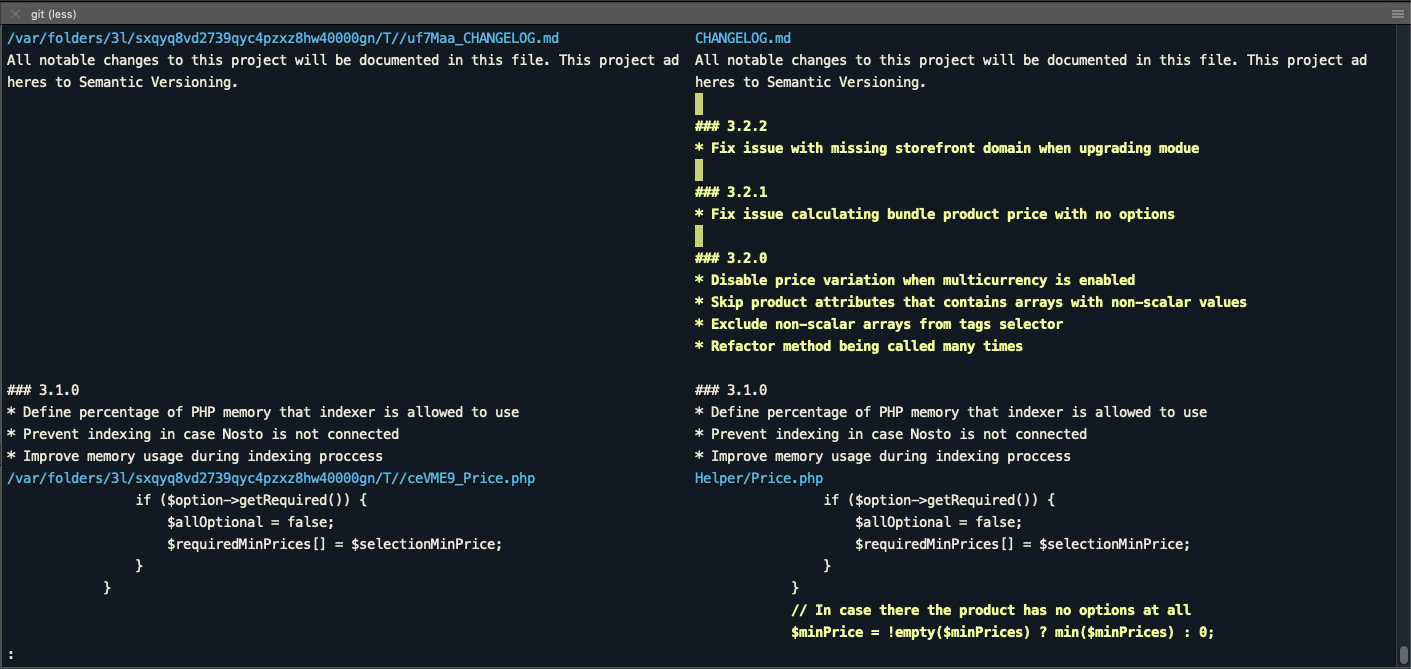
icdiff provides a nice side-by-side diff view between files and also supports git diffs.
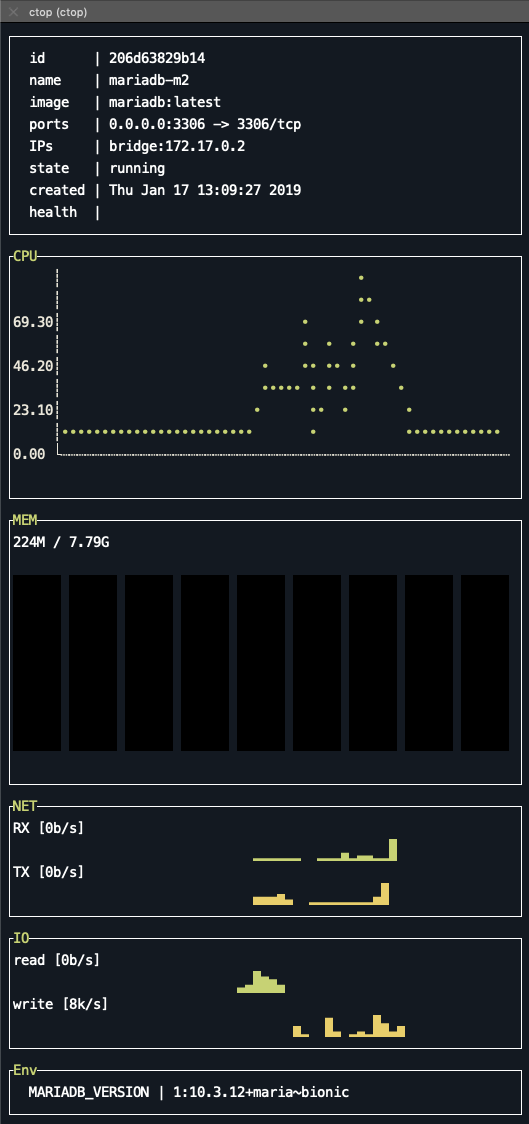
ctop provides a nice view of all your running containers, where you can monitor the CPU and memory usage, check the logs, network, pause/stop/restart containers etc.

Dry manages your local docker installation, allowing you to inspect, start/stop/delete, monitor containers, get information about images and networks. You no longer will need to type those long and complexes docker commands.


fzf & preview
Using a nice combination of fuzzy search with bat, we can get a nice preview screen of all the files in our project.
I use an alias for this preview='fzf --preview '\''bat --color "always" {}'\'

ncdu offers a nice and interactive interface that allows you to quickly scan folders or files that are responsible for taking up space. It's and alternative for running du -sh.
Install with brew install ncdu.
I also have an alias for that prevents deleting files by, sets a dark background and excludes .git and node_modules directories. du='ncdu --color dark -rr -x --exclude .git --exclude node_modules'


tldr offers a nice way to quickly read the documentation of a command without skimming through the long long man pages. A concise view with the most used commands.
