This article is about how to use semantic-ui with webpack 4 in your reactjs project. I am going to try as much as I can to make this article simple and straight to the point.
Semantic-ui is a css framework that has a reactjs port called React Semantic UI. The reactjs port allows you to write JSX while using the semantic ui css.
This tutorial assumes that you have a working knowledge of webpack 4/reactjs and that you already have a standing webpack 4/ reactjs project waiting to be integrated with semantic-ui.
Let's get to it:
First you need to install the needed modules by running the following codes in your shell.
- Run Semantic-UI https://gist.github.com/dfea1eda85690f067a2c2df072a9b48e
This will prompt an interactive installer that will ask you questions like where to put your semantic-ui source codes and all. Feel free to answer this questions as it suits you
- Install semantic-ui-react by running the following code
https://gist.github.com/095ba4c9bb1c5e30d7b736ea3ec0cd19
NOTE:Semantic-ui is the CSS to be used by semantic-ui-react because semantic-ui-react is just a port of semantic-ui , it still needs its css
- Install the semantic-ui-less https://gist.github.com/74dc9765441e00cc582b6ff3ba50f3d9
Semantic-ui-less is needed for the theming functionality of semantic-ui.
Now that we have installed all of what we need in semantic. We need to install some plugins to be used in webpack 4. You can omit any of these plugins if you already have them installed.
https://gist.github.com/3bf3d7e6f653cf4a9670d9719c519f97
You should have at least two of these plugins installed already, if not all.
Install Less globally in your machine, if you haven't. There is a clause to this, though.
The present version of less conflicts with the present version of semantic-ui-react, so we might have to go back a bit. I wish it wasn't this way, but downgrading back to version 2.7.3 was the only way I was able to make it work.
So , if you have the latest version installed, you might have to downgrade it to 2.7.3.
Run the code below to install the compatible Less version. Run the second line only if you don't have Less installed before.
https://gist.github.com/8217778f6cc566c2d67204e15fea25c7
Now, let's head over to webpack. I will assume , you have webpack 4 installed already with working configurations in your webpack.config.js. This part is a little trickish, because everybody's webpack config is sort of written differently. Nevertheless, follow the following procedures to tweak your configurations:
-
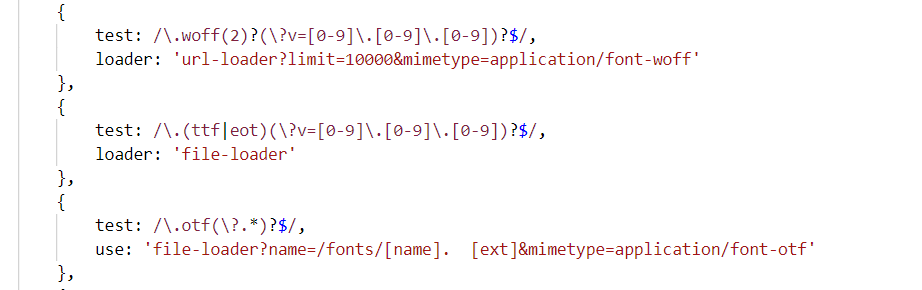
You have to update the types of file that your webpack handles because of the different files that might be involved in the usage of react semantic ui.
https://gist.github.com/f6a5974cba79cea68c0125aa46a370ce
You can see how I added my own below. https://gist.github.com/1292e1ee9cede9a87c9e9c08d3b02251
The above is just an excerpt of my webpack configuration file
https://gist.github.com/37d50d25e9b0dbbe5274ae3434727f50
This doesn't look neat enough so I am gonna do a snap shot of it, so you could see how it really is.
Now, let's sort out the css , this side of the whole process is very important. Check the codes below and use it to update your webpack config.
https://gist.github.com/7f2e8e7c3b8eda224a900b611d9d82b0
Here is a snap shot, so you can see it clearly.

What is most important in the picture above is the order of the loaders and the configurations of less-loader. If you have options already configured for the other loaders , you can leave it but don't forget to add the options for less-loader as shown above.
As you can see, from bottom to top, the loaders are in the following order , less-loader -> Postcss-loader -> css-loader -> style-loader. Deviating from this order might lead to misinterpration of the css codes.
Note: If you noticed, there is no SASS support. Adding Sass Loader to the whole thing might actually mess the webpack compilation up. SASS and LESS seems to conflict each other when you use them with webpack. So you might have to comment out all SASS configurations on your webpack.config.js until later . It is more or less a trade off.
Now we need to update the resolve section of your webpack config , jsut press Ctrl+f and press resolve , you should find it. Here is my own resolve.
https://gist.github.com/e8ee43a70131a4af9bfc81e6f465d4ed
Here is a picture of it below for clarity.

All you need to do here is to add '.less' and '.css' to your extensions list if they were not present.
Now that we are done with all this, you are ready to use react-semantic-ui in your project as shown below.
https://gist.github.com/4c8165f9c13fc6dd74801e3eaea0d84a
After this is done, you then add <link rel="stylesheet" href="//cdn.jsdelivr.net/npm/semantic-ui@2.4.1/dist/semantic.min.css"/>/ to the of your index.html file. I mean the file that your webpack builds on , it is usually located in the src folder.
Here is an example of such file: