Skip to content

Instantly share code, notes, and snippets.

@topshed
topshed / gist:32031368da774252782f39dd39f10b1c
Last active February 6, 2018 14:36
Draft activity for CoderDojo starter pack (Micro:Bit Blocks)

Making a Crowd Display with Micro:Bits and MakeCode

Program a set of Micro:Bits so that they talk to each other via radio to create a synchonised light show.

Design your image

  1. Connect the Micro:Bit to your computer using the USB cable.
  2. Open the MakeCode webpage (makecode.microbit.org) or run the offline versions (pxt serve).
  3. Drag these blocks from the Basic group.
@topshed
topshed / MB_CD_python.md
Last active August 21, 2018 08:08
Draft activity for CoderDojo starter pack (Micro:Bit Python)

Making a Crowd Display with Micro:Bits and Python

Program a set of Micro:Bits so that they talk to each other via radio to create a synchonised light show.

Design your image

  1. Connect the Micro:Bit to your computer using the USB cable.
  2. Open the Mu editor.
  3. Add the following code to import the Micro:Bit libraries you'll need.

Getting started with Arduino

Introducing Arduino Uno

An Arduino is a really useful microcontroller. The one shown below is an Uno, but you can use most other models with the same code and circuit (althought you may need to search up the pinout to work out which pins to use).

The Arduino is connected to your computer via USB. You create programs - called sketches - using the Arduino IDE and download them to the device using this cable.

To successfully connect you need to select the correct Board and Port from the Tools menu.

Two LEDs on a breadboard

An electronics breadboard (as opposed to the type on which sandwiches are made) is actually referring to a solderless breadboard. These are great units for making temporary circuits and prototyping, and they require absolutely no soldering.

The circuit below uses 2 resistors to limit the current flowing through the LEDs.

Imgur

This sketch uses two digital pins on the Ardunio, set as outputs, to control the LEDs.

Buttons and the Serial monitor

What about if you want to find out what the Arduino is doing? You can communicate with it using the Serial Monitor.

In this example, use an Digital pin as an input to detect when a button is pressed.

Imgur

When the button is pressed the input value changes from 0 (LOW) to 1 (HIGH) and you can write this value to the Arduino's serial port.

Analog inputs

Analog electronics have a continuously variable signal, in contrast to digital electronics where signals usually take only two levels (HIGH/LOW or 1/0).

This circuit demonstrates how to read an analog input - the voltage across a variable resistor - and uses this to control the tone of a buzzer.

Imgur   Imgur

Analog temperature sensor

This circuit demonstrates how to read the analog input from a TMP36 temperature sensor. This corresponds to the temperature measured by the sensor.

Imgur

The Arduino will give you a reading that you need to convert into temperature value. Because the TMP36 is connected to 5v we need to multiply the reading from the analog pin by 5. Then divide by 1024 (the Arduino uses a 10-bit analog to digital converter - this means that it will map input voltages between 0 and 5 volts into integer values between 0 and 1023).

Once you have a voltage reading, convert that to temperature: for the TMP36 there are 10 mv per degree, with a 500 mV offset

Ultrasonic Range Finder

This circuit demonstrates how to use an HC-SR04 Ultrasonic Range finder to measure the distance to an object.

Imgur

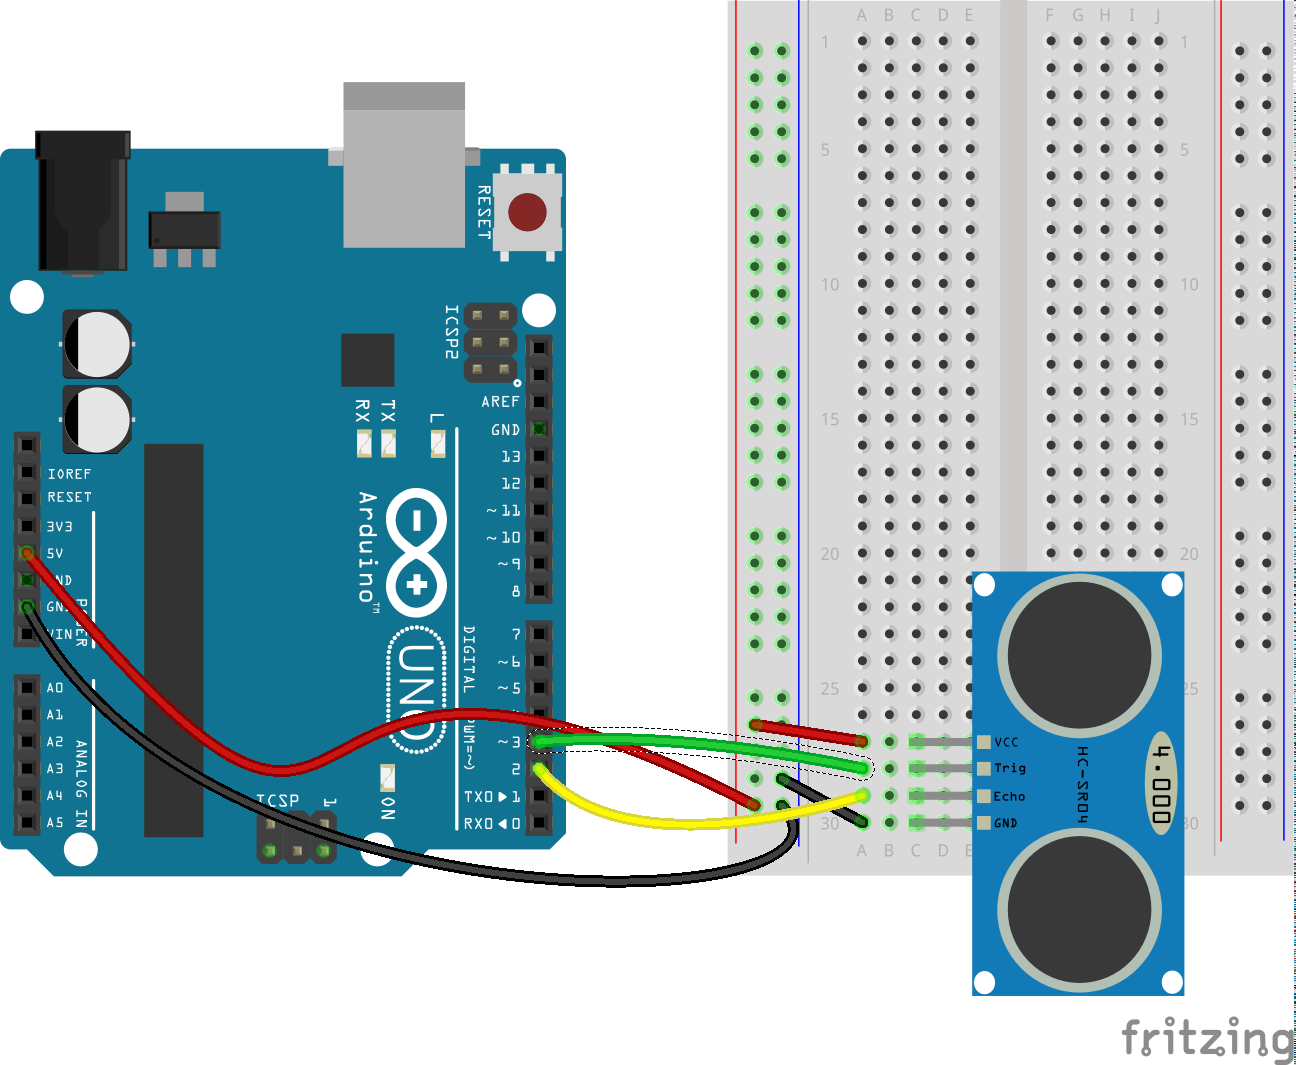
The HC-SR04 ultrasonic sensor uses sonar to determine distance to an object like bats or dolphins do. Power the module using Vcc, ground it using GND, and use an Arduino digital pin to send an input signal to TRIG, which triggers the sensor to transmit an ultrasonic burst of 8 x 40KHz pulses. The sound waves bounce off any nearby objects and some are reflected back to the sensor.

The ECHO pin will be “LOW” (0V) until the outgoing signal has stopped, at which point it goes HIGH (5v). Once a return pulse has been detected, ECHO is set “LOW” again. So the time for which the ECHO pin is HIGH equals the time taken for the sound wave to travel to the nearest obstacle and back.

Introduction to Arduino

Types of Arduino

Just like Raspberry Pi, Arduino both the open of a computer company and their project: a single-board microcontrollers and microcontroller for building digital devices and interactive objects that can sense and control objects in the physical and digital world. The project's products are distributed as open-source hardware and software, which are licensed under licenses that allow anyone to manufacture of Arduino boards.

There are lots of dirrent types of Arduino. Many are based around the ATMega328 chip, although there are now lots of other varieties in use.

Official Arduino/Genuino models come in a range of sizes. from left to right: Leonardo, Uno, MKR Zero and Micro.