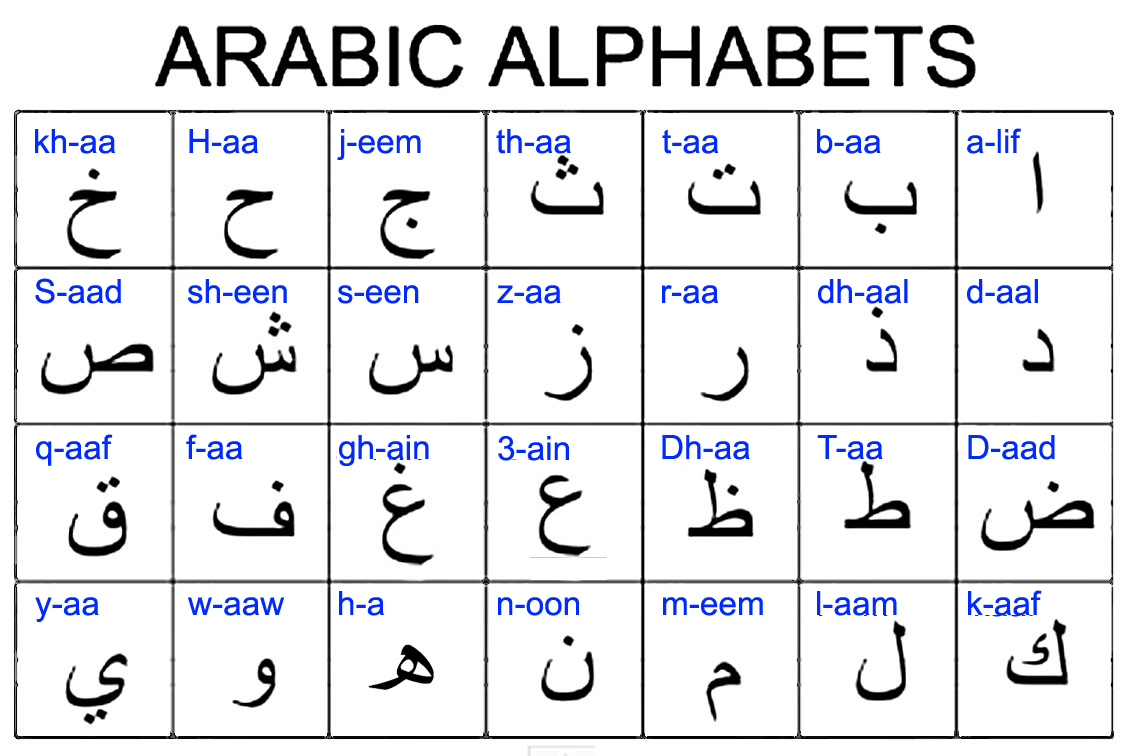


أ (alif)
ب (ba)
ت (ta)
ث (tha)
ج (jim)
ح (ḥa)
خ (khaw)
د (dal)
ذ (dhal)
ر (ra)
ز (zain)
س (seen)
ش (sheen)
ص (sad)
ض (dad)
ط (taa)
ظ (zaa)
ع ('ayn)
غ (ghayn)
ف (fa)
ق (qaf)
ك (kaf)
ل (lam)
م (meem)
ن (noon)
ه (ha)
و (waw)
ي (ya)
Last active
February 1, 2024 03:11
-
-
Save 4mirul/ab5c0a4b54f4a15191d49ee2b01d1903 to your computer and use it in GitHub Desktop.
study-and-notes
- Screwdriver and Precision screwdriver with bits
- Hemostat(hemostatic clamp)
- Tweezers
- Spudgers
- Pry bars metal/plastic
- Voltage tester
- Volt/ohm meter (multimeter)
- Thumb drives
- iFixit Pro Tech Toolkit
!!! warning
If the customer is using their organization's laptop, there might be procedures and policies that they must follow when using the laptop. They should check it with their organization's IT.
Step 1: Identify the problem
- Question the User and identify User changes to computer and perform backups before making changes
- Inquire regarding environmental or Infrastructure changes
- Review system and application logs
Step 2: Establish a theory of probable cause(question the obvious)
- If necessary, conduct external or internal research based on symptoms
Step 3: Test the theory to determine cause
- Once the theory is confirmed, determine the next steps to resolve problem
- If theory is not confirmed re-establish new theory or escalate
Step 4: Establish a plan of action to resolve the problem and implement the solution
Step 5: Verify full system functionality and, if applicable, implement preventive measures
Step 6: Document findings, actions and outcome
!!! info "ChatGPT Troubleshooting Theory"
The troubleshooting theory typically consists of the following steps:

1. Identify the problem: The first step is to identify the problem that needs to be solved. This can be done by gathering information from the user or system logs.

2. Gather information: Once the problem is identified, gather as much information as possible about the problem. This may include error messages, system logs, user reports, or any other relevant information.

3. Analyze the information: Analyze the information gathered to identify the root cause of the problem. This may involve identifying patterns or commonalities between different incidents.

4. Develop a hypothesis: Based on the analysis, develop a hypothesis about what is causing the problem. This hypothesis should be testable and verifiable.

5. Test the hypothesis: Test the hypothesis by taking action and observing the results. This may involve making changes to the system or software, or gathering additional information.

6. Iterate: If the hypothesis is not correct, go back to step 4 and develop a new hypothesis based on the new information. Iterate until the problem is solved.

7. Implement a solution: Once the root cause of the problem is identified, implement a solution to fix it. This may involve making changes to the system, software, or user behavior.

8. Monitor and evaluate: Monitor the system or software to ensure that the problem has been fully resolved. Evaluate the effectiveness of the solution and make further changes if necessary.

By following these steps, you can effectively troubleshoot and solve problems in various systems and software.
System unit;
- Motherboard
- Central Processing Unit (CPU)
- Random Access Memory (RAM)
- Mass storage; Hard Disk Drive (HDD) or Solid State Drive (SSD)
- Power Supply Unit (PSU)
- Cooling Fans
- Optical Drive (CD/DVD/Blu-ray)
- Expansion Cards (e.g., graphics card, sound card, network card)
- Ports (e.g., USB, Ethernet, HDMI, DisplayPort)
- Internal Cables (e.g., SATA, power cables)
Peripheral;
- Keyboard
- Mouse
- Monitor
- Printer
- Scanner
- Speakers
- Microphone
- External hard drive
- Webcam
- Game controllers
Common connections on system units;
- Power connector
- USB ports
- Audio jacks
- Ethernet port
- HDMI port
- VGA port
- DisplayPort
- DVI port
- PCI/PCIe expansion slots
- SATA ports
- Memory slots
- CMOS battery
Older connectors;
- PS/2 ports
- Parallel port
- Serial port
- SCSI port
- IDE ports
- Floppy drive connector
- AT power connector
New connectors;
- Thunderbolt 3 port
- USB-C port
- M.2 slot
- DisplayPort 1.4
- RJ45 2.5GbE/5GbE Ethernet port
- HDMI 2.1
- Wi-Fi antennas
- Personal computers(PCs): These are computers designed for personal use by individuals. Examples include desktops, laptops, tablets, and all-in-one computers.
- Workstations: These are high-performance computers designed for specialized tasks like video editing, 3D modeling, and scientific simulations. Examples include HP Z Workstations, Dell Precision Workstations, and Apple Mac Pro.
- Servers: These are computers that provide services to other computers or devices on a network. Examples include web servers, file servers, and email servers. Some popular server brands include Dell, HP, and Lenovo.
- Mainframes: These are large, powerful computers designed for processing massive amounts of data and running critical applications. Examples include IBM System z mainframes and Unisys ClearPath systems.
- Supercomputers: These are the fastest and most powerful computers in the world, used for complex scientific simulations and data analysis. Examples include Summit and Sierra, two of the world's most powerful supercomputers.
- Embedded computers: These are computers that are built into other devices, such as cars, appliances, or industrial equipment. Examples include the Raspberry Pi, Arduino boards, and Intel NUCs.
- Gaming computers: These are computers designed for playing video games, often with high-end graphics and processing power. Examples include Alienware, ASUS ROG, and MSI Gaming laptops and desktops.
- Smartphones: These are mobile devices that have computing capabilities, internet connectivity, and other features like cameras and sensors. Examples include the Apple iPhone, Samsung Galaxy, and Google Pixel.
- Wearable computers: These are computers that can be worn on the body, such as smartwatches, fitness trackers, and augmented reality glasses. Example include the Apple Watch, Fitbit, and Google Glass.
- Referred as brain of the computer or the processor
- Executing instructions and performing calculations in computer system
- CPU consists of the arithmetic logic unit (ALU) and the control unit
- ALU performs mathematical and logical operations
- Control unit manages the activities of the CPU, including fetching, decoding, and executing instructions
- CPU interacts with other hardware components such as memory, storage devices, and input/output devices
- Retrieves instructions and data from memory, processes them, and stores results or sends them to output devices
- Manufactured by companies like Intel, AMD, and ARM
- Different CPUs have varying performance, power consumption, and features
- CPUs are essential for running software applications and performing various tasks in computers, laptops, smartphones, and other electronic devices
Arithmetic Instructions:
- Addition (ADD)
- Subtraction (SUB)
- Multiplication (MUL)
- Division (DIV)
Logical Instructions:
- Logical AND (AND)
- Logical OR (OR)
- Logical NOT (NOT)
- Bitwise Shift (SHIFT)
Data Transfer Instructions:
- Move (MOV)
- Load (LOAD)
- Store (STORE)
- Input (IN)
- Output (OUT)
Control FLow Instructions:
- Jump (JMP)
- Conditional Jump (JNZ,JZ,JG,JL,etc)
- Compare (CMP)
- Call (CALL)
- Return (RET)
Stack Manipulations Instructions:
- Push (PUSH)
- Pop (POP)
Floating-Point Instructions:
- Floating-Point Addition (FADD)
- Floating-Point Multiplication (FMUL)
- Floating-Point Division (FDIV)
- Floating-Point Comparison (FCMP)
System Instructions:
- Halt (HLT)
- Interrupt (INT)
- System Call (SYSCALL)
- Control Unit (CU):
...
...
- CD
- CD-ROM
- CD-R
- CD-RW
- 650-700 MB
- DVD
- DVD-5
- DVD-9
- DVD-10
- DVD-18
- DVD-R
- DVD-RW
- DVD+R
- DVD+RW
- 4.37-15.9 GB
- BluRay
- Standard disk
- Mini disk
- BD-RE
- 25-50 GB
- Optical Disk Drives
- All optical media comes in ROM, R, RW/RE
-
USB 1.0
-
USB 1.1
-
USB 2.0
-
USB 3.0 (compatibality issue)
-
USB 3.1 Gen 1
-
USB 3.1 Gen 2
-
USB type-A connector
-
USB type-B connector
-
USB mini-B connector
-
USB micro-B connector
-
USB 3.0 micro-B connector
-
USB type-C
| Standard | Maximum Speed |
|---|---|
| USB 1.0 | 1.5 Mbps |
| USB 1.1 | 12 Mbps |
| USB 2.0 | 480 Mbps |
| USB 3.0 | 5 Gbps |
| USB 3.1 Gen 1 | 5 Mbps |
| USB 3.1 Gen 2 | 10 Mbps |


- USB controller
- USB upstream & downstream connector
- USB type-B connector, USB mini-B connector & USB micro-B connector commonly used on the devices not on the computer
- Root hub
- USB hub (up to 127 connection), USB hub with power
- USB devices must have device driver
- OS come with thousands of built-in device drivers
- Some devices, need to get the correct driver to get it work
- Thunderbolt is a general purpose I/O port that runs at 10 Gbps up to 40 Gbps
- Thunderbolt uses a mini DP or a USB C connector
- Lightning standard is exclusive to Apple products
- Lightning uses a proprietary lightning connector
- Keyboards use either a USB or PS/2 connection
- Mouse almost exclusively use USB
- Other device can have a proprietary connection that requires a converter
- KVM switches enable multiple computers to share devices
- Speaker systems include satellites and subwoofers, called 2.1 or 5.1 systems
- Sound uses 3.5mm jacks or SPDIF
- Webcam or headsets, include speakers
- Smart card/magnetic readers are used to read cards
- Flash memory readers read many types of flash memory
- SD cards are very popular flash memory
- Scanners read paper documents. Automatic document feeders enable scanning multiple pages
- Barcode and QR code scanners read printed coded labels
- Handle expansion cards carefully, avoiding the contacts
- Apply power, data connections or dongles as needed
- Make sure to add the correct driver, check Device Manager to confirm good drivers
- New device installation is a common place for BSOD
- Thick Client (Fat Client): A client device with significant processing power and local software, capable of running applications independently. It has a rich user interface and stores data locally.
- Thin Client: A client device with minimal processing power and storage, relying on a central server for most computing tasks. It is lightweight, easy to manage, and often used in environments where centralized control is important.
Create console app template using command dotnet new console --framework net7.0 or dotnet new console --framework net7.0 --force
Visual Studio Code will prompts to add the missing assets to build and debug the app. Or add the configuration at "Run and Debug"
Include using System; on top of the file to use classes from System namespace. Or use inline such as System.Console.WriteLine()
C# ignores whitespace/blank line
namespace in code is to organize the code, and it is a container for classes and other namespaces
{} marks the beginning and the end of a block of code
class is a container for data and methods, Every line of code that runs in C# must be inside a class
Every C# statement ends width a semicolon ;
C# is case-sensitive: MyClass and myclass has different meaning
C# file does not have to match the class name
Console is a class of the System namespace, which has WriteLine() method that is used to output/print text. Write() method used to output/print text not in new line
Comment in C# start with two forward slashes //. Text between slashes and the end of the line is ignored
Multi-line comments start with /* and ends with */
int - stores integers(whole numbers), without decimals
double - stores floating point numbers, with decimals
char - stores single characters, such as a or B, surrounded by single quotes
string - stores text, such as "Hello World", surrounded by double quotes
bool - stores values with two states: true of false
To create a variable, must specify the type and assign it a value: type variableName = value;
Example:
string name = "John";
Console.WriteLine(name);

int myNum;
myNum = 15;
Console.WriteLine(myNum);

int myNum = 15;
myNum = 20;
Console.WriteLine(myNum);

int myNum = 5;
double myDoubleNum = 5.99D;
char myLetter = 'D';
bool myBool = true;
string myText = "Hello";
add const keyword in front of the variable type, if don't want others to overwrite existing values, "constant", unchangeable and read-only
Cannot declare a constant variable without assigning the value
Can use WriteLine() method to display variable values to the console window
Combine with +
string name = "Amirul";
Console.WriteLine("Hello " + name);
string firstName = "Amirul";
string lastName = "Aziz";
string fullName = firstName + lastName;
Console.WriteLine(fullName);
For numeric values, the + character works as a mathematical operator
int x = 5;
int y = 6;
Console.WriteLine(x+y);
Can declare more than one variable of the same type, use comma-separated list
int x = 5, y = 6,z = 50;
Console.WriteLine(x+y+z);
Can also assign the same value to multiple variables
int x, y, z;
x = y = z = 50;
Console.WriteLine(x+y+z);
All variables must be identified with unique names, called identifiers
The general rules for naming variables are:
- Names can contain letters, digits and the underscore character (_)
- Names must begin with a letter
- Names should start with a lowercase letter and it cannot contain whitespace
- Names are case sensitive ("myVar" and "myvar" are different variables)
- Reserved words (like C# keywords, such as
intordouble) cannot be used as names
A data type specifies the size and type of variable values
important to use correct data type to avoid errors, save time and memory and make code more maintainable and readable
Most common data types are:
| Data Type | Size | Description |
|---|---|---|
| int | 4 bytes | Stores whole numbers from -2,147,483,648 to 2,147,483,647 |
| long | 8 bytes | Stores whole numbers from -9,223,372,036,854,775,808 to 9,223,372,036,854,775,807 |
| float | 4 bytes | Stores fractional numbers. Sufficient for storing 6 to 7 decimal digits |
| double | 8 bytes | Stores fractional numbers. Sufficient for storing 15 decimal digits |
| bool | 1 bit | Stores true or false values |
| char | 2 bytes | Stores a single character/letter, surrounded by single quotes |
| string | 2 bytes per character | Stores a sequence of characters, surrounded by double quotes |
Number types are divided into two: Integer types(int,long) and Floating Types(float,double)
float and double data types can store fractional numbers, should end the value with an "F" for floats and "D" for doubles
floating point number can also be a scientific number with an "e" to indicate the power of 10
float f1 = 35e3F;
double d1 = 12E4D;
Console.WriteLine(f1);
Console.WriteLine(d1);
bool keyword can only take values true or false:
bool isCSharpFun = true;
bool isFishTasty = false;
Console.WriteLine(isCSharpFun); // Outputs True
Console.WriteLine(isFishTasty); // Outputs False
Char data type is used to store a single character, must be surrounded by single quotes
String data type is used to store a sequence of characters (text), values must be surrounded by double quotes
Assign a value of one data type to another type.
- Implicit Casting (automatically) - converting a smaller type to a larger type size:
char->int->long->float->double - Explicit Casting (manually) - converting a larger type to a smaller size type:
double->float->long->int->char
Console.ReadLine() to get user input
// Type your username and press enter
Console.WriteLine("Enter username:");

// Create a string variable and get user input from the keyboard and store it in the variable
string userName = Console.ReadLine();

// Print the value of the variable (userName), which will display the input value
Console.WriteLine("Username is: " + userName);
Console.ReadLine() method returns a string, cannot get information from another data type, but can convert
Convert.ToInt32
Convert.ToDecimal
Convert.ToBoolean
Convert.ToDateTime
Convert.ToDouble
Convert.ToInt64
Console.WriteLine("Enter your age:");
int age = Convert.ToInt32(Console.Readline());
Console.WriteLine("Your age is: " + age);+ operator to add together two values, it can also be used to add together a variable and a value, or a variable and another variable
Arithmetic operators are used to perform common mathematical operations
| Operator | Name | Description | Example |
|---|---|---|---|
| + | Addition | Adds together two values | x + y |
| - | Subtraction | Subtracts one value from another | x - y |
| * | Multiplication | Multiplies two values | x * y |
| / | Division | Divides one value by another | x / y |
| % | Modulus | Returns the division remainder | x % y |
| ++ | Increment | Increases the value of a variable by 1 | x++ |
| -- | Decrement | Decreases the value of a variable by 1 | x-- |
Assignment operators = are used to assign values to variables
Addition assignment operator += adds a value to a variable
| Operator | Example | Same As |
|---|---|---|
| = | x = 5 | x = 5 |
| += | x += 3 | x = x + 3 |
| -= | x -= 3 | x = x - 3 |
| *= | x *= 3 | x = x * 3 |
| /= | x /= 3 | x = x / 3 |
| %= | x %= 3 | x = x % 3 |
| &= | x &= 3 | x = x & 3 |
| l= | x l= 3 | x = x l 3 |
| ^= | x ^= 3 | x = x ^ 3 |
| >>= | x >>= 3 | x = x >> 3 |
| <<= | x <<= 3 | x = x << 3 |
Comparison operators are used to compare two values (or variables), the return value of a comparison is either True or False
| Operator | Name | Example |
|---|---|---|
| == | Equal to | x == y |
| != | Not equal | x != y |
| > | Greater than | x > y |
| < | Less than | x < y |
| >= | Greater than or equal to | x >= y |
| <= | Less than or equal to | x <= y |
Can also test for True of False values with logical operators
| Operator | Name | Description | Example |
|---|---|---|---|
| && | Logical and | Returns True if both statements are true | x < 5 && x < 10 |
| || | Logical or | Returns True if one of the statements is true | x < 5 || x < 4 |
| ! | Logical not | Reverse the result, returns False if true | !(x < 5 && x < 10) |
C# Math class has many methods that allows you to perform mathematical tasks on numbers
Math.Max(x,y) method can be used to find the highest value of x and y
Math.Min(x,y) method can be used to find the lowest value
Math.Sqrt(x) method return the square root of x
Math.Abd(x) method returns the absolute (positive) value of x
Math.Round() rounds a number to the nearest whole number
Console.WriteLine(Math.Max(5, 10) + " " + Math.Sqrt(64) + " " + Math.Min(5, 10) + " " + Math.Abs(-4.7) + " " + Math.Round(9.99));Used for storing text, contains a collection of characters surrounded by double quotes, can contain many words
A string in C# is actually an object, contain properties and methods that can perform certain operations on strings, example, the length of a string ca be found with the Length property
There are many string methods available, example, ToUpper() and ToLower(), which returns a copy of the string converted to uppercase or lowercase
string greeting = "Hello world!";
string txt = "ABCDEFGHIJKLMNOPQRSTUVWXYZ";
Console.WriteLine("The length of the txt string is: " + txt.Length);
string txt = "Hello World";
Console.WriteLine(txt.ToUpper());   // Outputs "HELLO WORLD"
Console.WriteLine(txt.ToLower());   // Outputs "hello world"
string text = " Hello, world! ";
int length = text.Length; // Length: Returns 18
string upperCaseText = text.ToUpper(); // ToUpper: Converts the string to uppercase. Returns " HELLO, WORLD! "
string lowerCaseText = text.ToLower(); // ToLower: Converts the string to lowercase. Returns " hello, world! "
string substring = text.Substring(7, 5); // Substring: Extracts the substring "world"
string replacedText = text.Replace("world", "universe"); // Replace: Replaces "world" with "universe". Returns " Hello, universe! "
string trimmedText = text.Trim(); // Trim: Removes leading and trailing whitespace characters. Returns "Hello, world!"
Console.WriteLine("Original Text: " + text);
Console.WriteLine("Length: " + length);
Console.WriteLine("Uppercase: " + upperCaseText);
Console.WriteLine("Lowercase: " + lowerCaseText);
Console.WriteLine("Substring: " + substring);
Console.WriteLine("Replaced Text: " + replacedText);
Console.WriteLine("Trimmed Text: " + trimmedText);
+ operator can e used between strings to combine them, this is called concatenation
Can also use the string.Concat() method to concatenate two strings
string firstName = "John ";
string lastName = "Doe";
string name = firstName + lastName;
Console.WriteLine(name);
string name = string.Concat(firstName, lastName);
Console.WriteLine(name);
C# uses the + operator for both addition and concatenation, numbers are added, strings are concatenated
another option of string concatenation, is string interpolation, which substitutes values of variables into placeholders in a string
string firstName = "John";
string lastName = "Doe";
string name = $"My full name is: {firstName} {lastName}";
Console.WriteLine(name);
Can access the characters in a string by referring to its index number inside square brackets []
string myString = "Hello";
Console.WriteLine(myString[0]);  // Outputs "H"
Can also find the index position of a specific character in a string, by using the IndexOf() method
string myString = "Hello";
Console.WriteLine(myString.IndexOf("e"));  // Outputs "1"
Another useful method is Substring(), extracts the characters from a string, often used together with IndexOf() to get the specific character position
// Full name
string name = "John Doe";

// Location of the letter D
int charPos = name.IndexOf("D");

// Get last name
string lastName = name.Substring(charPos);

// Print the result
Console.WriteLine(lastName);
To use special character such as in string, need to put the backslash escape character
| Escape Character | Result | Description |
|---|---|---|
| ' | ' | Single quote |
| " | " | Double quote |
| \ | \ | Backslash |
Other usefull escape characters in C# are
| Escape Character | Result | Description |
|---|---|---|
| \n | New Line | Inserts a new line |
| \t | Tab | Inserts a tab |
| \b | Backspace | Inserts a backspace |
C# has bool data type, which can take the values true or false, bool keyword and can only take the values true or false
Can use a comparison operator, such as the greater that (>) operator to find out if an expression (or a variable) is true
bool isCSharpFun = true;
bool isFishTasty = false;
Console.WriteLine(isCSharpFun);   // Outputs True
Console.WriteLine(isFishTasty);   // Outputs False
int x = 10;
int y = 9;
Console.WriteLine(x > y); // returns True, because 10 is higher than 9if statement to specify a block of C# code to be executed if a condition is True
else statement to specify a block of code to be executed if the condition is False
else if statement to specify a new condition if the first condition is False
int time = 22;
if (time < 10)
{
  Console.WriteLine("Good morning.");
}
else if (time < 20)
{
  Console.WriteLine("Good day.");
}
else
{
  Console.WriteLine("Good evening.");
}
// Outputs "Good evening."
A short-hand if else, which is known as the ternary operator because it consists of three operands, can be used to replace multiple lines of code with a single line, often used to replace simple if else statements
int time = 20;
string result = (time < 18) ? "Good day." : "Good evening.";
Console.WriteLine(result);switch statement to select one of many code blocks to be executed
break keyword, it breaks out of the switch block, this will stop the execution of more code and case testing inside the block
default keyword is optional and specifies some code to run if there is no case match
int day = 4;
switch (day)
{
  case 6:
    Console.WriteLine("Today is Saturday.");
    break;
  case 7:
    Console.WriteLine("Today is Sunday.");
    break;
  default:
    Console.WriteLine("Looking forward to the Weekend.");
    break;
}
// Outputs "Looking forward to the Weekend."Loops can execute a block of code as long as a specified condition is reached
while loop loops through a block of code as long as a specified condition is True
int i = 0;
while (i < 5)
{
  Console.WriteLine(i);
  i++;
}
The do/while loop is a variant of the while loop. This loop will execute the code block once, before checking if the condition is true, then it will repeat the loop as long as the condition is true
int i = 0;
do
{
  Console.WriteLine(i);
  i++;
}
while (i < 5);When know exactly how many times you want to loop through a block of code, use for loop instead of a while loop
for (int i = 0; i < 5; i++)
{
  Console.WriteLine(i);
}

for (int i = 0; i <= 10; i = i + 2)
{
  Console.WriteLine(i);
}
Possible to place a loop inside another loop. This is called a nested loop
// Outer loop
for (int i = 1; i <= 2; ++i)
{
  Console.WriteLine("Outer: " + i);  // Executes 2 times

  // Inner loop
  for (int j = 1; j <= 3; j++)
  {
    Console.WriteLine(" Inner: " + j); // Executes 6 times (2 * 3)
  }
}
foreach loop, is used exclusively to loop through elements in an array
string[] cars = {"Volvo", "BMW", "Ford", "Mazda"};
foreach (string i in cars)
{
  Console.WriteLine(i);
}break statement can also be used to jump out of a loop
for (int i = 0; i < 10; i++)
{
  if (i == 4)
  {
    break;
  }
  Console.WriteLine(i);
}
continue statement breaks one iteration (in the loop), if a specified condition occurs, and continues with the next iteration in the loop
for (int i = 0; i < 10; i++)
{
  if (i == 4)
  {
    continue;
  }
  Console.WriteLine(i);
}
Can also use break and continue in while loops
int i = 0;
while (i < 10)
{
  Console.WriteLine(i);
  i++;
  if (i == 4)
  {
    break;
  }
}

int j = 0;
while (j < 10)
{
  if (j == 4)
  {
    ij++;
    continue;
  }
  Console.WriteLine(j);
  j++;
}
Arrays are used to store multiple values in a single variable, instead of declaring separate variables for each value
To declare an array, define the variable type with square brackets
string[] cars = {"Volvo", "BMW", "Ford", "Mazda"};
int[] myNum = {10, 20, 30, 40};
Access an array element by referring to the index number
To change the value of a specific element, refer to the index number
To find out how many elements an array has, use the Length property
string[] cars = {"Volvo", "BMW", "Ford", "Mazda"};
cars[0] = "Opel";
Console.WriteLine(cars[0]);
// Now outputs Opel instead of Volvo
Console.WriteLine(cars.Length);
If you declare an array and initialize it later, you have to use the new keyword
// Declare an array
string[] cars;

// Add values, using new
cars = new string[] {"Volvo", "BMW", "Ford"};
Loop through the array elements with the for loop, and use the Length property to specify how many times the loop should run
string[] cars = {"Volvo", "BMW", "Ford", "Mazda"};
for (int i = 0; i < cars.Length; i++)
{
  Console.WriteLine(cars[i]);
}
Also a foreach loop, which is used exclusively to loop through elements in an array
string[] cars = {"Volvo", "BMW", "Ford", "Mazda"};
foreach (string i in cars)
{
  Console.WriteLine(i);
}
Many array methods available, for example Sort(), which sorts an array alphabetically or in an ascending order
// Sort a string
string[] cars = {"Volvo", "BMW", "Ford", "Mazda"};
Array.Sort(cars);
foreach (string i in cars)
{
  Console.WriteLine(i);
}

// Sort an int
int[] myNumbers = {5, 1, 8, 9};
Array.Sort(myNumbers);
foreach (int i in myNumbers)
{
  Console.WriteLine(i);
}
Other useful array methods, such as Min, Max, and Sum, can be found the System.Linq namespace
using System;
using System.Linq;

namespace MyApplication
{
  class Program
  {
    static void Main(string[] args)
    {
      int[] myNumbers = {5, 1, 8, 9};
      Console.WriteLine(myNumbers.Max());  // returns the largest value
      Console.WriteLine(myNumbers.Min());  // returns the smallest value
      Console.WriteLine(myNumbers.Sum());  // returns the sum of elements
    }
  }
}
Arrays is known as single dimension arrays. If want to store data as a tabular form, like a table with rows and columns, need to get familiar with multidimensional arrays
Is basically an array of arrays
Arrays can have any number of dimensions, the most common are two-dimensional arrays (2D)
To create a 2D array, add each array within its own set of curly braces, and insert a comma (,) inside the square brackets
int[,] numbers = { {1, 4, 2}, {3, 6, 8} };To access an element of a two-dimensional array, you must specify two indexes: one for the array, and one for the element inside that array, or better yet, with the table visualization in mid; one fro the row and one for the column
int[,] numbers = { {1, 4, 2}, {3, 6, 8} };
Console.WriteLine(numbers[0, 2]);  // Outputs 2
Can also change the value of an element
int[,] numbers = { {1, 4, 2}, {3, 6, 8} };
numbers[0, 0] = 5;  // Change value to 5
Console.WriteLine(numbers[0, 0]); // Outputs 5 instead of 1
Can easily loop through the elements of a two-dimensional array with a foreach loop
int[,] numbers = { {1, 4, 2}, {3, 6, 8} };

foreach (int i in numbers)
{
  Console.WriteLine(i);
}
Can also use a for loop, for multidimensional arrays, need one loop for each of the array's dimensions
Note that we have to use GetLength() instead of Length to specify how many times the loop should run
int[,] numbers = { {1, 4, 2}, {3, 6, 8} };

for (int i = 0; i < numbers.GetLength(0); i++)
{
  for (int j = 0; j < numbers.GetLength(1); j++)
  {
    Console.WriteLine(numbers[i, j]);
  }
}A method is a block of code which only runs when its is called
Can pass data, known as parameters, into a method
Used to perform certain actions, and they are also known as functions
To reuse code: define the code once, and use it many times
A method is defined with the name of the method, followed by parentheses ()
To call (execute) a method, write the method's name followed by two parentheses () and a semicolon ;
A method can be
static void MyMethod()
{
  Console.WriteLine("I just got executed!");
}

static void Main(string[] args)
{
  MyMethod();
  MyMethod();
  MyMethod();
}

// I just got executed!
// I just got executed!
// I just got executed!Information ca be passed to methods as parameter. Parameter act as variables inside the method
Can add as many parameters, just separate them with a comma
static void MyMethod(string fname, int age)
{
  Console.WriteLine(fname + " is " + age);
}

static void Main(string[] args)
{
  MyMethod("Liam", 5);
  MyMethod("Jenny", 8);
  MyMethod("Anja", 31);
}

// Liam is 5
// Jenny is 8
// Anja is 31
Can also use a default parameter value, by using the equals sign (=)
If call the method without an argument, it uses the default value
static void MyMethod(string country = "Norway")
{
  Console.WriteLine(country);
}

static void Main(string[] args)
{
  MyMethod("Sweden");
  MyMethod("India");
  MyMethod();
  MyMethod("USA");
}

// Sweden
// India
// Norway
// USA
void keyword indicates that the method should not return a value
If want the method return a value, ca use a primitive data type instead of void, and use the return keyword inside the method
Can return the sum of a method's two parameters
Can also store the result in a variable
static int MyMethod(int x, int y)
{
  return x + y;
}

static void Main(string[] args)
{
  int z = MyMethod(5, 3);
  Console.WriteLine(z);
}

// Outputs 8 (5 + 3)
It is also possible to send arguments with the key: value syntax
static void MyMethod(string child1, string child2, string child3)
{
  Console.WriteLine("The youngest child is: " + child3);
}

static void Main(string[] args)
{
  MyMethod(child3: "John", child1: "Liam", child2: "Liam");
}

// The youngest child is: John
With method overloading, multiple methods can have the same name with different parameters
static int PlusMethod(int x, int y)
{
  return x + y;
}

static double PlusMethod(double x, double y)
{
  return x + y;
}

static void Main(string[] args)
{
  int myNum1 = PlusMethod(8, 5);
  double myNum2 = PlusMethod(4.3, 6.26);
  Console.WriteLine("Int: " + myNum1);
  Console.WriteLine("Double: " + myNum2);
}OOP stands for Object-Oriented Programming
Procedural programming is about writing procedures or methods that perform operations on the data, while object-oriented programming is about creating objects that contain both data and methods
Advantages:
- OOP is faster and easier to execute
- OOP provides a clear structure for the programs
- OOP helps to keep the C# code DRY "Don't Repeat Yourself", and makes the code easier to maintain, modify and debug
Classes and objects are the two main aspects of object-oriented programming
Below illustration to see the difference between class and objects
| Class | Objects |
|---|---|
| Car | Volvo |
| Audi | |
| Toyota |
| Class | Objects |
|---|---|
| Fruit | Apple |
| Banana | |
| Mango |
A class is a template for objects, and an object is an instance of a class
When the individual objects are created, they inherit all the variables and methods from the class
Everything in C# is associated with classes and objects, along with its attributes and methods,
A class is like an object constructor, or a "blueprint" for creating objects
To create a class, use the class keyword
When a variable is declared directly in a class, it is often referred to as a field or attribute
class Car
{
  string color = "red";
}
An object is created from a class
class Car
{
  string color = "red";

  static void Main(string[] args)
  {
    Car myObj = new Car();
    Console.WriteLine(myObj.color);
  }
}
Can create multiple objects of one class
class Car
{
  string color = "red";
  static void Main(string[] args)
  {
    Car myObj1 = new Car();
    Car myObj2 = new Car();
    Console.WriteLine(myObj1.color);
    Console.WriteLine(myObj2.color);
  }
}
Can also create an object of a class and access it in another class
public keyword is called an access modifier, accessible for other classes as well
class Car
{
  public string color = "red";
}
class Program
{
static void Main(string[] args)
{
Car myObj = new Car();
Console.WriteLine(myObj.color);
}
}Fields and methods inside classes are often referred to as "Class Members"
// The class
class MyClass
{
  // Class members
  string color = "red";        // field
  int maxSpeed = 200;          // field
  public void fullThrottle()   // method
  {
    Console.WriteLine("The car is going as fast as it can!");
  }
}
Can also leave the fields blank, and modify them when creating the object
Useful when creating multiple objects of one class
class Car
class Car
{
  string model;
  string color;
  int year;

  static void Main(string[] args)
  {
    Car Ford = new Car();
    Ford.model = "Mustang";
    Ford.color = "red";
    Ford.year = 1969;

    Car Opel = new Car();
    Opel.model = "Astra";
    Opel.color = "white";
    Opel.year = 2005;

    Console.WriteLine(Ford.model);
    Console.WriteLine(Opel.model);
  }
}
Methods normally belongs to a class, and they define how an object of a class behaves
Can acesses methods with the dot syntax, method must be public, and remember that use the name of the method followed by two parantheses () and a semicolon ; to call (execute) the method
A static method can be accessed without creating an object of the class, while public methods can only be accessed by objects
class Car
{
  string color;                 // field
  int maxSpeed;                 // field
  public void fullThrottle()    // method
  {
    Console.WriteLine("The car is going as fast as it can!");
  }

  static void Main(string[] args)
  {
    Car myObj = new Car();
    myObj.fullThrottle();  // Call the method
  }
}
Multiple classes
class Car
{
  public string model;
  public string color;
  public int year;
  public void fullThrottle()
  {
    Console.WriteLine("The car is going as fast as it can!");
  }
}
class Program
{
static void Main(string[] args)
{
Car Ford = new Car();
Ford.model = "Mustang";
Ford.color = "red";
Ford.year = 1969;
Car Opel = new Car();
Opel.model = "Astra";
Opel.color = "white";
Opel.year = 2005;
Console.WriteLine(Ford.model);
Console.WriteLine(Opel.model);
}
}public keyword is called an access modifier
A constructor is a special method that is used to initialize objects. Advantage of a contructor, is that it is called when an object of a class is created. It can be used to set initial values for fields
The constructor name must match the class name, and it cannot have a return type (like void or int)
The constructor is called when the object is created
All classes have constructors by default: if you do not create a class constructor yourself, C# creates one for you, however, then you are not able to set initial values for fields
Constructors save time
// Create a Car class
class Car
{
  public string model;  // Create a field

  // Create a class constructor for the Car class
  public Car()
  {
    model = "Mustang"; // Set the initial value for model
  }

  static void Main(string[] args)
  {
    Car Ford = new Car();  // Create an object of the Car Class (this will call the constructor)
    Console.WriteLine(Ford.model);  // Print the value of model
  }
}

// Outputs "Mustang"
Constructors can also take parameters, which is used to initialize fields
Can have as many parameters as you want
Just like other methods, constructors can be overloaded by using different numbers of parameters
class Car
{
  public string model;
  public string color;
  public int year;

  // Create a class constructor with multiple parameters
  public Car(string modelName, string modelColor, int modelYear)
  {
    model = modelName;
    color = modelColor;
    year = modelYear;
  }

  static void Main(string[] args)
  {
    Car Ford = new Car("Mustang", "Red", 1969);
    Console.WriteLine(Ford.color + " " + Ford.year + " " + Ford.model);
  }
}


// Outputs Red 1969 Mustang
Constructors help reducing hte amount of code
public keyword is an access modifier, which is used to set the access level/visibility for classes, fields, methods and properties
C# has the following access modifiers:
| Modifier | Description |
|---|---|
| public | The code is accessible for all classes. |
| private | The code is only accessible within the same class. |
| protected | The code is accessible within the same class, or in a class that is inherited from that class. |
| internal | The code is only accessible within its own assembly, but not from another assembly. |
There's also two combinations: protected internal and private protected
If you declare a field with a public access modifier, it is accessible for all classes
if declare a field with a private access modifier, it can only be accessed within the same class
To control the visibility of class members (the security level of each individual class and class member)
To archieve "Encapsulation" - which is the process of making sure that "sensitive" data is hidden from users, this is done by declaring fields as private
By default, all members of a class are private if you don't specify an access modifier
class Car
{
  private string model = "Mustang";

  static void Main(string[] args)
  {
    Car myObj = new Car();
    Console.WriteLine(myObj.model);
  }
}
class Car
{
private string model = "Mustang";
}
class Program
{
static void Main(string[] args)
{
Car myObj = new Car(); // error
Console.WriteLine(myObj.model);
}
}'Car.model' is inaccessible due to its protection level
The field 'Car.model' is assigned but its value is never used
Encapsulation is to make sure that "sensitive" data is hidden from users, to achive this,
- declare fields/variables as private
- provide
publicgetandsetmethods, through properties, to access and update the value of aprivatefield
private variables can be access with properties
A property is like a combination of a variable and a method, and it has two methods: a get and a set method
class Person
{
  private string name; // field

  public string Name   // property
  {
    get { return name; }   // get method
    set { name = value; }  // set method
  }
}
Example explained:
- The
Nameproperty is associated with thenamefield. It is good practice to use the same name for both the property and the private field, but with an uppercase first letter - The
getmethod returns the value of the variable `name - The
setmethod assigns avalueto thenamevariable. Thevaluekeyword represents the value we assign to the property
C# also provides a way to use short-hand / automatic properties, where you do not have to define the field for the property, and you only have to write get; and set; inside the property
class Person
{
  public string Name  // property
  { get; set; }
}

class Program
{
  static void Main(string[] args)
  {
    Person myObj = new Person();
    myObj.Name = "Liam";
    Console.WriteLine(myObj.Name);
  }
}
Why Encapsulation?
- Better control of class members (reduce the possibility to mess up the code)
- Fields can be make read-only (if only use the
getmethod), or write-only (if only use thesetmethod) - Flexible: the programmer can change one part of the code without affecting other parts
- Increased security of data
In C#, it is possible to inherit fields and methods from one class to antoher. We group the "inheritance concept" into two categories
- Derived Class (child) - the class that inherits from another class
- Base Class (parent) - the class being inherited from
To inherit from a class, use the : symbol
class Vehicle  // base class (parent)
{
  public string brand = "Ford";  // Vehicle field
  public void honk()             // Vehicle method
  {
    Console.WriteLine("Tuut, tuut!");
  }
}

class Car : Vehicle  // derived class (child)
{
  public string modelName = "Mustang";  // Car field
}

class Program
{
  static void Main(string[] args)
  {
    // Create a myCar object
    Car myCar = new Car();

    // Call the honk() method (From the Vehicle class) on the myCar object
    myCar.honk();

    // Display the value of the brand field (from the Vehicle class) and the value of the modelName from the Car class
    Console.WriteLine(myCar.brand + " " + myCar.modelName);
  }
}
Why and When To Use "Inheritance"?
- It is useful for code reusability: reuse fields and methods of an existing class when you create a new class
If you don't want other classes to inherit from a class, use the sealed keyword
sealed class Vehicle
{
  ...
}

class Car : Vehicle
{
  ...
}
'Car': cannot derive from sealed type 'Vehicle'
Connect the application to the hardware Example: Linux Kernel
Collection of applicatons making up the OS Example: RHEL, Fedora, Ubuntu, Arch
Program that boot the OS Example: GRUB, ISOLINUX
Program that runs as a background process Example: httpd, nfsd, ntpd, ftpd, named, dhcpd
Method storing and organizing files Example: ext3, ext4, FAT, XFS, NTFS, Btrfs
Graphical subsystem
Graphical user interface on top of the OS Example: GNOME, KDE, Xfce, LXDE, Mate
Interface for typing commands on top of the OS
Command line interpreter that interprets the command line input and instructs the OS to perform any tasks or commands Example: Bash, tcsh, zsh

Initializes the screen and keyboard and test the main memory. This process also called POST(Power On Self Test). POST is a test a computer must complete to verify all hardware is working properly before starting the remainder of the boot process. POST checks RAM, hard drive, CDROM, keyboard, etc. Make sure all working properly.
BIOS software stored in motherboard. Remainder of the boot process is controlled by the OS. Originally, stored in motherboard. In modern computer systems, stored in flash memory so it can be rewritten without removing the chip from mobo. Easy to updates the BIOS firmware, but creates possibility for the computer to become infected with BIOS rootkits. BIOS upgrade that fails can brick the mobo permanently, unless the system includes some form or backups.
Most OSs do not use the BIOS after loading, instead accessing the hardware components directly.
UEFI replaces the BIOS. UEFI firmware implementations providing legacy support for BIOS services. UEFI can support remote diagnostics and repair of computers, even with no OS installed.

POST completed, system control passes from the BIOS to the boot loader. Boot loaded stored on one of the hard disk, either in the boot sector(for traditional BIOS/MBR systems) or the EFI partition( for more recent EFI/UEFI systems). The machine does not access any storage. Then, information on date, time, and the most important peripherals are loaded from CMOS.
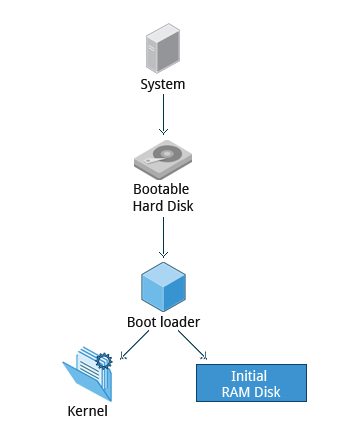
GRUB, ISOLINUX, DAS U-Boot. When booting Linux, boot loader is responsible for loading the kernel image and initial RAM disk or filesystem into the memory.

Boot loader has 2 stages.
First. For BIOS/MBR method, boot loader resides at the first sector of the hard disk, also known as the MBR. Size MBR is 512 bytes. In this stage, boot loader examines partition table and find bootable partition. Once it finds a bootable partition, then searches for the second stage boot loader, example GRUB, and loads it into RAM. For EFI/UEFI method, UEFI firmware reads its Boot Manager data to determine which UEFI application is to be launched from from where. The firmware then launches the UEFI application, example GRUB as defined in boot entry in firmware's boot manager.
Second. Resides under /boot. Splash screen displayed, allow us to choose OS to boot. After select OS, the boot loader loads kernel of the OS into RAM and passes control to it. Kernel always almost compressed , so its first job is to uncompress itself. Then, it will check and analyze the system hardware and initialize any hardware device drivers built into the kernel.
Initramfs filesystem image contains programs and binary files that perform all actions needed to mount the proper root filesystem, like providing kernel functionality for the needed filesystem and device drivers for mass storage controllers with a facility called udev, which responsible for figuring out which devices are present, locating device drivers they need to operate properly and loading them. After root filesystem has been found, it is checked for errors and mounted.
Mount program instructs the operating system that a filesystem is ready for use, and associates it with a particular point in the overall hierarchy of the filesystem(mount point). If successful, the initramfs is cleared from RAM and the init program on the root filesystem /sbin/init is executed.
Init handles the mounting and pivoting over to the final root filesystem. If special hardware drivers are needed before the mass storage can be accessed, they must be in the initramfs image.

End of the boot process, init starts a number of text-mode login prompts. If running GUI, will not see these.
Can access command shells using alt key + functions key. Most distros start six text terminals and one GUI terminal F1 or F2. In GUI, CTRL + ALT + (F2 to F7) for text console.
Usually default command shell is bash. Shell prints a text prompt indicating it is ready to accept commands.

Boot loader loads kernel and initramfs into memory, so it can be used directly by the kernel.
When kernel loaded in RAM, it immediately initialize and configure the computer's memory, also configures all the hardware attached to the system. Includes all processors, I/O subsystems, storage devices, etc.. Kernel also loads some necessary user space applications.


Once kernel has set up all its hardware and mounted root filesystem, kernel runs /sbin/init. This becomes initial process, which then starts other processes to get the system running. Most other processes on the system trace their origin ultimately to init; exceptions include the so called kernel processes. These are started by the kernel directly, and their job is to manage internal OS details.
Also, init responsible keeping the system running and shut down cleanly. One of its responsibilities is to act when necessary as a manager for all non-kernel processes; it cleans up after them upon completion, and restarts user login services as needed when users log in and out, and does the same for other background system services.
Traditionally is System V. This serial process has the system passing through a sequence of runlevels containing collections of scripts that start and stop services. Each runlevel supports a different mode of running the system. Within each runlevel, individual services can be set to run, or to be shut down if running.
All major distros moved away from this sequential runlevel method of system initialization.
SysVinit is old method. Two main alternatives developed to replace SysVinit.
- Upstart
- Developed by Ubuntu and first included in 2006
- Adopted in Fedora 9 (in 2008) and in RHEL 6 and its clones
- systemd
- Adopted by Fedora first (in 2011)
- Adopted by RHEL 7 and SUSE
- Replaced Upstart in Ubuntu 16.04
System with systemd start up faster than those with earlier init methods. Because it replaces a serialized set of steps with aggressive parallelization techniques, which permits multiple services to be initiated simultaneously.
Complicated startup shell scripts are replaces with simpler configuration files, which enumerate what has to be done before a service is started, how to execute service startup, and what conditions the service should indicate have been accomplished when startup is finished. /sbin/init now just points to /lib/systemd/systemd; i.e. systemd takes over the init process.
One most used command is systemctl for basic tasks.
- Starting, stopping, restarting a service (nfs as an example) on a currently running system:
sudo systemctl start|stop|restart nfs.service
- Enabling or disabling a system service from starting up at system boot:
sudo systemctl enable|disable nfs.service
In most cases, .service can be omitted.
- Different types of filesystems supported by Linux:
- Conventional dis filesystems: ext2, ext3, ext4, XFS, Btrfs, JFS, NTFS, etc.
- Flash storage filesystems: ubifs, JFFS2, YAFFS, etc.
- Database filesystems
- Special purpose filesystems: procfs, sysfs, tmpfs, squashfs, debugfs, etc.
A partition is a physically contiguous section of a disk.
A filesystem is a method of storing/finding files on a hard disk/usually in a partition.
A partition as a container in which a filesystem resides, although in some circumstances, a filesystem can span more than one partition if one uses symbolic links.
Comparison between filesystems in Windows and Linux.
| Windows | Linux | |
|---|---|---|
| Partition | Disk1 | /dev/sda1 |
| Filesystem Type | NTFS/VFAT | EXT3/EXT4/XFS/BTRFS.... |
| Mounting Parameters | DriveLetter | MountPoint |
| Base Folder (where OS is stored) | C:\ | / |
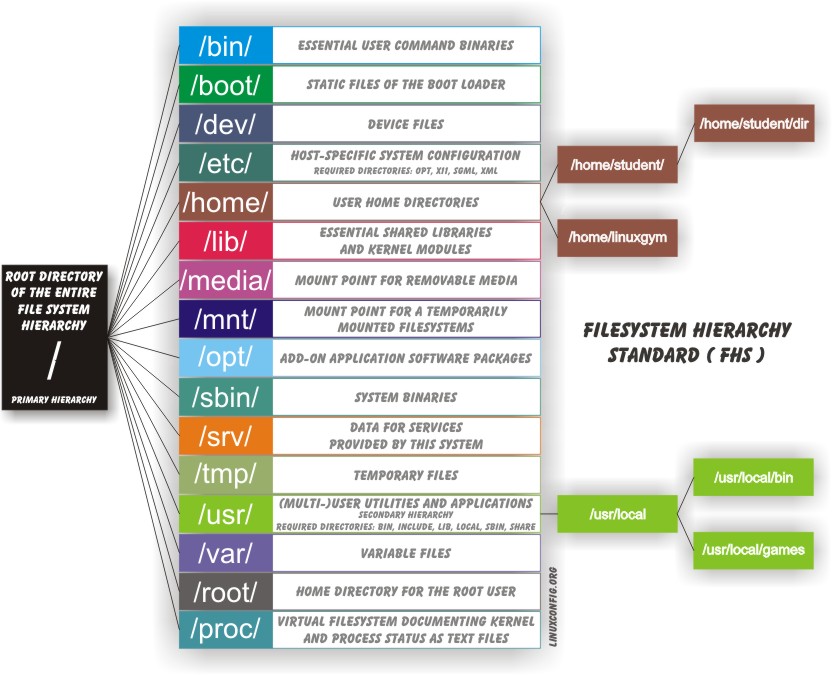
Linux systems store their important files according to a standard layout called the Filesystem Hierarchy Standard (FHS), maintained by The Linux Foundation. For more information, Filesystem Hierarchy Standard created by LSB Workgroup. This standard is designed to ensure that users, administrators, and developers can move between distributions without having to re-learn how the system is organized.
Linux uses the '/' character to separate paths, Windows uses '', and Linux does not have drive letters. Multiple drives and/or partitions are mounted as directories in the single filesystem. Removable media such as USB drives and CDs and DVDs will show up as mounted at /run/media/yourusername/disklabel for recent Linux systems, or under /media for older distros.
![The Filesystem Hierarchy Standard] (https://prod-edxapp.edx-cdn.org/assets/courseware/v1/66def40e2774fd96011565107706da2d/asset-v1:LinuxFoundationX+LFS101x+3T2018+type@asset+block/dirtree.jpg)
All Linux filesystem names are case-sensitive, so /boot, /Boot, and /BOOT represent three different directories or folders. Many distros distinguish between core utilities needed for proper system operation s and other programs, and place the latter in directories under /usr (think user).

- What is the main function of the system (server or desktop)?
- What types of packages are important to the organization? Example, web server, word processing, etc.
- How much hard disk is required and how much is available?
- How often are packages updated?
- How long is the support cycle for each release?
- Do you need kernel customization from the vendor or a third party?
- What hardware are you running on? Example, it might be X86, ARM, PPC, etc.
- Do you need long-tern stability?
Partition layout needs to be decided at the time of installation; it can be difficult to change later.

All installations include the bare minimum software for running a Linux distribution.

Linux distros are provided on removable media such as USB drives and CDs or DVDs. Most Linux distros also support booting a small image and downloading the rest of the system over the network.
Many installers can do an installation completely automatically, using a configuration file to specify installation options. This file is called a Kickstart file for Red Hat-based systems, an AutoYAST profile for SUSE-based systems, and a Preseed file for Debian-based systems.
After booting installation media, the installer starts and asks questions about how the system should be set up. This skipped if an automatic installation file is provided.
- Methods installation
- Re-partitioning your hard disk to free up enough room to permit dual boot (side-by-side) installation of Linux, along with your present OS.
- Using host machine hypervisor program (VMWare / Virtualbox)
- Booting off of and using a Live CD or USB stick
Preparing your computer for LFS101x.2
Linux can be GUI or CLI. For CLI, must remember which programs and commands.
Generally, in Linux system, X Window System is loaded as one of the final steps in the boot process.
A service called display manager keeps track of the displays being provided and loads the X server (so-called). DM also handles graphical logins and starts the appropriate desktop environment after a user logs in.
X Window System is rather old system; has certain deficiencies on modern systems (example, with security), as it has been stretched rather far from its original purposes. A newer system, known as Wayland, is gradually superseding it and was adopted as the default display system in Fedora 25.

A desktop environment consists of a session manager, which starts and maintains the components of the graphical session, and the window manager, which controls the placement and movement of windows, window title-bars, and controls.
These can be mixed, generally a set of utilities, session manager, and window manager are are used together as a unit, and together provide seamless de.
If dm is not started by default in the default runlevel, you can start X a different way, in text mode type startx. or start the display manager (gdm, lightdm, kdm, xdm, etc.) manually from command line.

X display manager starts at the end of the boot. Responsible for the graphic system, logging in the user starting de. Default dm for Gnome is gdm. kdm is for old KDE.
xdpyinfo | grep dim
Package often depend on each other. For example, because Firefox can communicate using SSL/TLS, it will depend on a package which provides the ability to encrypt and decrypt SSL and TLS communication, and will not install unless that package is also installed at the same time.
One utility handles the low-levels details of unpacking a package and putting the pieces in the right places. Most of the time, you will be working with a higher-level utility which knows how to download packages from the internet and can manage dependencies and groups for you.
dpkg is the underlying package manager for Debian. It can install, remove, and build packages. Unlike higher-level package management systems, it does not automatically download and install packages and satisfy their dependencies.
apt (Advanced Package Tool) is the higher-level package management system for Debian-based systems.
Generally, while each distribution within the Debian family uses apt, it creates its own user interface on top of it (for example, apt-get, aptitude, synaptic, Ubuntu Software Center, Update Manager, etc).

Developed by Red Hat, and adopted by a number of other distributions, including openSUSE, Mandriva, CentOS, Oracle Linux, others.
The high-level package manager differs between distributions: Red Hat family distributions have historically used the repository format used by yum (Yellowdog Updater, Modified), although recent Fedora uses a replacement, dnf, still using the same format. SUSE family distributions also use RPM, but the zypper interface. The GNOME also uses PackageKit as a unified interface.

RPM-based application.

GUI make easy tasks easier, command line make difficult tasks possible
Command line advantages:
- No GUI
- every task can be accomplished using command line
- can implement scripts for often-used tasks and series of procedures
- can sign into remote machines anywhere on the internet
- can run any apps using command line
- GUI vary among Linux distributions, command line does not.

halt/poweroff commands issue shutdown -h to halt the system
reboot issues shutdown -r
shutdown with msg and time; sudo shutdown -h 10:00 "test shutdown"
In general, executable programs and scripts should live in the /bin, /usr/bin, /sbin, /usr/sbin or /opt. Can also in /usr/local/bin and /usr/local/sbin or in user's space, /home/yuu/bin.
To locate it use which. if which cannot locate it, use whereis

Default directories should be Home directory. echo $HOME will print the exact path.
pwd = Display the present working directory
cd ~ or cd = Change to home directory
cd .. = Change to parent directory
cd - = Change to previous directory
Absolute pathname: begin with the root directory and follows the tree. start with /
Relative pathname: never start with /. start from present working directory.
Multiple slashes(/) between directories and files are allowed. But only one slash.
////usr//bin = /usr/bin
. = present directory
.. = parent directory
~ = home directory
Example:-
Absolute pathname method = cd /usr/bin
Relative pathname method = cd ../../usr/bin

tree command can check the directories and files. man tree for more information.
cd / change current directory to root directory.
ls list the content on current directory.
ls -a list the content on current directory including hidden files and directories.
ln utility used to create hard links.
ln -s used to create soft links/symbolic links/symlinks.
Example:-
ln file1 file2
ls -li = -i option is for ls to print the inode number. For this, both file showing the same inode number, both files actually same thing but different name.

Example:-
ln -s file1 file3
Symbolic links take no extra space on the filesystem. can be modified to point to different places. easy way to create shortcut. Soft links can point to objects on different filesystems, partitions, and/or disks and other media, which may or may not be available. dangling link, if link to the unavailable object.

pushd . to save current directory to the stack. popd to change directory to the last entry in the stack. dirs to list all directories in the stack.

Linux provides commands that help to renaming, removing, moving, create file, create empty file, create folder, changing timestamps, viewing files.
cat = for viewing files but it does not provide any scroll-back
tac = for viewing files backwards, starting with the last line. does not provide any scroll-back.
less = has paging program to view larger files. provide scroll-back capabilities and search and navigate the file. press h to check the help page.
tail = print last 10(default) lines of the file. tail -n 15 or tail -15 for the 15 lines
head = print first 10(default) lines of the file.head -n 15 or head -15 for the 15 lines
touch often used to set or update the access, change, and modify times of files. Can create empty file with touch .
touch with option -t can set the time.
touch -t 201912311200 testfile = the time for this file is December 31, 2019 12:00

mkdir is used to create a directory.
mkdir newdir
mkdir /usr/newdir
Removing empty dir using rmdir.
to remove all files inside the target dir, use rm -rf.

mv command can move and rename the file.
| Command | Usage |
|---|---|
| mv | Rename a file |
| rm | Remove a file |
| rm -f | Forcefully remove a file |
| rm -i | Interactively remove a file |
rmdir only works on empty directories.
rm -rf fast to remove directories and its tree.
| Command | Usage |
|---|---|
| mv | Rename a directory |
| rmdir | Remove an empty directory |
| rm -rf | Forcefully remove a directory recursively |
PS1 variable is the character string that is displayed as the prompt on the command line.
echo $PS1
\$
PS1="\u@\h \$ "
coop@quad64 $ echo $PS1
\u@\h \$
coop@quad64 $
When commands are executed, by default there are three standard file streams(or descriptors) always open for use: standard input(standard in or stdin), standard output(standard out or stdout) and standard error(or stderr).
| Name | Symbolic Name | Value | Example |
|---|---|---|---|
| standard input | stdin | 0 | keyboard |
| standard output | stdout | 1 | terminal |
| standard error | stderr | 2 | log file |
Usually, stdin is your keyboard, and stdout and stderr are printed on your terminal. Stderr is often redirected to an error logging file, while stdin is supplied by directing input to come from a file or from the output of a previous command through a pipe. Stdout is also often redirected into a file. Since stderr is where error messages are written, usually nothing will go there.
In Linux, all open files are represented internally by what are called file descriptors. Simply put, these are represented by numbers starting at zero. stdin is file descriptor 0, stdout is file descriptor 1, and stderr is file descriptor 2. Typically, if other files are opened in addition to these three, which are opened by default, they will start at file descriptor 3 and increase from there.
through command shell, we can redirect the three standard file streams so that we can get input from either a file or another command, instead of from our keyboard, and we can write out and errors to files or use them to provide input for subsequent commands.
for example, if we have a program called do_something that reads from stdin and writes to stdout and stderr, we can change its input source by using the less-than sign (<) followed by the name of the file to be consumed for input data:
do_something < input-file
if you want to send the output to a file, use the greater-than sign (>) as in:
do_something > output-file
because stderr is not the same as stdout, error messages will still be seen on the terminal windows in the above example.
if you want to redirect stderr to a separate file, you use stderr's file descriptor number(2), the greater-than sign (>), followed by the name of the file you want to hold everything the running command writes to stderr:
do_something 2> error-file
Note: by the same logic, do_something 1> output-file is the same as do_something > output-file
a special shorthand notation can send anything written to file descriptor 2 (stderr) to the same place as file descriptor 1 (stdout): 2>&1.
do_something > all-output-file 2>&1
bash permits an easier syntax for the above:
do_something >& all-output-file
unix/linux philosophy is to have many simple and short programs (or commands) cooperate together to produce quite complex results, rather that have one complex program with many possible options and modes of operation. in order to accomplish this, extensive use of pipes is made. you can pipe the output of one command or program into another as its input.
in order to do this, we use the vertical-bar, |, (pipe symbol) between commands as in:
command1 | command2 | command3
the above represents what we often call a pipeline, and allows Linux to combine the actions of several commands into one. This is extraordinarily efficient because command2 and command3** do not have to wait for the previous pipeline commands to complete before they can begin hacking at the data in their input streams; on multiple CPU or core system, the available computing power is much better utilized and things get done quicker.
furthermore, there is no need to save output in (temporary) files between the stages in the pipeline, which saves disk space and reduces reading and writing from disk, which is often the slowest bottleneck in getting something done.

main tools for doing the search are the locate and find utilities.
the locate utility program performs a search taking advantage of a previously constructed database of files and directories on your system, matching all entries that contain a specified character string. this can sometimes result in a very long list.
to get shorter and possibly more relevant list, we can use the grep program as a filter. grep will print only the lines that contain one or more specified strings, as in:
locate zip | grep bin
which will list all the files and directories with both zip and bin in their name.
locate utilizes a database created by a related utility, updatedb. most linux systems run this automatically once a day. however, you can update it at any time by just running updatedb from the command line as the root user.

| Wildcard | Result |
|---|---|
| ? | Matches any single character |
| * | Matches any string of characters |
| [set] | Matches any character in the set of characters, for example [adf] will match any occurrence of "a", "d", or "f" |
| [!set] | Matches any character not in the set of characters |
Uppercase:

À: Alt+0192
Â: Alt+0194
Ç: Alt+128
É: Alt+144
È: Alt+0200
Ê: Alt+0202
Ë: Alt+0203
Î: Alt+0206
Ï: Alt+0207
Ô: Alt+0212
Ù: Alt+0217
Û: Alt+0219
Ü: Alt+154
Π(ligature): Alt+0140

Lowercase:

à: Alt+133
â: Alt+131
ç: Alt+135
é: Alt+130
è: Alt+138
ê: Alt+136
ë: Alt+137
î: Alt+140
ï: Alt+139
ô: Alt+147
ù: Alt+151
û: Alt+150
ü: Alt+129
œ (ligature): Alt+0156

ø: Alt+0248
Uppercase:
É (E with acute accent): Ctrl + Shift + U, then 00C9
È (E with grave accent): Ctrl + Shift + U, then 00C8
Ê (E with circumflex accent): Ctrl + Shift + U, then 00CA
Ë (E with diaeresis/umlaut): Ctrl + Shift + U, then 00CB
À (A with grave accent): Ctrl + Shift + U, then 00C0
 (A with circumflex accent): Ctrl + Shift + U, then 00C2
Ô (O with circumflex accent): Ctrl + Shift + U, then 00D4
Î (I with circumflex accent): Ctrl + Shift + U, then 00CE
Û (U with circumflex accent): Ctrl + Shift + U, then 00DB
Ç (C with cedilla): Ctrl + Shift + U, then 00C7
Ï (I with diaeresis/umlaut): Ctrl + Shift + U, then 00CF
Π(Ligature OE): Ctrl + Shift + U, then 0152
Æ (Ligature AE): Ctrl + Shift + U, then 00C6
Ù (U with grave accent): Ctrl + Shift + U, then 00D9
Ÿ (Y with diaeresis/umlaut): Ctrl + Shift + U, then 0178
Lowercase:
é (e with acute accent): Ctrl + Shift + U, then 00E9
è (e with grave accent): Ctrl + Shift + U, then 00E8
ê (e with circumflex accent): Ctrl + Shift + U, then 00EA
ë (e with diaeresis/umlaut): Ctrl + Shift + U, then 00EB
à (a with grave accent): Ctrl + Shift + U, then 00E0
â (a with circumflex accent): Ctrl + Shift + U, then 00E2
ô (o with circumflex accent): Ctrl + Shift + U, then 00F4
î (i with circumflex accent): Ctrl + Shift + U, then 00EE
û (u with circumflex accent): Ctrl + Shift + U, then 00FB
ç (c with cedilla): Ctrl + Shift + U, then 00E7
ï (i with diaeresis/umlaut): Ctrl + Shift + U, then 00EF
œ (ligature oe): Ctrl + Shift + U, then 0153
æ (ligature ae): Ctrl + Shift + U, then 00E6
ù (u with grave accent): Ctrl + Shift + U, then 00F9
ÿ (y with diaeresis/umlaut): Ctrl + Shift + U, then 00FF
ø: Ctrl + Shift + U, then 00F8- Bienvenue
Welcome - Bonjour
Hello / Good morning / Good Afternoon - Salut
Hi/Bye (informal) - Coucou
Hye/Hi (informal) - Je m'appelle Amirul
My name is Amirul - Comment t'appelles tu?
What is your name? - Enchanté(e)
Nice to meet you - Bonsoir
Good evening - Bonne journée
Have a good day - Bonne soirée
Have a good evening - Bonne nuit
Good night - Comment vas tu?
How are you? - Comment ça va?
How are you? - Je vais [trés] bien
I am [very] well/good - Ça va bien
I'm doing well - Comment allez-vous?
How are you? (formal) - Et toi?
And you? - Au revoir
Good-bye - À bientôt
See you soon - À plus tard
See you later - Bon weekend
Have a good weekend - Joyeux anniversaire
Happy birthday - Bonne fête
Happy holiday/celebration - Bon appétit
Enjoy your meal - Félicitations
Congratulations - Meilleurs vœux
Best wishes - Bravo!
Congratulations!
- S'il te plaît
Please (singular/informal) - S'il vous plaît
Please (plural/formal) - Merci [beaucoup]
Thank you [very much] - De rien
You're welcome / nothing - Pardon
Sorry - Je suis désolé(e)
I'm sorry - Excuse(z)-moi
Excuse me / sorry - Navré(e)
I'm sorry - Mes excuses
My apologies - Puis-je avoir..?
Can I have..? - J'aimerais..
I would like.. - Je vous en prie
You're welcome (formal) - Parlez-vous anglais?
Do you speak english? - Je ne comprends pas
I don't understand - Je vous remercie
I thank you (formal) - Je vous prie de m'excuser
I beg your pardon (formal) - Je vous souhaite une bonne journée
I wish you a good day (formal) - S'il vous plaît, pourriez-vous m'aider?
Please, could you help me? (formal) - Je vous demande permission
I ask fo your permission (formal) - Je vous présente mes respects
I present you my respects (formal) - Je suis à votre disposition
I am at your disposal (formal) - Je vous en prie de m'excuser
I beg your pardon (formal)
- Un
1 - Deux
2 - Trois
3 - Quatre
4 - Cinq
5 - Six
6 - Sept
7 - Huit
8 - Neuf
9 - Dix
10 - Onze
11 - Douze
12 - Treize
13 - Quatorze
14 - Quinze
15 - Seize
16 - Dix-sept
17 - Dix-huit
18 - Dix-neuf
19 - Vingt
20 - Vingt et un
21 - Vingt deux
22 - Vingt trois
23 - Vingt quatre
24 - Vingt cinq
25 - Vingt six
26 - Vingt sept
27 - Vingt huit
28 - Vingt neuf
29 - Trente
30 - Trente et un
31 - Trente deux
32 - Trente trois
33 - Trente quatre
34 - Trente cinq
35 - Trente six
36 - Trente sept
37 - Trente huit
38 - Trente neuf
39 - Quarante
40 - Quarante et un
41 - Quarante deux
42 - Quarante trois
43 - Quarante quatre
44 - Quarante cinq
45 - Cinquante
50 - Cinquante et un
51 - Cinquante deux
52 - Cinquante trois
53 - Cinquante quatre
54 - Cinquante cinq
55 - Soixante
60 - Soixante et un
61 - Soixante deux
62 - Soixante trois
63 - Soixante quatre
64 - Soixante cinq
65 - Soixante-dix
70 - Soixante-onze
71 - Soixante-douze
72 - Soixante-treize
73 - Soixante-quatorze
74 - Soixante-quinze
75 - Soixante-seize
76 - Soixante-dix-sept
77 - Soixante-dix-huit
78 - Soixante-dix-neuf
79 - Quatre-vingt
80 - Quatre-vingt-un
81 - Quatre-vingt-deux
82 - Quatre-vingt-trois
83 - Quatre-vingt-quatre
84 - Quatre-vingt-cinq
85 - Quatre-vingt-dix
90 - Quatre-vingt-onze
91 - Quatre-vingt-douze
92 - Quatre-vingt-treize
93 - Quatre-vingt-quatorze
94 - Quatre-vingt-quinze
95 - Quatre-vingt-seize
96 - Quatre-vingt-dix-sept
97 - Quatre-vingt-dix-huit
98 - Quatre-vingt-dix-neuf
99 - Cent
100 - Cent un
101 - Deux cents
200 - Trois cents
300 - Quatre cents
400 - Cinq cents
500 - Six cents
600 - Sept cents
700 - Huit cents
800 - Neuf cents
900 - Mille
1000 - Deux Mille
2000 - Un million
1,000,000 - Deux millions
2,000,000 - Un milliard
1,000,000,000 - Deux milliards
2,000,000,000
- Bleu(e)
Blue - Rouge
Red - Jaune
Yellow - Vert(e)
Green - Marron
Brown - Violet(te)
Purple - Rose
Pink - Orange
Orange - Noir(e)
Black - Blanc(he)
White - Gris(e)
Gray - Turquoise
Turquoise - Argent
Silver - Or
Gold - Beige
Beige - Indigo
Indigo - Caramel
Caramel - Olive
Olive - Émeraude
Emerald - Sable
Sand - Fuchsia
Fuchsia - Bordeaux
Burgundy - Bronze
Bronze - Corail
Coral - Citron
Lemon
- Le pain
Bread - Du riz
Rice - Un oœf
Egg - La viande
Meat - Du porc
Pork - Du poulet
Chicken - Du boeuf
Beef - Du poisson
Fish - Des légumes
Vegetables - La laitue
Lettuce - Un oignon
Onion - De l'ail
Garlic - Un poivron
Bell pepper - Une carotte
Carrot - Une tomate
Tomato - Les fruits
Fruits - Une pomme
Apple - Une banane
Banana - Un ananas
Pineapple - Une fraise
Strawberry - Des raisins
Grapes - La boisson
Drink - Le lait
Milk - Du thé
Tea - Du sucre
Sugar - Sel
Salt - Du miel
Honey - Fromage
Cheese - Jambon
Ham - Pâtes
Pasta - Yaourt
Yogurt - Beurre
Butter - Pomme de terre
Potato - Salade
Salad - Pain de mie
Sliced bread - Croissant
Croissant - Baguette
French baguette - Crêpe
Pancake - Gâteau
Cake - Des féculents
Starchy food - Des protéines
Proteins - De l'édulcorant
Sweetener
- a
a - be
b - se
c - de
d - ə
e - ɛf
f - ʒe
g - aʃ
h - i
i - ʒi
j - ka
k - ɛl
l - ɛm
m - ɛn
n - o
o - pe
p - ky
q - ɛr
r - ɛs
s - te
t - y
u - ve
v - dubləve
w - iks
x - igʁɛk
y - zɛd
z
- Un chat
Cat - Un chien
Dog - Un oiseau
Bird - Un éléphant
Elephant - Un lion
Lion - Un ours
Bear - Un cheval
Horse - Un tigre
Tiger - Un taureau
Bull - Une tortue
Tortoise/Turtle - Un cochon
Pig - Une vache
Cow - Un mouton
Sheep - Un canard
Duck - Lapin
Rabbit - Girafe
Giraffe - Singe
Monkey - Poule
Chicken - Renard
Fox - Loup
Wolf - Serpent
Snake - Requin
Shark
- À
To/at/in - De
Of/from - Avec
With - Pour
For - Dans
In/inside - Sur
On,upon - Sous
Under/beneath - Devant
In front of - Derrière
Behind - Entre
Between - Parmi
Among - Autour de
Around - Près de
Near/close to - Chez
At/to the house/place of - Vers
Towards - Malgré
Despite/in spite of - Depuis
Since/from - Jusqu'à
Until/up to - À travers
Through/across - En face de
In front of/opposite
- Un
A (masculine) - Une
A (feminine) - Des
Some (plural)
- Aimer
To love / to like - Aller
To go - Être
To be - Avoir
To have - Apprendre
To learn - Arriver
To arrive - Boire
To drink - Chanter
To sing - Danser
To dance - Dire
To say / to tell - Écouter
To listen - Étudier
To study - Faire
To do / to make - Manger
To eat - Parler
To talk/speak - Penser
To think - Prendre
To take - Regarder
To watch / to look at - Rester
To stay / to remain - Savoir
To know(facts/information) - Voir
To see - Voyager
To travel - Courir
To run - Marcher
To walk - Sauter
To jump - Vite
Fast - Lentement
Slowly - Ralentir
To slow down - Accélérer
To speed up - Nager
To swim - Voler
To fly - Dormir
To sleep - Rire
To laugh - Pleurer
To cry - Crier
To shout / to scream - Travailler
To work - Jouer
To play - Écrire
To write - Lire
To read - Dessiner
To draw - Construire
To build - Transpirer
Sweat - Adorer
Love - Déteste
Hated - Grandir
To grow up - Partir
To leave - Pouvoir
To be able to
- Café
Coffee - Eau
Water - Bière
Beer - Exercice
Exercise - Entraînement
Training - Résumé
Summary - La table
Table - La chaise
Chair - Le sac
Bag - Le stylo
Pen - Le livre
Book - Le miroir
Mirror - Juif/Juive
- Chrétien(ne)
- Musulman(ne)
- Athéiste
- Démocratique
- Républicain
- Chemise
- Coton
- Mére
- Pére
- Frére
- Ami
- Grand(e)
- Petit(e)
- Blond(e)
- Timide
- Extraverti(e)
- Se trouve
- Megasin
- Maison
- Content(e)
- Heureux/Heureuse
- Triste
- Froid(e)
- En train de
| -er verbs | |
|---|---|
| Je -e | Nous -ons |
| Tu -es | Vous -ez |
| il/elle/on -e | ils/elles -ent |
| -ir verbs | |
|---|---|
| Je -s/is | Nous -ons/ssons |
| Tu -s/is | Vous -ez/ssez |
| il/elle/on -t/it | ils/elles -ent/ssent |
| -re/oir verbs | |
|---|---|
| Je -s | Nous -ons/ssons |
| Tu -s | Vous -ez/ssez |
| il/elle/on -t/ø | ils/elles -ent/ont/ssent |
Être to be |
|
|---|---|
| Je suis | Nous sommes |
| Tu es | Vous êtes |
| il/elle/on est | ils/elles sont |
Avoir to have |
|
|---|---|
| J'ai | Nous avons |
| Tu as | Vous avez |
| il/elle/on a | ils/elles ont |
Aller to go (irrégulier) |
|
|---|---|
| Je vais | Nous allons |
| Tu vas | Vous allez |
| il/elle/on vas | ils/elles vont |
Partir to leave |
|
|---|---|
| Je pars | Nous partons |
| Tu pars | Vous partez |
| il/elle/on part | ils/elles partent |
Pouvoir to be able to (irrégulier) |
|
|---|---|
| Je peux | Nous pouvons |
| Tu peux | Vous pouvez |
| il/elle/on peut | ils/elles peuvent |
Parler to talk/speak |
|
|---|---|
| Je parle | Nous parlons |
| Tu perles | Vous parlez |
| il/elle/on parle | ils/elles parlent |
voir to see |
|
|---|---|
| Je vois | Nous voyons |
| Tu vois | Vous voyez |
| il/elle/on voit | ils/elles voient |
Grandir to grow |
|
|---|---|
| Je grandis | Nous grandissons |
| Tu grandis | Vous grandissez |
| il/elle/on grandit | ils/elles grandissent |
Savoir to know (irrégulier) |
|
|---|---|
| Je sais | Nous savons |
| Tu sais | Vous savez |
| il/elle/on sait | ils/elles savent |
Connaître to know |
|
|---|---|
| Je connais | Nous connaissons |
| Tu connais | Vous connaissez |
| il/elle/on connaît | ils/elles connaisse |
Mettre to put |
|
|---|---|
| Je mets | Nous mettons |
| Tu mets | Vous mettez |
| il/elle/on met | ils/elles mettent |
Dire to say |
|
|---|---|
| Je dis | Nous disons |
| Tu dis | Vous dites (irrégulier) |
| il/elle/on dit | ils/elles disent |
Vouloir to want (irrégulier) |
|
|---|---|
| Je veux | Nous voulons |
| Tu veux | Vous voulez |
| il/elle/on veut | ils/elles veulent (irrégulier) |
Donner to give |
|
|---|---|
| Je donne | Nous donnons |
| Tu donnes | Vous donnez |
| il/elle/on donne | ils/elles donnent |
Manger to eat |
|
|---|---|
| Je mange | Nous mangeons |
| Tu manges | Vous mangez |
| il/elle/on mange | ils/elles mangent |
Marcher
je marche
tu marches
il marche
nous marchons
vous marchez

Sauter
je saute
tu sautes
il saute
nous sautons
vous sautez
ils sautent

Nager
je nage
tu nages
il nage
nous nageons
vous nagez
ils nagent

Jouer
je joue
tu joues
il joue
nous jouons
vous jouez
ils jouent

Chanter
je chante
tu chantes
il chante
nous chantons
vous chantez
ils chantent

Manger
je mange
tu manges
il mange
nous mangeons
vous mangez
ils mangent

Parler
je parle
tu parles
il parle
nous parlons
vous parlez
ils parlent

Danser
je danse
tu danses
il danse
nous dansons
vous dansez
ils dansent

Étudier
je étudie
tu étudies
il étudie
nous étudiions
vous étudiiez
ils étudiaient

Regarder
je regarde
tu regardes
il regarde
nous regardons
vous regardez
ils regardent

Travailler
je travaille
tu travailles
il travaille
nous travaillons
vous travaillez
ils travaillent

Voyager
je voyage
tu voyages
il voyage
nous voyageons
vous voyagez
ils voyagent

Grandir
je grandis
tu grandis
il grandit
nous grandissons
vous grandissez
ils grandissent

Courir
je cours
tu cours
il court
nous courons
vous courez
ils courent

Finir
je finis
tu finis
il finit
nous finissons
vous finissez
ils finissent

Choisir
je choisis
tu choisis
il choisit
nous choisissons
vous choisissez
ils choisissent

Réfléchir
je réfléchis
tu réfléchis
il réfléchit
nous réfléchissons
vous réfléchissez
ils réfléchissent

Réussir
je réussis
tu réussis
il réussit
nous réussissons
vous réussissez
ils réussissent

Obéir
je obéis
tu obéis
il obéit
nous obéissons
vous obéissez
ils obéissent

Punir
je punis
tu punis
il punit
nous punissons
vous punissez
ils punissent

Rougir
je rougis
tu rougis
il rougit
nous rougissons
vous rougissez
ils rougissent

Réagir
je réagis
tu réagis
il réagit
nous réagissons
vous réagissez
ils réagissent

Prendre
je prends
tu prends
il prendre
nous prenons
vous prenez
ils prennent

Comprendre
je comprends
tu comprends
il comprend
nous comprenons
vous comprenez
ils comprennent

Mettre
je mets
tu mets
ils met
nous mettons
vous mettez
ils mettent

Vendre
je vends
tu vends
il vend
nous vendons
vous vendez
ils vendent

Répondre
je réponds
tu réponds
il répond
nous répondons
vous répondez
ils répondent

Conduire
je conduis
tu conduis
il conduit
nous conduisons
vous conduisez
ils conduisent

Défendre
je défends
tu défends
il défend
nous défendons
vous défendez
ils défendent

Perdre
je perds
tu perds
il perd
nous perdons
vous perdez
ils perdent

Croire
je crois
tu crois
il croit
nous croyons
vous croyez
nous croient

Vouloir
je veux
tu veux
il veut
nous voulons
vous voulez
ils veulent

Savoir
je sais
tu sais
il sait
nous savons
vous savez
ils savent

Recevoir
je reçois
tu reçois
il reçoit
nous recevons
vous recevez
ils reçoivent

Pouvoir
je peux
tu peux
il peut
nous pouvons
vous pouvez
ils peuvent

Boire
je bois
tu bois
il boit
nous buvons
vous buvez
ils boivent

Rire
je ris
tu ris
il rit
nous rions
vous riez
ils rient

Lire
je lis
tu lis
il lit
nous lisons
vous lisez
ils lisent

Faire
je fais
tu fais
il fait
nous faisons
vous faites
ils font

Partir
je partis
tu partis
il partit
nous partons
vous partez
ils partent

Dormir
je dors
tu dors
il dort
nous dormons
vous dormez
ils dorment

Sortir
je sors
tu sors
il sort
nous sortons
vous sortez
nous sortent- La semaine
- L'année \ L'an
- Lundi
- Mardi
- Mercredi
- Jeudi
- Vendredi
- Samedi
- Dimanche
- Les mois
- Janvier
- Février
- Mars
- Avril
- Mai
- Juin
- Juillet
- Août
- Septembre
- Octobre
- Novembre
- Décembre
- Quelle heure est-il?
- Il est une heure
- Il est deux heures
- Il est trios heures
- Il est six heures
- Il est une heure et quart
- Il est deux heures et demie
- Il est trios heures moins quart
- Il est dix heures vingt
- Il est onze heures moins cinq
10:55
- Il est une heure
- Il est deux heures
- Nous sommes lundi
- Nous sommes jeudi
- Nous sommes samedi
- Nous sommes Dimanche
- Je viens de..
- D'où viens tu?
- D'où vient il/elle?
- Elle vient de/d'..
- Nous venons de/d'..
- Il es juif
- Tu es chrétien
- Je suis musulman
- Elle est athéiste
- C'est un pays démocratique
- Le président est républicain
- Le chemise est en coton
- C'est ma mère
- C'est l'ami de mon frère
- Elle est grande
- Nous sommes petits
- Je suis blonde
- Je suis timide
- Le garçon est extraverti
- Lyon se trouve en France
- Je suis dans le megasin
- Ma mère est à la maison
- Je suis content/heureux
- Elle est triste
- La nourriture est froide
- Je suis en train de marcher
- Ils sont en train de sauter
- Mon père est en train de courir
- Les parents
- La mère
- Le père
- Les proches
- Le frère
- La soeur
- Les frères et soeurs
- Le grand-père
- La grand-mère
- Les grand-parents
- L'oncle
- La tante
- Le/La cousin(e)
- Le fils
- La fille
- Le petit fils
- La petite fille
- L'époux(se)
- L'arrière grand-père
- L'arrière grand-mère
- L'arrière petit fils
- L'arrière petite fille
- Dans ma famille, j'ai 1 mère, 1 père, 4 grand-parents, 7 oncles, 9 cousins
- Dans la famille de mon époux, il y a 1 mère, 1 frère, 10 oncles, 25 cousins
- Quoi
- Qui
- Pourquoi
- Où
- Combien
- Quand
- Comment
- Content(e)
- Triste
- Excité(e)
- Fatigué(e)
- En colère
- Préoccupé(e)
- S'ennuyer
- Confus(e)
- Amoureux(se)
- Avoir peur/Être effrayé(e)
- Frustré(e)
- Surpris(e)
- [In]comfortable
- Malaisé(e)/Embarrassé(e)
- Timide
- Nerveux(se)
- Anxieux(se)
- Sentir/Se sentir
| Se sentir | |
|---|---|
| Je me sens | Nous sentons |
| Tu te sens | Vous sentez |
| Il/elle/on se sent | Ils/elles se sentent |
- Me sentir vs Être
    - Comment vas-tu?
    - Comment te sens-tu?
- La tête
- Le visage
- Les yeux
- Les oreilles
- La poitrine
- Les bras
- Les jambes
- Les pieds
- Les mains
- Les doigts
- Les orteils
- Le dos
- Le genou
- Le coude
- L'épaule
- La cheville
- Les dents
- L'estomac
- Les hanches
- Les cheveux
- Le poignet
- Toucher
| Toucher | |
|---|---|
| Je touche | Nous touchons |
| Tu touches | Vous touchez |
| Il/elle/on touche | Ils/elles touchent |
| French Phrase | English Translation |
|---|---|
| J'aime | I like |
| Je n'aime pas | I don't like |
| J'adore | I love |
| Je déteste | I hate |
| Je préfère | I prefer |
| Je suis fan de | I am a fan of |
| Je trouve que | I think that |
| Je suis d'accord | I agree |
| Je ne suis pas d'accord | I disagree |
| Je suis intéressé(e) par | I am interested in |
| Je ne suis pas intéressé(e) par | I am not interested in |
| Je suis excité(e) | I am excited |
| Je suis déçu(e) | I am disappointed |
| Je suis surpris(e) | I am surprised |
| Je suis en colère | I am angry |
| French Phrase | English Translation |
|---|---|
| Je suis fatigué(e) | I am Tired |
| Je me sens anxieux(se) | I feel anxious |
| Je suis Préoccupé(e) | I am worried |
| Tu te sens triste | You feel sad |
| Nous sommmes contents | We are happy |
| Ils sont en colère | They are angry |
| Elle s'ennuie | She is bored |
- Faire de l'exercice
- Faire du vélo
- J'aime nager
- Je n'aime pas danser
- J'adore faire du vélo
- Résumé de la leçon 1
- Je viens de [pays]
- Quel est ton prénom?
- Comment vas-tu?
- Comment te sens-tu?
Je suis I am
Il parle He speaks
Ils/Elles peuvent They can
Tu es You are
Nous allons / On va We go
Elle voit She sees
J'ai I have
Ils/Elles sont They are
Je parle I speak
Tu peux You can
Nous sommes / On est We are
Vous partez You all leave
Je vois I see
Ils/Elles ont They have
Je sais I know
Il dit He says
Ils/elles veulent They want
Nous mangeons / On mange We eat
Elle donne She gives
Je mets I put
Ils/Elles savent They know
Vous dites Y'all say
Je veux I want
Nous connaissons / On connait We know
Tu manges You eat
Je donne I give
Elle met She puts
- Une série originale..
An original series.. - Musique suspende
Suspenseful music - Bonjour
Good morning / hello - C'est bon
It's good - Allez
Go on - On se dépêche
We hurry
| (dépêcher) verbs | |
|---|---|
| Je (dépêche) | Nous (dépêchons) |
| Tu (dépêches) | Vous (dépêchez) |
| il/elle/on (dépêche) | ils/elles (dépêchent) |
- On n'a pas toute la nuit
We don't have all night - Musique douce
Soft music - C'est le collier de la Reine
It's the queen's necklace - Ils le mettent aux enchères
They put it up for auction
| (mettre) verbs | |
|---|---|
| Je (mets) | Nous (mettons) |
| Tu (mets) | Vous (mettez) |
| il/elle/on (met) | ils/elles (mettent) |
Il était une fois une petite fille nommée Sophie. Sophie aimait passer du temps dans le jardin de sa grand-mère. Un jour, alors qu'elle jouait dans le jardin, elle aperçut un magnifique papillon aux couleurs vives. Le papillon virevoltait de fleur en fleur, attirant l'attention de Sophie.
Curieuse, Sophie décida de suivre le papillon. Elle le poursuivit à travers le jardin, en essayant de l'attraper du bout des doigts. Mais le papillon était trop rapide et se posait toujours juste hors de sa portée.
Finalement, le papillon se posa sur une fleur. Sophie s'approcha doucement, espérant ne pas effrayer le papillon. Elle tendit la main et le papillon se posa délicatement sur son doigt.
Sophie était enchantée. Elle regarda le papillon de près, admirant ses ailes colorées. Puis, elle le laissa s'envoler, le regardant disparaître dans le ciel.
Depuis ce jour, Sophie aimait observer les papillons dans le jardin de sa grand-mère. Chaque fois qu'elle en voyait un, elle se rappelait du moment magique où elle avait pu tenir un papillon sur son doigt.
Fin.
Once upon a time, there was a little girl named Sophie. Sophie loved spending time in her grandmother's garden. One day, while she was playing in the garden, she spotted a beautiful butterfly with vibrant colors. The butterfly was fluttering from flower to flower, catching Sophie's attention.
Curious, Sophie decided to follow the butterfly. She chased it through the garden, trying to catch it with her fingertips. But the butterfly was too fast and always landed just out of her reach.
Finally, the butterfly landed on a flower. Sophie approached slowly, hoping not to scare the butterfly away. She reached out her hand, and the butterfly gently landed on her finger.
Sophie was enchanted. She looked closely at the butterfly, admiring its colorful wings. Then, she let it fly away, watching it disappear into the sky.
Since that day, Sophie loved observing butterflies in her grandmother's garden. Every time she saw one, she remembered the magical moment when she had held a butterfly on her finger.
The End.
Il était une fois une petite fille appelée le Petit Chaperon Rouge. Un jour, sa mère lui demanda de porter un panier de nourriture à sa grand-mère malade. En chemin, elle rencontra un loup qui essaya de la tromper. Mais grâce à son ingéniosité, le Petit Chaperon Rouge réussit à échapper au loup et à sauver sa grand-mère.
Au cœur d'une forêt enchantée, une princesse nommée Aurore tomba dans un profond sommeil à cause d'un sort jeté par une sorcière maléfique. Pendant de nombreuses années, elle resta endormie jusqu'à ce qu'un prince courageux vienne la réveiller d'un baiser d'amour véritable.
Dans une basse-cour, un caneton était souvent rejeté par ses frères et sœurs à cause de sa différence. Il était plus grand et plus maladroit. Mais un jour, il réalisa qu'il n'était pas un canard ordinaire, mais un magnifique cygne. Finalement, il trouva sa véritable place parmi les siens.
Un lion puissant se retrouva piégé dans un filet tendu par des chasseurs. Une petite souris passa par là et, avec son courage, rongea les cordes pour libérer le lion. Reconnaissant, le lion comprit que même les plus petites créatures peuvent rendre de grands services.
Le Petit Poucet était un garçon très malin et audacieux. Perdu dans la forêt avec ses frères, il utilisa des miettes de pain pour retrouver son chemin et les guider en toute sécurité jusqu'à leur maison. Grâce à son intelligence, ils échappèrent aux dangers et retrouvèrent leur famille.
Boot process:
- Machine's BIOS or boot firmware loads and runs a boot loader
- Boot loader finds the kernel image on disk, loads it into memory, and starts it
- Kernel initializes the devices and its drivers
- Kernel mounts the root filesystem
- Kernel starts a program called
initwith process ID of 1. This point is theuser space start - Init sets the rest of the system processes in motion
- At some point, init starts a process allowing you to log in, usually at the end or near the end of the boot sequence
View kernel's boot and runtime diagnostic messages using journalctl, journalctl -k messages from the current boot, journalctl -b messages from the current boot.
If no systemd, can check for a logfile such as /var/log/kern.log or run dmesg command to view messages in the kernel ring buffer.
Startup scripts are designed to send messages to the console that are erased after the boot process finishes. However, systemd captures diagnostic messsages from startup and runtime that would normally go to the console.
Linux kernel initializes in general order:
- CPU inspection
- Memory inspection
- Device bus discovery
- Device discovery
- Auxiliary kernel subsystem setup (networking and the like)
- Root filesystem mount
- User space start
Linux kernel starts with a set of text-based kernel parameters containing a few additional system details.
View the parameters passed to system currently running kernel by looking at the /proc/cmdline.
Many parameters are unimportant, but one that is critical is the root parameter. This is the location of the root filesystem.
ro parameter instructs the kernel to mount root filesystem in read-only mode upon user space start. This to ensures that fsck can check the root filesystem before anything. Then, bootup process remounts the root filesystem in read-write mode.
Upon encountering a parameter that it doesn't understand, the linux kernel saves that parameter, later passes the parameter to init when performing the user space start.
man bootparam for more information about basic boot parameters.
For specific, kernel-params.txt a reference file that comes with the Linux kernel
These parameters are typically passed through the bootloader configuration (like GRUB) in /etc/default/grub (or the configuration file specific to your bootloader) or by editing bootloader entries during the boot process. The actual list and availability of parameters can vary depending on the kernel version and specific distribution of Linux being used.
-
Root Filesystem Parameters:
root=<device>: Specifies the root filesystem. For example,root=/dev/sda1root=UUID=17f12d53-c3d7-4ab3-943e-a0a72366c9fa.ro: Mounts the root filesystem as read-only.
-
Boot Parameters:
quiet: Suppresses most boot messages.splash: Shows a graphical splash screen during boot (if supported).nomodeset: Disables kernel mode setting (KMS) for graphical boot.
-
Debugging and Logging Parameters:
debug: Enables debugging information.loglevel=<level>: Sets the kernel log level (0-7, higher numbers display more messages).
-
Hardware and Architecture Parameters:
acpi=<off | strict | ...>: Controls Advanced Configuration and Power Interface (ACPI) behavior.noapic: Disables the Advanced Programmable Interrupt Controller (APIC).nolapic: Disables the local APIC.
-
Kernel Behavior Parameters:
init=<path>: Specifies the initial userspace program. For example,init=/bin/bash.panic=<seconds>: Sets the time (in seconds) before a kernel panic occurs.
-
Memory Parameters:
mem=<amount>[K | M | G]: Limits the amount of memory usable by the system.memmap=<exactmap | topdown | bottomup>[size]: Defines a memory map for specific addresses.
-
Processor and CPU Parameters:
noexec: Disables CPU execution protection.maxcpus=<number>: Limits the maximum number of CPUs used by the kernel.
-
Network Parameters:
ip=<client-ip>:<server-ip>:<gw-ip>:<netmask>:<hostname>:<device>:<autoconf>: Sets network configuration during boot (used in diskless systems).
-
Security Parameters:
selinux=<0 | 1>: Enables or disables SELinux (Security-Enhanced Linux).apparmor=<0 | 1>: Enables or disables AppArmor security module.
Skip
- https://www.guru99.com/unix-linux-tutorial.html
- https://www.youtube.com/watch?v=Sy03p-FbaVI
- https://www.linuxfromscratch.org/lfs/downloads/stable-systemd/LFS-BOOK-12.0-NOCHUNKS.html
-
Category: Linux
- Activity: Continue Linux From Scratch
- Details:
-
Category: Web Development
- Activity: Start Full Stack Web App using Vue.js & Express.js
- Details:
- Category: Linux
- Activity: Continue Linux From Scratch
- Details: How to build LFS system.
Install Software from Source Code
Building and Installing Software Packages for Linux
Beginner's Guide to Installing from Source
Filesystem Hierarchy Standard (FHS) Version 3.0
Linux Standard Base (LSB) Version 5.0 (2015)
-
Acl: This package contains utilities to administer Access Control Lists, which are used to define fine-grained discretionary access rights for files and directories.
-
Attr: This package contains programs for managing extended attributes on file system objects.
-
Autoconf: This package supplies programs for producing shell scripts that can automatically configure source code from a developer's template. It is often needed to rebuild a package after the build procedure has been updated.
-
Automake: This package contains programs for generating Make files from a template. It is often needed to rebuild a package after the build procedure has been updated.
-
Bash: This package satisfies an LSB core requirement to provide a Bourne Shell interface to the system. It was chosen over other shell packages because of its common usage and extensive capabilities.
-
Bc: This package provides an arbitrary precision numeric processing language. It satisfies a requirement for building the Linux kernel.
-
Binutils: This package supplies a linker, an assembler, and other tools for handling object files. The programs in this package are needed to compile most of the packages in an LFS system.
-
Bison: This package contains the GNU version of yacc (Yet Another Compiler Compiler) needed to build several of the LFS programs.
-
Bzip2: This package contains programs for compressing and decompressing files. It is required to decompress many LFS packages.
-
Check: This package provides a test harness for other programs.
-
Coreutils: This package contains a number of essential programs for viewing and manipulating files and directories. These programs are needed for command line file management, and are necessary for the installation procedures of every package in LFS.
-
DejaGNU: This package supplies a framework for testing other programs.
-
Diffutils: This package contains programs that show the differences between files or directories. These programs can be used to create patches, and are also used in many packages' build procedures.
-
E2fsprogs: This package supplies utilities for handling the ext2, ext3 and ext4 file systems. These are the most common and thoroughly tested file systems that Linux supports.
-
Expat: This package yields a relatively small XML parsing library. It is required by the XML::Parser Perl module.
-
Expect: This package contains a program for carrying out scripted dialogues with other interactive programs. It is commonly used for testing other packages.
-
File: This package contains a utility for determining the type of a given file or files. A few packages need it in their build scripts.
-
Findutils: This package provides programs to find files in a file system. It is used in many packages' build scripts.
-
Flex: This package contains a utility for generating programs that recognize patterns in text. It is the GNU version of the lex (lexical analyzer) program. It is required to build several LFS packages.
-
Gawk: This package supplies programs for manipulating text files. It is the GNU version of awk (Aho-Weinberg-Kernighan). It is used in many other packages' build scripts.
-
GCC: This is the Gnu Compiler Collection. It contains the C and C++ compilers as well as several others not built by LFS.
-
GDBM: This package contains the GNU Database Manager library. It is used by one other LFS package, Man-DB.
-
Gettext: This package provides utilities and libraries for the internationalization and localization of many packages.
-
Glibc: This package contains the main C library. Linux programs will not run without it.
-
GMP: This package supplies math libraries that provide useful functions for arbitrary precision arithmetic. It is needed to build GCC.
-
Gperf: This package produces a program that generates a perfect hash function from a set of keys. It is required by Udev.
-
Grep: This package contains programs for searching through files. These programs are used by most packages' build scripts.
-
Groff: This package contributes programs for processing and formatting text. One important function of these programs is to format man pages.
-
GRUB: This is the Grand Unified Boot Loader. It is the most flexible of several boot loaders available.
-
Gzip: This package contains programs for compressing and decompressing files. It is needed to decompress many packages in LFS.
-
Iana-etc: This package provides data for network services and protocols. It is needed to enable proper networking capabilities.
-
Inetutils: This package supplies programs for basic network administration.
-
Intltool: This package contributes tools for extracting translatable strings from source files.
-
IProute2: This package contains programs for basic and advanced IPv4 and IPv6 networking. It was chosen over the other common network tools package (net-tools) for its IPv6 capabilities.
-
Kbd: This package produces key-table files, keyboard utilities for non-US keyboards, and a number of console fonts.
-
Kmod: This package supplies programs needed to administer Linux kernel modules.
-
Less: This package contains a very nice text file viewer that allows scrolling up or down when viewing a file. Many packages use it for paging the output.
-
Libcap: This package implements the userspace interfaces to the POSIX 1003.1e capabilities available in Linux kernels.
-
Libelf: The elfutils project provides libraries and tools for ELF files and DWARF data. Most utilities in this package are available in other packages, but the library is needed to build the Linux kernel using the default (and most efficient) configuration.
-
Libffi: This package implements a portable, high level programming interface to various calling conventions. Some programs may not know at the time of compilation what arguments are to be passed to a function. For instance, an interpreter may be told at run-time about the number and types of arguments used to call a given function. Libffi can be used in such programs to provide a bridge from the interpreter program to compiled code.
-
Libpipeline: The Libpipeline package supplies a library for manipulating pipelines of subprocesses in a flexible and convenient way. It is required by the Man-DB package.
-
Libtool: This package contains the GNU generic library support script. It wraps the complexity of using shared libraries into a consistent, portable interface. It is needed by the test suites in other LFS packages.
-
Libxcrypt: This package provides the libcrypt library needed by various packages (notably, Shadow) for hashing passwords. It replaces the obsolete libcrypt implementation in Glibc.
-
Linux Kernel: This package is the Operating System. It is the Linux in the GNU/Linux environment.
-
M4: This package provides a general text macro processor useful as a build tool for other programs.
-
Make: This package contains a program for directing the building of packages. It is required by almost every package in LFS.
-
Man-DB: This package contains programs for finding and viewing man pages. It was chosen instead of the man package because of its superior internationalization capabilities. It supplies the man program.
-
Man-pages: This package provides the actual contents of the basic Linux man pages.
-
Meson: This package provides a software tool for automating the building of software. The main goal of Meson is to minimize the amount of time that software developers need to spend configuring a build system. It's required to build Systemd, as well as many BLFS packages.
-
MPC: This package supplies arithmetic functions for complex numbers. It is required by GCC.
-
MPFR: This package contains functions for multiple precision arithmetic. It is required by GCC.
-
Ninja: This package furnishes a small build system with a focus on speed. It is designed to have its input files generated by a higher-level build system, and to run builds as fast as possible. This package is required by Meson.
-
Ncurses: This package contains libraries for terminal-independent handling of character screens. It is often used to provide cursor control for a menuing system. It is needed by a number of the packages in LFS.
-
Openssl: This package provides management tools and libraries relating to cryptography. These supply cryptographic functions to other packages, including the Linux kernel.
-
Patch: This package contains a program for modifying or creating files by applying a patch file typically created by the diff program. It is needed by the build procedure for several LFS packages.
-
Perl: This package is an interpreter for the runtime language PERL. It is needed for the installation and test suites of several LFS packages.
-
Pkgconf: This package contains a program which helps to configure compiler and linker flags for development libraries. The program can be used as a drop-in replacement of pkg-config, which is needed by the building system of many packages. It's maintained more actively and slightly faster than the original Pkg-config package.
-
Procps-NG: This package contains programs for monitoring processes. These programs are useful for system administration, and are also used by the LFS Bootscripts.
-
Psmisc: This package produces programs for displaying information about running processes. These programs are useful for system administration.
-
Python 3: This package provides an interpreted language that has a design philosophy emphasizing code readability.
-
Readline: This package is a set of libraries that offer command-line editing and history capabilities. It is used by Bash.
-
Sed: This package allows editing of text without opening it in a text editor. It is also needed by many LFS packages' configure scripts.
-
Shadow: This package contains programs for handling passwords securely.
-
Sysklogd: This package supplies programs for logging system messages, such as those emitted by the kernel or daemon processes when unusual events occur.
-
Sysvinit: This package provides the init program, the parent of all the other processes on a running Linux system.
-
Udev: This package is a device manager. It dynamically controls the ownership, permissions, names, and symbolic links of device nodes in the /dev directory when devices are added to or removed from the system.
-
Tar: This package provides archiving and extraction capabilities of virtually all the packages used in LFS.
-
Tcl: This package contains the Tool Command Language used in many test suites.
-
Texinfo: This package supplies programs for reading, writing, and converting info pages. It is used in the installation procedures of many LFS packages.
-
Util-linux: This package contains miscellaneous utility programs. Among them are utilities for handling file systems, consoles, partitions, and messages.
-
Vim: This package provides an editor. It was chosen because of its compatibility with the classic vi editor and its huge number of powerful capabilities. An editor is a very personal choice for many users. Any other editor can be substituted, if you wish.
-
Wheel: This package supplies a Python module that is the reference implementation of the Python wheel packaging standard.
-
XML::Parser: This package is a Perl module that interfaces with Expat.
-
XZ Utils: This package contains programs for compressing and decompressing files. It provides the highest compression generally available and is useful for decompressing packages in XZ or LZMA format.
-
Zlib: This package contains compression and decompression routines used by some programs.
-
Zstd: This package supplies compression and decompression routines used by some programs. It provides high compression ratios and a very wide range of compression / speed trade-offs.
[WIP]
| Version |
|---|
| vue@3.4.15 |
Sign up for free
to join this conversation on GitHub.
Already have an account?
Sign in to comment