NOTE: The Tree-sitter API and documentation has changed and improved since this guide was created. I can't guarantee this is up to date.
Tree-sitter is the new way Atom is providing language recognition features, such as syntax highlighting, code folding, autocomplete, and more. In contrast to TextMate grammars, which work by regex matching, Tree-sitter will generate an entire syntax tree. But more on that can be found in it's own docs.
Here, we look at making one from scratch.
Building a Tree-sitter parser will require the following tools:
Node.js:- I recommend using
nvmto install this. Doing so allows you to have multiple versions of node installed, which helps if you also have other JS projects. - The version we will use is the one Atom is currently using. As of writing this, it's 8.9.3 (determined by the Electron version Atom is using).
- I recommend using
- Build tools:
node-gyp. I believe the only requirements are those for installing this. It has instructions for Linux, macOS, and Windows. Once these dependencies are set up, install node-gyp withnpm install -g node-gyp- For the dependencies on Windows, I ran the command
npm install --global --production windows-build-toolsusing an administrator command prompt. It also required changing the owner of the generated directory to your user, as described here
- IMPORTANT: The
pythoncommand must be pointing to Python 2.node-gyp(used to build the parser) uses this to run it's Python scripts, and they are incompatible with Python 3. - A familiarity with JavaScript will help, but is not essential. Likewise for regular expressions. Tree-sitter allows regular expressions in it's rules, but only as a shorthand for explicit character combinations. It will not run the actual regular expression when parsing.
- Clone this grammar repo
git clone https://github.com/Aerijo/tree-sitter-quick_check - Navigate to the root of this project in a terminal / command prompt
- Run
npm install - Add
./node_modules/.binto your PATH- If you don't add this, prefix all
tree-sittercommands with./node_modules/.bin/; e.g.,tree-sitter generatebecomes./node_modules/.bin/tree-sitter generate - Windows users need to replace forwards slashes with back slashes.
- If you don't add this, prefix all
- Run
tree-sitter generate - Run
node-gyp configure - Run
node-gyp build - Run
tree-sitter test
Once you have installed all the required programs, we can start on setting up the package.
You should make a new file called package.json in the project root directory. Here's an example of what to put in it:
{
  "name": "tree-sitter-dummy",
  "version": "0.0.0",
  "description": null,
  "main": "index.js",
  "repository": null,
  "author": null,
  "license": null,
  "devDependencies": {
    "tree-sitter-cli": "^0.13.5"
  },
  "scripts": {
    "build": "tree-sitter generate && node-gyp build"
  }
}
Some notes:
- By convention, the name should be
tree-sitter-languageName. E.g.,tree-sitter-javascript. Only word characters should be used in the name part (so[a-zA-Z0-9_]). - The file specified in
mainis automatically generated later and not a concern right now. - Don't forget to fill out the other fields when making your own.
- If building for Atom, the version of
tree-sitter-climust be one Atom accepts.- IMPORTANT NOTE: Currently, the versions for stable and beta Atom are incompatible. Stable is
^0.12.5, beta is^0.13.5. The official recommendation is build for beta, and eventually the versions will be the same astree-sitterbecomes stable.
- IMPORTANT NOTE: Currently, the versions for stable and beta Atom are incompatible. Stable is
- The
scriptsfield is just a shortcut definition for the build process. Just an FYI.
If you haven't already, open a new terminal / command prompt with the project root as the working directory. When you have the package.json file in place, run npm install. This will install all dependencies for generating the parser.
- It may also make a
package-lock.jsonfile. I don't know the best way to deal with it, but deleting it works fine (for this tutorial at least).
Aditionally, make a file called grammar.js and a directory called corpus. Inside the corpus is where you will place the test files (explained later). For now, the project structure should look like this:
tree-sitter-dummy
|- corpus
|  ` (test files)
|- grammar.js
|- node_modules
|  ` (dependencies)
`- package.json
At this point, I recommend checking to see if everything is working. We will do this by cloning a project I prepared earlier.
Once we have a grammar ready, you have two options:
- Add
./node_modules/.binto your PATH. This will let you runtree-sitter generatelike so when working from the project root directory. Run this now. - Call
./node_modules/.bin/tree-sitter generatedirectly. This is more cumbersome, but does not require any PATH changes. Also do this now.
When you execute this, it should generate several new files important for the next step. When it finishes, run node-gyp configure. The output should be a long list of info statements. If it throws an error, make sure you installed the requirements specified at the beginning. If it still doesn't work, comment below, or make a post on the discussion forum (preferred) and I'll try to help the best I can.
Finally, run node-gyp build. This will build the final parser, and (fingers crossed) that's it. To test the result, run the command tree-sitter test. If you copied over some tests into the corpus, it will run them and print the results.
Assuming everything worked, you can delete the clone and return back to the project we left off at.
Writing a grammar takes time and patience. It will be slow, it will throw errors, it will do unexpected things. Hopefully, this walkthrough can minimise the issues and mistakes you make.
Housekeeping:
-
First of all, the official docs have a good overview of the various tools you have at your disposal. They also have a short guide on writing a parser, and explain everything I'm about to go into below. If you haven't read them yet, stop here and take a moment to go over them. You may find them sufficient to get started on your own.
-
The grammar is written completely* in JavaScript. So you should be at least somewhat familiar with JS syntax. If not, you can probably still pick it up enough to use from the steps and existing examples.
* It is possible to write custom behaviour in C++, but we don't need that (for this guide at least).
With that out of the way, open up the (currently blank) grammar.js file. Fill it out with the following:
module.exports = grammar({
  name: "biber",

  rules: {

    program: $ => repeat(/\w/)

  }

})
Here, module.exports = grammar({...}) can be considered "magic", and understanding is not required for writing the grammar (if you do, that's great).
- The
nameproperty should be your languages name. In this guide, I'll be building a grammar for Biber.- Only word characters should be used (so
[a-zA-Z0-9_]). - Non-word characters (such as
-will break the generated parser files).
- Only word characters should be used (so
- The rules property contains the definition of the grammar. The first entry in here is considered the start of the entire grammar. In this example, the "grammar" is any number of word characters.
How about we test this now? First, we can compile the grammar like we did in the setup section. The first time, run tree-sitter generate, then node-gyp configure, then node-gyp build. Subsequent times (if you set up the script field right in the package.json file) you can just run npm run build to have it do all the required steps with one command.
Now we need a test file. In corpus, make a new file called test.txtt. Any name is fine, and the extension doesn't matter. I use txtt because I have a syntax highlighting package for these test files that will target that filetype. In it, we will write tests of the following structure:
=====
Test name
=====

test body

---

(program)
- The test starts with a heading wrapped in three or more equals signs.
- Three or more dashes mark the end of the test body. Note that whitespace is preserved, but this shouldn't matter if your grammar ignores whitespace. We can leave it as is for now.
- Below this divider, the expected parse tree is declared. For our simple grammar, it's just the root
programnode. Syntax will be explained later on.
Once you've written the test, run tree-sitter test. The output should be something like this:
  ♢ The biber language

  test
    ✓ First

✓ OK » 1 honored (0.007s)
Now that we have a working skeleton, lets add some rules.
With Biber, entries and commands start with @. Anything before this is considered a comment, or "junk". Let's add this in now.
module.exports = grammar({
  name: "biber",

  rules: {

    program: $ => repeat(choice(
      $._command_or_entry,
      $.junk,
      $.comment
    )),

    junk: $ => /[^%@\s\n\t][^%@]*/,

    comment: $ => token(seq('%', /.*/)),

    _command_or_entry: $ => "@" // TODO: handle command

  }

});
There's a lot to unpack here:
$ =>is a normal JS arrow function with one parameter. The convention is to use$as the parameter name, and you can see inprogramthat we use this parameter to refer to other rules.repeatmeans one or more of the argument can be matched. In this case, the argument is achoice.choicemeans any of the arguments can be matched. There is no order to this, so any conflicts will have to be resolved a different way (we will get to this later).- The
junkrule is a terminal value, represented using a regex. Remember that Tree-sitter does not use the regex directly, so this is just shorthand.- You can use normal escapes and operators, such as
\n,.,*,+, etc. - You cannot use anchors or look around. So
^this$does not work, nor(?=this) - In this example, we say anything that is not
%or@is junk, but I disallowed whitespace at the start (otherwise the matches are less useful).
- You can use normal escapes and operators, such as
- The
commentrule is made of- A
seqfunction to combine rules sequentially. - A
tokenfunction to make the parser treat the contents like a single "block". Apparently this can help performance.
- A
- Note I've left the
_command_or_entryrule unfinished. It's recommended to write and test the grammar "breadth first", and fill in the details later. You should always recompile and test the changes often when you add new rules. Also be sure to write the actual tests for these rules.
Once you've updated your grammar to the above, compile with npm run build (if you set up that shortcut; else run tree-sitter generate followed by node-gyp build). Run tree-sitter test again, and you should see something like the folowing (but in colour)
  ♢ The biber language

  test
    ✗ Test name
        »
        actual expected

        (program (junk))
         // macros.js:14

✗ Broken » 1 broken (0.008s)
It's now picking up the test body as junk, and complaining that we didn't declare this in the expected parse tree. There are two ways of fixing this: the first being to manually update the parse tree. This is fine, and probably safer than the second option, but can be tedious when there are many discrepancies.
The second is to delete the entire parse tree in your test file, and run tree-sitter test again. This will throw the error, but you can just copy and paste the parse tree it gives you.
- Note: always read over the tree and confirm it's what you expected. You will get into trouble later on if you just copy and paste, and didn't realise it was doing something completely different to what you wanted.
These are some tips I haven't put in the walkthrough part of the guide (yet)
-
Absolutely never use rules that allow a zero-width match. Tree-sitter will do it's best to detect this and throw errors if it finds one, but it's not perfect. If you have such a rule, parsing may hang in an infinite loop of zero-width matches.
- The only exception is the start rule; you can use
repeatdirectly there. - If you want to have something like this (note that
repeatis a potential zero width match)
array: $ => seq('[', $.optional_entries, ']'),
optional_entries: $ => repeat($.entry)
try the following instead
array: $ => seq('[', optional($.entries), ']'),
entries: $ => repeat1($.entry)
Note that
repeat1requires at least one match, so it is no longer zero-width. In the second example, we never have a zero-width rule. - The only exception is the start rule; you can use
-
Remember to always use
seqwhen writing sequential rule components. It is easy to forget this when inside another rule, e.g. likerepeatmyRule1: $ => seq("[", repeat($.first, $.second, $.third), "]"), // NO myRule2: $ => seq("[", repeat(seq($.first, $.second, $.third)), "]") // YES
I talk about writing tests in the above sections. Here I'll go into some finer points
- Everything I say here can be inferred from the test program itself
- In addition to
corpus, the namegrammar_testcan also be used for the tests folder.corpuswill take precedence overgrammar_testthough. - Folders can be nested as mush as you like.
- All files will be interpreted as tests.
- If you use the extension
txtt, you can use the tests grammar I wrote to make tests easier to read. I plan to also accepttst(tree-sitter test), or you could associate your own extension.
- If you use the extension
- Tests do not support comments. However, any text before the first test header will be ignored.
- Test names must be wrapped in three or more equals signs, with a single newline between the parts:
======
Valid test name
======
Tree-sitter is editor agnostic, but chances are you're reading this for Atom. Here are some steps to get it linked to a grammar package. The following assumes you've already got an existing package you want to add Tree-sitter support to, but I'll add steps to do it from scratch eventually.
- Publish the Tree-sitter parser to npm.
- This step is not required for local use, but will be if you want to publish. For local use (e.g., developing the Atom package simultaneously with the grammar) you can use
npm link
- This step is not required for local use, but will be if you want to publish. For local use (e.g., developing the Atom package simultaneously with the grammar) you can use
- In the Atom package
package.jsonfile register this module as a dependency - In the Atom package
grammarsfolder make a new grammar (it's standard to call ittree-sitter-name.cson) - Fill it out with the properties here
-
nameis what will appear in the grammar selector and status bar -
scopeNameis applied as the root scope of everything -
typedeclares it as a Tree-sitter grammar (it's important to get this one right) -
parserdeclares the name of the npm module that provides the parser (the one you built and linked / added to npm) -
fileTypesis an array of extensions to apply the grammar to.- If two grammars get the same score for a file, the Tree-sitter one will be chosen (assuming the other was a TextMate grammar)
-
injectionRegExpis a regular expression to allow this grammar to be inserted inside of other grammars.- I believe it only works for inserting into other Tree-sitter grammars, at least for now.
-
foldsandcommentsare self explanatory, and I'm not sure about the syntax of folds yet- The
endcan be omitted from acomment. Whatever it is, it will be used for the comment line shortcut.
- The
-
scopestranslates syntax nodes into CSS selectors. The selectors are then used for syntax highlighting. See the JS grammar for examples on the syntax here.- Mainly left side node name turns into right side CSS selector. However, you can also match literal characters (
"{"), require certain chains (parent > child), and even use regex to get finer detail than the parser provides.
- Mainly left side node name turns into right side CSS selector. However, you can also match literal characters (
-
[If testing your own installation] Run
npm install. -
NOTE: Look into using
prebuildto automate a build and distribution process when new releases are published. Users without build tools installed will be unable to build the Tree-sitter parser, so setting up CI to upload binaries targeting all common platforms to GitHub will allowprebuildto grab these instead. This means users without access to build tools can easily use the package, and will save installation times.A guide on this is in progress.
-
-
External scanners let you write C++ directly to parse a section
-
Make the file
src/scanner.ccto use one -
Familiarity with C / C++ pretty much required (or you're going to get familiar very quickly)
-
See the HTML grammar for an example of how it uses this to match tag names
-
This file must declare 5 functions:
void *tree_sitter_name_create()void tree_sitter_name_destroy(void *payload)bool tree_sitter_name_scan(void *payload, TSLexer *lexer, bool *valid_symbols)unsigned tree_sitter_name_serialize(void *payload, char *buffer)unsigned tree_sitter_name_deserialize(void *payload, char *buffer, unsigned length)
-
tree_sitter_name_createmakes the external scanner and returns a pointer to it -
tree_sitter_name_destroyhandles cleaning up the scanner, and freeing all memory it's holding.payloadis a pointer to the scanner you made (the one returned bycreate). -
tree_sitter_name_scanis the main function used to work out what the node is. It returnstruewhen the match is successful, and false when it fails. Note that it is the one function for all external scans.valid_symbolsis an array ofboolsrepresenting the rules declared as external. These should be declared in anenumin the scanner file. This is how you know what context your scanner is being used in; note that multiple tags may be possible, so be sure to account for all possibilities as needed.lexerprovides information about the "cursor" location and various other properties. Your scanner will interact with this to move along and mark the end of states. In particular,lexer->lookaheadtells you what the next character is,lexer->advancemoves to the next one, andlexer->mark_endcoupled withlexer->result_symbolto mark node boundaries and categorise the contents.
-
tree_sitter_name_serializeis used to save the current state at any point in time. What this state is is up to the implementation of the scanner, but should be quick to perform and sufficiently detailed for full retrieval. For this, you're provided a buffer with sizeTREE_SITTER_SERIALIZATION_BUFFER_SIZEbytes. The function should return a value representing the amount of the buffer it used. -
tree_sitter_name_deserializetakes the scanner, the buffer passed to the serialising function, and the number returned by it (which should represent the amount of buffer used). This should alter the scanner to be equivalent to how it was before the serialisation. -
TIPS:
- You don't get much room for serialisation (1024 bytes). For something like matching HTML tags, you want to define a list of common tags. This way, deeper serialisation will be more likely to be possible.
- I don't have a tip for handling running out of room right now.

Hi!
I am trying to write a tree-sitter syntax highlighter for an assembly language we use at my university.
Tree-sitter repo: https://github.com/lukamac/tree-sitter-frisc
Atom language package: https://github.com/lukamac/language-frisc
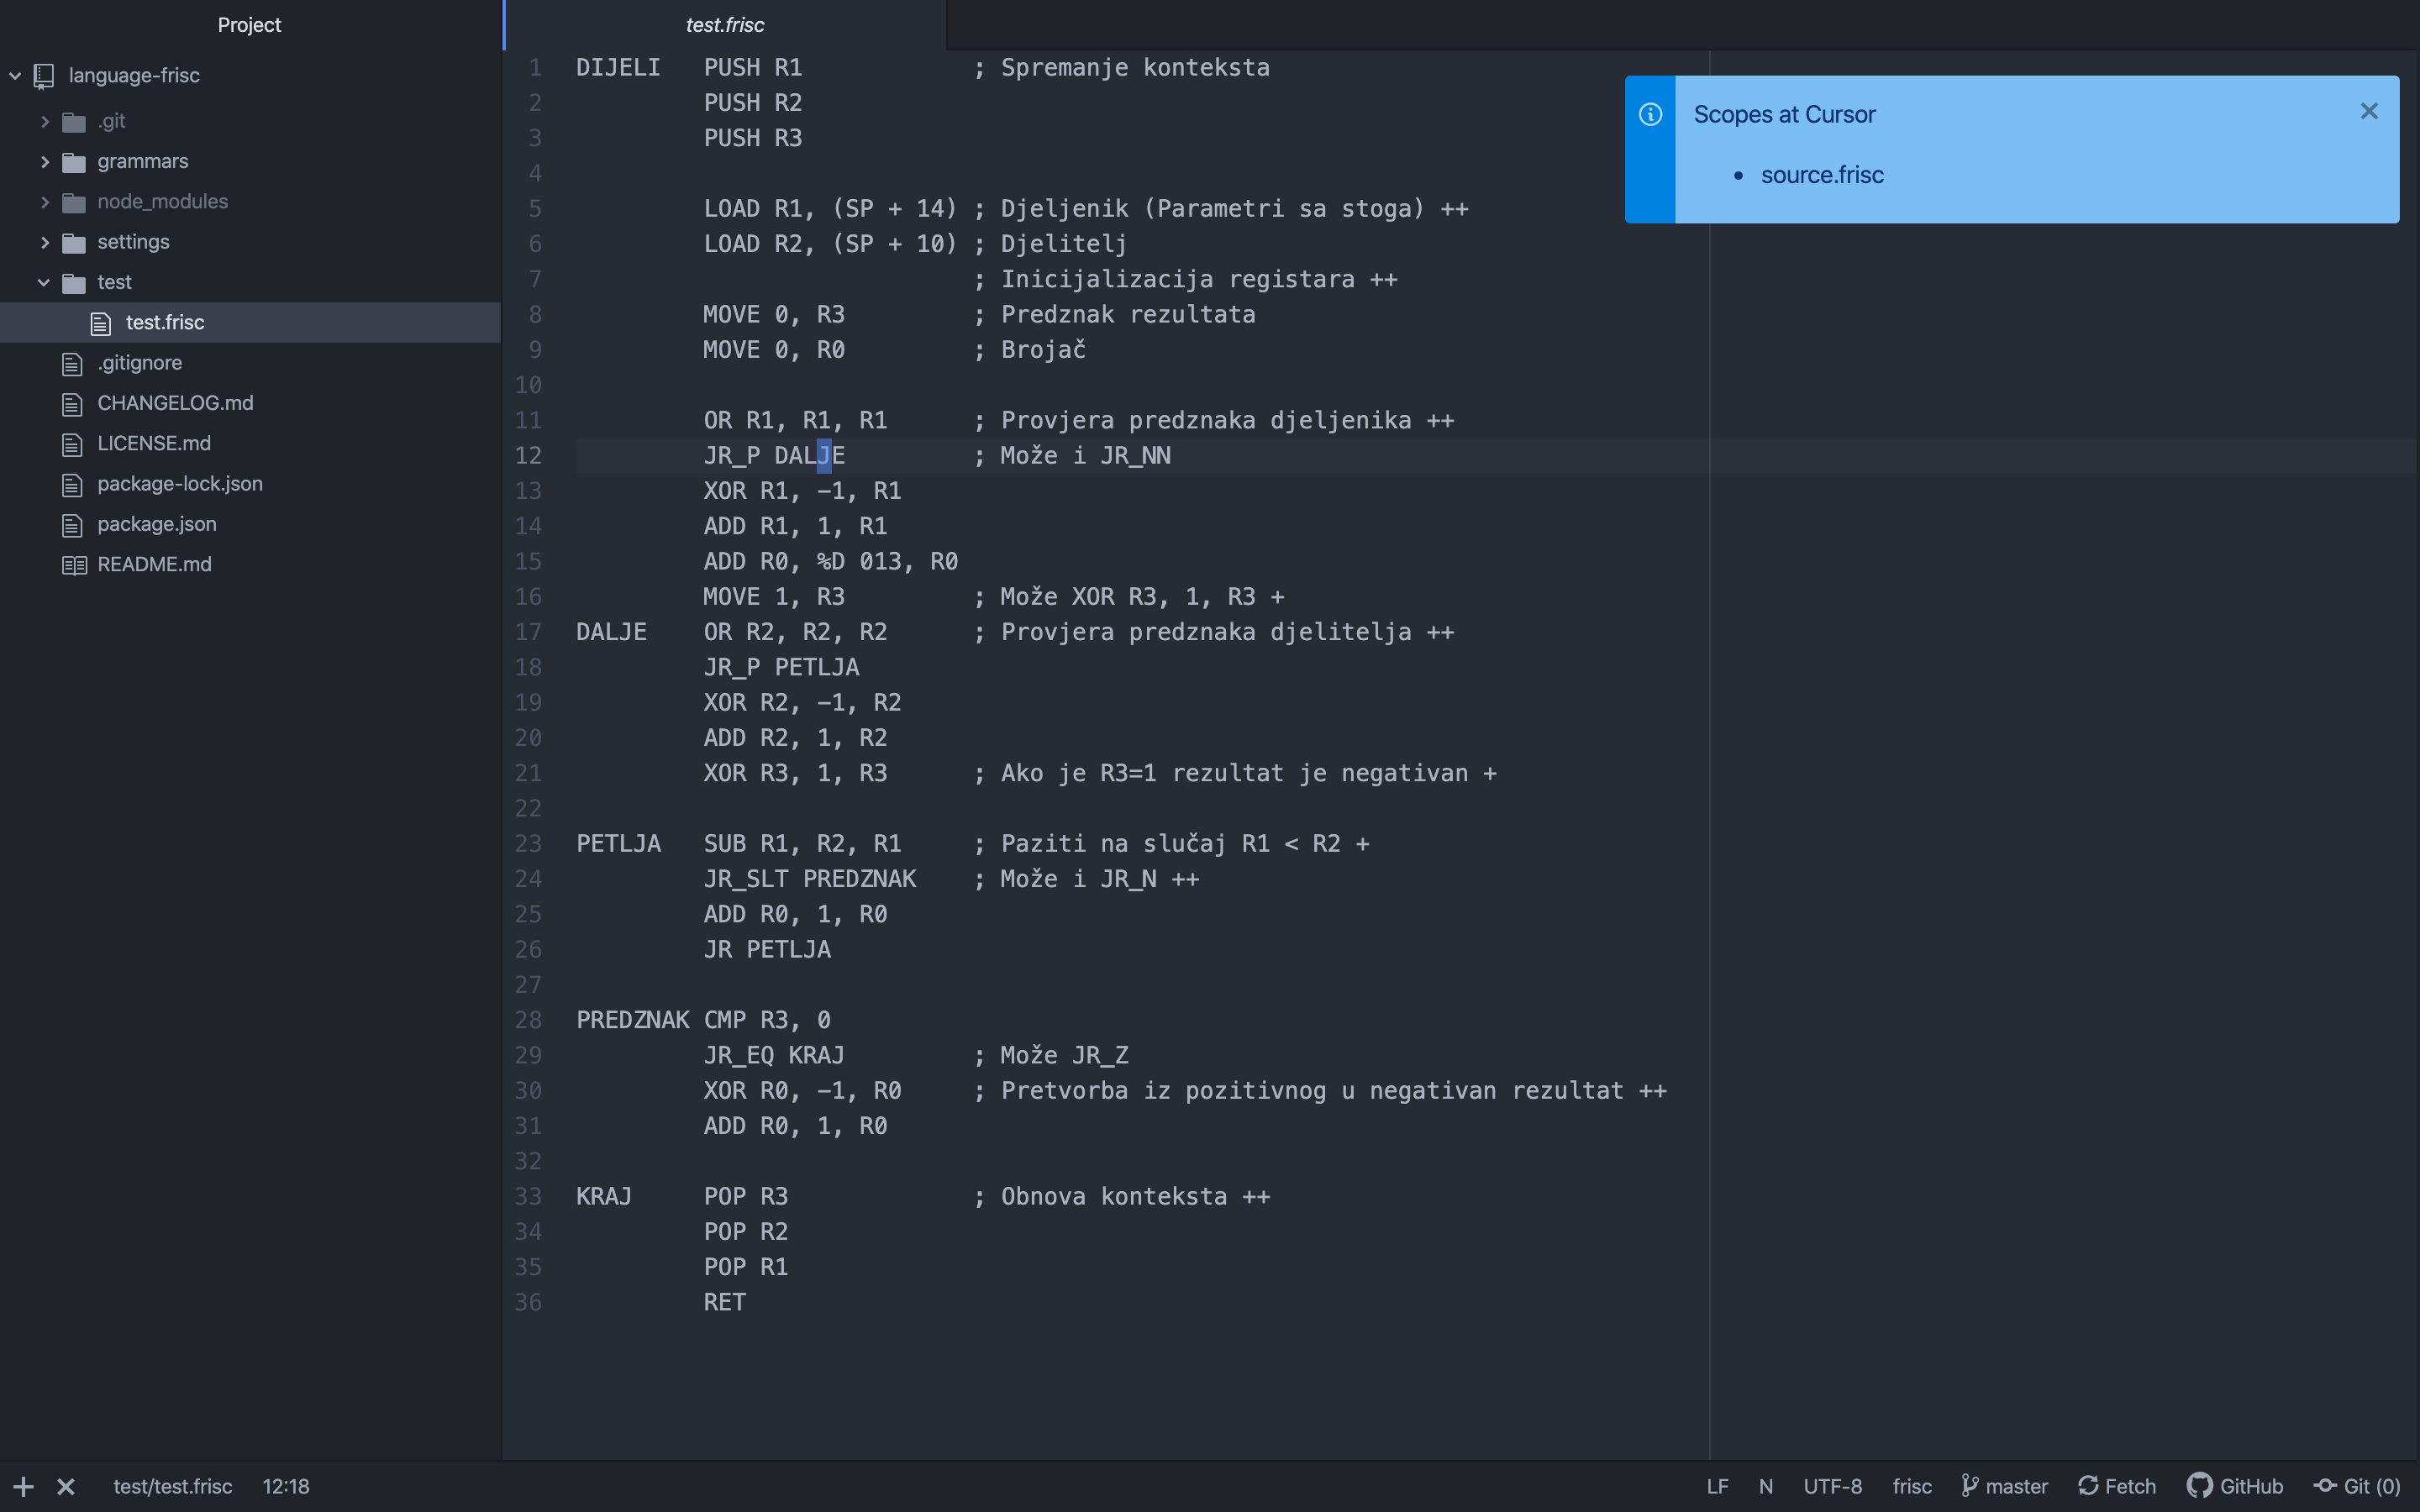
I feel like I've done the tree-sitter part of the job correctly but when I try to use the language package in Atom all I get is the "source.frisc" scope for everything. I tested this with the command "Editor: Log Cursor Scope".
I don't know how to debug this any further. Do you have any suggestions?