
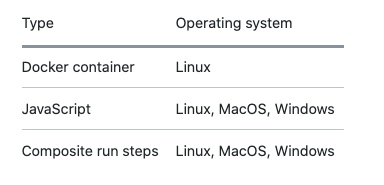
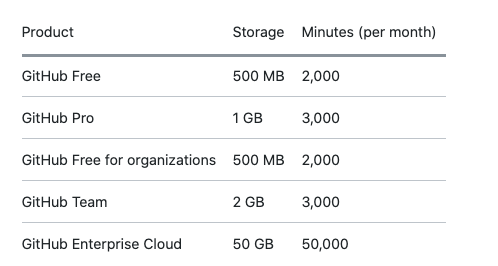
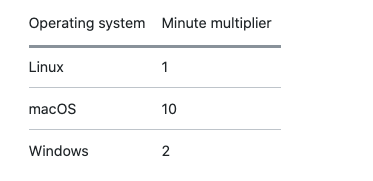
基本免費!! 還幫你準備好了多個平台 Windows & macOS 和 Linux
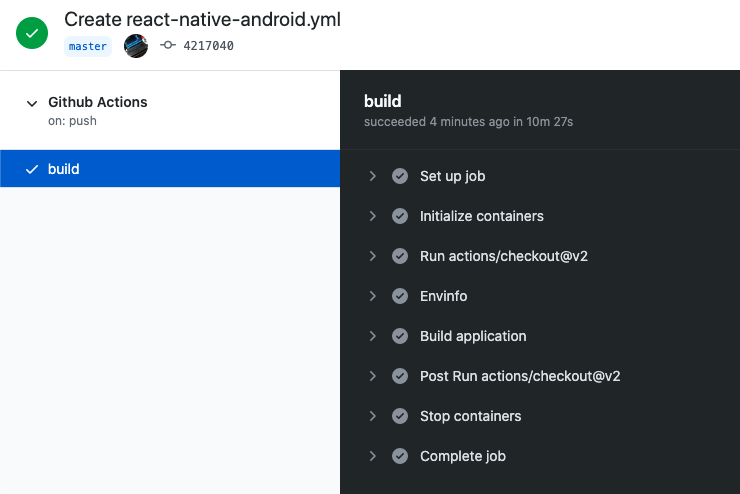
你會看到綠色勾勾,就是成功了
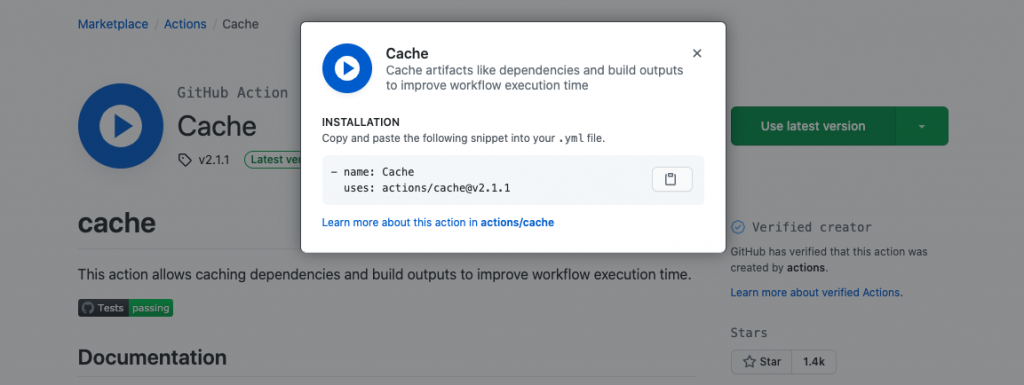
裡面可以找到許多別人已寫好的 actions
https://github.com/marketplace/actions/cache
reactnativecommunity/react-native-android 範例: https://github.com/react-native-community/ci-sample 這個 Docker image 提供的 container 可以幫助我們完成 React Naive Android 的環境建置 也有支援其他 CI 工具
- circleci
- gitlab
- travis-ci
- azure devops
- github actions
actions/checkout@v2
einaregilsson/build-number@v2
actions/create-release@v1
actions/upload-artifact@v1
actions/upload-release-asset@v1
在GitHub上的存儲庫中,找到在.github/workflows名為的目錄中創建一個新文件 Build-Android.yml。 有關更多信息,請參見“創建新文件”。
將以下YAML內容複製到 Build-Android.yml 文件中。 注意:如果您的默認分支不是main,請更新的值 DEFAULT_BRANCH 以匹配存儲庫的默認分支名稱。
name: Github Actions
# on: [push, pull_request]
on:
push:
branches: [ master ]
tags:
- 'v*'
pull_request:
branches: [ master ]
jobs:
build:
runs-on: ubuntu-latest
container: reactnativecommunity/react-native-android
steps:
- name: "#️⃣ Generate Build Number"
id: buildnumber
uses: einaregilsson/build-number@v2
with:
token: ${{ secrets.ACTION_TEST }}
- name: Print new build number
run: |
echo "Build number is $BUILD_NUMBER"
echo "Build number is $buildnumber" ${{ steps.buildnumber.outputs.build_number }}
echo $BUILD_NUMBER
- uses: actions/checkout@v2
- name: Envinfo
run: npx envinfo
- name: Build application
run: |
yarn install && cd android && chmod +x gradlew && ./gradlew build bundleRelease
du -shc `find . -regex '.+\.\(apk\|aab\)$'`
# run: yarn install && cd android && chmod +x gradlew && ./gradlew assembleRelease
#Prepare Release
- name: Prepare Release
id: prepare_release
run: |
APK_PATH=`find . -name '*.apk' | grep release`
echo ::set-output name=apk_path::$APK_PATH
APK_NAME=`basename $APK_PATH`
echo ::set-output name=apk_name::$APK_NAME
BUNDLE_PATH=`find . -name '*.aab' | grep release | grep -v intermediates`
echo ::set-output name=bundle_path::$BUNDLE_PATH
BUNDLE_NAME=`basename $BUNDLE_PATH`
echo ::set-output name=bundle_name::$BUNDLE_NAME
# 選用
# TAG_NAME=`echo $GITHUB_REF | cut -d / -f3`
# echo ::set-output name=tag_name::$TAG_NAME
# PACKAGE_NAME=`./tools/aapt2 dump packagename $APK_PATH`
# echo ::set-output name=package_name::$PACKAGE_NAME
#Uploads
- name: Upload Artifact
if: steps.prepare_release.outputs.apk_path
uses: actions/upload-artifact@v1
with:
name: app-release.apk
path: android/app/build/outputs/apk/release/
#Uploads
- name: Upload Artifact
if: steps.prepare_release.outputs.bundle_path
uses: actions/upload-artifact@v1
with:
name: app-release.aab
path: android/app/build/outputs/bundle/release/
- name: Create GitHub release
id: create_release
# if: steps.version_check.outputs.changed == 'true'
uses: actions/create-release@v1
env:
GITHUB_TOKEN: ${{ secrets.GITHUB_TOKEN }}
with:
tag_name: V-${{ steps.buildnumber.outputs.build_number }}
release_name: V-${{ steps.buildnumber.outputs.build_number }}
body: |

# Changelog
Release type: ${{ steps.buildnumber.outputs.build_number }}
prerelease: true
- name: Upload APK Asset
if: steps.create_release.outputs.upload_url && steps.prepare_release.outputs.apk_path && steps.prepare_release.outputs.apk_name
uses: actions/upload-release-asset@v1
env:
GITHUB_TOKEN: ${{secrets.GITHUB_TOKEN}}
with:
upload_url: ${{steps.create_release.outputs.upload_url}}
asset_path: ${{steps.prepare_release.outputs.apk_path}}
asset_name: ${{steps.prepare_release.outputs.apk_name}}
asset_content_type: application/vnd.android.package-archive
# 選用 BBA
- name: Upload Bundle Asset
if: steps.create_release.outputs.upload_url && steps.prepare_release.outputs.bundle_path && steps.prepare_release.outputs.bundle_name
uses: actions/upload-release-asset@v1
env:
GITHUB_TOKEN: ${{secrets.GITHUB_TOKEN}}
with:
upload_url: ${{steps.create_release.outputs.upload_url}}
asset_path: ${{steps.prepare_release.outputs.bundle_path}}
asset_name: ${{steps.prepare_release.outputs.bundle_name}}
asset_content_type: application/octet-stream
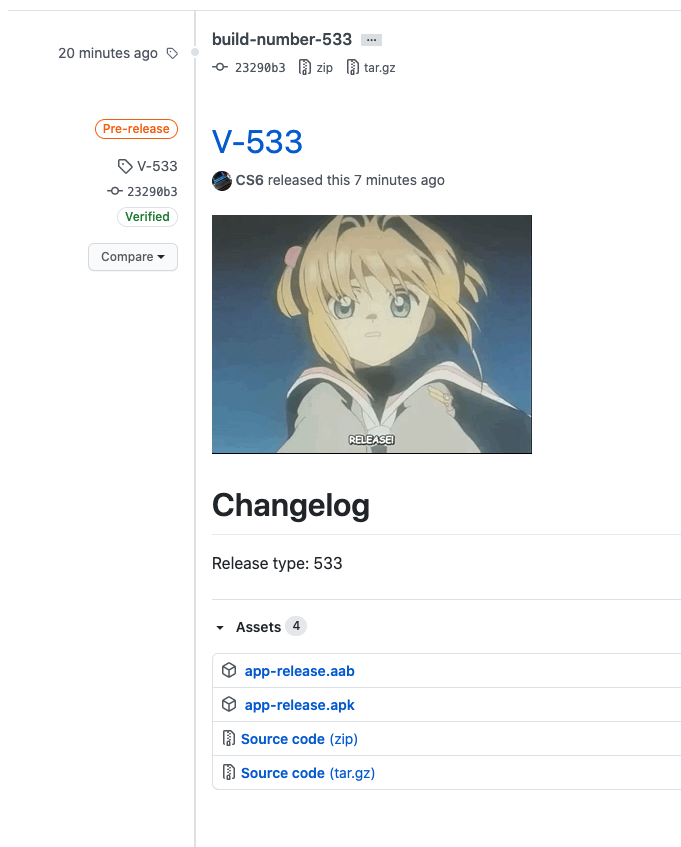
你會看到,就是成功了 在 Download artifacts 有兩個可以下載的檔案
 app-release.aab26.3 MB
 app-release.apk

在 Pre-release 中可以也找到完整的 Assets
app-release.aab
app-release.apk
Source code(zip)
Source code(tar.gz)
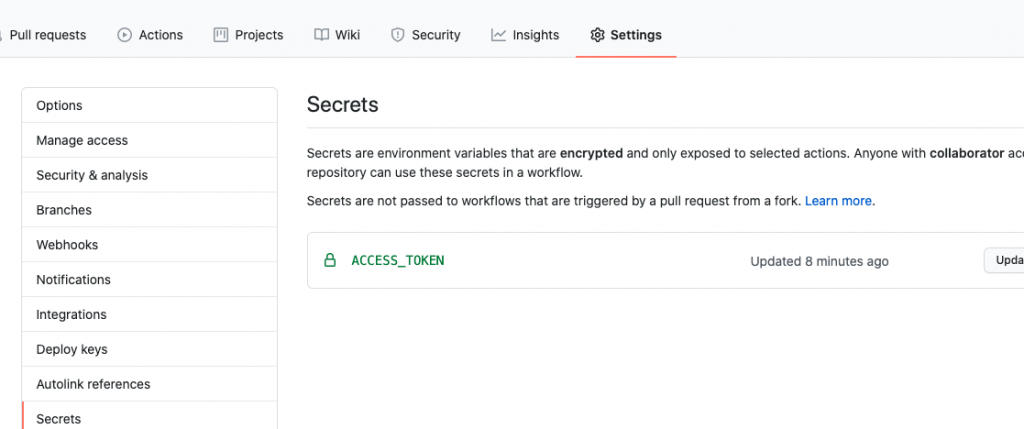
Generate an upload key and Keystore https://developer.android.com/studio/publish/app-signing#generate-key 將 KeyStore file,轉換為 base64 ,並加到 GitHub 專案的設定中的 Secret
cat MyKeyStore  | base64 | pbcopy
#ios cat AppleID.p12 | base64 | pbcopy
in android/app/build.gradle
def getMyVersionCode = { ->
    def code = project.hasProperty('versionCode') ? versionCode.toInteger() : -1
    println "VersionCode is set to $code"
    return code
}

def getMyVersionName = { ->
    def name = project.hasProperty('versionName') ? versionName : "1.0"
    println "VersionName is set to $name"
    return name
}
in android/app/build.gradle
    defaultConfig {
        applicationId "dev.dayuan.rn3d"
        minSdkVersion rootProject.ext.minSdkVersion
        targetSdkVersion rootProject.ext.targetSdkVersion
+       versionCode getMyVersionCode()
+       versionName getMyVersionName()
-       // versionCode 1
-       // versionName "1.0"

    }
gradle build bundleRelease -PversionCode=483 -PversionName=4.0.3
adb -s emulator-5554 install app/build/outputs/apk/release/app-release.apk
專案/whatsNewDirectory/whatsnew-zh-TW
<zh-TW>
HAHAHAHmapping.txtmapping.txt在這裡輸入或貼上 zh-TW 版的版本資訊
</zh-TW>
name: Github Actions
# on: [push, pull_request]
on:
push:
branches: [ Release-Store ]
tags:
- 'Store*'
pull_request:
branches: [ Release-Store ]
jobs:
build:
runs-on: ubuntu-latest
container: reactnativecommunity/react-native-android
steps:
- name: "#️⃣ Generate Build Number"
id: buildnumber
uses: einaregilsson/build-number@v2
with:
token: ${{ secrets.ACTION_TEST }}
- name: "#️⃣ Generate Build Number store"
id: buildnumber_store
uses: einaregilsson/build-number@v2
with:
token: ${{ secrets.ACTION_TEST }}
prefix: store
- name: Print new build number
run: |
echo "Build number is $BUILD_NUMBER"
echo "Build number is $buildnumber" ${{ steps.buildnumber.outputs.build_number }}
echo "Build number is $buildnumber_store" ${{ steps.buildnumber.outputs.buildnumber_store }}
echo $BUILD_NUMBER
- uses: actions/checkout@v2
- name: Envinfo
run: npx envinfo
- name: Build application
run: |
yarn install && cd android && chmod +x gradlew && ./gradlew build bundleRelease
du -shc `find . -regex '.+\.\(apk\|aab\)$'`
# run: yarn install && cd android && chmod +x gradlew && ./gradlew assembleRelease
# ./gradlew build bundleRelease
# du -shc `find . -regex '.+\.\(apk\|aab\)$'`
#Prepare Release
- name: Prepare Release
id: prepare_release
# if: contains(github.ref, 'tags/')
run: |
APK_PATH=`find . -name '*.apk' | grep release`
echo ::set-output name=apk_path::$APK_PATH
APK_NAME=`basename $APK_PATH`
echo ::set-output name=apk_name::$APK_NAME
BUNDLE_PATH=`find . -name '*.aab' | grep release | grep -v intermediates`
echo ::set-output name=bundle_path::$BUNDLE_PATH
BUNDLE_NAME=`basename $BUNDLE_PATH`
echo ::set-output name=bundle_name::$BUNDLE_NAME
# 選用
# TAG_NAME=`echo $GITHUB_REF | cut -d / -f3`
# echo ::set-output name=tag_name::$TAG_NAME
# PACKAGE_NAME=`./tools/aapt2 dump packagename $APK_PATH`
# echo ::set-output name=package_name::$PACKAGE_NAME
- name: Print build PATH
run: |
echo ${{steps.prepare_release.outputs.bundle_path}}
echo ${{steps.prepare_release.outputs.apk_name}}
echo ${{steps.prepare_release.outputs.bundle_path}}/${{steps.prepare_release.outputs.apk_name}}
# 簽署 BBA
- name: Sign AAB
id: sign
uses: r0adkll/sign-android-release@v1
with:
releaseDirectory: ./android/app/build/outputs/bundle/release/
signingKeyBase64: ${{ secrets.SIGNING_KEY }}
alias: ${{ secrets.ALIAS }}
keyStorePassword: ${{ secrets.KEY_STORE_PASSWORD }}
keyPassword: ${{ secrets.KEY_PASSWORD }}
#Uploads
- name: Upload Artifact
if: steps.prepare_release.outputs.apk_path
uses: actions/upload-artifact@v1
with:
name: app-release.apk
path: android/app/build/outputs/apk/release/
#Uploads
- name: Upload Artifact
if: steps.prepare_release.outputs.bundle_path
uses: actions/upload-artifact@v1
with:
name: app-release.aab
path: android/app/build/outputs/bundle/release/
- name: Create GitHub release
id: create_release
# if: steps.version_check.outputs.changed == 'true'
uses: actions/create-release@v1
env:
GITHUB_TOKEN: ${{ secrets.ACTION_TEST }}
with:
tag_name: V-${{ steps.buildnumber.outputs.build_number }}
release_name: V-${{ steps.buildnumber.outputs.build_number }}
body: |

# Changelog
Release type: ${{ steps.buildnumber.outputs.build_number }}
prerelease: true
- name: Upload APK Asset
if: steps.create_release.outputs.upload_url && steps.prepare_release.outputs.apk_path && steps.prepare_release.outputs.apk_name
uses: actions/upload-release-asset@v1
env:
GITHUB_TOKEN: ${{secrets.GITHUB_TOKEN}}
with:
upload_url: ${{steps.create_release.outputs.upload_url}}
asset_path: ${{steps.prepare_release.outputs.apk_path}}
asset_name: ${{steps.prepare_release.outputs.apk_name}}
asset_content_type: application/vnd.android.package-archive
# 選用上傳 BBA 至 release asset
- name: Upload Bundle Asset
if: steps.create_release.outputs.upload_url && steps.prepare_release.outputs.bundle_path && steps.prepare_release.outputs.bundle_name
uses: actions/upload-release-asset@v1
env:
GITHUB_TOKEN: ${{secrets.GITHUB_TOKEN}}
with:
upload_url: ${{steps.create_release.outputs.upload_url}}
asset_path: ${{steps.prepare_release.outputs.bundle_path}}
asset_name: ${{steps.prepare_release.outputs.bundle_name}}
asset_content_type: application/octet-stream
# 上傳 BBA
- name: Upload Android Release to Play Store (internal track publishing is default)
uses: r0adkll/upload-google-play@v1
with:
serviceAccountJsonPlainText: ${{ secrets.SERVICE_ACCOUNT_JSON }}
packageName: dev.dayuan.rn3d
releaseFile: ${{steps.prepare_release.outputs.bundle_path}}
track: internal
whatsNewDirectory: distribution/whatsnew

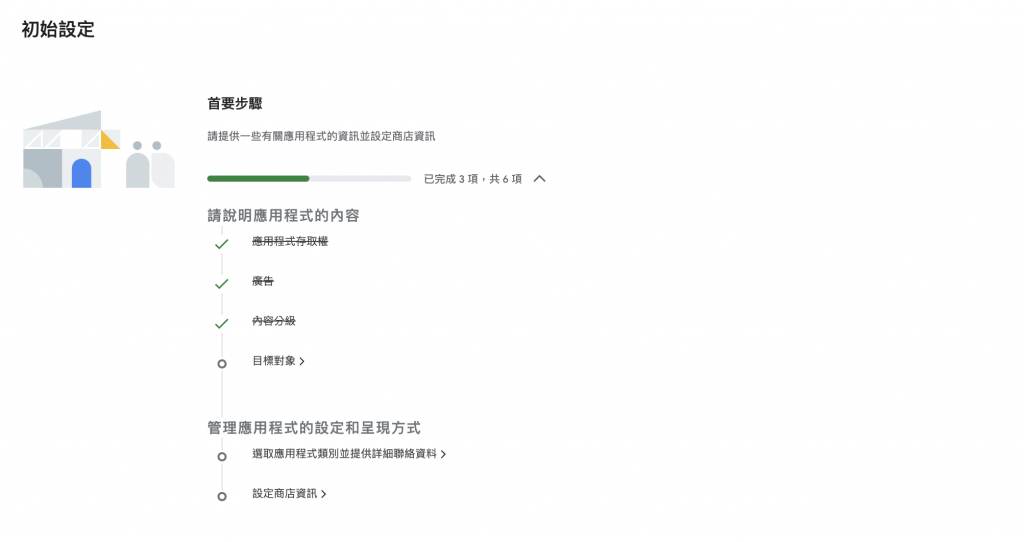
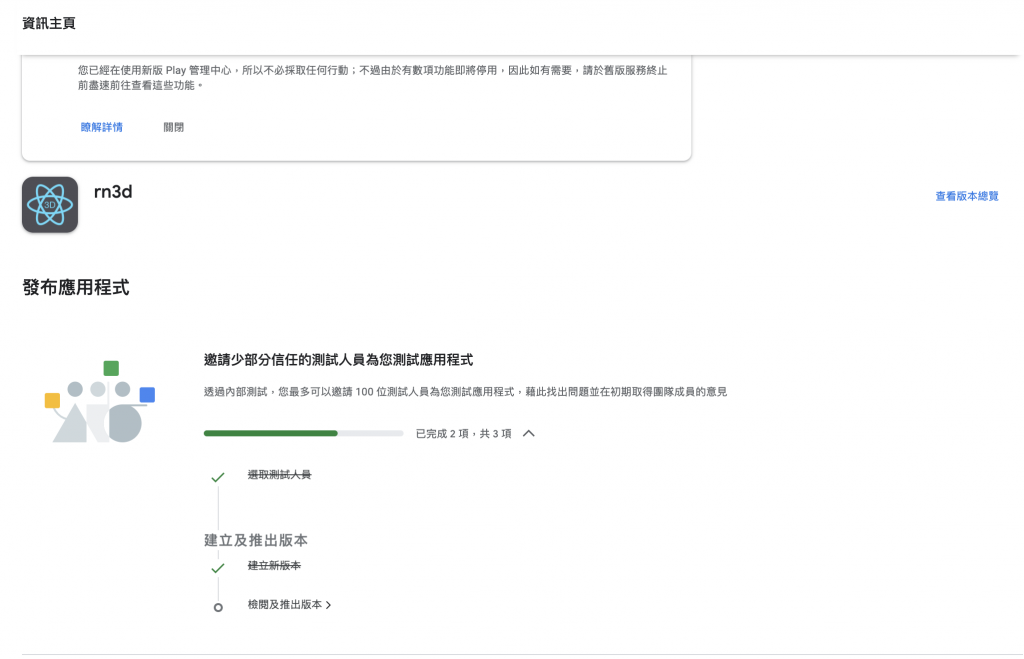
WIP 用 GitHub Actions 修改 Build Number 並上架到 Play Console測試
FIX-CIr0adkll/upload-google-play@v1
Notify Build status on Slack / Telegram