Skip to content

Instantly share code, notes, and snippets.

@CarloCattano
Last active April 17, 2024 00:00
Show Gist options
  • Star 10 You must be signed in to star a gist
  • Fork 1 You must be signed in to fork a gist
  • Save CarloCattano/8c01a6dea6ecbb459acd0b6bcd752ea6 to your computer and use it in GitHub Desktop.
Save CarloCattano/8c01a6dea6ecbb459acd0b6bcd752ea6 to your computer and use it in GitHub Desktop.
Raspberry pi UART MIDI Serial

rp3.+ raspberry OS lite (or better PatchboxOS as a starting point)

https://blokas.io/patchbox-os/

testing notes
Disable bluetooth or send bt to another serial port
    sudo nano /boot/config.txt

    enable_uart=1    
   
    dtoverlay=midi-uart0
midi-uart0 ttymidi will set Serial S&R MIDI at 31250 when using 38400 baudrate automatically

Remove UART serial shell option in boot/cmdline.txt

   sudo nano /boot/cmdline.txt
      delete:    
            console=serial0,115200 console=tty1

Disable Bluetooth

    dtoverlay=disable-bt
    sudo systemctl disable hciuart.service
    sudo systemctl disable bluealsa.service
    sudo systemctl disable bluetooth.service

OR move Bluetooth to other serial port

    dtoverlay=pi3-miniuart-bt 

install wiringpi ( optional )

    sudo apt-get install wiringpi
    gpio readall    (check tty dev tx rx)

download and install ttymidi to access pi serial http://www.varal.org/ttymidi/

    wget http://www.varal.org/ttymidi/ttymidi.tar.gz

    tar -zxvf ttymidi.tar.gz

    cd ttymidi/

    nano Makefike
    add -lpthread in "all:"

    make
    sudo make install

start serial midi and stay in background

    ttymidi -s /dev/ttyAMA0 -b 38400 -v &   // It will s&r at 31250 since midi-uart0

change midi device name

    ttymidi -s /dev/ttyAMA0 -v -n device_name

Depending on your setup you can manage ttymidi midi port instance after creation with ALSA MIDI or JACK

send the ALSA midi to Jack Midi for system messages (clock etc) to pass through as well
    a2jmidid

ALSA - list and connect to available ALSA MIDI input clients

    aconnect -l    aconnect id:0 id2:1                     

Connect TX/RX/GND (use midi specs circuitery for protection etc)

https://www.midi.org/specifications-old/item/midi-din-electrical-specification <-----

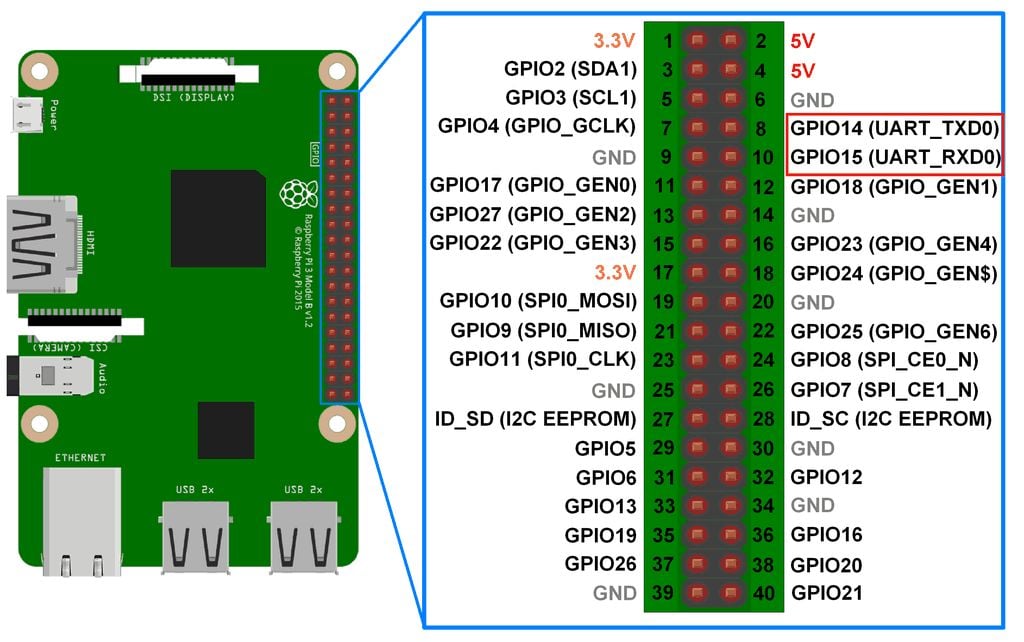
TX RX PINS ON THE PI ( Check your model , tested rpi3B+

@konsumer
Copy link

konsumer commented Apr 16, 2024

Very helpful info, but hardware "midi specs circuitery" link is dead. This is a nice summary of the circuit:

midi

or this:

midi-detail

Also, a helpful video tutorial can be found here

Sign up for free to join this conversation on GitHub. Already have an account? Sign in to comment