Skip to content

Instantly share code, notes, and snippets.

Show Gist options
  • Save ChrisTollefson/3c5b02c6d664b7fb157b44b1fc168799 to your computer and use it in GitHub Desktop.
Save ChrisTollefson/3c5b02c6d664b7fb157b44b1fc168799 to your computer and use it in GitHub Desktop.
Boot Camp Assistant - Enabling creation of bootable USB disks for installing Windows

Boot Camp Assistant - Enabling creation of bootable USB disks for installing Windows

Contents

Applicability

This information applies specifically to the following system, but may also apply to other hardware/software versions:

Introduction

In macOS, Boot Camp Assistant (FinderApplicationsUtilitiesBoot Camp Assistant) has the ability to create bootable USB disks for installing Windows in Boot Camp on a Mac computer. However, some Mac computers don't support booting from external USB devices, or don't support certain versions of Windows in Boot Camp, etc.; in these cases, the option to create bootable USB disks for installing Windows has been suppressed within Boot Camp Assistant.

Boot Camp Assistant

But you should still be able to use Boot Camp Assistant to create bootable USB disks for installing Windows on other computers, right?

To do so, you need to tell Boot Camp Assistant that your Mac supports the necessary options and Windows versions, by editing the Info.plist property list file within its application package.

Procedure

1. Obtain permission to edit Boot Camp Assistant's Property List file.

First, make sure it's OK with your mom.

Then, because Boot Camp Assistant is part of the operating system, in newer versions of macOS it is protected from editing, so you need to work around this limitation.

Option A: Duplicate the Boot Camp Assistant application package.

Copy the /Applications/Utilities/Boot Camp Assistant.app application package to another location, such as your ~/Desktop/. You will then be free to edit the Info.plist file within the copied application package.

Option B: Disable System Integrity Protection (SIP).

Boot into "Recovery Mode" by restarting your Mac, then while it's rebooting, before the "gong" startup sound, press and hold ⌘ Command + R until after the Apple logo and progress bar appear.

In Recovery Mode, open the Terminal application (Utilities menu → Terminal), then disable SIP by entering the following command:

csrutil disable

Then restart for the change to take effect.

Finally, if necessary, modify the permissions so that you can edit the Info.plist file. In FinderApplicationsUtilitiesTerminal, enter the following commands as necessary to add "write" permissions for "group" and "other" users:

sudo chmod go+w /path/to/your/Boot\ Camp\ Assistant.app/Contents
sudo chmod go+w /path/to/your/Boot\ Camp\ Assistant.app/Contents/Info.plist

Note: Replace /path/to/your/ with the actual path to your Boot Camp Assistant.app application package. For example:

  • If you copied Boot Camp Assistant to your Desktop:
sudo chmod go+w ~/Desktop/Boot\ Camp\ Assistant.app/Contents
sudo chmod go+w ~/Desktop/Boot\ Camp\ Assistant.app/Contents/Info.plist
  • If you are modifying the original Boot Camp Assistant application package:
sudo chmod go+w /Applications/Utilities/Boot\ Camp\ Assistant.app/Contents
sudo chmod go+w /Applications/Utilities/Boot\ Camp\ Assistant.app/Contents/Info.plist

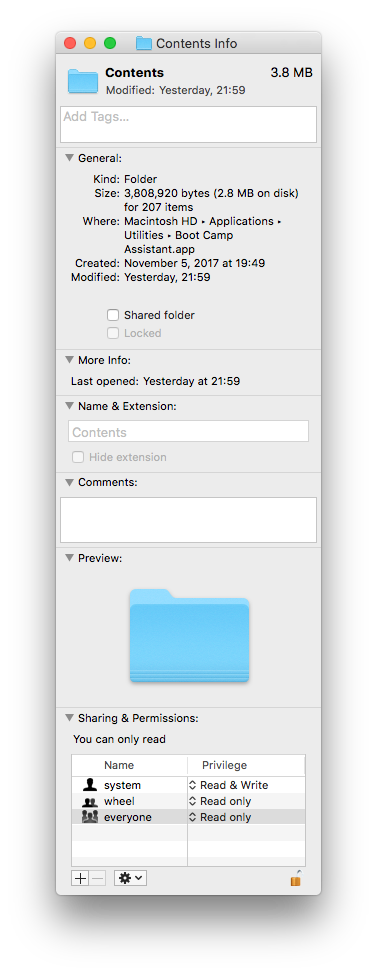
Or, right-click on the Boot Camp Assistant.app file → Show Package Contents, then right-click on the Contents folder → Get Info.

Contents Info

Click to unlock the icon in the bottom right corner (and enter your password if prompted), then set all privileges to "Read & Write".

Open the Contents folder, then repeat for the Info.plist file within.

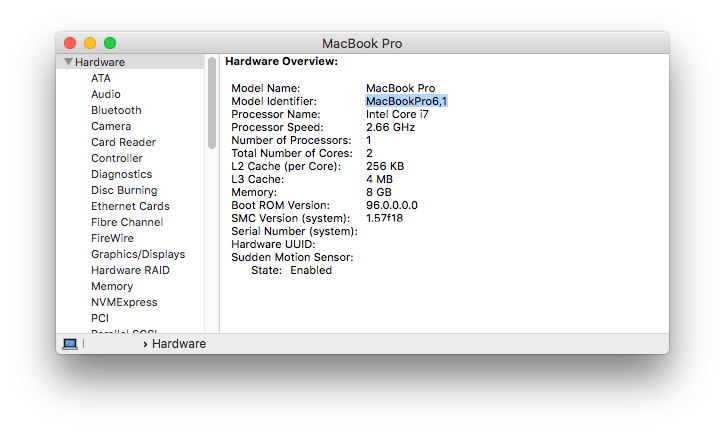
Apple  menu → About This MacOverview tab → System Report... button → Hardware:

Hardware Overview

Make a note of your "Model Identifier" and "Boot ROM Version".

3. Edit Boot Camp Assistant's Property List file.

Use a suitable code editor to open the /path/to/your/Boot Camp Assistant.app/Contents/Info.plist file, and add/remove/change the Model Identifier or Boot ROM Version within the various dictionary keys as follows. You might need to experiment with different combinations to find a configuration that works for you. (Explanations are just guesses, as I wasn't able to find any documentation online. Also refer to the included Info.plist file for examples.)


Enable earlier macOS versions

This option enables this version of Boot Camp Assistant to run in earlier versions of macOS.

  • CHANGE the version number to be less than or equal to your operating system version.
	<key>LSMinimumSystemVersion</key>
	<string>10.0.0</string>

Enable USB option

This enables the option to "Create a Windows 7 (or Windows 8) version install disk" onto a USB drive.

PreUSBBootSupportedModels
  • REMOVE the value for your Model Identifier.
	<key>PreUSBBootSupportedModels</key>
	<array/>

Enable WIM support

This should enable support for Windows installation package formats prior to ESD (Electronic Software Distribution), such as WIM (Windows Imaging Format).

  • Note: This option is unconfirmed - for me, the WIM format appeared to be supported regardless of the settings here.

  • Note: This also seems to enable the option to "Download the latest Windows support software from Apple".

PreESDRequiredModels
  • CHANGE the value for your respective model to any valid Intel-based Model Identifier (omitting the comma and subsequent digits) that is greater than or equal to your respective model's identifier.
	<key>PreESDRequiredModels</key>
	<array>
		<string>MacBook10</string>
		<string>MacBookAir8</string>
		<string>MacBookPro15</string>
		<string>MacPro6</string>
		<string>Macmini8</string>
		<string>iMac18</string>
		<string>iMacPro1</string>
		<string>Xserve3</string>
		<string>Parallels14</string>
	</array>

Enable 32-bit support

This enables installation of 32-bit versions of Windows.

  • Note: This option is unconfirmed - for me, the resulting installers appeared to support 32-bit Windows regardless of the settings here (notwithstanding the specific Windows versions enabled/disabled by the options below).
32BitSupportedModels
  • CHANGE the value for your respective model to any valid Intel-based Model Identifier that is greater than your respective model's identifier.
	<key>32BitSupportedModels</key>
	<array>
		<string>MacBook10,1</string>
		<string>MacBookAir8,1</string>
		<string>MacBookPro15,2</string>
		<string>MacPro6,1</string>
		<string>Macmini8,1</string>
		<string>iMac18,3</string>
		<string>iMacPro1,1</string>
		<string>Xserve3,1</string>
		<string>Parallels14,1</string>
	</array>

Enable 32-bit Windows 10, and Windows versions prior to Windows 10

This enables installation of 32-bit Windows 10, and other Windows versions prior to Windows 10.

  • Related error message:

Need 64-bit Windows 10 or later ISO file.

Boot Camp only supports 64-bit Windows 10 or later installation on this platform. Please use an ISO file for 64-bit Windows 10 or later installation.

PreWindows10OnlyModels
  • CHANGE the value for your respective model to any valid Intel-based Model Identifier that is greater than or equal to your respective model's identifier.
	<key>PreWindows10OnlyModels</key>
	<array>
		<string>MacBook10,1</string>
		<string>MacBookAir8,1</string>
		<string>MacBookPro15,2</string>
		<string>MacPro6,1</string>
		<string>Macmini8,1</string>
		<string>iMac18,3</string>
		<string>iMacPro1,1</string>
		<string>Xserve3,1</string>
		<string>Parallels14,1</string>
	</array>

Enable Windows versions after Windows 7

This enables installation of Windows versions after Windows 7.

  • Related error message:

Windows 8 is not supported on this Mac

Boot Camp only supports installing Windows 7 on this Mac. Please insert a USB drive or DVD which contains a full version of Windows 7.

Win7OnlyModels
  • REMOVE the value for your Model Identifier.
	<key>Win7OnlyModels</key>
	<array/>

Enable 64-bit Windows 10

This enables installation of 64-bit Windows 10.

  • Related error message:

Windows 10 is not supported on this Mac.

Boot Camp only supports 64-bit Windows 8 or Windows 7 installation on this platform. Please use an ISO file for 64-bit Windows 8 or Windows 7 installation.

SupporedNonWin10Models (sic)
  • REMOVE the value for your Model Identifier. (Notice that the word "Suppored" is missing the letter "t".)
	<key>SupporedNonWin10Models</key>
	<array/>

Enable BIOS/UEFI firmware modes

This option enables booting to BIOS (Basic Input/Output System) and/or UEFI (Unified Extensible Firmware Interface) firmware modes.

  • Note: This option is unconfirmed - for me, the resulting installers appeared to support both BIOS and UEFI regardless of the settings here.
PreUEFIModels
  • CHANGE the value for your respective model to any valid Intel-based Model Identifier (omitting the comma and subsequent digits) that is greater than or equal to your respective model's identifier.
	<key>PreUEFIModels</key>
	<array>
		<string>MacBook10</string>
		<string>MacBookAir8</string>
		<string>MacBookPro15</string>
		<string>MacPro6</string>
		<string>Macmini8</string>
		<string>iMac18</string>
		<string>iMacPro1</string>
		<string>Xserve3</string>
		<string>Parallels14</string>
	</array>
UEFIOnlyModels
  • REMOVE the value for your Model Identifier.
	<key>UEFIOnlyModels</key>
	<array/>

Enable internal installation

This option enables installation to internal hard drives. Probably irrelevant if you are trying to create an external USB installation disk.

  • Note: This option is unconfirmed - I have never attempted to install Windows onto an internal drive in a Mac.
ExternalInstallOnlyModels
  • REMOVE the value for your Model Identifier
	<key>ExternalInstallOnlyModels</key>
	<array/>

Enable boot ROM support

This option enables support for your boot ROM.

  • Note: This option is unconfirmed - it had no effect for me, but others have suggested that it is required.
DARequiredROMVersions
  • ADD this key if it is missing, and ADD your Boot ROM Version as a new <string> value within the key's <array> value.
  <key>DARequiredROMVersions</key>
  <array>
    <string>96.0.0.0.0</string>
  </array>

4. OPTIONAL: Restore original permissions (recommended).

For security reasons, it is recommended to restore the original permissions within the Boot Camp Assistant application package. In FinderApplicationsUtilitiesTerminal, enter the following commands as necessary to remove "write" permissions for "group" and "other" users:

sudo chmod go-w /path/to/your/Boot\ Camp\ Assistant.app/Contents/Info.plist
sudo chmod go-w /path/to/your/Boot\ Camp\ Assistant.app/Contents

Or, right-click on the Boot Camp Assistant.app file → Show Package Contents, then within the Contents folder, right-click on the Info.plist file → Get Info. Then click to unlock the icon in the bottom right corner (and enter your password if prompted), then set the privileges for everything other than "system" to "Read only". Repeat for the Contents folder itself.

5. Code-sign the edited application package (if necessary).

Some versions of macOS will require the Boot Camp Assistant application package to be code-signed in order to run it. In FinderApplicationsUtilitiesTerminal, enter one of the following commands to sign it ad-hoc (without an identity):

sudo codesign --force --sign - /path/to/your/Boot\ Camp\ Assistant.app
  • If that doesn't work, then for later versions of macOS, nested content must be signed as well, by specifying the --deep option:
sudo codesign --force --sign - /path/to/your/Boot\ Camp\ Assistant.app --deep

NOTE: If Xcode Command Line Tools are not already installed, the above commands may prompt to do so; afterward, the above commands may need to be run again.

6. OPTIONAL: Re-enable System Integrity Protection (recommended).

For security reasons, it is recommended to re-enable System Integrity Protection (SIP). Boot into "Recovery Mode" by restarting your Mac, then while it's rebooting, before the "gong" startup sound, press and hold ⌘ Command + R until after the Apple logo and progress bar appear. In Recovery Mode, open the Terminal application (Utilities menu → Terminal), then enable SIP by entering the following command:

csrutil enable

Then restart for the change to take effect.

Conclusion

If everything worked, in Boot Camp Assistant you should now have the option to "Create a Windows 7 or Windows 8 version install disk" (which should also work for Windows 10 and later versions, depending on the chosen configuration for your Info.plist file).
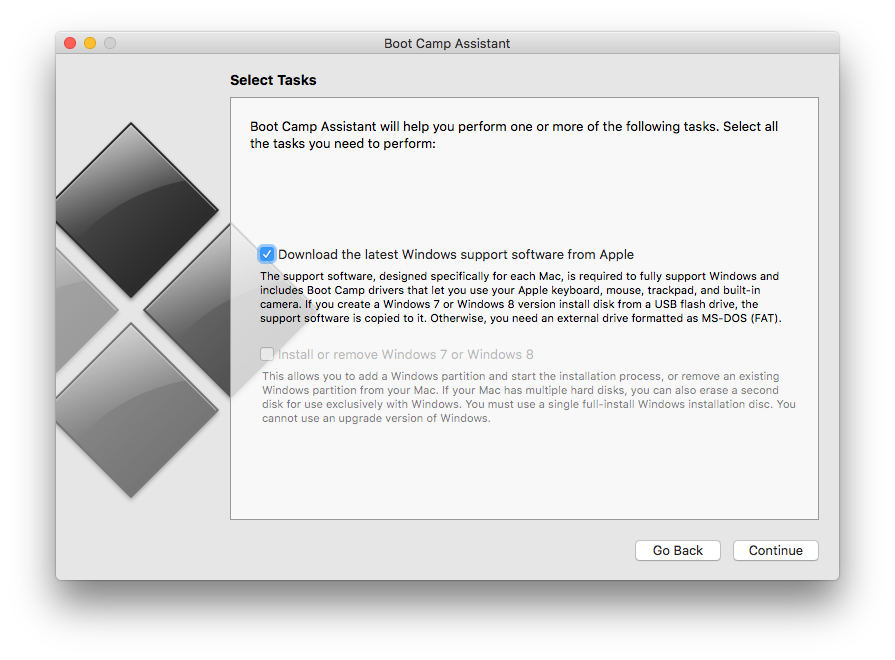
Boot Camp Assistant_- Create Install Disk

<?xml version="1.0" encoding="UTF-8"?>
<!DOCTYPE plist PUBLIC "-//Apple//DTD PLIST 1.0//EN" "http://www.apple.com/DTDs/PropertyList-1.0.dtd">
<plist version="1.0">
<dict>
<key>32BitSupportedModels</key>
<array>
<string>MacBook10,1</string>
<string>MacBookAir8,1</string>
<string>MacBookPro15,2</string>
<string>MacPro6,1</string>
<string>Macmini8,1</string>
<string>iMac18,3</string>
<string>iMacPro1,1</string>
<string>Xserve3,1</string>
<string>Parallels14,1</string>
</array>
<key>BuildMachineOSBuild</key>
<string>16B2657</string>
<key>CFBundleDevelopmentRegion</key>
<string>English</string>
<key>CFBundleDisplayName</key>
<string>Boot Camp Assistant</string>
<key>CFBundleExecutable</key>
<string>Boot Camp Assistant</string>
<key>CFBundleGetInfoString</key>
<string>Boot Camp Assistant 6.1.0, Copyright © 2016 Apple Inc. All rights reserved</string>
<key>CFBundleIconFile</key>
<string>DA</string>
<key>CFBundleIdentifier</key>
<string>com.apple.bootcampassistant</string>
<key>CFBundleInfoDictionaryVersion</key>
<string>6.0</string>
<key>CFBundleName</key>
<string>Boot Camp Assistant</string>
<key>CFBundlePackageType</key>
<string>APPL</string>
<key>CFBundleShortVersionString</key>
<string>6.1.0</string>
<key>CFBundleSignature</key>
<string>????</string>
<key>CFBundleSupportedPlatforms</key>
<array>
<string>MacOSX</string>
</array>
<key>CFBundleVersion</key>
<string>6067.60.1</string>
<key>DARequiredROMVersions</key>
<array>
<string>14.1.0 (45387)</string>
<string>96.0.0.0.0</string>
<string>MBP112.0138.B16</string>
<string>MBP111.0138.B16</string>
<string>MBP102.0106.B0A</string>
<string>MBP101.00EE.B0A</string>
<string>MBP81.0047.2AB</string>
<string>MBP81.0047.B2A</string>
<string>MBP61.0057.B11</string>
<string>MBP55.00AC.B03</string>
<string>MBP53.00AC.B03</string>
<string>MBP52.008E.B05</string>
<string>MBP51.007E.B06</string>
<string>MBP31.0070.B07</string>
<string>MBP22.00A5.B07</string>
<string>MBP21.00A5.B08</string>
<string>MBP12.0061.B03</string>
<string>MBP11.0055.B08</string>
<string>MBA61.0099.B20</string>
<string>MBA51.00EF.B04</string>
<string>MBA41.0077.B12</string>
<string>MBA31.0061.B07</string>
<string>MBA21.0075.B03</string>
<string>MBA11.00BB.B03</string>
<string>MB71.0039.B0E</string>
<string>MB52.0088.B05</string>
<string>MB51.007D.B03</string>
<string>MB31.008E.B02</string>
<string>MB21.00A5.B07</string>
<string>MB11.0061.B03</string>
<string>IM114.0179.B12</string>
<string>IM141.0118.B12</string>
<string>IM131.010A.B09</string>
<string>IM121.0047.B21</string>
<string>IM121.0047.21B</string>
<string>IM112.0057.03B</string>
<string>IM111.0034.04B</string>
<string>IM91.008D.B08</string>
<string>IM71.007A.B03</string>
<string>IM51.0090.B09</string>
<string>IM61.0093.B07</string>
<string>IM52.0090.B09</string>
<string>IM42.0071.B03</string>
<string>IM41.0055.B08</string>
<string>MM71.0220.B06</string>
<string>MM61.0106.B0A</string>
<string>MM51.0077.B12</string>
<string>MM41.0042.B03</string>
<string>MM31.0081.B06</string>
<string>MM11.0055.B08</string>
<string>MP61.0116.B16</string>
<string>MP51.007F.B03</string>
<string>MP41.0081.B07</string>
<string>MP31.006C.B05</string>
<string>MP21.007F.B06</string>
<string>MP11.005C.B08</string>
<string>XS31.0081.B06</string>
<string>XS21.006C.B06</string>
<string>XS11.0080.B01</string>
</array>
<key>DTCompiler</key>
<string>com.apple.compilers.llvm.clang.1_0</string>
<key>DTPlatformBuild</key>
<string>9P107g</string>
<key>DTPlatformVersion</key>
<string>GM</string>
<key>DTSDKBuild</key>
<string>17G2062</string>
<key>DTSDKName</key>
<string>macosx10.13internal</string>
<key>DTXcode</key>
<string>0930</string>
<key>DTXcodeBuild</key>
<string>9P107g</string>
<key>ExternalInstallOnlyModels</key>
<array/>
<key>LSApplicationCategoryType</key>
<string>public.app-category.utilities</string>
<key>LSMinimumSystemVersion</key>
<string>10.0.0</string>
<key>NSMainNibFile</key>
<string>MainMenu</string>
<key>NSPrincipalClass</key>
<string>NSApplication</string>
<key>PreESDRequiredModels</key>
<array>
<string>MacBook10</string>
<string>MacBookAir8</string>
<string>MacBookPro15</string>
<string>MacPro6</string>
<string>Macmini8</string>
<string>iMac18</string>
<string>iMacPro1</string>
<string>Xserve3</string>
<string>Parallels14</string>
</array>
<key>PreUEFIModels</key>
<array>
<string>MacBook10</string>
<string>MacBookAir8</string>
<string>MacBookPro15</string>
<string>MacPro6</string>
<string>Macmini8</string>
<string>iMac18</string>
<string>iMacPro1</string>
<string>Xserve3</string>
<string>Parallels14</string>
</array>
<key>PreUSBBootSupportedModels</key>
<array/>
<key>PreWindows10OnlyModels</key>
<array>
<string>MacBook10,1</string>
<string>MacBookAir8,1</string>
<string>MacBookPro15,2</string>
<string>MacPro6,1</string>
<string>Macmini8,1</string>
<string>iMac18,3</string>
<string>iMacPro1,1</string>
<string>Xserve3,1</string>
<string>Parallels14,1</string>
</array>
<key>SupporedNonWin10Models</key>
<array/>
<key>UEFIOnlyModels</key>
<array/>
<key>Win7OnlyModels</key>
<array/>
</dict>
</plist>
@jumpnkick
Copy link

Chris this is great. I've been struggling to get Boot Camp on my 2011 MBP. Still, now that I modified the plist trying every option, I fail to get pass the "No bootable device - please insert bootable disk" black screen, when Boot Camp restarts the system to install windows.
That is because my model expects to update from an optical drive, which I had removed.
Do you know any way to get past this?
Something I didnt try in the plist?

@thebelgamo
Copy link

jumpnkick

I changed some things in my file, but i don't know what did the trick.
Your MBP seems to be the same as mine, MacbookPro8,1.

I added it under PreWindows10OnlyModels.
And I tried to create this array and put my MBP under it, but I misspelled it: USBBootSupportedModels.
And I may have removed it from somewhere else, but I don't think so.

Here's what I got (sorry for the portuguese):
bootcamp

@jumpnkick
Copy link

Chris I copied your info.plist file, but changed to my model 8,3 (late 2011 17''). I get to see that Boot Camp screen perfectly, and I was able to make bootable media and everything, but after I do the partition in bootcamp and the MBP restarts, to the No bootable device... screen (https://i.ytimg.com/vi/jhFvk1BoJgU/hqdefault.jpg).
I tried to install from mac's boot option, which actually worked, but had problems with audio and video drivers (has something to do, with legacy vs EFI boot), and for what I read, this model the only way to install windows in legacy mode is through a DVD.
Tired of trying things, I bought for something like 6 dolars a used optical drive (and the seller sent me 3 jajajajaja), and I created a windows 10 bootable DVD, and it did the magic.
The only reason I can imagine there was no workaround with my MBP is the year.
I read several similar guides to yours, on 2009 and 2010 MBP's and it seemed to work on those ones. But based on the comments, 2011 MBP owner's always seemed to get stuck at the same place as I did.
Still, if somebody reads this and know's a fix to the problem, it would be great to know, cause I woul like to be able to remove the optical drive and put another ssd.
Chris thanks a lot for the guide, and the answer! Hope my comments save some time to other MBP's owner.

@ChrisTollefson
Copy link
Author

ChrisTollefson commented Jun 9, 2020

Hi @jumpnkick, sorry for the late reply. Just to make sure I understand, you are installing Windows onto your Mac? If so, for my part, I have never tried that – I have only used Boot Camp Assistant to create USB disks for installing Windows on other computers, so I might not be much help.

But it looks like you created the USB installation disk successfully, so I think your Info.plist file must be OK? And for your error message, "no bootable device -- insert boot disk and press any key", you overcame that by using the boot options to select the USB disk to boot? Maybe the USBBootSupportedModels section in the Info.plist file can help, as suggested by @thebelgamo? (Although I too have read similar reports about general difficulties booting from USB devices on 2011 MacBook Pros.)

For the audio/video drivers, does Windows Device Manager show problems or missing drivers? Or things just don't work correctly? Maybe running Windows Update could find different drivers that might work better? Or if you haven't already tried this, in Boot Camp Assistant you could try selecting the option to "Download the latest Windows support software from Apple." If the problem is legacy vs. EFI, you could try changing the PreUEFIModels and/or UEFIOnlyModels sections in the Info.plist file to see if that helps (though I'm not sure what those values need to be, because for me that had no effect, which is probably because I wasn't installing on a Mac).

But it looks like the DVD installation worked for you, so now you have successfully installed Windows on your Mac? And if so, then you can remove the optical drive, as you no longer need the DVD for installation? ...Or do you mean that you want Windows installed on the 2nd SSD, which would take the place of the optical drive (for example using a Data Doubler)? If I've understood correctly, then I think this post on MacRumors describes how it could be done on a 2011 MBP:

  1. Temporarily leave the optical drive installed; but remove the primary SSD and temporarily install the secondary SSD in its place.
  2. At this point, the secondary SSD will not be bootable if it's still empty, but you can boot from the Windows installation DVD in the optical drive, and install Windows onto the secondary SSD that way.
  3. After Windows is successfully installed on the secondary SSD, then you can remove the optical drive and move the secondary SSD into its place, and put the primary SSD back into its original place.

Then you would have your primary bootable SSD (macOS), along with your secondary bootable SSD (Windows) in place of your optical drive, and you can switch between them by selecting the startup disk. Does that work?

@jumpnkick
Copy link

I see! I should have started by the title! Jejejejeje...
Chris thanx a lot for the answers you've been really helpful anyway!
The option of removing the ssd with High Sierra whilst leaving the optical drive temporarily wont probably work, since you need bootcamp (and to have bootcamp, MacOS) to actually get to install it with the optical drive.
In any case, now that I have it installed, I will probably simply remove the optical drive and will leave both OS in the same SSD, and just have an NTFS partition for windows and APFS for extra storage in the new one installed with a caddy like Data Doubler... I don't think trying to move Windows to the new SSD is worth the fuzz.
The post on Macrumors is correct, but it is with Windows 7 (which is actually suported "officially" by Mac on 2011 MBP. The actual problem, from what I read, comes from mixed video drivers (since 2011 MBP's come with AMD GPU and Intel onboard graphics, which work together) which are not officially supported in Windows 10 (they are in Windows 8.1), anymore, and some conflict if you actually install Windows 10 in EFI mode (with the USB) instead of legacy (with a DVD).
The funny/strange thing is that if you install Windows 10 with a DVD, those "unsupported" drivers work just fine, and I was even able to update them.
If anyone is struggling with this, don't doubt to ask.
PS: @thebelgamo I thanked Chris for your answer, didn't realize it was someone else when I read it. Thanx a lot for your answer also.

@lizbette
Copy link

Chris, thank you so much for this guide. I was trying to get Windows 10 installed on my older Macbook Pro, and your guide really helped me understand the changes I needed to make to info.plist to enable the USB, and enable install for the new Windows 10

@janinebp
Copy link

This is awesome. Thank you so much!

@waaykool
Copy link

waaykool commented Nov 4, 2020

I had to sign up to GitHub just so I could thank you for this! I have been struggling with various methods to install Win7 on a 2009 MBP. Tried dozens of fixes. Your info script did it for me. I just copied as is, replaced existing plist, and all was golden from that point on.

After days of futzing around, your script just made it all work. I'm looking at windows desktop right now on my MBP.

Thanks so much!!!

@keenyoths
Copy link

I decided to sign up GitHub mainly to thank you for your awesome detail guidance. Lots of useful tips for older Mac users who want to install Window via USB or Window 10. it works perfectly.
Thank you!

@8itCat
Copy link

8itCat commented Sep 28, 2021

My MacBookPro11,5 doesn't let me just create a bootable USB. It immediately goes to the screen with partitioning. How would I fix that? No tweaking works in the Info.plist via your method

@samanthagjones
Copy link

Does this guide apply for a MacBook Pro Mid-2012?

Sign up for free to join this conversation on GitHub. Already have an account? Sign in to comment