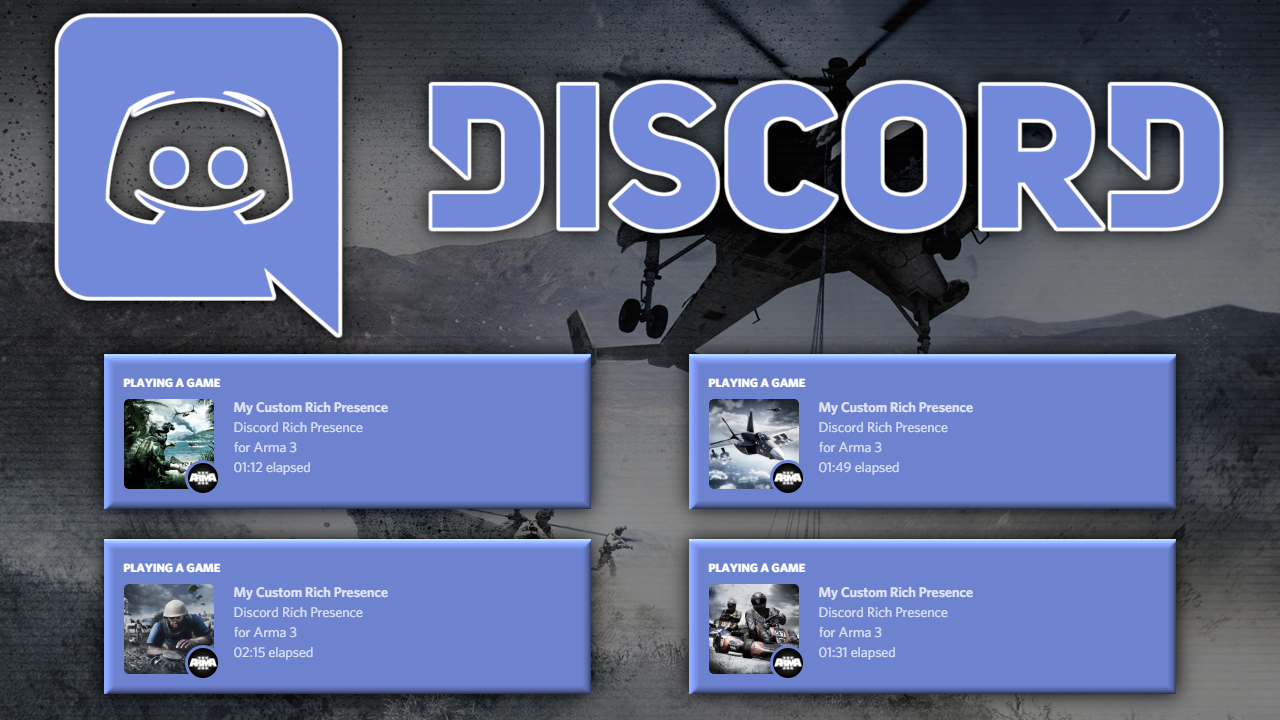
Show what you're playing in Arma 3 with Discord Rich Presence.
- Simple plug and play, works on every mission.
- Automatically activate rich presence as soon as the client spawns in.
- Update rich presence information instantly using SQF.
- SP/MP Compatible.
- BattlEye whitelisted (can be used on BE protected servers).
- You may need to install .NET Framework 4.5.2.
- Subscribe to the mod on steam workshop
- Enable it in your launcher
- Subscribe to the mod on steam workshop
- Navigate to the installation folder
- Copy the .bikey file
- Paste it in your server "keys" folder
Copy the following config into a description.ext or config.cpp and fill out the properties to your liking.
The mod first looks for the config in the mission file. If not found, it checks the game config file. If still not found, it uses default values.
This allows you to define rich presence settings for individual mission files and entire mods.
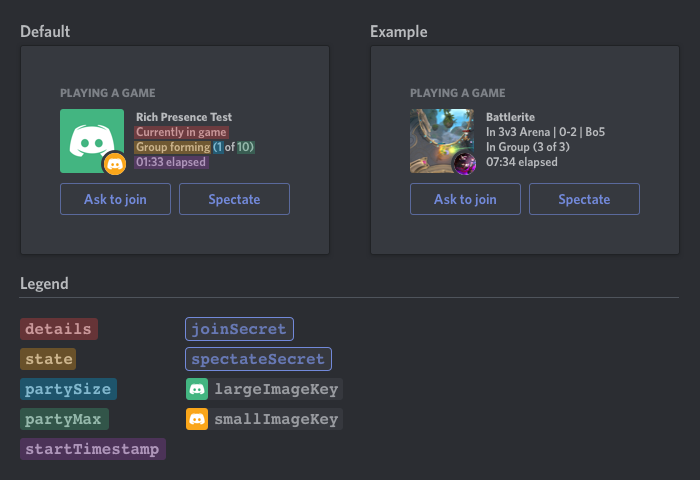
class CfgDiscordRichPresence {
    applicationID="";             // Provided by discord
    defaultDetails="";            // Upper text
    defaultState="";              // Lower text
    defaultLargeImageKey="";      // Large image
    defaultLargeImageText="";     // Large image hover text
    defaultSmallImageKey="";      // Small image
    defaultSmallImageText="";     // Small image hover text
    defaultButtons[]={};          // Button texts and urls
    useTimeElapsed=1;             // Show time elapsed since the player connected (1 - true, 0 - false)
};
The following tasks use a STRING parameter
UpdateDetailsUpdateStateUpdateLargeImageKeyUpdateLargeImageTextUpdateSmallImageKeyUpdateSmallImageText
The following tasks use a SCALAR parameter
UpdatePartySizeUpdatePartyMax
The following tasks use an ARRAY parameter
UpdateStartTimestampUpdateEndTimestamp(Displayed instead of start timestamp when both are enabled) Array format: [hours,minutes] (check below for example)
[0,0] will use the current time.
[] will disable the selected timestampUpdateButtons
Array format: ["button 1 text","button 1 url"(,"button 2 text","button 2 url")]
You can use the update function to modify multiple rich presence properties in a single call.
[
    // ["task",value]
    ["UpdateDetails","New Details"],
    ["UpdateState","New State"],
    ["UpdateLargeImageKey","New Art Asset"],
    ["UpdateSmallImageKey","New Art Asset"],
    ["UpdatePartySize",count playableUnits],
    ["UpdatePartyMax",getNumber(missionConfigFile >> "Header" >> "maxPlayers")],
    ["UpdateStartTimestamp",[-1,-30]], // 1 Hour 30 Mins since mission start
    ["UpdateEndTimestamp",[1,30]], // 1 Hour 30 Mins until mission end
    ["UpdateButtons",["Arma 3","https://arma3.com"]]
] call (missionNameSpace getVariable ["DiscordRichPresence_fnc_update",{}]);
I recommend using getVariable as shown above when updating so clients without the mod don't get errors about the variable being undefined.
You will need to create a discord application to use rich presence. This application will allow you to choose the game name for clients connected to your server, as well as upload custom images used by largeImageKey and smallImageKey.
- Navigate to https://discordapp.com/developers/applications/ and log in
- Click
Create an application. - Enter any name you like and click save.
- Copy the client ID and paste it into the
applicationIDproperty of yourCfgDiscordRichPresence. - Upload custom images by clicking
Rich-presence->Art assets. (Optional)
Here is a video tutorial showing how to set up your rich presence application. There is no audio to it but it shows you exactly what to do.
https://www.youtube.com/watch?v=YqlDNxxu0bI
You can view the licenses for this mod in the installation folder.