Website design and development experienced tremendous changes, improvements, and disruptive innovations from when it was just a single static page to what it is today - unique, slick, and beautiful. Web developers use animations for breathing life and motion into static website layouts. They make the user experience more intuitive and exciting. Animations on website turn an ordinary user experience into an unforgettable journey that ends up amazing. Web animations is translated via movements, adventures, interactions, and with colors changes.
Animation happens when something created in still or two-dimensional form is “brought to life” and appears to move in a way that follows laws of physics. It’s the way a cartoon character walks across the screen or how an app icon bounces like a ball while it is loading on the desktop [...] - DesignHack
React Spring is a spring-physics based animation library that should cover most of your UI related animation needs. It gives you tools flexible enough to confidently cast your ideas into moving interfaces. This library represents a modern approach to animation.

The principle you will be working with is called a spring, it does not have a defined curve or a set duration. In that it differs greatly from the animation you are probably used to. We think of animation in terms of time and curves, but that in itself causes most of the struggle we face when trying to make elements on the screen move naturally, because nothing in the real world moves like that. In React Spring, a spring simply animates values from one state to another. Updates are accumulative, springs remember all the values you ever pass. You can use arbitrary names. - React Spring docs
- Animations enhance design
- Animations showcase uniqueness of a website
- Establish a better or stronger emotional connection
- Animations improve engagement and conversion
- Improve the overall user experience
In this tutorial, I shall walk you through using React Spring library to provide awesome animations to your CRA (React App).
Prerequisites to setup your CRA
Before you proceed with this tutorial, you must satisfy the following conditions:
- Node.js ≥v6 is installed on your local machine
- NPM is installed on your local machine
- You have an understanding of React.js
- You have an understanding of React hooks
- You are interested in wowing your users
Let us jump right in 🎇🎆🎉

I will recommend that you add React Spring to your application via either of these package managers; Yarn or NPM. Simply open a terminal window on your project’s root directory and run the installation command below:
npm install react-spring
Or
yarn add react-spring
This makes React Spring available in your application.
React Hooks make it feasible to add state to functional components.

React Spring takes this up a notch by providing a hook-based API which allows you to define and convert data that you would generally pass as props to animated data.
To better demonstrate some of the features of React Spring, let us take a closer look at the available hooks in the React-spring module. There are five major hooks available in React Spring at the moment:
-
useSpring — A single spring moves data from
atob -
useSprings — Multiple springs mainly for lists, where each spring moves data from
atob -
useTrail — Multiple springs with a single data set, one spring follows or trails behind the other.
-
useTransition — For mount/unmount transitions (lists where items are added/removed/updated)
-
useChain — To queue or chain multiple animations together For each of these hooks, there are several animation effects you can implement, it is limitless and goes as far as your imagination will take you.
I will walk you through some use cases for useSpring , useSprings, useTrail, useTransition, and finally, useChain to demonstrate how you can implement them in your React applications.
First, you fetch your imports
import { useSpring, animated } from 'react-spring'useSpring is one of the simplest React Spring hooks that you can you to quickly add animations to your app. The useSpring hook accepts two props minimum; which are from and to which are part of the reserved keywords. It simply animates values from one state to another. useSpring converts defined values into animated values; it allows animating the state changes from the initial from to the final to. A spring simply animates values from one state to another. Updates are accumulative, springs remember all the values you ever pass. Learn more about the useSpring hook here..
Example:
import { useSpring, animated } from 'react-spring'

function App() {
  const props = useSpring({ to: { opacity: 1 }, from: { opacity: 0 } })
  return <animated.div style={props}>I will fade in</animated.div>
}
You need the animation-primitive itself, and a special factory called animated. This library animates outside React (for performance reasons). Your view has to know how to handle the animated props you pass to it. This is what animated is there for, it extends native elements to receive animated values.
First, you fetch your imports
import { useSprings, animated } from 'react-spring'useSprings is just like useSpring. It allows you to create multiple springs, each with its own config. It is used for static lists where each spring moves data from an initial state to a final state. This also provides you with two options on how to implement it. Since you are working with multiple values, this method works in two forms which are:
If you re-render the component with changed props, the animation will update.
const springs = useSprings(
  number,
items.map(item => ({ opacity: item.opacity }))You will get an updater function back, and it won't cause the component to render like an overwrite. Handling updates like this is useful for fast-occurring updates, but you should prefer it.Optionally there's a stop function.
const [springs, api] = useSprings(number, index => ({ opacity: 1 }))

// Update springs with new props
api.start(index => ({ opacity: 0 }))
// Stop all springs
api.stop()The return value is an array containing animated props
return springs.map(styles => <animated.div style={styles} />)First, you fetch your imports
import { useTrail, animated } from 'react-spring'The useTrail hook enables you to create multiple springs with a single config. It shares almost the same configuration with the useSpring hook with a variation in the implementation. It animates the first item of a list of elements while the rest of the elements form a natural trail and follow their previous sibling to animate.
Example
const items = [
  { text: "ITEM1", id: 1 },
  { text: "ITEM2", id: 2 },
  { text: "ITEM3", id: 3 },
  { text: "ITEM4", id: 4 }
];
export default function App() {
  const trail = useTrail(items.length, { opacity: 1, from: { opacity: 0 } });
  return (
    <>
      {trail.map((props, i) => (
        <animated.div style={props} key={i}>
          {items[i].text}
        </animated.div>
      ))}
    </>
  );
}This argument is the number of animation style objects to create.
const items = [
  { text: "ITEM1", id: 1 },
  { text: "ITEM2", id: 2 },
  { text: "ITEM3", id: 3 },
  { text: "ITEM4", id: 4 }
];
This argument below is the animation style to create.
const trail = useTrail(items.length, { opacity: 1, from: { opacity: 0 } });Then we can apply them as we do with the useSprings hook.
{trail.map((props, i) => (
        <animated.div style={props} key={i}>
          {items[i].text}
        </animated.div>
))}First, you fetch your imports.
import { useTransition, animated } from 'react-spring'function TransitionArray() {
const [items, setItems] = useState(NUM_TRANS)
const transitions = useTransition(items, {
from: { opacity: 0 },
enter: { opacity: 1 },
leave: { opacity: 0 },
delay: 200,
config: config.molasses,
onRest: () => setItems([]),
})
useEffect(() => {
if (items.length === 0) {
setTimeout(() => {
setItems(NUM_TRANS)
}, 2000)
}
}, [items])
return (
<div style={{ display: 'flex' }}>
{transitions(({ opacity }, item) => (
<animated.div
style={{
opacity: opacity.to(item.op),
transform: opacity
.to(item.trans)
.to(y => `translate3d(0,${y}px,0)`),
}}>
{item.fig}
</animated.div>
))}
</div>
)
}useTransition allows you to create an animated transition group. It takes in the elements of the list, their keys, and lifecycles. The animation is triggered by the appearance and disappearance of the elements. You can use transition for arrays, to toggle between components, or for mounting/unmounting of the same component.
Learn more about the useTransition hook here
First, you fetch your imports
import { useChain, animated, } from 'react-spring'useChain allows you to set the execution sequence of previously defined animation hooks. To do this, you need to use refs, which will subsequently prevent the independent execution of the animation.
Learn more about the useChain hook here

- Spring boot is an open source Java-based framework used to create a micro Service. It is developed by Pivotal Team and is used to build stand-alone and production ready spring applications. More information about React Spring boot here.
whereas
- React Spring is a spring-physics based animation library that should cover most of your UI related animation needs. It gives you flexible tools to cast your ideas into moving interfaces confidently. More information here.
whereas

- Node.js is an open-source, cross-platform, back-end JavaScript runtime environment that runs on the V8 engine and executes JavaScript code outside a web browser, which was designed to build scalable network applications. Node.js lets developers use JavaScript to write command line tools and for server-side scripting—running scripts server-side to produce dynamic web page content before the page is sent to the user's web browser.
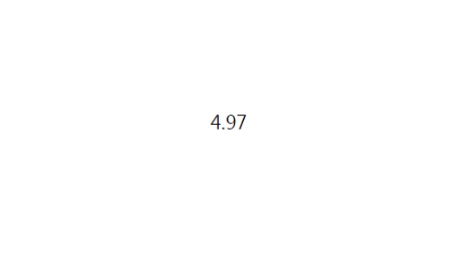
In this tutorial, you shall be walked through using React Spring to create a timer. This will be a pretty straight forward app. Let us dive right in.

npx create-react-app timer-appcd timer-appnpm install react-springReact Spring is used to add spring-based animations to our app. In this React Spring example, we will use the React Spring useSpring hook to demonstrate this example.
Let us now proceed to create the timer in React.JS.
Add the following lines of code in your App.js:
import React, { useState } from "react";
import { useSpring, animated } from "react-spring";

export default function AnimateTimer() {
   const [flip, set] = useState(false);
   const { number } = useSpring({
      reset: true,
      reverse: flip,
      from: { number: 0 },
      number: 60,
      delay: 100,
      onRest: () => set(!flip),
   });
   return <animated.div>{number.to((n) => n.toFixed(2))}</animated.div>;
}
export default function App() {
   return (
      <div style={{ marginLeft: 500, marginTop: 200 }}>
         <AnimateTimer />
      </div>
   );
}
-
The React Spring example creates a spring object, which will count from 0 to 60.
-
Then we added the attribute
resetto start the loop; it is set totrue, -
we added the attribute
reverseto indicate when the counting should start or end, -
we added the attribute
delayto delay the animation, -
we added the attribute
onRestto indicate what to do when the counting stops. -
we added the attribute
n.toFixed(2)indicates how many digits to show after the decimal.

-
React spring animations are based on physics. There is no need to customize duration or easing. The result is smooth, soft, and natural-looking animations.
-
Easy-to-use and clear documentation.
-
A lot of interesting and beautiful demos in the documentation and on the React Spring creator Paul Henschel’s CodeSandbox page.
-
The library repository is continually being updated and maintained. A small, but quite active community (spectrum, discord) has formed around the library. Paul Henschel regularly shares interesting insights, demos, and more on his Twitter page.
-
Framer/motion: A production-ready motion library for React. Utilize the power behind Framer, the best prototyping tool for teams—proudly open source.
-
React Transition Group: React Transition Group exposes transition stages, manages classes and group elements, and manipulates the DOM in useful ways, implementing actual visual transitions much more effortless. The React Transition Group component was developed by the ReactJS community team. It allows you to implement basic CSS animations and transitions worry-free.
-
React GSAP: This library lets you use the GreenSock Animation Platform (GSAP) in React in a fully declarative way. It abstracts away the direct use of the GSAP Tween and Timeline functions. If you’d like to learn about GSAP tutorials for beginners, pick into our standalone article on the topic.
In this tutorial, I walked you through animations in web development, introduced you to React Spring and its 5 hooks.