The real tragedy would be if people forgot, you can have new ideas about programming models... If the next generation of programmers grows up never being exposed to these ideas, and they teach [only what they know] to the next generation, so the second generation then grows up thinking, “It’s all been figured out. We know what programming is. We know what we are doing.” they grow up with dogma. And once you grow up with dogma, it’s really hard to break out of it.
~ Bret Victor, The Future of Programming
In 2014, front-end developer André Staltz set out to solve an imminent problem that developers are facing, especially in the Web world: dealing with large code bases and data flow. While even large corporations such as Facebook and Google and others have attempted this and brought forward popular frameworks, e.g., Angular and React, they seem to have missed the target. They have not solved the problem of how to achieve explicit data-flow graphs, nor efficiently dealing with the problem that new developers joining a large code base should be able to get a summarized overview of the architecture without spending multiple hours reading each file’s source code to build a mental model of the architecture.
Beyond astonishing and mind blowing, what Staltz achieved with just around 100 lines of code is a true paradigm changer. This changer is Cycle.js.
Cycle.js is an extension of the RxJS library more than a framework (though it will probably fall into that category). RxJS is the JavaScript version of ReactiveX, an API for asynchronous programming with observable streams. While RxJS solves the part of composing asynchronous and event-based programs by using observable sequences, Cycle.js does a unique thing by looping data flow between your application and the outside world. We will go into the details how this works later, but this makes explicit data-flow graphs possible; i.e., reasoning of dependencies between operations. Neither Angular nor React (nor any other that I am aware of) does this. This unique feature of Cycle.js has the benefit of making it far more easy to read and understand large code bases.
There is a debate whether reactive programming, when functional, can be called functional reactive programming (FRP), because it differs from the original specification by Conal Elliot. In this article, however, I will use the term functional reactive programming to mean something different than the original specification, but to be fair, I will shorten it fRP (with a small f).
We come from a time of object-oriented programming (OOP). A time that is dominated by imperative actions: Do this! Do that! Set this value! Remove that object! That time is over. The future is functional. The future is concurrent. To eliminate any doubt of these claims, let’s take a look at Moore’s Law:
Moore’s law is the observation that, over the history of computing hardware, the number of transistors in a dense integrated circuit has doubled approximately every two years.
A modern laptop has a billion transistors on it. The transistor density is 8.26 million transistors/mm2. Nobody can keep a billion transistors busy by trying to get them all to do something at once. The only way you can do that is by dividing your work up. Thus, the future is functional and the future is concurrent.
In the old days, we were all concerned about state. Programming was about maintaining state. It was about class invariants. It was about hiding data. It was about object orientation. Object-oriented programmers attempt to classify things into incredible hierarchies. In fact, we were not doing objected-oriented programming; we were doing class-oriented programming by dividing the world up into static hierarchies. But programming is, in fact, about transformation of data. That is what functional programming (FP) is concerned about. It is the transformation that actually gets work done. In OOP, we are thinking about coupling data and functionality together to have data and methods all in a class. With FP, we separate the two out. We decouple them. And decoupling leads to more flexible designs. Besides transformation of data, we also need to think about transformation of code.
The world is dynamic, and flexibility and transformability of code is critical if we are to generate the next version of the Web. In practice, this means that the vast amount of present libraries, frameworks and APIs in the near future will become obsolete if they don’t transform their code to a functional approach. Economics 101 tell us that this will automatically weed out any that doesn’t have a demand strong enough, because transformation of code comes at a cost. However, the cost of not transforming code is, as mentioned, an inevitable quickly-approaching death. My position is that hubs in the open source community will drive most of these transformations with support from corporations and other interest groups.
Reactive programming is oriented around data flows and the propagation of change. Erik Meijer gave us Rx because he was induced by push-based systems. When you want to stay up to date about the state of the world, it is much better to push instead of to pull. I will use a recent example Erik gave at the GOTO Copenhagen 2015 conference to illustrate why.
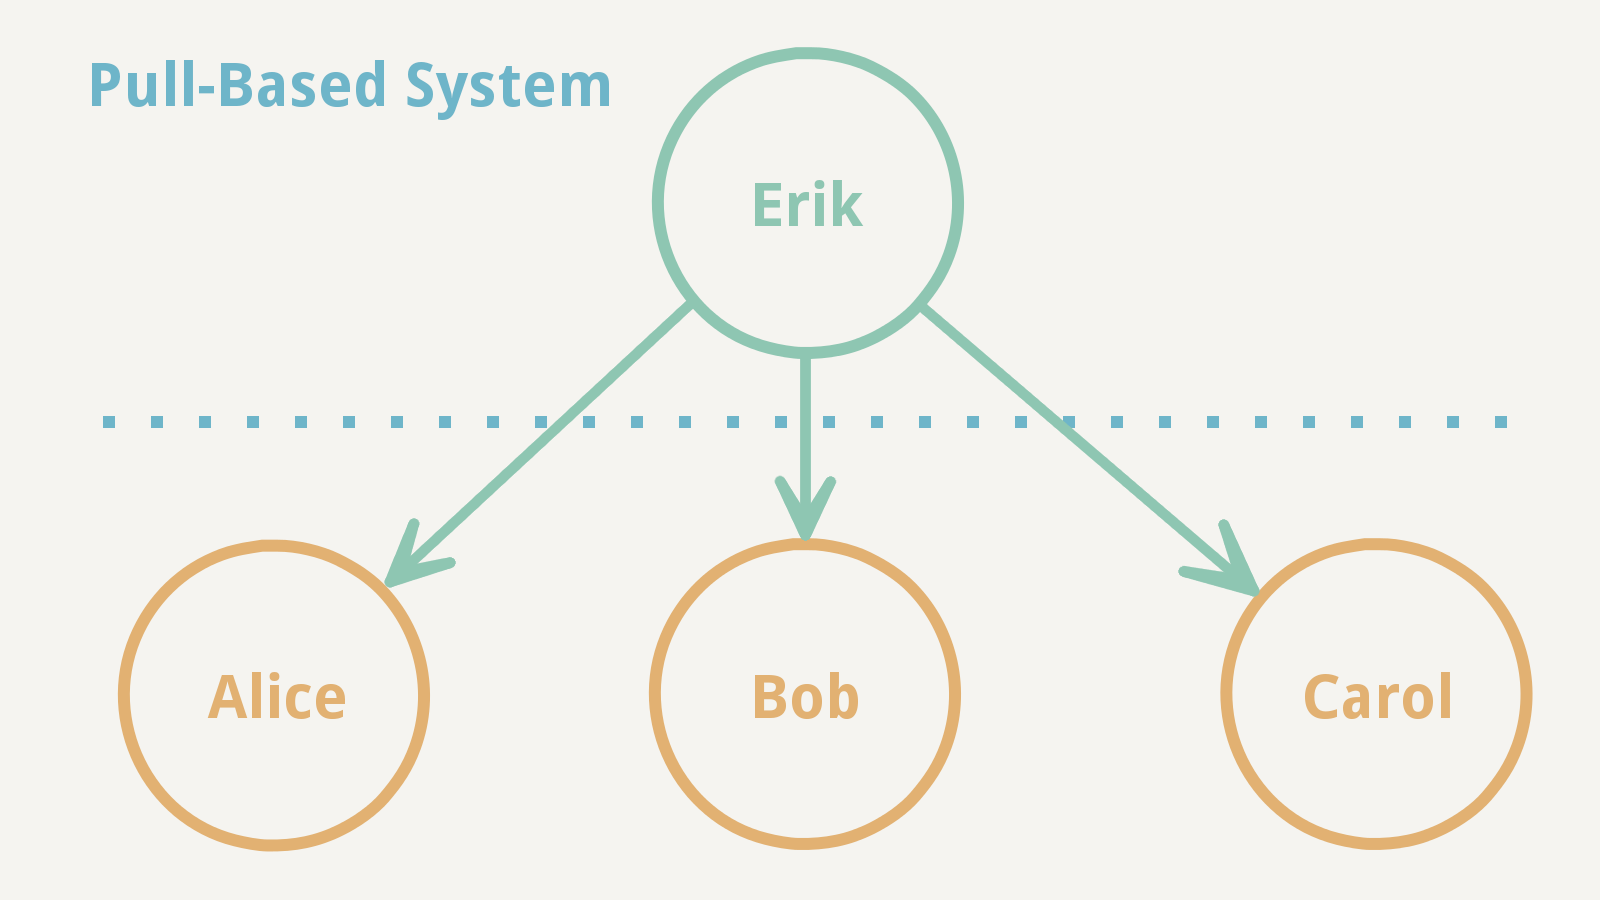
In the image above, Erik wants to stay up to date about what Alice, Bob and Carol are doing. Imagine that Erik is an app on your phone and Alice, Bob and Carol are sensors or sources of information on your phone, e.g., UI, motion, and position. If Erik is going to pull, he first has to ask Alice, “Is there anything interesting I should know?” but Alice is a little boring and answers, “No. Nothing happened.” Then Erik asks Bob, “Bob? Bob? Bob?! Are you there?” But Bob doesn’t answer, and if Erik is not careful, he is blocked by continuously asking Bob until Bob answers. This is why you must do asynchrony and never do a blocking call. While Erik was busy pulling information from Alice and Bob, Carol had all kinds of exciting things going on, but Erik never had a chance to ask her. When Erik finally asks Carol, she says, “Sorry, you already missed all the action. It’s now old stuff.” Therefore, when you want to stay up to date with the world, you have to push; you cannot pull.
Another way to look at this is this simple and naive implementation of pull. You are building a Web page that you want to refresh, and a common way is to use setInterval() to pull from the server at some rate.
window.setInterval(
  function () { ...pull from server...; }, ???
);
The question marks in the pseudo-code above are there because of the question: how often do you need to pull? The answer is: you don’t know. As we have seen with Alice, if you pull too fast, you waste resources because there is nothing interesting going on. With Bob, we have seen that if you pull at the wrong moment, you get blocked. And if you pull too slow, you may lose out on the action, as in the case of Carol. Thus, you cannot write code like this, because when you pull, you never get it right. Fortunately, JavaScript, with ES7 / ES 2016, now has async/await.
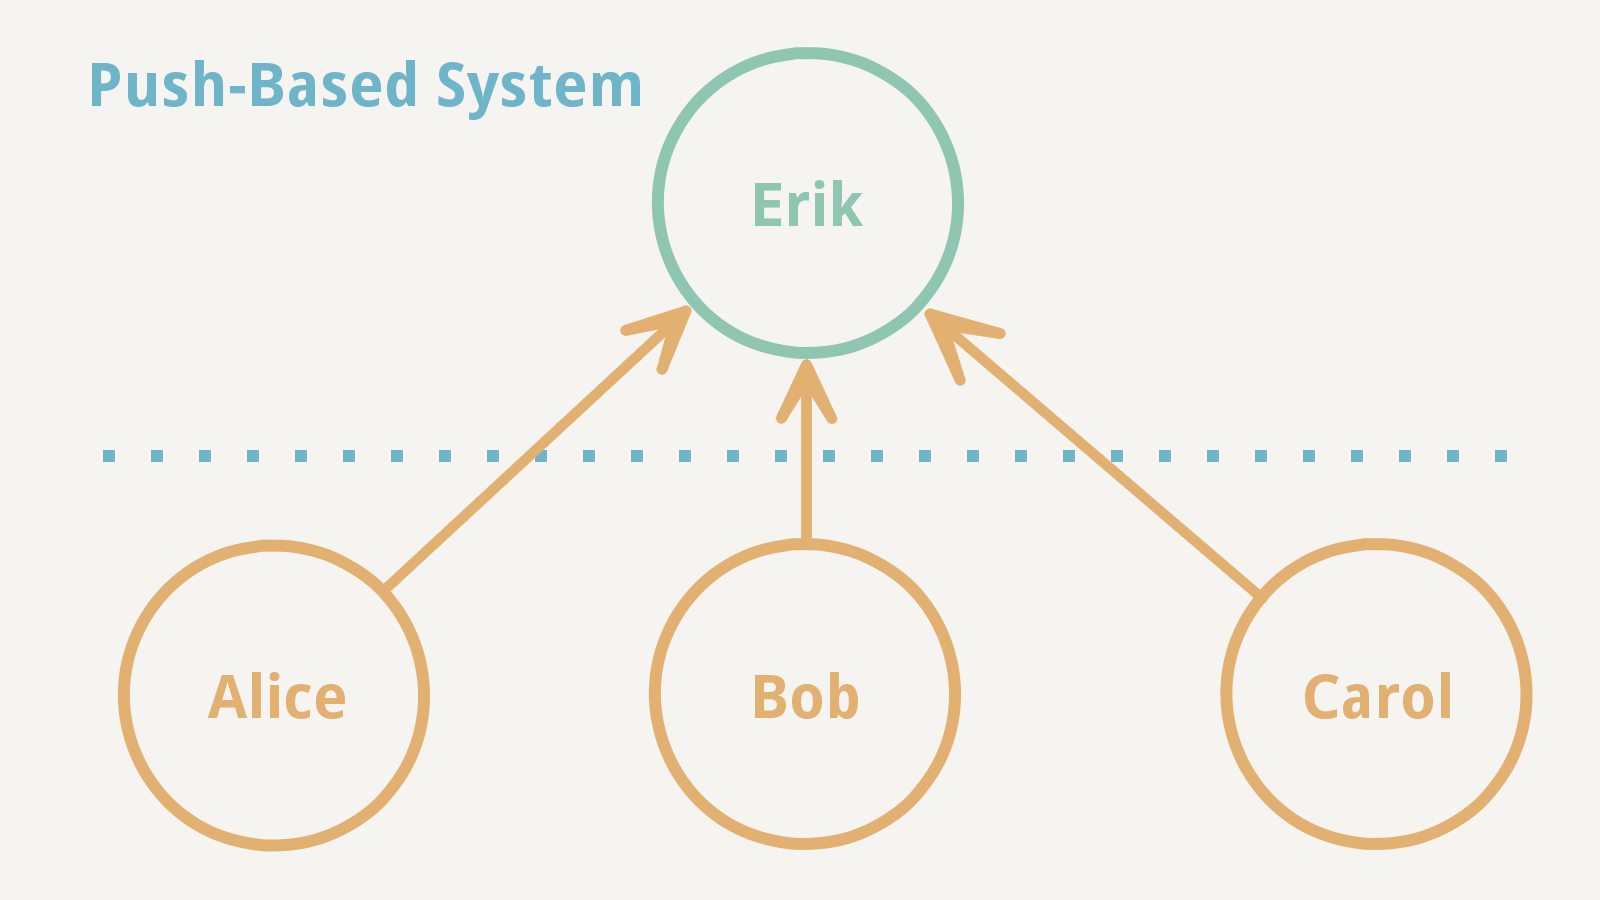
Here is the same example, but now the sources push. Again, the sources can be any source of information you can imagine, e.g., friends, stock ticks, or GPS. In this case, Alice is relaxed. Every once in a while something interesting happens, but not often. Bob is off line, but then suddenly he is back. You are not blocking because he will tell you when he is back. Erik doesn’t miss out on interesting stuff that Carol has to say, either. If Carol is pushing too fast, Erik can have some code that drops her messages or calms down the stream.
This is why reactive is so important. Push works, pull doesn’t.
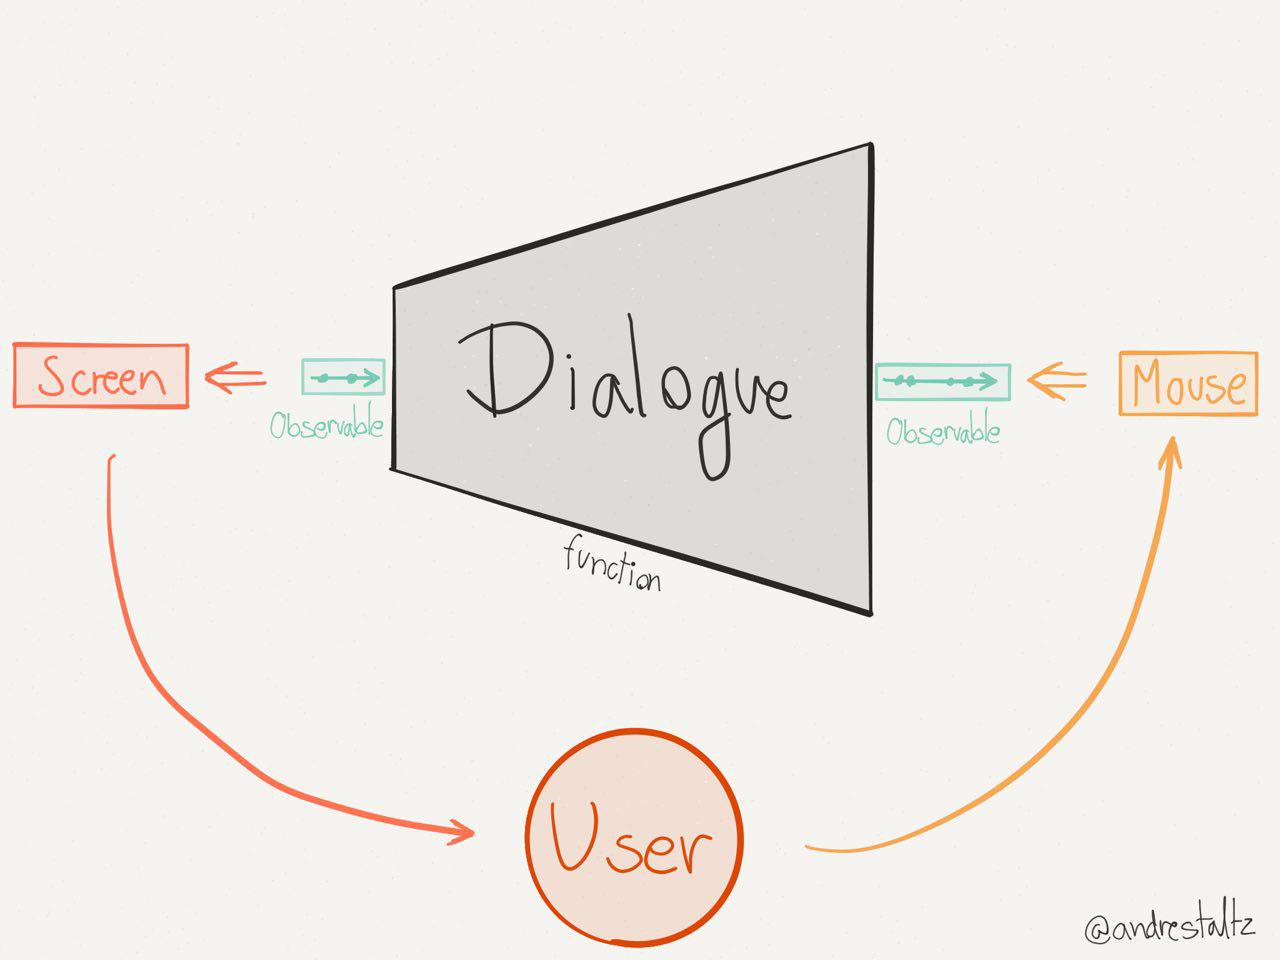
As we have seen in Erik Meijer’s examples above, everything is a stream of events. On the client side, this can be user mouse clicks, mouse moves, key presses, touches, swipes, etc. On the server side, it can be stock ticks, Web page updates, order fulfillments, etc. Seen from a program’s perspective, these streams of events are from sources in the outside world. It is the responsibility of the program to connect these observable streams and transform the data. To do this, the program must model the flow of data from these sources and build a sink, i.e., the output that is provided to the outside world, which will be explained in detail in the next section. It is here Cycle.js comes into play.
The core of Cycle.js is incredibly small but highly efficient to meet the demand for modeling flow of data and dealing with the communication between the application and the outside world. With Cycle.js, your program is a closed world, but obviously, if nothing comes in or out of the program, it is useless. Cycle.js provides a simple and ingenious way to compose your program’s interaction with the outside world while maintaining a true separation of concerns. A Cycle.js program’s entry point is called main(). In this function, the program is enclosed. Everything the program does happens from within that function.
// The program’s entry point
function main() {
  // What the program does goes here.
}
As noted above, if nothing can come in or out of the program, it is useless. The input to the program is in Cycle.js known as sources.
// Sources are injected
function main(sources) {
  // The program now has access to sources from the outside world.
}
One of the unique points of Cycle.js is how the sources are injected to the program. Cycle.js comes with an on-switch simply called run(). This is one of the two APIs that exist in Cycle.js and is used to kick-start Cycle.js. run() takes two arguments: a function and an object. The function is the program’s entry point main. The object is the sources that main should know about.
// First, we import the core
import { run } from '@cycle/core'

function main(sources) {
  // ...
}

// We kick-start Cycle.js
run(main, sources)
As you can see, we still haven’t declared what the sources are. The sources in Cycle.js are provided as drivers. A driver is the connection point to the outside world. Drivers are where side effects take place, e.g., updating the DOM in the browser, or sending a message to a server, but they also provide input to the program and reads output from the program. Cycle.js comes with a couple of common drivers, for example, the DOM driver. The DOM driver uses virtual-dom under the hood to effectively handle DOM manipulation and DOM state. Drivers are usually made with a factory function which accepts some options. The factory function will then return the actual driver function configured with the options. In case of the DOM driver factory function, it takes a CSS selector as argument.
import { run } from '@cycle/core'
// We import the DOM driver factory function
import { makeDOMDriver } from '@cycle/dom'

function main(sources) {
  // ...
}

// We declare our drivers as sources.
const sources = {
  // We tell the DOM driver that the DOM element of id `app`
  // is our application container.
  DOM: makeDOMDriver(`#app`)
}

run(main, sources)
Now our program can access the DOM driver’s API for reading events that happen in the DOM. As you recall, everything is a stream of events, and because Cycle.js is an extension of RxJS, drivers provide these streams of events from the outside world.
import { run } from '@cycle/core'
import { makeDOMDriver } from '@cycle/dom'

function main(sources) {
  // We can listen for DOM events by using the DOM drivers API.
  // The $-sign in `inputRangeValue$` is a Hungarian notation,
  // indicating that the variable is a stream.
  const inputRangeValue$ = sources.DOM
    // `select()` takes CSS selectors as argument and returns
    // an object of methods of which `events()` is one.
    .select(`.InputRange`)
    // `events()` takes a string representing the event type
    // to listen for and returns an Observable (stream)
    // of events of the specified type.
    .events(`input`)
    // We map the emitted events and return the value
    // of the event target.
    .map(ev => ev.target.value)
}

const sources = {
  DOM: makeDOMDriver(`#app`)
}

run(main, sources)
As the avid reader will recall, Cycle.js is essentially about modeling flow of data. This is the early beginning to start visualizing this flow. We now have a flow of input event data from an HTML element streaming into our program, available for it to use and act upon. But wait a minute. How can we then listen for events on a nonexistent element? We haven’t told the DOM to render any HTML INPUT element. That is true, and we won’t. Telling is imperative, and imperative commands don’t belong in our closed-world program. Even if we did choose to make imperative statements, the DOM is the outside world, and it is the responsibility of the driver to handle the rendering. Thus, imperative commands should exist solely in drivers.
The way the driver receives information about what it should do is by the same means of a push-based system. The program pushes information to the driver in the same form of event streams that the driver pushes to the program. Cycle.js uses the term sinks for the streams that are pushed out of the program to the outside world, i.e., the drivers. We simply return the sinks from the main().
import { run } from '@cycle/core'
import { makeDOMDriver } from '@cycle/dom'

// The program receives sources...
function main(sources) {
  const inputRangeValue$ = sources.DOM
    .select(`.InputRange`)
    .events(`input`)
    .map(ev => ev.target.value)

  // ...and returns sinks
  return sinks
}

const sources = {
  DOM: makeDOMDriver(`#app`)
}

run(main, sources)
In Cycle.js, the sinks are, like the sources, an object. The sinks’s keys correspond with the driver names, i.e., the keys in sources, to enable Cycle.js to do the mapping.
// We import Rx to build streams
import Rx from 'rx'
import { run } from '@cycle/core'
// We import virtual-hyperscript helper to create VTrees
import { h, makeDOMDriver } from '@cycle/dom'

function main(sources) {
  const inputRangeValue$ = sources.DOM
    .select(`.InputRange`)
    .events(`input`)
    .map(ev => ev.target.value)

  const sinks = {
    // Using the same key for the DOM driver as in `sources`
    // to enable correct mapping. The DOM driver expects
    // an Observable. Our Observable is of just one value;
    // a VTree of an INPUT element with class name `InputRange`
    // and of type `range`.
    DOM: Rx.Observable.just(h(`input.InputRange`, {type: `range`})),
  }

  return sinks
}

const sources = {
  DOM: makeDOMDriver(`#app`)
}

run(main, sources)
This code will actually execute and display an INPUT range slider in the browser. However, it doesn’t do anything else. The alert reader will probably wonder how we can listen for input events on the INPUT element when it is declared later in the code. The answer lies hidden in the core of Cycle.js, and the following explanation should complete the understanding of the flow of data in Cycle.js.
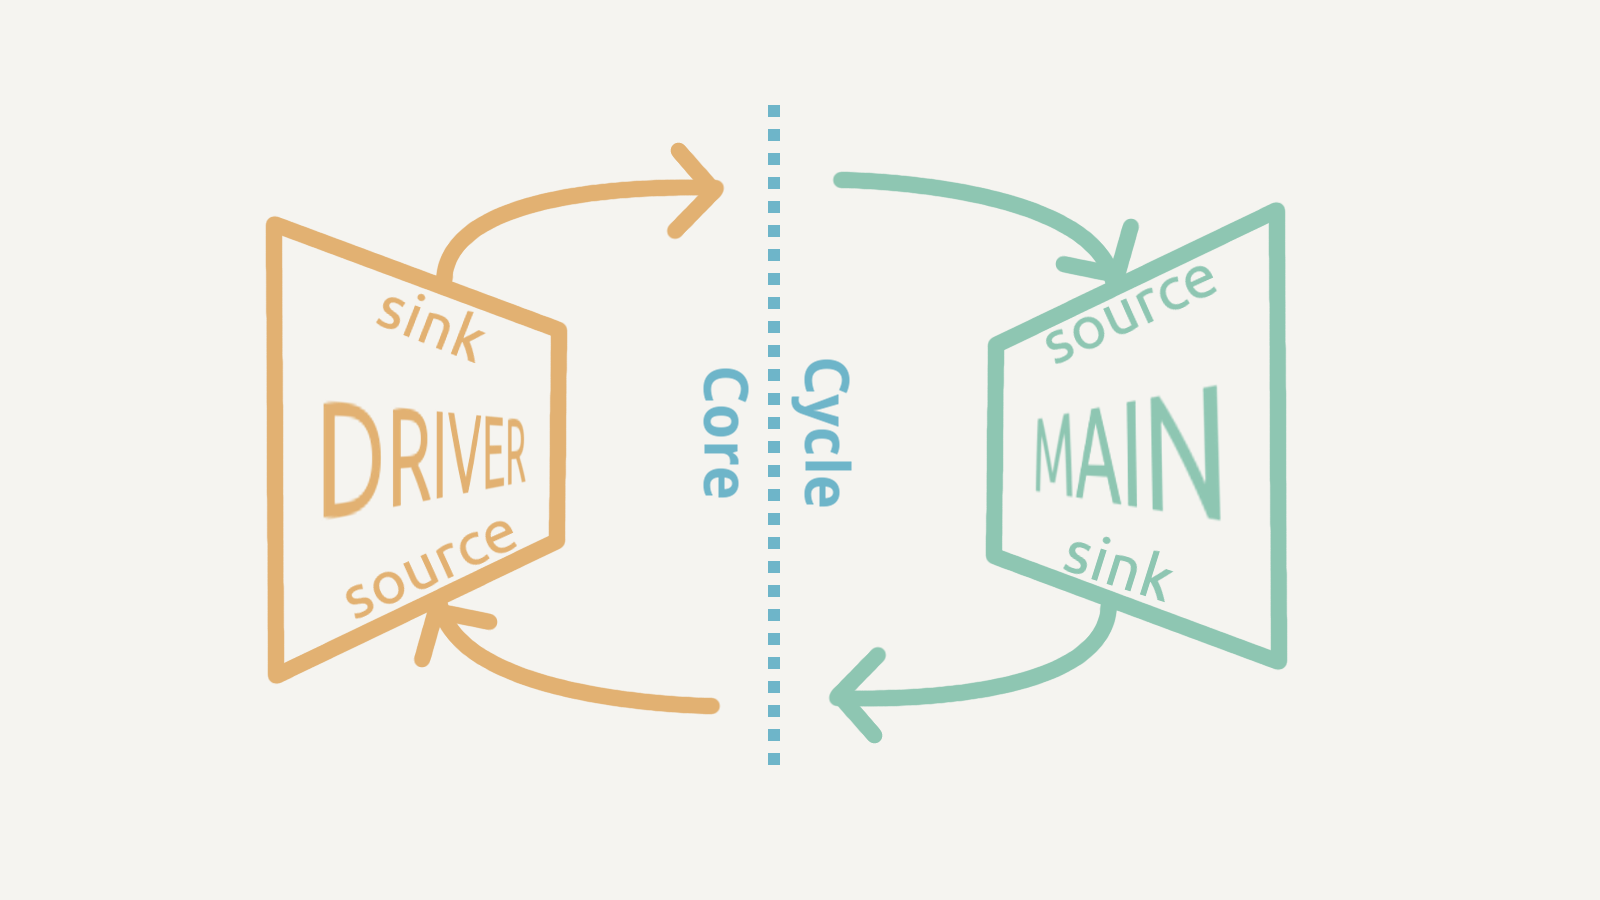
When run(main, sources), the kick-starter, is called, Cycle.js creates a proxy sink for each driver, and then calls each driver passing it the proxy sink. The proxy sink is both a replay-able, observable stream and an observer in one, known in Rx as a ReplaySubject. It is configured to replay just the last element. The results of each driver invocation are stored in a sources object and then passed to main(sources). main proceeds to execute, now having access to the driver APIs. When main returns the sinks, Cycle.js creates a disposable subscription to which each sink, i.e., the returned observable streams from main, is added and subscribed to, using the proxy sink as observer.
In effect, Cycle.js circularly connects main with the drivers, creating a feedback loop of data. The driver source observables are streaming events (or pushing data) into main, and main’s sink observables are streaming events (or pushing data) out to the drivers, which then can produce side effects based on the data from the program.
We will finish the example above in the Nested Dialogues and Model, View, Intent section. However, before you jump to that, it is advisable to read the next sections first to get a better grasp of how Cycle.js and its constituents work.
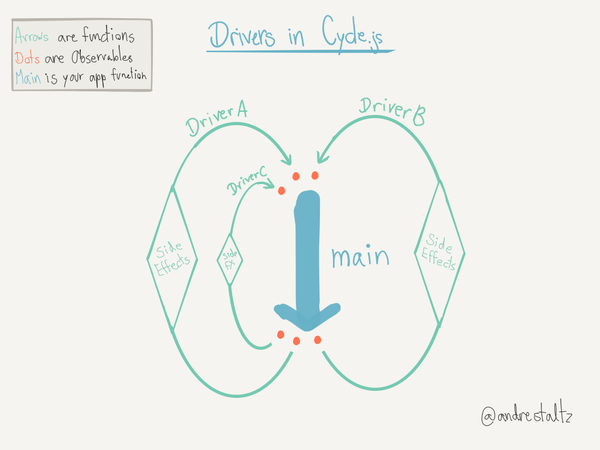
Cycle.js embraces functional reactive programming (fRP). Because programming is about transformation of data, and architecture is about flow of data, Cycle.js is really nothing more than functions (transformation) and observables (data flow). The observable streams as input to functions are called sources, and the observable streams as output from functions are called sinks. The observable streams that make the data flow are at the heart of Cycle.js; thus, Cycle.js is really just a clever extension of RxJS. Cycle.js, in its true essence, simply connects the data flow in a unidirectional cycle, a feedback loop, using drivers that are functions and can produce side effects and main() which is the actual program function.
Unlike frameworks like React and Angular, Cycle.js’s use of RxJS is not a last-minute patch. It is build around RxJS (though ports to other reactive libraries are quite possible). This is an enormous advantage and gives rise to the explicit data-flow graphs, which is unachievable with React and Angular.
As described previously, drivers are the building blocks for handling side effects. Any effect that has interaction with calling functions or the outside world, i.e., outside main(), is considered a side effect, e.g., drawing a pixel on the screen, storing a value in a database, or sending a message to a server. When our program requires side effects, we use a driver. Cycle.js offers, at current time of writing, the following drivers:
- HTTP Driver: for making HTTP requests, based on superagent;
- React Native Driver: for interacting with React Native experimental;
- History Driver: for dealing with the [History API], based on the rackt/history library;
- DOM Driver: for interaction with the DOM, based on virtual-dom;
- HTML Driver: for interaction with the DOM, based on virtual-dom;
- Fetch Driver: for making HTTP requests using the Fetch API;
- Notification Driver: for dealing with HTML5 notifications; and
- JSONP Driver: for making HTTP requests through the JSONP hack, based on the jsonp package.
We will build a very simple driver that doesn’t really do much, but it will be easier to reason about the basic structure of drivers and fitting the terminology that were introduced earlier.
We will make a driver for a program to shake hands with the outside world. We want our program to be able to push some text to our driver, and it to push simple text messages to the program. We also want to be able to make some basic configuration of the driver such as the greeting and name to use in the text messages.
// Begin with a factory function that should create
// our handshake driver. It is also through the factory function
// we pass options, a specification object, for configuration
// of our driver.
function makeHandshakeDriver(options) {
  // Extract the values from the options object.
  // These are invariable.
  const {greeting, name} = options

  // Declare the actual driver function.
  const handshakeDriver = () => {}

  // We return the actual driver from our factory.
  return handshakeDriver
}
Using the above factory will only give us a no-op function, which is pretty useless, so let’s do something about that. Remember that a driver, just as our program, accepts data input and exits data output. The terminology is source and sink. The driver accepts a sink from main(), but from the drivers perspective, it is a source of data. Likewise, the output from the driver’s perspective is a sink, but a source from the program’s perspective.
// We use `Subject` from RxJS for building our sink
import {Subject} from `rx`

function makeHandshakeDriver(options) {
  const {greeting, name} = options

  // Accept an observable stream
  const handshakeDriver = (source$) => {
    // Declare the sink.
    // `Subject` is the mutable version of an Observable.
    // It's both an Observer and an Observable. We will
    // use it to programmatically (imperatively) provide
    // the data that it will contain using `onNext()`.
    const sink$ = new Subject()

    // Return an observable stream.
    return sink$
  }

  return handshakeDriver
}
It should be noted that it is not a requirement that the driver returns an observable stream as output. It could, as in the case of the DOM driver, be an object with methods, or nothing at all for that matter. Likewise, it is also not a requirement that the driver accepts a source. When a driver accepts a source as input, it is a sink driver. Yes, this sounds strange and can easily cause confusion, but remember that from the program’s perspective, we return a sink that the driver accepts. When a driver returns a sink as output, it is a source driver because the program gets it as source. Our driver is a source-and-sink driver. As a rule of thumb, if the driver provides data to the program, it is a source driver, and if the program provides data to the driver, it is a sink driver.
With the terminology in place, let’s finish our simple handshake driver.
import {Subject} from `rx`

function makeHandshakeDriver(options) {
  const {greeting, name} = options

  const handshakeDriver = (source$) => {
    const sink$ = new Subject()

    // We subscribe to our source to get access to any data
    // the program pushes.
    source$.subscribe((data) => {
      // declare our text message using values from the factory
      // options and data from the source.
      const message = `${greeting}, ${data} ${name}`
      // We can perform a side effect,
      // e.g., logging to the console.
      console.log(message)
      // And we push the message to the sink.
      sink$.onNext(message)
      })

    return sink$
  }

  return handshakeDriver
}
If we don’t require our driver to be configured with options, we can remove the outer factory function altogether. The factory function in above example is there to illustrate the common way of structuring drivers.
Here is how we can use it in our Cycle.js program:
import {run} from '@cycle/core'
import {makeHandshakeDriver} from 'example-driver'

function main(sources) {
  const {Handshake} = sources

  const message$ = Handshake
    .startWith(`world from`)
    .map( message => {
      if (message === `Hello, world from Cycle.js`) {
        return `you’ve created your first application using`
      }
    })

  const sinks = {
    Handshake: message$
  }

  return sinks
}

const handshakeDriverOptions = {
  greeting: `Hello`,
  name: `Cycle.js`,
}

const sources = {
  Handshake: makeHandshakeDriver(handshakeDriverOptions)
}

run(main, sources)Now that we covered the inner workings of Cycle.js, let’s finish the INPUT range slider program which we began earlier. As we do so, we will cover some new concepts.
We left our program displaying the INPUT range slider and reading the value on input event. Yet, we never used the value for anything. Now we will take the INPUT range value to dynamically display n amount of DIVs on the screen, corresponding with the slider value. To make the DIVs a little interesting, we will add some styling and display which number DIV it is.
import Rx from 'rx'
import {run} from '@cycle/core'
import {h, makeDOMDriver} from '@cycle/dom'

function main(sources) {
  const inputRangeValue$ = sources.DOM
    .select(`.InputRange`)
    .events(`input`)
    .map(ev => ev.target.value)
    // We start with zero
    .startWith(0)

  // We make a styled dynamic DIV
  const dynamicDIV = h(`div`, {
    style: {
      alignItems: `center`,
      backgroundColor: `#454545`,
      boxSizing: `border-box`,
      color: `#fcfcfc`,
      display: `inline-flex`,
      fontFamily: `sans-serif`,
      fontWeight: `700`,
      fontSize: `8px`,
      height: `32px`,
      justifyContent: `center`,
      margin: `8px`,
      width: `32px`
    }
  })

  // We make an observable stream
  const dynamicDIV$s$ = inputRangeValue$
    .map(
      // with an array of size n
      n => Array.apply(null, Array(parseInt(n)))
        // and fill it with Observables of dynamicDIV
        .map(() => Rx.Observable.just(dynamicDIV))
    )

  const sinks = {
    DOM: Rx.Observable
      .just(h(`input.InputRange`, {type: `range`}))
      // We combine our observables
      .combineLatest(
        dynamicDIV$s$,
        (inputRangeSliderVTree, dynamicDIVs) => h(`div`, [
          inputRangeSliderVTree,
          h(`div`, dynamicDIVs)
        ])
      ),
  }

  return sinks
}

const sources = {
  DOM: makeDOMDriver(`#app`)
}

run(main, sources)
If you adjust the slider now, you will see little dark-grey squares appearing or disappearing, depending on whether you increase or decrease the value. However, we want to see some numbers in those squares, but if you look at the code, there doesn’t seem to be any way we can pass numbers to the dynamicDIV. Also, our main is beginning to get cluttered, so let’s clean it up.
import Rx from 'rx'
import {run} from '@cycle/core'
import {h, makeDOMDriver} from '@cycle/dom'

// We extract `main` content into its own function
function DynamicDIVSlider(sources) {
  const inputRangeValue$ = sources.DOM
    .select(`.InputRange`)
    .events(`input`)
    .map(ev => ev.target.value)
    .startWith(0)

  const dynamicDIV = h(`div`, {
    style: {
      alignItems: `center`,
      backgroundColor: `#454545`,
      boxSizing: `border-box`,
      color: `#fcfcfc`,
      display: `inline-flex`,
      fontFamily: `sans-serif`,
      fontWeight: `700`,
      fontSize: `8px`,
      height: `32px`,
      justifyContent: `center`,
      margin: `8px`,
      width: `32px`
    }
  })

  const dynamicDIV$s$ = inputRangeValue$
    .map(
      n => Array.apply(null, Array(parseInt(n)))
        .map(() => Rx.Observable.just(dynamicDIV))
    )

  const sinks = {
    DOM: Rx.Observable
      .just(h(`input.InputRange`, {type: `range`}))
      .combineLatest(
        dynamicDIV$s$,
        (inputRangeSliderVTree, dynamicDIVs) => h(`div`, [
          inputRangeSliderVTree,
          h(`div`, dynamicDIVs)
        ])
      ),
  }

  return sinks
}

function main(sources) {
  // We get the sinks from our extracted function
  const dynamicDIVSlider = DynamicDIVSlider(sources)

  const sinks = {
    // We map the DOM sink to the DOM driver
    DOM: dynamicDIVSlider.DOM
  }

  return sinks
}

const sources = {
  DOM: makeDOMDriver(`#app`)
}

run(main, sources)
Our main is now much cleaner. The function DynamicDIVSlider is like a component, and what is interesting to notice is how it accepts sources and returns sinks; just like our main. In fact, this is beginning to become fractal.
In Cycle.js, components in the program that accept sources and return sinks are called dialogues, because they listen and respond. And because of their fractal nature, dialogues can be nested. This concept of Nested Dialogues was introduced by André Staltz in his blog post Unidirectional User Interface Architectures.
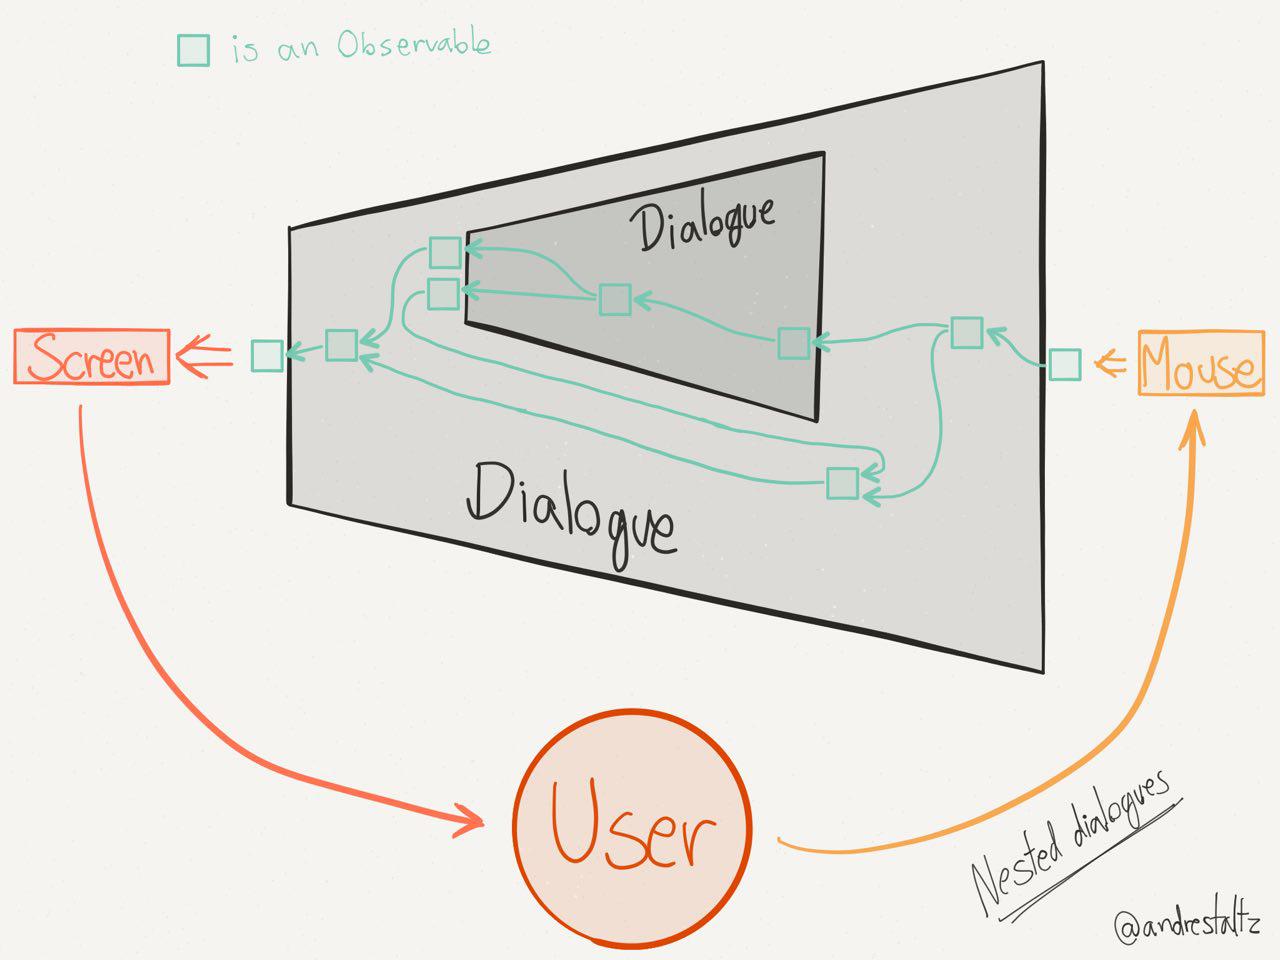
As you can see, a dialogue is just a function; just like out main is just a function, and our drivers are just functions. They all share this commonality of accepting sources and returning sinks. main is, in concept, a dialogue, i.e., our main dialogue; the root.
Before we get our numbers to show up in the squares as we require, we will extract the dynamicDIV as another dialogue and nest it in our DynamicDIVSlider dialogue.
import Rx from 'rx'
import {run} from '@cycle/core'
import {h, makeDOMDriver} from '@cycle/dom'

// We extract the dynamicDIV as another dialogue
function DynamicDIV(sources) {
  const dynamicDIV = h(`div`, {
    style: {
      alignItems: `center`,
      backgroundColor: `#454545`,
      boxSizing: `border-box`,
      color: `#fcfcfc`,
      display: `inline-flex`,
      fontFamily: `sans-serif`,
      fontWeight: `700`,
      fontSize: `8px`,
      height: `32px`,
      justifyContent: `center`,
      margin: `8px`,
      width: `32px`
    }
  })

  const sinks = {
    DOM: Rx.Observable.just(dynamicDIV),
  }

  return sinks
}

function DynamicDIVSlider(sources) {
  const inputRangeValue$ = sources.DOM
    .select(`.InputRange`)
    .events(`input`)
    .map(ev => ev.target.value)
    .startWith(0)

  const dynamicDIV$s$ = inputRangeValue$
    .map(
      n => Array.apply(null, Array(parseInt(n)))
        // We invoke the new dialogue
        .map(() => DynamicDIV(sources).DOM)
    )

  const sinks = {
    DOM: Rx.Observable
      .just(h(`input.InputRange`, {type: `range`}))
      .combineLatest(
        dynamicDIV$s$,
        (inputRangeSliderVTree, dynamicDIVs) => h(`div`, [
          inputRangeSliderVTree,
          h(`div`, dynamicDIVs)
        ])
      ),
  }

  return sinks
}

function main(sources) {

  const dynamicDIVSlider = DynamicDIVSlider(sources)

  const sinks = {
    DOM: dynamicDIVSlider.DOM
  }

  return sinks
}

const sources = {
  DOM: makeDOMDriver(`#app`)
}

run(main, sources)
We have now obtained a Nested Dialogue-approach, but there is more we need to do. Our DynamicDIV dialogue should accept properties in which the number to display should be held.
import Rx from 'rx'
import {run} from '@cycle/core'
import {h, makeDOMDriver} from '@cycle/dom'

function DynamicDIV(sources) {
  // We accept a value for our view
  const view = (value) => h(`div`, {
    style: {
      alignItems: `center`,
      backgroundColor: `#454545`,
      boxSizing: `border-box`,
      color: `#fcfcfc`,
      display: `inline-flex`,
      fontFamily: `sans-serif`,
      fontWeight: `700`,
      fontSize: `8px`,
      height: `32px`,
      justifyContent: `center`,
      margin: `8px`,
      width: `32px`
    }
    // And display it
  }, `${value}`)

  const sinks = {
    // We now map over our `props$`
    // to extract the `value`
    // which is passed to the view.
    DOM: sources.props$.map((props) => view(props.value)),
  }

  return sinks
}

function DynamicDIVSlider(sources) {
  // Deconstruction
  const {DOM} = sources

  const inputRangeValue$ = sources.DOM
    .select(`.InputRange`)
    .events(`input`)
    .map(ev => ev.target.value)
    .startWith(0)

  const dynamicDIV$s$ = inputRangeValue$
    .map(
      n => Array.apply(null, Array(parseInt(n)))
        .map(
          // We map `index` to an observable stream `props$`
          // which is just an object with a `value` property.
          (v, index) => DynamicDIV(
            {DOM, props$: Rx.Observable.just({
              value: index + 1
            }
          )}).DOM
        )
    )

  const sinks = {
    DOM: Rx.Observable
      .just(h(`input.InputRange`, {type: `range`}))
      .combineLatest(
        dynamicDIV$s$,
        (inputRangeSliderVTree, dynamicDIVs) => h(`div`, [
          inputRangeSliderVTree,
          h(`div`, dynamicDIVs)
        ])
      ),
  }

  return sinks
}

function main(sources) {

  const dynamicDIVSlider = DynamicDIVSlider(sources)

  const sinks = {
    DOM: dynamicDIVSlider.DOM
  }

  return sinks
}

const sources = {
  DOM: makeDOMDriver(`#app`)
}

run(main, sources)
Moving the slider forward and back will now show squares with a number. Perhaps you already noticed, but with a slight of hand we changed a variable to be called view, which is now a function that takes some state as argument, in this case value.
Slowly we are moving towards a separation that André Staltz has named Model, View, Intent or MVI in short form. This concept is part of the unidirectional data flow in Cycle.js. The Intent is a function, like almost everything else, whose purpose is to interpret the user’s intent into actions. If we look at our code, we can see that we in our DynamicDIVSlider reads the value of the slider by using the DOM driver. What we actually are doing is interpreting the user’s intent when the user moves the slider. In the light of this new concept, let’s refactor our code. Since we will only refactor the DynamicDIVSlider now, I will just show that function.
function DynamicDIVSlider(sources) {
  const {DOM} = sources

  // Our Intent function
  // accepts a DOM driver
  // and returns an object of actions.
  const intent = (DOM) => ({
    inputRangeValue$: DOM
      .select(`.InputRange`)
      .events(`input`)
      .map(ev => ev.target.value)
  })

  // We invoke `intent` with the DOM driver
  // to get an actions object.
  const actions = intent(DOM)

  // We now use our actions object.
  const dynamicDIV$s$ = actions.inputRangeValue$
    // We start our observable stream with zero.
    .startWith(0)
    .map(
      n => Array.apply(null, Array(parseInt(n)))
        .map(
          // We map `index` to an observable stream `props$`
          // which is just an object with a `value` property.
          (v, index) => DynamicDIV(
            {DOM, props$: Rx.Observable.just({
              value: index + 1
            }
          )}).DOM
        )
    )

  const sinks = {
    DOM: Rx.Observable
      .just(h(`input.InputRange`, {type: `range`}))
      .combineLatest(
        dynamicDIV$s$,
        (inputRangeSliderVTree, dynamicDIVs) => h(`div`, [
          inputRangeSliderVTree,
          h(`div`, dynamicDIVs)
        ])
      ),
  }

  return sinks
}
This might look like a step backwards, because our code actually got a bit more complicated. However, we can now see how the intent modifies the state of our dialogue. Instead of having state flying freely around in the dialogue, we use a Model to encapsulate it.
The model is also just, yes, you guessed it, a function. It takes the actions from the intent, often combined with other properties passed to the dialogue, and returns an observable stream of state. Let’s see how that works.
function DynamicDIVSlider(sources) {
  const {DOM} = sources

  const intent = (DOM) => ({
    inputRangeValue$: DOM
      .select(`.InputRange`)
      .events(`input`)
      .map(ev => ev.target.value)
  })

  // We declare our model
  // Here it only takes our actions,
  // but it could easily accept other input.
  const model = (actions) => {
    // This is simple, because actions only has
    // one observable stream.
    const state$ = actions.inputRangeValue$
      // We start our observable stream with zero.
      .startWith(0)
      // And we return a state object.
      .map(n => ({value: n}))

    // We return an observable stream of state.
    return state$
  }

  const actions = intent(DOM)
  // We pass the actions to our model
  // and get back an observable stream of state.
  const state$ = model(actions)

  // We now map over the dialogue’s state.
  const dynamicDIV$s$ = state$
    .map(
      (state) => Array.apply(null, Array(parseInt(state.value)))
        .map(
          (v, index) => DynamicDIV(
            {DOM, props$: Rx.Observable.just({
              value: index + 1
            }
          )}).DOM
        )
    )

  const sinks = {
    DOM: Rx.Observable
      .just(h(`input.InputRange`, {type: `range`}))
      .combineLatest(
        dynamicDIV$s$,
        (inputRangeSliderVTree, dynamicDIVs) => h(`div`, [
          inputRangeSliderVTree,
          h(`div`, dynamicDIVs)
        ])
      ),
  }

  return sinks
}
The final bit we are missing is our View. Right now it is awkwardly being returned in the sinks. Let’s refactor.
function DynamicDIVSlider(sources) {
  const {DOM} = sources

  const intent = (DOM) => ({
    inputRangeValue$: DOM
      .select(`.InputRange`)
      .events(`input`)
      .map(ev => ev.target.value)
  })

  const model = (actions) => {
    const state$ = actions.inputRangeValue$
      .startWith(0)
      .map(n => ({value: n}))

    return state$
  }

  // Our view takes the state stream from the `model`.
  const view = (state$) => {
    // We move the creation of the dynamic DIVs
    // to the view.
    const dynamicDIV$s$ = state$
    .map(
      (state) => Array.apply(null, Array(parseInt(state.value)))
        .map(
          (v, index) => DynamicDIV(
            {DOM, props$: Rx.Observable.just({
              value: index + 1
            }
          )}).DOM
        )
    )

    // It builds an observable stream of
    // virtual tree for the DOM.
    const vtree$ = state$
      .combineLatest(
        dynamicDIV$s$,
        (state, dynamicDIV$s) => h(`div`, [
          h(`input.InputRange`, {
            type: `range`,
            // We set the value to the value from state.
            value: state.value,
          }),
          h(`div`, dynamicDIV$s)
        ])
    )

    return vtree$
  }

  const actions = intent(DOM)
  const state$ = model(actions)

  const sinks = {
    // We map the view to the DOM driver
    DOM: view(state$, dynamicDIV$s$),
  }

  return sinks
}
And here is the final, compacted code.
import Rx from 'rx'
import {run} from '@cycle/core'
import {h, makeDOMDriver} from '@cycle/dom'

function DynamicDIV(sources) {
  const model = (props$) => props$.map((props) => ({
    value: props.value
  }))

  const view = (state$) => state$.map((state) => h(`div`, {
      style: {
        alignItems: `center`,
        backgroundColor: `#454545`,
        boxSizing: `border-box`,
        color: `#fcfcfc`,
        display: `inline-flex`,
        fontFamily: `sans-serif`,
        fontWeight: `700`,
        fontSize: `8px`,
        height: `32px`,
        justifyContent: `center`,
        margin: `8px`,
        width: `32px`
      }
    }, `${state.value}`)
  )

  return {
    DOM: view(model(sources.props$)),
  }
}

function DynamicDIVSlider(sources) {
  const {DOM} = sources

  const intent = (DOM) => ({
    inputRangeValue$: DOM
      .select(`.InputRange`)
      .events(`input`)
      .map(ev => ev.target.value)
  })

  const model = (actions) => {
    return actions.inputRangeValue$
      .startWith(0)
      .map(n => ({value: n}))
  }

  const view = (state$) => {
    const dynamicDIV$s$ = state$.map(
      (state) => Array.apply(null, Array(parseInt(state.value)))
        .map((v, index) => DynamicDIV(
          {DOM, props$: Rx.Observable.just({
            value: index + 1
          })}).DOM))

    return state$
      .combineLatest(
        dynamicDIV$s$,
        (state, dynamicDIV$s) => h(`div`, [
          h(`input.InputRange`, {
            type: `range`,
            value: state.value,
          }),
          h(`div`, dynamicDIV$s)
        ])
    )
  }

  return {
    DOM: view(model(intent(sources.DOM))),
  }
}

run(
  // `main` is inlined.
  (sources) => ({
    DOM: DynamicDIVSlider(sources).DOM
  }),
  {
    DOM: makeDOMDriver(`#app`)
  },
)
See the Pen Cycle.js demo by Frederik Krautwald (@Frikki) on CodePen.
<script async src="//assets.codepen.io/assets/embed/ei.js"></script>A simple challenge is to modify the final code to let the DynamicDIVSlider accept an observable stream of properties through its sources, through which an initial value, min and max can be set. You could also try to figure out how to display the value of the slider. Have fun!
It’s been a long ride, but we made it. We have learned how the future is functional and concurrent. We have learned how push-based systems are superior to pull-based systems. We have seen how everything is a stream of events. We have seen how reactive programming using observable streams solves the problem of state. We have learned how Cycle.js creates a feedback loop. We have learned how side effects are handled by drivers in Cycle.js. We have learned about nested dialogues, and how model, view and intent fit in writing Cycle.js programs. We have learned to embrace functions and leave imperative and class-oriented code behind us. We have learned to use Cycle.js by making ourselves a simple driver and a simple program. So now that we can cycle, let’s turbocharge it and spin it real fast. Cycle.js is a Ferrari on steroids when you use it cleverly.

I think we can change this sentence a bit. My point with large codebases was that the core problem is a new developer joining a large codebase should be able to get a summarized overview of the architecture, without spending multiple hours reading each source code file and building the mental model of the architecture in their heads.
Really good overview.