Skip to content

Instantly share code, notes, and snippets.

Show Gist options
  • Save HimDek/e09340eae2861e1ad8b7f6bdba5ee9ff to your computer and use it in GitHub Desktop.
Save HimDek/e09340eae2861e1ad8b7f6bdba5ee9ff to your computer and use it in GitHub Desktop.
This Guide will show you how to install and run apk files or Android apps in any Edition of Windows 11 using Windows Subsystem for Android. WSA or Windows Subsystem for Android is a Tool that allows Windows to run Android Apps directly without using any emulator.

Install Android apps or apk files in Windows using Windows Subsystem for Android

WSA or Windows Subsystem for Android is a Tool that allows Windows to run Android Apps directly without using any emulator. The problem is Windows Subsystem for Android is currently only available through preview via the Beta Channel of the Windows Insider Program. But if you follow my guide, you don't have to be in Windows Insider Program to try it out. The only thing you need is Windows 11 installed and some patience.

Prerequisites:

  • Windows Subsystem for Android or WSA must be Installed.

Click here to view the guide that shows how to install Windows Subsystem for Android in any Edition of Windows 11 (including Windows 11 Home) non Inider or stable release.

How to Install Android Apps or apk files in Windows Subsystem for Android:

  • First install Windows Subsystem for Android. Click here to know how to do that.
  • Search and run Windows Subsystem for Android Setting from Windows start menu.
  • The window shown in the screenshot below will appear. There, click on the icon in the extreme left side of the Files box. This will start Windows Subsystem for Android and open the File Manager App in Android. This can take some time so be patient.
  • Keep File Manager running otherwise Windows Subsystem for Android will terminate itself.
  • Enable Optional Diagnostic Data and Developer mode in Windows Subsystem for Android Setting Window and click the Refresh button in the IP address Section.
  • Click here to download the latest version of adb and extract the downloaded zip file.
  • Inside the extracted folder, there should be a file named
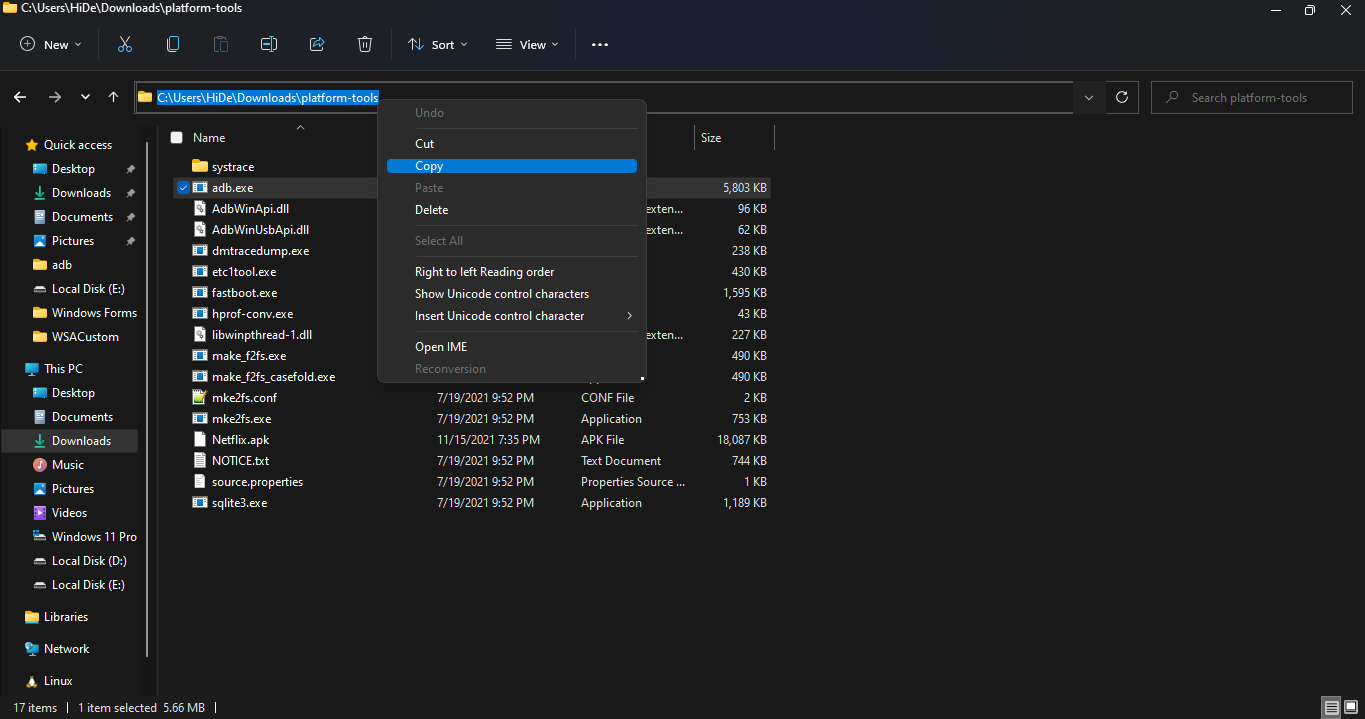
 adb.exe along with a plenty of other files.
  • Put the apk files of the Android apps that you want to install in this folder, and rename them to names that are easier to remember.

    Note: You can download apk files of Android apps from websites like APKPure, APKMirror or F-Droid. These are trusted websites.

  • Copy the path of this folder from the pathbox in Windows File Explorer as shown in the screenshot below: 11
  • Search for Command Prompt in Windows Start Menu and Open it.
  • Type cd "" in the command prompt. Inside those "", paste the copied path by pressing Ctrl + V. The windows should look something like the below screenshot. Then press Enter. 12
  • Now, type adb connect 127.0.0.1:58526 in the Command Prompt Window. Press Enter and wait for the connection.
  • Once connected, type adb install "name.apk" in the Command Prompt. Replace name with the name of the apk file that you want to install and press Enter. After successful install, the installed App will appear in Windows Start Menu. Repeat this step for all the apk files that you want to install and they will appear in Windows Start Menu as well.

Thats it! Thanks for using this Guide. I hope it helped.

@Lebanese3Arab
Copy link

i have a problem
i run the command C:\Users\zainh\Documents\important\platform-tools>adb uninstall "youtube.apk"
and it says:
Failure [DELETE_FAILED_INTERNAL_ERROR]

any fix?

@JoacoGonza3
Copy link

Thank you very much!

@flyknight9821
Copy link

C:\Users\flykn\Downloads\pl\pl2>adb install onstream.apk
adb.exe: device offline

I got this message...Any help?

@flyknight9821
Copy link

C:\Users\flykn\Downloads\pl\pl2>adb connect 127.0.0.1:5037
failed to connect to 127.0.0.1:5037

@octogeer
Copy link

I'm having an issue with the second to last step. When running the command i get:

* daemon not running; starting now at tcp:5037

* daemon started successfully
  cannot connect to 127.0.0.1:58526: No connection could be made because the target machine actively refused it. (10061)

And i don't know how to fix that

You fix that by starting WSA; just open the File Manager and one should be able to connect to 58526
grafik

@octogeer
Copy link

octogeer commented Mar 17, 2024

C:\Users\flykn\Downloads\pl\pl2>adb connect 127.0.0.1:5037 failed to connect to 127.0.0.1:5037

See above

@flyknight9821
Copy link

flyknight9821 commented Mar 18, 2024 via email

@gamer191
Copy link

Copy the path of this folder from the pathbox in Windows File Explorer as shown in the screenshot below

There's actually a much easier way: just backspace the folder path and type "cmd". The command prompt will open in the current directory!

@ninjazan420
Copy link

Copy the path of this folder from the pathbox in Windows File Explorer as shown in the screenshot below

There's actually a much easier way: just backspace the folder path and type "cmd". The command prompt will open in the current directory!

Holy. You're a master

@Dmod134
Copy link

Dmod134 commented Jun 28, 2024

hi, im new here. I'm running on win 11. after running the "change directory" command, when it came to the connection step, it gave me a "command not recognized" error.

@Alexabhatti
Copy link

Absolutely, using Windows Subsystem for Android (WSA) to run Android apps directly on Windows 11 is a great feature. For those interested in photo editing, this is especially useful. For instance, if you want to use the Photoroom Photo Editor, you can install its Android APK on your Windows PC using WSA. This way, you can edit your photos with Photoroom's advanced tools directly on your computer, without needing an emulator.

Photoroom is a powerful app for removing backgrounds and enhancing images, making it a favorite for many users. With WSA, you can take full advantage of its features on a bigger screen. Follow the guide to install WSA and then download the Photoroom Premium unlock APK to get started. Happy editing!

@Robertdan99
Copy link

Using Windows Subsystem for Android (WSA) to run Android apps on Windows 11 is a handy feature. If you're interested in video editing, you can also install the Wink Video Editor APK using this method.

Here’s how you can do it:

  1. Install Windows Subsystem for Android (WSA):

    • Make sure WSA is installed on your Windows 11 system. If you haven't installed it yet, follow the guide to set it up.
  2. Prepare the APK:

    • Download the Wink Video Editor APK from a trusted source like https://winkmodapk.pro/ APKPure or APKMirror.
    • Place the APK file in a folder along with adb.exe from the latest version of adb.
  3. Set Up WSA:

    • Open Windows Subsystem for Android Settings from the Start menu.
    • Enable Optional Diagnostic Data and Developer Mode. Click the Refresh button in the IP address section.
    • Open the File Manager in WSA and keep it running.
  4. Install the APK:

    • Open Command Prompt and navigate to the folder where your APK and adb.exe are located. You can do this by typing cd "path_to_folder" (replace path_to_folder with the actual path).
    • Connect to WSA by typing adb connect 127.0.0.1:58526 and press Enter.
    • Install the APK by typing adb install "wink_video_editor.apk" (replace wink_video_editor.apk with the actual name of your APK) and press Enter.
  5. Check Installation:

    • After installation, you should see the Wink Video Editor app in your Windows Start Menu.

This method allows you to use Wink Video Editor on your Windows PC, offering a larger screen and more powerful hardware for your video editing needs. Enjoy editing your videos with Wink!

Sign up for free to join this conversation on GitHub. Already have an account? Sign in to comment