This document was written by and for the teams of Headcrab. It is a guide to help and use Git and GitHub, as well as some best practices followed by the company's collaborators.
It is not exhaustive, and does not replace asking for help from colleagues.
This document was initially intended for internal use only, and was therefore intended for an informed audience. It was to serve as a reminder for developers, and as a knowledge base for other professions (Game Designers, Graphic Designers, QA testers...). It is therefore possible that some information may have been omitted, or that some concepts may be difficult to understand and / or not sufficiently developed here.
The purpose of this document is to explain in broad strokes how to use GitHub Desktop and GitHub.
Once you have read this document, we recommend that you go and read the Gitflow Workflow at least up to the Release Branches part (included), as this is the workflow we use.
Download GitHub Desktop for your machine, and install it.
Create a github account, or log in with your existing account to continue.
Interface overview:
- Project explorer
- This is where you choose the project you want to work on.
- File explorer
- The modifications between your project and the online project appear here;
- If you add a file to the project, it will appear with a green +;
- If you modify an existing file online, it will appear with an orange •;
- If you delete a file that was online, it will appear with a red -.
- Commit management
- The first box contains the commit title. (Here "Update Player.cs");
- The second box is for the commit description. (Ex: "Change z position of spawned projectile").
- Branch explorer
- This is where you choose which branch of the project you want to work on;
- We never work on develop or master. NEVER.
- Fetch button
- This button displays Fetch to check if modifications are present online;
- If there is something new online, it will turn into Pull to retrieve the modifications and update your local version. (An indicator of the number of commits to retrieve is displayed next to the button);
- If you have pending commit modifications, it will turn into Push to send your modifications to the remote server.
- Modifications explorer
- This box displays the modifications between the online version and your version of the selected file in the file explorer;
- On the current version, we can see that I modified lines 305 and 311;
- In red the line that was deleted;
- In green the line that was added. (Modification of "0" to "10").

This section explains how to use the main functions of GitHub Desktop.
If this is the first time you are launching GitHub Desktop, you have 3 choices.
- Clone a repository from the Internet
- This option allows you to retrieve a project you are working on, or a public project;
- If you are working on a project, it will appear in the GitHub.com tab. You just have to select it and choose where you want to clone it;
- If you want to retrieve a public project, go to the URL tab and enter the project's URL;
- All you have to do is click on Clone to start downloading the project.
- Create a New Repository on your hard drive
- This option allows you to create a new project that you can then host on GitHub.
- Add an Existing Repository from your hard drive
- This option allows you to add a project that you previously downloaded without using the Desktop application to GitHub Desktop.
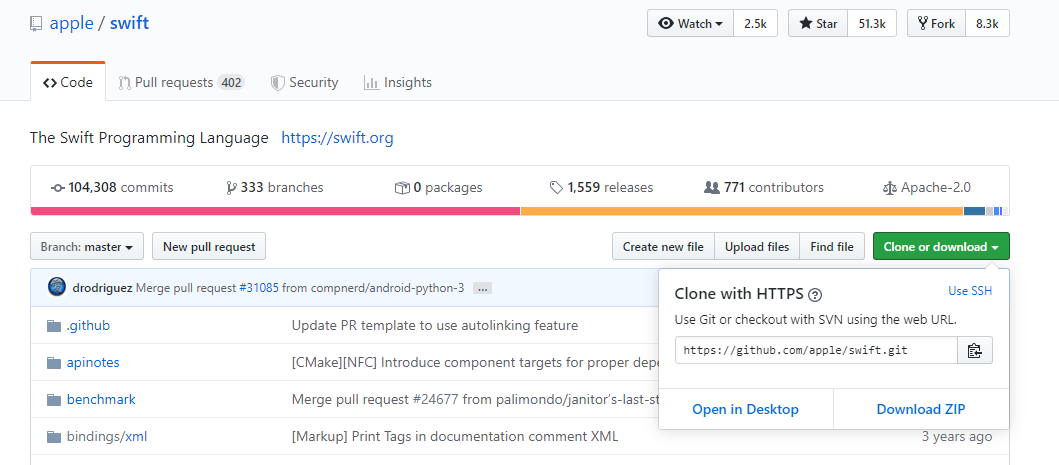
To clone a project from a URL, click on the green Clone or download button on the project's GitHub page, then copy the URL.
If you already have projects in GitHub Desktop, all you have to do is click on the Add button in the project explorer.
To create a branch, it's very simple. In the branch explorer, click on New branch to the right of the Filter box.
Don't forget to name your branch following the convention. (fix/#xx, implement/my-fonction, ...)
If you have changes that have not been committed at the time of creating the branch, you will have the option to move them to your new branch (useful if you forgot to switch branches before making changes), or leave them on your previous branch.
You will then be moved to the branch you just created.
A commit is used to save your changes at a specific point in time.
At any time (remember to do it regularly), you can create a "snapshot" of your changes at a specific point in time, with a title and description. The more commits you make, the easier it will be to go back if a problem arises.
However, it is not necessary to make a commit every time you modify a line, less is more.
A commit every time you complete a sub-task of your feature or fix is sufficient.
Once your commit is saved locally (when you have pressed "Commit to yourBanch"), the Fetch button becomes Push and the number of commits to be sent to the server increases.
Note that commits are saved locally. As long as you do not push a commit, you can cancel it (to modify its content, or its title/description) at will. (Be careful, the downside of this "freedom" is that you can lose your local changes in case of a problem with your machine).
You are not obliged to push each commit directly. (Sometimes we remember that we forgot to remove a Debug.Log just after the commit). This allows you to modify this commit if necessary. However, don't wait until you have finished your 4000-commit feature. If your hard drive fails, all non-pushed commits will be lost, and therefore have to be redone.
To move from one branch to another, simply select the branch you want from the branch explorer.
In the same way as when creating a branch, if you switch branches with uncommitted changes, GitHub Desktop will offer to move them with you or leave them on the branch you are leaving.
If you plan to leave your changes on the branch you are leaving, remember to commit them (no need to push them, you can undo the commit later) so that they do not go into the Stashed Changes section and can be overwritten.
To discard your current changes, there are several possibilities. If you want to discard everything, the easiest way is to right-click on X changed files at the top of the file explorer, then Discard all changes.
If you want to delete only certain files, select them in the file explorer, then right-click on one of them, Discard X selected files. (Or Discard changes if there is only one file).
Conflicts can occur when files are modified on multiple branches at the same time.
If a line is modified in one branch, and the same line is modified differently in another branch, git does not know which one to choose. It creates a conflict.
If a wild conflict appears, in the absence of capturing it with a pokéball, GitHub Desktop will offer to open it in Visual Studio Code (if it is installed on your machine) to resolve it.

If you decide to resolve it with VS Code, it will open and highlight the conflicting lines.

There is then a separator: =======
Then the modifications of the branch you are trying to retrieve, in blue with the inscription ">>>>>>> branchName (Incoming Change)".
On the example above, the modifications are not important. We just changed the player's speed. If you know which version you want to keep, simply click on Accept Current Change or Accept Incoming Change (above the green line) to keep respectively your modifications, or the changes on the other person who worked on the file, and delete the other version.
The Accept Both Changes option allows you to keep both versions, one on top of the other. This can be useful in the case where you need certain modifications from the current branch, and certain others from the incoming branch. (This is not the case in the current example, but it could be in a function where 2 people would add distinct and useful lines).
The Compare Changes option displays the 2 files (your version and the one modified by another person) side by side to compare the modifications more easily.
Use the GitHub website
Creating an issue is a simple way to inform everyone involved in a project of a bug, a point to improve, etc...
When you discover a new bug, be sure to create a ticket.
To create a ticket, nothing could be simpler. Go to the Issues section of the project, then click on the green New issue button.
Tickets should have a simple BUT descriptive name.
Feel free to add a description as clear as possible to explain how to reproduce a bug, or what kind of feature should be added.
A ticket template may exist to facilitate their creation.
To the right of the writing part of your issue are several options:
- Assignees
- These are the people who are related to this issue. If you know the person or people related to this ticket, feel free to assign them.
- Labels
- Different keywords to know what the ticket is about (and to be able to filter them). Feel free to put a label on your ticket if there is one that corresponds to it.
- Project
- Allows you to assign a ticket to an existing project.
- Milestone
- Allows you to give a deadline by which the ticket must be closed. (Only works if milestones have been created).
Remember to fix tickets regularly. It's better to do a few from time to time, rather than end up with 800 fixes to do at the end of the week.
Just because a ticket is assigned to someone else doesn't mean you can't take care of it. If a ticket inspires you and you want to fix it, don't hesitate, after making sure that the assigned person is not already working on the task (being 2 on the same task == git conflicts and loss of time).
Remember to note the ticket number you are fixing in the name of the branch you are going to work on. (#XX allows you to access the ticket by clicking on its name. This works in branch names, commit names, commit descriptions, comments, etc...)
When a pull request containing the name "fix #XX" is merged, the associated ticket is normally closed as well.
If this is not the case, you need to manually close your ticket by clicking on the Close issue button.
It's always good to add a comment like "fix with #XX" (where #XX represents the pull request number) if the link between the two was not made automatically.
The strength of git lies in 2 points. The first is the fact of keeping a history of your work, which allows you to easily go back to previous versions in case of problems. The second is the possibility it offers to easily work with several people on the same project. This second point is partly made possible thanks to pull requests.
A pull request allows you to control modifications before adding them to a branch.
Once you have finished your player movement feature, and it has been TESTED and VALIDATED, everyone should be able to access this feature. That's why you want to merge your feature/player-movements branch into develop.
To create a pull request, it's very simple, just go to the Pull requests section of your git project, then click on the green button New pull request.
From there, you will land on a page where you have to choose the branches you want to merge.
The left branch represents the destination, the branch that will receive the new features. In our example, it would be develop.
The right branch represents the source, the branch that will send its modifications. In our example, it would be your feature/player-movements branch.
You can then click on the green button Create pull request to create it.
Below, the differences between the source branch and the target branch are displayed.
- The different commits of the source branch that will be added (their numbers, titles, descriptions);
- The files that have been modified (with the possibility to view, comment, contest, etc...);
- The comments present on the different commits if there are any;
- The contributors of these modifications.
Once you have opened a pull request, you should NEVER merge it until it has been validated.
To do this, another user must review your pull request (i.e. check and validate the modifications). You will also need to review the pull requests of other members.
To review, select an open pull request, and go to the Files changed tab. (You can use the filter to hide files that cannot be reviewed (images, meta, ...))
From there, you need to read the person's code.
The goal is to make sure there are no typos, unnecessary comments, Debug.Logs lying around. That the code respects the guidelines.
Moreover, this allows you to learn a lot. That's why you shouldn't hesitate to propose solutions if something in the code seems strange to you. You have the possibility to comment on the code lines directly by clicking on the blue + on the left of the desired line.
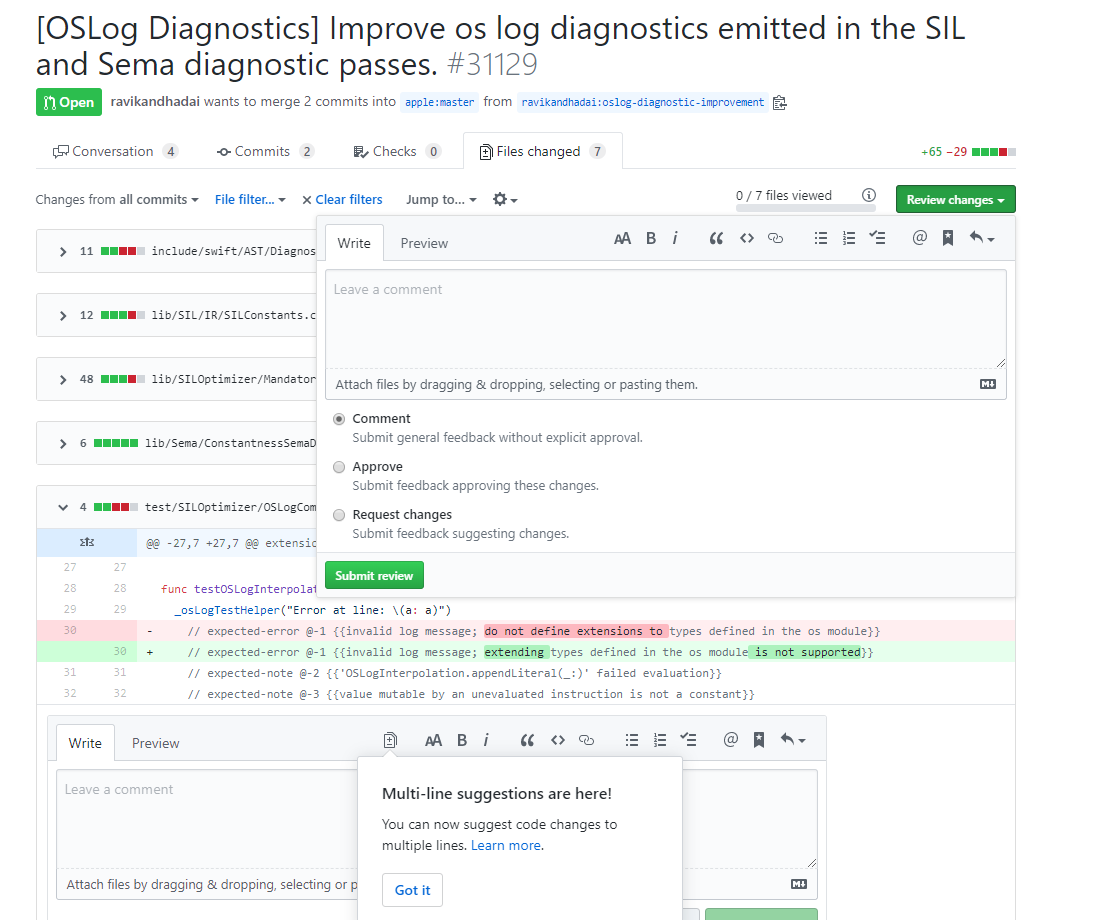
Once you have finished reviewing the code, you will need to click on the green button Review changes at the top right.
From there, 3 possibilities:
- Comment
- If you have a comment to make on the changes.
- Approve
- Validates the pull request. If you validate it, any user can merge it with the destination branch at any time.
- Request changes
- You do not validate the pull request, and indicate that changes need to be made (usually if you click on this button, you have also left one or more comment(s)).
Once you have made your choice, all you have to do is click on Submit review.
Once a review has been done on your pull request, there are 2 possibilities.
- Your pull request has been refused
- In this case, you modify the title to add "WIP" at the beginning of it. This indicates that you are working on it, that it should not be merged or reviewed for the moment.
- Your pull request has been validated
- All that remains is to click on the merge button at the bottom of the page, and delete or not the source branch, depending on whether you will continue to work from this branch or not.
This section provides the most commonly used commands in command line.
Most of the time, GitHub Desktop is sufficient. However, git commands offer much more freedom. They are not mandatory, so this section serves mainly as a reminder.
You can find all the commands in the git documentation.
- git branch branchName -> to create a new branch named
branchName. - git checkout branchName -> to switch to a local branch.
- git checkout -b branchName -> to create a local branch
branchNameand switch to it. (Equivalent to doing agit branchthen agit checkout.) - git fetch -> retrieves the modifications present on the server, which are not on your machine.
- git merge -> applies the changes retrieved from the server to your local branch.
- git pull -> automatically does a
git fetchthen agit merge. Retrieves the remote changes and applies them to your local branch in one command. - git pull origin branchName -> Merge
branchNameinto your current local branch. If your working on a branch X and need to fix merge conflicts with develop, you can usegit pull origin developto apply develop's changes into your branch, then fix conflicts - git add fileName -> to add the file
fileNameto the next commit. - git add . -> to add all local changes to the next commit.
- git commit -m "This commit contains such change" -> to create a local commit of your modifications.
- git push -u origin branchName -> to send a local branch to the remote server.
- git push -> to send local commits to the server.
- git stash -> to save your modifications in a corner and restore your workspace to the state before the stash modifications.
- git stash pop -> to restore the last stash.
- git cherry-pick commitNumber -> to retrieve a specific commit, without having to retrieve those before or after.
- git commit --amend -m "New commit message" -> allows you to modify a commit message that has already been pushed (avoid using this command on a commit used to create a branch)
If you want to retrieve changes while controlling when git will merge them locally, do it like this instead.
- git fetch -> retrieves remote changes from the server;
- git merge -> merges the retrieved changes with your local work. You can use the --no-ff option to create a merge commit, which is potentially cleaner and makes it easier to revert all your changes on the branch if an error has crept into your commits.
You can permanently disable fast forward by modifying your git configuration file like this.
[merge]
ff = no
commit = no
[pull]
ff = yes
As for rebase (which allows for a more linear history, but should not be done all the time), we will use the following commands:
- git rebase destinationBranch;
- git checkout destinationBranch;
- git merge myBranchToMerge.
To rebase when pulling, we can also do:
- git pull --rebase -> which allows to place the current branch after the upstream.
To squash commits and have a cleaner history (for example, you made 3 commits, but the first two are used to fix the same bug, which can ultimately be summarized in 1 single commit for clarity):
- git rebase -i HEAD~3 -> will allow you to edit your last 3 commits in interactive mode.
Remember to add the following line to your git configuration file to choose LF as the line ending.
(The choice may be offered to you during the installation of git)
[core]
autocrlf = false
(or execute this in your terminal)
git config --global core.autocrlf false
CRLF and LF each have their advantages, however we prefer LF for 3 main reasons:
- LF is cross-platform Unix/Windows;
- Some tools and versioning systems prefer LF;
- We save one byte per line. Insignificant on a small project, but not negligible on an industrial-scale project.
There are extensions available for Visual Studio and Visual Studio Code.
Git History (VS Code)
Git Lens (VS Code)
GitHub extension for visual studio (Visual Studio)
This is the English version of French gist Comment utiliser GitHub Desktop ?