Week 4 of MLOps-Zoomcamp
Link to Course: https://github.com/DataTalksClub/mlops-zoomcamp
We've learned how to rewrite our training into a workflow. Now we'll study how to deploy the resulting model.
There are 2 types/paradigms or deployment:
If we can wait a bit for getting our predictions. Then we periodically predict new data. We have a database, and a scoring job.The scoring job periodically pulls data from the database and runs the model on it. The result is written on a predictions DB.
Example: Churn job.
The model is always available for prediction. There are two ways to deploy an online model:
Example: Our Taxi duration prediction. The app needs the prediction immediately. Backend sends data to the model and the modelreplies with the predicted duration.
The relationship between the client (the Backend in this case) and the model is 1x1.
We have a producer(s) and consumers. The producer pushes some data into a data stream and the consumers take the data.Then from the same data stream the consumers may predict multiple variables.
Example: The backend (producer) pushes the data into the data stream alongside an event Ride_started; Consumer 1 (C1) predicts the duration, C2 predicts the cost, C3 predicts the Tip...etc
We can also run a simple model as a web service with the backend. Then if the user agrees we push the data to the data stream with the event and a more accurate duration prediction model (ex:C1) is run then push it back to the backend.
The consumers could also push their predictions to a prediction stream and a decision service will act on them.
To deploy as a web service we go through steps:
1- Getting the Python envrionment used to train/test the model using pipenv
2- Re-writing the prediction script and wrap it with a backend (Flask used here)
3- Creating a Docker Container and putting our prediction backend with it along with the Python environment
Flask Background: Flask Introduction Flask Deployment
Docker Background: Docker Introduction
We want to use the model developed in week 1 of the course. For that, we'll need to obtain the python environment we used to train and test the model for consistency. To obtain the packages and the package versions of the current python environment (even if conda), we use pip freeze; This outputs the installed packages and their versions. In our case, we're mostly interested in getting the scikit-learn version. So we grep scikit to only get lines with scikit in them:
scikit-learn==1.0.2
- Note for Conda Users: If the package was installed with conda, you can get the versions with
conda listinstead.
Now that we have the package version we need. We use pipenv to create an envionment with them:
mkdir web-service
cd web-service
pipenv install scikit-learn==1.0.2 flask --python=3.9
pipenv shell
-
pipenvuses the current directory as the root of the environment. So creating a directory and moving to it is important. -
--python=3.9restricts the Python version to Major version3.9.pipenvsearches for locally installed Python interpreters first before resorting to downloading a new interpreter. -
pipenv shellactivates the environment. -
Note: Dev packages in pipenv: Sometimes we want to add certain packages but only in the current environment without writing them to the production environment such as testing packages. We use
pipenv install --devinstead ofpipenv install.
This creates two files in our directory: Pipfile and Pipfile.lock. For information on what these files do read this. In short Pipfile stores the versions of the packages that we want (like scikit-learn, Flask) and Pipfile.lock stores the dependency tree to avoid for example updating Numpy for scikit-learn and breaking Flask in the process.
Quick recap: Our week 1 model writes 2 pickle files. One is the Linear Regressor, the other is the DictVectorizer object. The prediction moves through 3 steps:
1- Feature Engineering
2- DictVectorizer
3- Regressor
As a web service, our predictor will take a dictionary of a single "row" rather than a Pandas DataFrame as input.
Flask inputs and outputs JSON files. Two functions are used to deal with JSON files:
jsonify(D)transforms a dictionaryDinto a JSON- `request.get_json() reads the JSON passed to the app Both are imported using
from flask import request, jsonifyWe wrap the 3 prediction into a single function and create an app on it:
from flask import request, jsonify

with open('lin_reg.bin', 'rb') as f_in:
    (dv, model) = pickle.load(f_in)
def prepare_features(ride):
  ...
def predict(features):
  ...

app = Flask('duration-prediction')

@app.route('/predict', methods=['POST'])
def predict_endpoint():
  ride = request.get_json()

  features = prepare_features(ride)
  pred = predict(features)

  result = {
    'duration': pred
  }
return jsonify(result)- NOTE: The
@appdecorator must be right above the prediction function. The decorator is decorating the function and is not a simple magic method!
To run the Flask application on localhost we add to the previous file:
if __name__ == "__main__":
  app.run(debug=True, host='0.0.0.0', port=9696)
Now if we run the file, a Flask application will run on localhost on port 9696.
To request a prediction from the server, we create another file test.py. This file will post its ride information to the server and print out the response (i.e: The predicted duration):
import requests
ride = {
  ...
}

url = 'http://localhost:9696/predict'
response = request.post(url, json=ride)
print(response.json())To deploy the model into production, we use gunicorn to deploy the web service: (Run in normal shell after pip install gunicorn)
gunicorn --bind=0.0.0.0:9696 predict:app
where predict is the predict.py located in the current directory, and app is the Flask app defined on that file (See above).
Now we want to deploy our predictor into a Docker Container for reproducibility, scalability, security(This is connected to the internet)...etc
In the Container, we want to use the Pipfile and Pipfile.lock files created earlier to initialize the pipenv environment, copy the predict.py file created earlier, then running the gunicorn WGSI. This is done via the Dockerfile:
FROM python:3.9-slim

RUN pip install -U pip #Update pip as certain packages (ex: XGBoost) need certain versions of pip
RUN pip install pipenv

WORKDIR /app #Creates and cd's into the /app directory

COPY [ "Pipfile", "Pipfile.lock", "./" ]

RUN pipenv install --system --deploy #--system installs the environment in the parent OS in the container
                                     #--deploy makes sure Pipfile.lock is up-to-date and will crash if it isn't

COPY [ "predict.py", "lin_reg.bin", "./" ]

EXPOSE 9696

ENTRYPOINT [ "gunicorn", "--bind=0.0.0.0:9696", "predict:app" ]
We then build the Docker Image with:
docker build -t ride-duration-prediction-service:v1 .
And run the container that was built with:
docker run -it --rm -p 9696:9696 ride-duration-prediction-service:v1
Now when we request predictions like earlier, we're instead calling the WGSI within the Docker Container.
The core of deployment in Streaming are 4 components:
-
Event Stream: Where events are pushed constantly
-
Stream Data: All data passed through the stream has two components:
a- Event: The event contains at least two fields. The "Event" itself, i.e: the message that triggers that consumers, and the "data" payload which the consumers will take. It may also take attributes for the Event. b- Context: Which contains metadata.
-
Producers: They produce events that are pushed to the event stream
-
Consumers: They take the data from the event stream and consume it; Processing, Prediction...etc
The producers and production of events and data are handled by the Backend. While the other 2 components are usually hosted using an online service. Famous Services include:
- Event Stream: Kafka, AWS Kinesis, G PubSub
- Consumers: AWS Lambda, G Cloud Functions
Our Example workflow: (Inaccurate prediction on Backend/ Accurate prediction on Stream; Very Common workflow)
- Backend receives unconfirmed trip info by user. Sends info to Backend.
- Our previous model on the Backend is an inaccurate approximamtor for trip duration.
- User confirms or rejects.
- If User confirms, we send the data through the event stream to get a more accurate prediction.
Prequisites: 1- AWS Lambda introduction: ML-Zoomcamp unit
We'll follow the tutorial on Amazon: Tutorial: Using Amazon Lambda with Amazon Kinesis
Deploying using AWS has been covered by Alexey, for brievety' and time's sake I won't cover it here
We use Google Functions for the consumers and Google PubSub (Short for Publish Subscribe) for the stream.
The outline is very similar to AWS:
- Create a data stream A for sending the data from the Backend to the consumer. In our case a PubSub "Topic"
- Create a consumer function
- Deploy the consumer function in Google Cloud Functions
- Create a data stream B for ingesting the output of the consumer
- Pulling data from stream B in the Backend
Here, I will show a running example around our Taxi duration prediction, along with some notes about pitfalls I fell into.
We need two "main" directories/files.
- The Backend file. See above
- The consumer function
Before Starting:
- Make sure to have a working Backend with a simple predictor as described above
- Make sure to have an IAM service account (We'll add permissions progressively)
You can check My version of the code. I've added a few quick 1-liner bash scripts to ease the use of Environment Variables for security. It is recommended to use an env-file or a simple script that exports each environment variable (Ran through . instead of sh or directly).
To add an IAM service account, simply navigate to "IAM > Service Accounts" and create one! We then need the JSON key. To get it, select the newly created service account, then go to the "Keys" tab and Add a JSON key. Download the provided key and make sure to put it somewhere memorable and safe. Try not to expose the keys and give this user just enough permissions. It is always recommended to only give the permissions needed.
Set the environment variable GOOGLE_APPLICATION_CREDENTIALS to your keys' full path to use the Python API.
The basis of our Consumer Function will be a main.py file which can predict the duration of a ride based on a dictionary containing whatever information may be passed, its directory must also contain whatever files are necessary to make the prediction, such as DictVectorizer Pickle files, Models and potential separate preprocessor:
#! main.py

import xgboost as xgb

def preprocess(ride):
    features = {}
    ...
    return features

def vectorize(D):
    ...
    return X

def predict(X):
    ...
    return prediction #This is an integer or a float. Not an array.

if __name__ == "__main__":
    ride = {
            ...
    }
    D = preprocess(ride)
    X = vectorize(D)
    prediction = predict(X)
    print(prediction)
Alternatively, everything being present in a function is also fine.
The directory will also include 2 files: model.xgb and dv.pkl.
Note: To load a model.xgb file (The output of an Mlflow autologger) use:
booster = xgb.Booster({'verbosity':0, 'silent':True}) #Silence Warnings
booster.load_model('model.xgb')
We can also add more files for modularity/ease-of-use. I also have a deploy.sh file that deploys the function (Next paragraph), as well as a preprocessor file (My preprocessing is a bit complicated).
The consumer function directory Must have a main.py file. When deploying a function to GCF (Google Cloud Functions), the deployer will search (by default) in the main.py file for the function to be deployed.
Before writing the function to be deployed, I'll first introduce how to Push data to the event stream:
Note: If the Topic doesn't exist, it will be automatically created at deployment.
To create a new topic named MY_TOPIC simply use the command:
gcloud pubsub topics create MY_TOPIC
It is recommended to use an environment variable to call this topic from now on instead of putting it in the code. In my code I've used the variable BACKEND_PUSH_STREAM. (Same with the PROJECT_ID and the upcoming pull stream and subscriber)
Alternatively use the GCP console (Note that a subscriber isn't needed for this topic)
To push data to the event stream, we can use something like the following (taken mostly from Google's Docs):
#! publish.py

import os
import json
import base64

from google.cloud import pubsub_v1

#1. Initialize Client
publisher = pubsub_v1.PublisherClient()
PROJECT_ID = os.getenv("PROJECT_ID")
TOPIC_NAME = os.getenv("BACKEND_PUSH_STREAM")

topic_path = publisher.topic_path(PROJECT_ID, TOPIC_NAME)

def send(message_json):
        #2. Encode the message json
        message_bytes = message_json.encode('utf-8')

        try:
            #3. Publish the message to the topic
            publish_future = publisher.publish(topic_path, data=message_bytes)
            #4. Verify that the message has arrived
            publish_future.result()  # Verify the publish succeeded

            return 'Message published.'
        except Exception as e:
            print(e)
            return (e,500)

ride = {'datetime':'2022-06-23 11:36:42',
        'PULocationID': 34,
        'DOLocationID': 56,
        'trip_distance': 12
        }
ride = json.dumps(ride)
send(ride)
Pushing data goes through 4 steps:
- Initializing the Publisher Client through
pubsub_v1.PublisherClient - Encoding the JSON message
- Publishing the message to the topic, resulting in a
Futureobject - Making sure the message was sent by calling
resulton theFuture
Before pushing anything however, we must add permission to your service account to Publish messages to this topic via the GCP console.
The consumer function itself will look like (Inside main.py):
def predict_duration(event, context):
    ride = base64.b64decode(event['data']).decode('utf-8')
    ride = json.loads(ride)

    D = preprocess_dict(ride)
    X = vectorize(ride)
    predicted_duration = round(predict(X))
    return_dict = {'duration_final': predicted_duration}
    print(return_dict) #For Debugging
The consumer function which will be deployed must have 2 parameters: event and context as described above. The data field in the event (For functions) is encoded in base64 so it must be decoded first. Then the decoded JSON string will be loaded to produce a dictionary. The dictionary is what will be processed like earlier.
Deploying the Consumer Function can be done through either the GUI or the CLI tool. Here I'll show how to do it using the CLI, for the GUI it is very similar and one must upload a zip file.
To deploy the function predict_duration currently present in the main.py file in the current directory using the CLI (Requires gcloud), simply use:
gcloud functions deploy predict_duration --trigger-topic $BACKEND_PUSH_STREAM --runtime python39
With the BACKEND_PUSH_STREAM being either the topic defined above or a new topic and python39 the Python Runtime (Many runtimes are available).
To set some environment variables inside this function, we can use:
gcloud functions deploy predict_duration --trigger-topic $BACKEND_PUSH_STREAM --set-envs VARIABLE=VALUE
we will need to set environment variables later.
Once this is done, a predict_duration function should pop up in the GCP console Functions Tab.
To use packages inside the GC Function, these packages must be included in a requirements.txt (for pip) file along with the versions if necessary. For mine: (Use pip freeze like earlier)
#! requirements.txt

holidays >= 0.13
xgboost==1.5.0
pandas==1.4.2
scikit-learn==1.0.2
We can Ignore some files from being uploaded to Google using a .gcloudignore file similar to a .gitignore. This is important in case some sensitive training data is present in the directory or some files which we don't need on the cloud to save space such as the publish.py file.
At this point my directory (With the complex preprocessor) looks like:
model.xgb dv_xgboost.pkl .gcloudignore preprocess_complex_green.py publish.py main.py requirements.txt
Note: Don't ignore the requirements.txt file, it has to be uploaded as the function is built on GCP servers.
To test the function, simply use the publish.py file from above (With the appropriate environment variables set) and check the Logs on the GCP Console (Cloud Functions > 'predict_duration' > Logs). You should see the dictionary being printed.
First, we need to create a new Data Stream to pull the result from (Don't use the same stream or there will be trouble). This time it may be preferable to create it using the Console for the default subscriber (It's needed now, it can also be created via CLI).
For Security, I've assigned the Topic (Stream)'s name to BACKEND_PULL_STREAM and the default subscriber's ID to BACKEND_PULL_SUBSCRIBER_ID. Add permission to the service-account to subscribe to data from the Subscriber by going to the Topic > Subscribers > Default_Subscriber(Name changes) > Permissions.
To receive data from the stream, we use this function:
import os
import json
from google.cloud import pubsub_v1

#1. Initialize Subscriber Client
PROJECT_ID = os.getenv("PROJECT_ID")
subscriber = pubsub_v1.SubscriberClient()

SUBSCRIPTION_ID = os.getenv("BACKEND_PULL_SUBSCRIBER_ID")

timeout = 20. #Timeout in Seconds

subscriber_path = subscriber.subscription_path(PROJECT_ID, SUBSCRIPTION_ID)

def receive():
    #2. Pull response
    response = subscriber.pull(
        request={
            "subscription": subscriber_path,
            "max_messages": 1,
        }
    )
    #3. Acknowledge reception
    msg = response.received_messages[0]
    ack_id = msg.ack_id
    subscriber.acknowledge( #Acknowledge reception
            request={
                "subscription": subscriber_path,
                "ack_ids": [ack_id]
            }
    )
    data = msg.message.data
    data = json.loads(data) #JSON to Dict
    return data
As with before, we have 3 steps:
- Initialize the Client
- Request a Pull
- Acknowledge the Reception (Or the message will stay stuck)
Note: Unlike for functions, the message data here IS NOT encoded in Base 64
At this point we have everything we need to finish the puzzle; First we add a send function to the deployed Function (predict_duration) to send the output to the Pull Stream. Then add a send function to the Backend to send the data to the Push Stream as well as a receive function to receive data from the Pull Stream. We must also set up all the necessary environment varialbles.
We start with the deployed function, to which we must add a send function. And use this function to send data to the $BACKEND_PULL_STREAM. For the send function, we simply add it and add a send instruction at the end:
#! main.py
import os
import base64
import json

from preprocess_complex_green import preprocess_dict

import pickle

import xgboost as xgb

from google.cloud import pubsub_v1

publisher = pubsub_v1.PublisherClient()
PROJECT_ID = os.getenv("PROJECT_ID")
TOPIC_NAME = os.getenv("BACKEND_PULL_STREAM")

topic_path = publisher.topic_path(PROJECT_ID, TOPIC_NAME)

def send(message_json):
        message_bytes = message_json.encode('utf-8')
        print(message_bytes)

        try:
            publish_future = publisher.publish(topic_path, data=message_bytes)
            publish_future.result()  # Verify the publish succeeded

            return 'Message published.'
        except Exception as e:
            print(e)
            return (e,500)


def vectorize(D):

    with open('dv_xgboost.pkl', 'rb') as f_in:
        dv = pickle.load(f_in)

    return dv.transform(D)

def predict(X):

    booster = xgb.Booster({'verbosity':0, 'silent':True})
    booster.load_model('model.xgb')

    X_predict = xgb.DMatrix(X)
    return booster.predict(X_predict)[0]

def predict_duration(event, context):
    ride = base64.b64decode(event['data']).decode('utf-8')
    ride = json.loads(ride)

    D = preprocess_dict(ride)
    X = vectorize(ride)
    predicted_duration = round(predict(X))
    return_dict = {'duration_final': predicted_duration}
    send(json.dumps(return_dict)) #Send the result
Now to use it, the function expects two environment variables to be defined: PROJECT_ID, and BACKEND_PULL_STREAM. To define these functions, we deploy it using the --set-env-vars parameter. To make it smooth, we can put this deployment command in a sh script:
#! deploy.sh
#!/bin/bash

gcloud functions deploy predict_duration \
    --trigger-topic $BACKEND_PUSH_STREAM \
	--set-env-vars BACKEND_PULL_STREAM=$BACKEND_PULL_STREAM \
	--set-env-vars PROJECT_ID=$PROJECT_ID \
    --runtime python39
This gives the Deployed Function all it needs to properly function.
For the Flask Backend, we need to add a send function and a receive function. It sends (PUSHes) the Data to the $BACKEND_PUSH_STREAM, and receives (PULLs) data from the $BACKEND_PULL_STREAM:
#! predict.py
import os
import base64
import pandas as pd

import pickle

from sklearn.linear_model import LinearRegression
from sklearn.feature_extraction import DictVectorizer

from preprocess_simple_green import preprocess_dict

import json
from google.cloud import pubsub_v1


PROJECT_ID = os.getenv("PROJECT_ID")
publisher = pubsub_v1.PublisherClient()
subscriber = pubsub_v1.SubscriberClient()

PUBLISHER_TOPIC_NAME = os.getenv("BACKEND_PUSH_STREAM")
SUBSCRIPTION_ID = os.getenv("BACKEND_PULL_SUBSCRIBER_ID")

timeout = 20.

publisher_path = publisher.topic_path(PROJECT_ID, PUBLISHER_TOPIC_NAME)
subscriber_path = subscriber.subscription_path(PROJECT_ID, SUBSCRIPTION_ID)


def send_to_stream(message_json):
    message_bytes = message_json.encode('utf-8')

    try:
        publish_future = publisher.publish(publisher_path, data=message_bytes)
        publish_future.result()

        return 'Message published.'
    except Exception as e:
        print(e)
        return(e,500)

def receive():

    response = subscriber.pull(
        request={
            "subscription": subscriber_path,
            "max_messages": 1,
        }
    )
    msg = response.received_messages[0]
    ack_id = msg.ack_id
    subscriber.acknowledge( #Acknowledge reception
            request={
                "subscription": subscriber_path,
                "ack_ids": [ack_id]
            }
    )
    data = msg.message.data
    data = json.loads(data)
    return data


with open('dv_simple_linreg.pkl', 'rb') as f_in:
    dv = pickle.load(f_in)

with open('model.pkl', 'rb') as f_in:
    lr = pickle.load(f_in)


def predict(features):
    X = dv.transform(features)

    return round(lr.predict(X)[0])


from flask import Flask, request, jsonify

app = Flask('duration_predict')

@app.route('/endpoint_predict',methods=['POST','GET'])

def endpoint_predict():
    ride = request.get_json()

    features = preprocess_dict(ride)

    #return features
    pred_init = predict(features)
    print("Finished backend prediction")

    #Send data to the prediction stream
    message_bytes = json.dumps(ride)
    send_to_stream(message_bytes)

    #Receive data from  the output stream
    pred_final = receive()['duration_final']

    return_dict = {'duration_init': pred_init,
                   'duration_fin': pred_final}

    return jsonify(return_dict)
Note: Add google-cloud-pubsub to pipenv, it is now a dependency.
Now, remember that this needs to also be done inside a Docker container, and this Docker container must have access to the environment variables. To do so, we alter the Dockerfile:
#! Dockerfile
FROM python:3.9-slim


ARG PROJECT_ID
ARG BACKEND_PUSH_STREAM
ARG BACKEND_PULL_SUBSCRIBER_ID

RUN pip install -U pip
RUN pip install pipenv
WORKDIR /app
COPY ["Pipfile", "Pipfile.lock", "predict.py", "preprocess_simple_green.py" , "./"]
RUN pipenv install --deploy --system
COPY ["model.pkl", "dv_simple_linreg.pkl", "service-account.json", "./"]
EXPOSE 9696

ENV PROJECT_ID=$PROJECT_ID
ENV BACKEND_PUSH_STREAM=$BACKEND_PUSH_STREAM
ENV BACKEND_PULL_SUBSCRIBER_ID=$BACKEND_PULL_SUBSCRIBER_ID
ENV GOOGLE_APPLICATION_CREDENTIALS="./service-account.json"

ENTRYPOINT ["gunicorn", "--bind=0.0.0.0:9696", "predict:app"]
The ARGs are expected to be given at build-time using --build-arg. Again, we simply create a new bash 1-liner:
#! docker-build.sh
#!/bin/sh

docker build --build-arg PROJECT_ID=$PROJECT_ID \
	--build-arg BACKEND_PUSH_STREAM=$BACKEND_PUSH_STREAM \
	--build-arg BACKEND_PULL_SUBSCRIBER_ID=$BACKEND_PULL_SUBSCRIBER_ID \
	-t $1 ./
This script (after making it executable), runs as: ./docker-build.sh [tag]. Where [tag] is the tag given to docker build, example: ./docker-build.sh ride-duration:v1. To run it, simply use docker run like mentioned above, example:
docker run -it --rm -p 9696:9696 ride-duration:v1
This should now work, by running test.py from above, the output should now be a dictionary with two items. An initial value from the Linear Regressor, and a final value from the Booster.
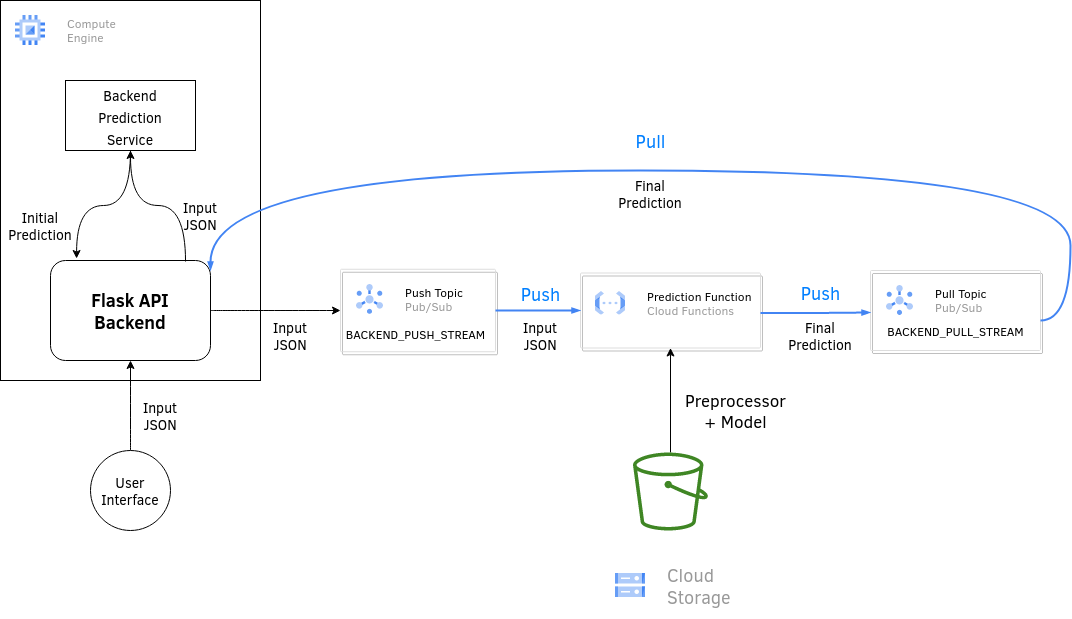
To make the deployment more flexible in case the model is updated, it is possible to upload the Model, preprocessor file and DictVectorizer to a Google Storage Bucket (Create one first) then upload the files there (Check my implementation).
These files will be uploaded to the /tmp/ directory (The only directory that is not write-protected) and loaded from there. The resulting diagram will look like: