(EventBus) - Android optimized event bus that simplifies communication between Activities, Fragments, Threads, Services, etc. Less code, better quality.
An EventBus is a great tool for decoupling components in your application. Over the next few posts I will describe the ways that I have been using it to make my code cleaner, easier to read, and easier to test. But first, this week I want to discuss why I use an EventBus in the first place. In particular, I will compare its use to some alternative techniques.
A common pattern in Java is the use of Interfaces to define "Listeners". In this pattern, the class implementing the Listener Interface must register itself with the class to which it will listen, and so the listener component has a hard dependency on the listenee component. This coupling makes your class difficult to unit test. Jake Wharton describes this problem well in his post Decoupling Android App Communication with Otto).
LocalBroadcastMessanger is used to send and listen for messages across components. To compare
let's build the following two component system:
Component A: Asynchronously updates records in a database. If successful, it sends a notification of the number of records updated. If not, sends an error message.
Component B: Needs to be informed when the update is complete and either how many records were updated or if there was an error, with the error message.
// when update completes successfully
  Intent intent=new Intent();
  intent.setAction(FILTER_ACTION_UPDATE_SUCCESS);
  intent.putExtra(EXTRA_COUNT,count);
  LocalBroadcastManager.getInstance(getContext()).sendBroadcast(intent);
  ...
  // when there is an error
  Intent intent=new Intent();
  intent.setAction(FILTER_ACTION_UPDATE_ERROR);
  intent.putExtra(EXTRA_ERROR_MSG,error.getMessage());
LocalBroadcastManager.getInstance(getContext()).sendBroadcast(intent); IntentFilter updateSuccessFilter = new IntentFilter(FILTER_ACTION_UPDATE_SUCCESS);
BroadcastReceiver updateSuccessReceiver = new BroadcastReceiver() {
@Override
public
void onReceive(Context context, Intent intent) {
int updateCount = intent.getIntExtra(EXTRA_COUNT, - 1);
// TODO - do something with the count
}
};
IntentFilter updateErrorFilter = new IntentFilter(FILTER_ACTION_UPDATE_ERROR);
BroadcastReceiver updateErrorReceiver = new BroadcastReceiver() {
@Override public
void onReceive(Context context, Intent intent) {
String errorMsg = intent.getStringExtra(EXTRA_ERROR_MSG);
// TODO - display error message or similar
}
};
//...
getContext().registerReceiver(updateSuccessReceiver, updateSuccessFilter);
getContext().registerReceiver(updateErrorReceiver, updateErrorFilter);
//...
getContext().unregisterReceiver(updateSuccessReceiver);
getContext().unregisterReceiver(updateErrorReceiver); public
class UpdateCompleteEvent {
public final int count;
UpdateCompleteEvent(int count) { this.count = count; }
} public
class UpdateErrorEvent {
public final String message;
UpdateCompleteEvent(String message) { this.message = message; }
} EventBus bus = EventBus.getDefault(); // Or better yet, inject it...
// when update completes successfully
bus.post(new UpdateCompleteEvent(count));
//...
// when there is an error
bus.post(new UpdateErrorEvent(error.getMessage())); EventBus bus = EventBus.getDefault(); // Or better yet, inject it...
public
void onEvent(UpdateCompleteEvent event) {
// TODO - do something with event.count
}
public
void onEvent(UpdateErrorEvent event) {
// TODO - do something with event.message
}
//...
bus.register(this);
//...
bus.unregister(this);EventBuskeeps the code cleanerEventBusis type-safe-r. Using anIntent, there is no compile-time check that the "extra" set is the same type as what is received.
Using an
EventBusyour message payload is carried via Event classes that you define. Since your receiver methods deal with instances of these classes directly, all of the payload properties are type-checked, and any mismatched handling results in an error at compile time.
Intents are limited to simple datatypes that can be added asIntentextras. Event classes however can be anything. For example you could post an entire instance of an ORM model class, and have your receiving class perform ORM-specific operations directly on the received instance.
Sticky events are events that are maintained in an internal cache by the EventBus. The bus maintains the most recent 1 event of each type (class) that is posted as sticky. A subsequent sticky post of an event of the same type replaces the previous event in the cache. When a subscriber registers on the bus, it may request sticky events. When this happens (and this is where the magic is) any cached sticky events are immediately, automatically delivered to the subscriber as if they were re-posted on the bus. This means that subscriber instances can receive events that were posted before the subscriber registered on the bus (or even before the subscribing class was even instantiated). This can be a powerful tool for getting around some of the inherent problems that you run into when passing around state on Android given the complexity of Activity and Fragment lifecycles, asynchronous calls, etc.
There are 2 different aspects to using sticky events:
- First, the publisher of the event must specifically request that a event be cached by calling
the
bus.postSticky(event)method. - Secondly, the subscriber must request to receive cached events by registering
via
bus.registerSticky(this).
Upon calling bus.registerSticky(this) the subscriber immediately receives any cached events for
which they have defined an onEvent handler. Alternately, a subscriber may request cached events
on-demand viabus.getStickyEvent(SomeEvent.class).
(Note that all actively registered subscribers receive events posted via postSticky at the time of
it being posted, just as they do with the standard post, regardless of whether or not they
registered with registerSticky. UsingregisterSticky simply causes cached events to automatically
be re-delivered at registration time.)
Sticky events remain in the cache indefinitely. So if you want an event to be cleared from the cache
at some point so that it is no longer fired, you can call bus.removeStickyEvent(event) or
bus.removeStickyEvent(SomeEvent.class) or bus. removeAllStickyEvents() to clean up stale events.
As may be evident from my previous
post, I am not a fan
of Android Bundles, and avoid using them whenever possible. I don't like being limited to
Serializable or worse yet Parcelable objects, and I especially don't like the lack of
type-safety involved. I mean this is Java after all, not Python or Javascript. I expect my IDE to
be able to able to tell me if one of my components is sending a different type of object than
another component is expecting to receive.
Don't get me wrong... using Intents to communicate across applications is very handy, and in
that scenario it makes sense that the payload would be serialized into some generic form. But why,
for the love of science, should I need to go through this hassle just to retain state after a user
rotates his device?! I'm speaking of course of the standard (#icky) pattern of handling
configuration changes,
where you need to save and retrieve your state using the (#gross) methods
onSaveInstanceState(Bundle bundle) and onRestoreInstanceState(Bundle bundle). Aside from the
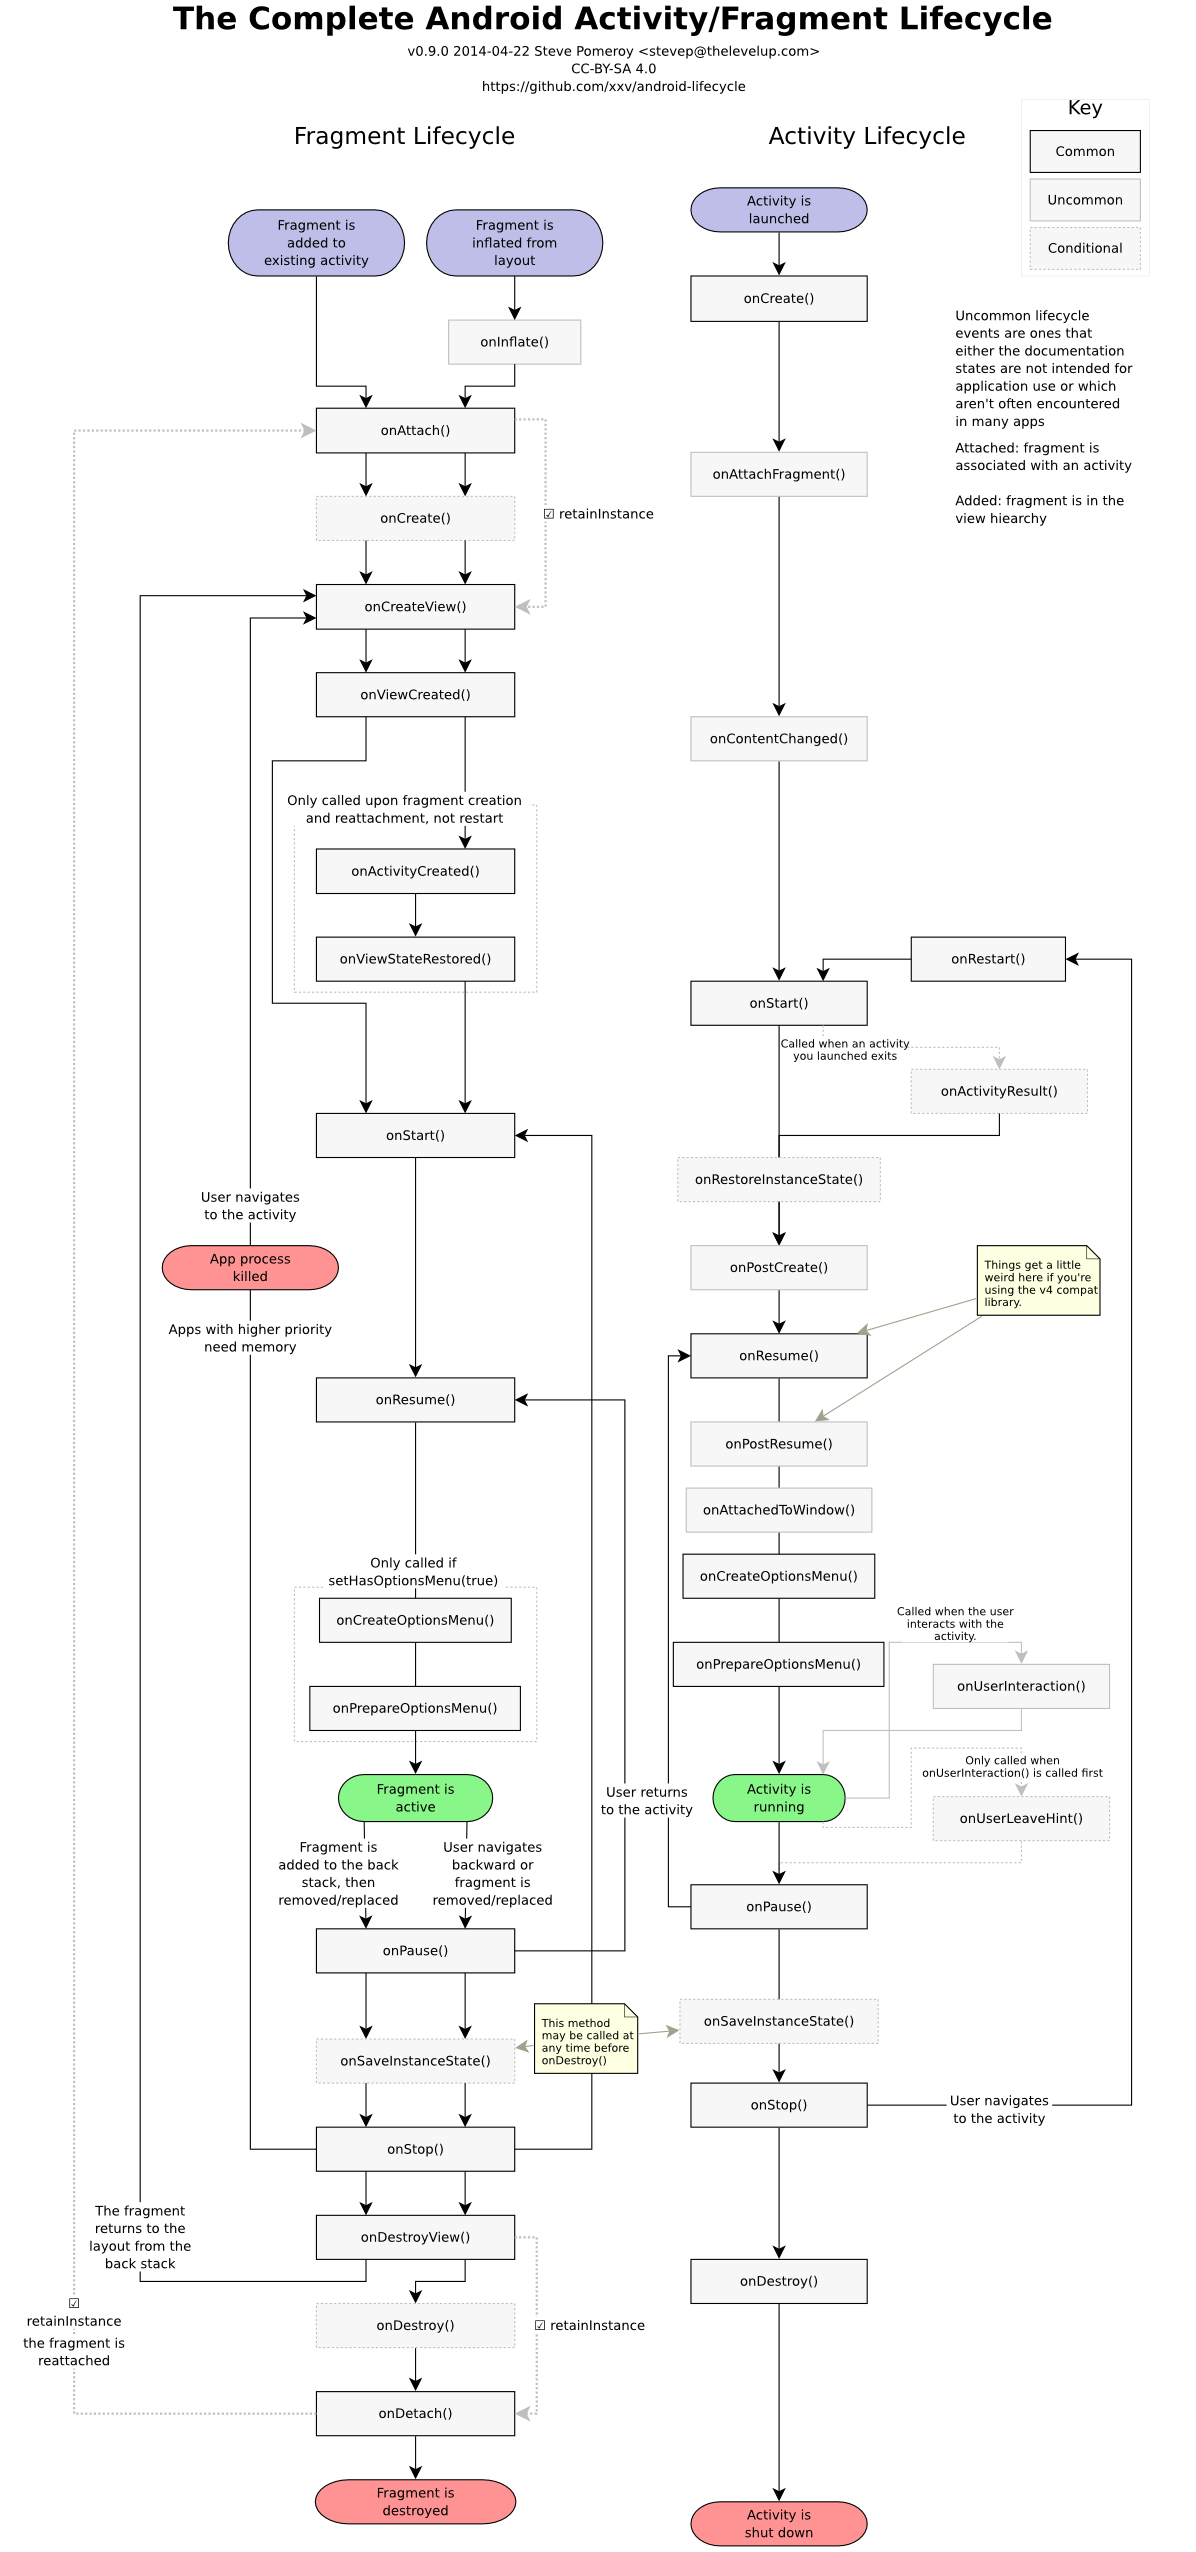
absurdly (#unneccessary) [complex lifecycle of Fragments]
(https://raw.githubusercontent.com/xxv/android-lifecycle/master/complete_android_fragment_lifecycle.png),
dealing with runtime state persistence is my least favorite aspect of Android development.
The alternative to stashing your runtime state in a Bundle is to stash it elsewhere, to cache it in some other object whose lifecycle survives the configuration change. And since GR's EventBus has a built-in mechanism for caching, we can use it to do just that.
Consider the standard, responsive "Master/Detail Flow" scenario:
- One List component (typically a Fragment) displays a list with summary information for each item.
- Another Detail component (another Fragment) that displays the full details of a single item.
- Clicking an item in the list displays the details of the respective selected item.
- In portrait mode, each the list and details fill the whole screen, and only one of the two is shown any given time.
- In landscape mode, the list remains displaying on the left, and the details change on the right as different items are selected from the list.
- A Main component (Activity) contains a layout that switches between a one- and two-pane display.
The challenge that I want to address here here is how to retain the state of which (if any) item is currently selected when the user switches between the portrait and landscape mode. This state is important not only to the Detail which obviously needs to know which item's details to display, but also the List which needs to visually identify which item is currently selected. Also, it is important for Main to know if there is an item selected or not, so that it knows whether or not to load Detail or List in portrait mode.
As you can see, the same state information (which item is selected) is needed for all 3 of our
components. Using the traditional method, each of the 3 components would need have their
onSaveInstanceState methods implemented set this information into a bundle, and their
onResumeInstanceState methods implemented to extract it back out again. Yuck.
But using sticky events, the solution is much simpler. To illustrate the solution, I have created and posted a working Android Studio project here: https://github.com/wongcain/EventBus-Config-Demo/ All of the code examples that follow are contained in this project.
First, an event class ([ItemSelectedEvent.java] (https://github.com/wongcain/EventBus-Config-Demo/blob/master/app/src/main/java/com/cainwong/demo/events/ItemSelectedEvent.java)) is created to carry the position of the selected item:
  public
  class ItemSelectedEvent {
    public final int position;

    public
    ItemSelectedEvent(int position) { this.position = position; }
  }
Then, in the List component ([ItemListFragment.java] (https://github.com/wongcain/EventBus-Config-Demo/blob/master/app/src/main/java/com/cainwong/demo/fragments/ItemListFragment.java)) , I extend the list item click handler to post a sticky event:
  @Override
  public void onListItemClick (ListView listView, View itemView,int position, long id){
    super.onListItemClick(listView, itemView, position, id);
    //**
    bus.postSticky(new ItemSelectedEvent(position));
    //**
  }
Next, the Detail component
([ItemDetailFragment.java]
(https://github.com/wongcain/EventBus-Config-Demo/blob/master/app/src/main/java/com/cainwong/demo/fragments/ItemDetailFragment.java))
registers to receive sticky events, and defines a handler for ItemSelectedEvent. Upon receiving
the event, the handler queries and displays the respective item's details:
  @Override public void onResume () {
    super.onResume();
    //**
    bus.registerSticky(this);
    //**
  }
  @Override
  public void onPause () {
    //**
    bus.unregister(this);
    //**
    super.onPause();
  }
  //...
  //**
  public void onEvent (ItemSelectedEvent event){
    Item item = MockDataSource.ITEMS.get(event.position);
    titleView.setText(item.title);
    dateView.setText(item.getDateStr());
    bodyView.setText(item.body);
  }
  //**
Finally, its all tied together in the Main component
([MainActivity.java]
(https://github.com/wongcain/EventBus-Config-Demo/blob/master/app/src/main/java/com/cainwong/demo/activities/MainActivity.java)).
The activity registers itself to receive sticky events, and creates a handler for the same
ItemSelectedEvent as does the Detail fragment. Upon receiving the event, the Detail
fragment is loaded into the appropriate container view, depending on the current layout:
  @Override protected void onResume () {
    super.onResume();
    //**
    bus.registerSticky(this);
    //**
    bus.postSticky(new LayoutEvent(isTwoPane()));
  }

  @Override protected void onPause () {
    //**
    bus.unregister(this);
    //**
    super.onPause();
  }
  //**
  public void onEvent (ItemSelectedEvent event){
    if(isTwoPane()) {
      getFragmentManager().beginTransaction().replace(detailContainer.getId(),
        new ItemDetailFragment()                     ).commit();
    }
    else {
      getFragmentManager().beginTransaction()
                          .replace(listContainer.getId(), new ItemDetailFragment())
                          .addToBackStack(ItemDetailFragment.class.getName())
                          .commit();
    }

  }
  //**
Notice that this activity not only listens for sticky events, but it also posts a different sticky event to communicate out the portait/landscape layout mode. This event is in turn received by our List fragment ([ItemListFragment.java] (https://github.com/wongcain/EventBus-Config-Demo/blob/master/app/src/main/java/com/cainwong/demo/fragments/ItemListFragment.java)) to conditionally configure the display of the selected list item:
  public void onEvent (LayoutEvent event){
    if(event.isTwoPane) {
      //**
      getListView().setChoiceMode(ListView.CHOICE_MODE_SINGLE);
      //**
      updateSelectedItem(activePosition);
    }
    else {
      //**
      getListView().setChoiceMode(ListView.CHOICE_MODE_NONE);
      //**
    }
  }
Also notice that none of the components implement onSaveInstanceState(Bundle bundle) andnor
onRestoreInstanceState(Bundle bundle). Instead they simply rely on the automatic delivery of
cached events that occurs onregisterSticky(this). So, given that a user has selected an item and
is viewing the item's details, the following occurs on automatically configuration change:
- Each component
onPauseis called where the component unregisters itself from the bus. - The Main activity is restarted, calling it's
onResumeevent which registers it for sticky events on the bus. - The cached
ItemSelectedEventis delivered to the Main activity, which causes it to load the Detail fragment. - The Detail fragment's
onResumeis called and theItemSelectedEventis delivered causing it to display the selected item's details. - Additionally, the List fragment's
onResumeis called, and theItemSelectedEventandLayoutEventare delivered so that the currently selected item can be visualized as is appropriate for the current layout.
So what did we learn today?
In summary,
Hopefully this has been helpful. As mentioned before, all of the code for this example is available here: https://github.com/wongcain/EventBus-Config-Demo/
Next time I will complete my series on Using an Event Bus with a discussion about using a bus across multiple threads and processes.
12 February 2015
In this final installment of EventBus series I want to discuss how Green Robot's EventBus can be used to more simply handle asynchronous tasks running across multiple threads.
There are quite a number of ways to execute code asynchronously (i.e. in parallel to the UiThread)
on Android. AsyncTask is the easiest to user mechanism and requires a relatively small amount of
set-up and code. However, it's proper use is limited in scope. As it states in the Android
Documentation:
AsyncTask is designed to be a helper class around Thread and Handler and does not constitute a generic threading framework. AsyncTasks should ideally be used for short operations (a few seconds at the most.) If you need to keep threads running for long periods of time, it is highly recommended you use the various APIs provided by the java.util.concurrent package such as Executor, ThreadPoolExecutor and FutureTask.
But even for "short operations" you can have issues, particularly given the nature of
Activity/Fragment lifecycles. Since AsyncTasks will continue running even if the Activity/Fragment
that started them is destroyed, it can be likely that your onPostExecute will end up throwing an
IllegalStateException, especially if you are trying to update the UI.
Android 3.0 introduced the Loaders API
which addresses the Activity/Fragment lifecycle problem, and is in fact very effective in its goal.
However, the Loaders API is specifically designed for the asynchronous loading of data into an
Activity or Fragment. And while the loading of data is a very common operation that should be
performed asynchonously, it's certainly not the only type of operation that you might want to move
out of the UiThread. Also, using Loaders requires yet another Listener interface to be implemented
by your Activity/Fragment. There's nothing inherently wrong with this, but I am personally not a fan
of the pattern. (My main issue with it is that you easily end up with to many callback
implementations in one place, resulting in code that can be difficult to read.) Finally, Activities
and Fragments are not the only place from which you may need to kick-off an asynchronous operation.
If you are in a Service, for example, you have no access to a LoaderManager, so you are either back
to using AsyncTask or java.util.concurrent.
The java.util.concurrent package is great, and I have used it extensively in both Android and
non-Android applications. It does, however, require a little more set-up and management that
something as simple as AsyncTask. You need to initiate your ExecutorService, manage/monitor its
lifecycle, and possibly keep up with a number of Future objects.
Given the right use-case, AsyncTasks, Loaders, and Executors can all be very effective. But in a complex application, selecting the right tool for each individual job, you are likely to end up using all three. And if you do, you now have 3 distinct frameworks to maintain, all just to handle concurrency.
GR's EventBus has a great built-in mechanism for handling concurrency. In your in your subscribing class, you can implement any of 4 different types of handler methods. When a matching event is posted, EventBus will pass the event to each of the handler methods in a different way in terms of concurrency:
- onEvent(T event): Runs on the same thread from which the event was posted.
- onEventMainThread(T event): Runs on the Main (UI) Thread, regardless of the thread from which was posted.
- onEventAsync(T event): Runs on a thread different from both the thread from which posted and the UI Thread.
- onEventBackgroundThread(T event): If the posting thread is not the UI Thread, it runs on the posting thread. If the event was posted from the UI Thread, however, it runs on a single thread that EventBus maintains. Multiple events are handled by this single background thread synchronously.
These options are very powerful and very easy to use. Let's say you have an operation that will take some time (because of network calls, large amount of processing, etc). This operation needs to be triggered via some UI action, and the UI needs to be updated when the operation is complete. For this example, I'm going to say that the UI action is a Button click, the Button is defined in an Activity, and the long-running operation will be performed in a Service. We can accomplish this as follows:
SomeActivity.java:
  //...
  @Inject EventBus bus;
  //...
  @Override
  protected void onCreate (Bundle savedInstanceState){
    super.onCreate(savedInstanceState);
    //...
    button.setOnClickListener(new View.OnClickListener() {
      public
      void onClick(View v) {
        //**
        eventBus.post(new DoOperationEvent());
        //**
      }
    });
  }
  @Override
  protected void onResume () {
    super.onResume();
    //**
    bus.register(this);
    //**
  }
  @Override
  protected void onPause () {
    //**
    bus.unregister(this);
    //**
    super.onPause();
  }
  //**
  public void onEventMainThread (OperationCompleteEvent event){
    Toast.makeText(this, "Operation complete!", Toast.LENGTH_SHORT).show();
  }
//**SomeService.java:
  //...
  @Inject EventBus bus;
  //...
  @Override
  protected void onCreate () {
    super.onCreate();
    //**
    bus.register(this);
    //**
  }
  @Override
  protected void onDestroy () {
    //**
    bus.unregister(this);
    //**
    super.onDestroy();
  }

public
void onEventAsync(DoOperationEvent event) {
  // DO SOMETHING LONG-RUNNING HERE
  //**
  eventBus.post(new OperationCompleteEvent());
  //**
}
//...
While this is a very simple example, it shows how concise this approach can be. There are no listener interfaces to implement, and the lifecycle issues are dealt with since the Activity will only receive the OperationCompleteEvent if it is active. What's more, if there is a configuration change or the Activity is otherwise destroyed and recreated in the time between the 2 events, the OperationCompleteEvent can still be received.
It is also very easy to see how we can build upon this. For example, if you want to post progress updates, you can simply implement another event class encapsulating the amount complete and post it. Or, if you need to ensure that other events of either the same or another type are not handled in parallel you can switch to using the onEventBackgroundThread method instead.
The easiest way to instatiate EventBus is via EventBus.getDefault(). However, there are a number
of useful of configurations that can be set by using the EventBusBuilder class which is available
via EventBus.builder(). Particularly relevant to this article is the option to specify your own
ExecutorService. By default the EventBus creates its own ExecutorService via
Executors.newCachedThreadPool() which is your best option most of the time. However, there may be
situations where you want to have more explicit control of the number of threads used by the
EventBus. In that case you can initialize your EventBus like this:
EventBus.builder().executorService(Executors.newFixedTheadPool(NUM_THREADS)).installDefaultEventBus();
The other configuration options available in the EventBusBuilder provide a number controls around Exception handling, as well as a switch for controlling whether or not inheritance is supported for Event classes. These options are outside the scope of this article, but I highly recommend looking into them. It doesn't appear that GR has documented them all, but if you look at the source code for [EventBusBuilder] (https://github.com/greenrobot/EventBus/blob/master/EventBus/src/de/greenrobot/event/EventBusBuilder.java) and EventBus it should be pretty easy to understand them.
That wraps up my EventBus series. In my next post I will be discussion my own approach to implementing the MVP pattern in Android. Until then, happy bussing! :)