AUTHOR: Shawn Armstrong
CONTACT: smarmstr@ucsc.edu
- This guide serves as a comprehensive reference for essential knowledge required to begin developing plugins for OpenTAP.
As a university student majoring in Computer Science, I have spent the last six months participating in a project focused on creating an OpenTAP plugin. Although the technical details are well-covered in OpenTAP's official documentation, it lacks some high-level aspects that are essential for beginner developers to grasp the whole picture. This document aims to bridge such knowledge gaps for newcomers.
In a single sentence, it's an open source testing platform that seeks to simplify test and measurement operations in an automated manner.
Test and Measurement (T&M) is a field dedicated to assessing and verifying the performance, reliability, and quality of products. It's a critical area in many industries, as companies heavily rely on it to ensure their products and services meet safety and reliability standards. This field commonly requires an interdisciplinary skill set with backgrounds in Electrical Engineering, Computer Science/Engineering, Mechanical Engineering, and Systems Engineering.
Traditionally, T&M involved a lot of manual labor, such as pushing buttons and recording results by hand, which were time consuming and error prone. OpenTAP represents a modern solution seeking to automate and optimize these actions.
There are two targeted user audiences:
- Operators
- Developers
In practice, the main audience for OpenTAP are operators, typically individuals employed by companies to carry out test and measurement tasks. OpenTAP aims to simplify their job with user-friendly software resources. These users may not have extensive CS technical background / knowledge; therefore, it's crucial to remember that certain aspects of their documentation are written for this audience.
The secondary audience are developers. These are the people who write code that implement OpenTAP resources for interfacing with testing equipment and products programmatically to carry out T&M operations.
Plugins are the core of the OpenTAP ecosystem. Essentially, they are code modules written by developers for T&M scenarios. Plugins can be compressed into packages to be more conveniently shared throughout the community.
It is essential to first familiarize yourself with OpenTAP as an operator before attempting to develop a plugin. This section will expose you to the fundamentals by installing OpenTAP, setting up a workspace and running a test using the demonstration plugin.
-
Begin by installing the OpenTAP distribution for your specific operating system.
-
Once that's done, our next step is to establish a workspace. OpenTAP features an in-built package manager intended to integrate common resources into your setup. In this stage, we are particularly interested in two packages: the Pathwave Editor and the demonstration package.
Start by navigating into the directory containing the OpenTAP installation within a command line environment and run the following commands:
tap package install "Editor CE"
tap package install "Demonstration"
These commands will tell the package manager to download and integrate these resources into your installation.
Within the same console, launch the Pathwave editor by running the following command:
tap editor
This is the standard workspace which is where the operators do all of their leg work. The enumerated areas represent sections within your workbench.
- The DUT stands for device under test. This is the product that the operator is interested in testing.
- An Instrument is simply any testing tool. More specifically, any piece of equipment responsible for conditioning, exposing or otherwise measuring a parameter related to the DUT.
- The Results section is an area where you can control how your testing data is displayed, logged and saved.
The demonstration package that we installed earlier acts as a learning tool, illustrating how a battery test within a DUT might be conducted using OpenTAP. It's important to note that this demonstration utilizes mock objects; the instruments and the DUT outlined in the subsequent section are simulated within the code. In a real-world scenario, we would interact with actual equipment, connected either physically or through a network.

- TimingDUT is just a placeholder; alternatively, you can think of it as a phone, TV or anything really.

- Observe that you can select multiple instruments and configure their parameters.
- In this testing procedure we're simulating a power supply unit (PSU), power analyzer1, temperature chamber2 and a timing instrument3.


- A test plan consists of test steps where each row is a single test step.
- A test step is loosely defined as a single action within the testing procedure and is the fundamental unit of the test.
- In this example, "DemonstrationAll Steps" is a test step that consists of multiple test steps for instructional convenience only.

- These first 3 test steps simulate a charge-discharge test for a battery. In essence, it is benchmarking the time it took to fully charge the battery then the time it took to discharge it. Afterwards, it uses these two values to rate the battery.
- We can see that the battery is being exposed to a 10 amp current by looking at the test step configuration on the far right hand side.
- The power analyzer is then used to measure the DUT's battery voltage every 200 milliseconds.
- When the battery reaches 4.2 volts it is tentatively fully charged.
- The total voltage margin field specifies an acceptable range for when the battery is considered fully charged. This is why the last measurement reported was 4.09 instead of 4.2.
- The console is reporting the data being observed by the power analyzer; the hash marks are just a crude graph modeling the voltage being observed.
In essence, OpenTAP establishes a link between a testing instrument, which in turn is connected to the DUT. This connection could be facilitated either physically through cables or over a network. Regardless of the connection method, OpenTAP sends commands to the instrument to perform certain actions. These actions could range from subjecting the device to higher currents, monitoring voltage levels, adjusting internal settings, and much more.

In short, C# and Python.
OpenTAP is built using the .NET framework and its core logic is implemented as a C# library. As such, plugins are typically written using C#. Alternatively, Python can be used through OpenTAP’s Python software development kit made possible with Python.NET which acts as a bridge between CPython and the .NET framework.
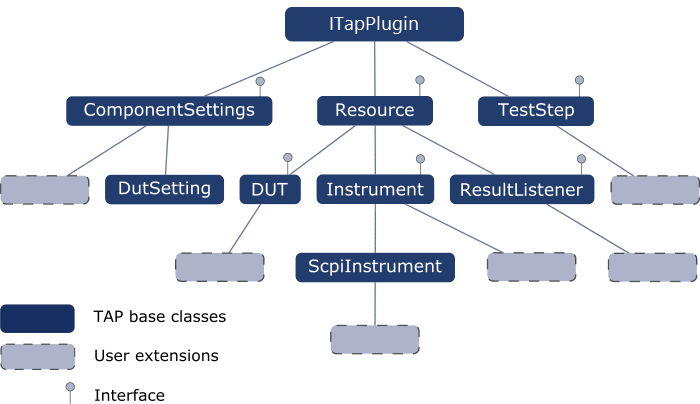
OpenTAP plugins are structured based on the platform's object-oriented class hierarchy. This system promotes well-organized modularity, providing a blueprint for creating custom plugins. For a more detailed explanation, I highly recommend reviewing the development essentials section of the official documentation.
There are two critical points related to this section.
The first is ITapPlugin, the foundational base class for all others. Subclasses of ITapPlugin include ComponentSettings, Resource, and TestStep, each of which is an abstract class. These abstract classes cannot be instantiated directly, instead they are designed to be extended by additional subclasses. A practical example provided later in this document will help illustrate this concept more clearly.
It's also crucial to understand the role of interfaces in this hierarchy. As C# adheres to the "single inheritance" principle, a class can directly inherit from only one base class. This means, in C#, you can "extend" only one class. However, if a developer requires functionality from more than one base class, interfaces can be used as an alternative. In this way, a class can "implement" multiple interfaces, thereby allowing for a form of multiple inheritance.
OpenTAP provides resources for generating a basic project template as well as generic example implementations that you can grow from. In the following section, we'll explore these resources with a simple project.
In this project, we'll create an OpenTAP plugin to control a simulated robot arm. Specifically, we'll write a test step and an instrument to illustrate fundamentals.

-
We will begin by starting up a robotic arm simulator. Ensure Docker is started and run the following command in a console:
docker network create --subnet=192.168.56.0/24 ursim_net
docker run -it -e ROBOT_MODEL=UR3e --net ursim_net --ip 192.168.56.101 -p 30002:30002 -p 30004:30004 -p 6080:6080 --name ur3e_container universalrobots/ursim_e-series
Ensure the simulator started by visiting http://localhost:6080/vnc_auto.html in Google Chrome.
-
Next, we'll create a project to work with; in the same console, run the following command:
tap python new-project --project-name demo --directory path/to/any/folder/goes/here
Start by navigating to the directory where you've set up your project skeleton. Inside this root directory, you'll find a folder named demo which contains two key files: TestInstrument.py and TestStepExample.py. For brevity, we will rename TestInstrument.py as Robot.py and TestStepExample.py as MoveRobot.py. You can think of MoveCobot.py as being synonymous to our main(); its run function is what controls the flow of the program when OpenTAP begins executing this test step. On the other hand, Robot.py will be an instrument responsible for interfacing with the robot encapsulating related logic.
The following sections are written / commented for OpenTAP instructional purposes only.
It is important to note that our robot simulator has a server abstraction already running on it. The send_move_command() is setting up a client connection with it then sending a string of code representing a move command in the robot's programming language.
import OpenTap
from opentap import *
import socket

@attribute(OpenTap.Display("Robot", "This instrument interface with robot", "demo"))
class Robot(Instrument):

    # This creates a field called IP Address within the GUI when selecting this instrument
    # The default value of the field is your host machine's IPv4 but can be modified by
    # the operator.
    ip_address = property(String, socket.gethostbyname(socket.gethostname()))\
        .add_attribute(OpenTap.Display("IP Address", "The static IP address of the robot."))


    def __init__(self):
        # These also get displayed in the GUI when selecting the instrument
        "Set up the properties, methods and default values of the instrument."
        super(Robot, self).__init__()
        self.Name = "Robot"

    # This functions enables OpenTAP to make a connection to an internal server
    # already running on the robot. Afterwards, it then sends a move command
    # in the robot's proprietary programming language which is executed.
    def send_move_command(self, command):
        host_ip = self.ip_address
        port = 30002

        client_socket = socket.socket(socket.AF_INET, socket.SOCK_STREAM)

        try:
            # Connect to the server running on the robot
            self.log.Debug(f"Connecting to {host_ip} : {port}")
            client_socket.connect((host_ip, port))

            # Send the command to the robot's server.
            self.log.Debug(f"Sending command: {command}")
            command = command + "\n"
            client_socket.sendall(command.encode())

        finally:
            self.log.Debug(f"Closing connection")
client_socket.close()from opentap import *
import OpenTap
from .Robot import Robot
# This gets rendered in the GUI
# Move cobot is an object that inherits from the abstract class TestStep
# Move cobot is a test step itself extending the test step base class.
@attribute(OpenTap.Display("Move Robot", "A simple python test step", "demo"))
class MoveRobot(TestStep):
# These are fields within the GUI.
# The step is asserting that the operator must have a Robot instrument to run this plan.
# The command is just a way to customize what gets sent to the robot. The default is a
# move command.
myRobot = property(Robot, None).\
add_attribute(OpenTap.Display("Instrument", "The instrument to use in the step.", "Resources"))
command = property(String, "movej([0, 0, 0, 0, 0, 0], a=1.2, v=1.05)")\
.add_attribute(OpenTap.Display("command", "This move command gets sent to the robot", "UR Script", -1, True))
def __init__(self):
super(MoveRobot, self).__init__()
# This is essentially synonymous to main() and serves as the entry point
# When OpenTAP begins executing this specific test step on the test plan
def Run(self):
self.log.Debug("Starting Move Robot test step.")
self.myRobot.send_move_command(self.command)
self.log.Debug("Move Robot test step finishing.")Navigate to the root directory of your project's skeleton within a console and run the following commands:
dotnet build
cd bin
tap package install "Editor CE"
tap editor
This will build your code and launch the editor which can then be used with the following actions:

You can compress your plugin into a single file to facilitate easier sharing using OpenTAP's CLI. From your project's root directory, execute the following command which will create a file with a .TapPackage extension:
bin\tap package create ./package.xmlThis packaged plugin can be installed on any OpenTAP environment using the CLI with the command:
tap package install path/to/file.TapPackage- This guide provided an overview of OpenTAP and Test & Measurement (T&M), along with instructions on executing a test plan and developing and packaging your own plugin.
- The example project we discussed was basic, but it serves as a strong foundation for the development of more sophisticated plugins.
Footnotes
-
A power analyzer is a common tool used to observe and analyze electrical power consumption in a DUT. They can typically measure both alternating current and direct current as well as reporting parameters such as voltage, amperes, watts and harmonic distortion. Its cell size attribute is the measurement interval, typically in milliseconds, in which it collects data. The smaller the value the more data points. ↩
-
A temperature chamber is a piece of equipment commonly used to expose a DUT to varying degrees of heat or humidity to observe its performance and take note of any potential deterioration in hardware. ↩
-
A time instrument is a class of tools commonly used to measure and analyze the timing and synchronization of electrical signals. Contingent on the specific instrument, they're capable of measuring a wide range of parameters such as frequency, period, rise / fall time, and phase delay. An example of a time instrument would be a time interval analyzer, universal counter and a logic analyzer. ↩