Skip to content

Instantly share code, notes, and snippets.

@Suzhou65
Last active April 19, 2024 06:51
Show Gist options
  • Star 18 You must be signed in to star a gist
  • Fork 5 You must be signed in to fork a gist
  • Save Suzhou65/efc948c5341738d5eab7661cb2dc747e to your computer and use it in GitHub Desktop.
Save Suzhou65/efc948c5341738d5eab7661cb2dc747e to your computer and use it in GitHub Desktop.
Raspberry Pi Setup APCUPSD

Raspberry Setup APC UPS

What is this?
Raspberry Pi OS (Raspbian) install apcupsd Installation guide

What is apcupsd?
apcupsd is a open source UPS mangement and controlling software, it allows the computer to interact with APC UPSes.

Install apcupsd

First, install apcupsd utility, and the dynamic web page monitor.

sudo apt-get -y install apcupsd apcupsd-cgi

Then backup the configuration file.

sudo cp /etc/apcupsd/apcupsd.conf /etc/apcupsd/apcupsd.orig
sudo cd /etc/apcupsd/

Using vim editor to editing the configuration file.

sudo vim apcupsd.conf

If you are using APC BN650M1 series, and connect to raspberry by USB cable, the configuration file will be like this:

## apcupsd.conf v1.1 ##
UPSNAME BN650M1-TW

# UPSCABLE <cable>
UPSCABLE usb

# UPSTYPE
UPSTYPE usb
DEVICE

# POLLTIME <int>
#POLLTIME 60

# LOCKFILE <path to lockfile>
LOCKFILE /var/lock

# SCRIPTDIR <path to script directory>
SCRIPTDIR /etc/apcupsd

# PWRFAILDIR <path to powerfail directory>
PWRFAILDIR /etc/apcupsd

# NOLOGINDIR <path to nologin directory>
NOLOGINDIR /etc

# During power failures
ONBATTERYDELAY 6
BATTERYLEVEL 15

MINUTES 10
TIMEOUT 0

ANNOY 60
ANNOYDELAY 60

# NOLOGON <string> [ disable | timeout | percent | minutes | always ]
NOLOGON disable
# KILLDELAY <seconds>  0 disables
KILLDELAY 0

# Network Information Server
# NETSERVER [ on | off ] on enables, off disables the network
NETSERVER on

# NISIP <dotted notation ip address>
NISIP 0.0.0.0

# NISPORT <port> IANA
NISPORT 3551

EVENTSFILE /var/log/apcupsd.events
EVENTSFILEMAX 10

# Configuration statements used if sharing
# UPSCLASS
UPSCLASS standalone

# UPSMODE
UPSMODE disable

After saving the configuration file, start (or restart) apcupsd service.

sudo service apcupsd start

Running commond, if everything goes right, you will saw the UPS status.

apcaccess

Install Apache

If you want to monitoring your UPS online (via LAN network), please follow the instructions below.

Install Apache 2.4.

sudo apt-get -y install apache2

Then backup the configuration file.

sudo cp /etc/apache2/apache2.conf /etc/apache2/apache2.orig
sudo cp /etc/apache2/sites-available/000-default.conf /etc/apache2/sites-available/000-default.orig

Using vim editor to editing the apache configuration file.

sudo cd /etc/apache2/
sudo vim apache2.conf

The configuration file section at Directory will be like this:

<Directory /var/www/>
	Options Indexes FollowSymLinks
	AllowOverride None
	Require all granted
</Directory>

#	apcupsd
ScriptAlias /apcupsd/ /usr/lib/cgi-bin/apcupsd/
<Directory "/usr/lib/cgi-bin/apcupsd">
	DirectoryIndex upsstats.cgi
	Options +FollowSymLinks +ExecCGI
	AddHandler cgi-script .cgi
	DirectoryIndex upsstats.cgi
	Require all granted
</Directory>

Using vim editor to editing the website configuration file.

sudo cd /etc/apache2/sites-available/
sudo vim 000-default.conf

The configuration file section at serve-cgi-bin.conf will be like this:

Include conf-available/serve-cgi-bin.conf

	# apcupsd-cgi
	ScriptAlias /apcupsd/ /usr/lib/cgi-bin/apcupsd/
	<Directory "/usr/lib/cgi-bin/apcupsd">
		DirectoryIndex multimon.cgi
		Options +FollowSymLinks +ExecCGI
		AddHandler cgi-script .cgi
		DirectoryIndex upsstats.cgi
		Require all granted
	</Directory>

Enable the CGI module

sudo a2enmod cgi

After saving the configuration file, running configtest to check syntax errors, if everything goes right, you will saw Syntax OK

pi@raspberry:/etc/apache2 $ sudo apache2ctl configtest
Syntax OK

If you saw this error, please follow the instructions below.

pi@raspberry:/etc/apache2 $ sudo apache2ctl configtest
apache2: Could not reliably determine the server's fully qualified domain name, using 127.0.1.1 for ServerName
Syntax OK

Go back to apache configuration file.

sudo cd /etc/apache2/
sudo vim apache2.conf

Add this section

ServerName localhost

After saving the configuration file, start (or restart) apcupsd service.

sudo service apache2 start
sudo service apache2 reload

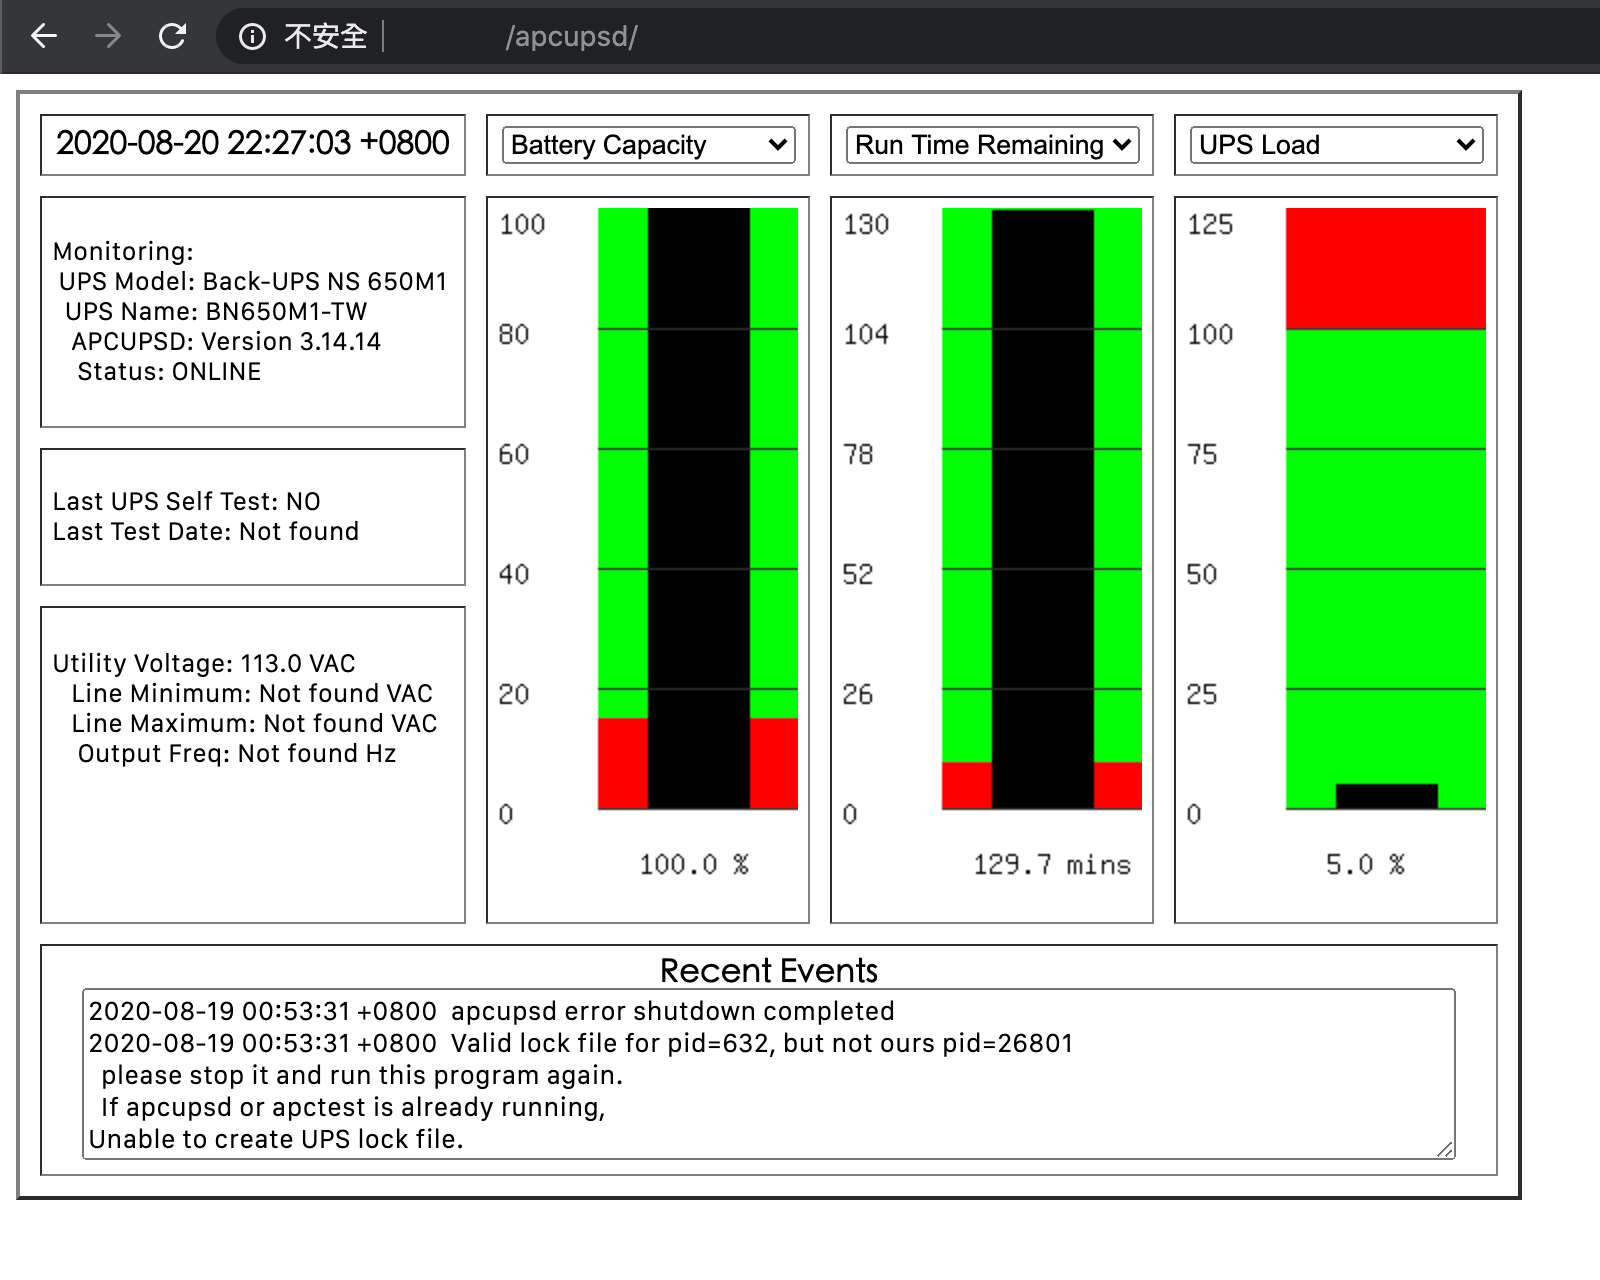
Now you can check the CGI monitor

http://your.server.address/apcupsd/

ScreenShot

Tips

If you have multi-APC UPSes which can broadcasting data, then you can choice multimon function into index as default.

Please modify the section below

DirectoryIndex upsstats.cgi

into

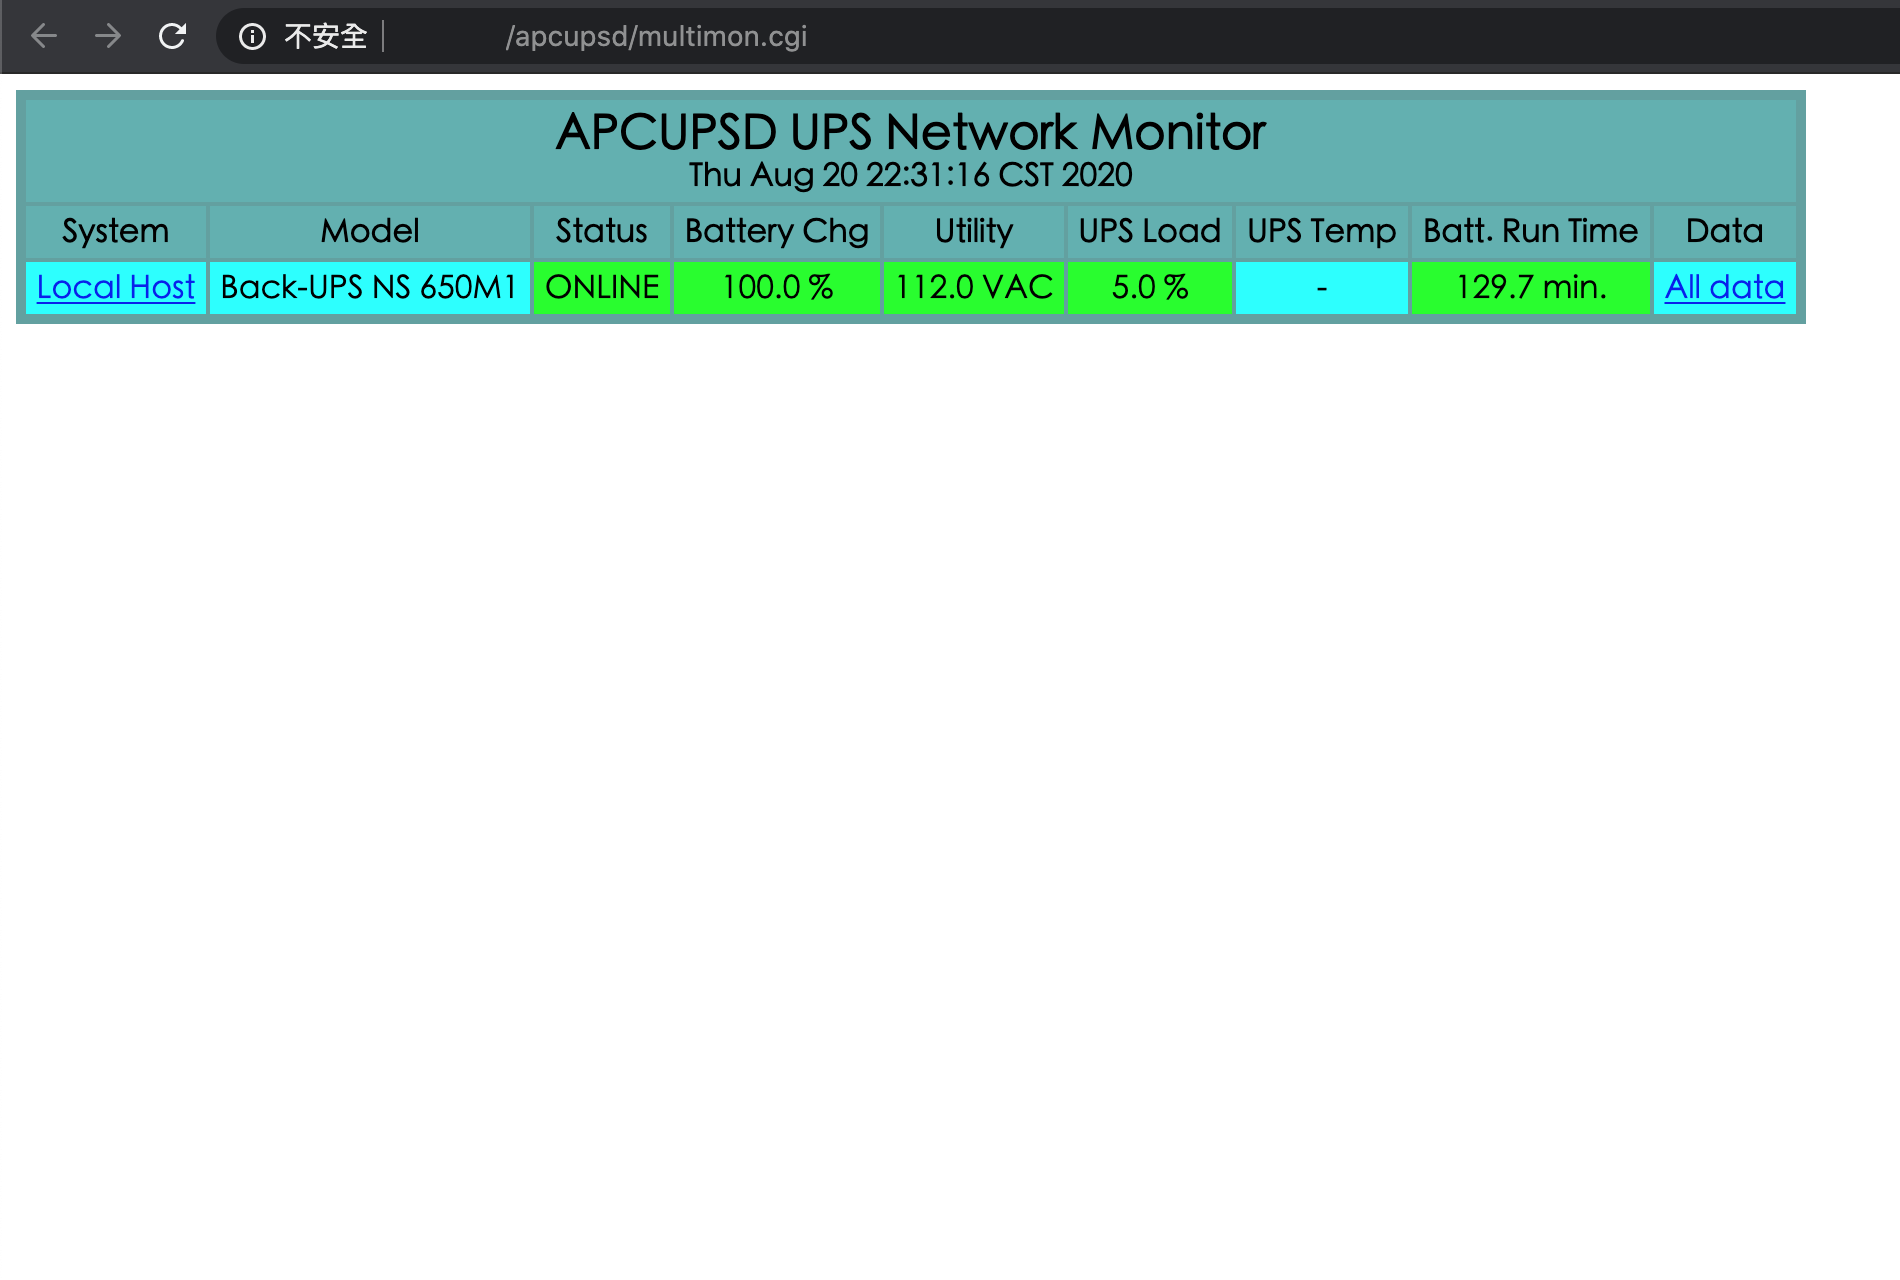
DirectoryIndex multimon.cgi

The multimon.cgi will be like this ScreenShot

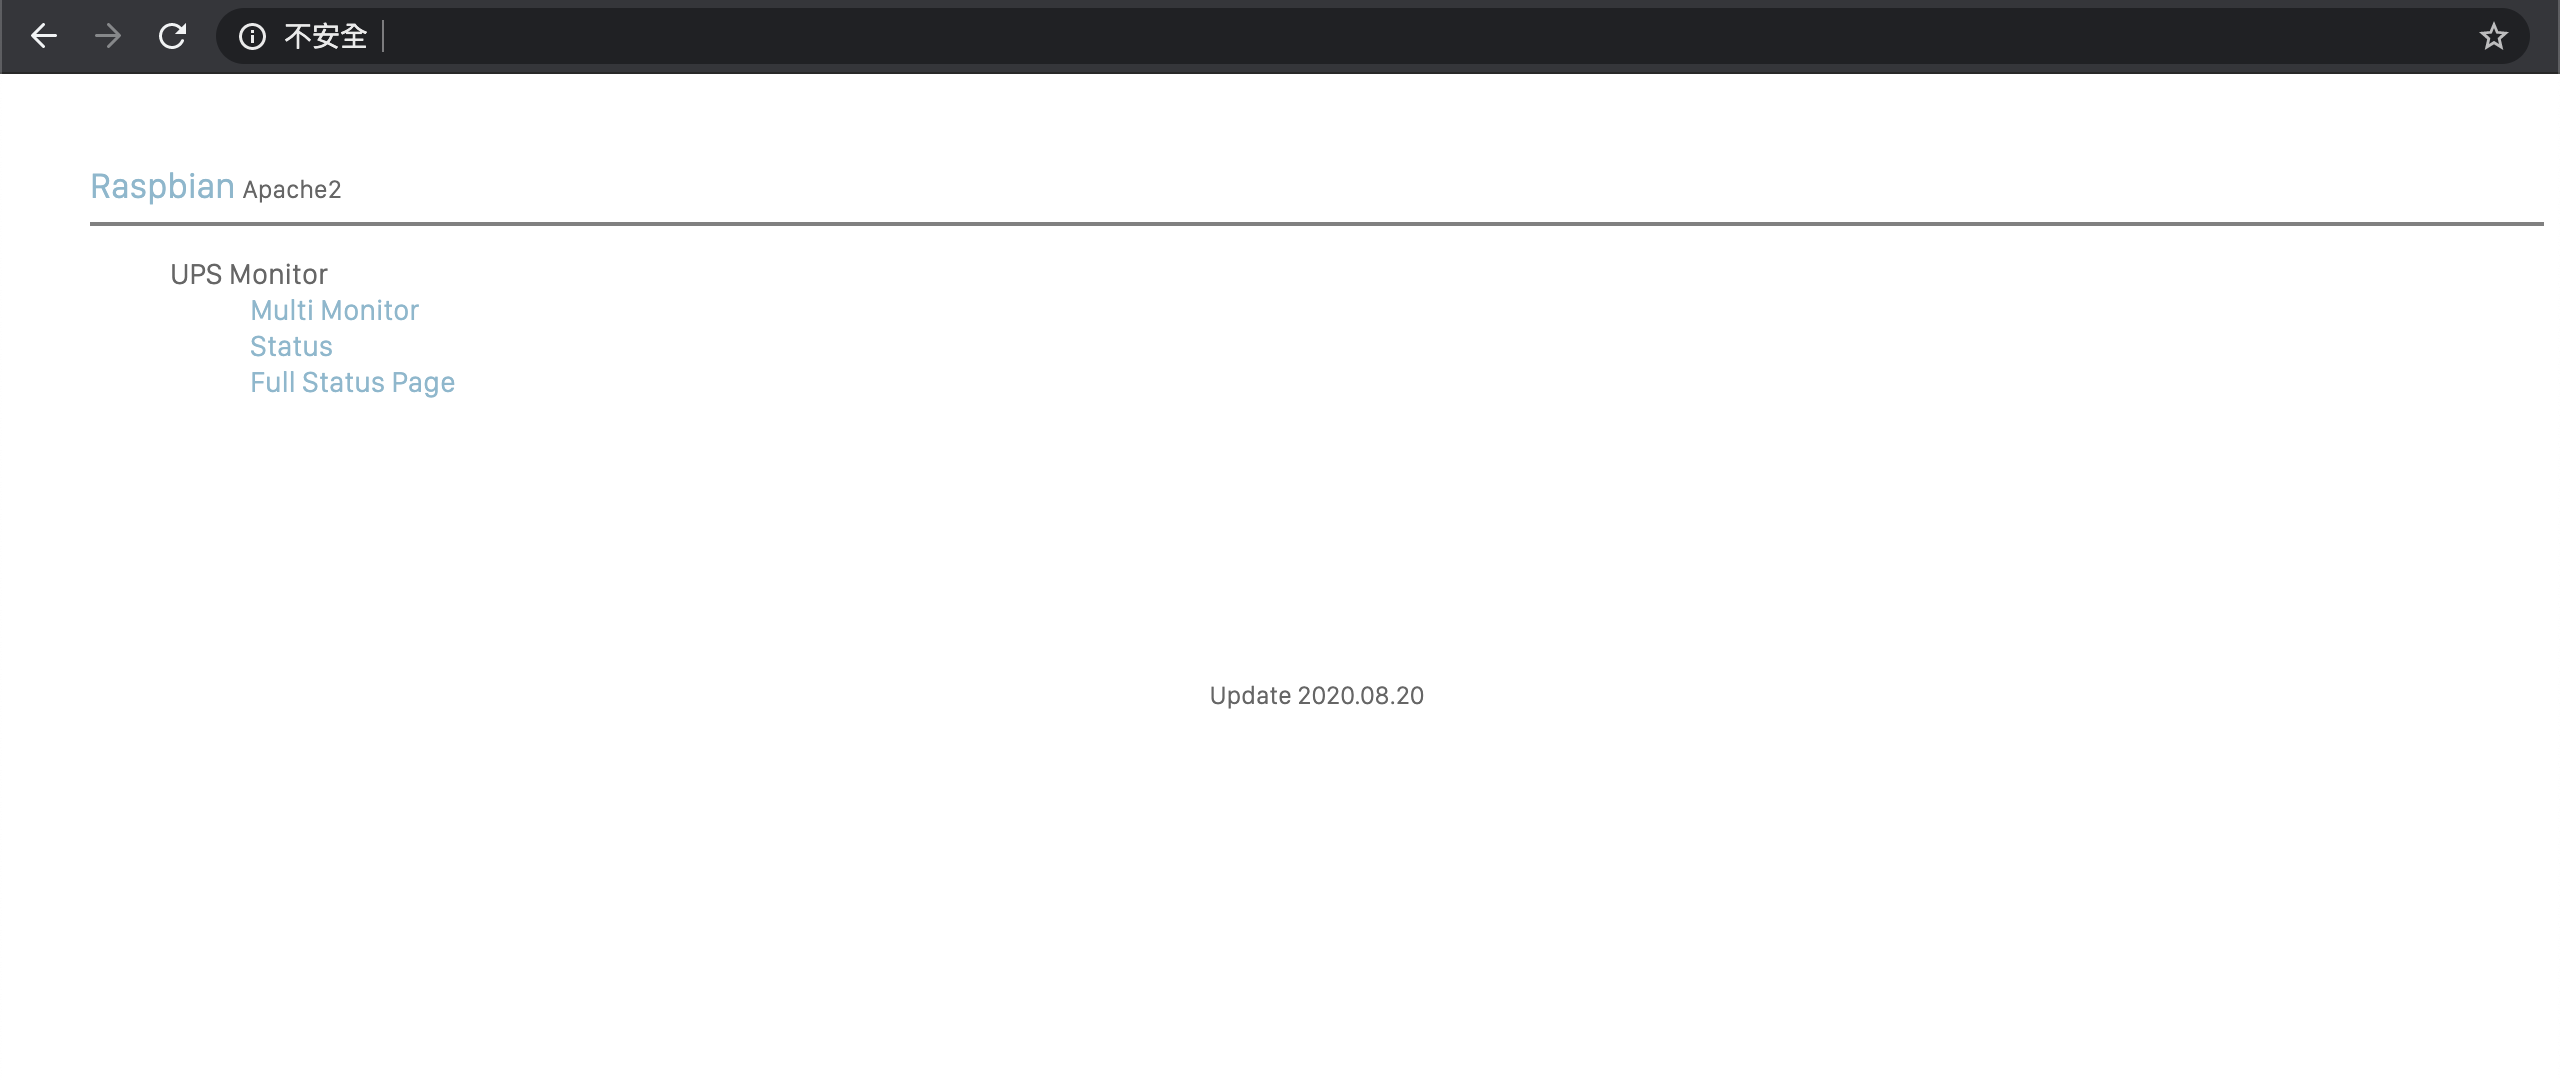
You can also modify the apache default index page, let you easier to access different function. ScreenShot

If apache server default folder (/var/www/html) show Permission denied alert, using the command below

sudo chown -R $USER:$USER /var/www
@theluke
Copy link

theluke commented Dec 30, 2021

Despite hours of searches and several attempts, I cannot configure apcupsd to manage my UPS.

This is my UPS:
https://www.se.com/ww/en/product/BK650MI/apc-backups-650va-230v/

My configuration:

  1. Raspberry Pi 4, 5.10.63-v7l+
  2. Serial to USB Cable, correctly configured:
Bus 001 Device 003: ID 067b:23c3 Prolific Technology, Inc. USB-Serial Controller
  1. The port is configured correctly:
pi@raspberrypi:~ $ ls -ltra /dev/serial/by-id
total 0
drwxr-xr-x 4 root root 80 Dec 29 23:05 ..
drwxr-xr-x 2 root root 60 Dec 29 23:05 .
lrwxrwxrwx 1 root root 13 Dec 29 23:05 usb-Prolific_Technology_Inc._USB-Serial_Controller_BRA_h10CD20-if00-port0 -> ../../ttyUSB0
  1. I tried every possible configuration in the apcupsd.conf file. The furthest I went in terms of results from testing was with the following:
UPSCABLE simple
UPSTYPE dumb
DEVICE /dev/ttyUSB0

But even then, the every option under apctest fails: Illegal response.

I followed these guides:

@Suzhou65
Copy link
Author

Wow, this is surprising, I have never seen before. In my case, after using lsusb command, my APC ups showing like this:

Bus 001 Device 003: ID 051d:0002 American Power Conversion Uninterruptible Power Supply

And the configuration is setting like this:

# UPSCABLE <cable>
UPSCABLE usb

UPSTYPE usb
DEVICE

It works fine.

Maybe the problem is your UPS cable working at serial port mode.
Searching others apcupsd user's configuration which UPS model match yours can be helpful.

@theluke
Copy link

theluke commented Dec 30, 2021

Hey thanks for getting back so fast!!

My UPS is an old APC, with a serial port and I am using a serial to USB adapter on Raspberry Pi 4

I did try to search long and wide, but no one seems to be using my type of UPS with a Serial to USB cable...

@Suzhou65
Copy link
Author

Suzhou65 commented Dec 30, 2021

Prolific_Technology_Inc, seems like the USB-UART chip on the cable is PL2302, or others chip make by Prolific, like PL2303. But the log isn't seems normal, I means if the USB-UART cable work properly, following command should print something:

dmesg | grep tty

or

ls /dev/ttyUSB*

Also, I found some discussion about old APC ups, likes APC SC1000.
They using following configuration:

UPSCABLE smart
UPSTYPE apcsmart
DEVICE /dev/usb-tty/ttyUSB0

@theluke
Copy link

theluke commented Dec 30, 2021

Hey man, thank you for helping.

Some feedback from dmesg | grep tty:

[    0.000000] Kernel command line: coherent_pool=1M 8250.nr_uarts=0 snd_bcm2835.enable_compat_alsa=0 snd_bcm2835.enable_hdmi=1  smsc95xx.macaddr=DC:A6:32:D7:B1:F5 vc_mem.mem_base=0x3ec00000 vc_mem.mem_size=0x40000000  console=ttyS0,115200 console=tty1 root=PARTUUID=aaf5aa4d-02 rootfstype=ext4 fsck.repair=yes rootwait quiet splash plymouth.ignore-serial-consoles
[    0.001108] printk: console [tty1] enabled
[    1.458154] fe201000.serial: ttyAMA0 at MMIO 0xfe201000 (irq = 38, base_baud = 0) is a PL011 rev2
[    3.331949] systemd[1]: Created slice system-getty.slice.
[    6.149774] usb 1-1.2: pl2303 converter now attached to ttyUSB0

I applied the same config as you proposed, but no luck:

pi@raspberrypi:~ $ sudo systemctl status apcupsd
● apcupsd.service - UPS power management daemon
     Loaded: loaded (/lib/systemd/system/apcupsd.service; enabled; vendor preset: enabled)
     Active: active (running) since Thu 2021-12-30 17:47:11 GMT; 2min 6s ago
       Docs: man:apcupsd(8)
    Process: 537 ExecStartPre=/lib/apcupsd/prestart (code=exited, status=0/SUCCESS)
    Process: 560 ExecStart=/sbin/apcupsd (code=exited, status=0/SUCCESS)
   Main PID: 570 (apcupsd)
      Tasks: 4 (limit: 4915)
        CPU: 110ms
     CGroup: /system.slice/apcupsd.service
             └─570 /sbin/apcupsd

Dec 30 17:47:11 raspberrypi systemd[1]: Starting UPS power management daemon...
Dec 30 17:47:11 raspberrypi apcupsd[570]: apcupsd 3.14.14 (31 May 2016) debian startup succeeded
Dec 30 17:47:11 raspberrypi apcupsd[570]: NIS server startup succeeded
Dec 30 17:47:11 raspberrypi systemd[1]: Started UPS power management daemon.
Dec 30 17:48:12 raspberrypi apcupsd[570]: Communications with UPS lost.

@theluke
Copy link

theluke commented Dec 30, 2021

I am looking at this guide as well:
https://community.home-assistant.io/t/how-to-connect-your-apc-ups-to-rpi-and-home-assistant-using-apcupsd/10609/41
Which in turns points to: http://www.apcupsd.org/manual/#connecting-a-serial-line-ups-to-a-usb-port

When configuring the UPS as dumb and cable as simple, I can see apcupsd service working, but all tests fail, so
do not trust the output of the command apcaccess.

APC      : 001,018,0458
DATE     : 2021-12-30 18:01:27 +0000
HOSTNAME : raspberrypi
VERSION  : 3.14.14 (31 May 2016) debian
UPSNAME  : APC
CABLE    : Custom Cable Simple
DRIVER   : DUMB UPS Driver
UPSMODE  : Stand Alone
STARTTIME: 2021-12-30 18:01:24 +0000
STATUS   : ONLINE LOWBATT
MBATTCHG : 5 Percent
MINTIMEL : 3 Minutes
MAXTIME  : 0 Seconds
NUMXFERS : 0
TONBATT  : 0 Seconds
CUMONBATT: 0 Seconds
XOFFBATT : N/A
STATFLAG : 0x05000048
END APC  : 2021-12-30 18:01:27 +0000

@Suzhou65
Copy link
Author

I was looking for APCUPSD manual, and I found this:

Connecting a Serial-Line UPS to a USB Port
By using a special adaptor, you can connect your serial-line UPS to a USB port. If you would like to free up your serial port and connect your existing serial port UPS to a USB port, it is possible if you have one of the later kernels. You simply get a serial to USB adapter that is supported by the kernel, plug it in and make one minor change to your apcupsd.conf file and away you go. (Kern adds: Thanks to Joe Acosta for pointing this out to me.)

The device that Joe Acosta and Kern are using is IOgear GUC232A USB 2 serial adapter. Bill Marr informs us that it also works with a Back-UPS Pro 650 and the 940-0095B cable.

At Kern's site, running Red Hat 7.1 with kernel 2.4.9-12, he simply changed his /etc/apcupsd/apcupsd.conf configuration line to be:
DEVICE /dev/ttyUSB0

Depending on whether or not you have hotplug working, you may need to explicitly load the kernel modules usbserial and pl2303. In Kern's case, this was not necessary.

As, at this part:
Supported UPSes and Cables
apcsmart
The 'apcsmart' protocol uses an RS232 serial connection to pass commands back and forth in a primitive language resembling modem-control codes. APC calls this language "UPS-Link". Originally introduced for Smart-UPS models (thus the name 'apcsmart'), this class of UPS is in decline, rapidly being replaced in APC's product line by USB and MODBUS UPSes.
usb
A USB UPS speaks a universal well defined control language over a USB wire. Most of APC's lineup now uses this method as of late 2003, and it seems likely to completely take over in their low- and middle range. The most recent APC UPSes support only a limited set of data over the USB interface. MODBUS (see below) is required in order to access the advanced data.

By the log output by apcupsd and dmesg, the USB-UART cable indeed using Prolific's chip, and work properly, but there is some config issue let apcupsd cannot connect with your UPS. Maybe reboot the Raspberry after change config can fix it.

Reference:

@theluke
Copy link

theluke commented Dec 30, 2021

ok, let's go through this step by step:

  1. I can see the serial to USB correctly at /dev/ttyUSB0,
  2. About the driver, it looks like the basics are in place.
pi@raspberrypi:~ $ dmesg | grep usbcore
[    6.098692] usbcore: registered new interface driver usbserial_generic
[    6.122521] usbcore: registered new interface driver pl2303
[    6.293700] usbcore: registered new interface driver brcmfmac
  1. I rebooted the R Pi tons of times, makes no difference, unfortunately.

  2. from the first point in your reference, where do you type the code below?

if [ ! -d /dev/usb-tty ]
then
mkdir -p /dev/usb-tty
fi

mknod /dev/usb-tty/ttyUSB0 c 188 0
mknod /dev/usb-tty/ttyUSB1 c 188 1
mknod /dev/usb-tty/ttyUSB2 c 188 2
mknod /dev/usb-tty/ttyUSB3 c 188 3
mknod /dev/usb-tty/ttyUSB4 c 188 4
mknod /dev/usb-tty/ttyUSB5 c 188 5
mknod /dev/usb-tty/ttyUSB6 c 188 6
mknod /dev/usb-tty/ttyUSB7 c 188 7
mknod /dev/usb-tty/ttyUSB8 c 188 8
mknod /dev/usb-tty/ttyUSB9 c 188 9
mknod /dev/usb-tty/ttyUSB10 c 188 10
mknod /dev/usb-tty/ttyUSB11 c 188 11
mknod /dev/usb-tty/ttyUSB12 c 188 12
mknod /dev/usb-tty/ttyUSB13 c 188 13
mknod /dev/usb-tty/ttyUSB14 c 188 14
mknod /dev/usb-tty/ttyUSB15 c 188 15

@Suzhou65
Copy link
Author

Sorry for reply late.

I think this problem cause by compatibility, maybe the newer APCUPSD out of support with old APC ups product, even the raspberry system can detected the USB-UART connector, the APCUPSD can't decode the signal properly.

Sorry can't help you to solved problem, maybe you can ask help at reddit, there is a sub call "homelab".
Or, you can try "NUT" to replace APCUPSD.

@theluke
Copy link

theluke commented Feb 1, 2022

Hello there! No worries at all and thanks so much for helping me so far.
I gave up on that project, I need to get a more modern UPS. I will re-use the old UPS with my other computer, so I do not need to care about the cables

@soharddbwarez
Copy link

Hello there! No worries at all and thanks so much for helping me so far. I gave up on that project, I need to get a more modern UPS. I will re-use the old UPS with my other computer, so I do not need to care about the cables

Hi @theluke perhaps I have some helpful information for you.
I have an antient UPS that I got from a friend but he didn't have the original serial cable anymore so I did some research online and found that you can customize the serial port on your UPS, I've done it myself and it's very easy.

You just take any old USB cable you can sacrifice for this, keep the USB A connector on one side that you plug into your Raspberry Pi later and cut the other connector off to expose the wires that you'll use to connect to the PCB of the UPS directly, you have to solder the cable to the PCB to get the best result.

Turns out that the serial port on the UPS doesn't need the Serial to USB board to communicate to the Pi or any other computer via USB, it can talk to your Pi via USB directly by changing the port.

Here's the exact pinout of the USB cable and the serial port and how you need to connect the wires.
DIY Custom USB Cable for UPS

I hope this is helpful to you.

@theluke
Copy link

theluke commented Mar 1, 2022 via email

@soharddbwarez
Copy link

Hi @theluke I just took apart the UPS and pulled off the serial port with the 10 pins and soldered the USB cable directly to the pins as shown in the previous comment.

So now I have the USB cable directly soldered on the board instead of the serial cable.

You can also change the original serial cable instead of soldering it directly to the board, just use the same pinout but then you have to measure which wire goes to which pin on the PCB and make sure you don't make a mistake and blow up your USB port.
However it will work by soldering the cable directly to the PCB or change the original serial cable to USB.

@soharddbwarez
Copy link

So after following the instructions, getting the predicted error messages and doing the extra changes and doing the apache2 installation and configurations I've got it all running without a problem.

I'm really happy with it because I have no other use for the UPS, my PC overloads the UPS without even breaking a sweat so after testing it initially I put it aside until I got the idea to use it for my Raspberry Pi with the display and I also put my modem on the same UPS which is very handy since I use my Raspberry Pi as my local DNS server with Pi-Hole which is an adblocker on DNS level capable of blocking even Google tracking stuff and analytics, it works very well.

So for who's interested in how I got my UPS working on the first time after going through the instructions above, I made a few extra changes to the config file that aren't covered in the instructions so this maybe help you if you don't get it working.

First I made the custom USB cable as I explained in my previous comment above and checked if it worked on my PC to make sure the UPS was working and it did, then I started reading the awesome instructions that I found by chance, can't find it anymore if I do the search on Google again so I'm glad I saved it in my favorites.

Here's how my config file looks:

UPSNAME APCUPS
UPSCABLE usb
UPSTYPE usb
DEVICE 
POLLTIME 60
LOCKFILE /var/lock
SCRIPTDIR /etc/apcupsd
PWRFAILDIR /etc/apcupsd
NOLOGINDIR /etc
ONBATTERYDELAY 6
BATTERYLEVEL 5
MINUTES 3
TIMEOUT 0
ANNOY 300
ANNOYDELAY 60
NOLOGON disable
KILLDELAY 0
NETSERVER on
NISIP 127.0.0.1
NISPORT 3551
EVENTSFILE /var/log/apcupsd.events
EVENTSFILEMAX 10
UPSCLASS standalone
UPSMODE disable
STATTIME 3600
STATFILE /var/log/apcupsd.status
LOGSTATS off
DATATIME 3600
FACILITY DAEMON
UPSNAME APCUPS
BATTDATE 01/01/22
SENSITIVITY H
WAKEUP 060
SLEEP 180
LOTRANSFER  208
HITRANSFER 253
RETURNCHARGE 15
BEEPSTATE T
LOWBATT 02
OUTPUTVOLTS 230
SELFTEST 336

Using the following command to check my USB devices:
pi@raspberrypi:~ $ lsusb

Giving me the following result:

Bus 001 Device 006: ID 051d:0002 American Power Conversion Uninterruptible Power Supply
Bus 001 Device 004: ID 046d:08da Logitech, Inc. QuickCam Messanger
Bus 001 Device 005: ID 0c45:8101 Microdia 
Bus 001 Device 007: ID 0424:7800 Standard Microsystems Corp. 
Bus 001 Device 003: ID 0424:2514 Standard Microsystems Corp. USB 2.0 Hub
Bus 001 Device 002: ID 0424:2514 Standard Microsystems Corp. USB 2.0 Hub
Bus 001 Device 001: ID 1d6b:0002 Linux Foundation 2.0 root hub

Checking the systemctl status of the UPS:

pi@raspberrypi:~ $ sudo systemctl status apcupsd
● apcupsd.service - UPS power management daemon
   Loaded: loaded (/lib/systemd/system/apcupsd.service; enabled; vendor preset: enabled)
   Active: active (running) since Fri 2022-03-04 04:56:05 CET; 8h ago
     Docs: man:apcupsd(8)
  Process: 627 ExecStartPre=/lib/apcupsd/prestart (code=exited, status=0/SUCCESS)
  Process: 638 ExecStart=/sbin/apcupsd (code=exited, status=0/SUCCESS)
 Main PID: 653 (apcupsd)
    Tasks: 3 (limit: 2088)
   CGroup: /system.slice/apcupsd.service
           └─653 /sbin/apcupsd

Mar 04 12:59:07 raspberrypi apcupsd[653]: 000.0,000.0,230.0,13.59,50.00,12.0,29.2,000.0,000.0,234.0,100.0,1
Warning: Journal has been rotated since unit was started. Log output is incomplete or unavailable.

I did get a warning but I don't think that's a problem so I'll just leave it as is.

Then I checked the apcaccess:

pi@raspberrypi:~ $ apcaccess
APC      : 001,045,1049
DATE     : 2022-03-04 12:58:06 +0100  
HOSTNAME : raspberrypi
VERSION  : 3.14.14 (31 May 2016) debian
UPSNAME  : APCUPS
CABLE    : USB Cable
DRIVER   : USB UPS Driver
UPSMODE  : Stand Alone
STARTTIME: 2022-03-04 04:56:05 +0100  
MODEL    : Back-UPS CS 350 
STATUS   : ONLINE 
LINEV    : 234.0 Volts
LOADPCT  : 12.0 Percent
BCHARGE  : 100.0 Percent
TIMELEFT : 21.2 Minutes
MBATTCHG : 5 Percent
MINTIMEL : 3 Minutes
MAXTIME  : 0 Seconds
OUTPUTV  : 230.0 Volts
SENSE    : High
DWAKE    : 0 Seconds
DSHUTD   : 0 Seconds
LOTRANS  : 196.0 Volts
HITRANS  : 266.0 Volts
RETPCT   : 0.0 Percent
ITEMP    : 29.2 C
ALARMDEL : 30 Seconds
BATTV    : 13.6 Volts
LINEFREQ : 50.0 Hz
LASTXFER : No transfers since turnon
NUMXFERS : 0
TONBATT  : 0 Seconds
CUMONBATT: 0 Seconds
XOFFBATT : N/A
SELFTEST : NO
STESTI   : None
STATFLAG : 0x05000008
MANDATE  : 2009-04-02
SERIALNO : 4B0914P17694  
BATTDATE : 2021-05-12
NOMOUTV  : 230 Volts
NOMINV   : 230 Volts
NOMBATTV : 12.0 Volts
NOMPOWER : 210 Watts
FIRMWARE : 807.q8.I USB FW:q8
END APC  : 2022-03-04 12:58:27 +0100

I did have to restart the Raspberry Pi twice to get it all working though, once after the first install from the first part of the instructions and once after I set up the apache2 server to get the website working correctly.

And here's how it looks from my main PC when I use the IP address of my Raspberry Pi like this:
http://192.168.1.70/apcupsd/upsstats.cgi
Note that I had to add the upsstats.cgi to the URL to get it working.

Capture

I hope this is helpful.

@soharddbwarez
Copy link

Update to my last comment

So with the last installation everything worked out, however it did break something else that I was running on my Raspberry Pi which was using the apache2 service also and after adding this something changed that I'm not aware of that broke the Pi-hole program.

Not a big deal really because it is not necessary and I might get it working again later.

More important that I wanted to mention is that I started over new with a clean OS but now I have the latest version of Raspberry Pi OS which is the x64 version, it even runs flawless on my older Raspberry Pi 3B+ with only 1GB of memory and I didn't know if this is going to work on the new 64-bit OS but to my surprise it's exactly the same to install APCUPS on the new 64-bit OS.

So for those who want to get APCUPS working on Raspberry Pi OS x64, just use the instructions above I can assure you that it works.

@carlsmoore
Copy link

@soharddbwarez Maybe you can advise here. I've been running the APCUPS successfully for awhile now on my RPi4. Lately I've been getting these messages. How do I fix this?
Screenshot 2024-02-14 at 7 57 24 PM

@lochstar
Copy link

Got this working with my APS Easy UPS On-Line - SRV1KRIRK

UPSCABLE usb
UPSTYPE apcsmart
DEVICE /dev/ttyUSB0

Sign up for free to join this conversation on GitHub. Already have an account? Sign in to comment