Skip to content

Instantly share code, notes, and snippets.

@X3msnake
Last active March 15, 2024 21:40
Show Gist options
  • Star 7 You must be signed in to star a gist
  • Fork 3 You must be signed in to fork a gist
  • Save X3msnake/ed5337bb6b21dc5c40036b204968dfd4 to your computer and use it in GitHub Desktop.
Save X3msnake/ed5337bb6b21dc5c40036b204968dfd4 to your computer and use it in GitHub Desktop.
Antminer Beaglebone S5 - hack to use linux research

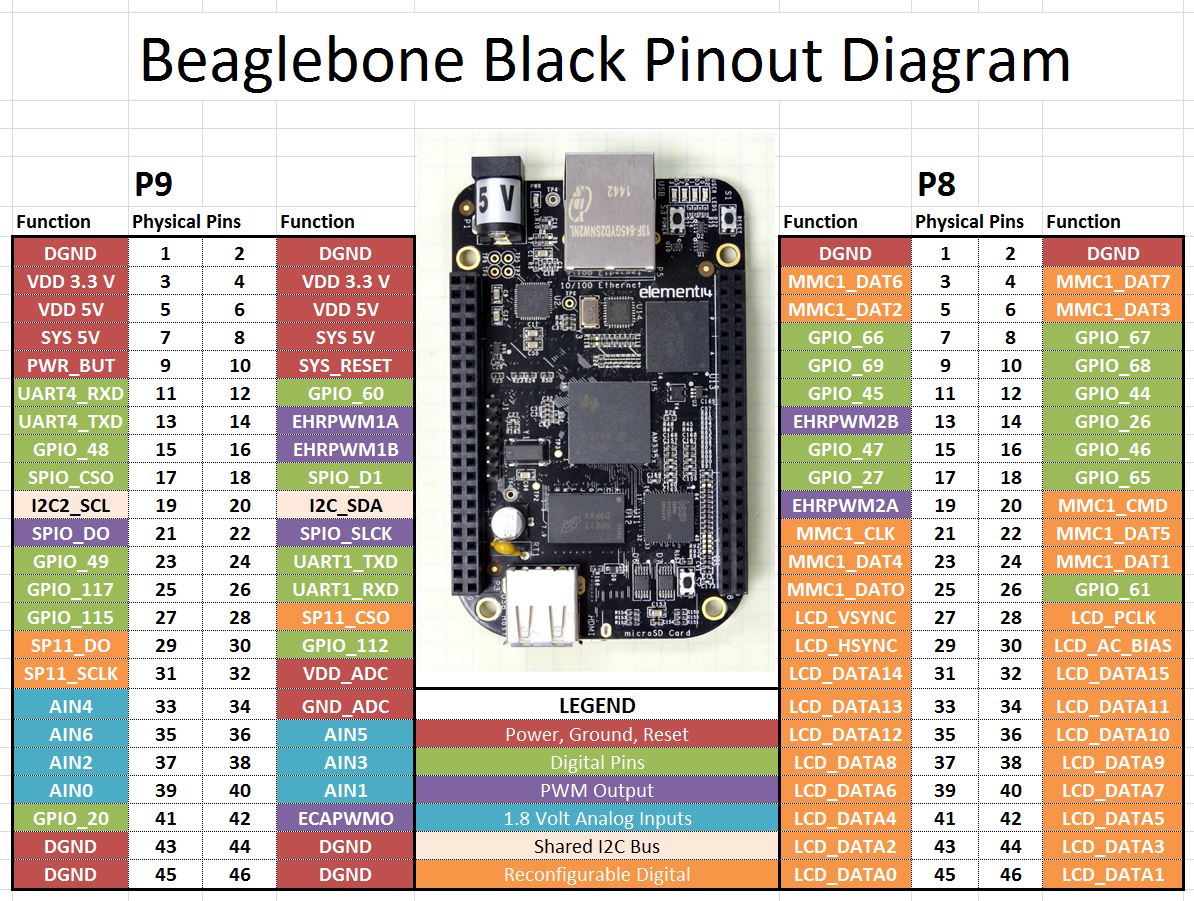
BeaglePinout BeagleSerialPins-LED Meanings Power Jack Flashing-a-Beagle

erase emmc manually: https://e2e.ti.com/support/legacy_forums/embedded/linux/f/linux-forum-read-only/398780/script-to-erase-emmc-independently-beagle-bone-black

Online board view (click image for link)

image


Beagle Reference Manual

Images

Debugging Putty

JTAG

Backup and Flashing

Resetting the root password

Bootloader

About DTS files (Device Tree Blob - Flat Device Tree)

Micron NAND Flash Memory (S5 Antminer)

Could not probe the EEPROM; something fundamentally wrong on the I2C bus.

https://e2e.ti.com/support/processors/f/791/t/297989?AM335x-EEPROM-disable

Power quick flahs - Dead from bad probing

https://www.element14.com/community/thread/41564/l/element14-branded-beaglebone-black-wont-power-on?displayFullThread=true

NAND reading with arduino

https://hackaday.com/2017/03/10/arduino-into-nand-reader/ https://www.j-michel.org/blog/2014/05/27/from-nand-chip-to-files

CAPES

@X3msnake
Copy link
Author

@pekatete

image
It's the short way across as you can see from this online schematic (link below) ;)

https://upverter.com/eda/#designId=34ecff0e0b5c858f,tool=pcb

@pekatete
Copy link

Yeah, did that - pads are connected longways so the shorting is across, but still boots straight to antminer firmware. Maybe it is the way I've prepared the sd card. I used win32diskimager after formatting the card as FAT32.

@X3msnake
Copy link
Author

X3msnake commented Sep 18, 2020

This is the method i used. it takes a bit for the beagle to enter the flash mode you ahve to leave the short for a bit untill the leds change

image

https://elinux.org/Beagleboard:Updating_The_Software#Flashing_the_eMMC

image

@pekatete
Copy link

On mine- three user leds light up as soon as I apply power, then the other lights up about 20 seconds later. I have tried releasing the contact just after the first three leds light up and also after the fourth lights up in concert, but it still boots in the antminer firmware.

@X3msnake
Copy link
Author

X3msnake commented Sep 18, 2020

If you have a complete beaglebone try flashing it this way it to make sure the image is working.
Problem with antminers is they come with lot's of stripped hardware and we never know what was removed depending on the version.

If you can access the system then maybe you can use the command line to check the sd card is redable

@pekatete
Copy link

I can ssh into it alright, but cannot see the sd card. Maybe I need to mount it first.

@X3msnake
Copy link
Author

if i remember correctly on mine i had to put power to the board, short the s3 power once for it to start and keep the short on the s2 untill it started to flash from sd card

@X3msnake
Copy link
Author

Can you post a picture of your antminer front and back

@pekatete
Copy link

You mean the beaglebone?
image
image

@pekatete
Copy link

I actually can see the sd card in the terminal. Sorry about the misinformation.

@pekatete
Copy link

here's the relevant fdisk -l

Disk /dev/mmcblk0: 31.9 GB, 31914983424 bytes
239 heads, 36 sectors/track, 7244 cylinders
Units = cylinders of 8604 * 512 = 4405248 bytes

    Device Boot      Start         End      Blocks  Id System

/dev/mmcblk0p1 * 1 857 3682304 83 Linux

@X3msnake
Copy link
Author

X3msnake commented Sep 18, 2020

Your's looks like it has all the hardware for USB unlike mine
If you have some soldering skills you can try adding a usb port and trying the USB way described on the beagle pages

@pekatete
Copy link

Not too good at soldering (though I have all the kit!), but could try, just need to get the the USB bracket to solder on!
The other route is using the web interface to upload. I can access it OK but still unsure whether my modified filesystem will work as that'll kill the web interface without the SD card booting fallback.

@X3msnake
Copy link
Author

I remember something about the SDcard needing to have some special formatting or something.

@X3msnake
Copy link
Author

It was this

image

NOTE: To mark a partition as active in Windows 7: Open command prompt and enter the following commands: diskpart -> list disk -> select disk x (where x is the uSD card) -> list partition -> select partition 1 (assuming the uSD card has 1 partition) -> active.

@pekatete
Copy link

It is marked as active - as you can see from the fdisk -l output above.

I read somewhere that you had to format it as FAT32 then copy the image. But the link above contains the source link and that does it all in linux. It's the complete thing, from u-boot to filesystem, though it still leverages the sd card.
I'll setup a new virtual machine and get all the toolchain, build everything then I'm sure to find a way to pack it like bitmaim did, then upload via the web interface. That's the weekend's plan. Wish me luck.

@X3msnake
Copy link
Author

Good luck.
Let me know the result so others can benifit from your finding in the future ;)

@mpictor
Copy link

mpictor commented Sep 23, 2020

Header J1 is a serial port; pretty sure I was able to interact with uboot and the linux terminal through that, so if userland gets borked you have that to fall back on.

Regarding the size of initramfs.bin.SD3, is it possible that it's padded and the original had the padding stripped off?

@pekatete
Copy link

pekatete commented Sep 23, 2020

@mpictor

Header J1 is a serial port; pretty sure I was able to interact with uboot and the linux terminal through that, so if userland gets borked you have that to fall back on.

That is correct. Saying that, I have been on exactly that today and can only get garbage! I tried both the PL2303 (had to install old driver on Win10) and CP2101, both no luck. I even tried different terminals (Putty, Realterm and pyserial) and baudrates - read somewhere it needs ttl signal inversion.

Regarding the size of initramfs.bin.SD3, is it possible that it's padded and the original had the padding stripped off?

Again correct. It was padded and I had to remove the padding to be able to mount it (for changes). Problem is, when I re-ack it, it is larger than the original even though I made no changes to the file system.

I decided to explore re-compiling uboot, & the kernel and adding a new filesystem. Looks like this will work to upload through the UI, just want to finish off re-instating the UI upload on the new file system.

Also with regard to dtb's, not sure whether you resolved that), these are compiled with the kernel - there's an archive in the deploy folder

EDIT:

  1. I must have been tired when I wired the J1 header as I placed the GRN on pin 2 and RX/TX on 5 and 6 as apposed to 1, 4 and 5 respectively - (can't think why, but I was working with arrays all day!)

  2. As for initramfs.bin.SD3 being padded, I misread your comment (and possibly you mine) - I compared it with both the original when padded and ****.SD1 which was not padded.

As I have a few spare BBB's ripped from old miners, I'll take the dip on one of them with my contraptions later today or sometime over the coming weekend now that I have access to the serial over J1

@pekatete
Copy link

pekatete commented Sep 28, 2020

Just to update - I have run into a mind block.

  1. I use the mainline method to cross compile kernel 5.4.61
  2. I then install all the modules compiled with the kernel and also unzip all the DTBs into the /boot directory of the file system.
  3. When I re-pack everything, I get a file system that is 45MB (compressed) , whereas the MTD partition is only 20MB

I think the default configuration file needs to be trimmed to exclude most modules, but for now, I am unsure which ones to leave out. I have therefore put this on the back-burner for now until I can get a more streamlined configuration for the kernel.

PS: Since I can, in theory, just update the kernel, I'll try this later today when I get back and update as and when.
EDIT: scrub that PS - I'd need to install the modules for that to work!

@joquers
Copy link

joquers commented Sep 28, 2020

I'm also trying to get to work the antminer BBBs to work with custom firmware (actually my plan is to run openwrt along with a usb wifi adapter or a wifi cape to use the BBB as a wireless repeater

@X3msnake
Copy link
Author

X3msnake commented Jul 8, 2021

Recently found this about resetting a beaglebone password. not sure it works for all but it is a good thing to know

http://mmmsoftware.blogspot.com/2014/01/recovering-root-password-on-beaglebone.html

To recover the root password of a BeagleBone Black, you'll need the following items:

  • A 5V, minimum 1 A dedicated power source (you shouldn't really be powering the board off of the micro USB port)
  • An SD card (and reader, of course)
  • An FTDI USB-to-serial cable for accessing the debug serial port of the BeagleBone Black.

Once you've acquired all of the required items above, perform the following steps:

  • Flash the SD card with an image that you can obtain from BeagleBone.org/GettingStarted.
  • Insert the SD card into the unpowered BeagleBone Black.
  • Apply power.
  • The BeagleBone Black should boot from the SD card (assuming that you've flashed the correct image)
  • Connect the FTDI serial cable to the board and your compter, and open your serial client of choice to connect to the board.
  • Hit enter once or twice, and a command prompt should come up, assuming you've used the correct settings:
  • 115200
  • 8N1
  • Log in using root and a blank password (should be the default on the SD card image that you downloaded from the BeagleBoard.org website.)

You're now logged into the image running on the SD card. However, we can't change the root password now because that will only change it for the root user on the SD card image. We need to change it for the permanent image stored on the BeagleBone Black's embedded eMMC flash. Being logged in as you are, perform the following steps to mount the eMMC image and change the password for that image's root user:

  • Mount the eMMC flash: mount /dev/mmcblk1p2 /media/card
  • Change the root of the file system to be the partition on the eMMC flash which you just mounted: chroot /media/card
  • Change the password of the root user to something you know: passwd root
  • Exit out of the changed root: exit
  • Shutdown the BeagleBone Black : shutdown -h now
  • Disconnect the power from the board
  • Eject the microSD card.
  • Reconnect the power to the board
  • Watch the board boot up, and log in as root. You should be able to log in with the password that you just set.

and this: https://groups.google.com/g/beaglebone/c/zKMGGQWCOTw

Try to login as the normal user and use sudo to reset the root password,
there's a chance this will work (it depends on the image you're running)
and it's the easiest solution. If you can't connect via ssh, hook a
keyboard and monitor to the BBB, since most images are setup to
automatically log you in when they boot.

Otherwise, if you are not familiar with Linux, just reflash the BBB.

If you are familiar with Linux and uBoot, you can pass init=/bin/bash to
the kernel as a command line argument (using the serial port, or by
editing uEnv.txt if you boot from uSD). This will let you boot into
your system as root and you can reset the root password.

If you are booting from a uSD card, mount it in another Linux system and
edit the /etc/shadow file to reset or remove your password.

If you're booting from eMMC, boot from uSD instead, the latest Debian
image should work well for this:

http://beagleboard.org/latest-images/

https://s3.amazonaws.com/beagle-debian/bone-debian-7.4-2014-03-04-2gb.img.xz

...again, edit the /etc/shadow file on the eMMC and reset/remove the
root password.

@Demianra
Copy link

Demianra commented Jan 7, 2022

Hi people i'm at this project like you, any of you can make it? As far by now i only can boot from SD a older version of Debian 7.5 2GB version, at this point for me the most sense option it´s to boot any version compatible because eMMc for any reason can´t be write with any BBB image i can found on web.

I´ll post here what image works for me, if it works for any of you.

Direct link:
https://debian.beagleboard.org/images/bone-debian-7.5-2014-05-14-2gb.img.xz

User "root" without a password.

Where i can found it with other images, but flasher gave me error with a mounting point that didin´t exists.

https://beagleboard.org/latest-images

5V pin works but USB connector don´t need to put many components and by now isn´t my priority.

Best regards.

@Demianra
Copy link

Demianra commented Jan 7, 2022

Flasher script gaves me this error:

root@beaglebone:/opt/scripts/tools# sudo ./beaglebone-black-eMMC-flasher.sh

debug copying: [/dev/mmcblk0] -> [/dev/mmcblk1]
NAME MAJ:MIN RM SIZE RO TYPE MOUNTPOINT
mmcblk0 179:0 0 7.4G 0 disk
|-mmcblk0p1 179:1 0 96M 0 part /boot/uboot
`-mmcblk0p2 179:2 0 1.6G 0 part /

Error: [/dev/mmcblk1] does not exist
writing to [/dev/mmcblk1] failed...

umount: /dev/mmcblk1p1: not found
umount: /dev/mmcblk1p2: not found
root@beaglebone:/opt/scripts/tools#


These are the mounting points on system

root@beaglebone:/opt/scripts/tools# mount
sysfs on /sys type sysfs (rw,nosuid,nodev,noexec,relatime)
proc on /proc type proc (rw,nosuid,nodev,noexec,relatime)
udev on /dev type devtmpfs (rw,relatime,size=10240k,nr_inodes=30746,mode=755)
devpts on /dev/pts type devpts (rw,nosuid,noexec,relatime,gid=5,mode=620)
tmpfs on /run type tmpfs (rw,nosuid,relatime,size=49824k,mode=755)
/dev/mmcblk0p2 on / type ext4 (rw,noatime,errors=remount-ro,data=ordered)
tmpfs on /dev/shm type tmpfs (rw,nosuid,nodev,relatime)
tmpfs on /sys/fs/cgroup type tmpfs (rw,nosuid,nodev,noexec,relatime,mode=755)
cgroup on /sys/fs/cgroup/systemd type cgroup (rw,nosuid,nodev,noexec,relatime,release_agent=/lib/systemd/systemd-cgroups-agent,name=systemd)
cgroup on /sys/fs/cgroup/cpu,cpuacct type cgroup (rw,nosuid,nodev,noexec,relatime,cpuacct,cpu)
cgroup on /sys/fs/cgroup/memory type cgroup (rw,nosuid,nodev,noexec,relatime,memory)
cgroup on /sys/fs/cgroup/blkio type cgroup (rw,nosuid,nodev,noexec,relatime,blkio)
systemd-1 on /proc/sys/fs/binfmt_misc type autofs (rw,relatime,fd=24,pgrp=1,timeout=300,minproto=5,maxproto=5,direct)
mqueue on /dev/mqueue type mqueue (rw,relatime)
debugfs on /sys/kernel/debug type debugfs (rw,relatime)
tmpfs on /run/user type tmpfs (rw,nosuid,nodev,noexec,relatime,size=102400k,mode=755)
tmpfs on /run/lock type tmpfs (rw,nosuid,nodev,noexec,relatime,size=5120k)
securityfs on /sys/kernel/security type securityfs (rw,relatime)
fusectl on /sys/fs/fuse/connections type fusectl (rw,relatime)
/dev/mmcblk0p1 on /boot/uboot type vfat (rw,relatime,fmask=0022,dmask=0022,codepage=437,iocharset=iso8859-,shortname=mixed,errors=remount-ro)

The lack of this point for me it´s the main problem here: "[/dev/mmcblk1]"

@AdamM68
Copy link

AdamM68 commented Jun 9, 2022

Have You solved the problem how to flash linux(debian) to Antminer BBB ?
I have one antminer BBB, soldered switch to S2, hold S2 during powering and ....it is still loading antminer software :(
Have You found any trick ?

@X3msnake
Copy link
Author

X3msnake commented Jun 9, 2022 via email

@AdamM68
Copy link

AdamM68 commented Jun 9, 2022

:( so antminer is going to a dustbin . sad

@Demianra
Copy link

Demianra commented Jul 7, 2022

Have You solved the problem how to flash linux(debian) to Antminer BBB ? I have one antminer BBB, soldered switch to S2, hold S2 during powering and ....it is still loading antminer software :( Have You found any trick ?

Read mi post from Jan 04, i can boot debian 7.5 from a SD, isn´t perfect but maybe works for your project.

Here the link with Debian 7.5

https://debian.beagleboard.org/images/bone-debian-7.5-2014-05-14-2gb.img.xz

User "root" without a password.

@Ga-Ol-St
Copy link

Ga-Ol-St commented Mar 15, 2024

Additional updates about board which I did found by hardware and software investigations and digging documentation.

All information which I will put here is relevant for old boards BB_V1.4 and BB_V1.5 sourced from old Antminers S5.

I have them on hand and did test this and burn 1 of them during hardware investigation :-)
Judging by photos this information should be relevant for earlier boards and probably latest,
But you should understand that if you fry your board - it's your fault :-)
My Goal is to give them a second life with latest Debian for different tasks like drive 3D printer with klipper, do RS-485 MQTT bridge, use them in home automation, data logging, etc ...
I still have 8 of them alive.

Basic statements:

  • "Boot" button will not help you without additional tweaks.
  • Board based on AM3352 Cortex A8 CPU (this CPU don't have additional PRU cores as AM3358)
  • Board have 512Mb DDR3 memory
  • Board uses NAND flash with 256Mb memory (2Gbit size) and it's partitioned to 9 partitions (SPL, 3xSPL backups, U-boot, Bootenv, FDT, KERNEL, ROOT, CONFIG)
  • I went thru all the hell to do full NAND restoration successfully - but it's not worth it when uSD is quicker and cheap.
  • Board don't have EEPROM
  • Board can work without Hashing control board.
  • Board have PCB RevB5 - it can be seen thru black silk screen on back side under missing power input, but not sure if it's truth.
  • Board don't have Barrell power input but it can be soldered, or you can use pins (P9_01+P9_02) as a GND and (P9_05 + P9_06) as +5v power input
  • Board require 5v, 1A DC power, but usually consuming only 0.1-0.2A
  • Board have Auto-start, if it's see power - it will try to start for 5 sec, if CPU hardware can't start - PMIC will shutdown itself.
  • To see some results you need Serial connection to board, if pins are missing - add them (only 3 needed ) connector J1, pins 1(Gnd), 4(rx), 5{tx)

More serious details and workarounds.

Why boot button is not helping ?

When you press (or short) boot button it should change boot order by putting SYSBOOT[2] flag to a low state,
it's doing this by connecting GND and LCD_DATA2(P8_43) pin via 100oHm resistor (R75)
(connection GND->BOOTBTN->R75->LCD_DATA2)
but that LCD_DATA2(P8_43) pin in Antminer boards is already in low state, so button don't have any effects.

Boot description

From factory this board have following hardwired boot flags: SYSBOOT[4:0] = 10011h
Which setting board to this boot order: NAND NANDI2C MMC0 UART0
So the board always loading first stage loader from NAND device, if NAND is there and in good shape then first stage loader will start (SPL U-BOOT), SPL will load second stage loader (Main U-BOOT).
When main U-Boot is progressing it will search for uSD card and if found it and considered a valid - it will start loading from there, if it's considered invalid - it will continue boot process from NAND.

If NAND is not in good shape - you stuck, SPL not loaded and board doesn`t show anything on Serial console, just Red LED will be glowing this indicate that second power rail (VLDO2) of TPS65217C is working.

How to tweak boot button and boot order

There are 2 options: permanent and temporary.
Permanent: move resistor from R93 (Front of a board, around P8_41 pin) to R68 empty place (Back of a board, around P8_41), this will make SYSBOOT[2] High by default and will switch default boot order to SYSBOOT[4:0] = 10111h
new default boot order: MMC0 SPI0 UART0 USB0
If button will be (pressed) shorted - you will get old vanilla boot order: NAND NANDI2C MMC0 UART0

Temporary solution: you can temporary switch that SYSBOOT[2] flag by pooling P8_43 to High state,
for that you need a peace of wire and 1K (1000 oHm) resistor.
Power off the board and create following connection
P9_03(+3.3v)------wire------1k resistor ----wire ------- P9_43(LCD_DATA2)

After you get new boot order and try to start board without uSD card in serial console you should see that board is constantly sending "C" characters - this is a good sign that you did switch boot order, board didn't found uSD and SPI sources and vent to UART Boot mode, BTW This UART mode can be used to boot without uSD card at all.
Now if you did permanent solution - you can short boot button and give power - board will be booting from NAND.
If you did use temporary solution - you can remove it and board will return to old style boot from NAND.

Now when you have Full uSD loading capabilities - you can try different images, but many will not work :-)

Why many images don't want to load:

Simple answer - they can't recognize your board.
Board don't have EEPROM which is storing information about board type and hardware revision so Bootloaders refusing to load, if you will add EEPROM chip U7 and 2 additional missing components R156 and C152, then write to EEPROM board data from BeagleBone black - almost all images will start trying to boot (you will see boot sequence) but most probably they will die in process because of trying to access eMMC flash which is not there.

Why some images can load without EEPROM

Simply because they don't care at all and always loading single hardware definition, usually this kind of images are referenced as "Custom board images", but they can be unstable because hardware definitions which was put in that image can be incompatible or interfere with your board.

Where to get good image for booting

There are 2 options,
First options just search and tryout, most probable candidates should have support for NAND flash and am335x CPU or which don't have eMMC support at all - This board is using good portion of pins for NAND flash which are usually used for eMMC flash - so here is a conflict,
Second option is to build your own "Custom board image" anyway you like (Buildroot, Yocto, etc..) but be sure that you did apply special patches which are disabling EEPROM detection and using some "default" board, then add hardware definition (DTS) to that "default" board. Then compile, build, create uSD Image and try it out. Currently I have a work in progress to create custom image with U-Boot 2023.10 and Debian 11.7 (Kernel 5.10.162), but still there are some issues with hardware definitions which make Kernel to die, when I will have stable image - I will post it, But don't wait for it from me - my nerves are on edge from this.

Where to get correct hardware definitions for board (DTS - Device tree source)

You can extract it from uSD images for corresponding Antminer, usually these boards default to "A335BLNT" board name when system try to detect it, Then U-Boot is loading corresponding DTB file for this kind of board, those DTB files are located on second partition, or analyze your U-boot environment to understand where it's getting this file. Don't be fooled by filename like "am335x-beaglebone.dtb" or "am335x-boneblack.dtb" - yes their content have some parts from "beaglebone" or "beaglebone black" but those files are custom builds with additional stuff like "i2c" bus with "asic-board" hardware in it (Hashing control board). When you will get that DTB file you can decompile to human readable format with "dtc" tools.

Sources of information

Most information was obtained form TI documents and BeagleBone forums, docs, schematics.
some documents and links:
"AM335x and AMIC110 Sitara™ Processors Technical Reference Manual"
"AM3352 datasheet"
https://www.ti.com/product/AM3352
https://github.com/beagleboard/beaglebone-black (use TAGs to get access to old revision)
https://github.com/bitmaintech/Antminer_firmware
https://elinux.org/BeagleBoardRecovery

I hope this info will help somebody to move further or it will help to unbrick the board.

Sign up for free to join this conversation on GitHub. Already have an account? Sign in to comment