YOLODetectionBlockV3
get_yolov3
yolo3_darknet53_custom
YOLOV3 类被创建实例的 case
实例被调用的 case
在 YOLO3DefaultTrainTransform 中
        with autograd.train_mode():
_, self._anchors, self._offsets, self._feat_maps, _, _, _, _ = net(self._fake_x)整个 YOLOV3 的 building blocks 有 stages, transitions (_conv2d), yolo_blocks (YOLODetectionBlockV3), yolo_outputs (YOLOOutputV3)
            # note that anchors and strides should be used in reverse order
            for i, stage, channel, anchor, stride in zip(
                    range(len(stages)), stages, channels, anchors[::-1], strides[::-1]):
                self.stages.add(stage)
                block = YOLODetectionBlockV3(
                    channel, norm_layer=norm_layer, norm_kwargs=norm_kwargs)
                self.yolo_blocks.add(block)
                output = YOLOOutputV3(i, len(classes), anchor, stride, alloc_size=alloc_size)
                self.yolo_outputs.add(output)
                if i > 0:
                    self.transitions.add(_conv2d(channel, 1, 0, 1,
norm_layer=norm_layer, norm_kwargs=norm_kwargs))- 因为采用了 Feature Pyramid, 所以这里的 anchors 和 strides 才是逆序使用的, 也就是先从 feature map 面积最小的开始
def hybrid_forward(self, F, x, *args):- 输入的 x 是 Feature map, 大小为 (B, C, H, W)
- 输入的 args 是一个 List, 训练的时候为 (gt_boxes, obj_t, centers_t, scales_t, weights_t, clas_t)
- 输出: 训练时只会输出各种 loss, 即 (obj_loss, center_loss, scale_loss, cls_loss); inference 时, 返回 (B, N, 6) 的 mx.ndarray, 最后一维依次是 (cid, score, xmin, ymin, xmax, ymax)
        routes = []
        for stage, block, output in zip(self.stages, self.yolo_blocks, self.yolo_outputs):
            x = stage(x)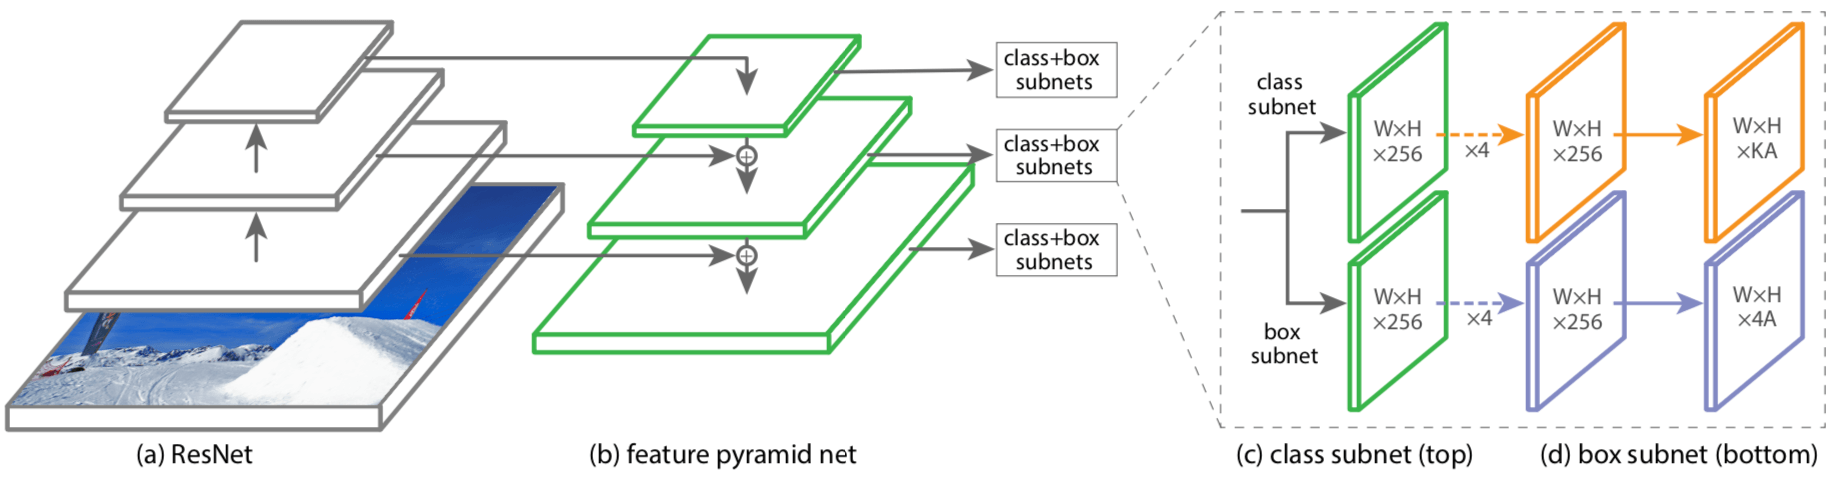
routes.append(x)- routes 里面存的就是由浅到深每个 stage 输出的 feature map, 这部分代码执行完毕后, 一定要注意, x 已经是 Darknet53 本身最末端的输出了. 因为 YOLO3 的 Backbone 其实是 Darknet53 + Feature Pyramid, 这一步是为了后续实现 Feature Pyramid 而做准备的. 下图是采用了 Feature Pyramid 的 RetinaNet 的示意图.
        # the YOLO output layers are used in reverse order, i.e., from very deep layers to shallow
        for i, block, output in zip(range(len(routes)), self.yolo_blocks, self.yolo_outputs):
x, tip = block(x)- 从 DarknetBasicBlockV3 结构图 可以看出, 假设输入的 x 是 (B, C, H_i, W_i) 的 mx.ndarray, 输出的 x 还是 (B, C, H_i, W_i) 的 mx.ndarray, 而 tip 则是 (B, 2C, H_i, W_i) 的 mx.ndarray
            if autograd.is_training():
                dets, box_centers, box_scales, objness, class_pred, anchors, offsets = output(tip)
                all_box_centers.append(box_centers.reshape((0, -3, -1)))
                all_box_scales.append(box_scales.reshape((0, -3, -1)))
                all_objectness.append(objness.reshape((0, -3, -1)))
                all_class_pred.append(class_pred.reshape((0, -3, -1)))
                all_anchors.append(anchors)
                all_offsets.append(offsets)
                # here we use fake featmap to reduce memory consuption, only shape[2, 3] is used
                fake_featmap = F.zeros_like(tip.slice_axis(
                    axis=0, begin=0, end=1).slice_axis(axis=1, begin=0, end=1))
                all_feat_maps.append(fake_featmap)
            else:
                dets = output(tip)
            all_detections.append(dets)
如果是在 training 阶段:
- 从
YOLOOutputV3中可以知道, 在 training 阶段, output(tip) 的输出分别如下:- dets 是 (B, H_i x W_i x num_anchors, 4) 的 mx.ndarray
- box_centers 是 (B, H_i x W_i, num_anchors, 2) 的 mx.ndarray
- box_scales 是 (B, H_i x W_i, num_anchors, 2) 的 mx.ndarray
- objness 是 (B, H_i x W_i, num_anchors, 1) 的 mx.ndarray
- class_pred 是 (B, H_i x W_i, num_anchors, num_class) 的 mx.ndarray
- anchors 是 (1, 1, 3, 2) 这样的 mx.ndarray
- offsets 是 (1, H_i x W_i, 1, 2) 的 mx.ndarray, 存的是作为当前 feature map 以行优先逐个扫描整个 feature map 单索引的 index
all_box_centers这个 List append 的box_centers.reshape((0, -3, -1))是 (B, H_i x W_i x num_anchors, 2) 的 mx.ndarrayall_box_scales这个 List append 的box_scales.reshape((0, -3, -1))是 (B, H_i x W_i x num_anchors, 2) 的 mx.ndarrayall_objectness这个 List append 的objness.reshape((0, -3, -1))是 (B, H_i x W_i x num_anchors, 1) 的 mx.ndarrayall_class_pred这个 List append 的class_pred.reshape((0, -3, -1))是 (B, H_i x W_i x num_anchors, num_class) 的 mx.ndarrayall_anchors这个 List append 的anchors是 (1, 1, 3, 2) 的 mx.ndarray, 因为这里的 anchors 是 output block 输出的, 而 output block 是按照 feature map 的大小逆序被调用的, 因此在这个 List 中, anchor 面积最大的是在最前面, 浅层面积小的 anchor 在最后all_offsets这个 List append 的offsets是 (1, H_i x W_i, 1, 2) 的 mx.ndarray, 因为 Pyramid Feature 逆序, 都是面积最小的 feature map 优先- tip 是 (B, 2C, H_i, W_i) 的 mx.ndarray, fake_featmap 是一个 (1, 1, H_i, W_i) 的 mx.ndarray
all_feat_maps这个 List append 的fake_featmap是 (1, 1, H_i, W_i) 的 mx.ndarrayall_detections这个 List append 的 append 的dets是 (B, H_i x W_i x num_anchors, 4) 的 mx.ndarray
如果是在 test 阶段:
- 得到的 dets 是 (B, num_class x H x W x num_anchors, 6) 的 mx.ndarray, 最后一维的 6 个元素分别是 id, score 和 bbox
- all_detections append 就是 dets
            if i >= len(routes) - 1:
break- i 最大就可以到 len(routes) - 1, 也就是最后一次就不跑后面的代码了, 因为这个循环后面的代码是用来完成特征上采样以及融合的, 最后一层自然就不用了
            # add transition layers
            x = self.transitions[i](x)
            # upsample feature map reverse to shallow layers
            upsample = _upsample(x, stride=2)
            route_now = routes[::-1][i + 1]
x = F.concat(F.slice_like(upsample, route_now * 0, axes=(2, 3)), route_now, dim=1)- self.transitions[i] 就是做一次 Conv2D(c=channel,k=1,p=0,s=1) + BN + LeakyReLU(0.1) 的特征变换
- upsample 就是将当前的 feature map 也就是 x 上采样
- route_now 就是与当前 feature map 大小对应的原 feature map List (routes) 中的 feature map
- 最后得到的 feature map x 是将上采样后的 feature map 和 原来 darknet 相应 stage 输出的 feature map concat 起来
基本上 Pyramid Feature Network 的结构是这样的:
1. x_1 = stage_1(img)
2. x_2 = stage_2(x_1)
3. x_3 = stage_3(x_2)
4. x'_3, tip_3 = block_3(x_3)                                => dets_3 = output_3(tip_3)
5. x'_2, tip_2 = block_2(upsample(transition_2(x'_3)) ⊙ x_2) => dets_2 = output_2(tip_2)
6. x'_1, tip_1 = block_1(upsample(transition_1(x'_2)) ⊙ x_1) => dets_1 = output_1(tip_1)
- stages 负责抽取基本的 features
- blocks 负责将输入的 concat 得来的 features 做融合 (特征变换) 使其适合做 Prediction, 简而言之, 为 Prediction 做准备的特征变换
- transitions 也是做个特征变换
- upsample 顾名思义就是上采样
- outputs 顾名思义就是做 Prediction
        if autograd.is_training():
            # during training, the network behaves differently since we don't need detection results
            if autograd.is_recording():
                # generate losses and return them directly
                box_preds = F.concat(*all_detections, dim=1)
                all_preds = [F.concat(*p, dim=1) for p in [
                    all_objectness, all_box_centers, all_box_scales, all_class_pred]]
                all_targets = self._target_generator(box_preds, *args)
return self._loss(*(all_preds + all_targets))- box_preds: 如果是在 training 阶段, 因为 all_detections 是 List of mx.ndarray, 里面每个元素都是 (B, H_i x W_i x num_anchors, 4), 存的是 [xmin, ymin, xmax, ymax]. concat 之后得到的 box_preds 是 (B, H_1 x W_1 x num_anchors + ... + H_3 x W_3 x num_anchors, 4) 的 mx.ndarray
- all_preds 是一个 List of List of mx.ndarray, 里面每个元素如下:
- all_objectness 转化来的 mx.ndarray 形状为 (B, H_1 x W_1 x num_anchors + ... + H_3 x W_3 x num_anchors, 1)
- all_box_centers 转化来的 mx.ndarray 形状为 (B, H_1 x W_1 x num_anchors + ... + H_3 x W_3 x num_anchors, 2)
- all_box_scales 转化来的 mx.ndarray 形状为 (B, H_1 x W_1 x num_anchors + ... + H_3 x W_3 x num_anchors, 2)
- all_class_pred 转化来的 mx.ndarray 形状为 (B, H_1 x W_1 x num_anchors + ... + H_3 x W_3 x num_anchors, num_class)
- box_preds 是 (B, H_1 x W_1 x num_anchors + ... + H_3 x W_3 x num_anchors, 4) 的 mx.ndarray, args 是 (gt_boxes, obj_t, centers_t, scales_t, weights_t, clas_t), self._target_generator 函数具体的输入如下:
- box_preds 是 (B, H_1 x W_1 x num_anchors + ... + H_3 x W_3 x num_anchors, 4) 的 mx.ndarray
- x 是 YOLOV3 的 hybrid_forward 中的 x, (B // 2, 3, H, W) 的 mx.ndarray
- gt_boxes 是 (B, M_max, 4) 的 mxnet.ndarray,是 [xmin, ymin, xmax, ymax] 的 Corner 编码
- obj_t 是 (B, H_3 x W_3 x 3 + H_2 x W_2 x 3 + H_1 x W_1 x 3, 1) 的 mx.ndarray
- centers_t 是 (B, H_3 x W_3 x 3 + H_2 x W_2 x 3 + H_1 x W_1 x 3, 2) 的 mx.ndarray
- scales_t 是 (B, H_3 x W_3 x 3 + H_2 x W_2 x 3 + H_1 x W_1 x 3, 2) 的 mx.ndarray
- weights_t 是 (B, H_3 x W_3 x 3 + H_2 x W_2 x 3 + H_1 x W_1 x 3, 2) 的 mx.ndarray
- clas_t 是 (B, H_3 x W_3 x 3 + H_2 x W_2 x 3 + H_1 x W_1 x 3, num_class) 的 mx.ndarray
- self._target_generator 函数的输出 all_targets 是一个 tuple, 具体内容如下
- objectness 是 (B, N, 1) 的 mx.ndarray, N = H_1 x W_1 x num_anchors + ... + H_3 x W_3 x num_anchors
- center_targets 是一个 (B, N, 2) 的 全零 mx.ndarray, N = H_1 x W_1 x num_anchors + ... + H_3 x W_3 x num_anchors
- scale_targets 是一个 (B, N, 2) 的 全零 mx.ndarray, N = H_1 x W_1 x num_anchors + ... + H_3 x W_3 x num_anchors
- weights 是一个 (B, N, 2) 的 全零 mx.ndarray, N = H_1 x W_1 x num_anchors + ... + H_3 x W_3 x num_anchors
- class_targets 是一个 (B, N, num_class) 的 mx.ndarray, 数值都是 -1, N = H_1 x W_1 x num_anchors + ... + H_3 x W_3 x num_anchors
- class_mask 是 (B, N, num_class) 的 mx.ndarray, 匹配 anchor 上的数值为 1, 其余为 0, N = H_1 x W_1 x num_anchors + ... + H_3 x W_3 x num_anchors
- self._loss(*(all_preds + all_targets)) 得到的是:
            # return raw predictions, this is only used in DataLoader transform function.
            return (F.concat(*all_detections, dim=1), all_anchors, all_offsets, all_feat_maps,
                    F.concat(*all_box_centers, dim=1), F.concat(*all_box_scales, dim=1),
                    F.concat(*all_objectness, dim=1), F.concat(*all_class_pred, dim=1))
只有在 Training 但不记录梯度, 也就是只有在用 fake data 第一次产生 anchor 时, 这一段代码才会被运行, 依次返回的内容如下:
F.concat(*all_detections, dim=1)得到的是 (B, H_1 x W_1 x num_anchors + ... + H_3 x W_3 x num_anchors, 4) 的 mx.ndarray, 这其实就是再之前代码的 box_predsall_anchors是 List of mx.ndarray, 每个元素大小为 (1, 1, 3, 2), 因为这里的 anchors 是 output block 输出的, 而 output block 是按照 feature map 的大小逆序被调用的, 因此在这个 List 中, anchor 面积最大的是在最前面, 浅层面积小的 anchor 在最后- all_offsets 是 List of mx.ndarray, 每个元素大小为 (1, H_i x W_i, 1, 2), 而且是面积最小的 (1, H_3 x W_3, 1, 2) 在最前面, 因为 Feature Pyramid, 存的是作为当前 feature map 以行优先逐个扫描整个 feature map 单索引的 index
- all_feat_maps 是 List of mx.ndarray, 里面每个元素是 fake_featmap, 大小为 (1, 1, H_i, W_i), 而且是面积最小的 (1, H_3 x W_3, 1, 2) 在最前面, 因为 Feature Pyramid, 逆序
F.concat(*all_box_centers, dim=1)得到的是 (B, H_1 x W_1 x num_anchors + ... + H_3 x W_3 x num_anchors, 2) 的 mx.ndarrayF.concat(*all_box_scales, dim=1)得到的是 (B, H_1 x W_1 x num_anchors + ... + H_3 x W_3 x num_anchors, 2) 的 mx.ndarrayF.concat(*all_objectness, dim=1)得到的是 (B, H_1 x W_1 x num_anchors + ... + H_3 x W_3 x num_anchors, 1) 的 mx.ndarrayF.concat(*all_class_pred, dim=1)得到的是 (B, H_1 x W_1 x num_anchors + ... + H_3 x W_3 x num_anchors, num_class) 的 mx.ndarray