Have a repository on GitHub? Planning on making a repository on GitHub? This checklist is intended to introduce you to various features that may help you make the most of your GitHub repository with specific recommendations for C# repositories.
These are only suggestions.
They may not be appropriate for all repositories.
They are in no particular order.
Click each item to expand for more information.
Are you happy with the current URL (account, name, default branch)?
Make sure you are happy with the name of your repo and the account your repo is under. You can rename and transfer ownership of repositories, but that will change the URL of your repo, which may cause confusion for your community.
GitHub has organization accounts, so if you already have a group of dedicated developers or intend to grow a community around the repository, having the repository be under an organization's account may be more appropriate than a personal account.
See more information on GitHub organization here.Also, make sure you are happy with the name of your default branch.
"master"has been a common name for default branches, but most repositories are using"main"now. Changing branch names in GitHub is very easy, but it is still easier to start out with your prefered default branch name rather than having to change to it.
Here is GitHub's documentation on changing branch names.
Do you have a LICENSE?
If you don't already have one, you should add a
LICENSEfile to the root of your repository.
See GitHub's guide on licensing here.
Do you have a .gitignore?
Don't include unnecessary content in your repository. Your repository should include the source code for your project. It should not include compilation results (the
binandobjfolders), compiler generated.xmlfiles, user-specific IDE settings (such as the.vsdirectory created by Visual Studio), etc. The binaries (compilation results) belong in releases and/or packages rather than the files of your repository.The
.gitignorefile is how you can control what files are included or excluded from your repository. For C# repsoitories, if you use GitHub's online interface, you want to choose theVisual Studiooption when you create your repository:
If you need to add or update a
.gitignorefile to an existing repsoitory, you copy the latest version of theVisual Studiotemplate here: https://github.com/github/gitignore/blob/master/VisualStudio.gitignore

Do you have a .gitattributes?
.gitattributesis a settings file forgit. The most common use is to standardize line endings, so that when the code is cloned it will have the appropriate line endings based on the environment from which it is cloned. For C# repositories, you generally just want to use this as your.gitattributes:* text=autoHowever, if you do have any binary files you should add explicit entries for those types of files to make sure they do not get corrupted. For example, if you have a
.pngimage file in your repository you could add this line to your.gitattributes:*.png binary
.gitattributesfiles can especially help if you have content that requires specific line endings such as Linux shell scripts.
Do you have a README.md?
If you don't already have one, you should add a
README.mdfile to the root of your repository. GitHub will show the contents of theREADME.mdfile located in the current directory without users having to open that file explicitily. So, if you have aREADME.mdin the root of your project, GitHub will show that content on the landing page of your repository. If you put aREADME.mdfile in a sudirectory likeTest A/Test B/README.md, than the content of that file will be shown by GitHub when a user accesses theTest A/Test B/directory.GitHub supports other formats for
READMEfiles such as.txt, but markdown.mdis the prefered format as it supports formatting features other formats do not.
Here is GitHub's documentation on markdown.
Do you have a description?
Your repository's description is often the first text people will see since it appears on most searching and exploring views on GitHub. Having an concise yet informative description will help you grab the attention of users that may be interested in your repository. However, if you have issues labeled
good first issueorhelp wanted, GitHub often shows those issues instead of your description as a way to encourage potential contributors to give your repository a look.You can edit the description by clicking the gear in the upper right corner of a repository's landing page.
Do you have a .editorconfig?
An
.editorconfigfile is a settings file supported by most common C# IDEs and editors. It includes settings like tabs vs spaces, indentation size, suppressing compiler warnings, and more. You can have multiple.editorconfigfiles in various directories if you need directory specific settings.Here is
.editorconfiginfromation onhttps://docs.microsoft.com/.Here is
.editorconfiginfromation onhttps://editorconfig.org/.
Do you have "dotnet test" projects?
If you don't already have a unit testing project, consider making one. Unit tests help with regression testing, validate code works on different environments, doing test-driven development, etc. Unit tests can also serve as examples of how to use the code.
Unit testing projects are seperate projects from your source code. You should have multiple
.csprojfiles in different directories. Unit tests can be run with thedotnet testcommand. There are several popular frameworks for unit testing:MSTest,NUnit, andXUnit. While there are minor feature differences between them, they can all get the job done.It is fairly common for new .NET developers to implement unit testing as a console applications with
Console.WriteLinerather than using a "dotnet test" supported framework. You should really use a "dotnet test" supported framework.
Do you have unit testing code coverage on your README.md?
Have you seen a badge like this on other repositories?
That percentage represent how much of the source code is touched by unit tests. Generally, the higher the percentage of your code that is unit tested, the more robust/reliable your code is. However, try to write meaningful unit tests rather than slapping on unit tests to achieve 100% coverage. Just because you have a high coverage percentage does not mean your code is bug free. Having unreliable, excessive, or verbose unit testing can sometimes hinder a project more than help it.
How do I get my test coverage?
More information here (MS Docs code coverage).
Here are some common resources for producing code coverage reports:
CodeCov: https://about.codecov.io/SonarCloud: https://sonarcloud.io/ReportGenerator: https://github.com/danielpalme/ReportGenerator
Are your .NET target(s) on your README.md?
It is important to clearly display the .NET target(s) of your project on your landing page. Are you targetting
.NET 5,.NET 6,.NET Standard 2.0,.NET Framework 4.8, or any other version? You don't want to make your community dig through your.csprojfiles or try to run your application only to find out it is dependent on.NET 9000which they don't have installed yet.This could be as simple as including a comment at the top of your
README.mdfile:"This project targets .NET 5."
But an nicer way can be to make a badge. You can even make the badge dynamic so that if you change your .NET target (such as migrating from
.NET 5to.NET 6) the badge can automatically update for you. Here is an example of a .NET target badge:
Here is a guide on how you can set up a dynamic .NET target badge for your repository.
Are your recommended build processes and IDEs on your README.md?
If you have any custom build processes, such as
.cmdscripts like "Build.cmd" or "Restore.cmd", put it on your rootREADME.md. Don't bury it on another page (such as aWikipage) that new users may miss upon first glance.Also put what
IDEsare recommended for your project on yourREADME.md:
- Visual Studio?
- JetBrains Rider?
- Visual Studio Code? (see the
.vscode/xxx.jsonbullet below)- Visual Studio for Mac?
- other?
For example, if you have a
Windows Forms Application(which is best to develop onVisual Studio), then it can help beginners if you explicitly recommendVisual Studioinstead ofVisual Studio CodeorVisual Studio for Mac.Badges can be useful for this topic as well. Here are some examples:
Source of the badge can be seen here.
Source of the badge can be seen here.


Do you have .github/workflows/xxx.yml files (GitHub Actions workflows)?
GitHub supports devops pipelines with GitHub
Actions. You can create pipelines to do anything you need including running builds, running unit tests, deploying nuget packages, deploying GitHubPagescontent, etc. All you need to do is create.ymlfiles inside the.github/workflows/directory of your repository, and you have workflows.For C# repositories, you should at least have a continuous integration workflow that will build your code and run your unit tests. Here is an example of a C# continuous integration workflow for a project targetting .NET 5:
name: Continuous Integration
on:
  workflow_dispatch:
  push:
    branches:
      - main
    paths-ignore:
      - '.vscode/**'
      - '.github/**'
      - 'README.md'
  pull_request:
    branches:
      - main
    paths-ignore:
      - '.vscode/**'
      - '.github/**'
      - 'README.md'
jobs:
  continuous-integration:
    runs-on: ubuntu-latest
    steps:
    - uses: actions/checkout@v2
    - name: setup dotnet
      uses: actions/setup-dotnet@v1
      with:
        dotnet-version: 5.0.301
    - name: dotnet build
      run: dotnet build --configuration 'Release'
    - name: dotnet test
      run: dotnet test --configuration 'Release'
GitHub provides badges so you can display the results of the workflow. Here is what a badge from the above workflow looks like assuming it is successful:
Are Issues and/or Discussions enabled on your repository?
IssuesandDiscussionsare two seperate features on GitHub.Issuesis enabled on GitHub repositories by default, butDiscussionsis not. You can enable or disable either feature from the settings of your repository.Discussionsis a newer feature and is currently considered to be in abetaversion.For a C# repository, it is likely a good idea to have both
IssuesandDiscussionsenabled.Issuesare a great place to track bugs and feature requests.Discussionsare generally a better place to have conversations, such as users asking questions or showcasing projects.Discussionsallow users to reply to other comments while inIssuesusers can only reply to the original post.
Do you have clearly defined Labels for issues and pull requests?
Labelshelp you categorize and document issues and pull requests. You can create your own labels to match your projects needs. Examples of common custom labels includebacklog,approved,needs approval, andneeds more information.If you want to encourage people to contribute to your repository, you should espcially use the
good first issueandhelp wantedlabels. Issues with those specific labels are tracked by GitHub and other resources that may help guide the open source community to helping you with your project.
Do you have Milestones and/or Projects for issues?
Issuesare great for documenting bugs an enhancements, but how do you document the the timelines/deadlines of them? That is whereMilestonescan help. If you are planning on a future release3.0.0it may be nice to create a milestone for that release, and put the relevant issues inside that milestone. That way your community can clearly see what all issues still need to be addressed for the upcoming3.0.0release.Milestonesare built intoIssuesand thus are enabled ifIssuesare enabled.
Projectsis a seperate feature fromIssuesand can be enabled/disabled in the settings of the repository.Projectsare enabled by default.Projectsare an additional way to categorize and trackIssues. WhileMilesteonesare useful, they don't necessarily track the state of anIssue(has work on theIssuestarted or not).Projectsare intended to fill in that need.
Do you have Issues templates, a .github/ISSUE_TEMPLATE/config.yml, and a .github/pull_request_template.md?
You can set up
Issues templatesso that when creating a new issue, users can select from templates you make.BugandEnhancementare common templates for example. With the templates, you can pre-populate issues with content such as labeling issues.
More information here.When creating new GitHub issues on your repository, the
.github/ISSUE_TEMPLATE/config.ymlfile will let you add options that link to other locations. For example, you may want to direct questions to be opened asDiscussionsrather thanIssues, or if you have multiple repositories you may want to have a message like, "If your issue involves XXX please open an issue here instead...".
More information here.When a pull request is opened, GitHub prepopulates the content of the pull request with the
.github/pull_request_template.mdfile. This allows you to instruct the community on how you expect pull requests to be written.
More information here.
Do you have packages (preferably NuGet)?
If you are making a library in which you intend for other developers to use your code as a dependency, you should be using packages.
GitHub has package hosting, but most .NET developers use
nuget.orgfor hosting packages rather than GitHub, becausenuget.orgis the default source of theNuGet Package ExplorerinVisual Studiowhen users search for packages.More information here (
dotnet pack).More information here (publishing NuGet packages).
More information here (GitHub
Packages)A great way to handle the creation and deployment of
NuGetpackages is to make a GitHubActionthat triggers when you publish aReleaseon your repository. Here is an example GitHubActionfor that:
https://github.com/ZacharyPatten/Towel/blob/main/.github/workflows/Towel%20Deployment.ymlIf you host your packages on
nuget.orgrather than GitHub, be sure to disable thePackagesfeature on your GitHub repo so that it doesn't confuse your community by saying "No packages published".shields.io lets you create dynamic badges that will display the latest version of your nuget package. Here is an example of a nuget badge:
<img src="https://img.shields.io/nuget/v/Towel.svg?logo=nuget" title="Go To Nuget Package" />

Are you using GitHub Pages?
You can host static websites on GitHub for free. That feature is called GitHub
Pages.
More information here.GitHub Pages can host the output of documentation generators like
docfx. (see the "documentation generation" bullet below)You can even host Blazor webassembly projects on GitHub
Pages. Here is an example:
Source Code: https://github.com/ZacharyPatten/dotnet-blazor-games
GitHub Pages: https://zacharypatten.github.io/dotnet-blazor-games/
Do you have documentation generation (such as docfx)?
For .NET repositories, there are tools for generating static documentation websites. One of the most popular tools is
docfx. You can usedocfxto generate a documenation website, and you can host the generated website on GitHubPagesfor free. Here are some key features ofdocfx:
- it will generate an api reference using the
xmlcomments on your source code
- the api references include links back to the source code
- it allows additional content on top of the
xmlcomments (via theImprove this doclinks indocfxoutput)- supports articles in markdown format
- is easy to customize (including custom stylings)
- is easy to include in GitHub
Actionsso it can automatically trigger when you push changesHere is an example output of
docfx:
https://zacharypatten.github.io/Towel/api/index.htmlHere is an example of a GitHub
Actionthat runsdocfxand deploys it to GitHubPageson code pushes:
https://github.com/ZacharyPatten/Towel/blob/main/.github/workflows/Documentation.yml
Do you have a change log? Are you using Releases?
Your community can see your code changes in the
githistory, but having a summarized change log is really important. Besides informing your community of changes between versions, it can also be useful reference for potential new contributors by summarizing what topics are involved in active development.Handle your change log however you want: a
Changelog.mdmarkdown file in your repository, a page on your wiki, etc. However, probably the best place to keep your change log is theReleasesof your GitHub repository. Here are some examples of change logs implemented in theReleasesof several GitHub repositories:
- https://github.com/ZacharyPatten/Towel/releases
- https://github.com/dotnet/Silk.NET/releases
- https://github.com/Singulink/Singulink.Numerics.BigDecimal/releases
If you have
NuGetpackages, you can link the release notes on theNuGetpackage back to your GitHubReleases, so that if you need to update any log, there is only one location that needs to be updated. Here is an example:
https://www.nuget.org/packages/Towel/1.0.32
Notice that the "Release Notes" is a link back to theReleasein GitHub:See https://github.com/ZacharyPatten/Towel/releases/tag/1.0.32That way there is only one change log that needs to be updated if there are typos, formatting errors, etc.
Releasescan be enabled/disabled by clicking the gear in the upper right of your repository's landing page.
Do you have branch policies?
You can protect important branches by setting branch protection rules, which define whether collaborators can delete or force push to the branch and set requirements for any pushes to the branch, such as passing status checks or a linear commit history.
Do you have a chat location (possibly an alternate platform than GitHub)?
GitHub is a great platform for what it does well, but one thing that it does not do very well is acting as a community chat. GitHub
IssuesandDiscussionsare not really intended to be real-time chat platforms. They are relatively slow, they notify everyone who is watching the repository, and they are intended to be permanently retained for future reference.So, it can be nice to use a platform outside of GitHub where your community can have more laid-back discussions. Use whatever platform you prefer: Discord, Gitter, Facebook, Reddit, etc. However Discord gets a special recommendation as it supports multiple channels, text and voice channels, it allows streaming, it supports bots, it support webhooks, it supports custom user roles and permissions, and much more. If you do set up another platform for your community, clearly document that on your root
README.mdso your community can find it, such as having a badge. Here is an example of a badge for a Discord server:
Here is the markdown/HTML for that badge:<a href="https://discord.gg/4XbQbwF"><img src="https://img.shields.io/discord/557244925712924684?logo=discord&logoColor=ffffff&color=7389D8" title="Go To Discord Server" /></a>

Do you have a logo?
Is a logo required? No, but logos help the community remember your project and associate it with content outside your GitHub repsoitory:
- website
- social media posts
- discord, gitter, and other platforms
- articles
Scalable Vector Graphics (
.svg) is generally the prefered format for logos because vector formats will render cleanly on any resolution, unlike raster graphics formats such as.jpg,.png,.gif, and.tif.However, if you plan on having nuget packages, nuget currently does not support the
.svgformat. You should still make your logo in the.svgformat if you can, but you just need to convert it to a raster format (generally.png) in order to use it with nuget packages.The
.svgfile format support animations, so if you want an animated logo, you can do that with the.svgfile format. Here is an example:
That logo example is from this repository: https://github.com/LanguageDev/Yoakke

Do you have .vscode/xxx.json files?
Most .NET developers expect to use
Visual Studio, butVisual Studio Codeis gaining popularity too. If your project is compatible withVisual Studio Codeconsider adding the following files soVisual Studio Codeusers have an easier time getting started with your repository:
.vscode/extensions.json
This file lets you recommend extensions to users that open your repository inVisual Studio Code.
More information here..vscode/settings.json
This is a settings file: enable semantic highlighting, exclude directories from the Explorer, show parameter hints, etc.
More information here..vscode/tasks.json
This file defines tasks that can be run in Visual Studio Code, such as building your project. Tasks are often referenced from thelaunch.jsonfile.
More information here..vscode/launch.json
This file defines the options the users can select from the "Run and Debug" view in Visual Studio Code.
More information here.
Do you have a "using my project" badge?
If you are making a project that is intended to be used by other developers such as a code library, consider making a badge that other developers can easily copy and display on their projects. Here is an example:
That example is from this repository: https://github.com/ZacharyPatten/Towel
Be sure to include the markdown/HTML of the badge in a code block so it can be easily copied:<a href="https://github.com/ZacharyPatten/Towel"><img src="https://github.com/ZacharyPatten/Towel/blob/main/.github/Resources/UsingTowel.svg?raw=true" title="Go To Towel"></a>

Do you have GitHub Sponsors set up (community financial support)?
Have you seen other projects with the
Sponsorbutton at the top of their repsoitory?
Are you wanting the same for your repository? That feature is called GitHub
Sponsors. You can also configure the sponsor button to link to alternate funding platforms likePatreon,Buy Me a Coffee, etc.

Disable GitHub Wikis?
Can GitHub
Wikisbe useful? Yes. However, they are often not the best place to put documentation, especially for .NET projects.
- If you are going to use
Wikis, don't letWikisget verbose. The extra real estate thatWikisprovide often lead to bloat verbage. No one likes unnecessary filler content. Also don't spread the information too thin. A handful of more dense pages are often preferred to dozens of pages with very little content in them.- Often times
Wikicontent could be put on the rootREADME.mdrather than distributed among dozens of seperate (often barren) pages in aWiki. Expanders are especially useful so that yourREADME.mdhas a lot of content but is not overwhelming at first glance.- If you are using GitHub
Pages(website), why not include your documentation on there rather than on a GitHubWiki? Having documentation in multiple places will only cause confusion. Especially if you are using a documentation generator likedocfx, then you should probably put on your documentation in yourdocfxcontent rather than a GitHubWiki. No reason to have both.- You can just include markdown files in your repository rather than using the GitHub
Wikis. This makes it easier to add markdown linting (validation), it will be easier for the community to contribute to, there will only be one history (rather than Wiki + Repository history), and users who clone the repo will have the documentation even if they are offline (without having to have cloned theWikitoo).
Wikisare one of the few features in GitHub that might be better to ignore/disable. You can enable/disableWikisin the settings of your repository.
If you have benchmarking, are you using BenchmarkDotNet?
Writing a console application using
StopwatchorDateTimeis not a reliable way to gather benchmarking data. If you want to include benchmarking in your repository, you should be using theBenchmarkDotNet.BenchmarkDotNetoutputs results in a format that is supported by GitHub markdown. You can copy-paste the results directly into GitHub markdown.
If you are using dotnet test with GitHub Actions, are you using Tyrrrz/GitHubActionsTestLogger for cleaner output?
More information here (Tyrrrz/GitHubActionsTestLogger GitHub repository).
Do you have a CODE_OF_CONDUCT.md?
If you want to have a file detailing the code of conduct you expect out of your community, the best place to document that is in a
CODE_OF_CONDUCT.mdfile in the root of your repository. That is just the file path/name recommended by GitHub, and many repositories follow that convention, so if you also put for community guidelines in the same fileCODE_OF_CONDUCT.mdit will be easier for your community to find it.
Do you have a CONTRIBUTING.md?
GitHub recommends you make a
CONTRIBUTING.mdfile in the root of your repository that documents how your community can contribute to your project. If you write similar documentation you should likely put it in that file name/path so it is easy for your community to find it.
Are you using GitHub Topics?
You can label your repository with various topics, which can make it easier for users to find your repository when searching/exploring GitHub.

Once added, your repository will appear in the search results on pages like https://github.com/topics.
Do you have a ".sln" file in the root of your repository?
Try to have a single solution "
.sln" file in the root directory of your repository. That way newcomers to your project have a clear entry point for how to get started even without reading your documentation.
Do you have a social preview?
The
social previewis a banner image that will be displayed on some platforms with links to your repsoitory.
Are you using GitHub webhooks?
GitHub
webhooksare a way to send notifications to other platforms when various changes occur on your repository such as code pushes, issues being opened, or pull requests being opened. This can be especially useful if you set up aDiscordserver for your repository.
Is the Automatically delete head branches setting enabled?
The
Automatically delete head branchessetting is disabled by default. Depending on your branching strategy enabling that setting may help you keep the number of branches on your repository relatively low. For example, if a branch is created for "feature1", and "feature1" is completed and merged into "main", the branch used to develop "feature1" has served its purpose and can likely be deleted. Keeping unnecessary branches only causes confusion because developers will assume it is still being actively developed if the branch hasn't been deleted. This setting can be enabled/disabled in the repository settings.
Are you using Source Link?
Source Link is a project that allows your binaries to support source code debugging. That way you and/or your users can debug your project without having to pull down the source code and referencing it directly.
If you want to enforce C# code style, are you using StyleCopAnalyzers?
https://github.com/DotNetAnalyzers/StyleCopAnalyzers
StyleCopAnalyzersis a project with roslyn analyzers that will enforce code style via compiler warnings. Here are a few examples of analyzers it includes:
- loops and if statments must contain scoping brackets
{ ... }- must name generic type parameters starting with "T" (example: "TKey")
- no extra white space after code
- using directives must be in alphabetical order
- parameters must be on same line
StyleCopAnalyzerscan be rather intrusive/aggressive when you first add it to a project because it may show a lot of warnings for topics that you do not care about. However, you can easily enabled/disable any analyzer with assembly attribute or the.editorconfigsuppressions. So you can customizeStyleCopAnalyzersto fit your needs.
If you want to enforce markdown code style, are you using markdownlint? Do you have a .markdownlint.json?
markdownlint is a style checker for markdown files. It is supported by various markdown editors and is easy to integrate into pipelines such as GitHub Actions.
.markdownlint.jsonis a settings file used by markdownlint when validating markdown (.md) files. For example, by default markdownlint will report errors if inline HTML is used in markdown, but if you want to allow inline HTML the.markdownlint.jsonfile can be used to suppress theMD033 no-inline-html - Inline HTMLerrors.Even if you do not use markdownlint on your project, members of your community might (such as the extension for
Visual Studio Code), and if they open your markdown files they may see a lot of notifications if you do not include a.markdownlint.jsonwith suppressions.
Use <br/> for line breaks in GitHub markdown.
If
you
need
a
line
break
use
<br/>.
Use shields.io to make badges.
shields.io is a great website you can use to make badges. The badges are in
.svgfile format and are easy to customize if needed such as adding custom logos.
Use expanders in GitHub markdown.
You can make drop downs on markdown with the following:
<details>
<summary>
HEADING
</summary>
<p>

CONTENT

</p>
</details>
Use <sub> to nearly vertically center badges and images with text in GitHub markdown.
Unfortunately there is no way to vertically center badges and images with text in GitHub's markdown. Badges and images are rendered slightly above the midline of the text. However, you can force the badges and images to be slightly lower by wrapping them in
<sub>tags (which is subscript).Without
<sub>:With
out<sub>:
Use <p align="center"> to horizontally center content in GitHub markdown.
You can horizontally center content in GitHub markdown with the following:
<p align="center">
    CONTENT
</p>
This is particularly nice for logos and badges.
You can't mix normal markdwon syntax with inline HTML syntax. So rather than using markdown images like
you need to use HTML like<a href="LINK"><img src="SOURCE"/></a>.
Use <a href="#"> to help prevent image links.
Unfortunately in GitHub markdown, there is no way to prevent an image from being a click-able link. GitHub adds links to images and
<a>tags that wrap images. This is a problem in multiple scenarios such as when you want an image to be in the<summary>of a expander. Clicking the<summary>should toggle the exander rather than being a link.. The best thing you can currently do is wrap images with<a href="#">IMAGE</a>and then at least the images will link to the current page rather opening the URL of the image.
🎉 GitHub markdown has emojis.
📄
📁
🍖
See this link.Emojis are especially useful inside of expanders, since images and expanders in GitHub markdown do not play well.
GitHub's icons are open source.
GitHub's icons are open source so you can use them in your content. https://github.com/primer/octicons
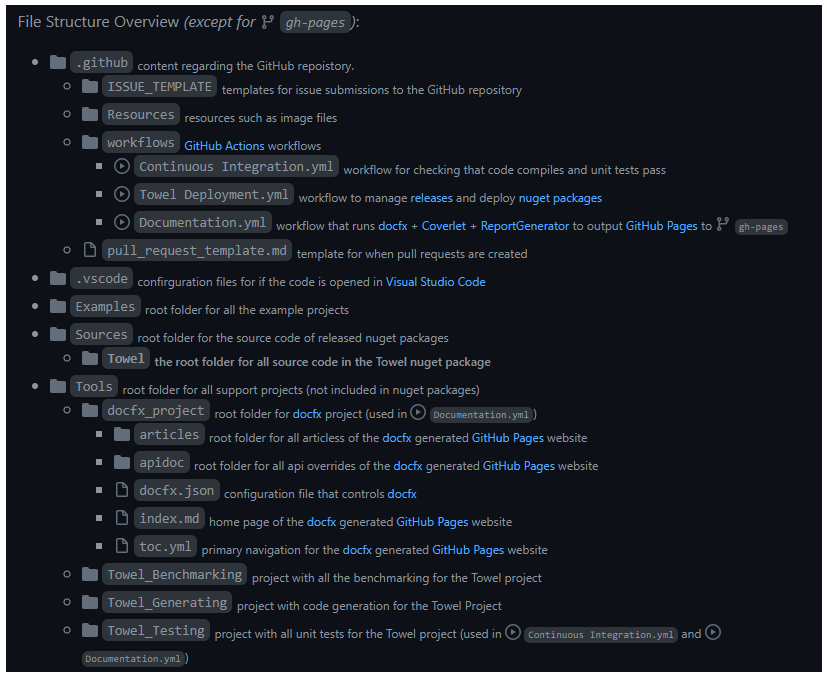
There are lots of things you can do with the icons. Here is an example where the icons were used to document the file structure of a repository:
That screenshot was taken from this repository:
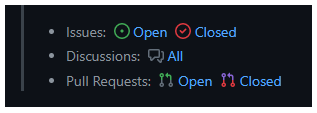
https://github.com/ZacharyPatten/TowelAnother example of using the github icons is for making links to GitHub queries. Here is an example of a GitHub profile that uses the icons in links to topics authored by that user:
That screenshot was taken from this GitHub profile:
https://github.com/ZacharyPatten
Links to GitHub queries.
You can create links to queries in GitHub. One use case for this could be linking to all Q/A discussions that have not yet been answered so you can make sure they get help quickly.
Here is the base URL you want to use:
https://github.com/search. Avoid using other URLs likehttps://github.com/issues, because those are only accessible by users who are logged into their GitHub. Thehttps://github.com/searchURL works even for users who are not logged into GitHub.You can add parameters such as
q=author%3Azacharypattenandis%3Aissue+is%3Aopento adjust the resulting query of the link. For example this link results in a query of allIssuesopened by thezacharypattenuser:
https://github.com/search?q=author%3Azacharypatten+is%3Aissue+is%3AopenJust modify the parameters to adjust your query as needed.
Don't forget to check your graphics on all themes in GitHub!
Make sure you check out what your repository looks like in all of GitHub's themes. Currently GitHub supports the following themes:
Default lightDefault darkDark dimmedYour logo may look good in one theme, but it may blend into the background in another.
You can change themes from the settings of your GitHub account.
I'm sure I skipped/missed some important topics when compiling this list. If you know of anything that should have been included, please comment below. :)