Skip to content

Instantly share code, notes, and snippets.

@ahandsel
Last active March 17, 2022 23:03
Show Gist options
  • Save ahandsel/556e42aad59ff22604a9042174c556bc to your computer and use it in GitHub Desktop.
Save ahandsel/556e42aad59ff22604a9042174c556bc to your computer and use it in GitHub Desktop.

React & REST API Workshop!

Let’s Access Web Database Data From a React Component

Thank you for attending our Kintone x React workshop!

Use the following files to follow along!

Download Links

Click here or the Download Zip button on the upper right corner for all the code & slide you need for our workshop!

📎 PREREQUISITE

💾 Install Node & npm

🕹️ Set Up a React App

  • Create a myproject folder
  • Inside, install a React App named frontend
  • npx create-react-app frontend

🚀 Getting your FREE Kintone Database!

① Sign-Up for Developer Program Account (Website) 🌐

  • bit.ly/KDP_signup
    • ⚠ Do NOT use Safari
    • ⚡Accept Cookies First
    • ✅ Use Chrome & Firefox

② THEN Create a Kintone Subdomain (Database) 📂

  • bit.ly/K_DevLic
    • ⚡ Only use lowercase, numbers, & hyphens in your subdomain
    • ⚠ Do not use uppercase nor special characters

https://youtu.be/Gzz8SbTuoFg Quick video on the Kintone sign-up process

https://youtu.be/Gzz8SbTuoFg

📚 Suggested Reading

We advise you to have a look through the following React documents beforehand:

  1. Hello World
  2. Introducing JSX
  3. Rendering Elements
  4. Components and Props

Details at dev.to

React & REST API Series' Articles

Check out Will's React & REST API Series' Articles at dev.to Community 👩‍💻👨‍💻!

Prepping for React Workshop

This is a step-by-step guide that will go over everything you need to do before our workshop in detail! Let's get started!

Outline:


1. Create a myproject folder

Somewhere inside your Document folder will be good.

Check if you already have Node.js or npm

React requires Node ≥ 10.16 & npm ≥ 5.6
Go inside the myproject folder.

$ node -v
$ npm -v

2. Install Node.js

If Node & npm are missing, let's install them!

Options:

macOS with nodenv

We recommend installing Node.js using nodenv to manage node versions. This allows your computer to have a specific Node.js version per project.

⚠️ Remove any existing installations of Node.js before installing nodenv! ⚠️
Having different Node.js installations can lead to conflict issues.

Step 1: Install nodenv with Homebrew

  • Update Homebrew:

    brew update && brew upgrade
  • Install nodenv:

    brew install nodenv

Step 2: Set up nodenv shell integration

  • Run the initialization command:

    nodenv init
  • Do as instructed by appending the following line into your shell's rc/profile file:

    eval "$(nodenv init -)"
    • For Zsh users:

      $ echo 'eval "$(nodenv init -)"' >> ~/.zshrc
      $ cat < ~/.zshrc
    • For Bash users:

      $ echo 'eval "$(nodenv init -)"' >> ~/.bash_profile
      $ cat < ~/.bash_profile

Step 3: Implement the changes

Close & open a new Terminal window for the changes to take place.

Optional: Verify that nodenv is properly set up using nodenv-doctor script.

  • For those using Z shell (Zsh) shell:

    curl -fsSL https://github.com/nodenv/nodenv-installer/raw/master/bin/nodenv-doctor | bash
  • Expected result:

    Checking for `nodenv' in PATH: /usr/local/bin/nodenv
    Checking for nodenv shims in PATH: OK
    Checking `nodenv install' support: /usr/local/bin/nodenv-install (node-build 3.0.22-4-g49c4cb9)
    Counting installed Node versions: none
      There aren't any Node versions installed under `~/.nodenv/versions'.
      You can install Node versions like so: nodenv install 2.2.4
    Auditing installed plugins: OK

Step 4: Install Node.js inside the React Workshop folder (myproject)

  • Now you're ready to install specific Node.js versions!

  • Inside myproject folder, install Node.js version 14.5.0:

    $ cd myproject/
    $ nodenv install 14.5.0
    $ nodenv local 14.5.0

Alright! Your Mac is now armed with Node.js!
Skip down to the 3. Install a Sample React App section!


Windows with nvm-windows

The following steps are straight from the Microsoft Docs on Set up NodeJS on native Windows. We recommend installing and managing Node.js with nvm-windows

⚠️ Remove any existing installations of Node.js before installing nvm-windows! ⚠️
Having different Node.js installations can lead to conflict issues.

Step 1: Go to the windows-nvm's latest release.

Step 2: Download the nvm-setup.zip file for the most recent release.

Step 3: Once downloaded, open the zip file, then open the nvm-setup.exe file.

Step 4: The Setup-NVM-for-Windows installation wizard will walk you through the setup steps, including choosing the directory where both nvm-windows and Node.js will be installed.

  • install-nvm-for-windows-wizard.png

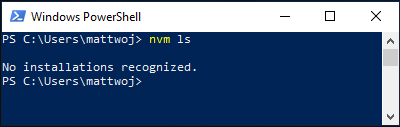
Step 5: After the installation is complete, open PowerShell & enter nvm ls

  • nvm ls lists out installed Node versions (should be none at this point)
  • windows-nvm-powershell-no-node.png

Step 6: Install Node.js inside the React Workshop folder (myproject)

  • Now you're ready to install specific Node.js versions!
  • Inside myproject folder, install Node.js version 14.5.0:
    $ cd .\Documents\myproject
    $ nvm install 14.5.0
    $ nvm use 14.5.0

Alright! Your Windows is now armed with Node.js!
Skip down to the 3. Install a Sample React App section!


3. Install a Sample React App

Still inside the myproject folder, let's install a React App named frontend.

Install:

  • npx create-react-app frontend

Starting it up:

  • Go inside the frontend folder
  • npm start

⚠️ Got an error?

  • Make sure you are inside the myproject folder when setting up Node.js
    • Mac: nodenv local 14.5.0
    • Windows: nvm use 14.5.0
  • Make sure you are inside the frontend folder when running npm start!
// 01_Text_index.js | Simple JSX code
import React from 'react';
import ReactDOM from 'react-dom';
// jsx includes html-like syntax
const myelement = <h1><u>These are the details of the myelement const</u></h1>;
// Where the magic happens!
ReactDOM.render(
myelement,
document.querySelector('#root')
);
/*
Let's run a simple code that uses React to render content into the UI.
Expected output:
These are the details of the myelement const
*/
// 02_UserAPI_index.js | Call & Output API to Console
import React from 'react';
import ReactDOM from 'react-dom';
// Let's call Random User Generator API
const restEndpoint = "https://randomuser.me/api/";
// Wait for response & output to Console Log
const callRestApi = async () => {
const response = await fetch(restEndpoint);
const jsonResponse = response.json();
console.log(jsonResponse);
};
callRestApi();
const myelement = <h1><u>These are the details of the myelement const</u></h1>;
ReactDOM.render(
myelement,
document.querySelector('#root')
);
/*
Make REST API calls to Random User Generator API
Expected output:
API Response from Random User Generator API is outputted to Console Log
*/
// 03_PromiseError_index.js | Try to output the API response in React!
import React from 'react';
import ReactDOM from 'react-dom';
const restEndpoint = "https://randomuser.me/api/";
// Let's try to output the API response in React!
const callRestApi = async () => {
const response = await fetch(restEndpoint);
const jsonResponse = await response.json();
console.log(jsonResponse);
// React.createElement( type, [properties], [...children]);
return React.createElement('h1', null, JSON.stringify(jsonResponse));
};
ReactDOM.render(
callRestApi(),
document.querySelector('#root')
);
/*
Attempt to display the Random User Generator API response
Expected output: [Error!]
Error: Objects are not valid as a React child (found: [object Promise]). If you meant to render a collection of children, use an array instead.
*/
// 04_StateEffect_index.js | Successfully output the response in React!
import React, { useState, useEffect } from 'react';
import ReactDOM from 'react-dom';
const restEndpoint = "https://randomuser.me/api/";
const callRestApi = async () => {
const response = await fetch(restEndpoint);
const jsonResponse = await response.json();
console.log(jsonResponse);
return JSON.stringify(jsonResponse);
};
function RenderResult() {
// const [state, setState] = useState(initialState);
const [apiResponse, setApiResponse] = useState("*** now loading ***");
// useEffect takes 2 arguments:
// 1st = effect is the function that is executed when the React Component is rendered
// 2nd = Empty array as dependency so useEffect is only invoked once
useEffect(() => {
callRestApi().then(
result => setApiResponse(result));
}, []);
return (
<div>
<h1>React App</h1>
<p>{apiResponse}</p>
</div>
);
};
ReactDOM.render(
<RenderResult/>,
document.querySelector('#root')
);
/*
Uses useState Hooks and useEffect Hooks to handle the async API call function
Expected output: [Success!]
Outputs the Random User API Call to the page
*/

Notes on the Express Server (backend)

Setting up the Express Server

(1) From your terminal, go to your myproject folder

  • $ cd .../myproject

(2) Create backend folder

  • $ mkdir backend
  • $ cd backend

(3) Create your Express project

  • $ npm init
  • Hit enter to skip the questions

(4) Continue to install some dependencies

  • $ npm install express node-fetch cors

(5) Create a server.js file inside the backend folder

  • $ touch server.js

Starting the Express Server

(1) Configure the server.js file

(2) From your terminal, go to your backend folder

  • $ cd .../myproject/backend

(3) Start the Express Server

  • $ node server.js
// 06_xkcd_server.js | Backend | Get xkcd comic
const express = require('express');
const cors = require('cors');
const fetch = require('node-fetch');
const PORT = 5000;
const app = express();
app.use(cors());
const corsOptions = {
origin: "http://localhost:3000"
};
const requestEndpoint = "https://xkcd.com/327/info.0.json";
// This function runs if the http://localhost:5000/getData endpoint
// is requested with a GET request
app.get('/getData', cors(corsOptions), async (req, res) => {
const fetchOptions = {
method: 'GET'
}
const response = await fetch(requestEndpoint, fetchOptions);
const jsonResponse = await response.json();
res.json(jsonResponse);
});
app.listen(PORT, () => {
console.log(`Example app listening at http://localhost:${PORT}`);
});
/*
backend - Express server side!
Set up the Express code
Expected Output at http://localhost:5000/getData
Display the API call to xkcd with the comic information
*/
// 07_xkcd_index.js | Frontend | Output backend's data in React
import React, { useState, useEffect } from 'react';
import ReactDOM from 'react-dom';
// Switch the Endpoint from xkcd's link to Express server's
const restEndpoint = "http://localhost:5000/getData";
const callRestApi = async () => {
const response = await fetch(restEndpoint);
const jsonResponse = await response.json();
console.log(jsonResponse);
return JSON.stringify(jsonResponse);
};
function RenderResult() {
const [apiResponse, setApiResponse] = useState("*** now loading ***");
useEffect(() => {
callRestApi().then(
result => setApiResponse(result));
}, []);
return (
<div>
<h1>React App</h1>
<p>{apiResponse}</p>
</div>
);
};
ReactDOM.render(
<RenderResult/>,
document.querySelector('#root')
);
/*
frontend - React project side
Display the API call made from the Express server to the frontend.
Expected Output at http://localhost:3000/
Display the API call to xkcd with the comic information
*/
// 08_Kintone_server.js | Backend | Get Kintone data
const express = require('express');
const cors = require('cors');
const fetch = require('node-fetch');
const PORT = 5000;
const app = express();
app.use(cors());
const corsOptions = {
origin: "http://localhost:3000"
};
// Replace {subdomain} with your subdomain
// Replace {APP_ID} with the App ID
const requestEndpoint = "https://{subdomain}.kintone.com/k/v1/records.json?app={APP_ID}";
// Replace {API_TOKEN} with your API token generated for the App specified in the App ID (from above)
app.get('/getData', cors(corsOptions), async (req, res) => {
const fetchOptions = {
method: 'GET',
headers: {
'X-Cybozu-API-Token': '{API_TOKEN}'
}
}
const response = await fetch(requestEndpoint, fetchOptions);
const jsonResponse = await response.json();
res.json(jsonResponse);
});
app.listen(PORT, () => {
console.log(`Example app listening at http://localhost:${PORT}`);
});
/*
backend - Express server side
Expected Output at http://localhost:5000/getData
Display the data inside the Kintone App
*/

Hide the Kintone API Token

(1) Add dotenv to your backend

  • $ cd ./myproject/backend
  • $ npm install dotenv

(2) Create a .env file

  • $ touch .env

(3) Place the Kintone API token credentials in the .env file

  • API_TOKEN = "_TOKEN_HERE_"

(4) Add dotenv to the beginning of server.js

  • require('dotenv').config();

(5) Update the headers inside fetchOptions

  const fetchOptions = {
      method: 'GET',
      headers:{
          'X-Cybozu-API-Token': process.env.API_TOKEN
      }
  }

(6) Restart the Express server

  • Stop the server: ctrl + c
  • Start the server: $ node server.js

(7) Reload the browser showing the React App.

  • http://localhost:3000/
// 10_Complete_server.js | Backend | Hide API Token
require('dotenv').config();
const express = require('express');
const cors = require('cors');
const fetch = require('node-fetch');
const PORT = 5000;
const app = express();
app.use(cors());
const corsOptions = {
origin: "http://localhost:3000"
};
// Replace {subdomain} with your subdomain
// Replace {APP_ID} with the App ID
const requestEndpoint = "https://{subdomain}.kintone.com/k/v1/records.json?app={APP_ID}";
// Replace {API_TOKEN} with your API token generated for the App specified in the App ID (from above)
app.get('/getData', cors(corsOptions), async (req, res) => {
const fetchOptions = {
method: 'GET',
headers: {
'X-Cybozu-API-Token': process.env.API_TOKEN
}
}
const response = await fetch(requestEndpoint, fetchOptions);
const jsonResponse = await response.json();
res.json(jsonResponse);
});
app.listen(PORT, () => {
console.log(`Example app listening at http://localhost:${PORT}`);
});
/*
backend - Express server side
Expected Output at http://localhost:5000/getData
Kintone API Token is hidden with dotenv
*/

Troubleshooting Notes

Starting the frontend React Project

Enter the following commands in your terminal

  • $ cd ../myproject/frontend
  • $ npm start

Then access your React project at

  • http://localhost:3000/

Starting the backend Express Server

Enter the following commands in your terminal

  • $ cd ../myproject/backend
  • $ node server.js

Then access your Express server at

  • http://localhost:5000/

Access the xkcd API call at

  • http://localhost:5000/getData

Kintone Section: React not updating after updating server.js

Be sure to restart the server after making changes to server.js!

(1) Go to the terminal running the Express server. It should look something like this:

```terminal
user@computer backend % node server.js
Example app listening at http://localhost:${PORT}
```

(2) Restart the Express server

  • Stop the server: ctrl + c
  • Start the server: $ node server.js

(3) Reload the browser showing the React App.

  • http://localhost:3000/

Kintone API Token

To generate an API Token for a Kintone App:

  1. Go to the Kintone App
  2. Go to the Gear icon ⚙️ (top right corner) > Open the App Settings page
  3. Click on the App Settings Tab > Click on API Token settings
  4. Click the Generate button to generate a token
  5. Click the Save button (top left corner) to save the token setting
  6. Finally, click the Update App button (top right corner) to implement the token setting change.

Generating an API Token Gif

Thank you for attending our workshop!

Your Feedback Please 🙇

Please fill out this quick survey for a chance to win 💰️ $25 Amazon Gift Card:

Next Step

For those wanting a visualization projects:

  • Try linking to different amChart libraries, and reuse the code we used in the workshop!

For those wanting to create projects on Kintone and want to retrieve & store data from public APIs:

For those wanting to use Kintone as a back-end database:

Where to Get Help?

Display the source blob
Display the rendered blob
Raw
Loading
Sorry, something went wrong. Reload?
Sorry, we cannot display this file.
Sorry, this file is invalid so it cannot be displayed.
Sign up for free to join this conversation on GitHub. Already have an account? Sign in to comment