##Getting Started
Resources
Goals
- Understand the purpose of version control systems
- Learn how to manage files with git and github
- Understand git branching (We didn't get to this, that's OK for now)
- Understand how to collaborate with others
What is version control, and why should you care?
Version control is a system that records changes to a file or set of files over time so that you can recall specific versions later. More specifically, a VCS allows you to:
- revert files back to a previous state
- revert the entire project back to a previous state
- review changes made over time
- collaborate on a set of files with others!!
- see who last modified something that might be causing a problem
Plus it functions as a backup system, a safe place for all your work. Using a VCS means that if you screw things up or lose files, you can generally recover easily. In addition, you get all this for very little overhead.
Software programming is a highly team based activity, large teams working together on single projects. That's why I love programming: A project is always more fun when you’ve got friends working with you.
So how do you collaborate in software projects, what are some useful workflows and best practices? Git and github provide a framework, tools and workflows for collaboration.
git
git is a version control system
github
It's a social network build around git. I has has completely changed the way we, as programmers, work. GitHub is now the largest online storage space of collaborative works.
git and github together is a distributed version control system
PIC: Distribute Version Control System http://git-scm.com/figures/18333fig0103-tn.png
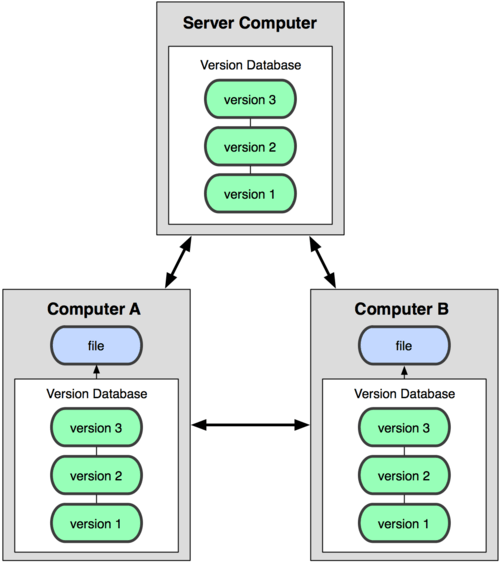
git is local (Computer A). Nearly every operation is local. Most operations in Git only need local files and resources to operate — generally no information is needed from another computer on your network. Advantage?
Github is the "Server Computer" and more, as we will see.
##Git
Check that git is installed
git --version
Let's put yesterday's lab code under git. For example, I put mine here:
cd ~/Code/wk1d1
The first step is creating a version database, a repository
git init
Now add files to the repo - this is also called staging. You can add files individually or the entire directory (includes sub dirs)
git add guessing_game.rb (add just a single file)
git add . (to add everything in the directory)
The files and folders are now under git management, or tracked.
Let's say you're done for now and want to save a version.
git commit -m 'initial commit'
Let's look of what we did
PIC: http://git-scm.com/figures/18333fig0106-tn.png
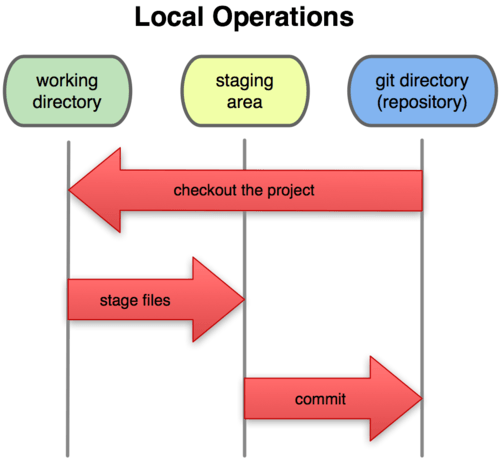
- working directory; that's root folder of your project
- staging area: now file is tracked in git
- git directory: a snapshot of your committed work
Now let's go and change a file … mess it up! Check status:
git status <file>
check differences, what changed since last commit
git diff <file>
How to we revert to a working version?
git checkout <file>
Now make a real change that you want to keep.
perhaps add comment
Now stage change (note: you use it to begin tracking new files or to stage files)
git add <file>
Commit first change - Now that your staging area is set up the way you want it, you can commit your changes. Remember that anything that is still unstaged — any files you have created or modified that you haven’t run git add on since you edited them
git commit -m 'comment' (commits only what was staged with git add)
Note Staging is optional: Although it can be amazingly useful for crafting commits exactly how you want them, the staging area is sometimes a bit more complex than you need in your workflow. If you want to skip the staging area, Git provides a simple shortcut. Providing the -a option to the git commit command makes Git automatically stage every file that is already tracked before doing the commit, letting you skip the git add part.
I recommend a workflow without 'staging'
Let's try this out. Make change and not stage it with add, but commit with -a option.
git commit -a  -m 'comment' //includes staging step **OR**
git commit -m 'comment' <file> or . //omits  staging step entirely
check log - shows the version history, let's take a look
git log <file>
getting help
git help <command> - super useful
My personal workflow usually looks like
- Do some programming.
- git status or . to see what files I changed.
- git diff or . to see exactly what I modified.
- git commit -m 'message' or . to commit
PIC: here's an overview of all file states: http://git-scm.com/figures/18333fig0201-tn.png
Remember that each file in your working directory can be in one of two states: tracked or untracked. Tracked files are files that were in the last snapshot; they can be unmodified, modified, or staged. Untracked files are everything else
We omitted the delete feature, let's do:
touch abc.txt git rm abc.txt git commit -a -m'deleted file'
##Github
Now, everything is still local, on your computer.
So far we have looked solely at local repositories, remember most of what you do in git is local. In order to share your code and collaborate, you need to create a remote repository.
Remote repositories are versions of your project that are hosted on the Internet or network somewhere. You can have several of them, each of which generally is either read-only or read/write for you. Collaborating with others involves managing these remote repositories and pushing and pulling data to and from them when you need to share work. Plus: remote repositories functions as backups, they cannot get lost, like your laptop. It is like saving 'in the cloud'.
Enter github - a place to host remote repositories.
Got to github.com and explore. Some interesting repositories:
- https://github.com/ruby - ruby source code
- https://github.com/facebook - facebook on github
- https://github.com/google - google on github
Now check configuration:
- git config --global user.name
- git config --global user.email
- git config -l | grep user
Ok, good to go.
Create repo, name it 'week1day1' (for example)
git remote add origin git@github.com:aikalima/week1day1.git
Reads: Connect the remote repository week1day1 with my local workspace, where it shall be known as 'origin'
Push changes to remote/github - you may have to authenticate.
Note: you can setup password caching see https://help.github.com/articles/set-up-git
git push origin master
Reads: Upload what is in my local repository (master) to github (origin)
Check if changes made it to github. Now make a local change. 5 min
make change
git commit -m 'my comment' .
git push origin master
Did change make it to remote?
Try cloning a repo. cd into /tmp direcory.
cd /tmp
git clone … (grab url from git repo page, either SSH or HTTPS)
##Branching
The master branch is where we’ve currently been working. Normally this branch is reserved for production code, meaning that it is ready to be put on production servers for the whole world to use. Instead, development is normally done on other branches. Currently there are master branches both locally and remotely.
Use case: Let's say you need to work on a larger feature that takes about a week, you want to create a separate code branch and start work there. This is called 'topic branch'. The idea is that you want to keep a clean, production ready master branch at all time. Why? Let's say a severe bug was discovered on the live web site, pointy haired boss asks you to fix it. You Create another branch from the clean master branch, fix the bug and merge the fix back to master.
List of branches:
git branch -av
Just like in a tree, you can create a branch off an existing branch.
git branch development
Now that a new branch has been created, let’s move to it.
git checkout development
git checkout -b development (create and switch at the same time)
Notice that the branch has changed. What was in master? Your files should also show up in the development branch because it was branched from the master. Check it using ls.
Ok, let's start working in this branch. Please go ahead an make a change, modify a file.
Commit the change and check git status.
If clean, switch back to 'master'
git checkout master
Now that we are back in master, we have to merge the changes form the dev branch back to master. Remember, master is our production branch, we always push to github from master.
check which branch you are in:
git branch
now merge development branch:
git merge development
This should succeed (happy path). Now that master is clean, push it to github.
Note: for lab assignments and mini projects, using branches is overkill. It's fine to work in the master branch. However, when you get to larger projects, branches become your friend.
#Activity - Collaboration
The real power of Git comes out when you are collaborating with others on a project.
If you own a repo, you can ask others to collaborate with you as contributors.
Get into pairs, one is A the other is B
A makes B collaborator on their repository
Github -> Repos page ->Settings > Collaborators
B clones repository of A on to their local machine
git clone <repo> -> first pull from github
B makes a change
git commit -m'a comment' <file>  -> updates git
git status <file>
git push origin master  -> updates github repo
A picks up changes
git pull origin master -> pulls from github repo
Setup password caching, also an exercise in command line usage:
https://help.github.com/articles/set-up-git
Interactive github tutorial, githug. Find it on github, clone, follow install instructions:
githug
You may encounter some new commands that we didn't have time to cover, for example:
tag / stash … look it up, google.