
Not a simple answer to the question:
- a CLI
- a collection of community tools
- a way of working
- A free GitHub organization with 2 free users (one will approve PRs and the other is a bot user used by the pipelines) OR just 2 free users (one will approve PRs and the other is a bot user used bythe pipelines)
- I will use the first option as it is closer to what you would do in a real team, but it doesn't really matter
- An AWS account to run the EKS cluster in.
- It is not that expensive to run the cluster just to give it a try (I estimated at around 0.18 USD per hour for 2 worker nodes) but it can become expensive to keep this cluster running all the time for personal use.
- Jenkins X needs the Kubernetes clusters to be set up in a certain way
- Jenkins X uses
eksctl(among other tools) to prepare the cluster this means that if you create the EKS cluster with some other tools, then you won't be able to deploy Jenkins X on that cluster (eksctlcan only make changes on clusters it creates) unless you manage to create manually all the resources Jenkins X requires - I found very little information on this topic - Therefore, the easiest way is to use the Jenkins X provided tools for creating the cluster
- How To
- Make sure to run
aws configurebefore creating the cluster and configure the authentication with your AWS account - To run all the CLIs, I am using an Ubuntu 18.04 VM running on Parallels
- You can use this shell script to install all the dependencies you need to go through this: https://gist.github.com/alexchiri/67d3a267e8dc05cdfdb34ae1e926001c
- New
jxversions are released every week, so the version from the gist might become quickly outdated - make sure to check here and update as needed
- I created an EKS cluster called
jenkins-x-ekswith 2t3a.mediumnodes (max 4) in us-east-1:jx create cluster eks --cluster-name='jenkins-x-eks' --skip-installation=true --node-type='t3a.medium' --nodes-min=2 --nodes-max=4 --region='us-east-1' --zones='us-east-1a,us-east-1b'- takes about 20 mins
- Make sure to run
- Clone the
jenkins-x-boot-configrepo:git clone https://github.com/jenkins-x/jenkins-x-boot-config.git environment-jenkins-x-eks-dev- This repo contains all the needed configuration for Jenkins X for different cloud providers
- During the Jenkins X installation, this local copy of the repo will be customised with your specific configuration details
- Your local copy of this repo will also be used to create the dev environment of Jenkins X in your cluster - where all the pipelines, among other things, will run - more on this later
- Do not clone this repo in the folder of another Git repo. In version
2.0.1275ofjxthis will cause the installation of Jenkins X in the cluster to fail.
- Change directory into it:
cd environment-jenkins-x-eks-dev - Edit
jx-requirements.yamland change provider toeks, setversionStream.reftov1.0.403(there seems to be an issue with the latest version, looks like the secret for ECR is missing and it cannot push docker images to it) and if you want, setenvironmentGitPublictotrue(the rest stays the same)- By setting
environmentGitPublictotrueyou tell Jenkins X to create all repositories for the environments as public (required if you intend to create the environment repos in a free GitHub organization like I will do next)
- By setting
- Run
jx bootfrom theenvironment-jenkins-x-eks-devfolder and we'll go through the options together- Enter
ywhen asked aboutDo you want to jx boot the jenkins-x-eks cluster? Git Owner name for environment repositories- here jx is expecting a GitHub username or organization where all the environment repositories will be created - I created a free organization on GitHub calledjenkinsx-playjust for this purpose and I will use it hereComma-separated git provider usernames of approvers for development environment repository- here you should also provide a list of GitHub usernames that will be able to make changes to the dev repo (the repo we use now to install Jenkins X). Whoever is in this list will be able to make changes to the Jenkins X cluster - I will provide my real GitHub username- Enter
yforDo you wish to continue?related to TLS - Go with the default
adminwhen it comes to theJenkins X Admin Username - Provide a password for the admin for
Jenkins X Admin Password- make sure you write it down somewhere, we will need it later Pipeline bot Git username- provide the GitHub username that would be used to create resources in GitHub - it can be any GitHub user, I used the bot account I created in the free organizationPipeline bot Git email address- this can be any email address, it will show up in the commits, but this doesn't have to be a real emailPipeline bot Git token- here you should provide a token for the bot Git user. If you press?and hitEnter, the CLI will give you more information, including a link that you can use to generate the token, while being logged in on GitHub:https://github.com/settings/tokens/new?scopes=repo,read:user,read:org,user:email,write:repo_hook,delete_repo- Go with the generated HMAC token at
HMAC token, used to validate incoming webhooks. Press enter to use the generated token- this token is used for making sure that only the whoever knows this token can trigger the pipelines - Enter
nwhen askedDo you want to configure an external Docker Registry? - Now
jxwill create the repositories for all the environments in the using the provided git credentials. By default, there will bedev,stagingandproductionenvironments created- Go check out the new repositories created
- Have a look at all the information
jxhas filled in injx-requirements.ymlin thedevenvironment
- To wrap it up,
jxwill install all the tools it needs in the cluster and when it is done, the CLI will exit - Run
kubectl get pods -Ato see all the services Jenkins X has installed in the cluster, you will notice it is quite a long list - If you run
kubectl get ingressyou notice that Jenkins X is exposing some of these services outside the cluster, we will touch on that soon
- Enter
- Change directory outside of the dev environment folder:
cd .. jx create quickstart --git-public -f react-quickstartgithub.com username:- this user is going to be used to set up the repository of the new app - I entered here my real GitHub userAPI Token:- I created a new API token for using my real GitHub user by following the linkhttps://github.com/settings/tokens/new?scopes=repo,read:user,read:org,user:email,write:repo_hook,delete_repoin a browser window where I am authenticated as that userWho should be the owner of the repository?- this can be a GitHub username or an organization - I will enter my free organization I created for this walkthrough - IMPORTANT: the user you entered previously should have access to do things in the context of the owner you enter here. So if the owner is an organization, then the user you entered previously should be a part of the organization and have the right permissionsEnter the new repository name:- name of the repository for the new app, I will usecool-react- Enter
yforWould you like to initialise git now? - Use the default
Commit message:by hitting Enter. - When the command finishes, the new application is created and several pipeline will start soon.
- Notice some useful commands listed in the output of the command:

There are multiple ways to check what pipelines are running:
- Using the
jx get activitycommand - it will display the stages of all the pipelines that have run or are running. You can filter the output using the-fparameter and you can watch the output for changes using the-wflag - Using the deck GUI that comes with Jenkins X
- You can find out its URL by looking at the ingress resources in the cluster with
kubectl get ingress, this was the output for me: - You're interested in the deck HOSTS value. You take that and put it in your browser and a login dialog should pop-up. This is where you use the Jenkins X username and password we configured during setup.
- You can find out its URL by looking at the ingress resources in the cluster with

At this point, you should notice up to 5 jobs in the deck GUI, either finished or in progress:
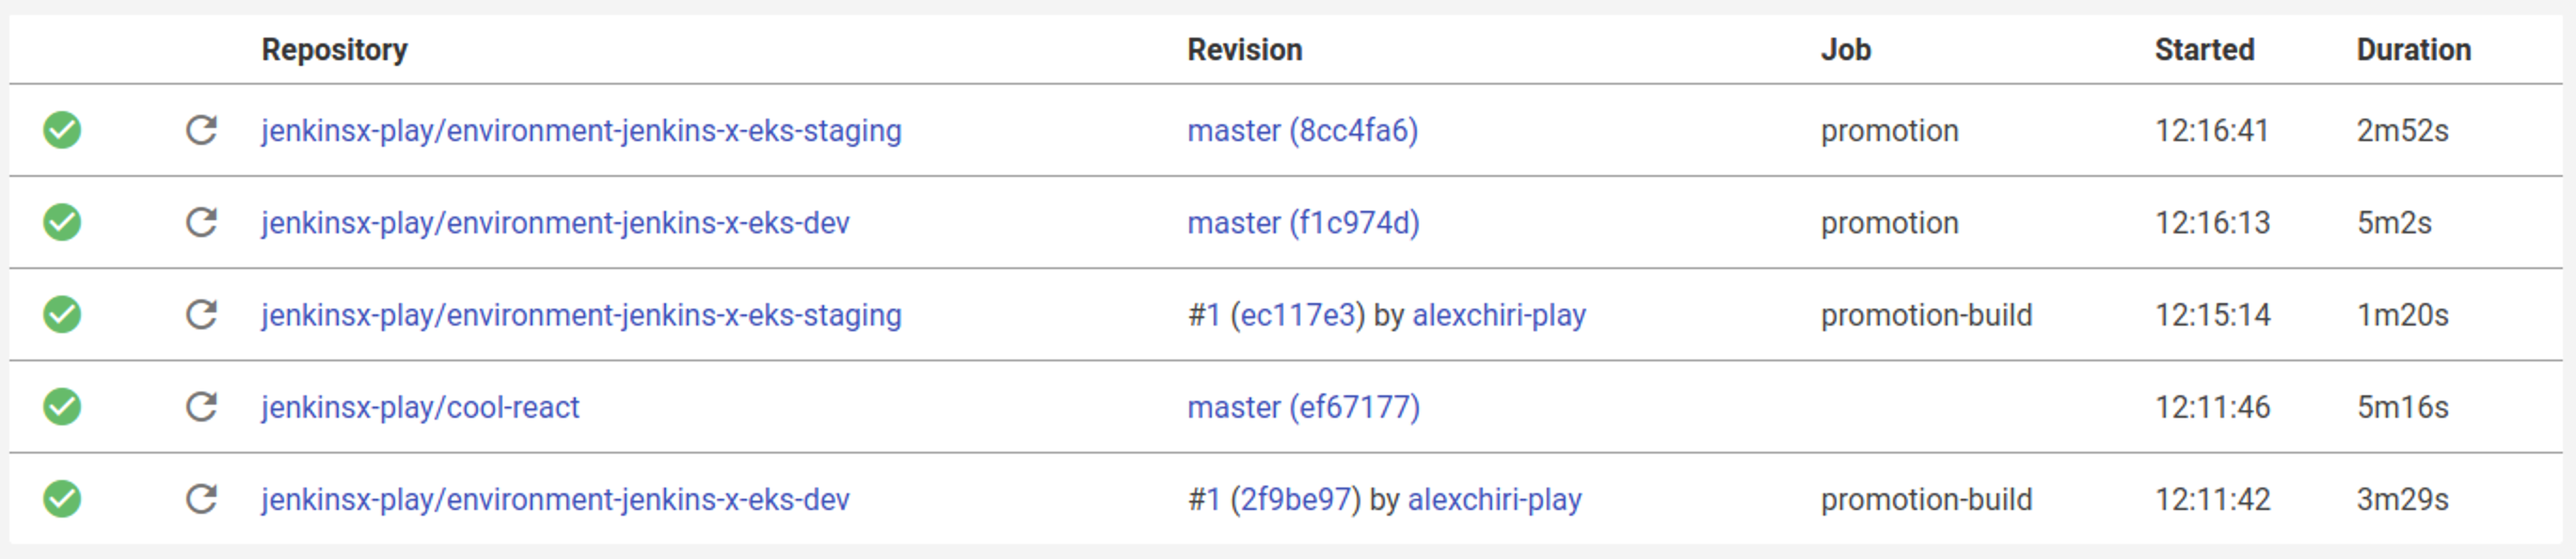
If you're wondering where these pipelines are defined, have a look at the jenkins-x.yaml files in each repo.
❗️All jenkins-x.yaml files can have 2 pipelines implemented: one for pull-request that builds when a pull request is created and one for release when a new commit is pushed in master.
- We'll talk more in the next section what each job did, but among other things, one of them deployed the app in staging
- You can see the URL using
jx get applications. For me it displays something like this: - And if you follow the URL, sure thing, you will see your new application running!
- The application is running in a pod in the
jx-stagingnamespace, you can check that by listing all the pods in that namespace usingkubectl get pods -n jx-staging


jx boot creates the namespace jx (among others) when installed in the cluster. This is where all the pipelines will actually run.
It also creates the repos for each environment in GitHub under the user or organization we have specified in the beginning. It installs webhooks from all the repos to the Jenkins X tools in the cluster so they get notified of all events (like commits, pull request created, comments etc)
3. We created a new application using a template provided by jx and a first version of it was already deployed in the staging environment
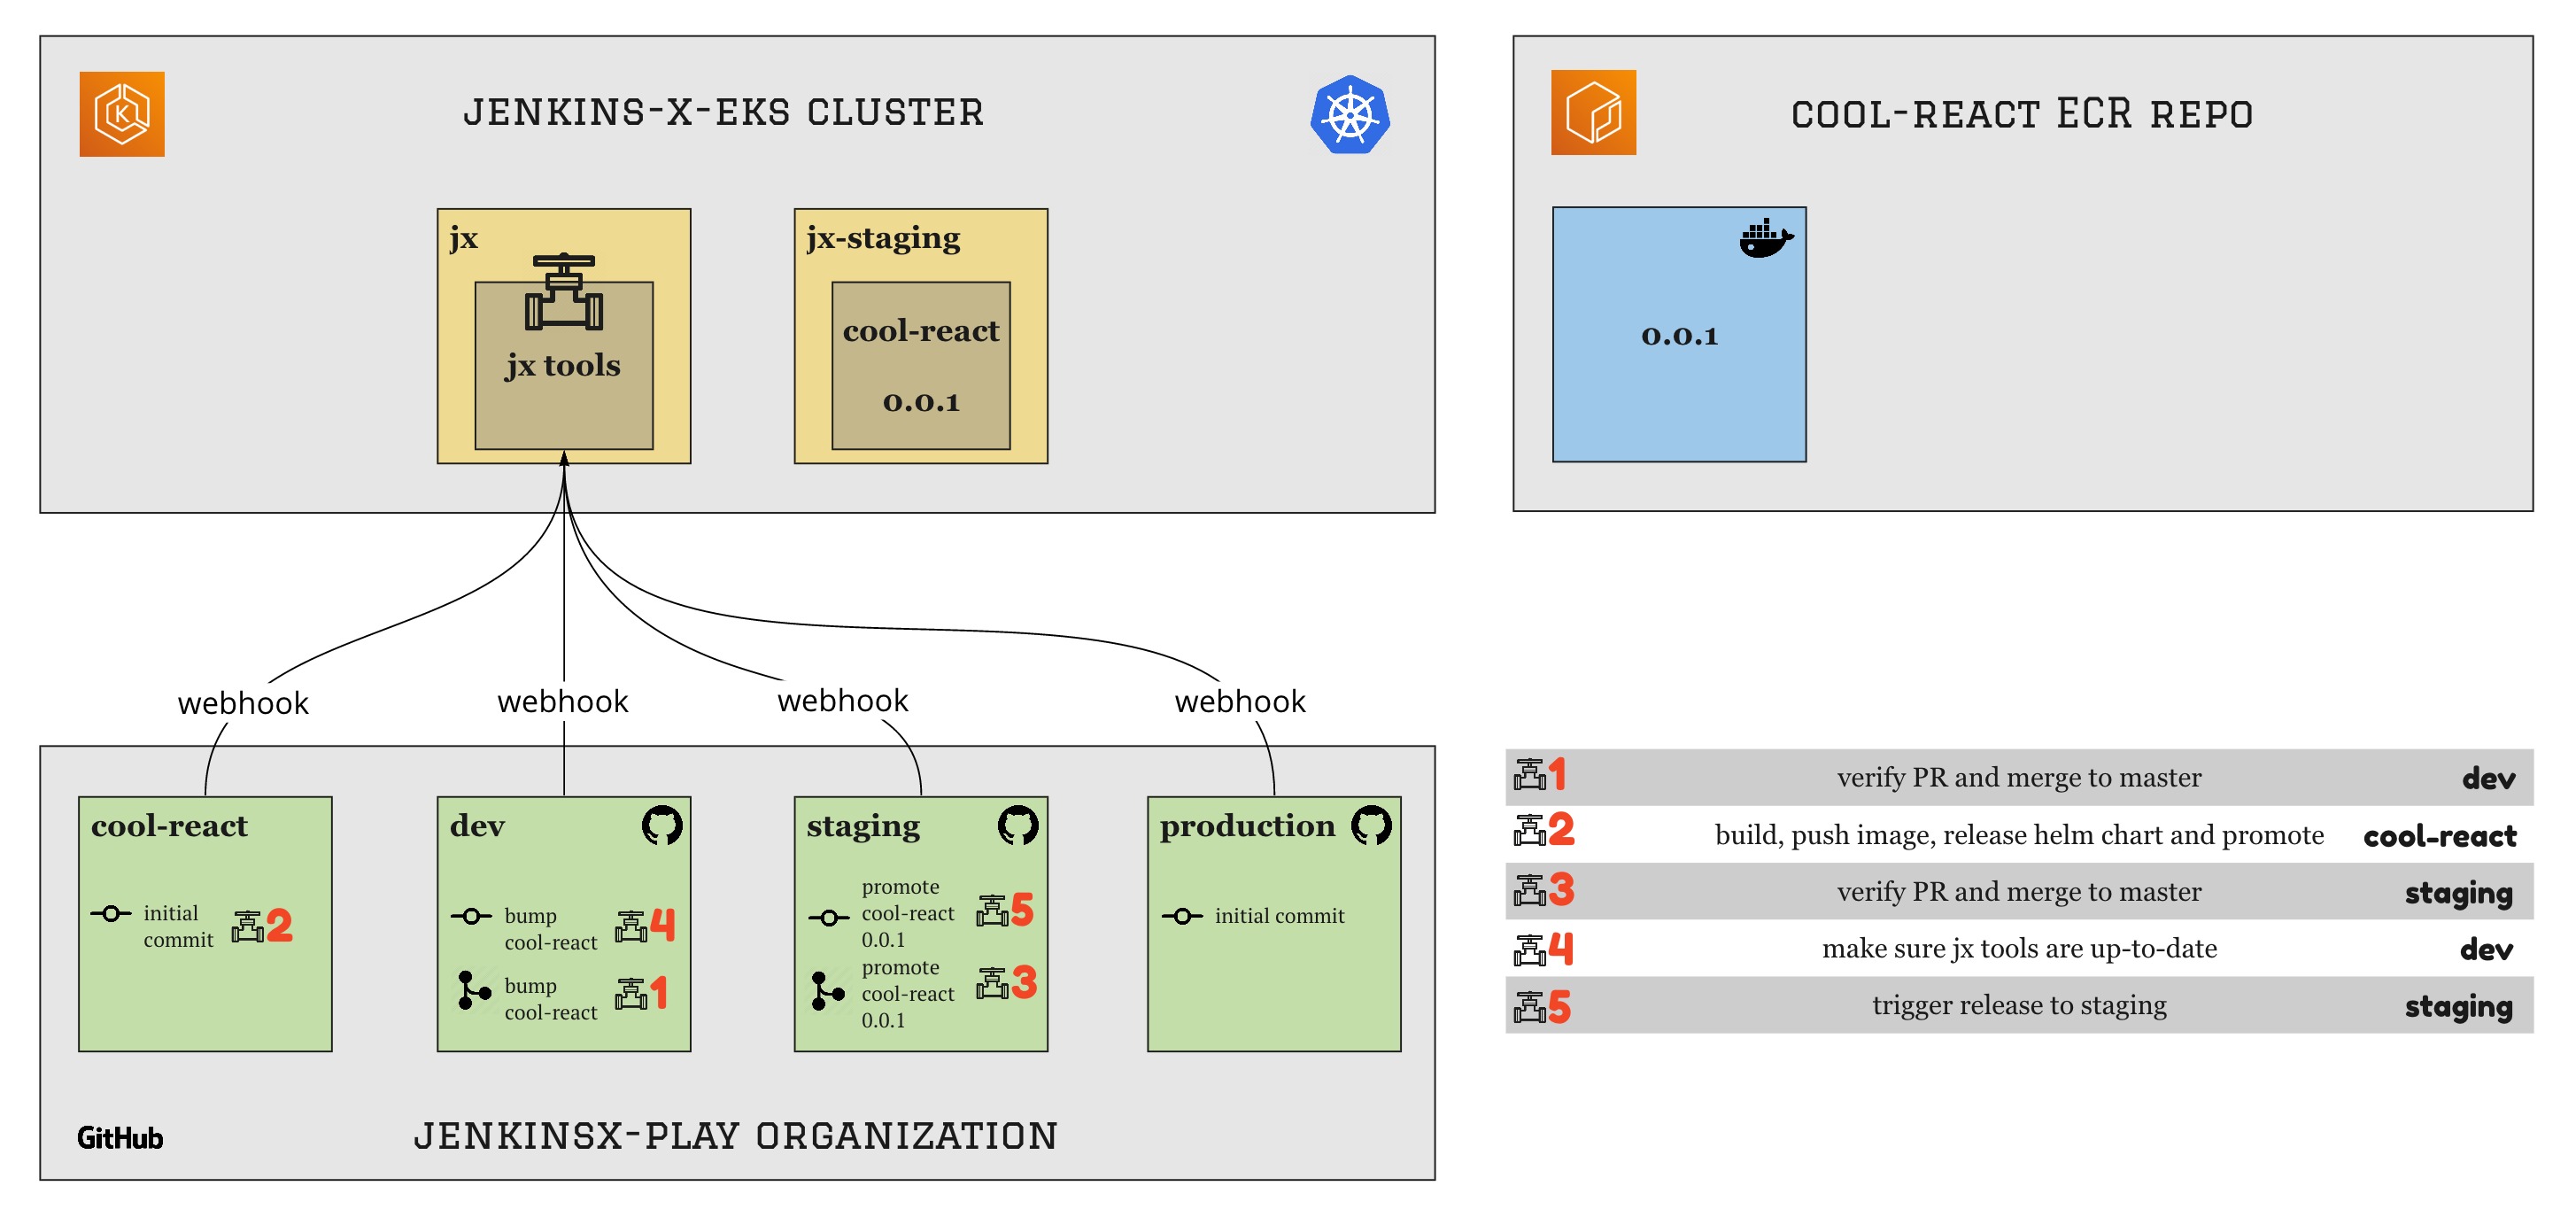
The new repo for the cool-react app has been created, together with a webhook - triggered pipeline 2
cool-react has been registered to the dev environment in a branch (which triggered pipeline 1), which is later on merged to master and triggers pipeline 4
Automatic promotion on the staging environment is on, so cool-react 0.0.1 is promoted, first in a branch (which triggered pipeline 3) which is later on merge to master and triggers pipeline 5. Pipeline 5 triggers a release of cool-react 0.0.1 to staging.
- Clone the app repo using the non-bot user in GitHub.
- Let's make a small change in the react app by editing the file
src > components > App.jsand add an extra line of text. - Commit and push to a separate branch, let's call it
small-change - Using the non-bot GitHub user, make a PR towards master from this new branch
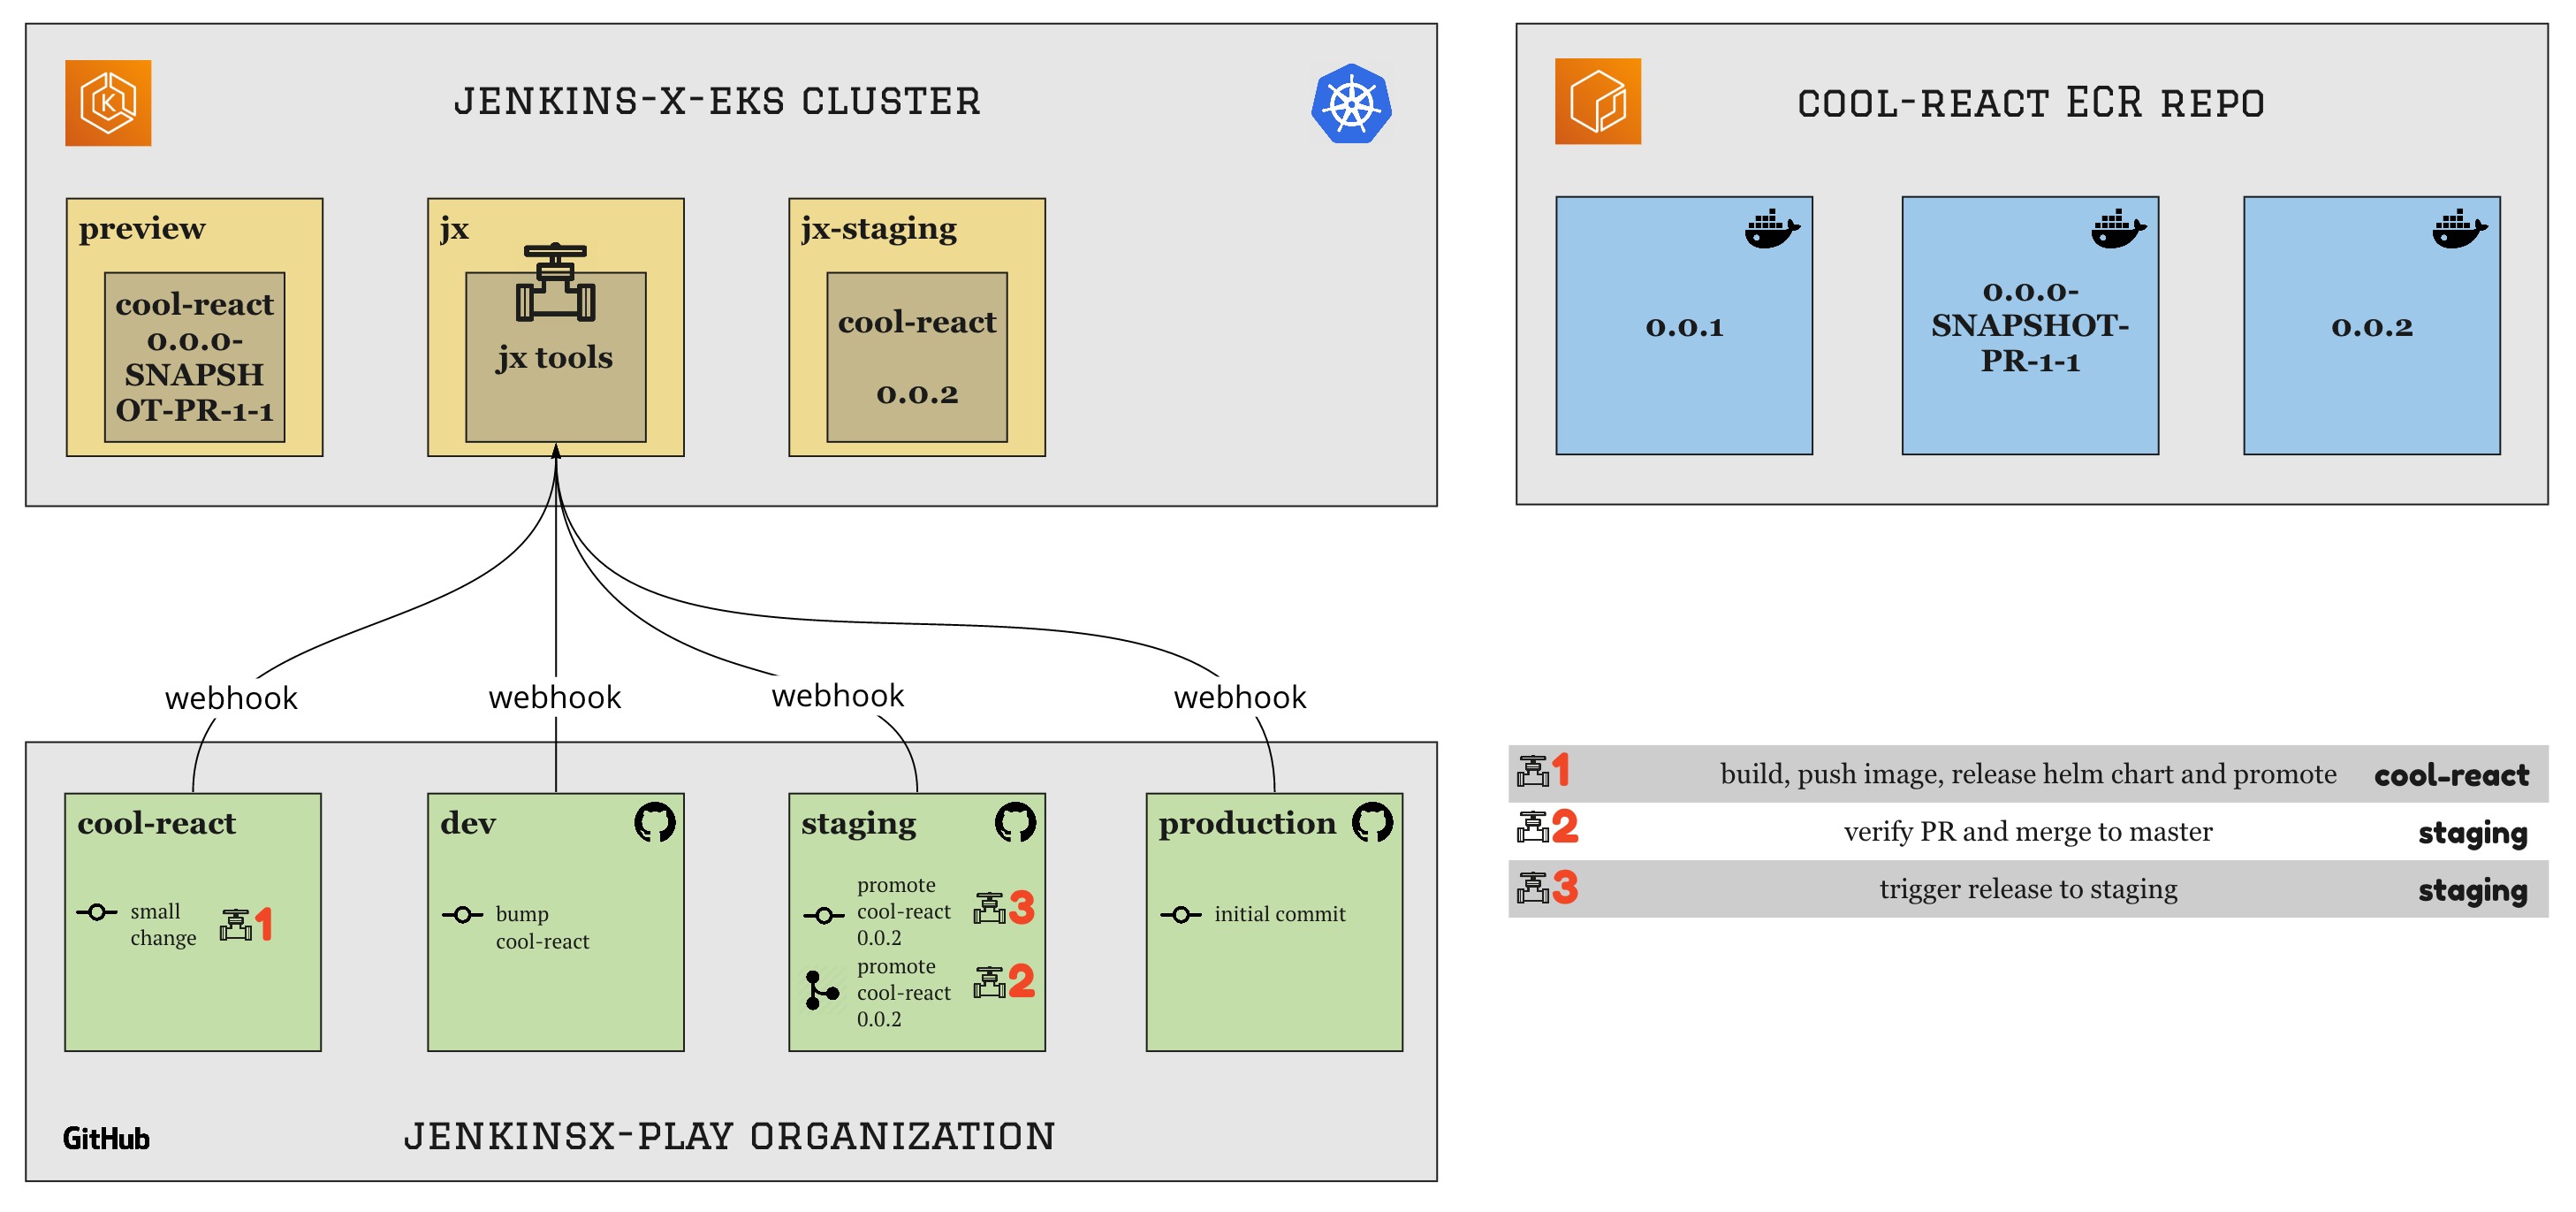
- In a few moments, a new pipeline will start and soon enough a new comment will be added to the PR linking to a preview of the changes you made:
The moment we create the PR in the
cool-reactrepo, it triggers the pull-request pipeline of the repo This pipeline creates a new Docker image and pushes it to the ECR repo and finally deploys it into the temporary preview environment

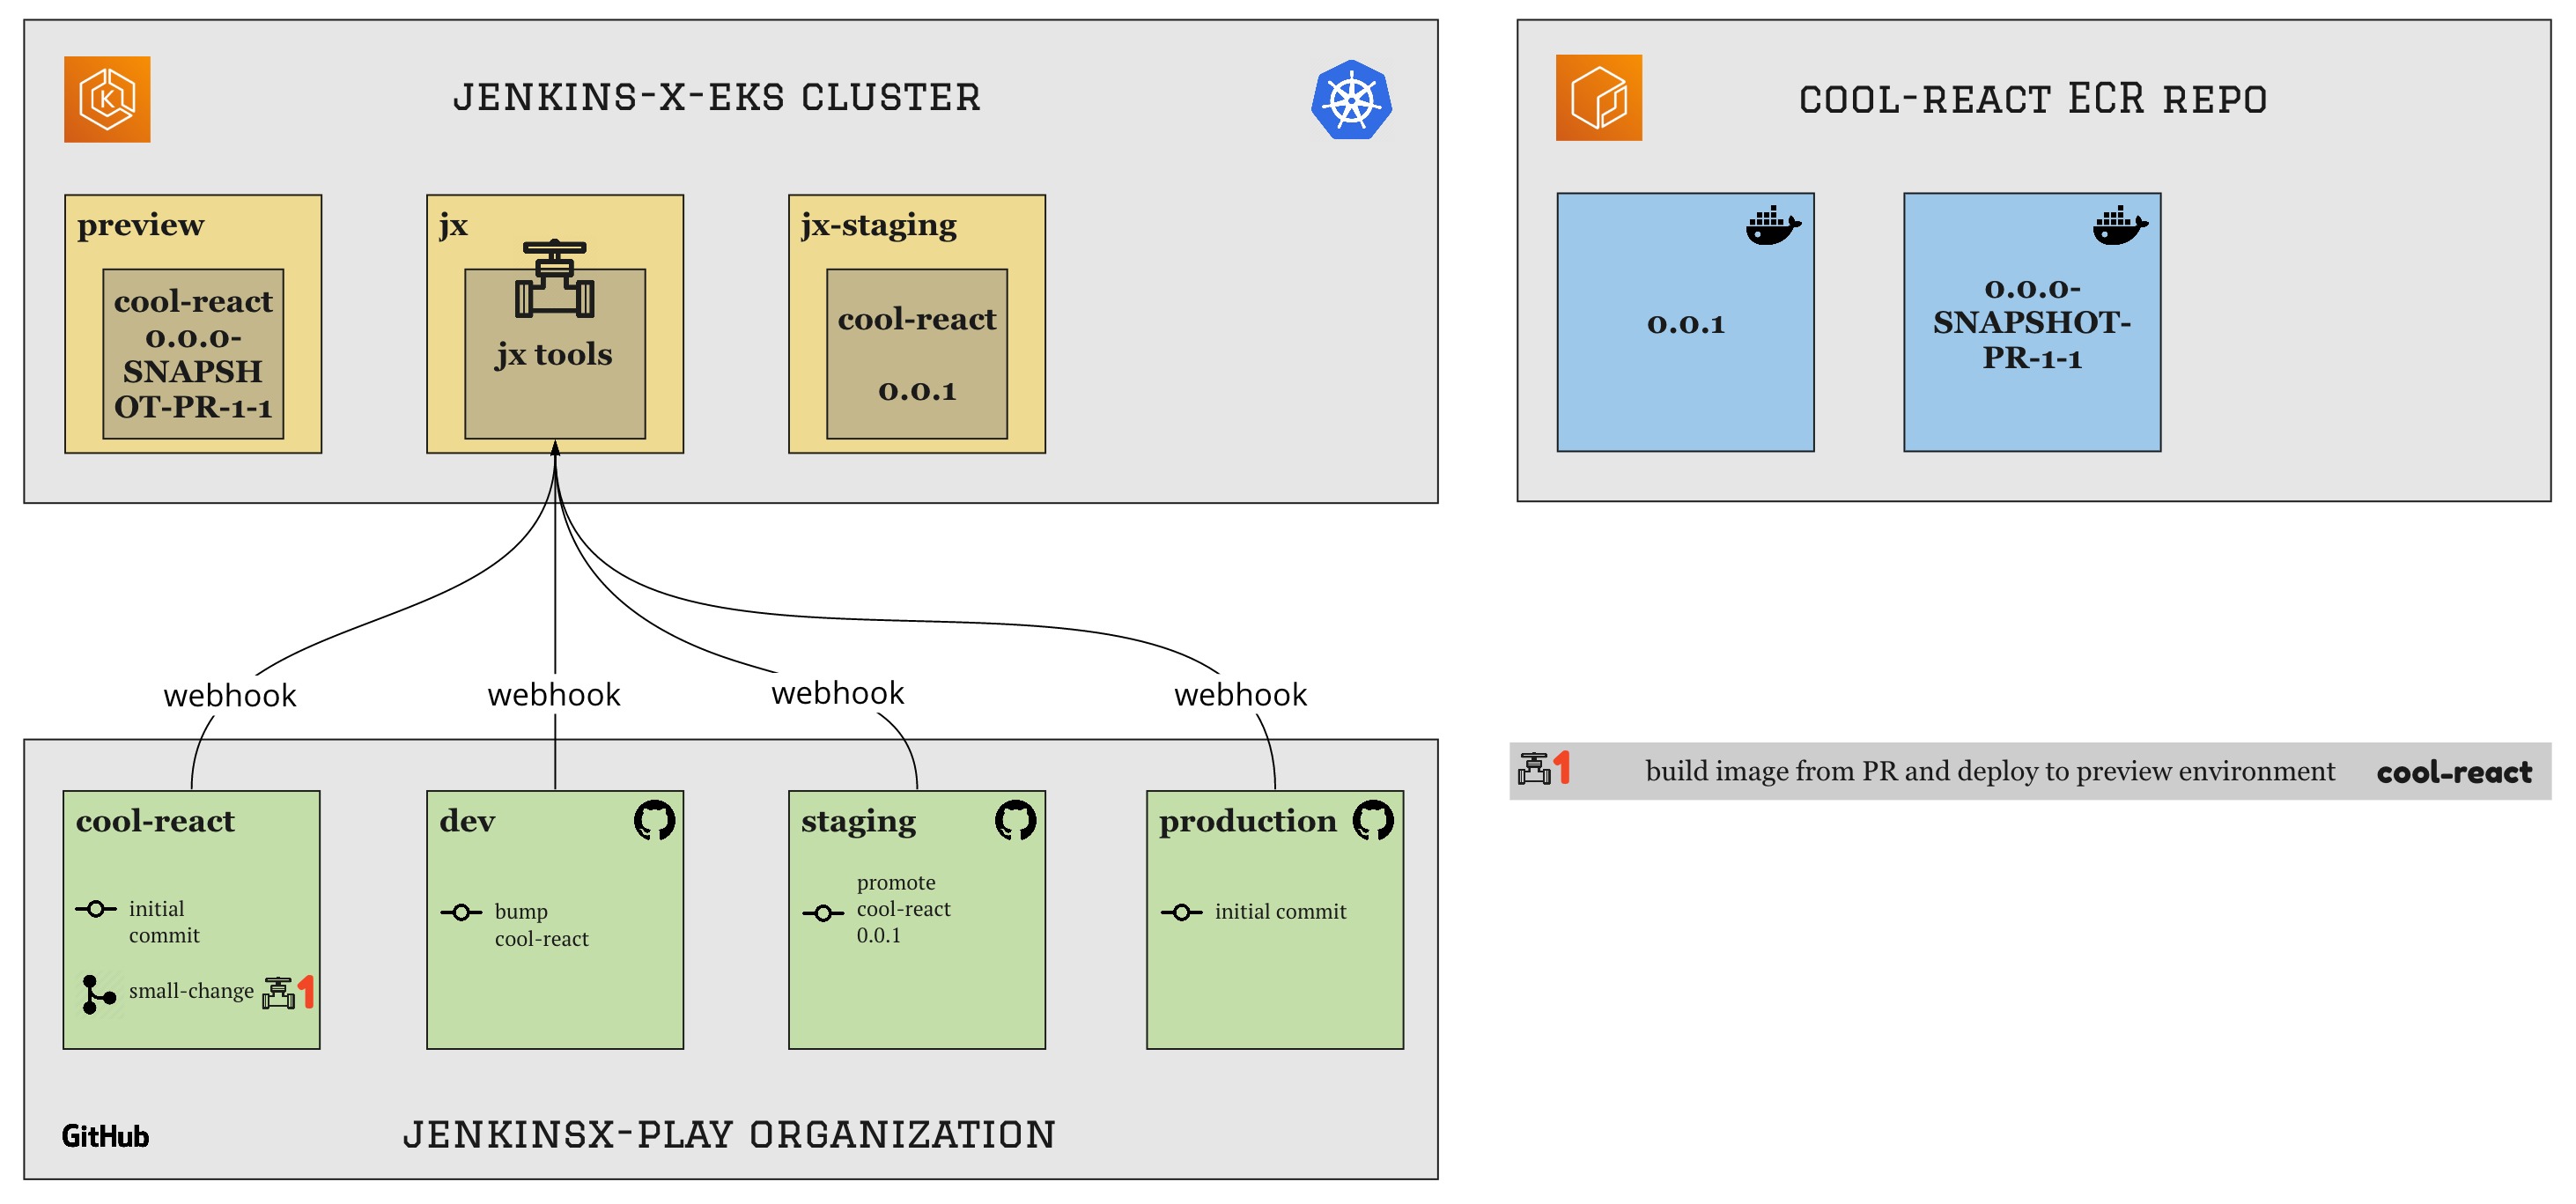
- If we are satisfied with the change, we can approve it and it will then be automatically merged and released to staging
- Only the GitHub users that are present in the
OWNERSfile of the app repo can approve changes. - In order to approve a PR, then we need to login as one of the users, go to the PR and simply add a comment with the text
/approve. This will trigger one of the Jenkins X tools running in our cluster to merge the PR to master, which will trigger the normal automatic promote to staging.
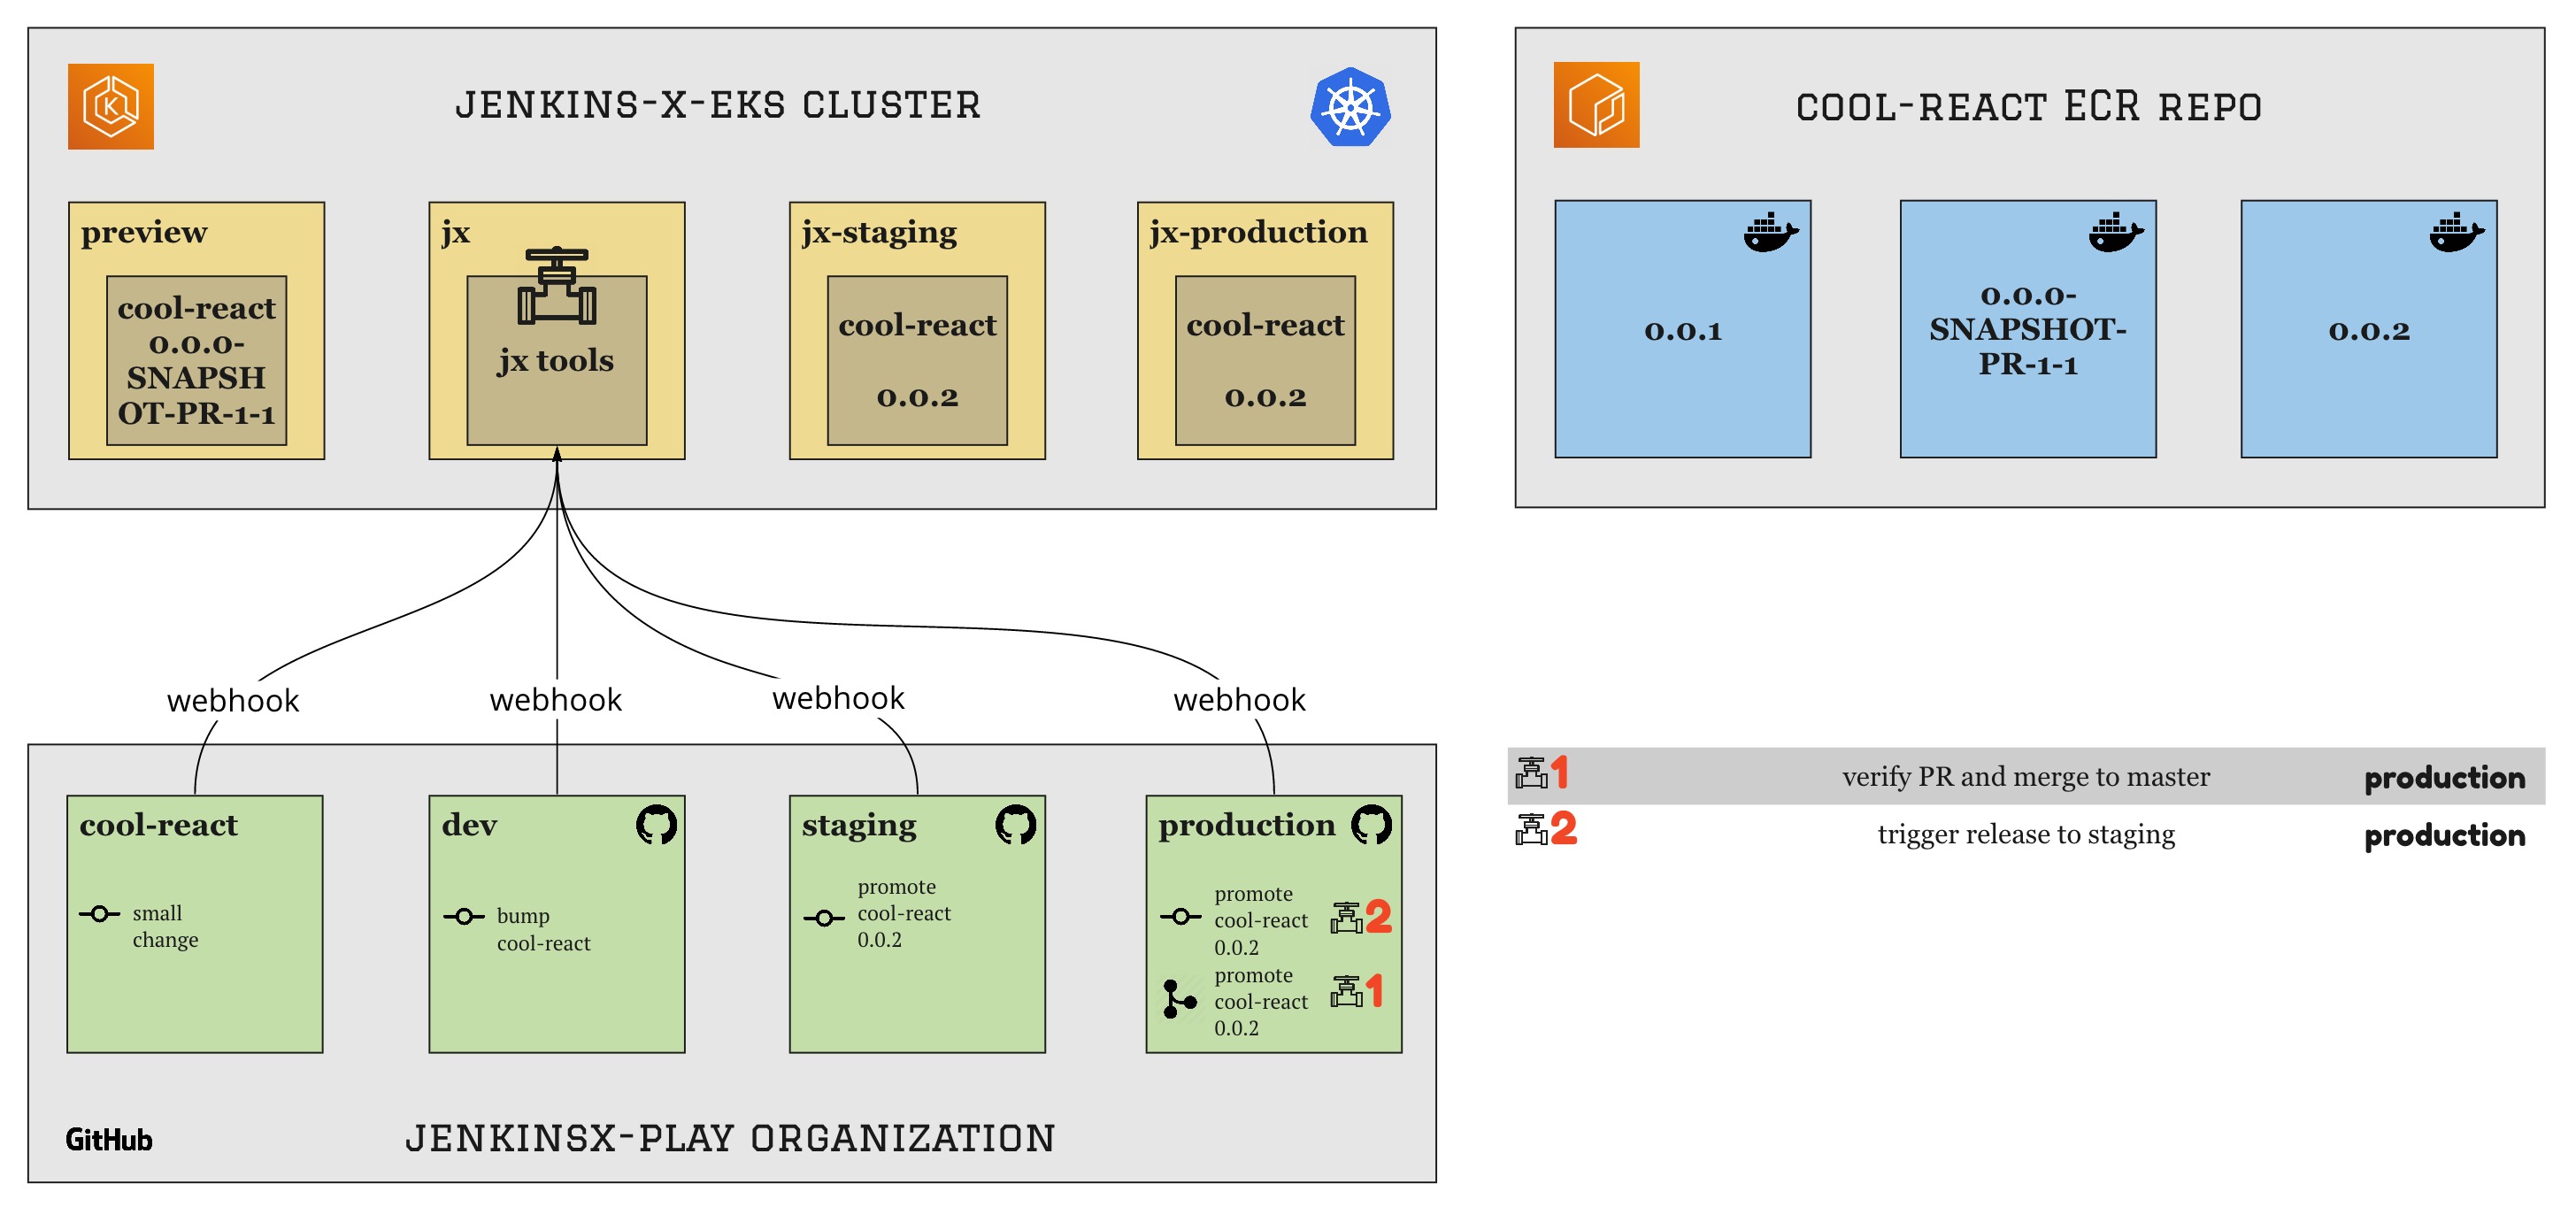
- Once we have done our integration tests or whatever we do in staging, we need to release the new feature to production.
- While releasing to staging is automatic by default in Jenkins X, the release to production is manual and requires us to run a command to do so.
- To promote version 0.0.2 of
cool-reactto production we simply need to run the following command from inside thecool-reactrepo:jx promote --version 0.0.2 --env production
eksctl delete cluster -n jenkins-x-eks -r us-east-1 -w- delete repository and images from ECR
- delete any remaining EBS volumes
- delete repos (from organization and from bot user)
- delete personal access tokens
- delete .jx folder and local copies of the environments
- delete Cloudformation stacks