Inspired by https://gist.github.com/blixt/97009dfa3eb916dbd4624a38191fe10d and https://github.com/steventhegeek/Parsec-Cloud-Preparation-Tool. Thanks to @blixt and @steventhegeek :)
We'll be creating a new Virtual Machine on Microsoft's cloud platform, Azure. The VM will have a beefy GPU just like a home computer so it can be used for playing games.
-
Go to the Azure portal and sign up or log in.
-
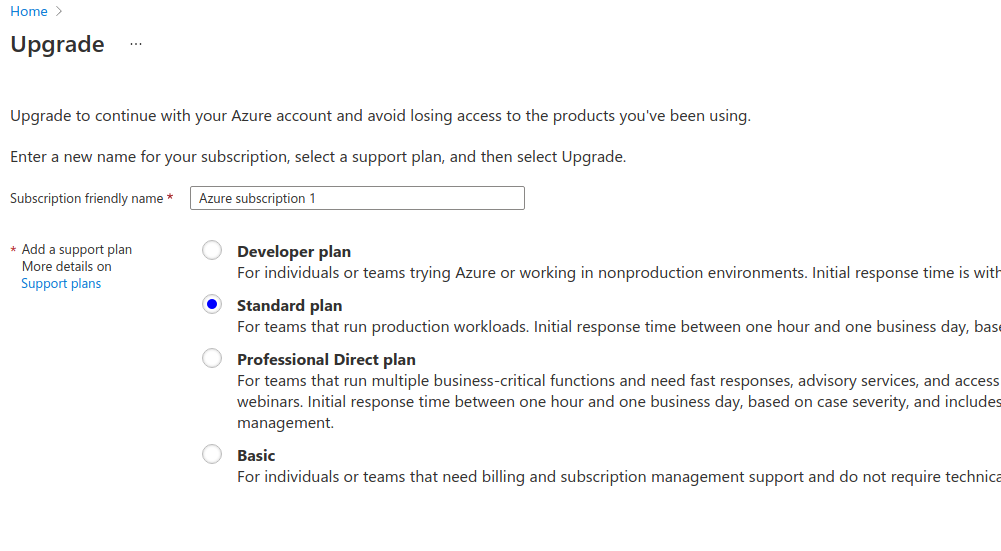
If you are on a Free account, first go to Subscriptions and upgrade it to a Pay-as-you-go plan. Don't worry, you will get to keep any free credits you have. Azure's interface is a bit slow so this will take a minute.
⚠️ Make sure to not include any support plan because they will charge you monthly! -
Go to Virtual machines and Add a new machine.
-
Create a Resource group (I named mine "Gaming") if you need to.
-
Give the machine a name (I named mine "Windows10").
-
Pick a Region close to you. Make sure the region you pick is close to you by checking where it is on a map.
-
Pick a Windows 10 Pro Image (I chose the 1809 release).
⚠️ This is important for Virtual Desktop to work. I tried Windows Server in multiple different configurations and it just wouldn't work. -
Under Size, pick an NV6 image. I was able to use the
Standard_NV6_Promosize, which is much cheaper. If an option is grayed out, hover the little i to see why. You may need to increase the size of the VM size column to see it. -
Enter the Username and Password that you'll use to log into Windows (and Remote Desktop).
-
Under Select inbound ports, enable RDP because you'll need it to connect to the machine.
-
Go to the Next step and add an SSD disk. I added a 128 GB one, which was enough for my needs. Note that over time storage can be the biggest cost of having a VM.
-
Now you can basically continue Next until you get to Review + create. You may want to enable Auto-shutdown under Management in case you forget to turn it off or fall asleep. You will be charged by the hour for a cloud computer.
-
Wait for it to be deployed!
-
-
Add the graphics card drivers to the Virtual Machine
- First select the VM that you created
- Under Settings in the VM sidebar, find the Extensions item and click it
- Click Add to add an extension
- Click NVIDIA GPU Driver Extension
- Press Create and then OK
- Wait for it to finish
-
Start up Microsoft Remote Desktop on a computer. If you're on a Mac, download it from the App Store.
- Add a new Desktop. Use the Public IP that Azure shows you for your new VM. You can also press the Connect button in Azure which will generate an RDP configuration for you.
- Check Connect to an admin session and if you want to, you can also add the User account (username and password from before) here so you don't have to enter them on connect.
- You can now connect to your VM and you should see it logging in.
-
Set up Virtual Desktop
- Get the Virtual Desktop Streamer application from the Virtual Desktop website.
- Run the downloaded file and follow the instructions (you may have to set up .NET Redistributable).
- Once the application is running, enter your Oculus username and hit Save.
-
Install Steam, SteamVR, and your favorite VR game
- Download and install Steam.
- Launch Steam and log in.
- You will probably need to let it update and restart the first time you launch it.
- Search for SteamVR in the Store and Launch it. This will cause it to download. You don't need to launch it yet.
- Download and install your favorite VR game on Steam.
- Log in to your VM via RDP and make note of the password - you'll need it later
- Open Powershell on the cloud machine.
- Copy the below code and follow the instructions in the script - you'll see them in RED:
[Net.ServicePointManager]::SecurityProtocol = "tls12, tls11, tls"
(New-Object System.Net.WebClient).DownloadFile("https://github.com/steventhegeek/Parsec-Cloud-Preparation-Tool/archive/master.zip","$ENV:UserProfile\Downloads\Parsec-Cloud-Preparation-Tool.zip")
New-Item -Path $ENV:UserProfile\Downloads\Parsec-Cloud-Preparation-Tool -ItemType Directory
Expand-Archive $ENV:UserProfile\Downloads\Parsec-Cloud-Preparation-Tool.Zip -DestinationPath $ENV:UserProfile\Downloads\Parsec-Cloud-Preparation-Tool
CD $ENV:UserProfile\Downloads\Parsec-Cloud-Preparation-Tool\Parsec-Cloud-Preparation-Tool-master\
Powershell.exe -File $ENV:UserProfile\Downloads\Parsec-Cloud-Preparation-Tool\Parsec-Cloud-Preparation-Tool-master\Loader.ps1
- You can now continue to the Setting up your Oculus Quest section.
You may need to go to the Device Manager in Windows and turn off the default display adapter (the non-NVIDIA one).
- https://lg.io/2016/10/12/cloudy-gamer-playing-overwatch-on-azures-new-monster-gpu-instances.html
- https://medium.com/microsoftazure/a-beginners-guide-to-cloud-gaming-c3e8a5915440
For this you will need to purchase and sideload Virtual Desktop on your Oculus Quest. This is a great app that will let you stream any computer desktop into a virtual space, and more importantly for this guide, also let you hook up SteamVR on that computer. The SteamVR integration is very impressive, as the computer will think you have an Oculus Rift S hooked up and will track head and hand controllers perfectly, and map buttons correctly.
- Get Virtual Desktop on the Quest store.
- (If you don't know what sideloading is, read the section after this one first.)
- Sideload the .apk that has SteamVR support over the official version.
- Your VM should show up in the Computers list.
- Connect to it and use Virtual Desktop's Launch SteamVR action.
The term "sideloading" means installing something from the side, that is something not from the official store. Developers use this to test their unreleased apps, and it's also a way for more adventurous people out there to install apps that haven't made their way onto the store for various reasons.
For sideloading you will use SideQuest. It's best you follow their guide for setting up your Oculus Quest. Once you've done that you can come back to this guide.
Without realising, this is what I believe Parsec is avoiding as I had previously used Remote Desktop and did experience this green screen. Using Parsec to access the VM when you need to seems to make it work in my experience :)