#Deploying BootCamp with DeployStudio & MDT/LiteTouch
So, you have a Windows Deployment Server and you'd like to use Microsoft Deployment Toolkit to image your Windows partitions on your dual-boot Macs.
Over the years--judging by the date of some of the posts I've seen on the topic--it seems that using MDT or SCCM to install BootCamp on a Mac en masse was more common in the past than it is now. Several folks cite their LiteTouch Task Sequences failing with this error or that ever since they upgraded from 2010 to something more modern.
There are other deployment tools out there for putting Windows on a Mac, but few are as flexible and modular as MDT--and things get even trickier in some ways with newer Macs that don't support Legacy booting, as their boot information is written to the EFI partition.
Using Windows-based installation tools ensures that the proper boot information gets written right the first time in the way Microsoft intended, no matter whether you are imaging a Legacy or UEFI-style installation of Windows.
So, after scouring around, breaking things and several late nights at work, I've come up with a solution that works.
-
There have been some modifications to this procedure since the introduction of APFS and 10.13--mainly at the partitioning steps. I will not be covering any quirks regarding APFS in the imaging process at this time--there are several ways one might wish to tackle that issue. However the Windows partitioning scripts have been modified appropriately.
-
This guide is written with DeployStudio in mind as your OS X imaging system. You may choose to use another OS X imaging system such as Imagr, in conjunction with a tool like WinClone to restore NTFS images--it should be possible to adapt these techniques to using those tools.
-
This guide is adaptable to multiple versions of Windows & several generations of Macs--but will focus on deploying 64-bit operating systems to computers that support 64-bit architecture.
These are the requirements for a functional MDT/LiteTouch to Mac deployment:
Windows Server 2008 R2 or better with:
- Windows ADK(Assessment & Deployment Kit) version 10
- MDT 2013 (I'm running Update 2 at the moment)
- A Deployment Share on your server
A Windows workstation, preferably running Windows 10 Pro/Enterprise with:
- Windows ADK version 10 installed, including the Deployment Imaging Tools Environment (
An OS X Server running DeployStudio
- A specific DeployStudio version is not required, although this guide was made originally using 1.6.15 and later, 1.7.2.
A Windows workstation, preferably running Windows 10 Pro/Enterprise with:
- Windows ADK version 10 installed
A Mac OS X workstation with DeployStudio Admin installed
A USB key, for preparing and cpaturing the WinPE boot media
A Mac for testing purposes
Now that we know what we need, we can get started. The general flow of our dual-boot deployment process goes like this:
- Mac boots to Deploystudio
- Dual-boot Workflow is selected
- Script determines Legacy or UEFI compatible WinPE
- Deploy OS X
- Deploy MDT/LiteTouch WinPE
- Run OS X post-image scripts
- Boot to WinPE
- Run Task Sequence
- MDT TS determines Legacy vs UEFI
- Run appropriate disk partitioning script
- Install Windows
The first thing we need to do is prepare the WinPE that will let us install Windows via MDT.
Let's configure our Deployment Share with a rule or two. Log onto your Windows Server and open Deployment Workbench. Right-click on your Deployment Share and select Properties. In the Properties window, select the 'Rules' tab and enter 'MAKE,' before 'Default' in the Priority line under [Settings], like this:
[Settings]
Priority=MAKE, Default
Properties=MyCustomProperty
Then create a new section at the bottom of the file that looks like this:
[Apple Inc.]
DONOTFORMATANDPARTITION=YES
This will ensure that when MDT runs a Task Sequence, it won't assume we're wiping the entire disk and erase our OSX partition. We'll go ahead and make specific Task Sequence format steps later--this step is necessary because this rule gets baked into the WinPE that we'll be booting from later on.
Now let's see about exporting said WinPE. In your Deployment Share's Properties, go to the 'General' tab, select the 'x64' checkbox, and uncheck the 'x86' checkbox, unless you plan to be putting 32-bit Windows on very old Macs.
We're going to need a couple extra features than a standard LiteTouch PE, so go to the 'Windows PE' tab, select the Platform pulldown, pick x64. In the 'General' sub-tab, uncheck 'Generate a Lite Touch bootable ISO image'--we won't be using this, so might as well cut some time off our boot-image building. Now, go to the 'Features' sub-tab. Make sure these feature packs are checked:
- Microsoft Data Access Components (MDAC/ADO) support
- .NET Framework
- Windows Powershell
- Storage Management Cmdlets
Click Apply & OK.
Now right-click on your Deployment Share and choose 'Update Deployment Share'. Select 'Completely Regenerate the Boot Images' and hit Next. This will take a little while. Go to your Windows workstation.
My favorite way to generate the MDT WinPE boot media is to create a generic WinPE using the CopyPE command in the Deployment Imaging Tools Environment on our Windows workstation, and then stick the LiteTouch .wim inside of it. I've had the best results with this procedure for creating capturable boot media.
Find the Deployment Imaging Tools Environment by searching for it among your installed applications--it should look like a Command Prompt icon. Start it as an administrator. This will open a Command Prompt environment with special path variables, giving you access to deployment commands not normally available.
Use the CopyPE command to generate a 64-bit WinPE in a directory of your choice:
copype amd64 C:\WinPE_MDT
More info on CopyPE is here.
While that's going, go back to your Windows Server and check if your LiteTouch boot image has been regenerated. When it is done, navigate to the root of your Deployment Share and go to the Boot folder. Inside, you should see a file named 'LiteTouchPE_x64.wim'.
Copy that to your Windows workstation, and rename it to 'Boot.wim'. Your workstation should be done generating the generic WinPE. Replace the Boot.wim at C:\WinPE_MDT\media\sources with your renamed LiteTouch .wim file.
Your WinPE media is ready to be captured into bootable formats for both UEFI Windows-capable & Legacy Windows Macs. To boot UEFI Macs, the solution is quite simple. Copy the contents of C:\WinPE_MDT\media to a folder on your DeployStudio file repository, under the Files share. Call your folder something like MDT- so you can tell separate boot media apart, if you've got multiple shares.
Now we're ready to create the USB key. Plug it in to your Windows box and format it as NTFS.
Copy the contents of C:\WinPE_MDT\media to the root of your USB key. Once that's done, you're ready to capture it as an NTFS image in DeployStudio from your Mac. Make sure that your workflow that creates a Windows Master is set to compress the image--best results are obtained when restoring small images to large drives when the filesystem is compressed beforehand & expanded to fill out the space in the target partition.
Now that our WinPE images/files are on DeployStudio, they're almost ready to go. I recommend the creation of two Meta workflows for the different install types.
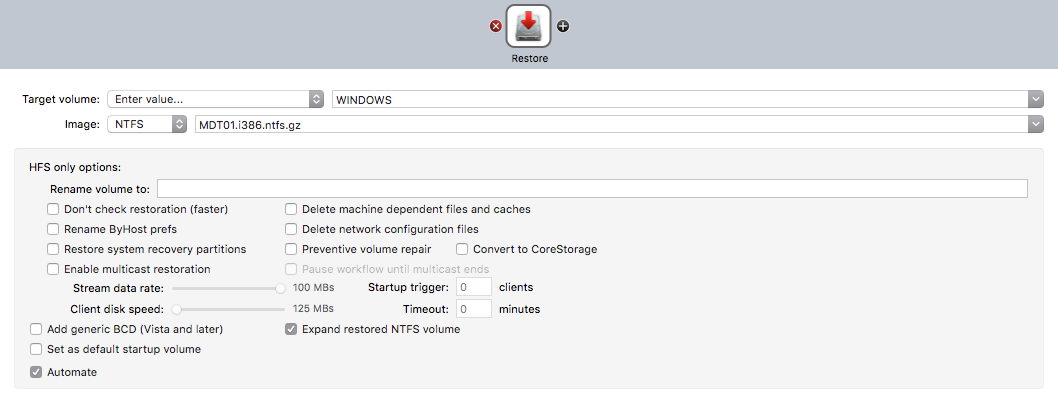
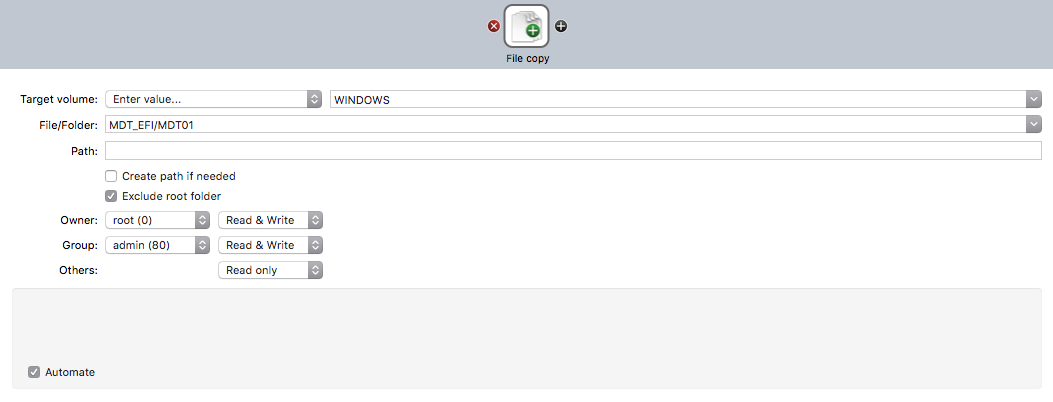
The NTFS/Legacy image requires little in the way of further configuration. Just image it to a FAT-formatted drive in the fourth partition.
The EFI-bootable WinPE is not deployed as an Image Restore function, but actually as a Copy Files step in DeployStudio, copying the contents of your MDT folder onto a FAT partition on the target Mac.
Here are some screenshots of the two Meta workflows for the install step:
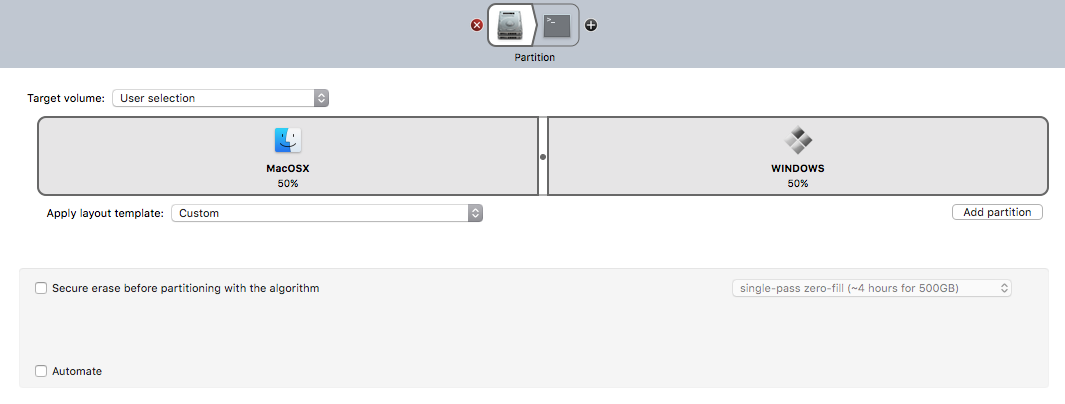
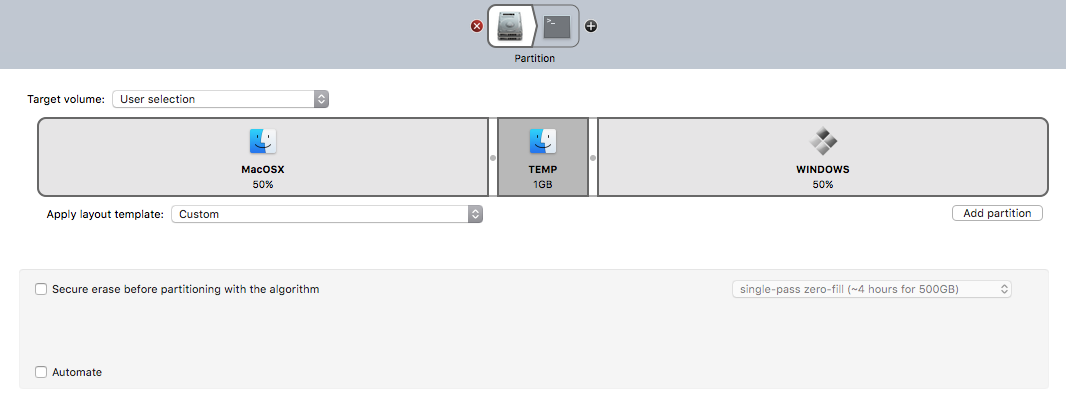
There is a funny partitioning trick to making the UEFI style install bootable, however.
NOTE This has changed with the introduction of 10.13 and creation of the dummy partition for EFI boot setups is no longer necessary if you are using a 10.13-based netboot. This means that the two Meta workflows for partitioning are unnecessary. However, if your netboot is 10.12-based then this still applies.
When Disk Utility is told to create a FAT partition in slot 4, it assumes you want a Legacy boot setup and does some magic in the background away from prying eyes, and automatically sets up the Hybrid MBR required for Legacy booting.
If we want an EFI-based boot, we need to create our FAT partition in the 5th slot. The trick is to create a small partition in slot 4(say, 1GB), formatted as the native OSX filesystem JHFS+. Then, fill the rest of the disk with your target Windows partition--formatted as FAT. This will avoid creating the Hybrid MBR and allow our EFI installer to boot properly.
If you are using a 10.13-based netboot, instead of creating the 1 GB JHFS+ partition, you can just create the FAT partition in slot 4, however diskutil will no longer auto-create a hybrid MBR for you. I've written a script to automate the creation of a Hybrid MBR using fdisk:
If a disk contains a Hybrid MBR, and you copy the EFI-boot WinPE files and attempt to boot from them, you'll be greeted with the Blue Screen Of Death :(
And of course, if you try to image a Legacy Boot-style partition on a newer MacBook Pro(2015 or newer) then it won't even show up as a boot option in the Startup Manager.
If either of those things are happening--that's a sign your partition table is incorrectly configured and you need to double check it.
All of this means that partitioning for the 2 styles of installation is different--which means we should make Meta workflows for these partitioning tasks as well--here are examples of mine:
Now we can use a script to select the right Meta workflows depending on the computer model.
Here is the script I use for this:
DeployStudio Legacy/UEFI Script
Since there are 2 Meta steps, Partition and Install, you need a script for each. The core of the script remains the same, just the filename and the workflow identifiers should be changed.
As a general DeployStudio tip: your MDT Install step(or any windows/bootcamp restore step) should be located BEFORE your OSX image restore step in your DeployStudio workflows. For reasons unknown to myself, restoring an ntfs image after the OSX partition in a workflow tends to be flaky and will often trigger workflow failures.
At this point, your WinPE should be functionally booting. Now we can move on to getting Windows to install properly without wiping out your whole disk.
For just getting the OS install to happen(which is a pretty big hurdle in itself, we will be concerning ourselves with two Task Sequence Phases: Preinstall and Install.
Normally MDT does the disk partitioning for us with the "Format and Partition Disk" step--notice there are two: one for MBR/BIOS, one for UEFI.
Unfortunately, MDT thinks you're imaging a single-boot system every time, and if we use these steps, it will wipe the disk, erasing our OSX partition. However: do NOT disable these steps. We have already configured these steps to not wipe and partition the disk in our customsettings.ini file.
If these steps are disabled, the task sequence will give you a failure saying it cannot find the target partition to restore the OS to. This is because the Format and Partition Disk steps also tie into determining the target drive letter, albeit not in a obvious way: just leave them alone.
Instead, we will be using Powershell scripts to format our disk. A lot of people have used Diskpart for this in the past, but I have found it prone to random failures.
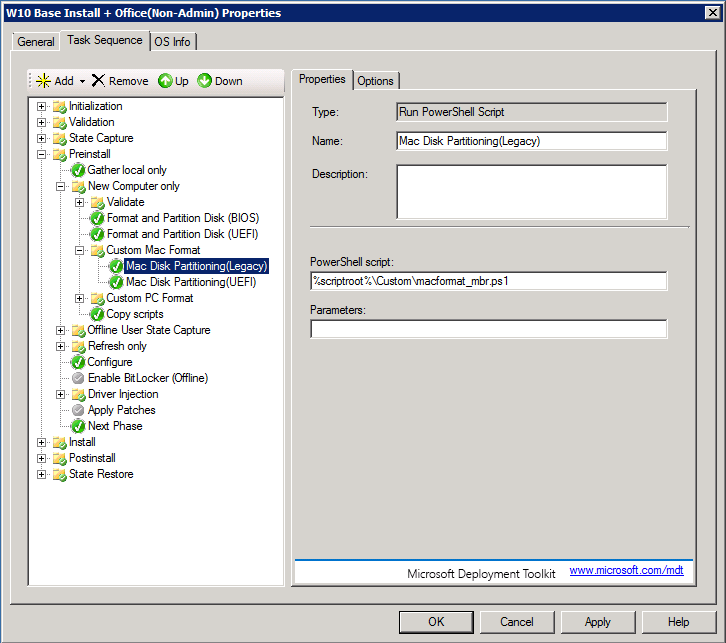
Create a new Group(that's a folder) under Preinstall>New Computer Only called "Custom Mac Format". Move this folder after the "Format and Partition Disk" steps.
Inside this folder, Add two "Run Powershell Script" steps. Call them "Mac Disk Partitioning(Legacy)" and "Mac Disk Partitioning(UEFI)".
Specify the scripts to be run in the Properties pane to the right: for the Legacy step:
%scriptroot%\Custom\macformat_legacy.ps1
for the UEFI step:
%scriptroot%\Custom\macformat_uefi.ps1
Example of Properties pane of the Legacy format step:
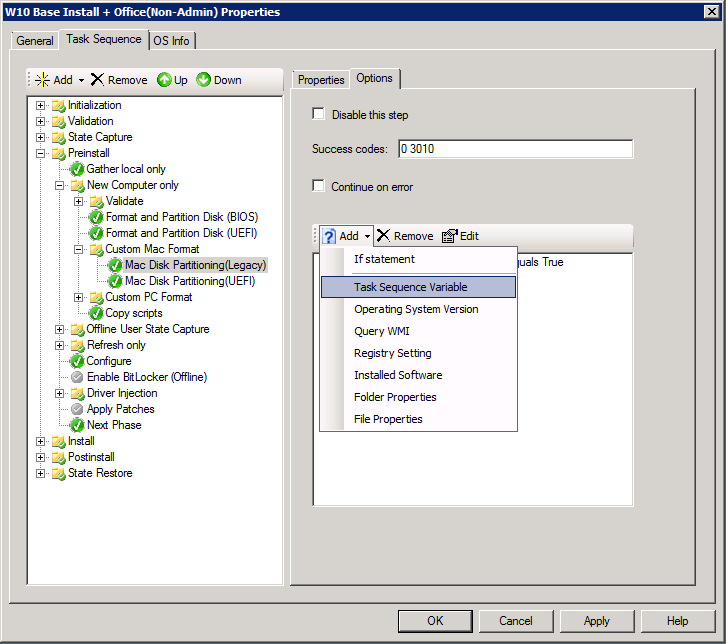
Then click on the Options tab next to Properties, go down to the big white space below(this is in the Options panel to the right, NOT in the main Task Sequence to the left) and click Add--select "Task Sequence Variable".
Example of Options pane of the Legacy format step:
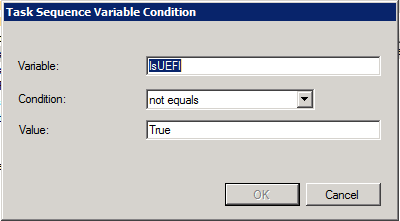
This will open the "Task Sequence Variable Condition" window. Fill out the fields for Legacy and UEFI as described below.
For Legacy:
Variable: IsUEFI

Condition: not equals

Value: True
For UEFI:
Variable: IsUEFI

Condition: equals

Value: True
Example of Conditions window of the Legacy format step:
Apply these conditions and hit OK. Lastly, let's put our Powershell scripts in the proper place. If you don't have a Custom folder in your MDT DeploymentShare\Scripts folder, make one now and plop these two PS scripts in it.
Powershell Script for Legacy Partitioning
Powershell Script for UEFI Partitioning
If you are installing Windows 10, you are done with the pre-install steps and should skip to the OS Install Step.
If you are installing Windows 7, you will want to inject the Windows 7 Ethernet drivers from a BootCamp 4 driver package.
Download the the package and extract it. Look in these folders: BootCamp\Drivers\Broadcom, BootCamp\Drivers\Marvell, BootCamp\Drivers\Nvidia\NvidiaChipset64\Ethernet. Grab the files in the Nvidia folder and stuff them in a new folder on your MDT server called "Apple Legacy Ethernet". Extract BroadcomEthernet64.exe and MarvellInstaller64.exe with something like The Unarchiver grab the files inside both executables, and stuff those in your Apple Legacy Ethernet folder as well.
Go to your Out-of-Box Drivers section of the Deployment Workbench. Create a folder called Apple Inc. and a subfolder called Legacy. Click Import Drivers and select the folder where your legacy Ethernet drivers are located.
Go to the Selection Profiles section of the Workbench. Create a Selection Profile called "Apple Legacy Ethernet" and point it at said Out-Of-Box Drivers\Apple Inc.\Legacy folder.
Go to your Task Sequence>Preinstall and select the Inject Drivers step. Change the Selection Profile in that step to Apple Legacy Ethernet.
Now the drivers will be injected into the OS image before it boots, so they'll have baked in support for the NIC that is common to most Macs.
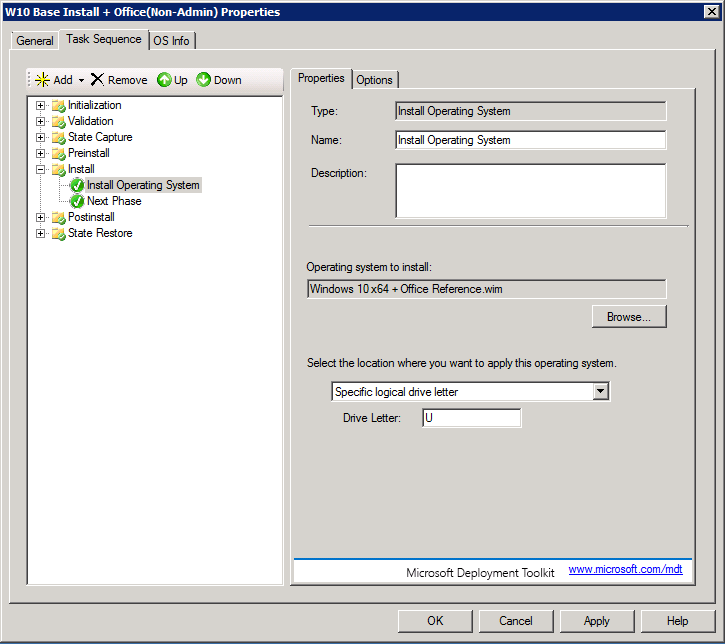
Go to the Install Phase, and select the "Install Operating System" step.
Not much to do here but specify the target install drive letter. Change the pulldown in the Properties Pane to read "Specific Logical Drive Letter" and type "U" in, as that is the drive letter we've specified in our partitioning scripts.
(The reason I've used U as it tends to be one of the least assigned by the OS to anything. If the OS assigns a drive letter before we get to do so in our script, our TS will fail)
Example of Install OS step Properties:
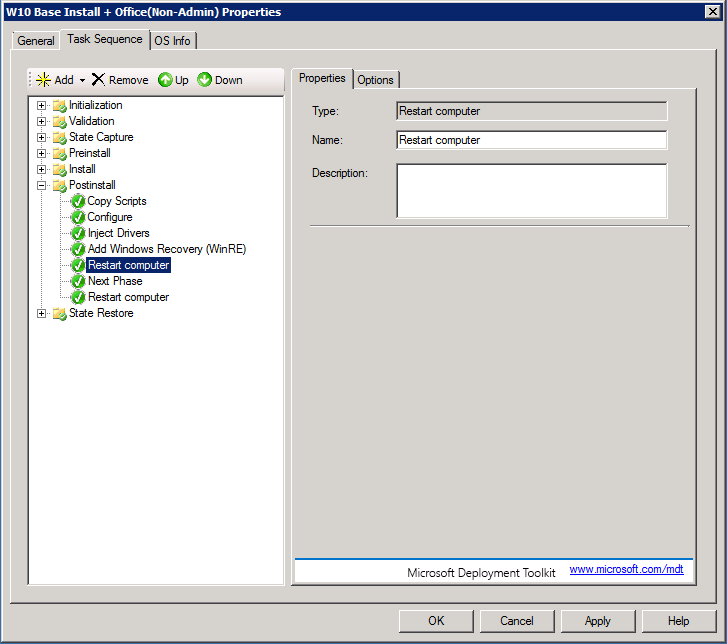
Lastly, I have noticed there is sometimes an issue with some models not rebooting properly into the OS after installation. To workaround this, add an extra "Restart Computer" step to the Postinstall Phase, just before the "Next Phase" step as shown in the example below.
Example of PostInstall Phase:
The only other things to do now have to do with post-OS installation--at this point you should be able to run your Task Sequence and have the OS restore properly.
All that remains to make sure your machines function properly is to set up and configure Boot Camp Driver installation, which we will cover in a separate article.
My MDT WinPE error'd out on the Powershell UEFI script, complaining Get-Partition wasn't valid. MDT may need to have a Powershell add-in installed as a pre-req.
Looks like the Storage Management cmdlet is needed in Win PE. Isn't on my current PE system unfortunately.