Figma是一款优秀的设计工具,不仅可以便捷地实现协作开发,同时还提供了丰富的扩展能力,使得我们可以通过编写插件实现自定义的功能。
Figma官方是有提供开发者文档的,资料也比较齐全。推荐同时读一下 https://www.figma.com/plugin-docs/intro/。
这篇文章里面,我会先从介绍Figma插件的概念说起,让读者对Figma插件大致有个印象,然后会再介绍一些插件开发过程中的实践经验和心得体会。
Figma插件类似于浏览器插件,使用 Web 技术(HTML/CSS/JS)进行开发。开发过浏览器插件的同学应该能很快上手,即使没有浏览器的开发经验,只要有过前端开发的经验,入门写一个插件也并不困难。此外常用的JS框架也可以正常使用,如React、Vue框架、Antd组件库及Webpack打包工具链等。
因为Figma插件一般用于操作Figma文件,所以在开发Figma插件的过程中,也会需要学习一些Figma内部的节点类型和各自的属性和方法,这些在官方文档中都可以找到。
值得一提的是Figma默认采用了Typescript,同时也为Figma的数据格式提供了丰富的类型定义,会大大降低开发的难度。
不同于技术栈的类似,Figma插件在运行时与浏览器插件会有较大的不同。
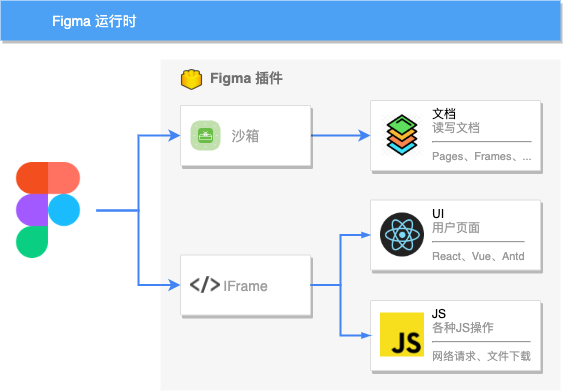
浏览器插件一般会分为 popup 页、background 代码和content script三个部分,各自有不同的能力和使用场景。Figma插件主要是分成 main 和 ui 两个部分。
Figma插件的 main 和 ui 两个部分虽然都可以认为是JS,但是运行环境和能力有较大的不同。
在讲具体的区别之前,先要理解Figma自身的运行环境。Figma既有自身的客户端软件(其实也是内嵌了web),又可以直接运行在浏览器之中。它使用了Web相关的技术(HTML/CSS/JS/WASM)。简单来说,Figma自身就是一个功能比较强大的Web应用。
出于安全和性能等方面的考虑,Figma将插件代码分成两个部分:main 和 ui。其中 main 代码运行在沙箱之中,ui 部分代码运行在 iframe 之中。
Figma为插件提供的沙箱环境,可以访问到 figma 全局变量用于获取文档内容,但是屏蔽了其它的各种全局变量,如window、document以及fetch等,可以避免恶意插件越权访问未授权的内容或破坏程序运行环境,提升安全性。
因为运行时代码是分为两个部分的,编程过程中不可避免地会涉及到两个窗口之间的通信。Figma中是用postMessage完成的。
原理部分讲得差不多了,下面来讲下具体的开发实践。
开发插件最好是从一个现成可用的插件改起。在这方面figma提供了一些友好的帮助。
可以选择从Figma客户端软件的 "Plugins -> Development -> New Plugin"中通过交互页面生成一个插件模板,也可以直接从Github中找到示例代码。
Figma客户端软件中提供的demo比较简单,建议从Github仓库的Samples中找个例子开始,如使用React的话,可以使用模板工程:https://github.com/figma/plugin-samples/tree/master/webpack-react
查看更多模板工程:https://github.com/figma/plugin-samples/
调试插件需要有一个Figma本地客户端,从菜单"Plugins -> Development -> Import plugin from manifest"进入,选择上一步中创建的figma插件中的manifest.json文件即可。
在选择之后,figma插件就会出现在"Plugins -> Development" 的子菜单之中。
先看一个manifest.json文件的经典结构:
{
  "name": "test",
  "id": "1029157888727225342",
  "api": "1.0.0",
  "main": "code.js",
  "editorType": [
    "figma"
  ],
  "ui": "ui.html"
}
其中的 main 和 ui 两个 key 分别指定的就是 plugin 代码(运行在沙箱之中)和 ui 代码(运行在iframe之中)的入口了。
对于前端的研发同学来说,可能比较习惯于热更新的开发模式,但是Figma插件的官方samples仓库中尚未提供关于热更新的demo,所以这里我着重讲一下热更新的实现。
在开始之前先要强调一下,因为main代码运行在沙箱环境中,而沙箱环境未提供网络访问的能力,所以目前尚未找到沙箱中的代码的热更新方式,只能实现自动编译,不能自动加载。这里指的热更新,是指的UI中的热更新。
在开始配置热更新之前,webpack配置文件的关键代码如下(查看完整版):
const InlineChunkHtmlPlugin = require('react-dev-utils/InlineChunkHtmlPlugin');
const HtmlWebpackPlugin = require('html-webpack-plugin')

module.exports = (env, argv) => ({
  entry: {
    ui: './src/ui.tsx', // The entry point for your UI code
    code: './src/code.ts', // The entry point for your plugin code
  },
  output: {
    filename: '[name].js',
    path: path.resolve(__dirname, 'dist'), // Compile into a folder called "dist"
  },
  plugins: [
    new HtmlWebpackPlugin({
      inject: "body",
      template: './src/ui.html',
      filename: 'ui.html',
      chunks: ['ui']
    }),
    new InlineChunkHtmlPlugin(HtmlWebpackPlugin, [/ui/]),
  ],
})
按照这个配置文件,webpack会将代码打包出 code.js 和 ui.html 两个文件。ui.js 相关的内容会内联注入到 ui.html 文件之中。
要支持热更新,就需要做出如下的改变(development模式中):
- 启用 webpackDevServer,以提供热更新需要的资源地址和 websocket 接口。
- 不使用InlineChunkHtmlPlugin进行注入,而是维持独立的入口JS文件地址
- 代码中使用 react-hot-loader 进行热更新
- package.json中同时执行 watch 模式,实时编译 code.js 的代码
下面看一下关键代码:
package.json
{
  "scripts": {
    "dev:plugin": "cross-env NODE_ENV=development webpack --mode=development --watch",
    "dev:ui": "cross-env NODE_ENV=development webpack serve --mode=development",
    "dev": "run-p dev:plugin dev:ui",
  }
}
其中 dev:plugin 会来打包 plugin 部分的代码,即运行在沙箱环境中的部分。这一部分代码不会被热更新,只会被实时编译。当它发生变化的时候,需要重新载入插件才能生效。
而 dev:ui 的代码用来启动 webpackDevServer,主要用于提供 ui.js。
webpack.config.js
module.exports = (env, argv) => {
  const isProduction = argv.mode === 'production'
  return {
    devtool: isProduction ? false : 'inline-source-map',
    entry: {
      ui: './src/ui.tsx',
      code: './src/code.ts',
    },
    resolve: {
      extensions: ['.tsx', '.ts', '.jsx', '.js'],
      alias: { 'react-dom': '@hot-loader/react-dom' },
    },
    output: {
      filename: '[name].js',
      path: path.resolve(__dirname, 'dist'),
      publicPath: 'http://localhost:8000/',
    },

    plugins: [
      new HtmlWebpackPlugin({
        template: './src/ui.html',
        filename: 'ui.html',
        chunks: ['ui'],
        inject: 'body',
      }),
      isProduction && new InlineChunkHtmlPlugin(HtmlWebpackPlugin, [/ui/]),
    ].filter(Boolean),

    devServer: isProduction
      ? undefined
      : {
          port: 8000,
          host: '0.0.0.0',
          allowedHosts: 'all',
          hot: true,
          headers: {
            'Access-Control-Allow-Origin': '*',
            'Access-Control-Allow-Methods':
              'GET, POST, PUT, DELETE, PATCH, OPTIONS',
          },
          client: {
            webSocketURL: 'ws://127.0.0.1:8000/ws',
          },
        },
  }
}
最后是启用下 react-hot-loader
ui.tsx
// @ts-ignore
if (module.hot) {
  // @ts-ignore
  module.hot.accept('./ui.tsx', () => {
    render(<App />, document.getElementById('my-plugin'))
  })
}最后再说一下窗口间的通信。
上面提到,Figma插件的代码分为 ui 和 main 两个部分,其中 ui 部分能访问网络和存储等,但不能访问到Figma文档的数据,而 main 部分可以读写 figma 文件,却不能访问外部网络。
当插件既需要访问网络,又需要对figma文件做读写的时候,一般就会涉及到两个窗口之间的通信的问题。
虽然通信机制被 figma 包装了一层,但本质上还是 Window.postMessage 那一套。
在 ui 中想要获取 figma 的文档内容的话,就需要先 postMessage 发给 main,然后 main 中处理数据完毕后,再 postMessage 给 ui,需要双方约定一些机制,才能让这个机制相对来说比较好用。
这里我采用的是一种 callback 的机制,ui 中 postMessage 的时候,带上 callback 函数,内部自动 id 参数,同时 figma 的 onmessage 处理后,再发送一个带相同 id 参数的 postMessage,根据 id 定位到 callback 函数并执行回调。
具体的实现可以参考下面给出的Github仓库。
因为 figma 插件 iframe 中用的 src 地址是一个 dataurl,所以在用 react-router 的时候有一些注意事项。
如不能使用 BrowserRouter,必须用 MemoryRouter。
一码胜千言,最后我梳理了一个模板代码,包含了上面提到的内容,有需要的同学可以使用它作为模板进行开发。
模板地址为:https://github.com/banyudu/figma-plugin-sample-react-hot-reload