-
-
Save befinitiv/fd44a597a48460c100a54649c97d5984 to your computer and use it in GitHub Desktop.
| #!/usr/bin/python | |
| import glob | |
| import socket | |
| import time | |
| from threading import Timer | |
| import picamera | |
| import RPi.GPIO as GPIO | |
| SENSOR_PIN = 18 | |
| W = 1296 | |
| H = 972 | |
| FPS = 18 | |
| IP = '192.168.0.21' | |
| PORT = 5000 | |
| def start_recording(): | |
| global camera_data | |
| global camera | |
| camera_data = CameraData() | |
| camera.start_recording(camera_data, format='h264') | |
| print('start') | |
| def stop_recording(): | |
| global camera_data | |
| global camera | |
| camera.stop_recording() | |
| camera_data.stop() | |
| print('stop') | |
| def timer_stop(): | |
| global stop_timer_running | |
| stop_timer_running = False | |
| stop_recording() | |
| last_sensor_event = 0 | |
| stop_timer_running = False | |
| def sensor_change(pin): | |
| global last_sensor_event | |
| global stop_timer | |
| global stop_timer_running | |
| now = time.time() | |
| if abs(last_sensor_event - now) > 0.5: | |
| start_recording() | |
| last_sensor_event = now | |
| if stop_timer_running: | |
| stop_timer.cancel() | |
| stop_timer = Timer(0.5, timer_stop) | |
| stop_timer.start() | |
| stop_timer_running = True | |
| GPIO.setmode(GPIO.BCM) | |
| GPIO.setup(SENSOR_PIN, GPIO.IN) | |
| GPIO.add_event_detect(SENSOR_PIN, GPIO.BOTH, sensor_change) | |
| # This class writes data to file and streams it in parallel | |
| class CameraData(object): | |
| def __init__(self): | |
| self.client_socket = socket.socket(socket.AF_INET, socket.SOCK_DGRAM) | |
| self.client_socket.connect((IP, PORT)) | |
| self.connection = self.client_socket.makefile('wb') | |
| self.file = open(self.create_unique_file_name(), 'wb') | |
| def create_unique_file_name(self): | |
| return '%d.h264' % len(glob.glob('*')) | |
| def write(self, s): | |
| self.connection.write(s) | |
| self.file.write(s) | |
| def flush(self): | |
| pass | |
| def stop(self): | |
| self.connection.close() | |
| self.client_socket.close() | |
| self.file.close() | |
| # Make a file-like object out of the connection | |
| try: | |
| camera = picamera.PiCamera() | |
| camera.resolution = (W, H) | |
| camera.framerate = FPS | |
| while True: | |
| time.sleep(1) | |
| #camera.wait_recording(60) | |
| finally: | |
| pass |
| [Unit] | |
| Description=Analog camera service | |
| After=network.target | |
| StartLimitIntervalSec=0 | |
| [Service] | |
| Type=simple | |
| Restart=always | |
| RestartSec=1 | |
| User=pi | |
| ExecStart=/home/pi/cam.py | |
| WorkingDirectory=/home/pi/videos | |
| [Install] | |
| WantedBy=multi-user.target |
really cool to see some movements in here to help others make it happen as well ! got hyped even more when i noticed that i already have the list at home so i will try it as well.
@HazeHyrule where could i find the 3D print files that you are mentioning ?
Oh I ended up designing my own cartridge from the ground up. it has some problems that are now talked about in the readmd and google doc, but I plan on fixing them soon. Preview Here and here for the files. gonna do some more work on this later.
Amazing, staying tuned ! thanks a lot for the work :) if we can help, please let know
A few pics in the event that they're helpful -- when I was doing, I definitely was able to see a spot where I could have things be in focus when they were closer than 4 ft, but it's such a fun adjustment, really.


finally received my pi cam
so just to be sure i got it right 10%, I need to remove the "lens" from it ? so that it looks like "raw" sensor ?
Yes, very carefully. I wouldn't recommend trying to cut the lens off (and tbh I hope you bought more than one just in case because that was me, lol).
So the way I did it -- and I've done it three times since the first failure the same way and it worked out ok -- unscrew the lens. It's got a little bit of glue holding it in the current position, but if you grab just the lens piece with a small pair of needle nose pliers and gently turn it, it will unscrew and come out.
Then, using the same needle nose pliers, carefully break off just the protruding threaded part that the lens screwed into, piece by piece.
The plastic that makes up the housing on the outside kind of bends as you move it, so you don't need to use any said emotions or anything, it should kind of bend and tear. Once you have that protruding part off, you can kind of get the tips of a pair of needle nose pliers Into the hole to gently pull/bend/break the outside, just be careful not to touch the sensor itself. With each one I've done, eventually that whole top housing will just pop off, just work small, go slowly, and be gentle.

This code only works on the legacy kernel of Pi OS, so after you get the cover off, you can hook the camera up to the pie, and then run 'vgencmd get_camera' from the command line. If it comes up as "listed 1 supported 1" (something like that, it's working. On the newer kernel you can do 'libcamera-vid --list-cameras and if it's working out will list the different camera modes.
Incidentally, I did take a stab at modifying this code (I'm a noob to this!) so that it would work with the new kernel, however the image looks different with lib camera and picamera2 seems to ignore the framerate setting, So if you aren't jamming the physical shutter on the super8, It will have a strobe like effect on the video.
Don't know if you already got it but For the second part to remove I squeezed it sideways with pliers careful not to get the circuit board and it seemed to break the glue bonds. did it like 3 different times with no problems yet
@hycday Above ^^ (updated this readme with a full tutorial)
ok, managed to do what you stated above for the lens/sensor..
and also managed to make the camera work and take a test image, works ! (before removing the lens part)
thanks @Codaea
now the next questions are :
1- I believe that I need to remove something on my camera 8mm, to make the sensor closer (otherwise it's blurry), right ? unsure how to do that :/
2- I will personally add an SD card extension so that I can save the images/videos on the sd card without having to touch the sd card with the OS/software (still need to see how to remove it easily while pi is on, or if I can do it via touch of a physical button to unmount/mount safely
3- would adding a physical button to "trigger" the recording work better/worst than detecting light to start it ?
i have never been so close to having digital 8mm :D i am so happy that you guys got as motivated as I was to see it happen !!
edit:
I removed the lens ok, but when removing the second part, I actually noticed that the end result I have is different from yours (it seems that the thin redish layer is gone on mine...)
is this normal ? I suppose not and that i will need to retry again.... but when removing the second part, the redish layer goes off immediately :/

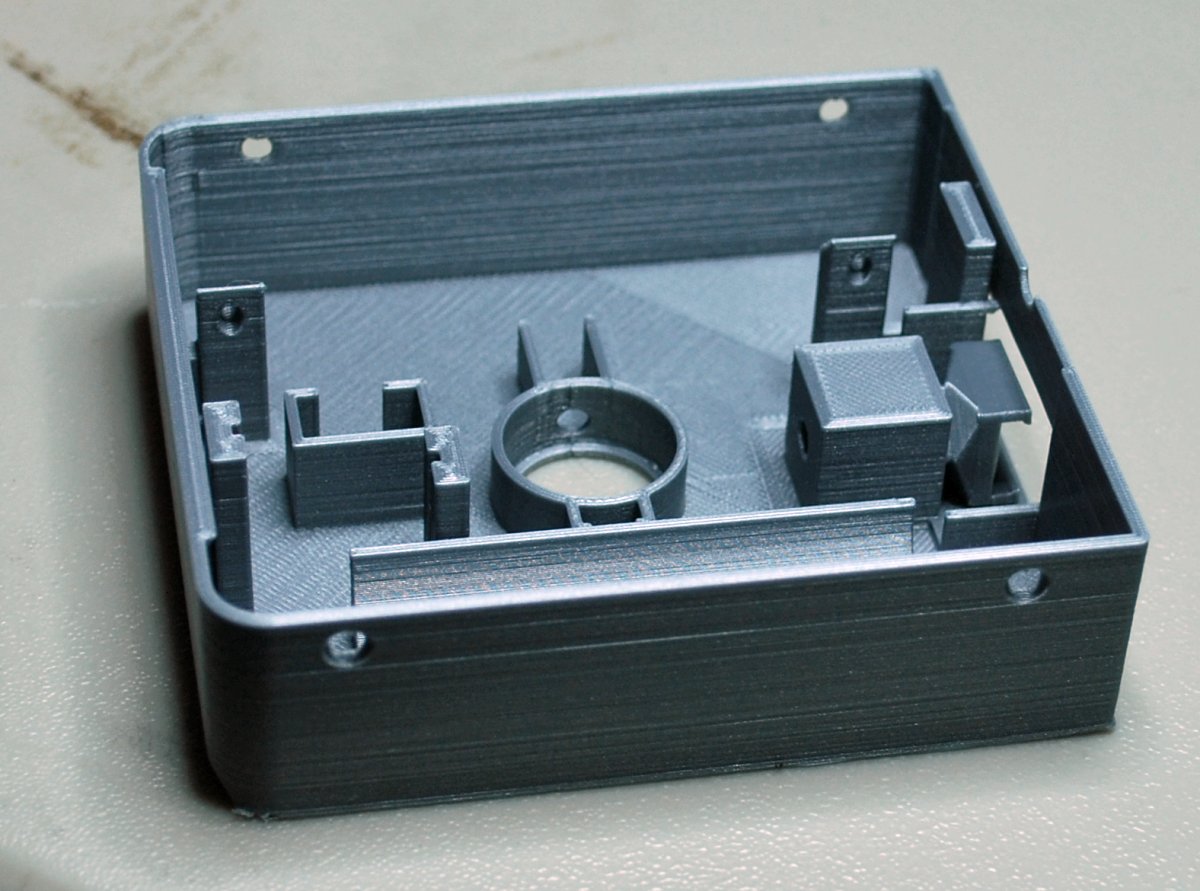
I printed one based from @befinitiv original case but it doesn’t quite fit both my super 8’s.. thinking of a redesign that would fit neater now we might not need the LED.
yes i did the same, but it slides back up and the walls are a bit too thin
I have an original cartridge and there are small "dents" at the bottom that blocks the cartridge in place
in white the 3D printed case vs original, size difference

inside one of my camera, see the latch system that keeps the cartridge in place

3D printed case slides up

original cartridge has a mini dent that would "clip" against the mechanism in the camera (sorry, lacking of vocab here)

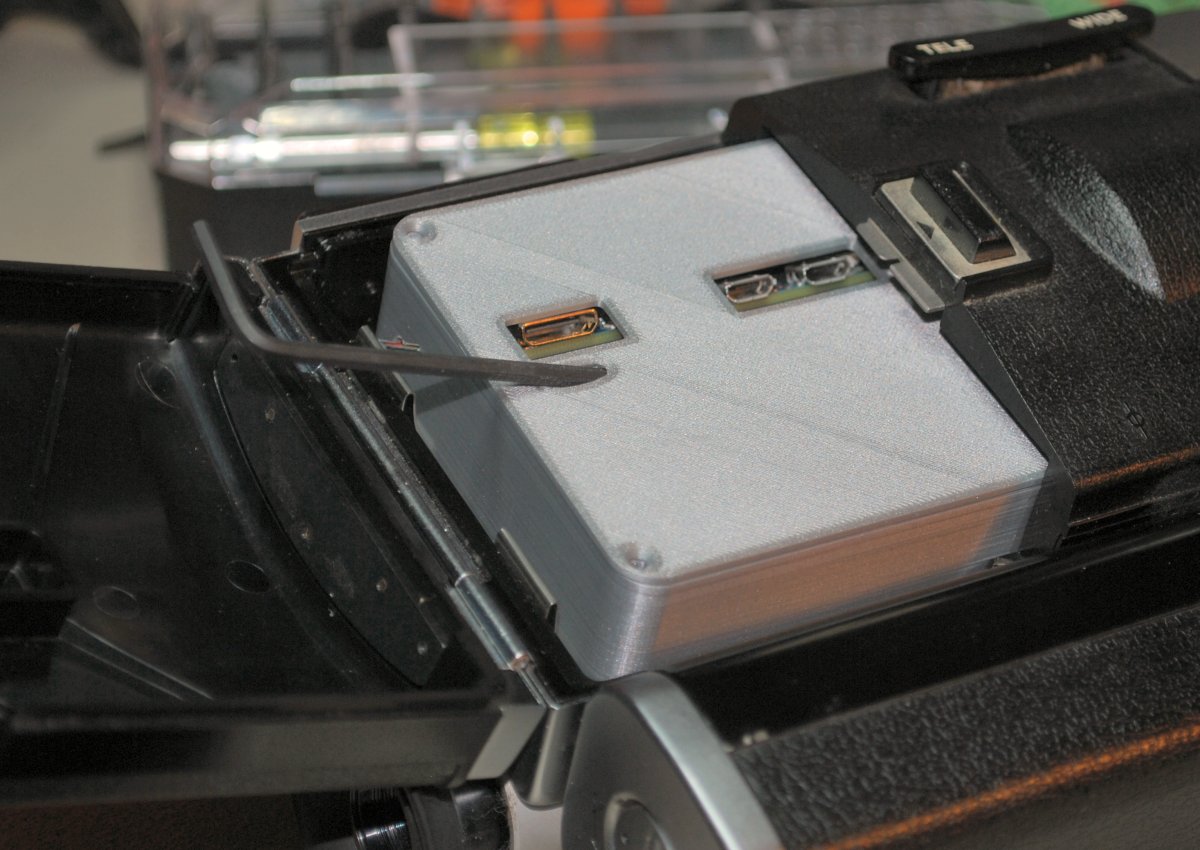
and side note, this part, I imagine that it would need to be removed, but unsure how (the screws have round head, not because damaged, but by design...)

received my new camera, was able to gently remove what is needed and now all set :)
however, my first picture is .... super blurry and I think it's because I need to remove the metal part (visible in last picture from my above post) so that the focal is right. Unsure how to remove it :/ any ideas ?
this is my first picture, it's blurry...
I was able to take other pictures, getting closer to the camera or further and i can confirm it is working correctly, but it's just not right yet..

received my new camera, was able to gently remove what is needed and now all set :) however, my first picture is .... super blurry and I think it's because I need to remove the metal part (visible in last picture from my above post) so that the focal is right. Unsure how to remove it :/ any ideas ?
this is my first picture, it's blurry... I was able to take other pictures, getting closer to the camera or further and i can confirm it is working correctly, but it's just not right yet..
It like it's just screwed on. Mine was, anyway. You just need a tiny screwdriver that would allow you to get in there at the right angle to get the screws out. Just be careful and go slowly so you don't strip them out.
I haven't tried it yet, but since I'm using an actual super8 cartridge I will see if I can put that back in to my camera and still get it to work. The sensor adjustment is the hardest part, getting it in exactly the right place. I'm designing my next version around being able to adjust the sensor position.
@finis-dev do you have your cartridge design with the camera sensor adjustment up somewhere ??
I thought I did but I don't see it. We had a few versions and the last one has a cover that an allen wrench adjusts the sensor.
oh that's sweet ! any place where we could download the STL (or 3MF or other format) ?
I thought I did but I don't see it. We had a few versions and the last one has a cover that an allen wrench adjusts the sensor.
@finis-dev This looks spectacular! Would you be able to share the STL for this design please?
我以为我做到了,但我没有看到。我们有几个版本,最后一个版本有一个盖子,内六角扳手可以调整传感器。
@finis-dev Hello! I am a filmmaker. I saw the super8 box you modified on GitHub and I was very impressed! Your design is very exquisite, and the details are perfect. It is really a work of art!
I have a question for you. Can you share your stl file? I want to use a 3D printer to make a super8 box as a prop for a documentary. I promise not to use it for commercial purposes, just to show your creativity and technology.
If you are willing to share, I would be very grateful! If you are not convenient, I completely understand. In any case, I want to praise your design. You are a genius!
Looking forward to your reply,
I thought I did but I don't see it. We had a few versions and the last one has a cover that an allen wrench adjusts the sensor.
@finis-dev This looks spectacular! Would you be able to share the STL for this design please?
Any info on the stl? Much appreciated
yep, doesn't look like the STL file will be shared by @finis-dev :( that would have been a nice "xmas gift" :D
Here is the STL from befinitiv
https://cad.onshape.com/documents/64a99f95e94bdd2171e690a9/w/2df2681fee64d06b5b4c427b/e/396c0cd434668cf87cac40be
thanks @finis-dev
however, this doesn't look exactly the same like the version from above screenshots (abobe, the raspberry can be inserted in diagonal, and we can see holes for usb ports and hdmi, as well as inserts for screws to close the enclosure)
It's always interesting to see people continue a project on the original developer's idea, but then not share their progress (for others to then progress with) with those that also want to progress this project.
It's not like there is money to make with this anymore, or to patent it. Super-8 is very niche, and a patented marketed Digital-8 cartridge already exists. It's just kinda expensive.
hey please if anyone is working on this project still please contact me im having trouble here installing the picamera ... i am now trying picamera2 but I'm not sure what's the issue unless someone would want to share there SD card. The rest of the project is complete in housing with everything.. im just stuck with the software issue

christian@pizero:~ $ cat /etc/os-release
PRETTY_NAME="Raspbian GNU/Linux 12 (bookworm)"
NAME="Raspbian GNU/Linux"
VERSION_ID="12"
VERSION="12 (bookworm)"
VERSION_CODENAME=bookworm
ID=raspbian
ID_LIKE=debian
HOME_URL="http://www.raspbian.org/"
SUPPORT_URL="http://www.raspbian.org/RaspbianForums"
BUG_REPORT_URL="http://www.raspbian.org/RaspbianBugs"
ok its working i think im no longer getting errors and im running Bullseye. The camera is showing a small red LED when running the script now im trying to see the live feed from my computer via web browser and nothing .. i had tried changing the ip address to 192.168.1.117:5000 but that didnt change anything considering the PI is on that address already @antisaint81
actually i believe the issue is i haven't set up the
[camera.service]
(https://gist.github.com/befinitiv/fd44a597a48460c100a54649c97d5984#file-camera-service) where would i implement this..?
Just fyi - I took a note from one of the element14 videos where they tried this and set my shutter speed on the coffee to 19 frames instead of 18, wish helps with the shutter roll if you aren't jamming the shutter open. The idea being to set it one frame higher than whatever the camera is doing. I've found it's most notable in bright light where the shutter cast to considerable shadow on the sensor, and in my case, since my camera had to be jerry-rigged to work at all (broken wire on battery compartment, trigger switch broken) I removed most of the shutter. But I'm planning on buying another camera which I intend to leave in tact.