To bring technology to my garden using cheap electronics like the Arduino and Rasberry Pi in a connected independent way.
Gather data about the Garden and make that data available.
- Air Temp/Humidity
- Exposed Air Temp
- Soil Temp
- Soil PH
- Soil Moisture
- Light Levels
- Barometric Pressure
- Rain Intensity
- Anemometer and Vane
The idea behind the Garden Monitor is to be cheap, durable and self-sufficient sensor set that can communicate with a central point. I would like for each monitor to have the following sensors: Ambient Temperature, Soil Temperature, Luminosity, Humidity, and Soil Moisture.
For the α version I think having everything contained in a single housing will be fine. For future versions I'd like to see the central housing contain the processor while the sensors are able to be positioned.
I think an Arduino Micro would be good in the long run but for now a Arduino Uno should be fine as the price difference is negligible and compatible shields will make prototyping easier. Small should generally be better, there wont be any taxing processing taking place, all of that will be on the central hub. Small power consumption should be a priority to support solar/battery powered operation.
Next a design consideration that will cut across all of the Gardenet is communication. The standard in simple low power wireless communication looks to be XBee modules. Simple point to point communication can be achieved with the simpler Series 1 modules and decent distance with the pro versions. A XBee Series 1 Pro with external antenna will be the most expensive component on the build but I haven't found another simple cheap method of wireless communication. RF might be a possibility in the future.
Since I will be using an Arduino Uno I can kill two birds with one stone. There is a XBee Shield that plops right on the Arduino and provides a mount for the XBee unit as well as a prototyping area for soldering up all my other connections.
Rather than having the monitor be smart and send out it's own readings I would rather have the central hub be in control of asking for readings. This could allow for more control over timing as well as avoiding the need for a RTC on each monitor.
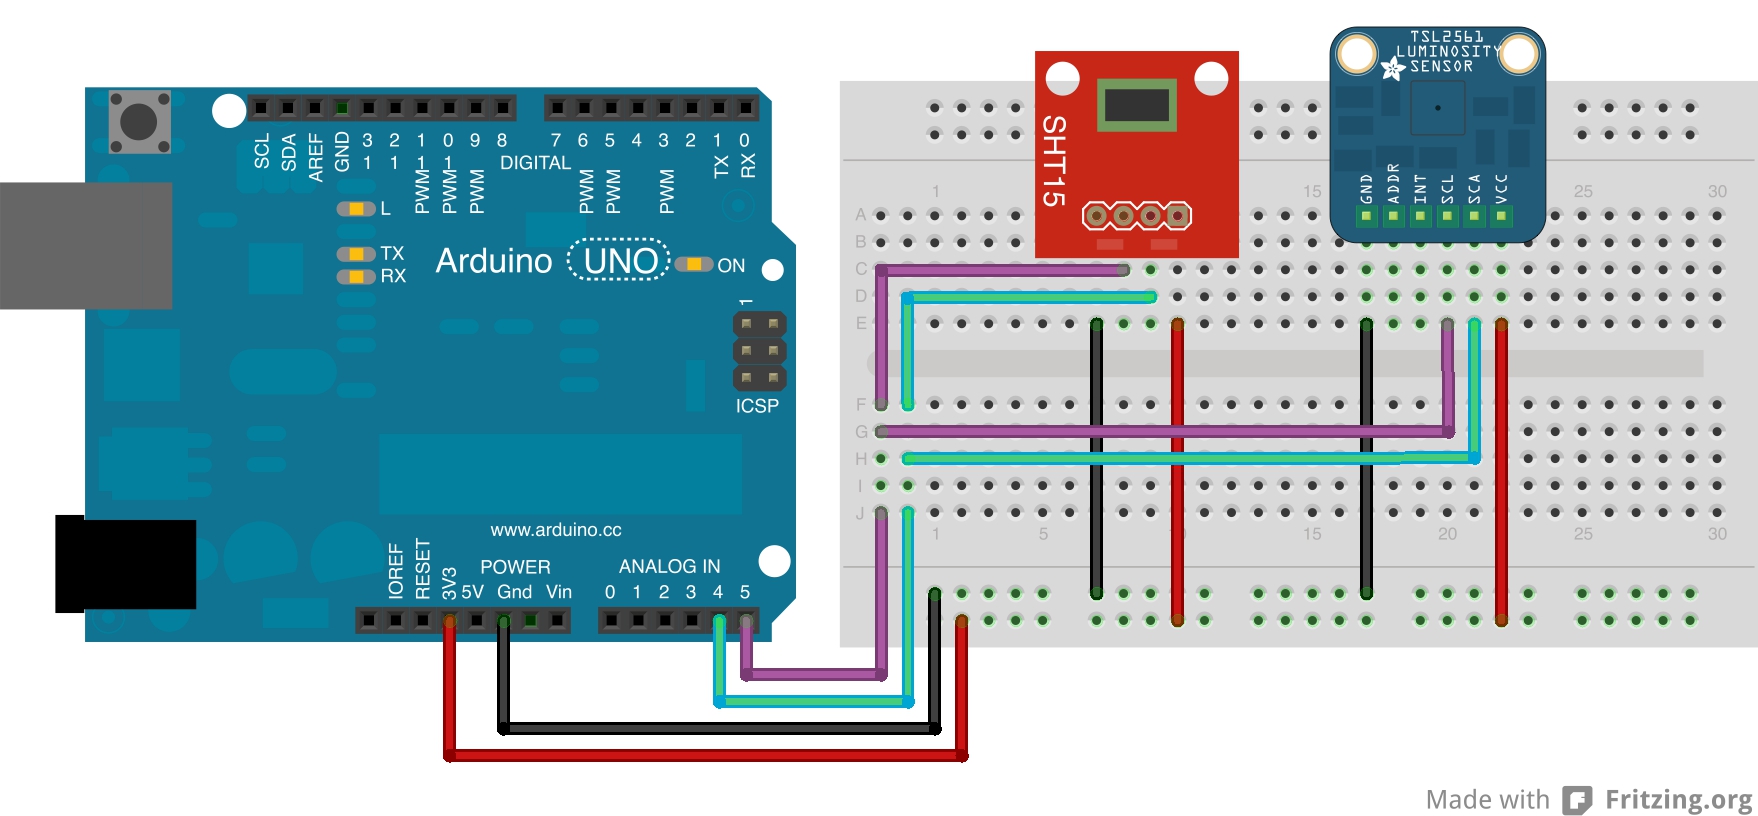
To take accurate humidity readings we will need ambient temperature as well. Luckily many of the popular humidity senors come with a build in temperature sensor as well. The SHT-15 mounted on a breakout board will be perfect for taking humidity and ambient temperature readings. Since we are looking for ambient temperature it would be a good idea to have this mounted not in direct view of the sun. Possibly on the underside of the unit or side depending on how the enclosure is built.
The SHT-15 Breakout can communicate using the TWC/I2C bus so wiring up will be simple. It can and should also run on 3.3V rather than 5V. As a design note it might be best to run all of the sensors off the 3.3V line to avoid extra complexity of remembering which goes where.
A decent luminosity senor is the Adafruit TSL2561 breakout. This chip will also run off the TWC/I2C bus and should be kept on the 3.3V line. The luminosity sensor should be mounted on the top of the enclosure with protected exposure to light, duh.
Of note, the XBee Shield blocks the dedicated TWC headers however the Uno also has connections on Analog 4 (SDA) and Analog 5 (SCL).
For soil temperature the popular DS18B20 connected to an external waterproof wire will do the trick. The Adafruit version is 4 wires: VCC, DATA, GND, and SHIELD. The DATA line connects to one of the available Digital Inputs but needs a Pull-Up resistor from the VCC.

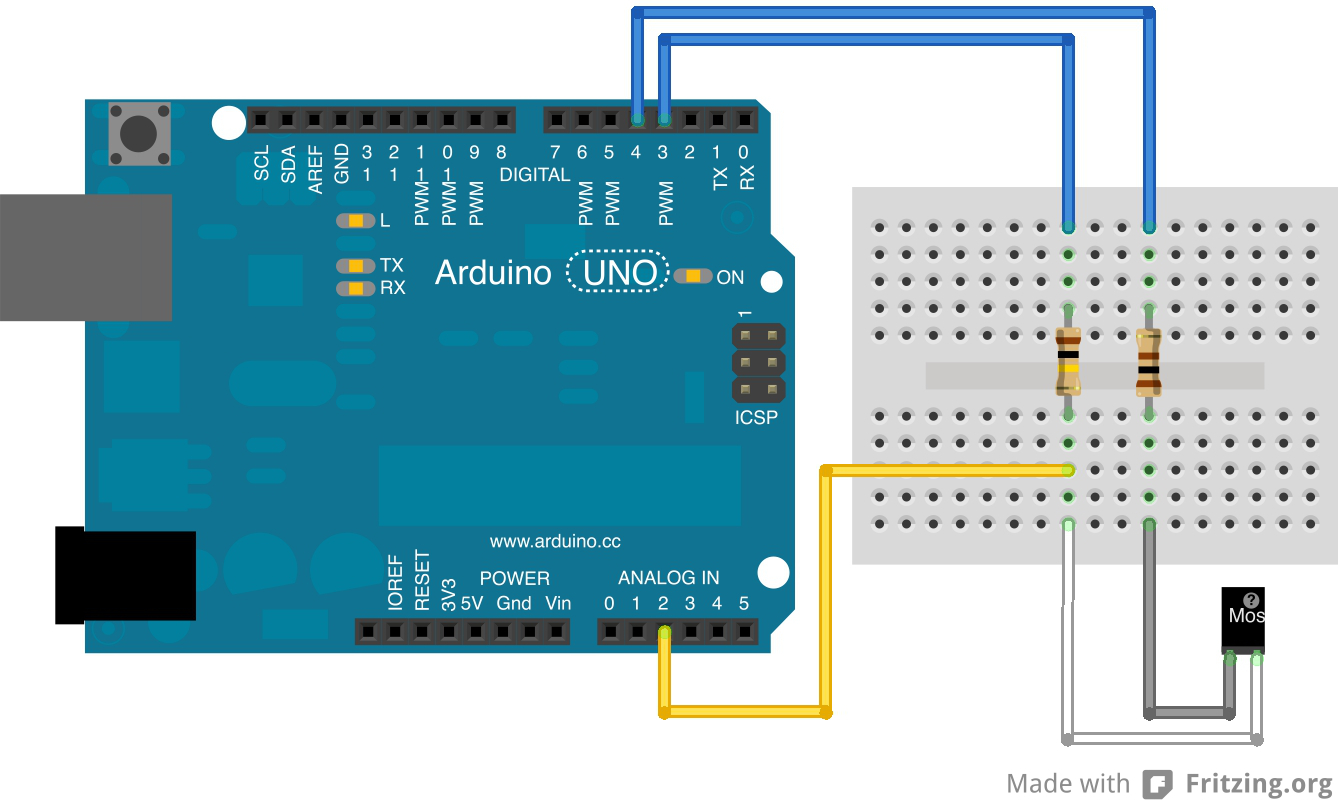
The final sensor, Soil Moisture, is a bit of a DIY sensor. The general idea is that there are two metal rods placed in the soil a known distance apart. The rods will need to be insulated except where we take the reading from. The reading will need to be adjusted for temperature so the soil temperature probe should be placed nearby. The probe is based on the electrical resistance of the soil. There will be a single read wire going to an Analog In on the Arduino as well as to a 57-100K ohm resistor then to one of the Arduino's Digital out pins. On the other side a 100 ohm resistor to prevent shorting, then to anther Digital out pin.
A problem we encounter is due to our use of Direct Current. The problem is that if you have DC current (constantly flowing electricity in one direction) going between two pieces of metal (like the exposed probe tips) then etching will take place. This process is called electrolysis, and it is bad for the probes, it means that they will be eaten away slowly by the action of the electricity. We solve this by only turning the current on when we want to take a reading.
This circuit is set up so that the two digital pins from Aruduino are used to flip-flop the voltage (running the current forward, then reverse). This back and forth current helps to cancel out electrolysis. That is not to say that electrolysis is not taking place. It is simply that the crust that is created by electrolysis is broken up when the current reverses. So the soil moisture sensor will operate effectively for a longer period of time. Since the soil moisture sensor is essentially a voltage divider, when we reverse the current, we also swap the relative voltages. This means the sensor now gives two different readings depending on the direction of the sensor.
In the software, we need to do a couple of things to use this new setup. We will need to flip-flop two different inputs to make the current go back and forth. And we must keep the readings separate and use a bit of smoothing when combining them. This minor inconvenience is worth the extra life you gain by using this setup.
In a future version it might be fun to have a deep and shallow soil moisture sensors.
-
Sensirion SHT-15 - High Quality (Solderable)
-
Sensirion SHT-75 - High Quality (Pins)
- Product Page: Sensirion
-
Filter Caps for Sensirion SHT-1x Sensors
- Product Page: Sensirion
The SHT-15 seems like the best choice here expecially with the breakout boards that are provided by various hobby shops. The SHT-75 might be nice for prototyping though so if it seems economicaly maybe pickup one of those. The SF1 will be useful to protect the sensor since it will need to be partial exposed. Adafruit carries the SHT-11 which isn't as accurate but has lots of good resources for the SHT-1x series of sensors.
-
Dallas Semiconductior DS18B20
-
Datasheet: Adafruit Hosted, SparkFun Hosted
-
Standalone Version: Adafruit
-
-
Atlas Scientific ENV-TEMP
- Product Page: Atlas Scientific
It seems like the DS18B20 is a pretty standard and accurate sensor. However has a bit annoying data transmission format. More research need to be looked into that. The ENV-TEMP model seems decent as well with some simple setup.
It seems like PH meters are pretty fragile and don't like to be left in their mediums, or if they are they can't dry out. They are also very expensive in many cases.
-
Conductivity based DIY
- Guides: Gardenbot How-To, Faludi
-
Vegtronic VH400
- Product Page: Vegetronix
Conductivity based soil moisture sensing is pretty straight forward and cheap to build however needs to be adjusted for temperature, this shouldn't be too much of a problem since we plan to be measuring soil temperature anyway. The Vegtronic sensor measures the dielectric constant of the soil and can be very accurate. However it is more expensive.
-
API PVD-P9203
- Datasheet: ArduDrop Hosted
-
TAOS TSL235R (Light to Frequency Converter)
-
Datasheet: SparkFun Hosted
-
Standalone Version: SparkFun
-
-
Atlas Scientific ENV-RGB
- Product Page: Atlas Scientific
-
TAOS TSL2561 Luminosity Sensor
- Breakout Board Version: Adafruit
There are many different options here. My favorite looks like the TSL2561 because it has a nice breakout board, lots of documentation and can measure light levels very accurately.
-
DIY Disdrometer
- Guide: DIY Acoustic Rain Gauge
-
DIY Tipping Bucket Gauge
- Guide: DIY Tipping Bucket Gauge
-
Tipping Bucket Gauge
- Full Weather Station: SparkFun Weather Meters
Not sure where to go here. I like the idea of the SparkFun meter since it covers Rain, Wind, and Barometric. All of my standalone applications.
Right now I am leaning towards a prebuild station. See the note in the Rain Intensity section about the SparkFun weather station.
Right now I am leaning towards a prebuild station. See the note in the Rain Intensity section about the SparkFun weather station.
FAO Penman-Monteith equation for calculating evapotranspiration.
Good reference at ardudrop.jottit.com
Self Sufficient Ardunio Board http://www.instructables.com/id/Self-Sufficient-Arduino-Board/
Analog sensor to SDI http://www.vegetronix.com/Products/SDI-12.phtml
Have central receiver synchronize time.


I think an excellent project, congratulate you