I can absolutely try! First, lets try and break down our code and make sure that we understand each component's responsibility.
- alert();
- This function should display an alert box in the browser with whatever message is passed in as an argument to the function. In our case, alert is getting called, but with an incorrect message.
- prizes
- Our array or messages we wish to display in the browser. Although the array has a length of three, we can access a specific element using the following syntax:
prizes[0]returns'A Unicorn!'prizes[1]returns'A Hug!'prizes[2]returns'Fresh Laundry!'
- Our array or messages we wish to display in the browser. Although the array has a length of three, we can access a specific element using the following syntax:
- for loop
- A for loop allows us loop through a specific set of code, executing it each time independently. In our case, we initialize (set an intial value) our variable btnNum as 0. Next, we define a condition
btnNum < prizes.lengththat will continue to run the loop until that condition returns false (i.e. when btnNum equals the length of the prizes array, or 3). Finally, we havebtnNum++which increments the value ofbtnNumby 1 after the code block is executed. In other words,btnNum++is the same as writingbtnNum = btnNum + 1- if we reference
btnNumwithin the code block inside the loop, its value will depend on how many times the loop has run.
- if we reference
- A for loop allows us loop through a specific set of code, executing it each time independently. In our case, we initialize (set an intial value) our variable btnNum as 0. Next, we define a condition
- document.getElementById('');
- You may or may not have used jQuery before, but this function returns an element from the document based on the selector we pass in.
- Specifically,
getElementByIdwill try to find an element with theidattribute equal to the selector we pass in. For example, document.getElementById('btn-1') would return our button element with text 'Button 2!' because itsidattribute equals 'btn-1'
- Specifically,
- Each run through the loop will return a different button from the document because the value of
btnNumis dynamic and incremented each run.- First run (
btnNumis 0):document.getElementById('btn-0')returns the first button - First run (
btnNumis 1):document.getElementById('btn-1')returns the second button - First run (
btnNumis 2):document.getElementById('btn-2')returns the third button
- First run (
- You may or may not have used jQuery before, but this function returns an element from the document based on the selector we pass in.
- onclick
- Once we have an element from
document.getElementById('<selector>'), we can set up blocks of code to execute after actions in the browser, or in this case when a user clicks a button. - In our example, when a button is clicked,
alert()should be called with a specific message. - since the onclick 'listener' function is set up within the for loop, a listener is defined for each of the elements returned by
getElementById
- Once we have an element from
Let's dive in with a story.
- Let's think of a for loop like a running track, and our variable
btnNumlike a white board at the start where we can keep track of our progress. After each lap, we will add a tick mark to the white board (equivalent tobtnNum++). We will continue to run until we have three tick marks on the board (while btnNum is less than the length of prizes, or 3). So, when we are finished, btnNum will have a value of 3 - If at any point during our run around the track (while we are executing the code block in the for loop) we want to reference how many laps we have run, we can reference out btnNum white board. Our first lap the value is 0, the second a value of 1, the third a value of 2 and finally a value of 3 when we finish
- Imagine we have three friends (nicknamed 0,1,2) on the other side of the track, and we tell each of them (one per lap according to their nickname) that if they receive a phone call at some point (like setting up a click listener to execute code after some action has occurred) they should look at the whiteboard and alert us to its value. They may know nothing about it's current value, and only know to respond with whatever value is on the board when called.
- But, we have only told them to look at the white board when they receive a call to get the value, and not until that point.
- After our third lap all of our listeners are prepared for a phone call, and our whiteboard has the value of 3
- If we call any of our friends and ask for the value on the whiteboard, what do we expect?
- Well, although we set up a listener on each lap when btnNum had a dynamic value, it is now a value of 3. Each of our listeners will say "3!" when called
- Let's bring it back to our code example, and we can see that after the click listeners are set up per button, the value of
btnNumis 3 - When any of the buttons are clicked, they will call
alert(prizes[3]);. But, as looked into above, there are only 3 values inprizesandprizes[3]is actually looking for a 4th element in the array, which isundefined! That's why we saw our strange behavior when clicking the buttons.
One solution (back to running):
- It seems like we can't get by having just one reference for our listeners, and we really want to have a more dynamic reference per loop.
- We will still write a tick mark on our btnNum board (and stop once it gets to 3)
- Now, we will define a new action (or function) per lap where we will give the corresponding friend the value of btnNum from the beginning of that lap and have them reference that value
- In Javascript we could use an anonymous function that gives us the flexibility to scope inner functionality to values that are passed in through an argument. We refer to it as an anonymous function because we do not need to use it later on after the initial setup
(function(args){ < code here > })(inputs)- Or, we can use a named function and call it directly with the desired arguments
// set up the function var functionName = function(args){ < code here > } // call the function functionName(inputs);- Since we aren't referring to the function later on in our code, using the anonymous function allows us to keep our code simple
- Then, we ask them to tell it back to us when we call them.
- Let's call friend 1. Instead of referencing btnNum, our friend remembers that we told them "1" and uses that value
- In our code, this would be like calling
alert(prizes[1])when clicking "Button 1!" - As we know,
prizes[1]returns'A Hug!', so we should see an alert with 'A Hug!'!
- In our code, this would be like calling
- Similarly, if we call friend 0, they would say "0!"
- In our code, this would be like calling
alert(prizes[0])when clicking "Button 0!" prizes[0]returns'A Unicorn!', so we should see an alert with 'A Unicorn!'!
- In our code, this would be like calling
Overview With an anonymous function:
<script type="text/javascript">
  var prizes = ['A Unicorn!', 'A Hug!', 'Fresh Laundry!'];
  for (var btnNum = 0; btnNum < prizes.length; btnNum++) {

    // for each run through, we call an anonymous function and pass in the current value of btnNum, which we can reference _per_ loop as prizeNum
    (function(prizeNum) {
      // for each of our buttons, when the user clicks it...
      document.getElementById('btn-' + btnNum).onclick = function() {

        // tell her what she's won!
        alert(prizes[prizeNum]);
      };
    }(btnNum))

  }
</script>
With a named function called directly:
<script type="text/javascript">
  var prizes = ['A Unicorn!', 'A Hug!', 'Fresh Laundry!'];
  for (var btnNum = 0; btnNum < prizes.length; btnNum++) {

    var prizes = ['A Unicorn!', 'A Hug!', 'Fresh Laundry!'];
    for (var btnNum = 0; btnNum < prizes.length; btnNum++) {

      // for each run through, set up a named function that will set up our click listeners
      var setupPrizes = function(prizeNum) {
        document.getElementById('btn-' + btnNum).onclick = function() {

          // tell her what she's won!
          alert(prizes[prizeNum]);
      };
    }
    // call the function directly with btnNum as the argument
   setupPrizes(btnNum);

  }

  }
</script>
has_many and has_many :through
-
When thinking about active record associations, I often like to approach them from both sides of the association. For instance, when talking about
has_manyandhas_many :throughI like to think about whether or not the associated object belongs to the subject. -
Specifically, the idea of belonging to highlights a 1:1 relationship with the other object, and typically means that the child object has a direct reference to the main object (a foreign key ID value on the child object for another specific record)
-
The main point I am trying to highlight is whether or not we can say the objects share a 1:1 relationship.
-
Let's assume, for example, that I am a musician. I could conceivably have purchased one or more instruments that belong to me. In other words, I have many instruments and they belong to me. For two classes, Musician and Instrument, we can express this relationship with
has_manyandbelongs_toclass Musician < ActiveRecord::Base has_many :instruments end class Instrument < ActiveRecord::Base belongs_to :musician end -
Now, as a musician, I may or may not belong to only one band. In fact, my musical tastes are so broad I could never imagine belonging to just one band.
-
At the same time, a band will most likely have more than one member (ex: Drummer, Bassist, Guitarist and Singer)
-
Unlike the example above, we wouldn't store a foreign key reference to a band we belonged to on our musician model, as we would need a column for each band we belonged to
-
Let's consider the idea of a membership to a band
- Similar to any kind of real-world membership, a BandMembership has two main attributes,
- a reference to which band the membership belongs to
- a reference to which musician the membership belongs to
- The band membership has a 1:1 association with a musician, and a 1:1 association with a band
- Similar to any kind of real-world membership, a BandMembership has two main attributes,
-
In this case, a band
has_manymusiciansthrougha band membership. -
The join model (band membership in this case) is also useful because it may have its own attributes like
membership_type, whereas with a direct reference between band and a musician an attribute likemembership_typebecomes a bit murky if it is on the band or the musician. It describes the membership itself, not the band or the musician directly.class Musician < ActiveRecord::Base has_many :band_memberships has_many :bands, through: :band_memberships end class BandMembership < ActiveRecord::Base belongs_to :musician belongs_to :band end class Band < ActiveRecord::Base has_many :band_memberships has_many :musicians, through: :band_memberships end -
The
has_many , through: :<other_model>requires that the join model (the model that sits between our two main models) have a 1:1 relationship with both of the main models. -
In summary, a
has_manyimplies that one of the models belongs to the other, whereas thehas_many :throughrepresents a many-to-many relationship between models
has_one :through
- This is similar in structure to
has_many :through, but it implies that there is an overall one-to-many relationship. - Let's extend our musician/band story and assume that there is a new law to help the growing number of musicians find work, and restricts a musician's ability to belong to more than one band.
- A band can still have "many" musicians, but a musician can only belong to one band
- We could represent this as an attribute
band_iddirectly on the musician. This approach would lead to a lot of updating and headaches if the strict musician / band relationship rules change - However, we could stay flexible (if musicians may be able to belong to more than one band in the future) and keep our band membership model. A musician would now only have 1 band membership for a specific band
- As well, we still may have important attributes on the membership itself (like
membership_type) that wouldn't make sense to have on the band or musician itselfclass Musician < ActiveRecord::Base has_one :band_membership has_one :band, through: :band_membership end class BandMembership < ActiveRecord::Base belongs_to :musician belongs_to :band end class Band < ActiveRecord::Base has_many :band_memberships has_many :musicians, through: :band_memberships end
- Our database is like a very trusting friend. When we (our application) give it a query to execute (assuming it is formatted correctly) it says "Ok!" and runs what we give it.
- One day, we meet someone who says "Hi there! I have a great query that I think you should give to your database to run!"
- We have a couple of choices:
- Scenario 1: Blindly give the query to the database to run
- Scenario 2: Refuse to give it blindly to the database, and instead say to that person "why don't you tell me (not in a query) what you would like from the database, and I'll go grab it for ya and construct the query myself!"
- In the second example, WE are the ones that decide on the query based on user specified criteria, and can make sure that our new acquantaince doesn't have bad intentions (like deleting or exporting data from our system)
- We have a couple of choices:
- Scenario 1 allows for SQL Injection, as we give the end user full control of queries directly in the database
- They may not have bad intentions, but with direct access they could drop tables, delete data or try to access/export sensitive information
- An example of SQL injection could work like this:
- Let's assume we have a database filled with user data including sensitive data like credit card numbers and social security numbers
- We want to have great UX in our application, so we decide to allow the end user to search through our list of users (through an HTML input element in a form)
- If we blindly hand the values in the input to the database we could open up our system to a SQL Injection attack.
- Here's an example: if they search for
drop table users;and we execute that statement directly then we would lose all of our data stored in the table. There are other commands that could allow an end-user to export data to a CSV directly from the database as well.
- Here's an example: if they search for
- How do we avoid this?
- Security practices are getting much more advanced, and making it harder for developers to simply execute commands from an HTML form. However, let's try and think about this like Scenario 2 above.
- What if we only compared the form's values as a String to a specific attribute on the user?
- ex: we compare the input's value to a users first_name attribute
- In this case WE are constructing the query we want, and can have a more flexible approach to limit the chances of a SQL Injection
- Escaping values
- Here is a potentially vulnerable way to construct a query with ActiveRecord
User.where("first_name = #{<statement from web form>}") - It is vulnerable because we are just inserting the form data (potentially a bad-intentioned query) directly into the query
- However, ActiveRecord gives us tools to escape the form data first which tells the database to treat the statement as something like an attribute (ex: a String value) and to not execute it like a query.
- This is how we would re-write the above example using ActiveRecord's built in escape functionality:
User.where("first_name = ?", <statement from web form>) - Before a final query is generated, ActiveRecord will substitute our
<statement from web form>for the placeholder?and apply some built in protections that will not run the statement as a query.
- Here is a potentially vulnerable way to construct a query with ActiveRecord
- What if we only compared the form's values as a String to a specific attribute on the user?
- Security practices are getting much more advanced, and making it harder for developers to simply execute commands from an HTML form. However, let's try and think about this like Scenario 2 above.
- If our end user is Kevin Bacon, we want at least 2 degrees of separation with our database (through appropriate sanitization models and/or ActiveRecord) to allow us to safeguard database access
Although I do not have extensive experience with Angular specifically, let's try and break down the two concepts. Depending on the goals of your application, you may be better suited using one versus the other
Libraries
- In general, I like to think of a library as something that provides specific functionality in a packaged and easier-to-develop manner.
- With a library, you can choose to either home-roll (write your own) version that accomplishes your application's goals, or apply the work that someone else has done creating a library and presumably speed up your development time.
- A library is a bit like a hardware store. Some thought went into stocking it with appropriate tools for certain projects (like plumbing), as well as other more generic tools (a hammer) that can be used for just about anything.
- These tools are a means to an end, and it's up to you to pick, choose and use them. Building a fence? There may be a subsection of the hardware store specifically for that. Plumbing? Same thing.
- Whether or not one library solves each of our goals completely isn't the most important thing to consider. But, does it get you started faster? Does it help abstract some of the complexity into easy-to-use tools?
- jQuery is a great set of tools speed up the development process to interact with elements from the DOM, make ajax requests to a specified url, tying animation and UI updates to user actions and much more.
- jQuery makes it very quick to set up functionality or animation based on events like an end-user clicking a button
- It's strengths lie in that it focuses on ease-of-use as a developer and can save countless hours of development effort.
- In addition, it can save a lot of code duplication in your application since you do not need to write your own functions to accomplish the same goals
- Browser compatible
- jQuery is built to provide the same developer interface but account for the different ways browsers implement interactions with the DOM
- Libraries are great if you are trying to solve a specific goal (rather than the architecture of your application or system), and can be relatively easy to replace or update as new versions come out
- However, libraries are great as a means to an end and may prove harder to work into an overall application design or structure. It's like having a magnifying glass on something specific that probably doesn't give you an overall view of everything in the system
Frameworks
-
To some extent -- if a library is a hardware store -- a framework is a bit more like a city plan. There may be varying degrees of specificity or detail between one city plan or another (frameworks), but they help you organize your work into logical and practical partitions
-
You know that you want to build a town or city with different types of components (houses, schools, underlying sewer system, business district etc.), but where do you begin? How do you separate your components so that you don't build a house in the middle of a loud business district or make sure that every building has electricity?
-
You know that a hardware store (or multiple) could help you build the individual buildings, but how should they all fit together?
-
Once you have built it, can you be sure everything is up to city code to last? Specifically, do you have safeguards in place to ensure that what you said you would build actually does what it is supposed to? Does everything make sense as a whole unit? (1000 houses with no schools, or no businesses for people to work in)
-
That's where a city plan, or framework can help to drive design/organization desicions, and help us make sure that we are building a solid and maintainable place
-
One of the hardest parts of development is to figure out how you want to approach building a feature. You may have a couple ideas, but what would be the best choice for this situation? What would have the least amount of technical debt moving forward?
-
Frameworks can vary greatly in how prescriptive they are in design choices and organizational approaches.
-
Pros
- Typically opinionated to encourage consistency across development
- New developers can look at tutorials or other code examples and get an idea how things should look within the framework's opinions
- Testing
- Frameworks often have recommended (or even propriatary) testing frameworks to help drive design desicions (writing tests first, almost as an outline of functionality, helps you to slow down and think about how to approach a problem, rather than just dive right in and start coding)
- Typically opinionated to encourage consistency across development
-
Cons
- Opinionated frameworks can feel too strict in certain circumstances where you would prefer some flexibility
- What are it's dependencies? Does it incorporate libraries (even proprietary) to build its functionality?
- Dependencies can lead to difficulties if any of them are abandoned
- Cost of updates
- How intense are the changes from one major version to another?
- Want to switch to a new framework? You're probably looking at a major overhaul of your entire application.
- If you already had a city plan and started (maybe completed) building all of the components, imagine how much work it would take to change the layout and structure of the whole city...
Overall, it is important to focus on whether you are trying to solve a specific functional goal or something a bit larger. Of course, you will often use libraries within a framework for functionality or to speed up development. A framework can help untangle the complexities of your application and keep your code organized in components
We use Big O Notation as a way to describe the complexity of an algorithm. In other words, we can think about algorithms and Big O Notation as a way to describe how processing time (time to completion of the algorithm) varies as the size of inputs change. Big O Notation describes an upper bound of complexity for an algorithm, where the actual number of processing steps may be fewer depending on the scenario.
We write Big O notation like this: O(<complexity>) where <complexity> is a mathematical representation of the upper bound of execution complexity. Some examples include O(1), O(n), O(n^2) etc.
We'll dive into just a couple of examples to show how we can try to diagnose and understand complexity within our own code. We will use ruby methods as a representation of an algorithm
For our examples we'll assume you are an employee at a grocery store working at the checkout counter with a line of customers waiting to buy their goods. For simplicity, once a line (represented as an array) has formed it will not change in length for the remainder of the example.
O(1) - Constant complexity/time regardless of how big the input is
-
A quick reminder: you are working the checkout line at a grocery store
-
You want to take a break soon, but you need to have an empty checkout line before you can leave
-
What do we need to check to decide if we can take our break?
- All we need to check is see if there is a customer in line
- Does it matter how many there are? No. We only care that there is at least one customer. So, we can check if there is someone at the front of the line
-
We wouldn't need to spend any more time (or repeat our checking process) to get our answer if there was 0, 1 or 10,000 people in line
-
Here's an example in Ruby, where we will use an array of customers to represent our line, passed into a method that checks if there is a customer at the front of the line
def checkout_is_empty?(customers) customers.first == nil end -
If our users array is empty,
customers.firstwill returnnilandcheckout_is_empty?will return true -
Otherwise, we don't care how many customers there are, we just check that there are at least 1 user.
-
In summary, regardless of how many customers we have, our complexity is 1 because we only perform one step to get our result, and we have
O(1)
O(n) - Time to completion increases linearly as the number of inputs increases
-
Again, you are working the checkout line at a grocery store
-
Your manager is trying to increase rewards membership, and wants you to check for customers in your line that are not currently members
-
We want to sign them up immediately, so we'll just start by checking each customer's membership status and stop at the first non-member and worry about the others later
-
For a line of 1 customer, it's a quick question and we are done
-
As we increase to 2, 3 or 4 customers in line we can see that we have to ask the same question per customer, and the time it will take to finish asking the entire line increased with each additional customer
-
If we had a (bear with me here) line of 10,000 people, we could expect the total amount of time to complete the task to be much much more (an order of magnitude bigger) than just one customer
-
Let's look at a method in Ruby to represent our example:
def non_members(customers) no_memberships = [] customers.each do |customer| if !customer.has_membership? no_memberships << customer end end no_memberships end -
If a customer does not have a membership (
!customer.has_membership?) we will add them to ourno_membershipsarray to return from the method -
As the array of
customersgrows (say from 2 to 10,000 customers) we have to loop through a larger collection of customers to get our result, which increases our processing time 1:1 as we add an additional customer -
Remember, Big O Notation is an upper bound of complexity, so at most we would have to every customer about their membership. In reality we may find a non-member before the end of the customer line
O(n^2) - Quadratic (for every item in a collection of n items we have to do n operations, so the total number of operations is n^2)
- We've solved the membership problem in the store, but now we want extra customer engagement. Your manager comes up with a genius plan, if at least two customers in line have the same name then they both get a 20% discount! Wow!
- For our customers, we'll start at the beginning of the customer line and for each customer we'll ask their name. Then we will check through the customers to see if there is a match for that name
- In other words, for each customer in our line, we may have to check with every customer in the line to see if there is a match
- If our line is 1 customer, we get their name, and when we check if there is a match, we have 1 customer to check. Well, they are the same person so no matches.
- For 2 customers, we start with the first and get his or her name. Then we go through our customers (2 people total) to check. Then we repeat the same process for the second person in line. Between asking for their names and checking for a match, we may have to ask a total of 4 questions!
- For 3 customers, we would have to ask at most 9 questions to exhaust all of the possibilities!
- As we can see, for each additional customer that we add to the line, the number of questions we have to ask increases very quickly (quadratically)
- Compared to our membership process where 100 customers would require 100 questions, our store discount scheme for 100 customers would require 10,000 questions!
- One way we can look at this is a nested loop through a collection, where any additional elements to the collection require an additional loop through all of the other elements
  def names_for_store_discount(customers)
      names_for_discount = []
      customers.each do |customer|
          name = customer.name
          customers.each do |other_customer|
              if other_customer.name == name && other_customer != customer
                  names_for_discount << name
              end
          end

      end
      names_for_discount
  end
-
As we can see in that example, adding a customer to the collection adds an extra loop through the outer
eachblock, which then loops through the customers. So, an additional customer has addedcustomers.lengthsteps to our process -
These are just a couple examples of Big O Notation. The big take away is that the more we loop through collections (or loops within loops) the higher complexity we introduce.
-
Now, assigning our algorithm/method/function a Big O value isn't going to directly help us improve our code, but it will help identify the symptoms of a potentially consuming process.
-
Once we understand why we have complexity (maybe loops on loops on loops?) we can begin to strategize how to tease complexity out and simplify our process
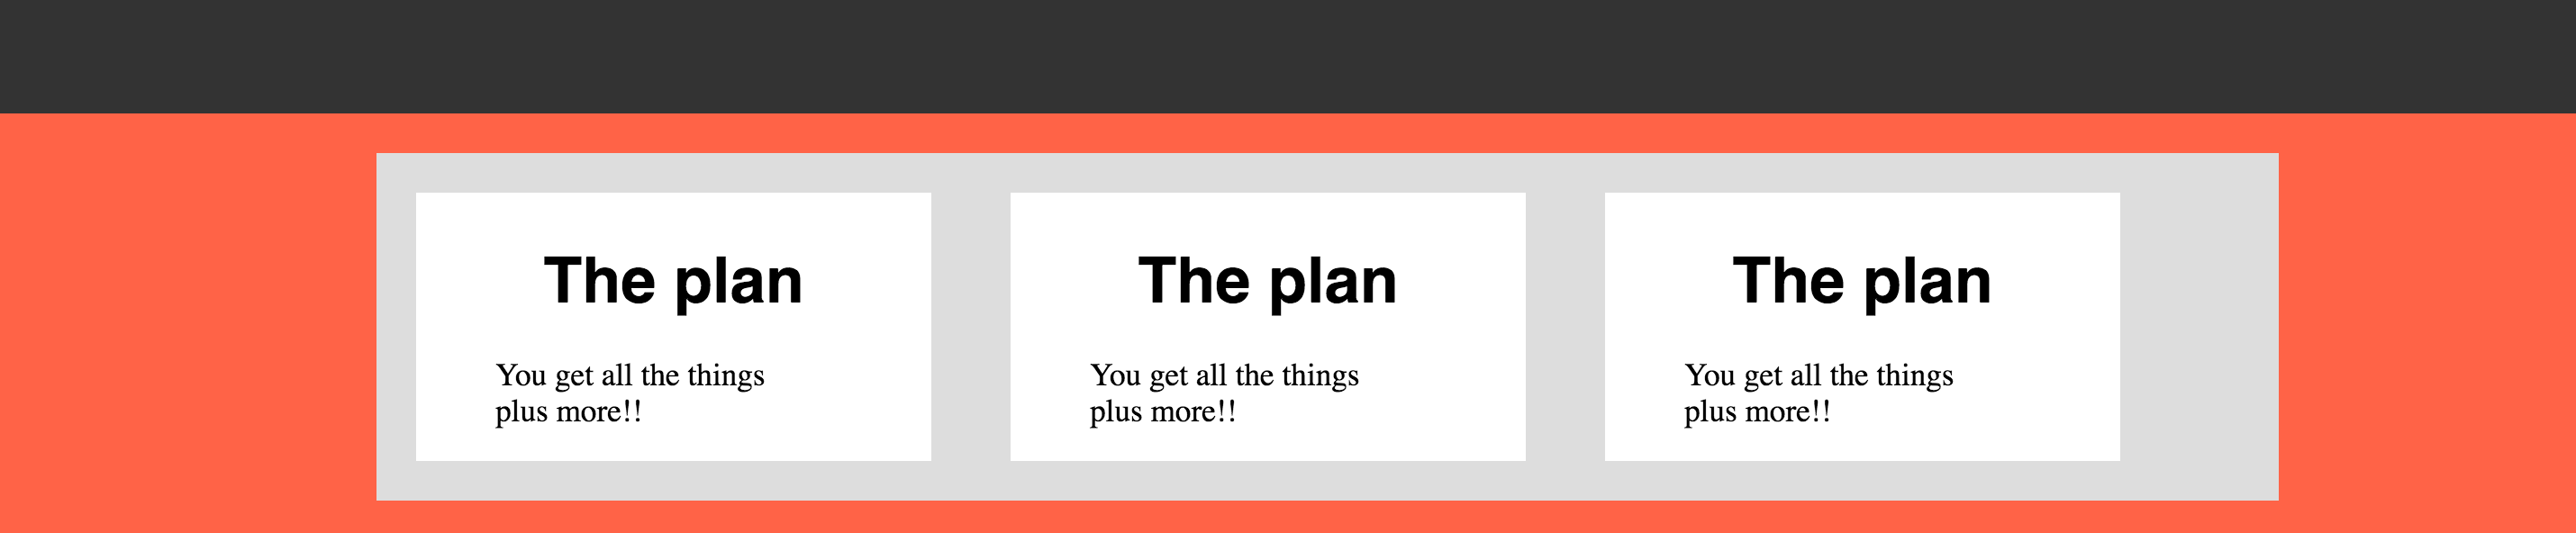
Don't worry! We'll get to the bottom of this. CSS can seem like a huge task, but lets focus on one thing at a time! Small incremental steps to gain understanding will help us make progress that we can be proud of! I like to build up momentum as we go
-
Let's ignore the lack of a gray background around our three white tiles for now, and start with something small
-
Our HTML has bullet points, and our mockup doesn't. To get the ball rolling, let's start there!
-
In an HTML list, or in our case a
ulelement, the list items (orlielements) are kind of like soldiers, and take orders from their leader which is theul -
By default a
ulcontains list items with bullet points (for contrast we can change theulto anoland see the changes) -
Regardless of our list type, the styling of the bullet points belongs on the list itself with the
list-styleproperty -
We don't want to alter the look of the current bullet points, we want to get rid of them and can add
list-style: none;to our CSS on theul. -
We need to be a careful and scope our CSS accordingly. For example, if we add the following CSS to our css file:
ul { list-style: none; }- then all
ulelements on the page will be affected, and not just the one we are trying to fix.
- then all
-
We only want the
ulelements within our.tierelements to change so we should scope our CSS like this:.tier ul { list-style: none; }- Now, only
ulelements within an element with classtier(in our case it is<div class="tier"></div>) will havelist-style: none;
- Now, only
-
Next, let's focus on getting that red background around the tiles
-
Where is that red color defined?
-
Look in our CSS, and we can see that
background-color: tomato;is defined on our element with class.pricing, which is our<section>element -
We want to make sure our three
<div>elements (with class.tier) are "inside" of the<section>element, or in other words, that our<section>element contains the three.tierelements -
The first thing to check is our HTML structure, and double check that the
.tierelements are inside our<section>, or between the opening<section>and closing</section>tags -
Well... Our HTML looks good, and all three are between the
<section>and closing</section>tags -
So where does that leave us?
-
We can rule out the HTML structure, so the issue must be something that is layered on the HTML, i.e. the CSS that is applied
-
It visually appears as if our child elements (the
.tierelements) are not contained in our.pricing-tiersparent element. -
Another interesting thing is that our CSS file has a
background-color: #ddd;property on.pricing-tiers, but we don't see any gray... -
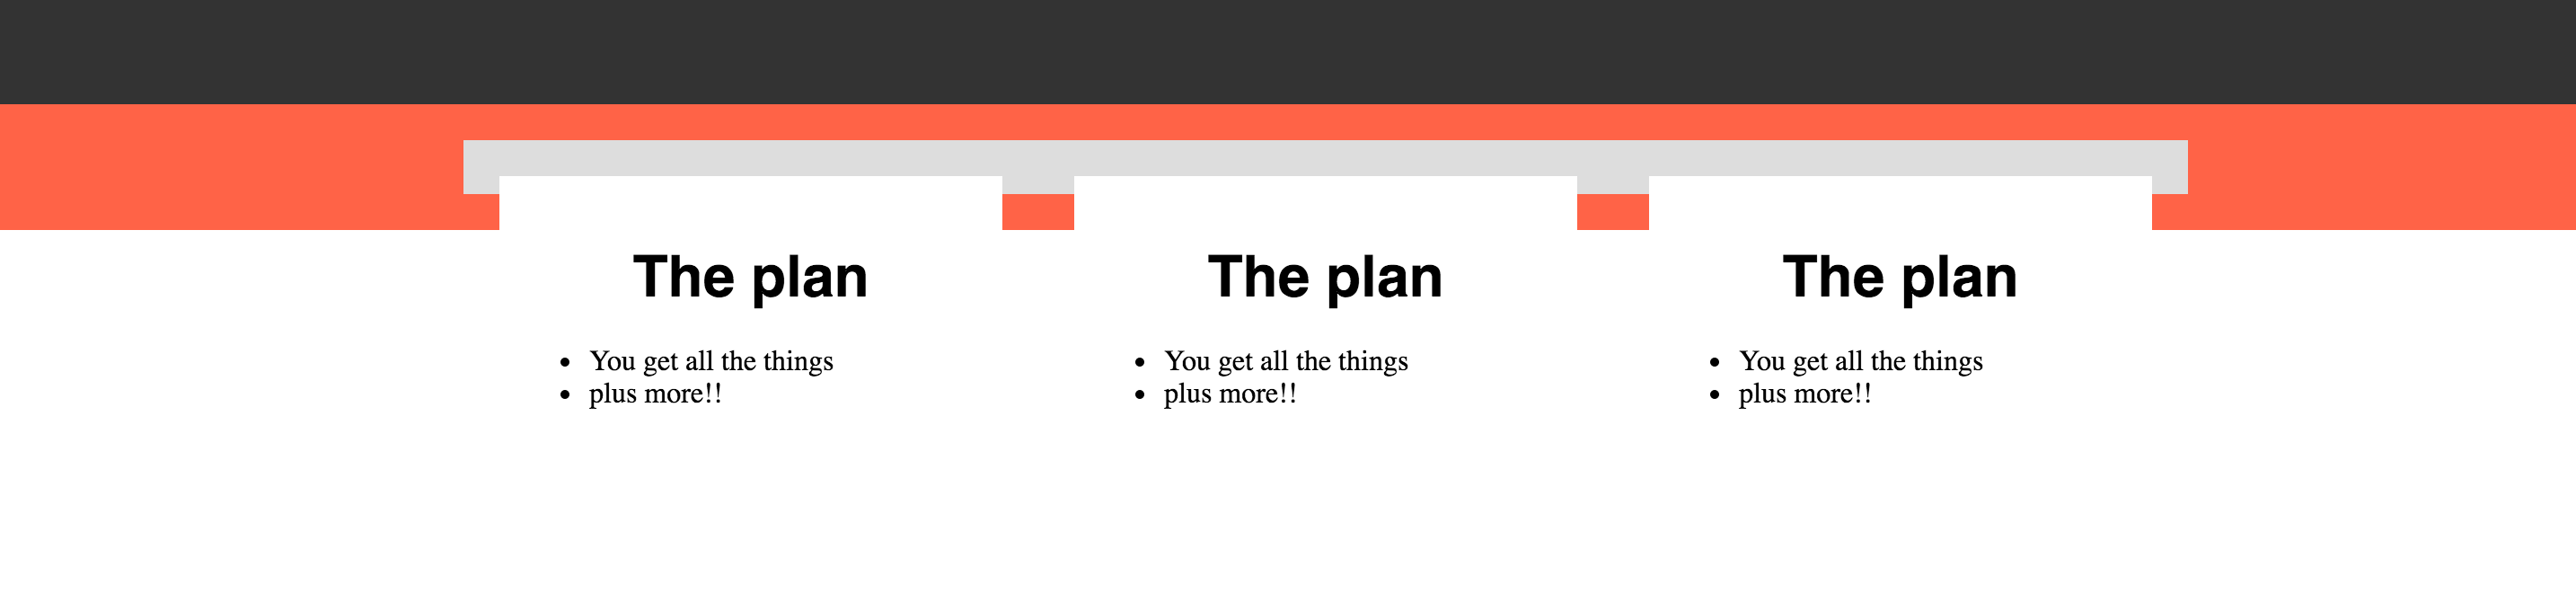
As a quick visual test, lets add
height: 30px;to.pricing-tiersand refresh the page -
Strange. We see a gray rectangle with height 30px, but we also see three white rectangles emerging from the bottom.
-
If we increase the height to 100px, the red background and gray areas extend, and it seems like the white tiles (from the mockup) are beginning to take shape
-
Let's keep going to 200px.
- Looks great right? Well... looks can be deceiving.
-
Zoom out on the browser page, and eventually the white tiles creep out of the gray background.
-
Our math may have worked out in this case, but it seems like we are still missing something to make sure the tiles are contained by the other elements
-
We want to build our page for varying screen sizes, so this doesn't seem like the full solution.
-
It seems like each of our child
.tierelements aren't playing nicely, so let's check out the the CSS file and see what we have applied to the.tierclass-
Here's what we have for
.tier:.pricing-tiers .tier { width: 260px; margin: 20px; padding: 10px; background-color: white; float: left; }
-
-
The
width,margin,paddingandbackground-colorproperties do affect the.tierelements, but they would respect the parent element's containment -
Since the
.pricing-tiersparent does not have a specified height, it would dynamically grow to contain its children -
That leaves
float: left;as our prime suspect. -
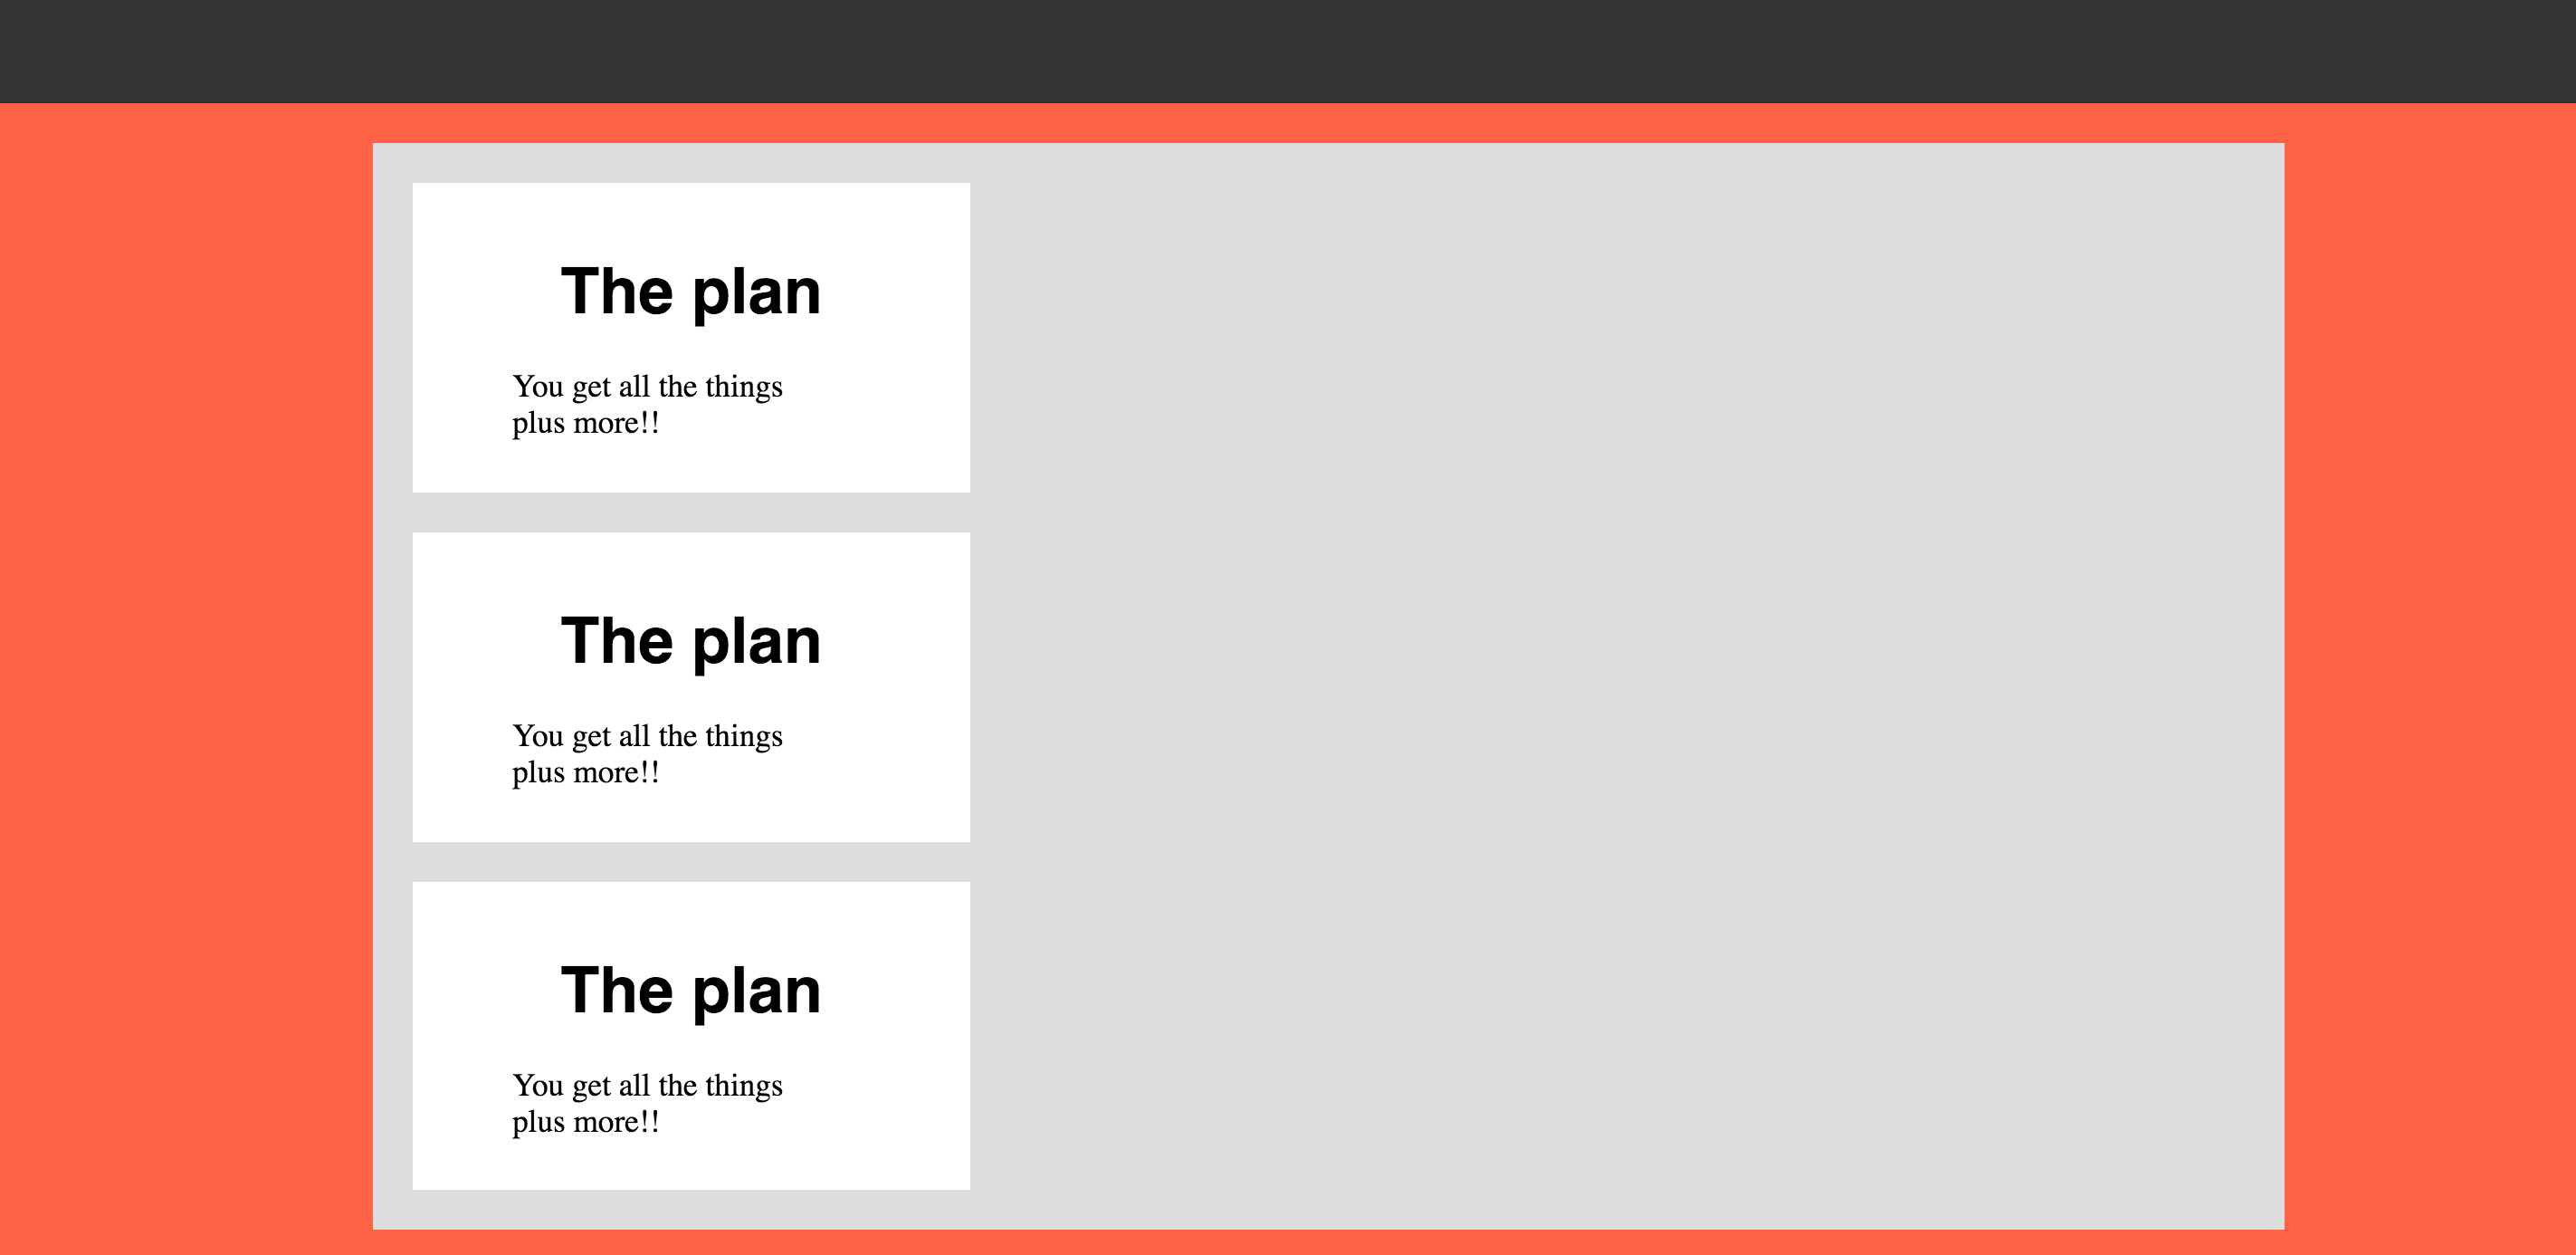
Let's comment out
float: left;and see what happens.- Not what you expected? Well, by definition, a
<div>element will clear a sibling element to a new line, so we see the three tiles vertically instead of horizontally.
- Not what you expected? Well, by definition, a
-
We want them all on the same line -- float gets us there -- so what can we do?
-
Adding floats to child elements can have some funky side affects. In particular, if a floated child element has a defined height that is greater than it's parent, it will appear "outside" of the parent's border
-
We don't have
heightexplicitly defined on the.tierelement, but it contains anh1with the following properties:.tier h1 { font-family: "Helvetica", sans-serif; font-weight: bold; font-size: 2em; margin-bottom: 20px; text-align: center; } -
The
.tierelement will have a defined height because it contains its childh1element, which has a height due to theh1element andfont-size: 2em; -
The solution
-
In my experience, to get around the issue of a floated child element with a larger
heightproperty than its parent, we will apply theoverflowproperty to the parent -
Specifically, I have used
overflow: hidden;. I believe you can also useoverflow: auto;, but I am more familiar withoverflow: hidden; -
I believe using "auto" can result in the browser adding a scrollbar in certain circumstances to allow you to scroll and view the full child elements
-
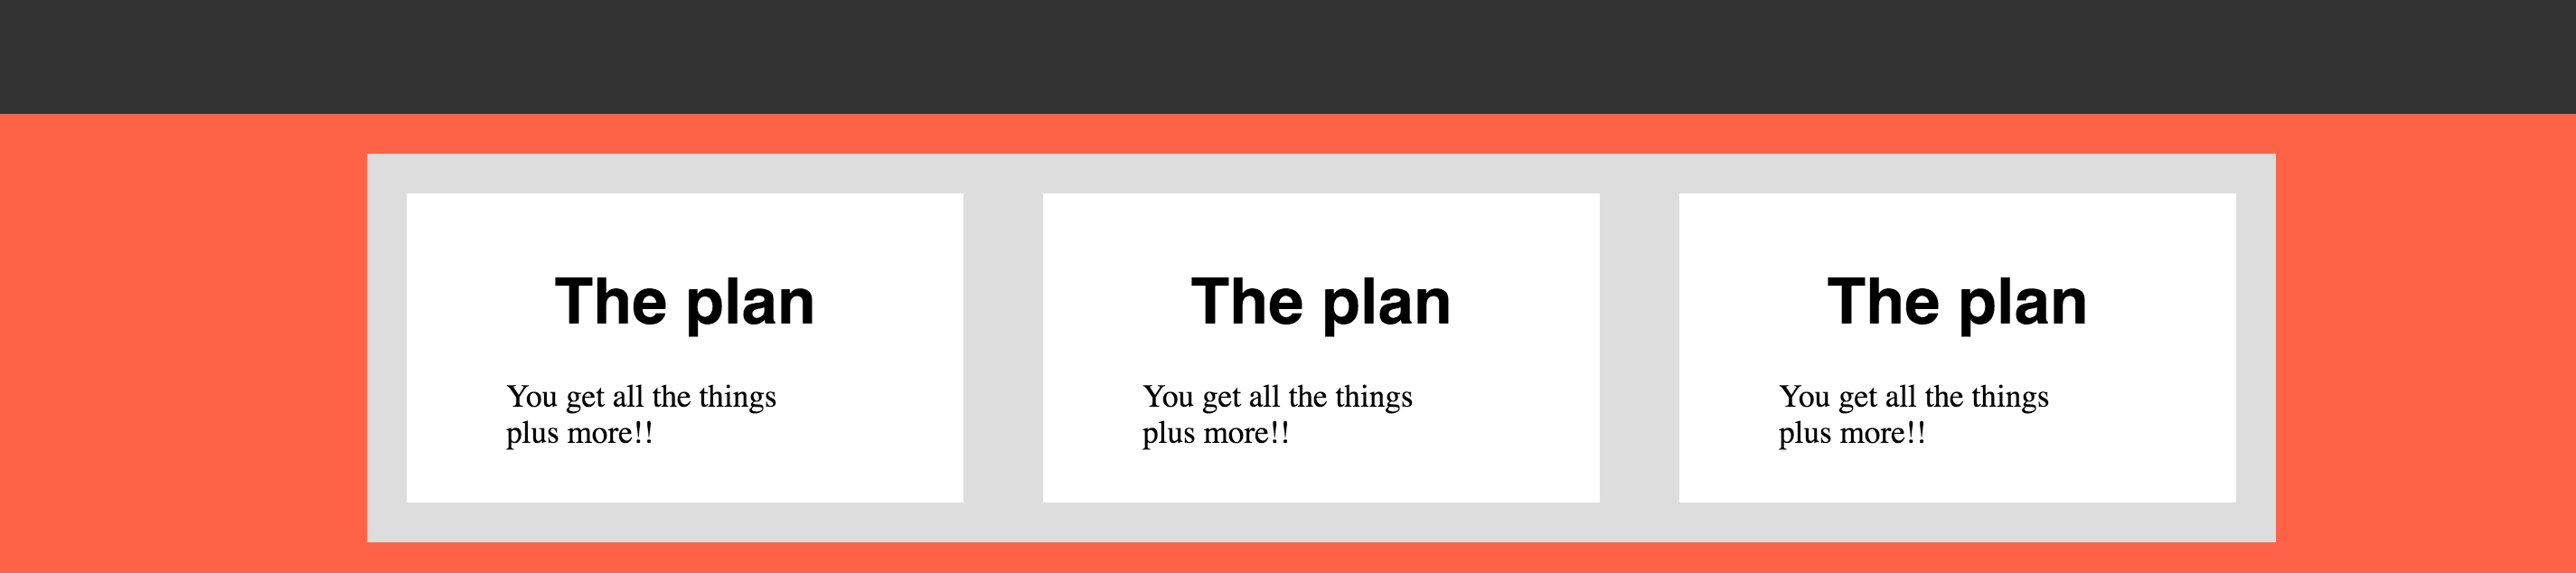
We definitely don't care about that, so let's stick with
overflow: hidden; -
I just file this solution under "learned tricks", and I find it is very difficult to explain the why behind it...
-
Great progress, almost there!
-
Seems like we have a bit of extra white space around the text in our
.tierelements! -
Where should we look first? Well, since it is shared across all of the
.tierelements, lets see what we have in our CSS:

   .pricing-tiers .tier {
     width: 260px;
     margin: 20px;
     padding: 10px;
     background-color: white;
     float: left;
   }
- We are investigating white space within the border of the
.tierso we can rule outmarginand take a first look atpadding. - Let's comment out
padding: 10px;. Look at that uneven gray space to the right. Removing the padding affected the overall width of all three.tierelements combined.
-
Worth a shot, but let's comment it back in and see if we can try something else first before we have to do tedious width calculations by hand to fix it.
-
If we ignore the parent element's
padding, we should next look at the child elements' styling:-
For the
h1.tier h1 { font-family: "Helvetica", sans-serif; font-weight: bold; font-size: 2em; margin-bottom: 20px; text-align: center; }-
If we inspect the
h1in the browser we can see there is margin on the top and bottom that is adding white space. Let's comment that out and see how it looks!- Looking closer to the mockup!
-
-
For the
ul, we don't have any custom styling that immediately appears to affect thelielement positioning, but our text has white space to the left....tier ul { list-style: none; } -
Let's inspect that
ulin the browser and we can see that there are 40px of padding to the left of ourul -
Let's add
padding-left: 0;to theuland take a look:- Great! Just a little bit of white space on the bottom and we can call it a day.
-
Inspecting the
ulin the browser also reveals that there is something adding a bottom margin. We can override this by addingmargin-bottom: 0;to theul
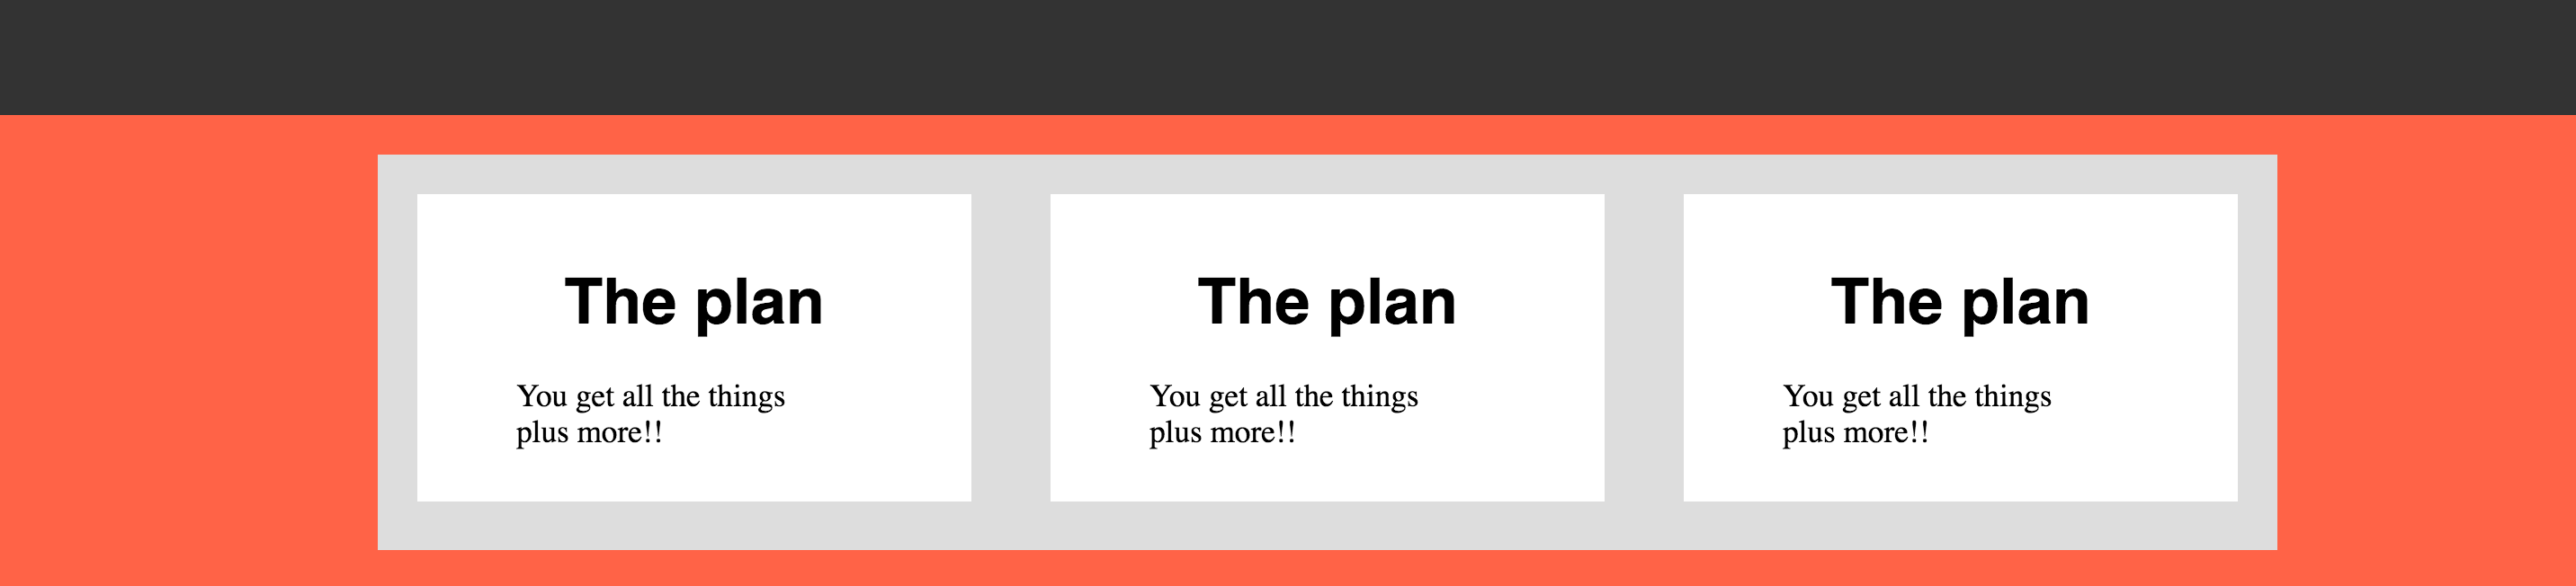
-
-
Looks great! We can always refine the details down to the correct px amount, but for now I think we've made great progress.
-
Here is our updated CSS:
   header {
     background-color: #333;
     height: 60px;
     width: 100%;
   }

   .pricing {
     background-color: tomato;
     padding: 20px;
     width: 100%;
   }

   .pricing-tiers {
     background-color: #ddd;
     margin: 0px auto;
     overflow: hidden;
     width: 960px;
   }

   .pricing-tiers .tier {
     background-color: white;
     float: left;
     margin: 20px;
     padding: 10px;
     width: 260px;
   }

   .tier ul {
     list-style: none;
     margin-bottom: 0;
     padding-left: 0;
   }

   .tier h1 {
     font-family: "Helvetica", sans-serif;
     font-size: 2em;
     font-weight: bold;
     margin: 0;
     text-align: center;
   }

   .pricing-tiers > .tier:last-child {
     margin-right: 0px;
   }


