- Overview
- Cloud resources
- Setup AWS credentials and environment variables
- Configure a Kubernetes cluster on AWS
- Deploy Jupyterhub to the cluster using Helm (PENDING)
- config.yaml
- authentication
- user resources
- base image
- initialization steps
- Tearing things down (PENDING)
The current project contains the required configuration files to deploy Jupyterhub to a working Kubernetes cluster in the cloud. We're focusing on AWS but it may well be another cloud provider.
Jupyterhub is a multi-user computational environment aimed to help researchers to prototype, develop and share code in a intuitive way. By default Jupyterhub comes with a Python back-end but other languages can be used. There are different ways to deploy Jupyterhub and this guide uses Kubernetes as the underlying could container orchestrator**.
First things first: Kubernetes.
Kubernetes is the default container orchestration platform in the cloud and a lot of the latest Jupyterhub work is focused on using it. The result of these efforts is a project called Zero to JupyterHub with Kubernetes or z2jh. They have a detailed set of instructions that overlap with this guide and it's a recommended first step if you want to learn things that are not covered here.
The first part of this guide is about installing a healthy Kubernetes cluster using AWS and a tool called Kops (Kubernetes Operations) and the second part is about Jupyterhub configuration and deployment to our Kubernetes cluster. We use Kops because it's simpler! if we were to install and configure Kubernetes manually we'll spend more time on that than actually talking about Jupyterhub.
** There is currently a in-house deployment at NSIDC that uses Docker Swarm that hopefully will converge with this project under the same Kubernetes umbrella.
When we talk about the cloud the main thing to take into account is... money. Sounds harsh and maybe a better term would be efficiency, as for all the operations we do in the cloud incur in money being spent. Before we setup a cluster we need to do some calculations on the resources we are going to need for a Jupyterhub deployment. We are going to use AWS as our cloud provider and we'll talk about their services and will use their naming convention. That said, Kubernetes abstracts some of this hardware specifics so we can see them as almost generic (cpu, memory etc).
The first thing to calculate is how many users are we going to serve concurrently, for simplicity we are not going to use auto scaling groups or different hardware profiles and this means that we need to do some math in advance. Based on user experiences with other Jupyterhub deployments like Binder we could set our baseline for a simple tutorial that does not do complicated stuff (Machine Learning or Big Data) in 2GB and .5 CPUs per user and adjust it up if necessary. We could start selecting the machines we are going to need and calculate the cost per hour for our cluster.
Let's say that we are going to host 50 concurrent users for a GeoSciences conference and they are going to use xarray, GeoPandas and PyPlot as the main tools with medium size data granules i.e. 50MB per area of interest or time of interest.
With these requirements 4GB and 1 full CPU would be more advisable than our resources baseline. We can browse AWS instances for the ones that will be of use for our tutorial. We need to keep in mind that VMs are not created equal and they are categorized for different purposes. For this tutorial we'll stick to the general purpose machines as they offer a good balance between resources and cost.
How many machines do we need? it depends. AWS offers small, medium and big machines at different prices and we could use many small machines that will host just a few users per machine or big machines that can handle a lot of our users, the right combination varies from tutorial to tutorial.
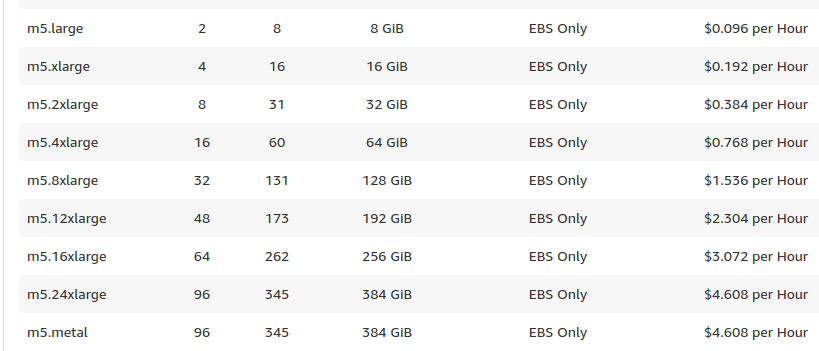
We will host our 50 users in 4 m5.4xlarge machines, remember that each machine also uses some resources for Kubernetes and the host OS so we don't get the whole VM for Jupyterhub users. The reason we need 4 of these machines is because each can accommodate 15 users and still has some room for this overhead. 15 x 4GB = 60GB and 1 CPU per user = 15 vCPUS, that leaves 1CPU and 4 GB for the OS and Kubernetes daemons. As we said, we could use a different configuration i.e smaller machines: if we pick m5.2xlarge instances we are going to need 8 machines to accommodate our 50 users. If we do the math, one of these machines will be really underutilized as it will only allocate 1 or 2 users.
We know that we need 4 m5.4xlarge machines for our Kubernetes nodes but what about the master? with these few nodes we don't need a big machine REF so we'll use the default m3.medium instance. This configuration results in
$0.77 x 4 nodes = $3.08 $0.067 x 1 master ~= $0.07 = $3.15 USD per hour for 50 concurrent users
There are other costs related to use a cluster in the cloud, AWS is famous for charging for everything we do but the big slice of a Kubernetes cluster is the computational resources on EC2, this is if we don't test the big data land where storage and data transfer cost will outweigh EC2.
The beauty of the cloud is that we buy what we need for the time we need it, usually in a tutorial we don't need to persist user data so we could resize, create and destroy the cluster to reduce our bill. Now we know how many machines we need and have a good estimate of how much it's going to cost us.
To facilitate our interaction with AWS and Kubernetes we are going to install the following:
awscli: AWS command line interface kubectl: The Kubernetes command-line tool kops: Command-line tool to create, modify and destroy Kubernetes clusters
Once that we have these tools installed in our machine (or a remote VM) we need to setup our AWS credentials using Amazon's web console or via the awscli tool. We need to make sure that our AWS credentials have these permissions:
AmazonEC2FullAccess
AmazonRoute53FullAccess
AmazonS3FullAccess
IAMFullAccess
AmazonVPCFullAccess
Once that we have our AccessKeyID and SecretAccessKey with these permissions we need to export them as environment variables.
export AWS_ACCESS_KEY_ID=$(aws configure get aws_access_key_id)
export AWS_SECRET_ACCESS_KEY=$(aws configure get aws_secret_access_key)
The next environment variables that we need to set are the ones related to how Kops is going to store our cluster's configuration:
export KOPS_STATE_STORE=s3://k8-cryohub-state-store
export KOPS_FEATURE_FLAGS=SpecOverrideFlag
KOPS_STATE_STORE is the bucket in AWS S3 where Kops will store the current cluster state. This bucket needs to be created before we start our cluster. KOPS_FEATURE_FLAGS=SpecOverrideFlag allows us to modify default values in Kops settings.
Now we export the last environment variables:
export AWS_NODE_TYPE=m5.4xlarge
export AWS_NODE_COUNT=4
export CLUSTER_NAME=nsidc-cryohub.org
At this point we are ready to use Kops to create and configure Kubernetes in AWS. The first step is to decide if we are going to use a domain or a gossip based cluster, this defines our Kubernetes nodes will communicate internally. If we don't want to use a domain the name of our cluster has to follow a specific naming convention ending in .k8s.local For more information on how Kubernetes will handle name resolution please read the Kubernetes wiki.
kops create cluster --master-volume-size 20 --master-zones us-west-2a --node-count=$AWS_NODE_COUNT --node-size=$AWS_NODE_TYPE --authorization RBAC --node-volume-size 40 --zones us-west-2a,us-west-2b,us-west-2c $CLUSTER_NAME
This will create a configuration file and store it on the S3 bucket, the cluster is not spun yet. Before we apply the configuration to start the cluster we need to alter it to allow token authorization, this will allow us to access the dashboard using a secret token.
kops --name=$CLUSTER_NAME set cluster spec.kubelet.authorizationMode=Webhook
kops --name=$CLUSTER_NAME set cluster spec.kubelet.authenticationTokenWebhook=true
Now we start the cluster, this operation requires some time, so in the meantime let's read some Kubernetes documentation.
kops update cluster --name $CLUSTER_NAME --yes
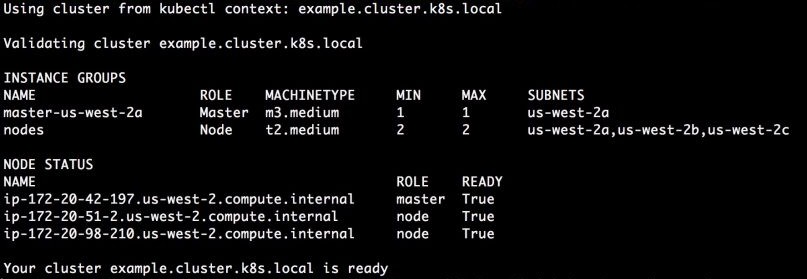
After some minutes we can validate the state of the cluster using:
kops validate cluster
Install miniconda3 (Python 3.7) for your platform from https://docs.conda.io/en/latest/miniconda.html
Download the AGU-2019-NSIDC-Data-Tutorial repository from Github by clicking the green 'Clone or Download' button located at the top right of the repository page.
Unzip the file, and open a command line or terminal window in the AGU-2019-NSIDC-Data-Tutorial folder's location.
From a command line or terminal window, install the required environment with the following command:
conda env create -f binder/environment.ymlyou should now see that the dependencies were installed and our environment is ready to be used.
Activate the environment with
conda activate tutorial
Launch the notebook locally with the following command:
jupyter labThis should open a browser window displaying your current working directory contents. Navigate to the notebooks folder and click on the NSIDC DAAC Customize and Access Data Tutorial.ipynb file. You can now interact with the notebook to explore and access data.