You signed in with another tab or window. Reload to refresh your session.You signed out in another tab or window. Reload to refresh your session.You switched accounts on another tab or window. Reload to refresh your session.Dismiss alert
*This list of resources is specifically targeted at Web Developers and Data Scientists…. so do with it what you will…*
This list borrows heavily from multiple lists created by :sindresorhus
Machine learning is a subfield of artificial intelligence, which is broadly defined as the capability of a machine to imitate intelligent human behavior. Artificial intelligence systems are used to perform complex tasks in a way that is similar to how humans solve problems.
The goal of AI is to create computer models that exhibit “intelligent behaviors” like humans, according toBoris Katz, a principal research scientist and head of the InfoLab Group at CSAIL. This means machines that can recognize a visual scene, understand a text written in natural language, or perform an action in the physical world.
Machine learning is one way to use AI. It was defined in the 1950s by AI pioneerArthur Samuelas “the field of study that gives computers the ability to learn without explicitly being programmed.”
Natural language processing is a field of machine learning in which machines learn to understand natural language as spoken and written by humans, instead of the data and numbers normally used to program computers. This allows machines to recognize language, understand it, and respond to it, as well as create new text and translate between languages. Natural language processing enables familiar technology like chatbots and digital assistants like Siri or Alexa.
Neural networks
Neural networks are a commonly used, specific class of machine learning algorithms. Artificial neural networks are modeled on the human brain, in which thousands or millions of processing nodes are interconnected and organized into layers.
In an artificial neural network, cells, or nodes, are connected, with each cell processing inputs and producing an output that is sent to other neurons. Labeled data moves through the nodes, or cells, with each cell performing a different function. In a neural network trained to identify whether a picture contains a cat or not, the different nodes would assess the information and arrive at an output that indicates whether a picture features a cat.
Be familiar with how Machine Learning is applied at other companies
Why is looking at runtime not a reliable method of calculating time complexity?
Not all computers are made equal( some may be stronger and therefore boost our runtime speed )
How many background processes ran concurrently with our program that was being tested?
We also need to ask if our code remains performant if we increase the size of the input.
The real question we need to answering is: How does our performance scale?.
big ‘O’ notation
Big O Notation is a tool for describing the efficiency of algorithms with respect to the size of the input arguments.
Since we use mathematical functions in Big-O, there are a few big picture ideas that we’ll want to keep in mind:
The function should be defined by the size of the input.
Smaller Big O is better (lower time complexity)
Big O is used to describe the worst case scenario.
Big O is simplified to show only its most dominant mathematical term.
Simplifying Math Terms
We can use the following rules to simplify the our Big O functions:
Simplify Products : If the function is a product of many terms, we drop the terms that don't depend on n.
Simplify Sums : If the function is a sum of many terms, we drop the non-dominant terms.
n : size of the input
T(f) : unsimplified math function
O(f) : simplified math function.
Putting it all together
- First we apply the product rule to drop all constants.
- Then we apply the sum rule to select the single most dominant term.
Complexity Classes
Common Complexity Classes
There are 7 major classes in Time Complexity
#### `O(1) Constant`
The algorithm takes roughly the same number of steps for any input size.
O(log(n)) Logarithmic
In most cases our hidden base of Logarithmic time is 2, log complexity algorithm’s will typically display ‘halving’ the size of the input (like binary search!)
O(n) Linear
Linear algorithm’s will access each item of the input “once”.
O(nlog(n)) Log Linear Time
Combination of linear and logarithmic behavior, we will see features from both classes.
Algorithm’s that are log-linear will use both recursion AND iteration.
O(nc) Polynomial
C is a fixed constant.
O(c^n) Exponential
C is now the number of recursive calls made in each stack frame.
Algorithm’s with exponential time are VERY SLOW.
Memoization
Memoization : a design pattern used to reduce the overall number of calculations that can occur in algorithms that use recursive strategies to solve.
MZ stores the results of the sub-problems in some other data structure, so that we can avoid duplicate calculations and only ‘solve’ each problem once.
Two features that comprise memoization:
FUNCTION MUST BE RECURSIVE.
Our additional Data Structure is usually an object (we refer to it as our memo… or sometimes cache!)
### Memoizing Factorial
Our memo object is mapping out our arguments of factorial to it’s return value.
Keep in mind we didn’t improve the speed of our algorithm.
Memoizing Fibonacci
- Our time complexity for Fibonacci goes from O(2^n) to O(n) after applying memoization.
The Memoization Formula
Rules:
Write the unoptimized brute force recursion (make sure it works);
Add memo object as an additional argument .
Add a base case condition that returns the stored value if the function’s argument is in the memo.
Before returning the result of the recursive case, store it in the memo as a value and make the function’s argument it’s key.
Things to remember
When solving DP problems with Memoization, it is helpful to draw out the visual tree first.
When you notice duplicate sub-tree’s that means we can memoize.
Tabulation
Tabulation Strategy
Use When:
The function is iterative and not recursive.
The accompanying DS is usually an array.
Steps for tabulation
Create a table array based off the size of the input.
Initialize some values in the table to ‘answer’ the trivially small subproblem.
Iterate through the array and fill in the remaining entries.
Your final answer is usually the last entry in the table.
Memo and Tab Demo with Fibonacci
Normal Recursive Fibonacci
function fibonacci(n) {
  if (n <= 2) return 1;
  return fibonacci(n - 1) + fibonacci(n - 2);
}
Memoization Fibonacci 1
Memoization Fibonacci 2
Tabulated Fibonacci
Example of Linear Search
Worst Case Scenario: The term does not even exist in the array.
Meaning: If it doesn’t exist then our for loop would run until the end therefore making our time complexity O(n).
Sorting Algorithms
Bubble Sort
Time Complexity: Quadratic O(n^2)
The inner for-loop contributes to O(n), however in a worst case scenario the while loop will need to run n times before bringing all n elements to their final resting spot.
Space Complexity: O(1)
Bubble Sort will always use the same amount of memory regardless of n.
- The first major sorting algorithm one learns in introductory programming courses.
- Gives an intro on how to convert unsorted data into sorted data.
It’s almost never used in production code because:
It’s not efficient
It’s not commonly used
There is stigma attached to it
Bubbling Up* : Term that infers that an item is in motion, moving in some direction, and has some final resting destination.*
Bubble sort, sorts an array of integers by bubbling the largest integer to the top.
Worst Case & Best Case are always the same because it makes nested loops.
Double for loops are polynomial time complexity or more specifically in this case Quadratic (Big O) of: O(n²)
Selection Sort
Time Complexity: Quadratic O(n^2)
Our outer loop will contribute O(n) while the inner loop will contribute O(n / 2) on average. Because our loops are nested we will get O(n²);
Space Complexity: O(1)
Selection Sort will always use the same amount of memory regardless of n.
- Selection sort organizes the smallest elements to the start of the array.
Summary of how Selection Sort should work:
Set MIN to location 0
Search the minimum element in the list.
Swap with value at location Min
Increment Min to point to next element.
Repeat until list is sorted.
Insertion Sort
Time Complexity: Quadratic O(n^2)
Our outer loop will contribute O(n) while the inner loop will contribute O(n / 2) on average. Because our loops are nested we will get O(n²);
Space Complexity: O(n)
Because we are creating a subArray for each element in the original input, our Space Comlexity becomes linear.
### Merge Sort
Time Complexity: Log Linear O(nlog(n))
Since our array gets split in half every single time we contribute O(log(n)). The while loop contained in our helper merge function contributes O(n) therefore our time complexity is O(nlog(n)); Space Complexity: O(n)
We are linear O(n) time because we are creating subArrays.
### Example of Merge Sort
- **Merge sort is O(nlog(n)) time.**
- *We need a function for merging and a function for sorting.*
Steps:
If there is only one element in the list, it is already sorted; return the array.
Otherwise, divide the list recursively into two halves until it can no longer be divided.
Merge the smallest lists into new list in a sorted order.
Quick Sort
Time Complexity: Quadratic O(n^2)
Even though the average time complexity O(nLog(n)), the worst case scenario is always quadratic.
Space Complexity: O(n)
Our space complexity is linear O(n) because of the partition arrays we create.
QS is another Divide and Conquer strategy.
Some key ideas to keep in mind:
It is easy to sort elements of an array relative to a particular target value.
An array of 0 or 1 elements is already trivially sorted.
### Binary Search
Time Complexity: Log Time O(log(n))
Space Complexity: O(1)
*Recursive Solution*
Min Max Solution
Must be conducted on a sorted array.
Binary search is logarithmic time, not exponential b/c n is cut down by two, not growing.
Binary Search is part of Divide and Conquer.
Insertion Sort
Works by building a larger and larger sorted region at the left-most end of the array.
Steps:
If it is the first element, and it is already sorted; return 1.
Pick next element.
Compare with all elements in the sorted sub list
Shift all the elements in the sorted sub list that is greater than the value to be sorted.
Insert the value
Repeat until list is sorted.
If you found this guide helpful feel free to checkout my GitHub/gists where I host similar content:
Test if you have Ubuntu installed by typing “Ubuntu” in the search box in the bottom app bar that reads “Type here to search”. If you see a search result that reads **“Ubuntu 20.04 LTS”** with “App” under it, then you have it installed.
In the application search box in the bottom bar, type “PowerShell” to find the application named “Windows PowerShell”
Right-click on “Windows PowerShell” and choose “Run as administrator” from the popup menu
In the blue PowerShell window, type the following: Enable-WindowsOptionalFeature -Online -FeatureName Microsoft-Windows-Subsystem-Linux
Restart your computer
In the application search box in the bottom bar, type “Store” to find the application named “Microsoft Store”
Click “Microsoft Store”
Click the “Search” button in the upper-right corner of the window
Type in “Ubuntu”
Click “Run Linux on Windows (Get the apps)”
Click the orange tile labeled “Ubuntu” Note that there are 3 versions in the Microsoft Store… you want the one just entitled ‘Ubuntu’
Click “Install”
After it downloads, click “Launch”
If you get the option, pin the application to the task bar. Otherwise, right-click on the orange Ubuntu icon in the task bar and choose “Pin to taskbar”
When prompted to “Enter new UNIX username”, type your first name with no spaces
When prompted, enter and retype a password for this UNIX user (it can be the same as your Windows password)
Confirm your installation by typing the command whoami ‘as in who-am-i'followed by Enter at the prompt (it should print your first name)
You need to update your packages, so type sudo apt update (if prompted for your password, enter it)
You need to upgrade your packages, so type sudo apt upgrade (if prompted for your password, enter it)
Git
Git comes with Ubuntu, so there’s nothing to install. However, you should configure it using the following instructions.
Open an Ubuntu terminal if you don’t have one open already.
You need to configure Git, so type git config --global user.name "Your Name" with replacing "Your Name" with your real name.
You need to configure Git, so type git config --global user.email your@email.com with replacing "your@email.com" with your real email.
Note: if you want git to remember your login credentials type:
$ git config --global credential.helper store
Google Chrome
Test if you have Chrome installed by typing “Chrome” in the search box in the bottom app bar that reads “Type here to search”. If you see a search result that reads “Chrome” with “App” under it, then you have it installed. Otherwise, follow these instructions to install Google Chrome.
Open Microsoft Edge, the blue “e” in the task bar, and type in http://chrome.google.com. Click the “Download Chrome” button. Click the “Accept and Install” button after reading the terms of service. Click “Save” in the “What do you want to do with ChromeSetup.exe” dialog at the bottom of the window. When you have the option to “Run” it, do so. Answer the questions as you’d like. Set it as the default browser.
Right-click on the Chrome icon in the task bar and choose “Pin to taskbar”.
Node.js
Test if you have Node.js installed by opening an Ubuntu terminal and typing node --version. If it reports "Command 'node' not found", then you need to follow these directions.
In the Ubuntu terminal, type sudo apt update and press Enter
In the Ubuntu terminal, type sudo apt install build-essential and press Enter
In the Ubuntu terminal, type curl -o- https://raw.githubusercontent.com/nvm-sh/nvm/v0.35.2/install.sh | bash and press Enter
In the Ubuntu terminal, type . ./.bashrc and press Enter
In the Ubuntu terminal, type nvm install --lts and press Enter
Confirm that node is installed by typing node --version and seeing it print something that is not "Command not found"!
Unzip
You will often have to download a zip file and unzip it. It is easier to do this from the command line. So we need to install a linux unzip utility.
In the Ubuntu terminal type: sudo apt install unzip and press Enter
Mocha.js
Test if you have Mocha.js installed by opening an Ubuntu terminal and typing which mocha. If it prints a path, then you're good. Otherwise, if it prints nothing, install Mocha.js by typing npm install -g mocha.
Python 3
Ubuntu does not come with Python 3. Install it using the command sudo apt install python3. Test it by typing python3 --version and seeing it print a number.
Note about WSL
As of the time of writing of this document, WSL has an issue renaming or deleting files if Visual Studio Code is open. So before doing any linux commands which manipulate files, make sure you close Visual Studio Code before running those commands in the Ubuntu terminal.
Deploy React App To Heroku Using Postgres & Express
Heroku is an web application that makes deploying applications easy for a beginner.
Deploy React App To Heroku Using Postgres & Express
Heroku is an web application that makes deploying applications easy for a beginner.
Before you begin deploying, make sure to remove any console.log's or debugger's in any production code. You can search your entire project folder if you are using them anywhere.
You will set up Heroku to run on a production, not development, version of your application. When a Node.js application like yours is pushed up to Heroku, it is identified as a Node.js application because of the package.json file. It runs npm install automatically. Then, if there is a heroku-postbuild script in the package.json file, it will run that script. Afterwards, it will automatically run npm start.
In the following phases, you will configure your application to work in production, not just in development, and configure the package.json scripts for install, heroku-postbuild and start scripts to install, build your React application, and start the Express production server.
Phase 1: Heroku Connection
If you haven’t created a Heroku account yet, create one here.
Add a new application in your Heroku dashboard named whatever you want. Under the “Resources” tab in your new application, click “Find more add-ons” and add the “Heroku Postgres” add-on with the free Hobby Dev setting.
In your terminal, install the Heroku CLI. Afterwards, login to Heroku in your terminal by running the following:
heroku login
Add Heroku as a remote to your project’s git repository in the following command and replace <name-of-Heroku-app> with the name of the application you created in the Heroku dashboard.
heroku git:remote -a <name-of-Heroku-app>
Next, you will set up your Express + React application to be deployable to Heroku.
Phase 2: Setting up your Express + React application
Right now, your React application is on a different localhost port than your Express application. However, since your React application only consists of static files that don’t need to bundled continuously with changes in production, your Express application can serve the React assets in production too. These static files live in the frontend/build folder after running npm run build in the frontend folder.
Add the following changes into your backend/routes.index.js file.
At the root route, serve the React application’s static index.html file along with XSRF-TOKEN cookie. Then serve up all the React application's static files using the express.static middleware. Serve the index.html and set the XSRF-TOKEN cookie again on all routes that don't start in /api. You should already have this set up in backend/routes/index.js which should now look like this:
// backend/routes/index.js
const express = require('express');
const router = express.Router();
const apiRouter = require('./api');

router.use('/api', apiRouter);

// Static routes
// Serve React build files in production
if (process.env.NODE_ENV === 'production') {
  const path = require('path');
  // Serve the frontend's index.html file at the root route
  router.get('/', (req, res) => {
    res.cookie('XSRF-TOKEN', req.csrfToken());
    res.sendFile(
      path.resolve(__dirname, '../../frontend', 'build', 'index.html')
    );
  });

  // Serve the static assets in the frontend's build folder
  router.use(express.static(path.resolve("../frontend/build")));

  // Serve the frontend's index.html file at all other routes NOT starting with /api
  router.get(/^(?!\/?api).*/, (req, res) => {
    res.cookie('XSRF-TOKEN', req.csrfToken());
    res.sendFile(
      path.resolve(__dirname, '../../frontend', 'build', 'index.html')
    );
  });
}

// Add a XSRF-TOKEN cookie in development
if (process.env.NODE_ENV !== 'production') {
  router.get('/api/csrf/restore', (req, res) => {
    res.cookie('XSRF-TOKEN', req.csrfToken());
    res.status(201).json({});
  });
}

module.exports = router;
Your Express backend’s package.json should include scripts to run the sequelize CLI commands.
The backend/package.json's scripts should now look like this:
Initialize a package.json file at the very root of your project directory (outside of both the backend and frontend folders). The scripts defined in this package.json file will be run by Heroku, not the scripts defined in the backend/package.json or the frontend/package.json.
When Heroku runs npm install, it should install packages for both the backend and the frontend. Overwrite the install script in the root package.json with:
This will run npm install in the backend folder then run npm install in the frontend folder.
Next, define a heroku-postbuild script that will run the npm run build command in the frontend folder. Remember, Heroku will automatically run this script after running npm install.
Define a sequelize script that will run npm run sequelize in the backend folder.
Finally, define a start that will run npm start in the `backend folder.
The root package.json's scripts should look like this:
The dev:backend and dev:frontend scripts are optional and will not be used for Heroku.
Finally, commit your changes.
Phase 3: Deploy to Heroku
Once you’re finished setting this up, navigate to your application’s Heroku dashboard. Under “Settings” there is a section for “Config Vars”. Click the Reveal Config Vars button to see all your production environment variables. You should have a DATABASE_URL environment variable already from the Heroku Postgres add-on.
Add environment variables for JWT_EXPIRES_IN and JWT_SECRET and any other environment variables you need for production.
You can also set environment variables through the Heroku CLI you installed earlier in your terminal. See the docs for Setting Heroku Config Variables.
Push your project to Heroku. Heroku only allows the master branch to be pushed. But, you can alias your branch to be named master when pushing to Heroku. For example, to push a branch called login-branch to master run:
git push heroku login-branch:master
If you do want to push the master branch, just run:
git push heroku master
You may want to make two applications on Heroku, the master branch site that should have working code only. And your staging site that you can use to test your work in progress code.
Now you need to migrate and seed your production database.
Using the Heroku CLI, you can run commands inside of your production application just like in development using the heroku run command.
For example to migrate the production database, run:
heroku run npm run sequelize db:migrate
To seed the production database, run:
heroku run npm run sequelize db:seed:all
Note: You can interact with your database this way as you’d like, but beware that db:drop cannot be run in the Heroku environment. If you want to drop and create the database, you need to remove and add back the "Heroku Postgres" add-on.
Another way to interact with the production application is by opening a bash shell through your terminal by running:
heroku bash
In the opened shell, you can run things like npm run sequelize db:migrate.
Open your deployed site and check to see if you successfully deployed your Express + React application to Heroku!
If you see an Application Error or are experiencing different behavior than what you see in your local environment, check the logs by running:
heroku logs
If you want to open a connection to the logs to continuously output to your terminal, then run:
heroku logs --tail
The logs may clue you into why you are experiencing errors or different behavior.
If you found this guide helpful feel free to checkout my github/gists where I host similar content:
fetch('/data.json', {
  method: 'post',
  body: new FormData(form), // post body
  body: JSON.stringify(...),

  headers: {
    'Accept': 'application/json'
  },

  credentials: 'same-origin', // send cookies
  credentials: 'include',     // send cookies, even in CORS

})
Catching errors
fetch('/data.json')
  .then(checkStatus)

function checkStatus (res) {
  if (res.status >= 200 && res.status < 300) {
    return res
  } else {
    let err = new Error(res.statusText)
    err.response = res
    throw err
  }
}
Non-2xx responses are still successful requests. Use another function to turn them to errors.
Common Python Data Structures Data structures are the fundamental constructs around which you build your programs. Each data structure provides a particular way of organizing data so it can be accessed efficiently, depending on your use case. Python ships with an extensive set of data structures in its standard library.
The space complexity represents the memory consumption of a data structure. As for most of the things in life, you can’t have it all, so it is with the data structures. You will generally need to trade some time for space or the other way around.
time
The time complexity for a data structure is in general more diverse than its space complexity.
Several operations
In contrary to algorithms, when you look at the time complexity for data structures you need to express it for several operations that you can do with data structures. It can be adding elements, deleting elements, accessing an element or even searching for an element.
Dependent on data
Something that data structure and algorithms have in common when talking about time complexity is that they are both dealing with data. When you deal with data you become dependent on them and as a result the time complexity is also dependent of the data that you received. To solve this problem we talk about 3 different time complexity.
The best-case complexity: when the data looks the best
The worst-case complexity: when the data looks the worst
The average-case complexity: when the data looks average
Big O notation
The complexity is usually expressed with the Big O notation. The wikipedia page about this subject is pretty complex but you can find here a good summary of the different complexity for the most famous data structures and sorting algorithms.
The Array data structure
### Definition
An Array data structure, or simply an Array, is a data structure consisting of a collection of elements (values or variables), each identified by at least one array index or key. The simplest type of data structure is a linear array, also called one-dimensional array. From Wikipedia
Arrays are among the oldest and most important data structures and are used by every program. They are also used to implement many other data structures.
Complexity Average Access Search Insertion Deletion
O(1) O(n) O(1) O(n)
indexvalue0 … this is the first value, stored at zero position
The index of an array runs in sequence
This could be useful for storing data that are required to be ordered, such as rankings or queues
In JavaScript, array’s value could be mixed; meaning value of each index could be of different data, be it String, Number or even Objects
2. Objects
Think of objects as a logical grouping of a bunch of properties.
Properties could be some variable that it’s storing or some methods that it’s using.
I also visualize an object as a table.
The main difference is that object’s “index” need not be numbers and is not necessarily sequenced.
The Hash Table
### *Definition*
A Hash Table (Hash Map) is a data structure used to implement an associative array, a structure that can map keys to values. A Hash Table uses a hash function to compute an index into an array of buckets or slots, from which the desired value can be found. From Wikipedia
Hash Tables are considered the more efficient data structure for lookup and for this reason, they are widely used.
Complexity
Average
Access Search Insertion Deletion
O(1) O(1) O(1)
The code
Note, here I am storing another object for every hash in my Hash Table.
The Set
Sets
Sets are pretty much what it sounds like. It’s the same intuition as Set in Mathematics. I visualize Sets as Venn Diagrams.
### *Definition*
A Set is an abstract data type that can store certain values, without any particular order, and no repeated values. It is a computer implementation of the mathematical concept of a finite Set. From Wikipedia
The Set data structure is usually used to test whether elements belong to set of values. Rather then only containing elements, Sets are more used to perform operations on multiple values at once with methods such as union, intersect, etc…
Complexity
Average
Access Search Insertion Deletion
O(n) O(n) O(n)
The code
The Singly Linked List
### *Definition*
A Singly Linked List is a linear collection of data elements, called nodes pointing to the next node by means of pointer. It is a data structure consisting of a group of nodes which together represent a sequence. Under the simplest form, each node is composed of data and a reference (in other words, a link) to the next node in the sequence.
Linked Lists are among the simplest and most common data structures because it allows for efficient insertion or removal of elements from any position in the sequence.
Complexity
Average
Access Search Insertion Deletion
O(n) O(n) O(1) O(1)
The code
The Doubly Linked List
### *Definition*
A Doubly Linked List is a linked data structure that consists of a set of sequentially linked records called nodes. Each node contains two fields, called links, that are references to the previous and to the next node in the sequence of nodes. From Wikipedia
Having two node links allow traversal in either direction but adding or removing a node in a doubly linked list requires changing more links than the same operations on a Singly Linked List.
Complexity
Average
Access Search Insertion Deletion
O(n) O(n) O(1) O(1)
The code
The Stack
Definition
A Stack is an abstract data type that serves as a collection of elements, with two principal operations: push, which adds an element to the collection, and pop, which removes the most recently added element that was not yet removed. The order in which elements come off a Stack gives rise to its alternative name, LIFO (for last in, first out). From Wikipedia
A Stack often has a third method peek which allows to check the last pushed element without popping it.
Complexity
Average
Access Search Insertion Deletion
O(n) O(n) O(1) O(1)
The code
The Queue
### *Definition*
A Queue is a particular kind of abstract data type or collection in which the entities in the collection are kept in order and the principal operations are the addition of entities to the rear terminal position, known as enqueue, and removal of entities from the front terminal position, known as dequeue. This makes the Queue a First-In-First-Out (FIFO) data structure. In a FIFO data structure, the first element added to the Queue will be the first one to be removed.
As for the Stack data structure, a peek operation is often added to the Queue data structure. It returns the value of the front element without dequeuing it.
Complexity
Average
Access Search Insertion Deletion
O(n) O(n) O(1) O(n)
The code
The Tree
### *Definition*
A Tree is a widely used data structure that simulates a hierarchical tree structure, with a root value and subtrees of children with a parent node. A tree data structure can be defined recursively as a collection of nodes (starting at a root node), where each node is a data structure consisting of a value, together with a list of references to nodes (the “children”), with the constraints that no reference is duplicated, and none points to the root node. From Wikipedia
Complexity
Average
Access Search Insertion Deletion
O(n) O(n) O(n) O(n)
To get a full overview of the time and space complexity of the Tree data structure, have a look to this excellent Big O cheat sheet.
*The code*
The Graph
### *Definition*
A Graph data structure consists of a finite (and possibly mutable) set of vertices or nodes or points, together with a set of unordered pairs of these vertices for an undirected Graph or a set of ordered pairs for a directed Graph. These pairs are known as edges, arcs, or lines for an undirected Graph and as arrows, directed edges, directed arcs, or directed lines for a directed Graph. The vertices may be part of the Graph structure, or may be external entities represented by integer indices or references.
A graph is any collection of nodes and edges.
Much more relaxed in structure than a tree.
It doesn’t need to have a root node (not every node needs to be accessible from a single node)
It can have cycles (a group of nodes whose paths begin and end at the same node)
Cycles are not always “isolated”, they can be one part of a larger graph. You can detect them by starting your search on a specific node and finding a path that takes you back to that same node.
Any number of edges may leave a given node
A Path is a sequence of nodes on a graph
Cycle Visual
A Graph data structure may also associate to each edge some edge value, such as a symbolic label or a numeric attribute (cost, capacity, length, etc.).
Representation
There are different ways of representing a graph, each of them with its own advantages and disadvantages. Here are the main 2:
Adjacency list: For every vertex a list of adjacent vertices is stored. This can be viewed as storing the list of edges. This data structure allows the storage of additional data on the vertices and edges.
Adjacency matrix: Data are stored in a two-dimensional matrix, in which the rows represent source vertices and columns represent destination vertices. The data on the edges and vertices must be stored externally.
Graph
The code
If you found this guide helpful feel free to checkout my GitHub/gists where I host similar content:
Each table is made up of rows and columns. If you think of a table as a grid, the column go from left to right across the grid and each entry of data is listed down as a row.
Each row in a relational is uniquely identified by a primary key. This can be by one or more sets of column values. In most scenarios it is a single column, such as employeeID.
Every relational table has one primary key. Its purpose is to uniquely identify each row in the database. No two rows can have the same primary key value. The practical result of this is that you can select every single row by just knowing its primary key.
SQL Server UNIQUE constraints allow you to ensure that the data stored in a column, or a group of columns, is unique among the rows in a table.
Although both UNIQUE and PRIMARY KEY constraints enforce the uniqueness of data, you should use the UNIQUE constraint instead of PRIMARY KEY constraint when you want to enforce the uniqueness of a column, or a group of columns, that are not the primary key columns.
Different from PRIMARY KEY constraints, UNIQUE constraints allow NULL. Moreover, UNIQUE constraints treat the NULL as a regular value, therefore, it only allows one NULL per column.
SELECT *
FROM table1
INNER JOIN table2 ON conditions
SELECT *
FROM table1
LEFT JOIN table2 ON conditions
SELECT *
FROM table1
FULL OUTER JOIN table2 ON conditions
SELECT *
FROM table1
CROSS JOIN table2;
SELECT *
FROM table1
NATURAL JOIN table2;
Return the number of rows of a table.
SELECT COUNT (*)
FROM table_name;
Sort rows in ascending or descending order:
SELECT select_list
FROM table
ORDER BY column ASC [DESC], column2 ASC [DESC],...;
Group rows using GROUP BY clause.
SELECT *
FROM table
GROUP BY column_1, column_2, ...;
Filter groups using the HAVING clause.
SELECT *
FROM table
GROUP BY column_1
HAVING condition;
Set operations
Combine the result set of two or more queries with UNION operator:
SELECT * FROM table1
UNION
SELECT * FROM table2;
Minus a result set using EXCEPT operator:
SELECT * FROM table1
EXCEPT
SELECT * FROM table2;
Get intersection of the result sets of two queries:
SELECT * FROM table1
INTERSECT
SELECT * FROM table2;
DROP DATABASE IF EXISTS books_db;
CREATE DATABASE books_db WITH ENCODING='UTF8' TEMPLATE template0;

DROP TABLE IF EXISTS books;

CREATE TABLE books (
  id SERIAL PRIMARY KEY,
  client VARCHAR NOT NULL,
  data JSONb NOT NULL
);
We’re going to store events in this table, like pageviews. Each event has properties, which could be anything (e.g. current page) and also sends information about the browser (like OS, screen resolution, etc). Both of these are completely free form and could change over time (as we think of extra stuff to track).
Using the JSON operators, combined with traditional PostgreSQL aggregate functions, we can pull out whatever we want. You have the full might of an RDBMS at your disposal.
Lets see browser usage:
SELECT browser->>'name' AS browser, count(browser) FROM events GROUP BY browser->>'name';
Output:
- Total revenue per visitor:
SELECT visitor_id, SUM(CAST(properties->>'amount' AS integer)) AS total FROM events WHERE CAST(properties->>'amount' AS integer) > 0 GROUP BY visitor_id;
Output:
- Average screen resolution
- `SELECT AVG(CAST(browser->'resolution'->>'x' AS integer)) AS width, AVG(CAST(browser->'resolution'->>'y' AS integer)) AS height FROM events;`
Output:
#### If you found this guide helpful feel free to checkout my github/gists where I host similar content:
Numbering can be done using $
You can use this inside tag or contents.
h${This is so awesome $}*6
<h1>This is so awesome 1</h1>
<h2>This is so awesome 2</h2>
<h3>This is so awesome 3</h3>
<h4>This is so awesome 4</h4>
<h5>This is so awesome 5</h5>
<h6>This is so awesome 6</h6>
HEAD^       # 1 commit before head
HEAD^^      # 2 commits before head
HEAD~5      # 5 commits before head
Branches
# create a new branch
  git checkout -b $branchname
  git push origin $branchname --set-upstream

# get a remote branch
  git fetch origin
  git checkout --track origin/$branchname

# delete local remote-tracking branches (lol)
  git remote prune origin

# list merged branches
  git branch -a --merged

# delete remote branch
  git push origin :$branchname

# go back to previous branch
  git checkout -
Collaboration
# Rebase your changes on top of the remote master
  git pull --rebase upstream master

# Squash multiple commits into one for a cleaner git log
# (on the following screen change the word pick to either 'f' or 's')
  git rebase -i $commit_ref
Submodules
# Import .gitmodules
  git submodule init

# Clone missing submodules, and checkout commits
  git submodule update --init --recursive

# Update remote URLs in .gitmodules
# (Use when you changed remotes in submodules)
  git submodule sync
git rebase 76acada^

# get current sha1 (?)
  git show-ref HEAD -s

# show single commit info
  git log -1 f5a960b5

# Go back up to root directory
  cd "$(git rev-parse --show-top-level)"
Short log
$ git shortlog
 $ git shortlog HEAD~20..    # last 20 commits

 James Dean (1):
     Commit here
     Commit there

 Frank Sinatra (5):
     Another commit
     This other commit
Bisect
git bisect start HEAD HEAD~6
git bisect run npm test
git checkout refs/bisect/bad   # this is where it screwed up
git bisect reset
Manual bisection
git bisect start
git bisect good   # current version is good

git checkout HEAD~8
npm test          # see if it's good
git bisect bad    # current version is bad

git bisect reset  # abort
Searching
git log --grep="fixes things"  # search in commit messages
git log -S"window.alert"       # search in code
git log -G"foo.*"              # search in code (regex)
GPG Signing
git config set user.signingkey <GPG KEY ID>       # Sets GPG key to use for signing

git commit -m "Implement feature Y" --gpg-sign    # Or -S, GPG signs commit

git config set commit.gpgsign true                # Sign commits by default
git commit -m "Implement feature Y" --no-gpg-sign # Do not sign
---
Refs
HEAD^       # 1 commit before head
HEAD^^      # 2 commits before head
HEAD~5      # 5 commits before head
Branches
# create a new branch
  git checkout -b $branchname
  git push origin $branchname --set-upstream

# get a remote branch
  git fetch origin
  git checkout --track origin/$branchname

# delete local remote-tracking branches (lol)
  git remote prune origin

# list merged branches
  git branch -a --merged

# delete remote branch
  git push origin :$branchname

# go back to previous branch
  git checkout -
Collaboration
# Rebase your changes on top of the remote master
  git pull --rebase upstream master

# Squash multiple commits into one for a cleaner git log
# (on the following screen change the word pick to either 'f' or 's')
  git rebase -i $commit_ref
Submodules
# Import .gitmodules
  git submodule init

# Clone missing submodules, and checkout commits
  git submodule update --init --recursive

# Update remote URLs in .gitmodules
# (Use when you changed remotes in submodules)
  git submodule sync
git rebase 76acada^

# get current sha1 (?)
  git show-ref HEAD -s

# show single commit info
  git log -1 f5a960b5

# Go back up to root directory
  cd "$(git rev-parse --show-top-level)"
Short log
$ git shortlog
 $ git shortlog HEAD~20..    # last 20 commits

 James Dean (1):
     Commit here
     Commit there

 Frank Sinatra (5):
     Another commit
     This other commit
Bisect
git bisect start HEAD HEAD~6
git bisect run npm test
git checkout refs/bisect/bad   # this is where it screwed up
git bisect reset
Manual bisection
git bisect start
git bisect good   # current version is good

git checkout HEAD~8
npm test          # see if it's good
git bisect bad    # current version is bad

git bisect reset  # abort
Searching
git log --grep="fixes things"  # search in commit messages
git log -S"window.alert"       # search in code
git log -G"foo.*"              # search in code (regex)
GPG Signing
git config set user.signingkey <GPG KEY ID>       # Sets GPG key to use for signing

git commit -m "Implement feature Y" --gpg-sign    # Or -S, GPG signs commit

git config set commit.gpgsign true                # Sign commits by default
git commit -m "Implement feature Y" --no-gpg-sign # Do not sign
#### If you found this guide helpful feel free to checkout my github/gists where I host similar content:
Learn CSS So That Your Site Doesn’t Look Like Garbage
CSS Selectors
Learn CSS So That Your Site Doesn’t Look Like Garbage
CSS Selectors
CSS Selector : Applies styles to a specific DOM element(s), there are various types:
Type Selectors : Matches by node name.
Class Selectors : Matches by class name.
ID Selectors : Matches by ID name.
Universal Selectors : Selects all HTML elements on a page.
Attribute Selectors : Matches elements based on the prescence or value of a given attribute. (i.e. a[title] will match all a elements with a title attribute)
Used for elements that directly follow one another and who both have the same parent.
h1 + h2 { font-style: italic; } <h1>Big header</h1> <h2>This one is styled because it is directly adjacent to the H1</h2> <h2>This one is NOT styled because there is no H1 right before it</h2>
Pseudo-Classes
Pseudo-Class : Specifies a special state of the seleted element(s) and does not refer to any elements or attributes contained in the DOM.
Some common pseudo-classes that are frequently used are:
active : ‘push down’, when ele are activated.
checked : applies to things like radio buttons or checkbox inputs.
disabled : any disabled element.
first-child : first element in a group of children/siblings.
focus : elements that have current focus.
hover : elements that have cursor hovering over it.
invalid : any form elements in an invalid state from client-side form validation.
last-child : last element in a group of children/siblings.
not(selector) : elements that do not match the provided selector.
required : form elements that are required.
valid : form elements in a valid state.
visited : anchor tags of whih the user has already been to the URL that the href points to.
Pseudo-Selectors
Used to create pseudo-elements as children of the elements to which the property applies.
::after
::before
<style>
  p::before {
    background-color: lightblue;
    border-right: 4px solid violet;
    content: ":-) ";
    margin-right: 4px;
    padding-left: 4px;
  }
</style>
<p>This is the first paragraph</p>
<p>This is the second paragraph</p>
<p>This is the third paragraph</p>
Will add some blue smiley faces before the p tag elements.
CSS Rules
CSS Rule : Collection of single or compound selectors, a curly brace, zero or more properties
CSS Rule Specificity : Sometimes CSS rules will contain multiple elements and may have overlapping properties rules for those same elements - there is an algorithm in CSS that calculates which rule takes precedence.
The Four Number Calculation : listed in increasing order of importance.
Coming back to our example where all the CSS Rules have tied, the last step 4 wins out so our element will have a purple border.
CSS: Type, Properties, and Imports
Typography
font-family : change the font.
- Remember that not all computers have the same fonts on them.
- You can import web fonts via an api by using
- `@import url('https://fonts.googleapis.com/css2?family=Liu+Jian+Mao+Cao&display=swap');` and pasting it st the top of your CSS file.
- And then reference it in your font-family.
- `font-size` : Changes the size of your font.
- Keep in mind the two kind of units CSS uses:
- `Absolute` : `Pixels`, Points, Inches, Centimeters.
- `Relative` : Em, Rem.
- Em: Calulating the size relative to the previous div (bubbles down)
- Rem: Calulates relative to the parent element always.
- `font-style` : Used to set a font to italics.
- `font-weight` : Used to make a font bold.
- `text-align` : Used to align your text to the left, center, or right.
- `text-decoration` : Use to put lines above, through, or under text. Lines can be solid, dashed, or wavy!
- `text-transform` : Used to set text to all lowercase, uppercase, or capitalize all words.
Background-Images
You can use the background-image property to set a background image for an element.
CSS: Colors, Borders, and Shadows
Colors
You can set colors in CSS in three popular ways: by name, by hexadecimal RGB value, and by their decimal RGB value.
rgba() is used to make an rbg value more transparent, the a is used to specify the alpha channel.
Color : Property used to change the color of text.
Background-Color : Property to change the backgrounf color of an element.
Borders
Borders take three values: The width of the border, the style (i.e. solid, dotted, dashed), color of the border.
Shadows
There are two kinds of shadows in CSS: box shadows and text shadows.
Box refers to HTML elements.
Text refers to text.
Shadows take values such as, the horizontal & vertical offsets of the shadow, the blur radius of the shadow, the spread radius, and of course the colors.
The Box Model
Box Model : A concept that basically boils down that every DOM element has a box around it.
Imagine a gift, inside is the gift, wrapped in foam all around (padding), and the giftbox outside of it (border) and then a wrapping paper on the giftbox (margin).- For items that are using block as it’s display, the browser will follow these rules to layout the element: - The box fills 100% of the available container space. - Every new box takes on a new line/row. - Width and Height properties are respected. - Padding, Margin, and Border will push other elements away from the box. - Certain elements have block as their default display, such as: divs, headers, and paragraphs.- For items that are using inline as it’s display, the browser will follow these rules to layout the element: - Each box appears in a single line until it fills up the space. - Width and height are not respected. - Padding, Margin, and Border are applied but they do not push other elements away from the box. - Certain elements have inline as their default display, such as: span tags, anchors, and images.
Standard Box Model vs Border-Box- As per the standard Box Model, the width and height pertains to the content of the box and excludes any additional padding, borders, and margins.
This bothered many programmers so they created the border box to include the calculation of the entire box’s height and width.
Inline-Block- Inline-block uses the best features of both block and inline. - Elements still get laid out left to right. - Layout takes into account specified width and height.
Padding- Padding applies padding to every side of a box. It is shorthand for four padding properties in this order: padding-top, padding-right, padding-bottom, padding-left (clockwise!)
Border- Border applies a border on all sides of an element. It takes three values in this order: border-width, border-style, border-color. - All three properties can be broken down in the four sides clockwise: top, right, bottom, left.
Margin- Margin sets margins on every side of an element. It takes four values in this order: margin-top, margin-right, margin-bottom, margin-left. - You can use margin: 0 auto to center an element.
Positioning
The position property allows us to set the position of elements on a page and is an integral part of creatnig a Web page layout.
It accepts five values: static, relative, absolute, fixed, sticky.
Every property (minus static) is used with: top, right, bottom, and left to position an element on a page.
Static Positioning
The default position value of page elements.
Most likely will not use static that much.
Relative Positioning
Remains in it’s original position in the page flow.
It is positioned RELATIVE to the it’s ORIGINAL PLACE on the page flow.
Creates a stacking context : overlapping elements whose order can be set by the z-index property.
Absolute elements are removed from the normal page flow and other elements around it act like it’s not there. (how we can easily achieve some layering)
Here are some examples to illustration absolute positioning:
- Note that the container ele has a relative positioning — this is so that any changes made to the absolute positioned children will be positioned from it’s top-left corner.
- Note that because we removed the pink from the normal page flow, the container has now shifted the blue box to where the pink box should have been — which is why it is now layered beneath the pink.
- As you can see here, since we have also taken the blue box out of the normal page flow by declaring it as absoutely positioned it now overlaps over the pink box.
- If we removed the container’s relative position. Our absolute unit would look for the nearest parent which would be the document itself.
Fixed Positioning
Another positioning that removes it’s element from the page flow, and automatically positions it’s parent as the HTML doc itself.
Fixed also uses top, right, bottom, and left.
Useful for things like nav bars or other features we want to keep visible as the user scrolls.
Sticky Positioning
Remains in it’s original position in the page flow, and it is positioned relative to it’s closest block-level ancestor and any scrolling ancestors.
Behaves like a relatively positioned element until the point at which you would normally scroll past it’s viewport — then it sticks!
It is positioned with top, right, bottom, and left.
A good example are headers in a scrollable list.
Flexible Box Model
Flexbox is a CSS module that provides a convenient way for us to display items inside a flexible container so that the layout is responsive.
Float was used back in the day to display position of elements in a container.
A very inconvenient aspect of float is the need to clear the float.
To ‘clear’ a float we need to set up a ghost div to properly align — this is already sounds so inefficient.
Using Flexbox
Flexbox automatically resizes a container element to fit the viewport size without needing to use breakpoints.
- Flexbox layout applies styles to the parent element, and it’s children.
.container {
  display: flex; /*sets display to use flex*/
  flex-wrap: wrap; /*bc flex tries to fit everything into one line, use wrap to have the elements wrap to the next line*/
  flex-direction: row; /*lets us create either rows or columns*/
}
flex-flow can be used to combine wrap and direction.
justify-content used to define the alignment of flex items along the main axis.
align-items used to define the alignment on the Y-axis.
align-content redistributes extra space on the cross axis.
By default, flex items will appear in the order they are added to the DOM, but we can use the order property to change that.
Some other properties we can use on flex items are:
flex-grow : dictates amount of avail. space the item should take up.
flex-shrink : defines the ability for a flex item to shrink.
flex-basis : Default size of an element before the remaining space is distributed.
flex : shorthand for grow, shrink and basis.
align-self : Overrides default alignment in the container.
Grid Layout
CSS Grid is a 2d layout system that let’s use create a grid with columns and rows purely using Vanilla CSS. (flex is one dimensional)
Bootstrap vs CSS Grid
Bootstrap was a front-end library commonly used to create grid layouts but now CSS grid provides greater flexibility and control.
Grid applies style to a parent container and it’s child elements.
Any grid items that aren’t explicity placed are automatically placed or re-flowed
Spanning Columns & Rows
We can use the following properties to take up a specified num of cols and rows.
grid-column-start
grid-column-end
grid-row-start
grid-row-end
All four properties can take any of the following values: the line number, span #, span name, auto.
.item-1 {
  grid-row-start: row2-start; /* Item starts at row line named "row2-start" */
  grid-row-end: 5; /* Item ends at row line 5 */
  grid-column-start: 1; /* Item starts at column line 1 */
  grid-column-end: three; /* Item ends at column line named "three" */
}.item-2 {
  grid-row-start: 1; /* Item starts at row line 1 */
  grid-row-end: span 2; /* Item spans two rows and ends at row line 3 */
  grid-column-start: 3; /* Item starts at column line 3 */
  grid-column-end: span col5-start; /* Item spans and ends at line named "col5-start" */
}
Grid Areas
We use the grid areas in conjunction with grid-container property to define sections of the layout.
We can then assign named sections to individual element’s css rules.
Justify & Align Self
Justify items and Align Items can be used to align all grid items at once.
Justify Self is used to align self on the row.
It can take four values: start, end, center, stretch.
Align Self is used to align self on the column.
It can take four values: start, end, center, stretch.
The Pseudo Class Selector hover activates when the cursor goes over the selected element.
Content Overflow- You can apply an overflow content property to an element if it’s inner contents are spilling over.
There are three members in the overflow family: — overflow-x : Apply horizontally. - overflow-y : Apply vertically. - overflow : Apply both directions.
Transitions
Transitions provide a way to control animation speed when changing CSS properties.
Implicit Transitions : Animations that involve transitioning between two states.
Defining Transitions
transition-property : specifies the name of the CSS property to apply the transition.
transition-duration : during of the transition.
transition-delay : time before the transition should start.
If you follow this guide to a tee… you will install PostgreSQL itself on your Windows installation. Then, you will install psql in your…
PostgreSQL Setup For Windows & WSL/Ubuntu
If you follow this guide to a tee… you will install PostgreSQL itself on your Windows installation. Then, you will install `psql` in your Ubuntu installation. Then you will also install Postbird, a cross-platform graphical user interface that makes working with SQL and PostgreSQL ‘allegedly’ …(personally I prefer to just use the command line but PG Admin makes for an immeasurably more complicated tutorial than postbird)… better than just using the **command line tool** `psql`**.**
Important Distinction: PSQL is the frontend interface for PostgreSQL … they are not synonymous!
The primary front-end for PostgreSQL is the psqlcommand-line program, which can be used to enter SQL queries directly, or execute them from a file.
In addition, psql provides a number of meta-commands and various shell-like features to facilitate writing scripts and automating a wide variety of tasks; for example tab completion of object names and SQL syntax.
pgAdmin:
The pgAdmin package is a free and open-source graphical user interface (GUI) administration tool for PostgreSQL.
When you read “installation”, that means the actual OS that’s running on your machine. So, you have a Windows installation, Windows 10, that’s running when you boot your computer. Then, when you start the Ubuntu installation, it’s as if there’s a completely separate computer running inside your computer. It’s like having two completely different laptops.
Other Noteworthy Distinctions:
### Installing PostgreSQL 12
To install PostgreSQL 12, you need to download the installer from the Internet. PostgreSQL’s commercial company, Enterprise DB, offers installers for PostgreSQL for every major platform.
Once that installer downloads, run it. You need to go through the normal steps of installing software.
Yes, Windows, let the installer make changes to my device.
Thanks for the welcome. Next.
Yeah, that’s a good place to install it. Next.
I don’t want that pgAdmin nor the Stack Builder things. Uncheck. Uncheck. Next.
- Also, great looking directory. Thanks. Next.
Oooh! A password! I’ll enter ****. I sure won’t forget that because, if I do, I’ll have to uninstall and reinstall PostgreSQL and lose all of my hard work. Seriously, write down this password or use one you will not forget!!!!!!!!!!!!!!!
I REALLY CANNOT STRESS THE ABOVE POINT ENOUGH… Experience is a great teacher but in this case … it’s not worth it.
Sure. 5432. Good to go. Next.
Not even sure what that means. Default! Next.
Yep. Looks good. Next.
Insert pop culture reference to pass the time
Installing PostgreSQL Client Tools on Ubuntu
Now, to install the PostgreSQL Client tools for Ubuntu. You need to do this so that the Node.js (and later Python) programs running on your Ubuntu installation can access the PostgreSQL server running on your Windows installation. You need to tell apt, the package manager, that you want it to go find the PostgreSQL 12 client tools from PostgreSQL itself rather than the common package repositories. You do that by issuing the following two commands. Copy and paste them one at a time into your shell. (If your Ubuntu shell isn't running, start one.)
Pro-tip: Copy those commands because you’re not going to type them, right? After you copy one of them, you can just right-click on the Ubuntu shell. That should paste them in there for you.
echo "deb http://apt.postgresql.org/pub/repos/apt/ `lsb_release -cs`-pgdg main" | sudo tee /etc/apt/sources.list.d/pgdg.list
The last line of output of those two commands running should read “OK”. If it does not, try copying and pasting them one at a time.
Now that you’ve registered the PostgreSQL repositories as a source to look for PostgreSQL, you need to update the apt registry. You should do this before you install any software on Ubuntu.
sudo apt update
Once that’s finished running, the new entries for PostgreSQL 12 should be in the repository. Now, you can install them with the following command.
If it asks you if you want to install them, please tell it “Y”.
Test that it installed by typing psql --version. You should see it print out information about the version of the installed tools. If it tells you that it can't find the command, try these instructions over.
Configuring the client tools
Since you’re going to be accessing the PosgreSQL installation from your Ubuntu installation on your Windows installation, you’re going to have to type that you want to access it over and over, which means extra typing. To prevent you from having to do this, you can customize your shell to always add the extra commands for you.
This assumes you’re still using Bash. If you changed the shell that your Ubuntu installation uses, please follow that shell’s directions for adding an alias to its startup file.
Make sure you’re in your Ubuntu home directory. You can do that by typing cd and hitting enter. Use ls to find out if you have a .bashrc file. Type ls .bashrc. If it shows you that one exists, that's the one you will add the alias to. If it tells you that there is no file named that, then type ls .profile. If it shows you that one exists, that's the one you will add the alias to. If it shows you that it does not exist, then use the file name .bashrc in the following section.
Now that you know which profile file to use, type code «profile file name» where "profile file name" is the name of the file you determined from the last section. Once Visual Studio Code starts up with your file, at the end of it (or if you've already added aliases, in that section), type the following.
alias psql="psql -h localhost"
When you run psql from the command line, it will now always add the part about wanting to connect to localhost every time. You would have to type that each time, otherwise.
To make sure that you set that up correctly, type psql -U postgres postgres. This tells the psql client that you want to connect as the user "postgres" (-U postgres) to the database postgres (postgres at the end), which is the default database created when PostgreSQL is installed. It will prompt you for a password. Type the password that you used when you installed PostgrSQL, earlier. If the alias works correctly and you type the correct password, then you should see something like the following output.
psql (12.2 (Ubuntu 12.2-2.pgdg18.04+1))
Type "help" for help.

postgres=#
Type \q and hit Enter to exit the PostgreSQL client tool.
Now, you will add a user for your Ubuntu identity so that you don’t have to specify it all the time. Then, you will create a file that PostgreSQL will use to automatically send your password every time.
Copy and paste the following into your Ubuntu shell. Think of a password that you want to use for your user. Replace the password in the single quotes in the command with the password that you want. It has to be a non-empty string. PostgreSQL doesn’t like it when it’s not.
psql -U postgres -c "CREATE USER `whoami` WITH PASSWORD 'password' SUPERUSER"
It should prompt you for a password. Type the password that you created when you installed PostgreSQL. Once you type the correct password, you should see “CREATE ROLE”.
Now you will create your PostgreSQL password file. Type the following into your Ubuntu shell to open Visual Studio Code and create a new file.
code ~/.pgpass
In that file, you will add this line, which tells it that on localhost for port 5432 (where PostgreSQL is running), for all databases (*), use your Ubuntu user name and the password that you just created for that user with thepsqlcommand you just typed. (If you have forgotten your Ubuntu user name, type whoami on the command line.) Your entry in the file should have this format.
localhost:5432:*:«your Ubuntu user name»:«the password you just used»
Once you have that information in the file, save it, and close Visual Studio Code.
The last step you have to take is change the permission on that file so that it is only readable by your user. PostgreSQL will ignore it if just anyone can read and write to it. This is for your security. Change the file permissions so only you can read and write to it. You did this once upon a time. Here’s the command.
chmod go-rw ~/.pgpass
You can confirm that only you have read/write permission by typing ls -al ~/.pgpass. That should return output that looks like this, with your Ubuntu user name instead of "web-dev-hub".
-rw------- 1 web-dev-hub web-dev-hub 37 Mar 28 21:20 /home/web-dev-hub/.pgpass
Now, try connecting to PostreSQL by typing psql postgres. Because you added the alias to your startup script, and because you created your .pgpass file, it should now connect without prompting you for any credentials! Type \q and press Enter to exit the PostgreSQL command line client.
Installing Postbird
Head over to the Postbird releases page on GitHub. Click the installer for Windows which you can recognize because it’s the only file in the list that ends with “.exe”.
After that installer downloads, run it. You will get a warning from Windows that this is from an unidentified developer. If you don’t want to install this, find a PostgreSQL GUI client that you do trust and install it or do everything from the command line.
You should get used to seeing this because many open-source applications aren’t signed with the Microsoft Store for monetary and philosophical reasons.
Otherwise, if you trust Paxa like web-dev-hub and tens of thousands of other developers do, then click the link that reads “More info” and the “Run anyway” button.
When it’s done installing, it will launch itself. Test it out by typing the “postgres” into the “Username” field and the password from your installation in the “Password” field. Click the Connect button. It should properly connect to the running
You can close it for now. It also installed an icon on your desktop. You can launch it from there or your Start Menu at any time.
Now.. if you still have some gas in the tank… let’s put our new tools to work:
The node-postgres
The node-postgres is a collection of Node.js modules for interfacing with the PostgreSQL database. It has support for callbacks, promises, async/await, connection pooling, prepared statements, cursors, and streaming results.
In our examples we also use the Ramda library. See Ramda tutorial for more information.
Setting up node-postgres
First, we install node-postgres.
$ node -v
v14.2
$ npm init -y
We initiate a new Node application.
npm i pg
We install node-postgres with nmp i pg.
npm i ramda
In addition, we install Ramda for beautiful work with data.
cars.sql
DROP TABLE IF EXISTS cars;
CREATE TABLE cars(id SERIAL PRIMARY KEY, name VARCHAR(255), price INT);
INSERT INTO cars(name, price) VALUES(‘Audi’, 52642);
INSERT INTO cars(name, price) VALUES(‘Mercedes’, 57127);
INSERT INTO cars(name, price) VALUES(‘Skoda’, 9000);
INSERT INTO cars(name, price) VALUES(‘Volvo’, 29000);
INSERT INTO cars(name, price) VALUES(‘Bentley’, 350000);
INSERT INTO cars(name, price) VALUES(‘Citroen’, 21000);
INSERT INTO cars(name, price) VALUES(‘Hummer’, 41400);
INSERT INTO cars(name, price) VALUES(‘Volkswagen’, 21600);
In some of the examples, we use this cars table.
The node-postgres first example
In the first example, we connect to the PostgreSQL database and return a simple SELECT query result.
We issue a simple SELECT query. We get the result and output it to the console. The res.rows is an array of objects; we use Ramda to get the returned scalar value. In the end, we close the connection with end().
node first.js
5
This is the output.
The node-postgres column names
In the following example, we get the columns names of a database.
Applications of Tutorial & Cheat Sheet Respectively (At Bottom Of Tutorial):
Basics
PEP8 : Python Enhancement Proposals, style-guide for Python.
print is the equivalent of console.log.
‘print() == console.log()’
# is used to make comments in your code.
def foo():
    """
    The foo function does many amazing things that you
    should not question. Just accept that it exists and
    use it with caution.
    """
    secretThing()
Python has a built in help function that let’s you see a description of the source code without having to navigate to it… “-SickNasty … Autor Unknown”
Numbers
Python has three types of numbers:
Integer
Positive and Negative Counting Numbers.
No Decimal Point
Created by a literal non-decimal point number … or … with the int() constructor.
T*his is because the letter i is common place as the de facto index for any and all enumerable entities so it just makes sense not to compete for name-*spacewhen there’s another 25 letters that don’t get used for every loop under the sun. My most medium apologies to Leonhard Euler.
Type Casting : The process of converting one number to another.
# Using Float
print(17)               # => 17
print(float(17))        # => 17.0

# Using Int
print(17.0)             # => 17.0
print(int(17.0))        # => 17

# Using Str
print(str(17.0) + ' and ' + str(17))        # => 17.0 and 17
The arithmetic operators are the same between JS and Python, with two additions:
“**” : Double asterisk for exponent.
“//” : Integer Division.
There are no spaces between math operations in Python.
Integer Division gives the other part of the number from Module; it is a way to do round down numbers replacingMath.floor()in JS.
There are no++and--in Python, the only shorthand operators are:
Strings
Python uses both single and double quotes.
You can escape strings like so 'Jodi asked, "What\'s up, Sam?"'
Multiline strings use triple quotes.
print('''My instructions are very long so to make them
more readable in the code I am putting them on
more than one line. I can even include "quotes"
of any kind because they won't get confused with
the end of the string!''')
Use thelen()function to get the length of a string.
print(len(“Spaghetti”)) # => 9
Python useszero-based indexing
Python allows negative indexing (thank god!)
print(“Spaghetti”[-1]) # => i

print(“Spaghetti”[-4]) # => e
Python let’s you use ranges
You can think of this as roughly equivalent to the slice method called on a JavaScript object or string… (mind you that in JS … strings are wrapped in an object (under the hood)… upon which the string methods are actually called. As a immutable privative typeby textbook definition*, a string literal could not hope to invoke most of it’s methods without violating the state it was bound to on initialization if it were not for this bit of syntactic sugar.)*
# Shortcut to get from the beginning of a string to a certain index.
print("Spaghetti"[:4])  # => Spag
print("Spaghetti"[:-1])    # => Spaghett

# Shortcut to get from a certain index to the end of a string.
print("Spaghetti"[1:])  # => paghetti
print("Spaghetti"[-4:])    # => etti
The index string function is the equiv. of indexOf() in JS
The count function finds out how many times a substring appears in a string… pretty nifty for a hard coded feature of the language.
print("Spaghetti".count("h"))    # => 1
print("Spaghetti".count("t"))    # => 2
print("Spaghetti".count("s"))    # => 0
print('''We choose to go to the moon in this decade and do the other things,
not because they are easy, but because they are hard, because that goal will
serve to organize and measure the best of our energies and skills, because that
challenge is one that we are willing to accept, one we are unwilling to
postpone, and one which we intend to win, and the others, too.
'''.count('the '))                # => 4
You can use+to concatenate strings, just like in JS.
You can also use “*” to repeat strings or multiply strings.
Use theformat()function to use placeholders in a string to input values later on.
first_name = "Billy"
last_name = "Bob"
print('Your name is {0} {1}'.format(first_name, last_name))  # => Your name is Billy Bob
*Shorthand way to use format function is:
*print(f'Your name is {first_name} {last_name}')
Some useful string methods.
Note that in JSjoinis used on an Array, in Python it is used on String.
- There are also many handy testing methods.
Variables and Expressions
Duck-Typing : Programming Style which avoids checking an object’s type to figure out what it can do.
Duck Typing is the fundamental approach of Python.
Assignment of a value automatically declares a variable.
a = 7
b = 'Marbles'
print(a)         # => 7
print(b)         # => Marbles
You can chain variable assignments to give multiple var names the same value.
Use with caution as this is highly unreadable
count = max = min = 0
print(count)           # => 0
print(max)             # => 0
print(min)             # => 0
The value and type of a variable can be re-assigned at any time.
a = 17
print(a)         # => 17
a = 'seventeen'
print(a)         # => seventeen
NaN *does not exist in Python, but you can 'create' it like so:
*print(float("nan"))
Python replacesnullwithnone.
noneis an objectand can be directly assigned to a variable.
Using none is a convenient way to check to see why an action may not be operating correctly in your program.
Boolean Data Type
One of the biggest benefits of Python is that it reads more like English than JS does.
# Logical AND
print(True and True) # => True
print(True and False) # => False
print(False and False) # => False
# Logical OR
print(True or True)     # => True
print(True or False)    # => True
print(False or False)   # => False

# Logical NOT
print(not True)             # => False
print(not False and True)   # => True
print(not True or False)    # => False
By default, Python considers an object to be true UNLESS it is one of the following:
Constant None or False
Zero of any numeric type.
Empty Sequence or Collection.
True and False must be capitalized
Comparison Operators
Python uses all the same equality operators as JS.
In Python, equality operators are processed from left to right.
Logical operators are processed in this order:
NOT
AND
OR
Just like in JS, you can use parentheses to change the inherent order of operations.
Short Circuit : Stopping a program when a true or false has been reached.
Identity vs Equality
print (2 == '2')    # => False
print (2 is '2')    # => False

print ("2" == '2')    # => True
print ("2" is '2')    # => True

# There is a distinction between the number types.
print (2 == 2.0)    # => True
print (2 is 2.0)    # => False
In the Python community it is better to use is and is not over == or !=
If Statements
if name == 'Monica':
    print('Hi, Monica.')

if name == 'Monica':
    print('Hi, Monica.')
else:
    print('Hello, stranger.')

if name == 'Monica':
    print('Hi, Monica.')
elif age < 12:
    print('You are not Monica, kiddo.')
elif age > 2000:
   print('Unlike you, Monica is not an undead, immortal vampire.')
elif age > 100:
   print('You are not Monica, grannie.')
spam = 0
while True:
  print('Hello, world.')
  spam = spam + 1
  if spam >= 5:
    break
As are continue statements
spam = 0
while True:
  print('Hello, world.')
  spam = spam + 1
  if spam < 5:
    continue
  break
Try/Except Statements
Python equivalent to try/catch
a = 321
try:
    print(len(a))
except:
    print('Silently handle error here')

    # Optionally include a correction to the issue
    a = str(a)
    print(len(a)

a = '321'
try:
    print(len(a))
except:
    print('Silently handle error here')

    # Optionally include a correction to the issue
    a = str(a)
    print(len(a))
You can name an error to give the output more specificity.
a = 100
b = 0
try:
    c = a / b
except ZeroDivisionError:
    c = None
print(c)
You can also use the pass commmand to by pass a certain error.
a = 100
b = 0
try:
    print(a / b)
except ZeroDivisionError:
    pass
The pass method won't allow you to bypass every single error so you can chain an exception series like so:
a = 100
# b = "5"
try:
    print(a / b)
except ZeroDivisionError:
    pass
except (TypeError, NameError):
    print("ERROR!")
You can use an else statement to end a chain of except statements.
# tuple of file names
files = ('one.txt', 'two.txt', 'three.txt')

# simple loop
for filename in files:
    try:
        # open the file in read mode
        f = open(filename, 'r')
    except OSError:
        # handle the case where file does not exist or permission is denied
        print('cannot open file', filename)
    else:
        # do stuff with the file object (f)
        print(filename, 'opened successfully')
        print('found', len(f.readlines()), 'lines')
        f.close()
finally is used at the end to clean up all actions under any circumstance.
def divide(x, y):
    try:
        result = x / y
    except ZeroDivisionError:
        print("Cannot divide by zero")
    else:
        print("Result is", result)
    finally:
        print("Finally...")
Using duck typing to check to see if some value is able to use a certain method.
# Try a number - nothing will print out
a = 321
if hasattr(a, '__len__'):
    print(len(a))

# Try a string - the length will print out (4 in this case)
b = "5555"
if hasattr(b, '__len__'):
    print(len(b))
Pass
Pass Keyword is required to write the JS equivalent of :
if (true) {
}

while (true) {}

if True:
  pass

while True:
  pass
Keep in mind, default parameters must always come after regular parameters.
# THIS IS BAD CODE AND WILL NOT RUN
def increment(delta=1, value):
    return delta + value
You can specify arguments by name without destructuring in Python.
def greeting(name, saying="Hello"):
    print(saying, name)

# name has no default value, so just provide the value
# saying has a default value, so use a keyword argument
greeting("Monica", saying="Hi")
The lambda keyword is used to create anonymous functions and are supposed to be one-liners.
toUpper = lambda s: s.upper()
Notes
Formatted Strings
Remember that in Python join() is called on a string with an array/list passed in as the argument.
Python has a very powerful formatting engine.
format() is also applied directly to strings.
width=8
print(‘ decimal hex binary’)
print(‘-’*27)
for num in range(1,16):
for base in ‘dXb’:
print(‘{0:{width}{base}}’.format(num, base=base, width=width), end=’ ‘)
print()
Getting Input from the Command Line
Python runs synchronously, all programs and processes will stop when listening for a user input.
The input function shows a prompt to a user and waits for them to type ‘ENTER’.
Scripts vs Programs
Programming Script : A set of code that runs in a linear fashion.
The largest difference between scripts and programs is the level of complexity and purpose. Programs typically have many UI’s.
Python can be used to display html, css, and JS. It is common to use Python as an API (Application Programming Interface)
Structured Data
Sequence : The most basic data structure in Python where the index determines the order.
List
Tuple
Range
Collections : Unordered data structures, hashable values.
Dictionaries Sets
Iterable : Generic name for a sequence or collection; any object that can be iterated through.
print(1 in [1, 2, 3]) #> True
print(4 in [1, 2, 3]) #> False
# Tuples : Very similar to lists, but they are immutable
Instantiated with parentheses
time_blocks = (‘AM’,’PM’)
Sometimes instantiated without
colors = ‘red’,’blue’,’green’
numbers = 1, 2, 3
Tuple() built in can be used to convert other data into a tuple
tuple(‘abc’) # returns (‘a’, ‘b’, ‘c’)
tuple([1,2,3]) # returns (1, 2, 3)
# Think of tuples as constant variables.
Ranges : A list of numbers which can’t be changed; often used with for loops.
Declared using one to three parameters.
Start : opt. default 0, first # in sequence.
Stop : required next number past the last number in the sequence.
Step : opt. default 1, difference between each number in the sequence.
range(5) # [0, 1, 2, 3, 4]
range(1,5) # [1, 2, 3, 4]
range(0, 25, 5) # [0, 5, 10, 15, 20]
range(0) # [ ]
for let (i = 0; i < 5; i++)
for let (i = 1; i < 5; i++)
for let (i = 0; i < 25; i+=5)
for let(i = 0; i = 0; i++)
# Keep in mind that stop is not included in the range.
Dictionaries : Mappable collection where a hashable value is used as a key to ref. an object stored in the dictionary.
Mutable.
a = {‘one’:1, ‘two’:2, ‘three’:3}
b = dict(one=1, two=2, three=3)
c = dict([(‘two’, 2), (‘one’, 1), (‘three’, 3)])
# a, b, and c are all equal
Declared with curly braces of the built in dict()
Benefit of dictionaries in Python is that it doesn’t matter how it is defined, if the keys and values are the same the dictionaries are considered equal.
Use the in operator to see if a key exists in a dictionary.
Sets : Unordered collection of distinct objects; objects that need to be hashable.
Always be unique, duplicate items are auto dropped from the set.
zip(*iterables) : creates a zip object filled with tuples that combine 1 to 1 the items in each provided iterable.
Functions that analyze iterable
len(iterable) : returns the count of the number of items.
max(*args, key=None) : returns the largest of two or more arguments.
max(iterable, key=None) : returns the largest item in the iterable.
key optional function which converts an item to a value to be compared.
min works the same way as max
sum(iterable) : used with a list of numbers to generate the total.
There is a faster way to concatenate an array of strings into one string, so do not use sum for that.
any(iterable) : returns True if any items in the iterable are true.
all(iterable) : returns True is all items in the iterable are true.
Working with dictionaries
dir(dictionary) : returns the list of keys in the dictionary.
Working with sets
Union : The pipe | operator or union(*sets) function can be used to produce a new set which is a combination of all elements in the provided set.
a = {1, 2, 3}
b = {2, 4, 6}
print(a | b) # => {1, 2, 3, 4, 6}
Intersection : The & operator ca be used to produce a new set of only the elements that appear in all sets.
a = {1, 2, 3}
b = {2, 4, 6}
print(a & b) # => {2}
Difference : The — operator can be used to produce a new set of only the elements that appear in the first set and NOT the others.
Symmetric Difference : The ^ operator can be used to produce a new set of only the elements that appear in exactly one set and not in both.
a = {1, 2, 3}
b = {2, 4, 6}
print(a — b) # => {1, 3}
print(b — a) # => {4, 6}
print(a ^ b) # => {1, 3, 4, 6}
For Statements In python, there is only one for loop.
Always Includes:
The for keyword
A variable name
The ‘in’ keyword
An iterable of some kid
A colon
On the next line, an indented block of code called the for clause.
You can use break and continue statements inside for loops as well.
You can use the range function as the iterable for the for loop.
print(‘My name is’)
for i in range(5):
print(‘Carlita Cinco (‘ + str(i) + ‘)’)

total = 0
for num in range(101):
total += num
print(total)
Looping over a list in Python
for c in [‘a’, ‘b’, ‘c’]:
print(c)

lst = [0, 1, 2, 3]
for i in lst:
print(i)
Common technique is to use the len() on a pre-defined list with a for loop to iterate over the indices of the list.
supplies = [‘pens’, ‘staplers’, ‘flame-throwers’, ‘binders’]
for i in range(len(supplies)):
print(‘Index ‘ + str(i) + ‘ in supplies is: ‘ + supplies[i])
You can loop and destructure at the same time.
l = 1, 2], [3, 4], [5, 6
for a, b in l:
print(a, ‘, ‘, b)
Prints 1, 2
Prints 3, 4
Prints 5, 6
You can use values() and keys() to loop over dictionaries.
spam = {‘color’: ‘red’, ‘age’: 42}
for v in spam.values():
print(v)
Prints red
Prints 42
for k in spam.keys():
print(k)
Prints color
Prints age
For loops can also iterate over both keys and values.
Getting tuples
for i in spam.items():
print(i)
Prints (‘color’, ‘red’)
Prints (‘age’, 42)
Destructuring to values
for k, v in spam.items():
print(‘Key: ‘ + k + ‘ Value: ‘ + str(v))
Prints Key: age Value: 42
Prints Key: color Value: red
Looping over string
for c in “abcdefg”:
print(c)
When you order arguments within a function or function call, the args need to occur in a particular order:
Modules are similar to packages in Node.js
Come in different types:
Built-In,
Third-Party,
Custom.
All loaded using import statements.
Terms
module : Python code in a separate file.
package : Path to a directory that contains modules. init.py : Default file for a package.
submodule : Another file in a module’s folder.
function : Function in a module.
A module can be any file but it is usually created by placing a special file init.py into a folder. pic
Try to avoid importing with wildcards in Python.
Use multiple lines for clarity when importing.
from urllib.request import (
HTTPDefaultErrorHandler as ErrorHandler,
HTTPRedirectHandler as RedirectHandler,
Request,
pathname2url,
url2pathname,
urlopen,
)
Watching Out for Python 2
Python 3 removed <> and only uses !=
format() was introduced with P3
All strings in P3 are unicode and encoded.
md5 was removed.
ConfigParser was renamed to configparser
sets were killed in favor of set() class.
print was a statement in P2, but is a function in P3.
Topics revisited (in python syntax)
Cheat Sheet:
If you found this guide helpful feel free to checkout my github/gists where I host similar content:
Regular expressions are patterns used to match character combinations in strings. In JavaScript, regular expressions are also objects. These patterns are used with theexec()andtest()methods ofRegExp, and with thematch(),matchAll(),replace(),replaceAll(),search(), andsplit()methods ofString. This chapter describes JavaScript regular expressions.
Creating a regular expression
You construct a regular expression in one of two ways:
Using a regular expression literal, which consists of a pattern enclosed between slashes, as follows:
let re = /ab+c/;
Regular expression literals provide compilation of the regular expression when the script is loaded. If the regular expression remains constant, using this can improve performance.
2. Or calling the constructor function of theRegExpobject, as follows:
let re = new RegExp('ab+c');
Using the constructor function provides runtime compilation of the regular expression. Use the constructor function when you know the regular expression pattern will be changing, or you don't know the pattern and are getting it from another source, such as user input.
Writing a regular expression pattern
A regular expression pattern is composed of simple characters, such as /abc/, or a combination of simple and special characters, such as /ab*c/ or /Chapter (\d+)\.\d*/.
The last example includes parentheses, which are used as a memory device. The match made with this part of the pattern is remembered for later use.
Using simple patterns
Simple patterns are constructed of characters for which you want to find a direct match.
For example, the pattern /abc/ matches character combinations in strings only when the exact sequence "abc" occurs (all characters together and in that order).
Such a match would succeed in the strings "Hi, do you know your abc's?" and "The latest airplane designs evolved from slabcraft."
In both cases the match is with the substring "abc".
There is no match in the string "Grab crab" because while it contains the substring "ab c", it does not contain the exact substring "abc".
Using special characters
When the search for a match requires something more than a direct match, such as finding one or more b's, or finding white space, you can include special characters in the pattern.
For example, to match a single"a"followed by zero or more"b"s followed by"c", you'd use the pattern /ab*c/:
the * after "b" means "0 or more occurrences of the preceding item." In the string "cbbabbbbcdebc", this pattern will match the substring "abbbbc".
Assertions** : Assertions include boundaries, which indicate the beginnings and endings of lines and words, and other patterns indicating in some way that a match is possible (including look-ahead, look-behind, and conditional expressions).**
Character classes** : Distinguish different types of characters. For example, distinguishing between letters and digits.**
Groups and ranges** : Indicate groups and ranges of expression characters.**
Quantifiers** : Indicate numbers of characters or expressions to match.**
Unicode property escapes** : Distinguish based on unicode character properties, for example, upper- and lower-case letters, math symbols, and punctuation.**
If you want to look at all the special characters that can be used in regular expressions in a single table, see the following:
### Special characters in regular expressions.
Escaping
If you need to use any of the special characters literally (actually searching for a "*", for instance), you must escape it by putting a backslash in front of it.
For instance, to search for "a" followed by "*" followed by "b",
you'd use /a\*b/ --- the backslash "escapes" the "*", making it literal instead of special.
Similarly, if you're writing a regular expression literal and need to match a slash ("/"), you need to escape that (otherwise, it terminates the pattern)
For instance, to search for the string "/example/" followed by one or more alphabetic characters, you'd use /\/example\/[a-z]+/i
--the backslashes before each slash make them literal.
To match a literal backslash, you need to escape the backslash.
For instance, to match the string "C:\" where "C" can be any letter,
you'd use /[A-Z]:\\/
--- the first backslash escapes the one after it, so the expression searches for a single literal backslash.
If using the RegExp constructor with a string literal, remember that the backslash is an escape in string literals, so to use it in the regular expression, you need to escape it at the string literal level.
/a\*b/ and new RegExp("a\\*b") create the same expression,
which searches for "a" followed by a literal "*" followed by "b".
If escape strings are not already part of your pattern you can add them using String.replace:
function escapeRegExp(string) {
  return string.replace(/[.*+\-?^${}()|[\]\\]/g, '\\$&'); // $& means the whole matched string
}
The "g" after the regular expression is an option or flag that performs a global search, looking in the whole string and returning all matches.
Using parentheses
Parentheses around any part of the regular expression pattern causes that part of the matched substring to be remembered.
Once remembered, the substring can be recalled for other use.
Using regular expressions in JavaScript
Regular expressions are used with the RegExpmethods
test()andexec()
and with the Stringmethodsmatch(),replace(),search(), andsplit().
Method Descriptions
exec()
Executes a search for a match in a string.
It returns an array of information or null on a mismatch.
test()
Tests for a match in a string.
It returns true or false.
match()
Returns an array containing all of the matches, including capturing groups, or null if no match is found.
matchAll()
Returns an iterator containing all of the matches, including capturing groups.
search()
Tests for a match in a string.
It returns the index of the match, or -1 if the search fails.
replace()
Executes a search for a match in a string, and replaces the matched substring with a replacement substring.
replaceAll()
Executes a search for all matches in a string, and replaces the matched substrings with a replacement substring.
split()
Uses a regular expression or a fixed string to break a string into an array of substrings.
Methods that use regular expressions
When you want to know whether a pattern is found in a string, use the test() or search() methods;
for more information (but slower execution) use the exec() or match() methods.
If you use exec() or match() and if the match succeeds, these methods return an array and update properties of the associated regular expression object and also of the predefined regular expression object, RegExp.
If the match fails, theexec()method returnsnull (which coerces to false).
In the following example, the script uses the exec() method to find a match in a string.
let myRe = /d(b+)d/g;
let myArray = myRe.exec('cdbbdbsbz');
If you do not need to access the properties of the regular expression, an alternative way of creating myArray is with this script:
let myArray = /d(b+)d/g.exec('cdbbdbsbz');
    // similar to "cdbbdbsbz".match(/d(b+)d/g); however,
    // "cdbbdbsbz".match(/d(b+)d/g) outputs Array [ "dbbd" ], while
    // /d(b+)d/g.exec('cdbbdbsbz') outputs Array [ 'dbbd', 'bb', index: 1, input: 'cdbbdbsbz' ].
If you want to construct the regular expression from a string, yet another alternative is this script:
let myRe = new RegExp('d(b+)d', 'g');
let myArray = myRe.exec('cdbbdbsbz');
With these scripts, the match succeeds and returns the array and updates the properties shown in the following table.
Results of regular expression execution.
You can use a regular expression created with an object initializer without assigning it to a letiable.
If you do, however, every occurrence is a new regular expression.
For this reason, if you use this form without assigning it to a letiable, you cannot subsequently access the properties of that regular expression.
For example, assume you have this script:
let myRe = /d(b+)d/g;
let myArray = myRe.exec('cdbbdbsbz');
console.log('The value of lastIndex is ' + myRe.lastIndex);

// "The value of lastIndex is 5"
However, if you have this script:
let myArray = /d(b+)d/g.exec('cdbbdbsbz');
console.log('The value of lastIndex is ' + /d(b+)d/g.lastIndex);

// "The value of lastIndex is 0"
The occurrences of /d(b+)d/g in the two statements are different regular expression objects and hence have different values for their lastIndex property.
If you need to access the properties of a regular expression created with an object initializer, you should first assign it to a variable.
[Advanced searching with flags]
Regular expressions have six optional flags that allow for functionality like global and case insensitive searching.
These flags can be used separately or together in any order, and are included as part of the regular expression.
Flag Description Corresponding property
g Global search. RegExp.prototype.global
i Case-insensitive search. RegExp.prototype.ignoreCase
m Multi-line search. RegExp.prototype.multiline
s Allows . to match newline characters. RegExp.prototype.dotAll
u "unicode"; treat a pattern as a sequence of unicode code points. RegExp.prototype.unicode
y Perform a "sticky" search that matches starting at the current position in the target string. RegExp.prototype.sticky
Regular expression flags
To include a flag with the regular expression, use this syntax:
let re = /pattern/flags;
or
let re = new RegExp('pattern', 'flags');
Note that the flags are an integral part of a regular expression. They cannot be added or removed later.
For example, re = /\w+\s/g creates a regular expression that looks for one or more characters followed by a space, and it looks for this combination throughout the string.
let re = /\w+\s/g;
let str = 'fee fi fo fum';
let myArray = str.match(re);
console.log(myArray);

// ["fee ", "fi ", "fo "]
You could replace the line:
let re = /\w+\s/g;
with:
let re = new RegExp('\\w+\\s', 'g');
and get the same result.
The behavior associated with the g flag is different when the .exec() method is used.
The roles of "class" and "argument" get reversed:
In the case of .match(), the string class (or data type) owns the method and the regular expression is just an argument,
while in the case of .exec(), it is the regular expression that owns the method, with the string being the argument.
Contrast this str.match(re) versus re.exec(str).
The g flag is used with the .exec() method to get iterative progression.
let xArray; while(xArray = re.exec(str)) console.log(xArray);
// produces:
// ["fee ", index: 0, input: "fee fi fo fum"]
// ["fi ", index: 4, input: "fee fi fo fum"]
// ["fo ", index: 7, input: "fee fi fo fum"]
The m flag is used to specify that a multiline input string should be treated as multiple lines.
If the m flag is used, ^ and $ match at the start or end of any line within the input string instead of the start or end of the entire string.
Using special characters to verify input
In the following example, the user is expected to enter a phone number. When the user presses the "Check" button, the script checks the validity of the number. If the number is valid (matches the character sequence specified by the regular expression), the script shows a message thanking the user and confirming the number. If the number is invalid, the script informs the user that the phone number is not valid.
Within non-capturing parentheses (?: , the regular expression looks for three numeric characters \d{3} OR | a left parenthesis \( followed by three digits \d{3}, followed by a close parenthesis \), (end non-capturing parenthesis )), followed by one dash, forward slash, or decimal point and when found, remember the character ([-\/\.]), followed by three digits \d{3}, followed by the remembered match of a dash, forward slash, or decimal point \1, followed by four digits \d{4}.
The Change event activated when the user presses Enter sets the value of RegExp.input.
HTML
<p>
  Enter your phone number (with area code) and then click "Check".
  <br>
  The expected format is like ###-###-####.
</p>
<form action="#">
  <input id="phone">
    <button onclick="testInfo(document.getElementById('phone'));">Check</button>
</form>
JavaScript
let re = /(?:\d{3}|\(\d{3}\))([-\/\.])\d{3}\1\d{4}/;
function testInfo(phoneInput) {
  let OK = re.exec(phoneInput.value);
  if (!OK) {
    console.error(phoneInput.value + ' isn\'t a phone number with area code!');
  } else {
    console.log('Thanks, your phone number is ' + OK[0]);}
}
Cheat Sheet
#### If you found this guide helpful feel free to checkout my GitHub/gist's where I host similar content:
Basics of Writing Files in Python The common methods to operate with files are open() to open a file,
Writing Files Using Python
Basics of Writing Files in Python
The common methods to operate with files are open() to open a file,
seek() to set the file’s current position at the given offset, and
close() to close th
As pointed out in a previous article that deals with reading data from files, file handling belongs to the essential knowledge of every professional Python programmer. This feature is a core part of the Python language, and no extra module needs to be loaded to do it properly.
Basics of Writing Files in Python
The common methods to operate with files are open() to open a file, seek() to set the file's current position at the given offset, and close() to close the file afterwards. The open() method returns a file handle that represents a file object to be used to access the file for reading, writing, or appending.
Writing to a file requires a few decisions — the name of the file in which to store data and the access mode of the file. Available are two modes, writing to a new file (and overwriting any existing data) and appending data at the end of a file that already exists. The according abbreviations are “w”, and “a”, and have to be specified before opening a file.
In this article we will explain how to write data to a file line by line, as a list of lines, and appending data at the end of a file.
Writing a Single Line to a File
This first example is pretty similar to writing to files with the popular programming languages C and C++, as you’ll see in Listing 1. The process is pretty straightforward. First, we open the file using the open() method for writing, write a single line of text to the file using the write() method, and then close the file using the close() method. Keep in mind that due to the way we opened the "helloworld.txt" file it will either be created if it does not exist yet, or it will be completely overwritten.
This entire process can be shortened using the with statement. Listing 2 shows how to write that. As already said before keep in mind that by opening the "helloworld.txt" file this way will either create if it does not exist yet or completely overwritten, otherwise.
with open('helloworld.txt', 'w') as filehandle:
    filehandle.write('Hello, world!\n')
Listing 2
Writing a List of Lines to a File
In reality a file does not consist only of a single line, but much more data. Therefore, the contents of the file are stored in a list that represents a file buffer. To write the entire file buffer we’ll use the writelines() method. Listing 3 gives you an example of this.
filehandle = open("helloworld.txt", "w")
filebuffer = ["a first line of text", "a second line of text", "a third line"]
filehandle.writelines(filebuffer)
filehandle.close()
Listing 3
Running the Python program shown in Listing 3 and then using the cat command we can see that the file "helloworld.txt" has the following content:
$ cat helloworld.txt
a first line of text a second line of text a third line
Listing 4
This happens because thewritelines()method does not automatically add any line separators when writing the data. Listing 5 shows how to achieve that, writing each line of text on a single line by adding the line separator "\n". Using a generator expression each line is substituted by the line plus line separator. Again, you can formulate this using the with statement.
with open('helloworld.txt', 'w') as filehandle:
    filebuffer = ["a line of text", "another line of text", "a third line"]
    filehandle.writelines("%s\n" % line for line in filebuffer)
Listing 5
Now, the output file “helloworld.txt” has the desired content as shown in Listing 6:
$ cat helloworld.txt
a first line of text
a second line of text
a third line
Listing 6
Interestingly, there is a way to use output redirection in Python to write data to files. Listing 7 shows how to code that for Python 2.x.
filename = "helloworld.txt"

filecontent = ["Hello, world", "a second line", "and a third line"]

with open(filename, 'w') as filehandle:

    for line in filecontent:
        print >>filehandle, line
Listing 7
For the latest Python releases this does not work in the same way anymore. To do something like this we must use the sys module. It allows us to access the UNIX standard output channels via sys.stdout, sys.stdin, and sys.stderr.
In our case we preserve the original value of the output channel sys.stdout, first (line 8 in the code below), redefine it to the handle of our output file,
next (line 15), print the data as usual (line 18), and finally restore the original value of the output channel sys.stdout (line 21). Listing 8 contains the example code.
import sys

filename = "helloworld.txt"

original = sys.stdout

filecontent = ["Hello, world", "a second line", "and a third line"]

with open(filename, 'w') as filehandle:

    sys.stdout = filehandle

    for line in filecontent:
        print(line)


    sys.stdout = original
Listing 8
This is not necessarily best practice, but it does give you other options for writing lines to a file.
Appending Data to a File
So far, we have stored data in new files or in overwritten data in existing files. But what if we want to append data to the end of an existing file? In this case we would need to open the existing file using a different access mode. We change that to ‘a’ instead of ‘w’.
Listing 9 shows how to handle that. And Listing 10 does the same thing, but it uses the with statement rather.
with open('helloworld.txt', 'a') as filehandle:
    filehandle.write('\n' + 'Hello, world!\n')
Listing 10
Using the same helloworld.txt file from before, running this code will produce the following file contents:
$ cat helloworld.txt
Hello, world
a second line
and a third line

Hello, world!
Conclusion
Writing plain text data to files, or appending data to existing files, is as easy as reading from files in Python. As soon as a file is closed after writing or appending data, Python triggers a synchronization call. As a result, the updated file is immediately written to disk.
If you found this guide helpful feel free to checkout my github/gists where I host similar content:
This topic is meant to give you a very basic overview of how Markdown works, showing only some of the most common operations you use most frequently. Keep in mind that you can also use the Edit menus to inject markdown using the toolbar, which serves as a great way to see how Markdown works. However, Markdown’s greatest strength lies in its simplicity and keyboard friendly approach that lets you focus on writing your text and staying on the keyboard.
What is Markdown
Markdown is very easy to learn and get comfortable with due it’s relatively small set of markup ‘commands’. It uses already familiar syntax to represent common formatting operations. Markdown understands basic line breaks so you can generally just type text.
Markdown also allows for raw HTML inside of a markdown document, so if you want to embed something more fancy than what Markdowns syntax can do you can always fall back to HTML. However to keep documents readable that’s generally not recommended.
Basic Markdown Syntax
The following are a few examples of the most common things you are likely to do with Markdown while building typical documentation.
Bold and Italic
markdown

This text **is bold**.
This text *is italic*.
By default Markdown adds paragraphs at double line breaks. Single line breaks by themselves are simply wrapped together into a single line. If you want to have soft returns that break a single line, add two spaces at the end of the line.
markdown

This line has a paragraph break at the end (empty line after).

Theses two lines should display as a single
line because there's no double space at the end.

The following line has a soft break at the end (two spaces at end)
This line should be following on the very next line.
This line has a paragraph break at the end (empty line after).
Theses two lines should display as a single line because there’s no double space at the end.
The following line has a soft break at the end (two spaces at end)
This line should be following on the very next line.
Links
markdown

[Help Builder Web Site](http://helpbuilder.west-wind.com/)
If you need additional image tags like targets or title attributes you can also embed HTML directly:
markdown

Go the Help Builder sitest Wind site: <a href="http://west-wind.com/" target="_blank">Help Builder Site</a>.
Images
markdown

### Block Quotes
Block quotes are callouts that are great for adding notes or warnings into documentation.
markdown

> ###  Headers break on their own
> Note that headers don't need line continuation characters
as they are block elements and automatically break. Only text
lines require the double spaces for single line breaks.
Headers break on their own
Note that headers don’t need line continuation characters as they are block elements and automatically break. Only text lines require the double spaces for single line breaks.
Fontawesome Icons
Help Builder includes a custom syntax for FontAwesome icons in its templates. You can embed a @ icon- followed by a font-awesome icon name to automatically embed that icon without full HTML syntax.
markdown

Gear:  Configuration
Configuration
HTML Markup
You can also embed plain HTML markup into the page if you like. For example, if you want full control over fontawesome icons you can use this:
markdown

This text can be **embedded** into Markdown:
<i class="fa fa-refresh fa-spin fa-lg"></i> Refresh Page
This text can be embedded into Markdown:
Refresh Page
Unordered Lists
markdown

* Item 1
* Item 2
* Item 3
This text is part of the third item. Use two spaces at end of the the list item to break the line.

A double line break, breaks out of the list.
Item 1
Item 2
Item 3
This text is part of the third item. Use two spaces at end of the the list item to break the line.
A double line break, breaks out of the list.
Ordered Lists
markdown
1. **Item 1**
Item 1 is really something
2. **Item 2**
Item two is really something else
If you want lines to break using soft returns use two spaces at the end of a line.
Item 1 Item 1 is really something
Item 2
Item two is really something else
If you want to lines to break using soft returns use to spaces at the end of a line.
Inline Code
If you want to embed code in the middle of a paragraph of text to highlight a coding syntax or class/member name you can use inline code syntax:
markdown
Structured statements like `for x =1 to 10` loop structures
can be codified using single back ticks.
Structured statements like for x =1 to 10 loop structures can be codified using single back ticks.
Code Blocks with Syntax Highlighting
Markdown supports code blocks syntax in a variety of ways:
markdown
The following code demonstrates:
// This is code by way of four leading spaces
// or a leading tab
More text here
The following code demonstrates:
pgsql
// This is code by way of four leading spaces
// or a leading tab
More text here
Code Blocks
You can also use triple back ticks plus an optional coding language to support for syntax highlighting (space injected before last ` to avoid markdown parsing):
markdown
`` `csharp
// this code will be syntax highlighted
for(var i=0; i++; i < 10)
{
Console.WriteLine(i);
}
`` `
csharp
// this code will be syntax highlighted
for(var i=0; i++; i < 10)
{
Console.WriteLine(i);
}
Many languages are supported: html, xml, javascript, css, csharp, foxpro, vbnet, sql, python, ruby, php and many more. Use the Code drop down list to get a list of available languages.
You can also leave out the language to get no syntax coloring but the code box:
There are many differences between Node.js and browser environments, but many of them are small and inconsequential in practice. For example, in our Asynchronous lesson, we noted how Node’s setTimeout has a slightly different return value from a browser’s setTimeout. Let’s go over a few notable differences between the two environments.
Global vs Window
In the Node.js runtime, the global object is the object where global variables are stored. In browsers, the window object is where global variables are stored. The window also includes properties and methods that deal with drawing things on the screen like images, links, and buttons. Node doesn’t need to draw anything, and so it does not come with such properties. This means that you can’t reference window in Node.
Most browsers allow you to reference global but it is really the same object as window.
Document
Browsers have access to a document object that contains the HTML of a page that will be rendered to the browser window. There is no document in Node.
Location
Browsers have access to a location that contains information about the web address being visited in the browser. There is no location in Node, since it is not on the web.
Require and module.exports
Node has a predefined require function that we can use to import installed modules like readline. We can also import and export across our own files using require and module.exports. For example, say we had two different files, animals.js and cat.js, that existed in the same directory:
If we execute animals.js in Node, the program would print ‘Sennacy is a great pet!’.
Browsers don’t have a notion of a file system so we cannot use require or module.exports in the same way.
The fs module
Node comes with an fs module that contains methods that allow us to interact with our computer’s File System through JavaScript. No additional installations are required; to access this module we can simply require it. We recommend that you code along with this reading. Let's begin with a change-some-files.js script that imports the module:
// change-some-files.js
const fs = require("fs");
Similar to what we saw in the readline lesson, require will return to us a object with many properties that will enable us to do file I/O.
Did you know?I/O is short for input/output. It’s usage is widespread and all the hip tech companies are using it, like.io.
The fs module contains tons of functionality! Chances are that if there is some operation you need to perform regarding files, the fs module supports it. The module also offers both synchronous and asynchronous implementations of these methods. We prefer to not block the thread and so we'll opt for the asynchronous flavors of these methods.
Creating a new file
To create a file, we can use the writeFile method. According to the documentation, there are a few ways to use it. The most straight forward way is:
The code acreate-a-nnew-file.js (github.com)bove will create a new file called foo.txt in the same directory as our change-some-file.js script. It will write the string 'Hello world!' into that newly created file. The third argument specifies the encoding of the characters. There are different ways to encode characters; UTF-8 is the most common and you'll use this in most scenarios. The fourth argument to writeFile is a callback that will be invoked when the write operation is complete. The docs indicate that if there is an error during the operation (such as an invalid encoding argument), an error object will be passed into the callback. This type of error handling is quite common for asynchronous functions. Like we are used to, since writeFile is asynchronous, we need to utilize callback chaining if we want to guarantee that commands occur after the write is complete or fails.
Beware! If the file name specified towriteFilealready exists, it will completely overwrite the contents of that file.
We won’t be using the foo.txt file in the rest of this reading.
Reading existing files
To explore how to read a file, we’ll use VSCode to manually create a poetry.txt file within the same directory as our change-some-file.js script. Be sure to create this if you are following along.
Our poetry.txt file will contain the following lines:
My code fails
I do not know why
My code works
I do not know why
We can use the readFile method to read the contents of this file. The method accepts very similar arguments to writeFile, except that the callback may be passed an error object and string containing the file contents. In the snippet below, we have replaced our previous writeFile code with readFile:
Running the code above would print the following in the terminal:
THE CONTENTS ARE:
My code fails
I do not know why
My code works
I do not know why
Success! From here, you can do anything you please with the data read from the file. For example, since data is a string, we could split the string on the newline character \n to obtain an array of the file's lines:
THE CONTENTS ARE:
[ 'My code fails',
'I do not know why',
'My code works',
'I do not know why' ]
The third line is My code works
File I/O
Using the samepoetry.txtfile from before:
My code fails
I do not know why
My code works
I do not know why
Let’s replace occurrences of the phrase ‘do not’ with the word ‘should’.
We can read the contents of the file as a string, manipulate this string, then write this new string back into the file.
We’ll need to utilize callback chaining in order for this to work since our file I/O is asynchronous:
Executing the script above will edit the poetry.txt file to contain:
My code fails
I should know why
My code works
I should know why
Refactor:
If you found this guide helpful feel free to checkout my github/gists where I host similar content:
Learning: The acquisition of skills and the ability to apply them in the future.
What makes an Effective learner?
They are active listeners.
They are engaged with the material.
They are receptive of feedback.
They are open to difficulty.
Why do active learning techniques feel difficult?
It feels difficult because you are constantly receiving feedback, and so you are constantly adapting and perfecting the material.
Desirable Difficulty
The skills we wish to obtain is often a difficult one.
We want challenging but possible lessons based on current level of skill.
Effective learners space their practice
Consistent effort > cramming => for durable knowledge
Getting visual feedback in your programs
The first command we’ll learn in JavaScript is console.log. This command is used to print something onto the screen. As we write our first lines of code, we’ll be using console.log frequently as a way to visually see the output of our programs. Let’s write our first program:
console.log("hello world");
console.log("how are you?");
Executing the program above would print out the following:
hello world
how are you?
Nothing too ground breaking here, but pay close attention to the exact way we wrote the program. In particular, notice how we lay out the periods, parentheses, and quotation marks. We’ll also terminate lines with semicolons (;).
Depending on how you structure your code, sometimes you’ll be able to omit semicolons at the end of lines. For now, you’ll want to include them just as we do.
Syntax
We refer to the exact arrangement of the symbols, characters, and keywords as syntax. These details matter — your computer will only be able to “understand” proper JavaScript syntax. A programming language is similar to a spoken language. A spoken language like English has grammar rules that we should follow in order to be understood by fellow speakers. In the same way, a programming language like JavaScript has syntax rules that we ought to follow!
As you write your first lines of code in this new language, you may make many syntax errors. Don’t get frustrated! This is normal — all new programmers go through this phase. Every time we recognize an error in our code, we have an opportunity to reinforce your understanding of correct syntax. Adopt a growth mindset and learn from your mistakes.
Additionally, one of the best things about programming is that we can get such immediate feedback from our creations. There is no penalty for making a mistake when programming. Write some code, run the code, read the errors, fix the errors, rinse and repeat!
Code comments
Occasionally we’ll want to leave comments or notes in our code. Commented lines will be ignored by our computer. This means that we can use comments to write plain english or temporarily avoid execution of some JavaScript lines. The proper syntax for writing a comment is to begin the line with double forward slashes (//):
// let's write another program!!!
console.log("hello world");
// console.log("how are you?");
console.log("goodbye moon");
The program above would only print:
hello world
goodbye moon
Comments are useful when annotating pieces of code to offer an explanation of how the code works. We’ll want to strive to write straightforward code that is self-explanatory when possible, but we can also use comments to add additional clarity. The real art of programming is to write code so elegantly that it is easy to follow.
The Number Data Type
The number data type in JS is used to represent any numerical values, including integers and decimal numbers.
Basic Arithmetic Operators
Operators are the symbols that perform particular operations.
+ (addition)
- (subtraction)
asterisk (multiplication)
/ (division)
% (modulo)
JS evaluates more complex expressions using the general math order of operations aka PEMDAS.
To force a specific order of operation, use the group operator ( ) around a part of the expression.
Modulo : Very useful operation to check divisibility of numbers, check for even & odd, whether a number is prime, and much more! (Discrete Math concept, circular problems can be solved with modulo)
Whenever you have a smaller number % a larger number, the answer will just be the initial small number.
console.log(7 % 10) // => 7;
The String Data Type
The string data type is a primitive data type that used to represent textual data.
can be wrapped by either single or double quotation marks, best to choose one and stick with it for consistency.
If your string contains quotation marks inside, can layer single or double quotation marks to allow it to work.
“That’s a great string”; (valid)
‘Shakespeare wrote, “To be or not to be”’; (valid)
‘That’s a bad string’; (invalid)
Alt. way to add other quotes within strings is to use template literals.
`This is a temp’l’ate literal ${function}` // use ${} to invoke functions within.
.length : property that can be appended to data to return the length.
empty strings have a length of zero.
indices : indexes of data that begin at 0, can call upon index by using the bracket notation [ ].
console.log(“bootcamp”[0]); // => “b”
console.log(“bootcamp”[10]); // => “undefined”
console.log(“boots”[1 * 2]); // => “o”
console.log(“boots”[“boot”.length-1]); // => “t”
we can pass expressions through the brackets as well since JS always evaluates expressions first.
The index of the last character of a string is always one less than it’s length.
indexOf() : method used to find the first index of a given character within a string.
console.log(“bagel”.indexOf(“b”)); // => 0
console.log(“bagel”.indexOf(“z”)); // => -1
if the character inside the indexOf() search does not exist in the string, the output will be -1.
the indexOf() search will return the first instanced index of the the char in the string.
concatenate : word to describe joining strings together into a single string.
The Boolean Data Type
The Boolean data type is the simplest data type since there are only two values: true and false.
Logical Operators (Boolean Operators) are used to establish logic in our code.
Logical Order of Operations : JS will evaluate !, then &&, then ||.
Short-Circuit Evaluation : Because JS evalutes from left to right, expressions can “short-circuit”. For example if we have true on the left of an || logical comparison, it will stop evaluating and yield true instead of wasting resources on processing the rest of the statement.
console.log(true || !false) // => stops after it sees “true ||”
Comparison Operators
All comparison operators will result in a boolean output.
The relative comparators
> (greater than)
< (less than)
>= (greater than or equal to)
<= (less than or equal to)
=== (equal to)
!== (not equal to)
Fun Fact: “a” < “b” is considered valid JS Code because string comparisons are compared lexicographically (meaning dictionary order), so “a” is less than “b” because it appears earlier!
If there is ever a standstill comparison of two string lexicographically (i.e. app vs apple) the comparison will deem the shorter string lesser.
Difference between == and ===
===
Strict Equality, will only return true if the two comparisons are entirely the same.
==
Loose Equality, will return true even if the values are of a different type, due to coercion. (Avoid using this)
Variables
Variables are used to store information to be referenced and manipulated in a program.
We initialize a variable by using the let keyword and a = single equals sign (assignment operator).
let bootcamp = “App Academy”;
console.log(bootcamp); // “App Academy”
JS variable names can contain any alphanumeric characters, underscores, or dollar signs (cannot being with a number).
If you do not declare a value for a variable, undefined is automatically set.
let bootcamp;
console.log(bootcamp); // undefined
We can change the value of a previously declared variable (let, not const) by re-assigning it another value.
let is the updated version of var; there are some differences in terms of hoisting and global/block scope
Assignment Shorthand
let num = 0;
num += 10; // same as num = num + 10
num -= 2; // same as num = num — 2
num /= 4; // same as num = num / 4
num *= 7; // same as num = num * 7
In general, any nonsensical arithmetic will result in NaN ; usually operations that include undefined.
Functions
A function is a procedure of code that will run when called. Functions are used so that we do not have to rewrite code to do the same thing over and over. (Think of them as ‘subprograms’)
Function Declaration : Process when we first initially write our function.
Includes three things:
Name of the function.
A list of parameters ()
The code to execute {}
Function Calls : We can call upon our function whenever and wherever* we want. (*wherever is only after the initial declaration)
JS evaluates code top down, left to right.
When we execute a declared function later on in our program we refer to this as invoking our function.
Every function in JS returns undefined unless otherwise specified.
When we hit a return statement in a function we immediately exit the function and return to where we called the function.
When naming functions in JS always use camelCase and name it something appropriate.
Greate code reads like English and almost explains itself. Think: Elegant, readable, and maintainable!
Parameters and Arguments
Parameters : Comma seperated variables specified as part of a function’s declaration.
Arguments : Values passed to the function when it is invoked.
If the number of arguments passed during a function invocation is different than the number of paramters listed, it will still work.
However, is there are not enough arguments provided for parameters our function will likely yield Nan.
Including Comments
Comments are important because they help other people understand what is going on in your code or remind you if you forgot something yourself. Keep in mind that they have to be marked properly so the browser won’t try to execute them.
In JavaScript you have two different options:
Single-line comments — To include a comment that is limited to a single line, precede it with //
Multi-line comments — In case you want to write longer comments between several lines, wrap it in /* and */ to avoid it from being executed
Variables in JavaScript
Variables are stand-in values that you can use to perform operations. You should be familiar with them from math class.
var, const, let
You have three different possibilities for declaring a variable in JavaScript, each with their own specialties:
var — The most common variable. It can be reassigned but only accessed within a function. Variables defined with var move to the top when the code is executed.
const — Can not be reassigned and not accessible before they appear within the code.
let — Similar to const, the let variable can be reassigned but not re-declared.
Data Types
Variables can contain different types of values and data types. You use = to assign them:
Numbers — var age = 23
Variables — var x
Text (strings) — var a = "init"
Operations — var b = 1 + 2 + 3
True or false statements — var c = true
Constant numbers — const PI = 3.14
Objects — var name = {firstName:"John", lastName:"Doe"}
There are more possibilities. Note that variables are case sensitive. That means lastname and lastName will be handled as two different variables.
Objects
Objects are certain kinds of variables. They are variables that can have their own values and methods. The latter are actions that you can perform on objects.
var person = {
firstName:”John”,
lastName:”Doe”,
age:20,
nationality:”German”
};
The Next Level: Arrays
Next up in our JavaScript cheat sheet are arrays. Arrays are part of many different programming languages. They are a way of organizing variables and properties into groups. Here’s how to create one in JavaScript:
var fruit = [“Banana”, “Apple”, “Pear”];
Now you have an array called fruit which contains three items that you can use for future operations.
Array Methods
Once you have created arrays, there are a few things you can do with them:
concat() — Join several arrays into one
indexOf() — Returns the first position at which a given element appears in an array
join() — Combine elements of an array into a single string and return the string
lastIndexOf() — Gives the last position at which a given element appears in an array
pop() — Removes the last element of an array
push() — Add a new element at the end
reverse() — Sort elements in a descending order
shift() — Remove the first element of an array
slice() — Pulls a copy of a portion of an array into a new array
sort() — Sorts elements alphabetically
splice() — Adds elements in a specified way and position
toString() — Converts elements to strings
unshift() —Adds a new element to the beginning
valueOf() — Returns the primitive value of the specified object
Operators
If you have variables, you can use them to perform different kinds of operations. To do so, you need operators.
Basic Operators
+ — Addition
- — Subtraction
* — Multiplication
/ — Division
(...) — Grouping operator, operations within brackets are executed earlier than those outside
% — Modulus (remainder )
++ — Increment numbers
-- — Decrement numbers
Comparison Operators
== — Equal to
=== — Equal value and equal type
!= — Not equal
!== — Not equal value or not equal type
> — Greater than
< — Less than
>= — Greater than or equal to
<= — Less than or equal to
? — Ternary operator
Logical Operators
&& — Logical and
|| — Logical or
! — Logical not
Bitwise Operators
& — AND statement
| — OR statement
~ — NOT
^ — XOR
<< — Left shift
>> — Right shift
>>> — Zero fill right shift
Functions
JavaScript functions are blocks of code that perform a certain task. A basic function looks like this:
function name(parameter1, parameter2, parameter3) {
// what the function does
}
As you can see, it consists of the function keyword plus a name. The function’s parameters are in the brackets and you have curly brackets around what the function performs. You can create your own, but to make your life easier – there are also a number of default functions.
Outputting Data
A common application for functions is the output of data. For the output, you have the following options:
alert() — Output data in an alert box in the browser window
confirm() — Opens up a yes/no dialog and returns true/false depending on user click
console.log() — Writes information to the browser console, good for debugging purposes
document.write() — Write directly to the HTML document
prompt() — Creates a dialogue for user input
Global Functions
Global functions are functions built into every browser capable of running JavaScript.
encodeURIComponent() — Same but for URI components
eval() — Evaluates JavaScript code represented as a string
isFinite() — Determines whether a passed value is a finite number
isNaN() — Determines whether a value is NaN or not
Number() —- Returns a number converted from its argument
parseFloat() — Parses an argument and returns a floating-point number
parseInt() — Parses its argument and returns an integer
JavaScript Loops
Loops are part of most programming languages. They allow you to execute blocks of code desired number of times with different values:
for (before loop; condition for loop; execute after loop) {
// what to do during the loop
}
You have several parameters to create loops:
for — The most common way to create a loop in JavaScript
while — Sets up conditions under which a loop executes
do while — Similar to the while loop but it executes at least once and performs a check at the end to see if the condition is met to execute again
break —Used to stop and exit the cycle at certain conditions
continue — Skip parts of the cycle if certain conditions are met
If — Else Statements
These types of statements are easy to understand. Using them, you can set conditions for when your code is executed. If certain conditions apply, something is done, if not — something else is executed.
if (condition) {
// what to do if condition is met
} else {
// what to do if condition is not met
}
A similar concept to if else is the switch statement. However, using the switch you select one of several code blocks to execute.
Strings
Strings are what JavaScript calls to text that does not perform a function but can appear on the screen.
var person = “John Doe”;
In this case, John Doe is the string.
Escape Characters
In JavaScript, strings are marked with single or double-quotes. If you want to use quotation marks in a string, you need to use special characters:
\' — Single quote
\" — Double quote
Aside from that you also have additional escape characters:
\\ — Backslash
\b — Backspace
\f — Form feed
\n — New line
\r — Carriage return
\t — Horizontal tabulator
\v — Vertical tabulator
String Methods
There are many different ways to work with strings:
charAt() — Returns a character at a specified position inside a string
charCodeAt() — Gives you the Unicode of a character at that position
concat() — Concatenates (joins) two or more strings into one
fromCharCode() — Returns a string created from the specified sequence of UTF-16 code units
indexOf() — Provides the position of the first occurrence of a specified text within a string
lastIndexOf() — Same as indexOf() but with the last occurrence, searching backward
match() — Retrieves the matches of a string against a search pattern
replace() — Find and replace specified text in a string
search() — Executes a search for a matching text and returns its position
slice() — Extracts a section of a string and returns it as a new string
split() — Splits a string object into an array of strings at a specified position
substr() — Similar to slice() but extracts a substring depending on a specified number of characters
substring() — Also similar to slice() but can’t accept negative indices
toLowerCase() — Convert strings to lower case
toUpperCase() — Convert strings to upper case
valueOf() — Returns the primitive value (that has no properties or methods) of a string object
Regular Expression Syntax
Regular expressions are search patterns used to match character combinations in strings. The search pattern can be used for text search and text to replace operations.
Pattern Modifiers
e — Evaluate replacement
i — Perform case-insensitive matching
g — Perform global matching
m — Perform multiple line matching
s — Treat strings as a single line
x — Allow comments and whitespace in the pattern
U — Ungreedy pattern
Brackets
[abc] — Find any of the characters between the brackets
[^abc] — Find any character which is not in the brackets
[0-9] — Used to find any digit from 0 to 9
[A-z] — Find any character from uppercase A to lowercase z
(a|b|c) — Find any of the alternatives separated with |
Metacharacters
. — Find a single character, except newline or line terminator
\w — Word character
\W — Non-word character
\d — A digit
\D — A non-digit character
\s — Whitespace character
\S — Non-whitespace character
\b — Find a match at the beginning/end of a word
\B — A match not at the beginning/end of a word
\0 — NUL character
\n — A new line character
\f — Form feed character
\r — Carriage return character
\t — Tab character
\v — Vertical tab character
\xxx — The character specified by an octal number xxx
\xdd — Character specified by a hexadecimal number dd
\uxxxx — The Unicode character specified by a hexadecimal number XXXX
Quantifiers
n+ — Matches any string that contains at least one n
n* — Any string that contains zero or more occurrences of n
n? — A string that contains zero or one occurrence of n
n{X} — String that contains a sequence of X n’s
n{X,Y} — Strings that contain a sequence of X to Y n’s
n{X,} — Matches any string that contains a sequence of at least X n’s
n$ — Any string with n at the end of it
^n — String with n at the beginning of it
?=n — Any string that is followed by a specific string n
?!n — String that is not followed by a specific string ni
Numbers and Math
In JavaScript, you can also work with numbers, constants and perform mathematical functions.
Number Properties
MAX_VALUE — The maximum numeric value representable in JavaScript
MIN_VALUE — Smallest positive numeric value representable in JavaScript
NaN — The “Not-a-Number” value
NEGATIVE_INFINITY — The negative Infinity value
POSITIVE_INFINITY — Positive Infinity value
Number Methods
toExponential() — Returns the string with a rounded number written as exponential notation
toFixed() — Returns the string of a number with a specified number of decimals
toPrecision() — String of a number written with a specified length
toString() — Returns a number as a string
valueOf() — Returns a number as a number
Math Properties
E — Euler’s number
LN2 — The natural logarithm of 2
LN10 — Natural logarithm of 10
LOG2E — Base 2 logarithm of E
LOG10E — Base 10 logarithm of E
PI — The number PI
SQRT1_2 — Square root of 1/2
SQRT2 — The square root of 2
Math Methods
abs(x) — Returns the absolute (positive) value of x
acos(x) — The arccosine of x, in radians
asin(x) — Arcsine of x, in radians
atan(x) — The arctangent of x as a numeric value
atan2(y,x) — Arctangent of the quotient of its arguments
ceil(x) — Value of x rounded up to its nearest integer
cos(x) — The cosine of x (x is in radians)
exp(x) — Value of Ex
floor(x) — The value of x rounded down to its nearest integer
log(x) — The natural logarithm (base E) of x
max(x,y,z,...,n) — Returns the number with the highest value
min(x,y,z,...,n) — Same for the number with the lowest value
pow(x,y) — X to the power of y
random() — Returns a random number between 0 and 1
round(x) — The value of x rounded to its nearest integer
sin(x) — The sine of x (x is in radians)
sqrt(x) — Square root of x
tan(x) — The tangent of an angle
Dealing with Dates in JavaScript
You can also work with and modify dates and time with JavaScript. This is the next chapter in the JavaScript cheat sheet.
Setting Dates
Date() — Creates a new date object with the current date and time
Date(2017, 5, 21, 3, 23, 10, 0) — Create a custom date object. The numbers represent a year, month, day, hour, minutes, seconds, milliseconds. You can omit anything you want except for a year and month.
Date("2017-06-23") — Date declaration as a string
Pulling Date and Time Values
getDate() — Get the day of the month as a number (1-31)
getDay() — The weekday as a number (0-6)
getFullYear() — Year as a four-digit number (yyyy)
getHours() — Get the hour (0-23)
getMilliseconds() — The millisecond (0-999)
getMinutes() — Get the minute (0-59)
getMonth() — Month as a number (0-11)
getSeconds() — Get the second (0-59)
getTime() — Get the milliseconds since January 1, 1970
getUTCDate() — The day (date) of the month in the specified date according to universal time (also available for day, month, full year, hours, minutes etc.)
parse — Parses a string representation of a date and returns the number of milliseconds since January 1, 1970
Set Part of a Date
setDate() — Set the day as a number (1-31)
setFullYear() — Sets the year (optionally month and day)
setHours() — Set the hour (0-23)
setMilliseconds() — Set milliseconds (0-999)
setMinutes() — Sets the minutes (0-59)
setMonth() — Set the month (0-11)
setSeconds() — Sets the seconds (0-59)
setTime() — Set the time (milliseconds since January 1, 1970)
setUTCDate() — Sets the day of the month for a specified date according to universal time (also available for day, month, full year, hours, minutes etc.)
DOM Mode
The DOM is the Document Object Model of a page. It is the code of the structure of a webpage. JavaScript comes with a lot of different ways to create and manipulate HTML elements (called nodes).
Node Properties
attributes — Returns a live collection of all attributes registered to an element
baseURI — Provides the absolute base URL of an HTML element
childNodes — Gives a collection of an element’s child nodes
firstChild — Returns the first child node of an element
lastChild — The last child node of an element
nextSibling — Gives you the next node at the same node tree level
nodeName —Returns the name of a node
nodeType — Returns the type of a node
nodeValue — Sets or returns the value of a node
ownerDocument — The top-level document object for this node
parentNode — Returns the parent node of an element
previousSibling — Returns the node immediately preceding the current one
textContent — Sets or returns the textual content of a node and its descendants
Node Methods
appendChild() — Adds a new child node to an element as the last child node
cloneNode() — Clones an HTML element
compareDocumentPosition() — Compares the document position of two elements
getFeature() — Returns an object which implements the APIs of a specified feature
hasAttributes() — Returns true if an element has any attributes, otherwise false
hasChildNodes() — Returns true if an element has any child nodes, otherwise false
insertBefore() — Inserts a new child node before a specified, existing child node
isDefaultNamespace() — Returns true if a specified namespaceURI is the default, otherwise false
isEqualNode() — Checks if two elements are equal
isSameNode() — Checks if two elements are the same node
isSupported() — Returns true if a specified feature is supported on the element
lookupNamespaceURI() — Returns the namespace URI associated with a given node
lookupPrefix() — Returns a DOMString containing the prefix for a given namespace URI if present
normalize() — Joins adjacent text nodes and removes empty text nodes in an element
removeChild() — Removes a child node from an element
replaceChild() — Replaces a child node in an element
Element Methods
getAttribute() — Returns the specified attribute value of an element node
getAttributeNS() — Returns string value of the attribute with the specified namespace and name
getAttributeNode() — Gets the specified attribute node
getAttributeNodeNS() — Returns the attribute node for the attribute with the given namespace and name
getElementsByTagName() — Provides a collection of all child elements with the specified tag name
getElementsByTagNameNS() — Returns a live HTMLCollection of elements with a certain tag name belonging to the given namespace
hasAttribute() — Returns true if an element has any attributes, otherwise false
hasAttributeNS() — Provides a true/false value indicating whether the current element in a given namespace has the specified attribute
removeAttribute() — Removes a specified attribute from an element
removeAttributeNS() — Removes the specified attribute from an element within a certain namespace
removeAttributeNode() — Takes away a specified attribute node and returns the removed node
setAttribute() — Sets or changes the specified attribute to a specified value
setAttributeNS() — Adds a new attribute or changes the value of an attribute with the given namespace and name
setAttributeNode() — Sets or changes the specified attribute node
setAttributeNodeNS() — Adds a new namespaced attribute node to an element
Working with the User Browser
Besides HTML elements, JavaScript is also able to take into account the user browser and incorporate its properties into the code.
Window Properties
closed — Checks whether a window has been closed or not and returns true or false
defaultStatus — Sets or returns the default text in the status bar of a window
document — Returns the document object for the window
frames — Returns all <iframe> elements in the current window
history — Provides the History object for the window
innerHeight — The inner height of a window’s content area
innerWidth — The inner width of the content area
length — Find out the number of <iframe> elements in the window
location — Returns the location object for the window
name — Sets or returns the name of a window
navigator — Returns the Navigator object for the window
opener — Returns a reference to the window that created the window
outerHeight — The outer height of a window, including toolbars/scrollbars
outerWidth — The outer width of a window, including toolbars/scrollbars
pageXOffset — Number of pixels the current document has been scrolled horizontally
pageYOffset — Number of pixels the document has been scrolled vertically
parent — The parent window of the current window
screen — Returns the Screen object for the window
screenLeft — The horizontal coordinate of the window (relative to the screen)
screenTop — The vertical coordinate of the window
screenX — Same as screenLeft but needed for some browsers
screenY — Same as screenTop but needed for some browsers
self — Returns the current window
status — Sets or returns the text in the status bar of a window
top — Returns the topmost browser window
Window Methods
alert() — Displays an alert box with a message and an OK button
blur() — Removes focus from the current window
clearInterval() — Clears a timer set with setInterval()
clearTimeout() — Clears a timer set with setTimeout()
close() — Closes the current window
confirm() — Displays a dialogue box with a message and an OK and Cancel button
focus() — Sets focus to the current window
moveBy() — Moves a window relative to its current position
moveTo() — Moves a window to a specified position
open() — Opens a new browser window
print() — Prints the content of the current window
prompt() — Displays a dialogue box that prompts the visitor for input
resizeBy() — Resizes the window by the specified number of pixels
resizeTo() — Resizes the window to a specified width and height
scrollBy() — Scrolls the document by a specified number of pixels
scrollTo() — Scrolls the document to specified coordinates
setInterval() — Calls a function or evaluates an expression at specified intervals
setTimeout() — Calls a function or evaluates an expression after a specified interval
stop() — Stops the window from loading
Screen Properties
availHeight — Returns the height of the screen (excluding the Windows Taskbar)
availWidth — Returns the width of the screen (excluding the Windows Taskbar)
colorDepth — Returns the bit depth of the color palette for displaying images
height — The total height of the screen
pixelDepth — The color resolution of the screen in bits per pixel
width — The total width of the screen
JavaScript Events
Events are things that can happen to HTML elements and are performed by the user. The programming language can listen for these events and trigger actions in the code. No JavaScript cheat sheet would be complete without them.
Mouse
onclick — The event occurs when the user clicks on an element
oncontextmenu — User right-clicks on an element to open a context menu
ondblclick — The user double-clicks on an element
onmousedown — User presses a mouse button over an element
onmouseenter — The pointer moves onto an element
onmouseleave — Pointer moves out of an element
onmousemove — The pointer is moving while it is over an element
onmouseover — When the pointer is moved onto an element or one of its children
onmouseout — User moves the mouse pointer out of an element or one of its children
onmouseup — The user releases a mouse button while over an element
Keyboard
onkeydown — When the user is pressing a key down
onkeypress — The moment the user starts pressing a key
onkeyup — The user releases a key
Frame
onabort — The loading of a media is aborted
onbeforeunload — Event occurs before the document is about to be unloaded
onerror — An error occurs while loading an external file
onhashchange — There have been changes to the anchor part of a URL
onload — When an object has loaded
onpagehide — The user navigates away from a webpage
onpageshow — When the user navigates to a webpage
onresize — The document view is resized
onscroll — An element’s scrollbar is being scrolled
onunload — Event occurs when a page has unloaded
Form
onblur — When an element loses focus
onchange — The content of a form element changes (for <input>, <select> and <textarea>)
onfocus — An element gets focus
onfocusin — When an element is about to get focus
onfocusout — The element is about to lose focus
oninput — User input on an element
oninvalid — An element is invalid
onreset — A form is reset
onsearch — The user writes something in a search field (for <input="search">)
onselect — The user selects some text (for <input> and <textarea>)
onsubmit — A form is submitted
Drag
ondrag — An element is dragged
ondragend — The user has finished dragging the element
ondragenter — The dragged element enters a drop target
ondragleave — A dragged element leaves the drop target
ondragover — The dragged element is on top of the drop target
ondragstart — User starts to drag an element
ondrop — Dragged element is dropped on the drop target
Clipboard
oncopy — User copies the content of an element
oncut — The user cuts an element’s content
onpaste — A user pastes the content in an element
Media
onabort — Media loading is aborted
oncanplay — The browser can start playing media (e.g. a file has buffered enough)
oncanplaythrough — The browser can play through media without stopping
ondurationchange — The duration of the media changes
onended — The media has reached its end
onerror — Happens when an error occurs while loading an external file
onloadeddata — Media data is loaded
onloadedmetadata — Metadata (like dimensions and duration) are loaded
onloadstart — The browser starts looking for specified media
onpause — Media is paused either by the user or automatically
onplay — The media has been started or is no longer paused
onplaying — Media is playing after having been paused or stopped for buffering
onprogress — The browser is in the process of downloading the media
onratechange — The playing speed of the media changes
onseeked — User is finished moving/skipping to a new position in the media
onseeking — The user starts moving/skipping
onstalled — The browser is trying to load the media but it is not available
onsuspend — The browser is intentionally not loading media
ontimeupdate — The playing position has changed (e.g. because of fast forward)
onvolumechange — Media volume has changed (including mute)
onwaiting — Media paused but expected to resume (for example, buffering)
Animation
animationend — A CSS animation is complete
animationiteration — CSS animation is repeated
animationstart — CSS animation has started
Other
transitionend — Fired when a CSS transition has completed
onmessage — A message is received through the event source
onoffline — The browser starts to work offline
ononline — The browser starts to work online
onpopstate — When the window’s history changes
onshow — A <menu> element is shown as a context menu
onstorage — A Web Storage area is updated
ontoggle — The user opens or closes the <details> element
onwheel — Mouse wheel rolls up or down over an element
ontouchcancel — Screen-touch is interrupted
ontouchend — User’s finger is removed from a touch-screen
ontouchmove — A finger is dragged across the screen
ontouchstart — A finger is placed on the touch-screen
Errors
When working with JavaScript, different errors can occur. There are several ways of handling them:
try — Lets you define a block of code to test for errors
catch — Set up a block of code to execute in case of an error
throw — Create custom error messages instead of the standard JavaScript errors
finally — Lets you execute code, after try and catch, regardless of the result
Error Name Values
JavaScript also has a built-in error object. It has two properties:
name — Sets or returns the error name
message — Sets or returns an error message in a string from
The error property can return six different values as its name:
EvalError — An error has occurred in the eval() function
RangeError — A number is “out of range”
ReferenceError — An illegal reference has occurred
SyntaxError — A syntax error has occurred
TypeError — A type error has occurred
URIError — An encodeURI() error has occurred
Explicit Conversions
The simplest way to perform an explicit type conversion is to use the Boolean(), Number(), and String() functions.
Any value other than null or undefined has a toString() method.
The simplest way to perform an explicit type conversion is to use the Boolean(), Number(), and String() functions.
Any value other than null or undefined has a toString() method.
n.toString(2);
binary
n.toString(8);
octal
n.toString(16);
hex
let n = 123456.789;
n.toFixed(0)
“123457”
n.toFixed(5)
“123456.78900”
n.toExponential(3)
“1.235e+5”
n.toPrecision(7)
“123456.8”
n.toPrecision(10)
“123456.7890”
parseInt("3 blind mice")
3
parseFloat(" 3.14 meters")
3.14
parseInt("-12.34")
-12
parseInt("0xFF")
255
parseInt("0xff")
255
parseInt("-0XFF")
-255
parseInt("0.1")
0
parseInt(".1")
NaN: integers can’t start with “.”
parseFloat("$72.47")
NaN: numbers can’t start with “$”
Supply Radix
parseInt("11", 2)
3
parseInt("ff", 16)
255
parseInt("077", 8)
63
Conversion Idioms
x + ""
String(x)
+x
Number(x)
x-0
Number(x)
!!x
Boolean(x)
Destructuring Assignment
let [x,y] = [1,2];
let x=1, y=2
[x,y] = [x + 1,y + 1];
x = x + 1, y = y + 1
[x,y] = [y,x];
Swap the value of the two variables
Destructuring assignment makes it easy to work with functions that return arrays of values:
let [r,theta] = toPolar(1.0, 1.0);
function toPolar(x, y) {
return [Math.sqrt(x*x+y*y), Math.atan2(y,x)];
}
Variable destructuring in loops:
let o = { x: 1, y: 2 };
for(const [name, value] of Object.entries(o)) {
console.log(name, value); // Prints "x 1" and "y 2"
}
Note: The Object.entries() method returns an array of a given object's own enumerable string-keyed property [key, value] pairs, in the same order as that provided by a for...in loop. (The only important difference is that a for...in loop enumerates properties in the prototype chain as well).
The list of variables on the left can include extra commas to skip certain values on the right
[,x,,y] = [1,2,3,4];
x == 2; y == 4
Note: the last comma does not stand for a value.
To collect all unused or remaining values into a single variable when destructuring an array, use three dots (...) before the last variable name on the left-hand side
let [x, ...y] = [1,2,3,4];
y == [2,3,4]
let [first, ...rest] = "Hello";
first == “H”; rest ==[“e”,”l”,”l”,”o”]
Destructuring assignment can also be performed when the righthand side is an object value.
In JavaScript, the values null and undefined are the only two values that do not have properties. In a regular property access expression using . or [], you get a TypeError if the expression on the left evaluates to null or undefined. You can use ?. and ?.[] syntax to guard against errors of this type.
You can also invoke a function using ?.() instead of ().
With the new ?.() invocation syntax, if the expression to the left of the ?. evaluates to null or undefined, then the entire invocation expression evaluates to undefined and no exception is thrown.
Write the function invocation using ?.(), knowing that invocation will only happen if there is actually a value to be invoked
function square(x, log) {
log?.(x); // Call the function if there is one
return x * x;
}
Note that expression x++ is not always the same as x = x + 1.The ++ operator never performs string concatenation: it always converts its operand to a number and increments it. If x is the string "1", ++x is the number 2, but x + 1 is the string "11".
JavaScript objects are compared by reference, not by value. An object is equal to itself, but not to any other object. If two distinct objects have the same number of properties, with the same names and values, they are still not equal. Similarly, two arrays that have the same elements in the same order are not equal to each other.
NaN value is never equal to any other value, including itself! To check whether a value x is NaN, use x !== , or the global isNaN() function.
If both values refer to the same object, array, or function, they are equal. If they refer to different objects, they are not equal, even if both objects have identical properties.
Evaluating Expressions
JavaScript has the ability to interpret strings of JavaScript source code, evaluating them to produce a value.
eval("3+2")
Because of security issues, some web servers use the HTTP “Content-Security-Policy” header to disable eval() for an entire website.
First-Defined (??)
The first-defined operator ?? evaluates to its first defined operand: if its left operand is not null and not undefined, it returns that value.
a ?? b is equivalent to (a !== null && a !== undefined) ? a : b
?? is a useful alternative to ||. The problem with this idiomatic use is that zero, the empty string, and false are all falsy values that may be perfectly valid in some circumstances. In this code example, if maxWidth is zero, that value will be ignored. But if we change the || operator to ??, we end up with an expression where zero is a valid value.
let max = maxWidth || preferences.maxWidth || 500;
let max = maxWidth ?? preferences.maxWidth ?? 500;
delete Operator
Deleting an array element leaves a “hole” in the array and does not change the array’s length. The resulting array is sparse.
void Operator
Using the void operator makes sense only if the operand has side effects.
let counter = 0;
const increment = () => void counter++;
increment()
undefined
counter
1
Statements
Expressions are evaluated to produce a value, but statements are executed to make something happen.
Expressions with side effects, such as assignments and function invocations, can stand alone as statements, and when used this way are known as expression statements.
A similar category of statements are the declaration statements that declare new variables and define new functions.
If a function does not have any side effects, there is no sense in calling it, unless it is part of a larger expression or an assignment statement.
for/of
The for/of loop works with iterable objects. Arrays, strings, sets, and maps are iterable.
Array
let data = [1, 2, 3, 4, 5, 6, 7, 8, 9], sum = 0;
for(let element of data) {
sum += element;
}
let text = "Na na na na na na na na";
let wordSet = new Set(text.split(" "));
let unique = [];
for(let word of wordSet) {
unique.push(word);
}
String
let frequency = {};
for(let letter of "mississippi") {
if (frequency[letter]) {
frequency[letter]++;
}
else {
frequency[letter] = 1;
}
}
Map
let m = new Map([[1, "one"]]);
for(let [key, value] of m) {
key // => 1
value // => "one"
}
Objects are not (by default) iterable. Attempting to use for/of on a regular object throws a TypeError at runtime.
If you want to iterate through the properties of an object, you can use the for/in loop.
Note: for/of can be used on objects with Object.entries property, but it will not pick properties from object’s prototype.
for/in
for/in loop works with any object after the in.
for(let p in o) {
console.log(o[p]);
}
Note: this will enumerate array indexes, not values.
for(let i in a) console.log(i);
The for/in loop does not actually enumerate all properties of an object. It does not enumerate properties whose names are symbols. And of the properties whose names are strings, it only loops over the enumerableproperties.
with
The with statement runs a block of code as if the properties of a specified object were variables in scope for that code.
The with statement is forbidden in strict mode and should be considered deprecated in non-strict mode: avoid using it whenever possible.
If a debugger program is available and is running, then an implementation may (but is not required to) perform some kind of debugging action.
In practice, this statement acts like a breakpoint: execution of JavaScript code stops, and you can use the debugger to print variables’ values, examine the call stack, and so on.
Note that it is not enough to have a debugger available: the debugger statement won’t start the debugger for you. If you’re using a web browser and have the developer tools console open, however, this statement will cause a breakpoint.
use strict
Strict mode is a restricted subset of the language that fixes important language deficiencies and provides stronger error checking and increased security.
The differences between strict mode and non-strict mode are the following:
· The with statement is not allowed in strict mode.
· In strict mode, all variables must be declared: a ReferenceError is thrown if you assign a value to an identifier that is not a declared variable, function, function parameter, catch clause parameter, or property of the global object.
· In non-strict mode, this implicitly declares a global variable by adding a new property to the global object.
· In strict mode, functions invoked as functions (rather than as methods) have a this value of undefined. (In non-strict mode, functions invoked as functions are always passed the global object as their this value.)
· A function is invoked with call() or apply() , the this value is exactly the value passed as the first argument to call() or apply(). (In non-strict mode, null and undefined values are replaced with the global object and non-object values are converted to objects.)
· In strict mode, assignments to non-writable properties and attempts to create new properties on non-extensible objects throw a TypeError. (In non-strict mode, these attempts fail silently.)
· In strict mode, code passed to eval() cannot declare variables or define functions in the caller’s scope as it can in non-strict mode. Instead, variable and function definitions live in a new scope created for the eval(). This scope is discarded when the eval() returns.
· In strict mode, the Arguments object in a function holds a static copy of the values passed to the function. In non-strict mode, the Arguments object has “magical” behavior in which elements of the array and named function parameters both refer to the same value.
· In strict mode, a SyntaxError is thrown if the delete operator is followed by an unqualified identifier such as a variable, function, or function parameter. (In non-strict mode, such a delete expression does nothing and evaluates to false.)
· In strict mode, an attempt to delete a non-configurable property throws a TypeError. (In non-strict mode, the attempt fails and the delete expression evaluates to false.)
· In strict mode, it is a syntax error for an object literal to define two or more properties by the same name. (In non-strict mode, no error occurs.)
Objects
In addition to its name and value, each property has three property attributes:
· The writable attribute specifies whether the value of the property can be set.
· The enumerable attribute specifies whether the property name is returned by a for/in loop.
· The configurable attribute specifies whether the property can be deleted and whether its attributes can be altered.
Prototypes
All objects created by object literals have the same prototype object, Object.prototype.
Objects created using the new keyword and a constructor invocation use the value of the prototype property of the constructor function as their prototype.
Object created by new Object() inherits from Object.prototype, just as the object created by {} does. Similarly, the object created by new Array() uses Array.prototype as its prototype, and the object created by new Date() uses Date.prototype as its prototype.
Almost all objects have a prototype, but only a relatively small number of objects have a prototype property. It is these objects with prototype properties that define the prototypes for all the other objects.
Most built-in constructors (and most user-defined constructors) have a prototype that inherits from Object.prototype.
Date.prototype inherits properties from Object.prototype, so a Date object created by new Date() inherits properties from both Date.prototype and Object.prototype. This linked series of prototype objects is known as a prototype chain.
Creating Objects
Objects can be created with object literals, with the new keyword, and with the Object.create() function.
Literal
let empty = {};
let point = { x: 0, y: 0 };
let book = {
"main title": "JavaScript",
"sub-title": "The Definitive Guide",
for: "all audiences",
author: {
firstname: "David", .
surname: "Flanagan"
}
};
new
let o = new Object(); let a = new Array(); let d = new Date(); let r = new Map();
Object.create
let o3 = Object.create(Object.prototype);
Use Object.create to guard against accidental modifications:
let o = { x: "don't change this value" };
library.function(Object.create(o));
Note: the library function can modify the passed in object, but not the original o object
Access Object Properties with an array ([]) notation
let addr = "";
for(let i = 0; i < 4; i++) {
addr += customer[`address${i}`] + "\n";
}
Inheritance
let o = {};
o.x = 1;
let p = Object.create(o);
p.y = 2;
let q = Object.create(p);
q.z = 3;
Property x and y available on object q
q.x + q.y
How to query for property which may be undefined
surname = book && book.author && book.author.surname;
let surname = book?.author?.surname;
Deleting properties
The delete operator only deletes own properties, not inherited ones. (To delete an inherited property, you must delete it from the prototype object in which it is defined. Doing this affects every object that inherits from that prototype.)
delete does not remove properties that have a configurable attribute of false.
Certain properties of built-in objects are non-configurable, as are properties of the global object created by variable declaration and function declaration.
delete Object.prototype
false: property is non-configurable
var x = 1;
delete globalThis.x
false: can’t delete this property
function f() {}
delete globalThis.f
false
globalThis.x = 1;
delete globalThis.x
true
Testing properties
To check whether an object has a property with a given name. You can do this with the in operator, with the hasOwnProperty() and propertyIsEnumerable() methods, or simply by querying the property
( != undefined).
in & query
let o = { x: 1 };
"x" in o
true
o.x !== undefined
"y" in o
false
o.y !== undefined
"toString" in o
true: o inherits a toString property
o.toString !== undefined
Advantage of using in: in can distinguish between properties that do not exist and properties that exist but have been set to undefined.
hasOwnProperty
let o = { x: 1 };
o.hasOwnProperty("x")
true
o.hasOwnProperty("y")
false
o.hasOwnProperty("toString")
false: toString is an inherited property
The propertyIsEnumerable() returns true only if the named property is an own property and its enumerable attribute is true.
let o = { x: 1 };
o.propertyIsEnumerable("x")
true
o.propertyIsEnumerable("toString")
false: not an own property
Object.prototype.propertyIsEnumerable("toString")
false: not enumerable
Enumerating properties
To guard against enumerating inherited properties with for/in, you can add an explicit check inside the loop body:
for(let p in o) {
if (!o.hasOwnProperty(p)) continue;
}
for(let p in o) {
if (typeof o[p] === "function") continue;
}
Functions you can use to get an array of property names
· Object.keys() returns an array of the names of the enumerable own properties of an object. It does not include non-enumerable properties, inherited properties, or properties whose name is a Symbol.
· Object.getOwnPropertyNames() works like Object.keys() but returns an array of the names of nonenumerable own properties as well.
· Object.getOwnPropertySymbols() returns own properties whose names are Symbols, whether or not they are enumerable.
· Reflect.ownKeys() returns all own property names, both enumerable and non-enumerable, and both string and Symbol.
Extending Objects
To copy the properties of one object to another object
let target = {x: 1}, source = {y: 2, z: 3};
for(let key of Object.keys(source)) {
target[key] = source[key];
}
One reason to assign properties from one object into another is when you have an object that defines default values for many properties and you want to copy those default properties into another object if a property by that name does not already exist in that object. Using Object.assign() naively will not do what you want:
Object.assign(o, defaults);
overwrites everything in o with defaults
Instead, use one of the following:,
o = Object.assign({}, defaults, o);
o = {...defaults, ...o};
Serializing Objects
The functions JSON.stringify() and JSON.parse() serialize and restore JavaScript objects.
let o = {};
o[PROPERTY_NAME] = 1;
o[computePropertyName()] = 2;
←>
let p = {
[PROPERTY_NAME]: 1,
[computePropertyName()]: 2
};
Symbols as Property Names
const extension = Symbol("my extension symbol");
let o = {
[extension]: {}
};
o[extension].x = 0;
Two Symbols created with the same string argument are still different from one another.
The point of Symbols is not security, but to define a safe extension mechanism for JavaScript objects. If you get an object from third-party code that you do not control and need to add some of your own properties to that object but want to be sure that your properties will not conflict with any properties that may already exist on the object, you can safely use Symbols as your property names.
Spread Operator
You can copy the properties of an existing object into a new object using the “spread operator” … inside an object literal:
let position = { x: 0, y: 0 }; let dimensions = { width: 100, height: 75 }; let rect = { ...position, ...dimensions }; rect.x + rect.y + rect.width + rect.height
When you write a method using this shorthand syntax, the property name can take any of the forms that are legal in an object literal: in addition to a regular JavaScript identifier like the name area above, you can also use string literals and computed property names, which can include Symbol property names:
const METHOD_NAME = "m";
const symbol = Symbol();
let weirdMethods = {
"method With Spaces"(x) { return x + 1; },
[METHOD_NAME](x) { return x + 2; },
[symbol](x) { return x + 3; }
};
weirdMethods["method With Spaces"](1)
2
weirdMethods[METHOD_NAME](1)
3
weirdMethods[symbol](1)
4
Property Getters and Setters
let o = {
dataProp: value,
get accessorProp() { return this.dataProp; },
set accessorProp(value) { this.dataProp = value; }
};
Arrays
Creating Arrays
· Array literals
· The … spread operator on an iterable object
· The Array() constructor
· The Array.of() and Array.from() factory methods
Array literals
let empty = [];
let primes = [2, 3, 5, 7, 11];
let misc = [ 1.1, true, "a", ];
let b = [[1, {x: 1, y: 2}], [2, {x: 3, y: 4}]];
If an array literal contains multiple commas in a row, with no value between, the array is sparse
let count = [1,,3];
let undefs = [,,];
Array literal syntax allows an optional trailing comma, so [,,] has a length of 2, not 3.
The Spread Operator
let a = [1, 2, 3];
let b = [0, ...a, 4];
[0, 1, 2, 3, 4]
create a copy of an array — modifying the copy does not change the original
When the Array() constructor function is invoked with one numeric argument, it uses that argument as an array length. But when invoked with more than one numeric argument, it treats those arguments as elements for the array to be created. This means that the Array() constructor cannot be used to create an array with a single numeric element.
Array.of()
[]
Array.of(10)
[10]
Array.of(1,2,3)
[1, 2, 3]
Array.from()
It is also a simple way to make a copy of an array:
let copy = Array.from(original);
Array.from() is also important because it defines a way to make a true-array copy of an array-like object. Array-like objects are non-array objects that have a numeric length property and have values stored with properties whose names happen to be integers.
let truearray = Array.from(arraylike);
Array.from() also accepts an optional second argument. If you pass a function as the second argument, then as the new array is being built, each element from the source object will be passed to the function you specify, and the return value of the function will be stored in the array instead of the original value.
Reading and Writing Array Elements
What is special about arrays is that when you use property names that are non-negative integers , the array automatically maintains the value of the length property for you.
JavaScript converts the numeric array index you specify to a string — the index 1 becomes the string “1”, then uses that string as a property name.
It is helpful to clearly distinguish an array index from an object property name. All indexes are property names, but only property names that are integers between 0 and 231 are indexes. All arrays are objects, and you can create properties of any name on them. If you use properties that are array indexes, however, arrays have the special behavior of updating their length property as needed.
Note that you can index an array using numbers that are negative or that are not integers. When you do this, the number is converted to a string, and that string is used as the property name. Since the name is not a non-negative integer, it is treated as a regular object property, not an array index.
a[-1.23] = true;
This creates a property named “-1.23”
a["1000"] = 0;
This the 1001st element of the array
a[1.000] = 1;
Array index 1. Same as a[1] = 1;
The fact that array indexes are simply a special type of object property name means that JavaScript arrays have no notion of an “out of bounds” error. When you try to query a nonexistent property of any object, you don’t get an error; you simply get undefined.
Sparse Arrays
Sparse arrays can be created with the Array() constructor or simply by assigning to an array index larger than the current array length.
a[1000] = 0;
Assignment adds one element but sets length to 1001.
you can also make an array sparse with the delete operator.
Note that when you omit a value in an array literal (using repeated commas as in [1,,3]), the resulting array is sparse, and the omitted elements simply do not exist
Array Length
if you set the length property to a nonnegative integer n smaller than its current value, any array elements whose index is greater than or equal to n are deleted from the array.
a = [1,2,3,4,5];
a.length = 3;
a is now [1,2,3].
a.length = 0;
Delete all elements. a is [].
a.length = 5;
Length is 5, but no elements, like new Array(5)
You can also set the length property of an array to a value larger than its current value. Doing this does not actually add any new elements to the array; it simply creates a sparse area at the end of the array.
Adding and Deleting Array Elements
let a = [];
a[0] = "zero";
a[1] = "one";
add elements to it.
You can also use the push() method to add one or more values to the end of an array.
You can use the unshift() method to insert a value at the beginning of an array, shifting the existing array elements to higher indexes.
The pop() method is the opposite of push(): it removes the last element of the array and returns it, reducing the length of an array by 1.
Similarly, the shift() method removes and returns the first element of the array, reducing the length by 1 and shifting all elements down to an index one lower than their current index.
You can delete array elements with the delete operator
let a = [1,2,3];
delete a[2];
a now has no element at index 2
2 in a
false
a.length
3: delete does not affect array length
Iterating Arrays
The easiest way to loop through each of the elements of an array (or any iterable object) is with the for/ofloop
let letters = [..."Hello world"];
let string = "";
for(let letter of letters) {
string += letter;
}
It has no special behavior for sparse arrays and simply returns undefined for any array elements that do not exist.
If you want to use a for/of loop for an array and need to know the index of each array element, use the entries() method of the array
let letters = [..."Hello world"];
let everyother = "";
for(let [index, letter] of letters.entries()) {
if (index % 2 === 0) everyother += letter;
}
Another good way to iterate arrays is with forEach(). This is not a new form of the for loop, but an array method that offers a functional approach to array iteration.
let letters = [..."Hello world"];
let uppercase = "";
letters.forEach(letter => {
uppercase += letter.toUpperCase();
});
You can also loop through the elements of an array with a for loop.
for(let i = 0, len = letters.length; i < len; i++) {
// loop body
}
Multidimensional Arrays
Create a multidimensional array
let table = new Array(10);
for(let i = 0; i < table.length; i++) {
table[i] = new Array(10);
}
for(let row = 0; row < table.length; row++) {
for(let col = 0; col < table[row].length; col++) {
table[row][col] = row * col;
}
}
Array Methods
Array Iterator Methods
First, all of these methods accept a function as their first argument and invoke that function once for each element (or some elements) of the array. If the array is sparse, the function you pass is not invoked for nonexistent elements. In most cases, the function you supply is invoked with three arguments: the value of the array element, the index of the array element, and the array itself.
FOREACH()
let data = [1,2,3,4,5], sum = 0;
data.forEach(value => { sum += value; });
data.forEach(function(v, i, a) {
a[i] = v + 1;
});
15
[2,3,4,5,6]
MAP()
let a = [1, 2, 3]; a.map(x => x*x)
[1, 4, 9]
FILTER()
let a = [5, 4, 3, 2, 1]; a.filter(x => x < 3) a.filter((x,i) => i % 2 === 0)
[2, 1];
[5, 3, 1];
FIND()
FINDINDEX()
let a = [1,2,3,4,5];
a.findIndex(x => x === 3)
a.find(x => x % 5 === 0)
a.find(x => x % 7 === 0)
2
5
undefined
EVERY()
SOME()
let a = [1,2,3,4,5];
a.every(x => x < 10)
a.some(x => x % 2 === 0)
a.some(isNaN)
true
true
false
REDUCE()
ReduceRight()
let a = [1,2,3,4,5];
a.reduce((x,y) => x+y, 0)
a.reduce((x,y) => x*y, 1)
a.reduce((x,y) => (x > y) ? x : y)
15
120
5
Note that map() returns a new array: it does not modify the array it is invoked on. If that array is sparse, your function will not be called for the missing elements, but the returned array will be sparse in the same way as the original array: it will have the same length and the same missing elements.
To close the gaps in a sparse array, you can do this:
let dense = sparse.filter(() => true);
And to close gaps and remove undefined and null elements, you can use filter, like this:
a = a.filter(x => x !== undefined && x !== null);
Unlike filter(), however, find() and findIndex() stop iterating the first time the predicate finds an element. When that happens, find() returns the matching element, and findIndex() returns the index of the matching element. If no matching element is found, find() returns undefined and findIndex()returns -1.
When you invoke reduce() with no initial value, it uses the first element of the array as the initial value.
reduceRight() works just like reduce(), except that it processes the array from highest index to lowest (right-to-left), rather than from lowest to highest. You might want to do this if the reduction operation has right-to-left associativity
Flattening arrays with flat() and flatMap()
[1, [2, 3]].flat()
[1, 2, 3]
[1, [2, [3]]].flat()
[1, 2, [3]]
let a = [1, [2, [3, [4]]]];
a.flat(1)
a.flat(2)
a.flat(3)
a.flat(4)
[1, 2, [3, [4]]]
[1, 2, 3, [4]]
[1, 2, 3, 4]
[1, 2, 3, 4]
let phrases = ["hello world", "the definitive guide"]; let words = phrases.flatMap(phrase => phrase.split(" "));
[“hello”, “world”, “the”, “definitive”, “guide”];
Calling a.flatMap(f) is the same as (but more efficient than) a.map(f).flat():
Adding arrays with concat()
let a = [1,2,3];
a.concat(4, 5)
[1,2,3,4,5]
a.concat([4,5],[6,7])
[1,2,3,4,5,6,7]
Stacks and Queues with push(), pop(), shift(), and unshift()
The push() and pop() methods allow you to work with arrays as if they were stacks. The push() method appends one or more new elements to the end of an array and returns the new length of the array.
The unshift() and shift() methods behave much like push() and pop(), except that they insert and remove elements from the beginning of an array rather than from the end.
You can implement a queue data structure by using push() to add elements at the end of an array and shift() to remove them from the start of the array. Note differences in unshift with single and multiple values.
let a = [];
a.unshift(1)
[1]
a.unshift(2)
[2, 1]
a = [];
a.unshift(1,2)
[1, 2]
Subarrays with slice(), splice(), fill(), and copyWithin()
SLICE()
let a = [1,2,3,4,5];
a.slice(0,3);
a.slice(3);
a.slice(1,-1);
a.slice(-3,-2);
[1,2,3]
[4,5]
[2,3,4]
[3]
SPLICE
let a = [1,2,3,4,5,6,7,8];
a.splice(4)
a.splice(1,2)
a.splice(1,1)
let a = [1,2,3,4,5];
a.splice(2,0,"a","b")
a.splice(2,2,[1,2],3)
[5,6,7,8]; a is now [1,2,3,4]
[2,3]; a is now [1,4]
[4]; a is now [1]
[]; a is now [1,2,”a”,”b”,3,4,5]
[“a”,”b”]; a is now [1,2,[1,2],3,3,4,5]
FILL()
let a = new Array(5);
a.fill(0)
a.fill(9, 1)
a.fill(8, 2, -1)
[0,0,0,0,0]
[0,9,9,9,9]
[0,9,8,8,9]
COPYWITHIN()
let a = [1,2,3,4,5];
a.copyWithin(1)
a.copyWithin(2, 3, 5)
a.copyWithin(0, -2)
[1,1,2,3,4]
[1,1,3,4,4]
[4,4,3,4,4]
splice() is a general-purpose method for inserting or removing elements from an array. splice() can delete elements from an array, insert new elements into an array, or perform both operations at the same time.
The first argument to splice() specifies the array position at which the insertion and/or deletion is to begin. The second argument specifies the number of elements that should be deleted from (spliced out of) the array.
Unlike concat(), splice() inserts arrays themselves, not the elements of those arrays.
copyWithin() copies a slice of an array to a new position within the array. It modifies the array in place and returns the modified array, but it will not change the length of the array.
Array Searching and Sorting Methods
INDEXOF()
LASTINDEXOF()
let a = [0,1,2,1,0];
a.indexOf(1)
a.lastIndexOf(1)
a.indexOf(3)
1
3
-1
SORT()
let a = [33, 4, 1111, 222];
a.sort();
a.sort((a,b) => a - b);
Case-insensitive sort
let a = ["ant", "Bug", "cat", "Dog"];
a.sort(); // a == ["Bug","Dog","ant","cat"];
a.sort(function(s,t) {
let a = s.toLowerCase();
let b = t.toLowerCase();
if (a < b) return -1;
if (a > b) return 1;
return 0;
});
[1111, 222, 33, 4];
[4, 33, 222, 1111]
REVERSE()
let a = [1,2,3]; a.reverse();
[3,2,1]
indexOf() and lastIndexOf() compare their argument to the array elements using the equivalent of the === operator. If your array contains objects instead of primitive values, these methods check to see if two references both refer to exactly the same object. If you want to actually look at the content of an object, try using the find() method with your own custom predicate function instead.
indexOf() and lastIndexOf() take an optional second argument that specifies the array index at which to begin the search. Negative values are allowed for the second argument and are treated as an offset from the end of the array.
indexOf() will not detect the NaN value in an array, but includes() will
When sort() is called with no arguments, it sorts the array elements in alphabetical order. To sort an array into some order other than alphabetical, you must pass a comparison function as an argument to sort().
Array to String Conversions
The join() method converts all the elements of an array to strings and concatenates them, returning the resulting string.
let a = [1, 2, 3];
a.join()
a.join(" ")
a.join("")
“1,2,3”
“1 2 3”
“123”
let b = new Array(10);
b.join("-")
“ — — — — -”
Arrays, like all JavaScript objects, have a toString() method. For an array, this method works just like the join() method with no arguments:
[1,2,3].toString()
“1,2,3”
["a", "b", "c"].toString()
“a,b,c”
[1, [2,"c"]].toString()
“1,2,c”
Static Array Functions
Array.isArray([])
true
Array.isArray({})
false
Array-Like Objects
It is often perfectly reasonable to treat any object with a numeric length property and corresponding non-negative integer properties as a kind of array.
let a = {};
let i = 0;
while(i < 10) {
a[i] = i * i;
i++;
}
a.length = i;
// Now iterate through it as if it were a real array
let total = 0;
for(let j = 0; j < a.length; j++) {
total += a[j];
}
Since array-like objects do not inherit from Array.prototype, you cannot invoke array methods on them directly. You can invoke them indirectly using the Function.call method.
let a = {"0": "a", "1": "b", "2": "c", length: 3};
// An array-like object
Array.prototype.join.call(a, "+")
“a+b+c”
Array.prototype.join.call("JavaScript", " ")
“J a v a S c r i p t”
Array.prototype.map.call(a, x => x.toUpperCase())
[“A”,”B”,”C”]
Array.from(a)
[“a”,”b”,”c”]
Strings as Arrays
let s = "test";
s.charAt(0)
t
s[1]
e
Functions
In addition to the arguments, each invocation has another value — the invocation context — that is the value of the this keyword.
Function Declarations
function printprops(o) {
for(let p in o) {
console.log(`${p}: ${o[p]}\n`);
}
}
Function declaration statements are “hoisted” to the top of the enclosing script, function, or block so that functions defined in this way may be invoked from code that appears before the definition.
Function Expressions
const square = function(x) { return x*x; };
const f = function fact(x) {
if (x <= 1) return 1;
return x * fact(x-1);
}
Function expressions can include names, which is useful for recursion
[3,2,1].sort(function(a,b) { return a - b; });
Function expressions can also be used as arguments to other functions
let tensquared = (function(x) {return x*x;}(10));
Function expressions are sometimes defined and immediately invoked
Arrow Functions
const sum = (x, y) => { return x + y; };
const sum = (x, y) => x + y;
no need for return
const polynomial = x => x*x + 2*x + 3;
omit parens with single parameter
const constantFunc = () => 42;
usage for no params
If the body of your arrow function is a single return statement but the expression to be returned is an object literal, then you have to put the object literal inside parentheses to avoid syntactic ambiguity between the curly braces of a function body and the curly braces of an object literal
const f = x => { return { value: x }; };
good
const g = x => ({ value: x });
good
const h = x => { value: x };
returns nothing
const i = x => { v: x, w: x };
syntax error
Arrow functions differ from functions defined in other ways in one critical way: they inherit the value of the this keyword from the environment in which they are defined rather than defining their own invocation context as functions defined in other ways do.
Nested Functions
function hypotenuse(a, b) {
function square(x) { return x*x; }
return Math.sqrt(square(a) + square(b));
}
Invoking Functions
For function invocation in non-strict mode, the invocation context (the this value) is the global object. In strict mode, however, the invocation context is undefined.
const strict = (function() { return !this; }())
Determine if we’re in strict mode
Constructor Invocation
A constructor invocation creates a new, empty object that inherits from the object specified by the prototypeproperty of the constructor.
Indirect invocation
JavaScript functions are objects, and like all JavaScript objects, they have methods. Two of these methods, call() and apply(), invoke the function indirectly. Both methods allow you to explicitly specify the this value for the invocation, which means you can invoke any function as a method of any object, even if it is not actually a method of that object.
Function Arguments and Parameters
Optional Parameters and Defaults
When a function is invoked with fewer arguments than declared parameters, the additional parameters are set to their default value, which is normally undefined.
function getPropertyNames(o, a) {
a = a || [];
for(let property in o) a.push(property);
return a;
}
function getPropertyNames(o, a = []) {
for(let property in o) a.push(property);
return a;
}
One interesting case is that, for functions with multiple parameters, you can use the value of a previous parameter to define the default value of the parameters that follow it
Rest Parameters and Variable-Length Argument Lists
Rest parameters enable us to write functions that can be invoked with arbitrarily more arguments than parameters.
function max(first=-Infinity, ...rest) {
let maxValue = first;
for(let n of rest) {
if (n > maxValue) {
maxValue = n;
}
}
return maxValue;
}
max(1, 10, 100, 2, 3, 1000, 4, 5, 6)
1000
within the body of a function, the value of a rest parameter will always be an array. The array may be empty, but a rest parameter will never be undefined.
This type of function is called variadic functions, variable arity functions, or vararg functions.
The Arguments Object
Within the body of any function, the identifier arguments refers to the Arguments object for that invocation.
function max(x) {
let maxValue = -Infinity;
for(let i = 0; i < arguments.length; i++) {
if (arguments[i] > maxValue)
maxValue = arguments[i];
}
return maxValue;
}
max(1, 10, 100, 2, 3, 1000, 4, 5, 6)
1000
you should avoid using it in any new code you write.
function timed(f) {
return function(...args) {
console.log(`Entering function ${f.name}`);
let startTime = Date.now();
try {
return f(...args);
}
finally {
console.log(`Exiting ${f.name} after ${Date.now() - startTime}ms`);
}
};
}
// Compute the sum of the numbers between 1 and n by brute force
function benchmark(n) {
let sum = 0;
for(let i = 1; i <= n; i++) sum += i;
return sum;
}
// Now invoke the timed version of that test function
timed(benchmark)(1000000)
function sum(a) {
let total = 0;
for(let element of a) {
if (typeof element !== "number") {
throw new TypeError("sum(): elements must be numbers");
}
total += element;
}
return total;
}
sum([1,2,3])
6
sum(1, 2, 3);
TypeError: 1 is not iterable
sum([1,2,"3"]);
TypeError: element 2 is not a number
Functions as Values
function square(x) { return x * x; }
let s = square;
square(4)
16
s(4)
16
Functions can also be assigned to object properties rather than variables.
let o = {square: function(x) { return x*x; }};
let y = o.square(16);
256
Functions don’t even require names at all, as when they’re assigned to array elements:
let a = [x => x*x, 20];
a[0](a[1])
400
a[0] accesses first element of the array, which is "x => x*x", (a[1]) passes parameter, which is 20.
Examples of using functions as data
function add(x,y) { return x + y; }
function subtract(x,y) { return x - y; }
function multiply(x,y) { return x * y; }
function divide(x,y) { return x / y; }
function operate(operator, operand1, operand2) {
return operator(operand1, operand2);
}
let i = operate(add, operate(add, 2, 3), operate(multiply, 4,5));
When a function needs a “static” variable whose value persists across invocations, it is often convenient to use a property of the function itself.
For example, suppose you want to write a function that returns a unique integer whenever it is invoked. The function must never return the same value twice. In order to manage this, the function needs to keep track of the values it has already returned, and this information must persist across function invocations.
uniqueInteger.counter = 0;
function uniqueInteger() {
return uniqueInteger.counter++;
}
uniqueInteger()
0
uniqueInteger()
1
Compute factorials and cache results as properties of the function itself.
function factorial(n) {
if (Number.isInteger(n) && n > 0) {
if (!(n in factorial)) {
factorial[n] = n * factorial(n-1);
}
return factorial[n];
}
else {
return NaN;
}
}
factorial[1] = 1;
Initialize the cache to hold this base case.
factorial(6)
720
factorial[5]
120; the call above caches this value
Functions as Namespaces
Variables declared within a function are not visible outside of the function. For this reason, it is sometimes useful to define a function simply to act as a temporary namespace in which you can define variables without cluttering the global namespace.
Variables that would have been global become local to the function. Following code defines only a single global variable: the function name chunkNamespace.
function chunkNamespace() {
// Chunk of code goes here
// Any variables defined in the chunk are local to this function
// instead of cluttering up the global namespace.
}
chunkNamespace();
If defining even a single property is too much, you can define and invoke an anonymous function in a single expression — IIEF (immediately invoked function expression)
(function() {
// chunkNamespace() function rewritten as an unnamed expression.
// Chunk of code goes here
}());
Closures
JavaScript uses lexical scoping. This means that functions are executed using the variable scope that was in effect when they were defined, not the variable scope that is in effect when they are invoked.
In order to implement lexical scoping, the internal state of a JavaScript function object must include not only the code of the function but also a reference to the scope in which the function definition appears.
This combination of a function object and a scope (a set of variable bindings) in which the function’s variables are resolved is called a closure.
Closures become interesting when they are invoked from a different scope than the one they were defined in. This happens most commonly when a nested function object is returned from the function within which it was defined.
let scope = "global scope";
function checkscope() {
let scope = "local scope";
function f() { return scope; }
return f();
}
checkscope()
“local scope”
let scope = "global scope";
function checkscope() {
let scope = "local scope";
function f() { return scope; }
return f;
}
let s = checkscope()();
“local scope”
Closures capture the local variables of a single function invocation and can use those variables as private state.
let uniqueInteger = (function() {
let counter = 0;
return function() { return counter++; };
}());
uniqueInteger()
0
uniqueInteger()
1
it is the return value of the function that is being assigned to uniqueInteger.
Private variables like counter need not be exclusive to a single closure: it is perfectly possible for two or more nested functions to be defined within the same outer function and share the same scope.
function counter() {
let n = 0;
return {
count: function() { return n++; },
reset: function() { n = 0; }
};
}
let c = counter(), d = counter();
c.count()
0
d.count()
0
c.reset();
c.count()
0
d.count()
1
You can combine this closure technique with property getters and setters
function counter(n) {
return {
get count() { return n++; },
set count(m) {
if (m > n) n = m;
else throw Error("count can only be set to a larger value")
}
};
}
let c = counter(1000);
c.count
1000
c.count
1001
c.count = 2000;
c.count
2000
c.count = 2000;
Error: count can only be set to a larger value
Define a private variable and two nested functions to get and set the value of that variable.
function addPrivateProperty(o, name, predicate) {
let value;
o[`get${name}`] = function() { return value; };
o[`set${name}`] = function(v) {
if (predicate && !predicate(v)) {
throw new TypeError(`set${name}: invalid value ${v}`);
}
else {
value = v;
}
};
}
let o = {};
addPrivateProperty(o, "Name", x => typeof x === "string");
o.setName("Frank");
o.getName()
“Frank”
o.setName(0);
TypeError: try to set a value ofthe wrong type
Function Properties, Methods, and Constructor
Since functions are objects, they can have properties and methods, just like any other object.
The length Property
The read-only length property of a function specifies the arity of the function — the number of parameters it declares in its parameter list, which is usually the number of arguments that the function expects.
The name Property
This property is primarily useful when writing debugging or error messages.
The prototype Property
When a function is used as a constructor, the newly created object inherits properties from the prototype object.
The call() and apply() Methods
call() and apply() allow you to indirectly invoke a function as if it were a method of some other object. The first argument to both call() and apply() is the object on which the function is to be invoked; this argument is the invocation context and becomes the value of the this keyword within the body of the function.
To invoke the function f() as a method of the object o (passing no arguments),
f.call(o);
f.apply(o);
To pass two numbers to the function f() and invoke it as if it were a method of the object o,
f.call(o, 1, 2);
The apply() method is like the call() method, except that the arguments to be passed to the function are specified as an array:
f.apply(o, [1,2]);
The trace() function defined uses the apply() method instead of a spread operator, and by doing that, it is able to invoke the wrapped method with the same arguments and the same this value as the wrapper method
function trace(o, m) {
let original = o[m];
o[m] = function(...args) {
console.log(new Date(), "Entering:", m);
let result = original.apply(this, args);
console.log(new Date(), "Exiting:", m);
return result;
};
}
The bind() Method
The primary purpose of bind() is to bind a function to an object.
function f(y) { return this.x + y; }
let o = { x: 1 };
let g = f.bind(o);
g(2)
3
let p = { x: 10, g };
p.g(2)
3 // g is still bound to o, not p.
The most common use case for calling bind() is to make non-arrow functions behave like arrow functions.
Partial application is a common technique in functional programming and is sometimes called currying.
let sum = (x,y) => x + y;
let succ = sum.bind(null, 1);
succ(2)
3
The toString() Method
Most (but not all) implementations of this toString() method return the complete source code for the function
The Function() Constructor
The Function() constructor is best thought of as a globally scoped version of eval() that defines new variables and functions in its own private scope. You will probably never need to use this constructor in your code.
Higher-Order Functions
A higher-order function is a function that operates on functions, taking one or more functions as arguments and returning a new function.
function not(f) {
return function(...args) {
let result = f.apply(this, args);
return !result;
};
}
const even = x => x % 2 === 0;
A function to determine if a number is even
const odd = not(even);
[1,1,3,5,5].every(odd)
true
Returns a new function that maps one array to another
const map = function(a, ...args) { return a.map(...args); };
function mapper(f) {
return a => map(a, f);
}
const increment = x => x + 1;
const incrementAll = mapper(increment);
incrementAll([1,2,3]
[2,3,4]
Example that takes two functions, f and g, and returns a new function that computes f(g()):
We defined a factorial function that cached its previously computed results. In functional programming, this kind of caching is called memoization.
Classes
JavaScript’s classes and prototype-based inheritance mechanism are substantially different from the classes and class-based inheritance mechanism of Java.
Classes and Prototypes
If we define a prototype object and then use Object.create() to create objects that inherit from it, we have defined a JavaScript class.
Factory function that returns a new range object:
function range(from, to) {
let r = Object.create(range.methods);
r.from = from;
r.to = to;
return r;
}
range.methods = {
includes(x) { return this.from <= x && x <= this.to; },
*[Symbol.iterator]() {
for(let x = Math.ceil(this.from); x <= this.to; x++)
yield x;
},
toString() { return "(" + this.from + "..." + this.to +")"; }
};
let r = range(1,3);
r.includes(2)
true
r.toString()
“(1…3)”
[...r]
[1, 2, 3]
Classes and Constructors
A constructor is a function designed for the initialization of newly created objects.
The critical feature of constructor invocations is that the prototype property of the constructor is used as the prototype of the new object.
While almost all objects have a prototype, only a few objects have a prototype property. It is function objects that have a prototype property.
This means that all objects created with the same constructor function inherit from the same object and are therefore members of the same class.
Because the Range() constructor is invoked with new, it does not have to call Object.create() or take any action to create a new object.
In the first example, the prototype was range.methods. This was a convenient and descriptive name, but arbitrary. In the second example, the prototype is Range.prototype, and this name is mandatory.
An invocation of the Range() constructor automatically uses Range.prototype as the prototype of the new Range object.
Constructors, Class Identity, and instanceof
Two objects are instances of the same class if and only if they inherit from the same prototype object.
The instanceof operator is not checking whether r was actually initialized by the Range constructor. Instead, it is checking whether r inherits from Range.prototype.
function Strange() {}
Strange.prototype = Range.prototype;
new Strange() instanceof Range
true
If you want to test the prototype chain of an object for a specific prototype and do not want to use the constructor function as an intermediary, you can use the isPrototypeOf() method
range.methods.isPrototypeOf(r);
The constructor Property
Every regular JavaScript function automatically has a prototype property. The value of this property is an object that has a single, non-enumerable constructor property.
The value of the constructor property is the function object
let F = function() {};
let p = F.prototype;
let c = p.constructor;
c === F
true
let o = new F();
o.constructor === F
true
Instances of the Range class, as defined, do not have a constructor property. We can remedy this problem by explicitly adding a constructor to the prototype:
Range.prototype = {
constructor: Range
};
Another common technique that you are likely to see in older JavaScript code is to use the predefined prototype object with its constructor property and add methods to it one at a time with code like this:
class Range {
constructor(from, to) {
this.from = from;
this.to = to;
}
includes(x) { return this.from <= x && x <= this.to; }
*[Symbol.iterator]() {
for(let x = Math.ceil(this.from); x <= this.to; x++)
yield x;
}
toString() { return `(${this.from}...${this.to})`; }
}
let r = new Range(1,3);
r.includes(2)
true
r.toString()
(1…3)
[...r]
[1, 2, 3]
Although class bodies are superficially similar to object literals, they are not the same thing. In particular, they do not support the definition of properties with name/value pairs.
If your class does not need to do any initialization, you can omit the constructor keyword and its body, and an empty constructor function will be implicitly created for you.
If you want to define a class that subclasses — or inherits from — another class, you can use the extends keyword with the class keyword:
class Span extends Range {
constructor(start, length) {
if (length >= 0) {
super(start, start + length);
}
else {
super(start + length, start);
}
}
}
class declarations have both statement and expression forms
let Square = class { constructor(x) { this.area = x * x; } };
new Square(3).area
9
Static methods
You can define a static method within a class body by prefixing the method declaration with the static keyword. Static methods are defined as properties of the constructor function rather than properties of the prototype object.
static parse(s) {
let matches = s.match(/^\((\d+)\.\.\.(\d+)\)$/);
if (!matches) {
throw new TypeError(`Cannot parse Range from "${s}".`)
}
return new Range(parseInt(matches[1]),
parseInt(matches[2]));
}
The method defined by this code is Range.parse(), not Range.prototype.parse(), and you must invoke it through the constructor, not through an instance:
let r = Range.parse('(1...10)');
Getters, Setters, and other Method Forms
Within a class body, you can define getter and setter methods just as you can in object literals. The only difference is that in class bodies, you don’t put a comma after the getter or setter.
Public, Private, and Static Fields
The ES6 standard only allows the creation of methods (including getters, setters, and generators) and static methods; it does not include syntax for defining fields.
If you want to define a field on a class instance, you must do that in the constructor function or in one of the methods. And if you want to define a static field for a class, you must do that outside the class body, after the class has been defined.
Standardization is underway, however, for extended class syntax that allows the definition of instance and static fields, in both public and private forms.
class Buffer {
constructor() {
this.size = 0;
this.capacity = 4096;
this.buffer = new Uint8Array(this.capacity);
}
}
←>
class Buffer {
size = 0;
capacity = 4096;
buffer = new Uint8Array(this.capacity);
}
The same proposal that seeks to standardize these instance fields also defines private (with the # prefix) instance fields.
class Buffer {
#size = 0;
get size() { return this.#size; }
}
A related proposal seeks to standardize the use of the static keyword for fields.
static integerRangePattern = /^\((\d+)\.\.\.(\d+)\)$/;
static parse(s) {
let matches = s.match(Range.integerRangePattern);
if (!matches) {
throw new TypeError(`Cannot parse Range from "${s}".`)
}
return new Range(parseInt(matches[1]), matches[2]);
}
Adding Methods to Existing Classes
We can augment JavaScript classes simply by adding new methods to their prototype objects.
if (!String.prototype.startsWith) {
String.prototype.startsWith = function(s) {
return this.indexOf(s) === 0;
};
}
Number.prototype.times = function(f, context) {
let n = this.valueOf();
for(let i = 0; i < n; i++) f.call(context, i);
};
Subclasses
Subclasses and Prototypes
Span subclass of the Range class. This subclass will work just like a Range, but instead of initializing it with a start and an end, we’ll instead specify a start and a distance, or span.
A robust subclassing mechanism needs to allow classes to invoke the methods and constructor of their superclass, but prior to ES6, JavaScript did not have a simple way to do these things.
Subclasses with extends and super
class EZArray extends Array {
get first() { return this[0]; }
get last() { return this[this.length-1]; }
}
let a = new EZArray();
a instanceof EZArray
true
a instanceof Array
true
a.push(1,2,3,4);
a.pop()
4
a.first
1
a.last
3
Array.isArray(a)
true
EZArray.isArray(a)
true
Array.prototype.isPrototypeOf(EZArray.prototype
true
Array.isPrototypeOf(EZArray)
true
Example demonstrates the use of the super keyword to invoke the constructor and methods of the superclass
class TypedMap extends Map {
constructor(keyType, valueType, entries) {
if (entries) {
for(let [k, v] of entries) {
if (typeof k !== keyType || typeof v !== valueType) {
throw new TypeError(`Wrong type for entry [${k}, ${v}]`);
}
}
}
super(entries);
this.keyType = keyType;
this.valueType = valueType;
}
set(key, value) {
if (this.keyType && typeof key !== this.keyType) {
throw new TypeError(`${key} is not of type${this.keyType}`);
}
if (this.valueType && typeof value !== this.valueType)
{
throw new TypeError(`${value} is not of type ${this.valueType}`);
}
return super.set(key, value);
}
}
You may not use the this keyword in your constructor until after you have invoked the superclass constructor with super(). This enforces a rule that superclasses get to initialize themselves before subclasses do.
Once private fields are supported, we could change these properties to #keyType and #valueType so that they could not be altered from the outside.
Class Hierarchies and Abstract Classes
Define abstract classes — classes that do not include a complete implementation — to serve as a common superclass for a group of related subclasses.
Modules
Automating Closure-Based Modularity
Imagine a tool that takes a set of files, wraps the content of each of those files within an immediately invoked function expression, keeps track of the return value of each function, and concatenates everything into one big file.
writing code like the following to make use of those modules
const stats = require("stats.js");
const BitSet = require("sets.js").BitSet;
// Now write code using those modules
let s = new BitSet(100);
s.insert(10);
s.insert(20);
s.insert(30);
let average = stats.mean([...s]);
Modules in ES6
ES6 adds import and export keywords to JavaScript and finally supports real modularity as a core language feature.
ES6 modularity is conceptually the same as Node modularity: each file is its own module, and constants, variables, functions, and classes defined within a file are private to that module unless they are explicitly exported.
ES6 Exports
To export a constant, variable, function, or class from an ES6 module, simply add the keyword export before the declaration
export const PI = Math.PI;
export function degreesToRadians(d) { return d * PI / 180; }
export class Circle {
constructor(r) { this.r = r; }
area() { return PI * this.r * this.r; }
}
or:
export { Circle, degreesToRadians, PI };
It is common to write modules that export only one value (typically a function or class), and in this case, we usually use export default instead of export
export default class BitSet {
// implementation omitted
}
ES6 Imports
import BitSet from './bitset.js';
import { mean, stddev } from "./stats.js";
When importing from a module that defines many exports, however, you can easily import everything with an import statement like this:
import * as stats from "./stats.js";
With the wildcard import shown in the previous example, the importing module would use the imported mean() and stddev() functions through the stats object, invoking them as stats.mean() and stats.stddev().
Note: not finished.
The JavaScript Standard Library
The Set Class
Sets are not ordered or indexed, and they do not allow duplicates.
let s = new Set();
let t = new Set([1, s]);
let t = new Set(s);
let unique = new Set("Mississippi");
The argument to the Set() constructor need not be an array: any iterable object (including other Set objects) is allowed.
The add() method takes a single argument; if you pass an array, it adds the array itself to the set, not the individual array elements. add() always returns the set it is invoked on, however, so if you want to add multiple values to a set, you can used chained method calls like.
it is very important to understand that set membership is based on strict equality checks, like the === operator performs.
The most important thing we do with sets is not to add and remove elements from them, but to check to see whether a specified value is a member of the set:
let oneDigitPrimes = new Set([2,3,5,7]);
oneDigitPrimes.has(2)
The Set class is iterable, which means that you can use a for/of loop to enumerate all of the elements of a set:
let sum = 0;
for(let p of oneDigitPrimes) {
sum += p; // and add them up
}
Because Set objects are iterable, you can convert them to arrays and argument lists with the … spread operator
[...oneDigitPrimes]
JavaScript Set class always remembers the order that elements were inserted in, and it always uses this order when you iterate a set: the first element inserted will be the first one iterated (assuming you haven’t deleted it first), and the most recently inserted element will be the last one iterated.
let m = new Map();
let n = new Map([["one", 1],["two", 2]]);
let copy = new Map(n);
let o = { x: 1, y: 2};
let p = new Map(Object.entries(o));
map is a set of keys, each of which has an associated value. This is not quite the same as a set of key/value pairs.
use has() to check whether a map includes the specified key; use delete() to remove a key (and its associated value) from the map; use clear() to remove all key/value pairs from the map; and use the size property to find out how many keys a map contains.
set() method of Map can be chained.
Any JavaScript value can be used as a key or a value in a Map. This includes null, undefined, and NaN, as well as reference types like objects and arrays.
Map compares keys by identity, not by equality.
let m = new Map();
m.set({}, 1);
m.set({}, 2);
Map a different empty object to the number 2.
m.get({})
undefined:
m.set(m, undefined);
m.has(m)
true
m.get(m)
undefined
Iterate over map:
let m = new Map([["x", 1], ["y", 2]]);
[...m]
[[“x”, 1], [“y”, 2]]
for(let [key, value] of m) {...}
Map class iterates in insertion order
If you want to iterate just the keys or just the associated values of a map, use the keys() and values() methods: these return iterable objects that iterate keys and values, in insertion order. (The entries() method returns an iterable object that iterates key/value pairs, but this is exactly the same as iterating the map directly.)
[...m.keys()]
[...m.values()]
[...m.entries()]
Map objects can also be iterated using the forEach()
m.forEach((value, key) => {...}
Note that the value parameter comes before the key parameter.
WeakMap and WeakSet
The WeakMap class is a variant (but not an actual subclass) of the Map class that does not prevent its key values from being garbage collected.
WeakMap keys must be objects or arrays; primitive values are not subject to garbage collection and cannot be used as keys.
WeakMap implements only the get(), set(), has(), and delete() methods. In particular, WeakMap is not iterable and does not define keys(), values(), or forEach(). If WeakMap was iterable, then its keys would be reachable and it wouldn’t be weak.
Similarly, WeakMap does not implement the size property because the size of a WeakMap could change at any time as objects are garbage collected
Typed Arrays and Binary Data
They differ from regular arrays in some very important ways
· The elements of a typed array are all numbers. Unlike regular JavaScript numbers, however, typed arrays allow you to specify the type (signed and unsigned integers and IEEE-754 floating point) and size (8 bits to 64 bits) of the numbers to be stored in the array.
· You must specify the length of a typed array when you create it, and that length can never change.
· The elements of a typed array are always initialized to 0 when the array is created.
Int8Array()
Uint8Array()
Uint8ClampedArray()
Int16Array()
Uint32Array()
Uint16Array()
Int32Array()
BigInt64Array()
BigUint64Array()
Float32Array()
let bytes = new Uint8Array(1024);
let matrix = new Float64Array(9);
let sudoku = new Int8Array(81);
Initialize with values
let white = Uint8ClampedArray.of(255, 255, 255, 0);
let ints = Uint32Array.from(white);
one more way to create typed arrays that involves the ArrayBuffer type
let buffer = new ArrayBuffer(1024*1024);
buffer.byteLength
1024*1024
Typed arrays are not true arrays, but they re-implement most array methods, so you can use them pretty much just like you’d use regular arrays:
let ints = new Int16Array(10);
10 short integers
ints.fill(3).map(x=>x*x).join("")
“9999999999”
Remember that typed arrays have fixed lengths, so the length property is read-only, and methods that change the length of the array (such as push(), pop(), unshift(), shift(), and splice()) are not implemented for typed arrays. Methods that alter the contents of an array without changing the length (such as sort(), reverse(), and fill()) are implemented.
Determine Endianess and DataView
let littleEndian = new Int8Array(new Int32Array([1]).buffer)
[0] === 1;
You can use the DataView class, which defines methods for reading and writing values from an ArrayBuffer with explicitly specified byte ordering. Refer to book for more examples.
Pattern Matching with Regular Expressions
RegExp objects may be created with the RegExp() constructor, of course, but they are more often created using a special literal syntax.
let pattern = /s$/;
←>
let pattern = new RegExp("s$");
Regular expressions can also have one or more flag characters that affect how they work
let pattern = /s$/i;
i = case insensitive
Punctuation characters have special meanings in regular expressions: ^ $ . * + ? = ! : | \ / ( ) [ ] { }. Other punctuation characters, such as quotation marks and @, do not have special meaning and simply match themselves literally in a regular expression.
If you use the RegExp() constructor, keep in mind that any backslashes in your regular expression need to be doubled, since strings also use backslashes as an escape character.
Character
Matches
[...]
Any one character between the brackets.
[^...]
Any one character not between the brackets
.
Any character except newline or another Unicode line terminator. Or, if the RegExp uses the s flag, then a period matches any character, including line terminators.
\w
Any ASCII word character. Equivalent to [a-zA-Z0–9_].
\W
Equivalent to [^a-zA-Z0–9_]
\s
Any Unicode whitespace character.
\S
Any character that is not Unicode whitespace.
\d
Equivalent to [0–9].
\D
Equivalent to [⁰-9].
[\b]
A literal backspace (special case).
[\s\d]
Any one whitespace character or digit
REPETITIONS
Character
Meaning
{n,m}
Match the previous item at least n times but no more than m times
{n,}
Match the previous item n or more times.
{n}
Match exactly n occurrences of the previous item.
?
Equivalent to {0,1}.
+
Equivalent to {1,}
*
Equivalent to {0,}.
Example
Description
let r = /\d{2,4}/;
Match between two and four digits
r = /\w{3}\d?/;
Match exactly three word characters and an optional digit
r = /\s+java\s+/;
Match “java” with one or more spaces before and after
r = /[^(]*/;
Match zero or more characters that are not open parens
If you want to match repetitions of more complicated expressions, you’ll need to define a group with parentheses
Be careful when using the * and ? repetition characters. Since these characters may match zero instances of whatever precedes them, they are allowed to match nothing.
NON-GREEDY REPETITION
It is also possible to specify that repetition should be done in a non-greedy way. Simply follow the repetition character or characters with a question mark: ??, +?, *?, or even {1,5}?.
String
Pattern
Match
"aaa"
/a+/
"aaa"
"aaa"
/a+?/
"a"
Note that using non-greedy repetition may not always produce the results you expect. This is because regular expression pattern matching is done by findingthe first position in the string at which a match is possible. Since a match is possible starting at the first character of the string, shorter matches starting at subsequent characters are never even considered.
ALTERNATION, GROUPING, AND REFERENCES
Char
Pattern
Pattern
|
/ab|cd|ef/
“ab” or the string “cd” or the string “ef”.
/\d{3}|[a-z]{4}/
either three digits or four lowercase letters.
/a|ab/
matches only the first letter “a”
()
/java(script)?/
matches “java” followed by the optional “script”
/(ab|cd)+|ef/
matches “java” followed by the optional “script”
If the left alternative matches, the right alternative is ignored, even if it would have produced a “better” match
Another purpose of parentheses in regular expressions is to define subpatterns within the complete pattern. When a regular expression is successfully matched against a target string, it is possible to extract the portions of the target string that matched any particular parenthesized subpattern. For example, suppose you are looking for one or more lowercase letters followed by one or more digits. You might use the pattern /[a-z]+\d+/. But suppose you only really care about the digits at the end of each match. If you put that part of the pattern in parentheses (/[a-z]+(\d+)/), you can extract the digits from any matches you find,
A related use of parenthesized subexpressions is to allow you to refer back to a subexpression later in the same regular expression. This is done by following a \ character by a digit or digits. The digits refer to the position of the parenthesized subexpression within the regular expression. For example, \1 refers back to the first subexpression, and \3 refers to the third.
Match
Pattern
zero or more characters within single or double quotes. However, it does not
require the opening and closing quotes to match
/['"][^'"]*['"]/
To require the quotes to match,use a reference
/(['"])[^'"]*\1/
Character
Meaning
|
match either the subexpression to the left or the subexpression to the right.
(…)
Grouping: group items into a single unit that can be used with *, +, ?, |, and so on. Also remember the characters that match this group for use with later references
(?:…)
group items into a single unit, but do not remember the characters that match this group.
Note (?:...) syntax:
In pattern "/([Jj]ava(?:[Ss]cript)?)\sis\s(fun\w*)/" \2 refers to the text matched by (fun\w*) since (?:[Ss]cript)?) in not remembered.
SPECIFYING MATCH POSITION
regular expression anchors because they anchor the pattern to a specific position in the search string. The most commonly used anchor elements are ^, which ties the pattern to the beginning of the string, and $, which anchors the pattern to the end of the string.
Example
Pattern
match the word “JavaScript” on a line by itself
/^JavaScript$/
To search for “Java” as a word by itself you can try the pattern /\sJava\s/, which requires a space before and after the word. But there are two problems with this solution. First, it does not match "Java" at the beginning or the end of a string, but only if it appears with space on either side. Second, when this pattern does find a match, the matched string it returns has leading and trailing spaces, which is not quite what’s needed. So instead of matching actual space characters with \s, match (or anchor to) word boundaries with \b. The resulting expression is /\bJava\b/.
The element \B anchors the match to a location that is not a word boundary. Thus, the pattern /\B[Ss]cript/ matches "JavaScript" and "postscript", but not "script" or "Scripting".
You can also use arbitrary regular expressions as anchor conditions.
If you include an expression within (?= and ) characters, it is a lookahead assertion, and it specifies that the enclosed characters must match, without actually matching them.
Example
Pattern
Matches
to match the name of a common programming language, but only if it is followed by a colon
/[Jj]ava([Ss]cript)?(?=\:)/
matches the word “JavaScript” in “JavaScript: The DefinitiveGuide”
does not match “Java” in “Java in a Nutshell”
If you instead introduce an assertion with (?!, it is a negative lookahead assertion.
FLAGS
Flags are specified after the second / character of a regular expression literal or as a string passed as the second argument to the RegExp() constructor.
Flag
Meaning
g
“global” — that is,that we intend to use it to find all matches within a string rather than just finding the first match.it does alter the behavior of the String match() method and the RegExp exec() method in important ways.
i
case-insensitive
m
“multiline” mode
s
useful when working with text that includes newlines.Normally, a “.” in a regular expression matches any character except a line terminator. When the s flag is used, however, “.” will match any character, including line terminators.
u
Unicode.
Setting the u flag on a RegExp also allows you to use the new \u{...} escape sequence for Unicode character and also enables the \p{...} notation for Unicode character classes.
y
“sticky”. should match at the beginning of a string or at the first character following the previous match
String Methods for Pattern Matching
SEARCH()
Strings support four methods that use regular expressions.
"JavaScript".search(/script/ui)
4
"Python".search(/script/ui)
-1
search() does not support global searches; it ignores the g flag of its regular expression argument.
REPLACE()
text.replace(/javascript/gi, "JavaScript");
No matter how it is capitalized, replace it with the correct capitalization
parenthesized subexpressions of a regular expression are numbered from left to right and that the regular expression remembers the text that each subexpression matches.
to replace quotation marks in a string with other characters:
let quote = /"([^"]*)"/g;
'He said "stop"'.replace(quote, '«$1»')
‘He said «stop»’
If your RegExp uses named capture groups, then you can refer to the matching text by name rather than by number:
let quote = /"(?<quotedText>[^"]*)"/g;
'He said "stop"'.replace(quote, '«$<quotedText>»')
‘He said «stop»’
Instead of passing a replacement string as the second argument to replace(), you can also pass a function that will be invoked to compute the replacement value.
Example to convert decimal integers in a string to hexadecimal:
let s = "15 times 15 is 225";
s.replace(/\d+/gu, n => parseInt(n).toString(16))
“f times f is e1”
MATCH()
"7 plus 8 equals 15".match(/\d+/g)
[“7”, “8”, “15”]
If the regular expression does not have the g flag set, match() does not do a global search; it simply searches for the first match. In this nonglobal case, match() still returns an array, but the array elements are completely different.
Thus, if match() returns an array a, a[0] contains the complete match, a[1] contains the substring that matched the first parenthesized expression, and so on.
let url = /(\w+):\/\/([\w.]+)\/(\S*)/;
let text = "Visit my blog at http://www.example.com/~david";
let match = text.match(url);
let fullurl, protocol, host, path;
if (match !== null) {
fullurl = match[0];
There are also important but less dramatic differences in behavior when the y flag is set. Refer to book for examples.
MATCHALL()
Instead of returning an array of matching substrings like match() does, however, it returns an iterator that yields the kind of match objects that match() returns when used with a non-global RegExp.
SPLIT()
"123,456,789".split(",")
[“123”, “456”,”789"]
"1, 2, 3,\n4, 5".split(/\s*,\s*/)
[“1”, “2”, “3”, “4”,”5"]
Surprisingly, if you call split() with a RegExp delimiter and the regular expression includes capturing groups, then the text that matches the capturing groups will be included in the returned array.
const htmlTag = /<([^>]+)>/;
"Testing<br/>1,2,3".split(htmlTag)
[“Testing”, “br/”,”1,2,3"]
The RegExp Class
The RegExp() constructor is useful when a regular expression is being dynamically created and thus cannot be represented with the regular expression literal syntax.
let zipcode = new RegExp("\\d{5}", "g");
let exactMatch = /JavaScript/; let caseInsensitive = new RegExp(exactMatch, "i");
TEST()
Returns true or false by calling exec().
EXEC()
let pattern = /Java/g;
let text = "JavaScript > Java";
let match;
while((match = pattern.exec(text)) !== null) {
console.log(`Matched ${match[0]} at ${match.index}`);
console.log(`Next search begins at ${pattern.lastIndex}`);
}
THE LASTINDEX PROPERTY AND REGEXP REUSE
The use of the lastIndex property with the g and y flags is a particularly awkward part of this API. When you use these flags, you need to be particularly careful when calling the match(), exec(), or test() methods because the behavior of these methods depends on lastIndex, and the value of lastIndex depends on what you have previously done with the RegExp object.
To find the index of all <p> tags within a string of HTML text:
If the html string contains at least one <p> tag, then it will loop forever. For each iteration of the loop, we’re creating a new RegExp object with lastIndex set to 0, so exec() always begins at the start of the string, and if there is a match, it will keep matching over and over. The solution, of course, is to define the RegExp once, and save it to a variable so that we’re using the same RegExp object for each iteration of the loop.
On the other hand, sometimes reusing a RegExp object is the wrong thing to do. Suppose, for example, that we want to loop through all of the words in a dictionary to find words that contain pairs of double letters.
let dictionary = [ "apple", "book", "coffee" ];
let doubleLetterWords = [];
let doubleLetter = /(\w)\1/g;
for(let word of dictionary) {
if (doubleLetter.test(word)) {
doubleLetterWords.push(word);
}
}
doubleLetterWords
[“apple”, “coffee”]: “book” is missing!
Because we set the g flag on the RegExp, the lastIndex property is changed after successful matches, and the test() method (which is based on exec()) starts searching for a match at the position specified by lastIndex. After matching the "pp" in "apple", lastIndex is 3, and so we start searching the word "book" at position 3 and do not see the "oo" that it contains.
Dates and Times
let now = new Date();
The current time
let epoch = new Date(0);
Midnight, January 1st, 1970, GMT
let century = new Date(2100,
0,
1,
2, 3, 4, 5);
Year 2100
January
1st
02:03:04.005, local
let century = new Date(Date.UTC(2100, 0, 1));
Midnight in GMT, January 1, 2100
If you print a date (with console.log(century), for example), it will, by default, be printed in your local time zone. If you want to display a date in UTC, you should explicitly convert it to a string with toUTCString() or toISOString().
if you pass a string to the Date() constructor, it will attempt to parse that string as a date and time specification
let century = new Date("2100-01-01T00:00:00Z");
Once you have a Date object, various get and set methods allow you to query and modify the year, month, day-of-month, hour, minute, second, and millisecond fields of the Date. Each of these methods hastwo forms: one that gets or sets using local time and one that gets or sets using UTC time.
Note that the methods for querying the day-of-month are getDate() and getUTCDate(). The more natural-sounding functions getDay() and getUTCDay() return the day-of-week (0 for Sunday through 6 for Saturday). The day-of-week is read-only, so there is not a corresponding setDay() method.
Timestamps
JavaScript represents dates internally as integers that specify the number of milliseconds since (or before) midnight on January 1, 1970, UTC time.
For any Date object, the getTime() method returns this internal value, and the setTime() method sets it.
d.setTime(d.getTime() + 30000);
add 30 secs
The static Date.now() method returns the current time as a timestamp and is helpful when you want to measure how long your code takes to run
let startTime = Date.now();
reticulateSplines(); // Do some time-consuming operation
let endTime = Date.now();
console.log(`Spline reticulation took ${endTime -startTime}ms.`);
adds three months and two weeks to the current date:
let d = new Date(); d.setMonth(d.getMonth() + 3, d.getDate() + 14);
Formatting and Parsing Date Strings
let d = new Date(2020, 0, 1, 17, 10, 30);
d.toString()
“Wed Jan 01 2020 17:10:30 GMT-0800 (Pacific Standard Time)”
d.toUTCString()
“Thu, 02 Jan 2020 01:10:30 GMT”
d.toLocaleDateString()
“1/1/2020”: ‘en-US’ locale
d.toLocaleTimeString()
“5:10:30 PM”: ‘en-US’ locale
d.toISOString()
“2020–01–02T01:10:30.000Z”
there is also a static Date.parse() method that takes a string as its argument, attempts to parse it as a date and time, and returns a timestamp representing that date. Date.parse() is able to parse the same strings that the Date() constructor can and is guaranteed to be able to parse the output of toISOString(), toUTCString(), and toString().
Error Classes
One good reason to use an Error object is that, when you create an Error, it captures the state of the JavaScript stack, and if the exception is uncaught, the stack trace will be displayed with the error message, which will help you debug the issue.
Error objects have two properties: message and name, and a toString() method. Node and all modern browsers also define a stack property on Error objects.
Subclasses are EvalError, RangeError, ReferenceError, SyntaxError, TypeError, and URIError.
You should feel free to define your own Error subclasses that best encapsulate the error conditions of your own program.
class HTTPError extends Error {
constructor(status, statusText, url) {
super(`${status} ${statusText}: ${url}`);
this.status = status;
this.statusText = statusText;
this.url = url;
}
get name() { return "HTTPError"; }
}
let error = new HTTPError(404, "Not Found", "http://example.com/");
error.status
JavaScript supports JSON serialization and deserialization with the two functions JSON.stringify() and JSON.parse().
let o = {s: "", n: 0, a: [true, false, null]};
let s = JSON.stringify(o);
s == ‘{“s”:””,”n”:0,”a”:[true,false,null]}’
let copy = JSON.parse(s);
copy == {s: “”, n: 0, a:[true, false, null]}
Inefficient way of creating a deep copy of an object
function deepcopy(o) {
return JSON.parse(JSON.stringify(o));
}
Typically, you pass only a single argument to JSON.stringify() and JSON.parse(). Both functions accept an optional second argument that allows us to extend the JSON format.
JSON.stringify() also takes an optional third argument. If you would like your JSONformatted string to be human-readable (if it is being used as a configuration file, for example), then you should pass null as the second argument and pass a number or string as the third argument. If the third argument is a number, then it will use that number of spaces for each indentation level. If the third argument is a string of whitespace (such as '\t'), it will use that string for each level of indent.
JSON Customizations
If JSON.stringify() is asked to serialize a value that is not natively supported by the JSON format, it looks to see if that value has a toJSON() method, and if so, it calls that method and then stringifies the return value in place of the original value. Date objects implement toJSON(): it returns the same string that toISOString() method does.
If you need to re-create Date objects (or modify the parsed object inany other way), you can pass a “reviver” function as the second argument to JSON.parse().
let data = JSON.parse(text, function(key, value) {
if (key[0] === "_") return undefined;
if (typeof value === "string" && /^\d\d\d\d-\d\d-\d\dT\d\d:\d\d:\d\d.\d\d\dZ$/.test(value)) {
return new Date(value);
}
return value;
});
The Console API
Console functions that print their arguments like console.log() have a little-known feature: if the first argument is a string that includes %s, %i, %d, %f, %o, %O, or %c, then this first argument is treated as format string, and the values of subsequent arguments are substituted into the string in place of the two-character % sequences.
URL API
let url = new URL("https://example.com:8000/path/name?q=term#fragment");
url.href
Often, however, HTTP requests encode the values of multiple form fields or multiple API parameters into the query portion of a URL. In this format, the query portion of the URL is a question mark followed by one or more name/value pairs, which are separated from one another by ampersands.
If you want to encode these kinds of name/value pairs into the query portion of a URL, then the searchParams property will be more useful than the search property.
let url = new URL("https://example.com/search");
url.search
“”
url.searchParams.append("q", "term");
url.search
“?q=term”
url.searchParams.set("q", "x");
url.search
“?q=x”
url.searchParams.append("opts", "1");
url.search
“?q=x&opts=1”
The value of the searchParams property is a URLSearchParams object.
setTimeout() and setInterval()—that allow programs to ask the browser to invoke a function after a specified amount of time has elapsed or to invoke the function repeatedly at a specified interval.
If you want to invoke a function repeatedly, use setInterval()
Both setTimeout() and setInterval() return a value. If you save this value in a variable, you can then use it later to cancel the execution of the function by passing it to clearTimeout() or clearInterval().
The iterator method of an iterable object does not have a conventional name but uses the Symbol, Symbol.iterator as its name. So a simple for/of loop over an iterable object iterable could also be written the hard way, like this:
let iterable = [99];
let iterator = iterable[Symbol.iterator]();
for(let result = iterator.next(); !result.done; result =iterator.next()) {
console.log(result.value) // result.value == 99
}
When you want to iterate though a “partially used” iterator:
let list = [1,2,3,4,5]; let iter = list[Symbol.iterator]();
let head = iter.next().value;
head == 1
let tail = [...iter];
tail == [2,3,4,5]
Implementing Iterable Objects
we will implement the Range class one more time, making it iterable without relying on a generator.
In order to make a class iterable, you must implement a method whose name is the Symbol Symbol.iterator
class Range {
constructor (from, to) {
this.from = from;
this.to = to;
}
has(x) { return typeof x === "number" && this.from <= x && x <= this.to; }
toString() { return `{ x | ${this.from} ≤ x ≤ ${this.to}}`; }
[Symbol.iterator]() {
let next = Math.ceil(this.from);
let last = this.to;
return {
next() {
return (next <= last) ? { value: next++ } : { done: true };
},
[Symbol.iterator]() { return this; }
};
}
}
for(let x of new Range(1,10)) console.log(x);
Logs numbers 1 to 10
[...new Range(-2,2)]
[-2, -1, 0,1, 2]
In addition to making your classes iterable, it can be quite useful to define functions that return iterable values.
Return an iterable object that iterates the result of applying f() to each value from the source iterable
function map(iterable, f) {
let iterator = iterable[Symbol.iterator]();
return {
[Symbol.iterator]() { return this; },
next() {
let v = iterator.next();
if (v.done) {
return v;
}
else {
return { value: f(v.value) };
}
}
};
}
[...map(new Range(1,4), x => x*x)]
[1, 4, 9, 16]
Return an iterable object that filters the specified iterable, iterating only those elements for which the predicate returns true
function filter(iterable, predicate) {
let iterator = iterable[Symbol.iterator]();
return {
[Symbol.iterator]() { return this; },
next() {
for(;;) {
let v = iterator.next();
if (v.done || predicate(v.value)) {
return v;
}
}
}
};
}
[...filter(new Range(1,10), x => x % 2 === 0)]
[2,4,6,8,10]
Generators
Particularly useful when the values to be iterated are not the elements of a data structure, but the result of a computation.
To create a generator, you must first define a generator function — defined with the keyword function* rather than function
When you invoke a generator function, it does not actually execute the function body, but instead returns a generator object. This generator object is an iterator.
Calling its next() method causes the body of the generator function to run from the start (or whatever its current position is) until it reaches a yield statement.
The value of the yield statement becomes the value returned by the next() call on the iterator.
Generators have a Symbol.iterator method to make them iterable
primes[Symbol.iterator]()
[...oneDigitPrimes()]
[2,3,5,7]
let sum = 0;
for(let prime of oneDigitPrimes()) sum += prime;
sum
17
Like regular functions, however, we can also define generators in expression form.
const seq = function*(from,to) {
for(let i = from; i <= to; i++) yield i;
};
[...seq(3,5)]
[3, 4, 5]
In classes and object literals, we can use shorthand notation to omit the function keyword entirely when we define methods.
let o = {
x: 1, y: 2, z: 3,
*g() {
for(let key of Object.keys(this)) {
yield key;
}
}
};
[...o.g()]
[“x”, “y”, “z”, “g”]
Generators often make it particularly easy to define iterable classes.
*[Symbol.iterator]() {
for(let x = Math.ceil(this.from); x <= this.to; x++)
yield x;
}
Generator Examples
Generators are more interesting if they actually generate the values they yield by doing some kind of computation.
generator function that yields Fibonacci numbers
function* fibonacciSequence() {
let x = 0, y = 1;
for(;;) {
yield y;
[x, y] = [y, x+y];
}
}
If this generator is used with the … spread operator, it will loop until memory is exhausted and the program crashes.
Use it in a for/of loop, however
function fibonacci(n) {
for(let f of fibonacciSequence()) {
if (n-- <= 0) return f;
}
}
fibonacci(20)
10946
This kind of infinite generator becomes more useful with a take() generator like this
function* take(n, iterable) {
let it = iterable[Symbol.iterator]();
while(n-- > 0) {
let next = it.next();
if (next.done) return;
else yield next.value;
}
}
[...take(5, fibonacciSequence())]
[1, 1, 2, 3, 5]
Asynchronous Javascript
Promises, new in ES6, are objects that represent the not-yet-available result of an asynchronous operation.
The keywords async and await were introduced in ES2017 and provide new syntax that simplifies asynchronous programming by allowing you to structure your Promise based code as if it was synchronous.
Asynchronous iterators and the for/await loop were introduced in ES2018 and allow you to work with streams of asynchronous events using simple loops that appear synchronous.
Asynchronous Programming with Callbacks
Timers
setTimeout(checkForUpdates, 60000);
let updateIntervalId = setInterval(checkForUpdates, 60000);
function stopCheckingForUpdates() {
clearInterval(updateIntervalId);
}
Events
Event-driven JavaScript programs register callback functions for specified types of events in specified contexts, and the web browser invokes those functions whenever the specified events occur.
These callback functions are called event handlers or event listeners, and they are registered with addEventListener()
Ask the web browser to return an object representing the HTML <button> element that matches this CSS selector:
let okay = document.querySelector('#confirmUpdateDialogbutton.okay');
Now register a callback function to be invoked when the user clicks on that button
okay.addEventListener('click', applyUpdate);
Network Events
JavaScript running in the browser can fetch data from a web server with code like this:
function getCurrentVersionNumber(versionCallback) {
let request = new XMLHttpRequest();
request.open("GET", "http://www.example.com/api/version");
request.send();
request.onload = function() {
if (request.status === 200) {
let currentVersion = parseFloat(request.responseText);
versionCallback(null, currentVersion);
}
else {
versionCallback(response.statusText, null);
}
};
request.onerror = request.ontimeout = function(e) {
versionCallback(e.type, null);
};
}
Promises
Promises, a core language feature designed to simplify asynchronous programming.
A Promise is an object that represents the result of an asynchronous computation. That result may or may not be ready yet, and the Promise API is intentionally vague about this: there is no way to synchronously get the value of a Promise; you can only ask the Promise to call a callback function when the value is ready.
One real problem with callback-based asynchronous programming is that it is common to end up with callbacks inside callbacks inside callbacks, with lines of code so highly indented that it is difficult to read.
Promises allow this kind of nested callback to be re-expressed as a more linear Promise chain that tends to be easier to read and easier to reason about.
Another problem with callbacks is that they can make handling errors difficult. If an asynchronous function (or an asynchronously invoked callback) throws an exception, there is no way for that exception to propagate back to the initiator of the asynchronous operation. This is a fundamental fact about asynchronous programming: it breaks exception handling. Promises help here by standardizing a way to handle errors and providing a way for errors to propagate correctly through a chain of promises.
Note that Promises represent the future results of single asynchronous computations. They cannot be used to represent repeated asynchronous computations, however.
We can’t use Promises to replace setInterval() because that function invokes a callback function repeatedly, which is something that Promises are just not designed to do.
Using Promises
How we would use this Promise returning utility function
getJSON(url).then(jsonData => {
// callback function that will be asynchronously invoked with the parsed JSON value when it becomes available.
});
The Promise object defines a then() instance method. Instead of passing our callback function directly to getJSON(), we instead pass it to the then() method. When the HTTP response arrives, the body of that response is parsed as JSON, and the resulting parsed value is passed to the function that we passed to then().
If you call the then() method of a Promise object multiple times, each of the functions you specify will be called when the promised computation is complete.
Unlike many event listeners, though, a Promise represents a single computation, and each function registered with then() will be invoked only once.
function displayUserProfile(profile) { ...}
getJSON("/api/user/profile").then(displayUserProfile);
HANDLING ERRORS WITH PROMISES
Asynchronous operations, particularly those that involve networking, can typically fail in a number of ways, and robust code has to be written to handle the errors that will inevitably occur.
if getJSON() runs normally, it passes its result to displayUserProfile(). If there is an error (the user is not logged in, the server is down, the user’s internet connection dropped, the request timed out, etc.), then getJSON() passes an Error object to handleProfileError().
In practice, it is rare to see two functions passed to then(). There is a better and more idiomatic way of handling errors when working with Promises.
To understand it, first consider what happens if getJSON() completes normally but an error occurs in displayUserProfile(). That callback function is invoked asynchronously when getJSON() returns, so it is also asynchronous and cannot meaningfully throw an exception (because there is no code on the call stack to handle it).
With this code, a normal result from getJSON() is still passed to displayUserProfile(), but any error in getJSON() or in displayUserProfile() (including any exceptions thrown by displayUserProfile) get passed to handleProfileError().
Chaining Promises
One of the most important benefits of Promises is that they provide a natural way to express a sequence of asynchronous operations as a linear chain of then() method invocations, without having to nest each operation within the callback of the previous one.
has largely been replaced by the newer, Promise-based Fetch API. In its simplest form, this new HTTP API is just the function fetch(). That promise is fulfilled when the HTTP response begins to arrive and the HTTP status and headers are available.
fetch("/api/user/profile")
.then(response => {
if (response.ok && response.headers.get("Content-Type") === "application/json") {
// What can we do here? We don't actually have the response body yet.
}
});
But although the initial Promise is fulfilled, the body of the response may not yet have arrived. So these text() and json() methods for accessing the body of the response themselves return Promises.
There is a second then() in the chain, which means that the first invocation of the then() method must itself return a Promise. That is not how Promises work, however.
When we write a chain of .then() invocations, we are not registering multiple callbacks on a single Promise object. Instead, each invocation of the then() method returns a new Promise object. That new Promise object is not fulfilled until the function passed to then() is complete.
There is actually a fourth Promise object involved as which brings up the point of what it means for a Promise to be “resolved.”
fetch() returns a Promise object which, when fulfilled, passes a Response object to the callback function we register. This Response object has .text(), .json(), and other methods to request the body of the HTTP response in various forms. But since the body may not yet have arrived, these methods must return Promise objects.
“task 2” calls the .json() method and returns its value. This is the fourth Promise object, and it is the return value of the callback1() function.
Let’s consider:
function c1(response) {
let p4 = response.json();
return p4;
}
// callback 1
// returns promise 4
function c2(profile) {
displayUserProfile(profile);
}
// callback 2
let p1 = fetch("/api/user/profile");
promise 1, task 1
let p2 = p1.then(c1);
promise 2, task 2
let p3 = p2.then(c2);
promise 3, task 3
In order for Promise chains to work usefully, the output of task 2 must become the input to task 3. The input to task 3 is the body of the URL that was fetched, parsed as a JSON object. But the return value of callback c1 is not a JSON object, but Promise p4 for that JSON object.
When p1 is fulfilled, c1 is invoked, and task 2 begins. And when p2 is fulfilled, c2 is invoked, and task 3 begins.
And when p2 is fulfilled, c2 is invoked, and task 3 begins. But just because task 2 begins when c1 is invoked,it does not mean that task 2 must end when c1 returns.
Promises are about managing asynchronous tasks, and if task 2 is asynchronous, then that task will not be complete by the time the callback returns.
When you pass a callback c to the then() method, then() returns a Promise p and arranges to asynchronously invoke c at some later time. The callback performs some computation and returns a value v. When the callback returns, p is resolved with the value v. When a Promise is resolved with a value that is not itself a Promise, it is immediately fulfilled with that value.
So if c returns a non-Promise, that return value becomes the value of p, p is fulfilled and we are done. But if the return value v is itself a Promise, then p is resolved but not yet fulfilled.
At this stage, p cannot settle until the Promise v settles. If v is fulfilled, then p will be fulfilled to the same value. If v is rejected, then p will be rejected for the same reason. This is what the “resolved” state of a Promise means
the Promise has become associated with, or “locked onto,” another Promise. We don’t know yet whether p will be fulfilled or rejected, but our callback c no longer has any control over that. p is “resolved” in the sense that its fate now depends entirely on what happens to Promise v.
Let’s bring this back to our URL-fetching example. When c1 returns p4, p2 is resolved. But being resolved is not the same as being fulfilled, so task 3 does not begin yet. When the full body of the HTTP response becomes available, then the .json() method can parse it and use that parsed value to fulfill p4. When p4 is fulfilled, p2 is automatically fulfilled as well, with the same parsed JSON value. At this point, the parsed JSON object is passed to c2, and task 3 begins.
More on Promises and Errors
With synchronous code, if you leave out error-handling code, you’ll at least get an exception and a stack trace that you can use to figure out what is going wrong. With asynchronous code, unhandled exceptions will often go unreported, and errors can occur silently, making them much harder to debug. The good news is that the .catch() method makes it easy to handle errors when working with Promises.
THE CATCH AND FINALLY METHODS
The .catch() method of a Promise is simply a shorthand way to call .then() with null as the first argument and an error-handling callback as the second argument.
Normal exceptions don’t work with asynchronous code. The .catch() method of Promises is an alternative that does work for asynchronous code.
fetch("/api/user/profile")
.then(response => {
if (!response.ok) {
return null;
}
let type = response.headers.get("content-type");
if (type !== "application/json") {
throw new TypeError(`Expected JSON, got ${type}`);
}
return response.json();
})
.then(profile => {
if (profile) {
displayUserProfile(profile);
}
else {
displayLoggedOutProfilePage();
}
})
.catch(e => {
if (e instanceof NetworkError) {
displayErrorMessage("Check your internet connection.");
}
else if (e instanceof TypeError) {
displayErrorMessage("Something is wrong with our server!");
}
else {
console.error(e);
}
});
p1 is the Promise returned by the fetch() call
p2 is the Promise returned by the first .then() call
c1 is the callback that we pass to that .then() call
p3 is the Promise returned by the second .then() call
c2 is the callback we pass to that call
c3 is the callback that we pass to the .catch() call
The first thing that could fail is the fetch() request itself. Let’s say p1 was rejected with a NetworkError object.
We didn’t pass an error-handling callback function as the second argument to the .then() call, so p2 rejects as well with the same NetworkError object.
Without a handler, though, p2 is rejected, and then p3 is rejected for the same reason.
At this point, the c3 error-handling callback is called, and the NetworkError-specific code within it runs.
There are a couple of things worth noting about this code. First, notice that the error object thrown with a regular, synchronous throw statement ends up being handled asynchronously with a .catch() method invocation in a Promise chain. This should make it clear why this shorthand method is preferred over passing a second argument to .then(), and also why it is so idiomatic to end Promise chains with a .catch() call.
it is also perfectly valid to use .catch() elsewhere in a Promise chain. If one of the stages in your Promise chain can fail with an error, and if the error is some kind of recoverable error that should not stop the rest of the chain from running, then you can insert a .catch() call in the chain, resulting in code that might look like this:
If the callback returns normally, then the .catch() callback will be skipped, and the return value of the previous callback will become the input to the next .then() callback.
Once an error has been passed to a .catch() callback, it stops propagating down the Promise chain. A .catch() callback can throw a new error, but if it returns normally, than that return value is used to resolve and/or fulfill the associated Promise, and
the error stops propagating.
Sometimes, in complex network environments, errors can occur more or less at random, and it can be appropriate to handle those errors by simply retrying the asynchronous request.
Sometimes,we want to execute a number of asynchronous operations in parallel. The function Promise.all() can do this. Promise.all() takes an array of Promise objects as its input and returns a Promise.
The returned Promise will be rejected if any of the input Promises are rejected. Otherwise, it will be fulfilled with an array of the fulfillment values of each of the input Promises.
const urls = [ /* zero or more URLs here */ ];
promises = urls.map(url => fetch(url).then(r => r.text()));
Promise.all(promises)
.then(bodies => { /* do something with the array of strings */ })
.catch(e => console.error(e));
The Promise returned by Promise.all() rejects when any of the input Promises is rejected. This happens immediately upon the first rejection and can happen while other input Promises are still pending. In ES2020, Promise.allSettled() takes an array of input
Promises and returns a Promise, just like Promise.all() does. But Promise.allSettled() never rejects the returned Promise, and it does not fulfill that Promise until all of the input Promises have settled. The Promise resolves to an array of objects, with one object for each input Promise. Each of these returned objects has a status property set to "fulfilled" or "rejected." If the status is "fulfilled", then the object will also have a value property that gives the fulfillment value. And if the status is "rejected", then the object will also have a reason property that gives the error or rejection value of the corresponding Promise.
Occasionally, you may want to run a number of Promises at once but may only care about the value of the first one to fulfill. In that case, you can use Promise.race() instead of Promise.all(). It returns a Promise that is fulfilled or rejected when the first of the Promises in the input array is fulfilled or rejected.
Making Promises
Promises in Sequence
async and await
These new keywords dramatically simplify the use of Promises and allow us to write Promise-based, asynchronous code that looks like synchronous code that blocks while waiting for network responses or other asynchronous events.
Asynchronous code can’t return a value or throw an exception the way that regular synchronous code can. And this is why Promises are designed the way the are. The value of a fulfilled Promise is like the return value of a synchronous function. And the value of a rejected Promise is like a value thrown by a synchronous function.
async and await take efficient, Promise-based code and hide the Promises so that your asynchronous code can be as easy to read and as easy to reason about as inefficient, blocking, synchronous code.
Given a Promise object p, the expression await p waits until p settles. If p fulfills, then the value of await p is the fulfillment value of p. On the other hand, if p is rejected, then the await p expression throws the rejection value of p.
let response = await fetch("/api/user/profile");
let profile = await response.json();
It is critical to understand right away that the await keyword does not cause your program to block and literally do nothing until the specified Promise settles. The code remains asynchronous, and the await simply disguises this fact. This means that any code that uses await is itself asynchronous.
async Functions
Because any code that uses await is asynchronous, there is one critical rule: you can only use the await keyword within functions that have been declared with the async keyword.
async function getHighScore() {
let response = await fetch("/api/user/profile");
let profile = await response.json();
return profile.highScore;
}
Declaring a function async means that the return value of the function will be a Promise even if no Promise-related code appears in the body of the function.
The getHighScore() function is declared async, so it returns a Promise. And because it returns a Promise, we can use the await keyword with it:
displayHighScore(await getHighScore());
Awaiting Multiple Promises
Suppose that we’ve written our getJSON() function using async:
async function getJSON(url) {
let response = await fetch(url);
let body = await response.json();
return body;
}
And now suppose that we want to fetch two JSON values with this function
let value1 = await getJSON(url1);
let value2 = await getJSON(url2);
The problem with this code is that it is unnecessarily sequential: the fetch of the second URL will not begin until the first fetch is complete. If the second URL does not depend on the value obtained from the firstURL, then we should probably try to fetch the two values at the same time.
let [value1, value2] = await Promise.all([getJSON(url1), getJSON(url2)]);
The for/await Loop
Suppose you have an array of URLs:
const urls = [url1, url2, url3];
You can call fetch() on each URL to get an array of Promises:
const promises = urls.map(url => fetch(url));
We could now use Promise.all() to wait for all the Promises in the array to be fulfilled. But suppose we want the results of the first fetch as soon as they become available and don’t want to wait for all the URLs to be fetched.
Git is an example of a distributed version control system (DVCS) commonly used for open source and commercial software development. DVCSs allow full access to every file, branch, and iteration of a project, and allows every user access to a full and self-contained history of all changes. Unlike once popular centralized version control systems, DVCSs like Git don’t need a constant connection to a central repository. Developers can work anywhere and collaborate asynchronously from any time zone.
Without version control, team members are subject to redundant tasks, slower timelines, and multiple copies of a single project. To eliminate unnecessary work, Git and other VCSs give each contributor a unified and consistent view of a project, surfacing work that’s already in progress. Seeing a transparent history of changes, who made them, and how they contribute to the development of a project helps team members stay aligned while working independently.
Why Git?
According to the latest Stack Overflow developer survey, more than 70 percent of developers use Git, making it the most-used VCS in the world. Git is commonly used for both open source and commercial software development, with significant benefits for individuals, teams and businesses.
Git lets developers see the entire timeline of their changes, decisions, and progression of any project in one place. From the moment they access the history of a project, the developer has all the context they need to understand it and start contributing.
Developers work in every time zone. With a DVCS like Git, collaboration can happen any time while maintaining source code integrity. Using branches, developers can safely propose changes to production code.
Businesses using Git can break down communication barriers between teams and keep them focused on doing their best work. Plus, Git makes it possible to align experts across a business to collaborate on major projects.
A repository, or Git project, encompasses the entire collection of files and folders associated with a project, along with each file’s revision history. The file history appears as snapshots in time called commits, and the commits exist as a linked-list relationship, and can be organized into multiple lines of development called branches. Because Git is a DVCS, repositories are self-contained units and anyone who owns a copy of the repository can access the entire codebase and its history. Using the command line or other ease-of-use interfaces, a git repository also allows for: interaction with the history, cloning, creating branches, committing, merging, comparing changes across versions of code, and more.
Working in repositories keeps development projects organized and protected. Developers are encouraged to fix bugs, or create fresh features, without fear of derailing mainline development efforts. Git facilitates this through the use of topic branches: lightweight pointers to commits in history that can be easily created and deprecated when no longer needed.
Git Flow
Cloning a repo and changing the remote url
(These steps are only for when you initially clone a project repo. Not when you clone your partners repo to collaborate together. To do that, you only have to complete step 1!)
1. The first step is to clone the repo!
Navigate to the repo you want to clone and hit the big green code button. Copy the link given.
- Navigate in your terminal to the directory where you want this repo to live. I’ve chosen downloads
- `git clone HTTPS://LINKTOURL/THATYOUCOPIED`
### 2. Sweet, you have the cloned repo in your preferred directory. Now lets make your own repo. On github, create a new repository.
Default settings are fine. Hit the big green button Create Repository
### 3. Next,
copy the .git link that is on the next page. Do not do any other steps on this page — That is for when you do not clone a repo.
These are the commands GitHub provides when you create a new Repo:
Quick setup — if you’ve done this kind of thing before
It already has a .git directory with certain configurations set up. To be able to push this repo to your newly created GitHub repo we have to change the remote origin.
To do that, just run this command: (Make sure you are inside the repo you cloned)
Like many disciplines, learning Git is just a matter of learning a new language. You’ll cover a lot of new vocabulary in this lesson! Remember that the vocabulary you’ll learn will allow you to communicate clearly with other developers worldwide, so it’s important to understand the meaning of each term.
It’s also important to note that Git is a complex and powerful tool. As such, its documentation and advanced examples may be tough to understand. As your knowledge grows, you may choose to dive deeper into Git. Today, you’ll focus on the commands you’ll use every day — possibly for the rest of your programming career! Get comfortable with these commands and resist the urge to copy/paste or create keyboard shortcuts as you’re getting started.
A glance into GIT
Before you look at any practical examples, let’s talk about how Git works behind the scenes.
Here is your first new word in Git-speak: repository, often shortened to repo. A Git repo comprises all the source code for a particular project. In the “dark ages” example above, the repo is the first directory you created, where work is saved to, and which acts as the source for code shared to others. Without a repo, Git has nothing to act on.
Git manages your project as a series of commits. A commit is a collection of changes grouped towards a shared purpose. By tracking these commits, you can see your project on a timeline instead of only as a finished project:
Notice the notes and seemingly random numbers by each commit? These are referred to as *commit messages* and *commit hashes*, respectively. Git identifies your commits by their hash, a specially-generated series of letters and numbers. You add commit messages to convey meaning and to help humans track your commits, as those hashes aren’t very friendly to read!
A Git hash is 40 characters long, but you only need the first few characters to identify which hash you’re referring to. By default, Git abbreviates hashes to 7 characters. You’ll follow this convention, too.
Git provides a helpful way for us to “alias” a commit in plain English as well. These aliases are called refs, short for “references”. A special one that Git creates for all repositories is HEAD, which references the most recent commit. You'll learn more about creating your own refs when you learn about "branching".
Git maintains three separate lists of changes: the working directory, the staging area, and the commit history. The working directory includes all of your in-progress changes, the staging area is reserved for changes you’re ready to commit, and the commit history is made up of changes you’ve already committed. You’ll look more at these three lists soon.
Git only cares about changes that are “tracked”. To track a file, you must add it to the commit history. The working directory will always show the changes, even if they aren’t tracked. In the commit history, you’ll only have a history of files that have been formally tracked by your repository.
Tracking changes in a repository
Now, let’s get practical!
You can create a repository with git init. Running this command will initialize a new Git repo in your current directory. It's important to remember that you only want a repository for your project and not your whole hard drive, so always run this command inside a project folder and not your home folder or desktop. You can create a new repo in an empty folder or within a project directory you've already created.
What good is an empty repo? Not much! To add content to your repository, use git add. You can pass this command a specific filename, a directory, a "wildcard" to select a series of similarly-named files, or a . to add every untracked file in the current directory:
# This will add only my_app.js to the repo:
> git add my_app.js
# This will add all the files within ./objects:
> git add objects/
# This will add all the files in the current directory ending in `.js`:
> git add *.js
# This will add everything in your current directory:
> git add .
Adding a file (or files) moves them from Git’s working directory to the staging area. You can see what’s been “staged” and what hasn’t by using git status:
In this example, “Changes to be committed” is your staging area and “Changes not staged for commit” is your working directory. Notice that you also have “Untracked files”, Git’s way of reminding us that you may have forgotten to `git add` a file to your repo. Most Git commands will include a bit of help text in the output, so always read the messages carefully before moving forward. Thanks, Git!
Once you’re happy with your files and have staged them, you’ll use git commit to push them into the commit history. It's significantly more work to make changes after a commit, so be sure your files are staged and exactly as you'd like them before running this command. Your default text editor will pop up, and you'll be asked to enter a commit message for this group of changes.
Heads Up: You may find yourself in an unfamiliar place! The default text editor for MacOS (and many variants of Linux) is called Vim. Vim is a terminal-based text editor you’ll discuss in the near future. It’s visually bare and may just look like terminal text to you! If this happens, don’t worry — just type :q and press your "return" key to exit.
You’ll want to ensure that future commit messages open in a more familiar editor. You can run the following commands in your terminal to ensure that Visual Studio Code is your git commit editor from now on:
If you experience any issues, you may be missing Visual Studio Code’s command line tools. You can find more details and some troubleshooting tips on Microsoft’s official VS Code and macOS documentation.
Once you close your editor, the commit will be added to your repository’s commit history. Use git log to see this history at any time. This command will show all the commits in your repository's history, beginning with the most recent:
Like many Git commands, `git commit` includes some helpful shorthand. If you need a rather short commit message, you can use the `-m` flag to include the message inline. Here's an example:
> git commit -m "Fix typo"
This will commit your changes with the message “Fix typo” and avoid opening your default text editor. Remember the commit messages are how you make your project’s history friendly to humans, so don’t use the -m flag as an excuse to write lame commit messages! A commit message should always explain why changes were made in clear, concise language. It is also best practice to use imperative voice in commit messages (i.e. use "Fix typo" instead of "Fixing the typo" or "Typo was fixed").
Branches and workflow
You’ve seen what a project looks like with a linear commit history, but that’s just scratching the surface of Git’s utility. Let’s explore a new realm with *branches*. A branch is a separate timeline in Git, reserved for its own changes. You’ll use branches to make your own changes independently of others. These branches can then be *merged* back into the main branch at a later time.
Let’s consider a common scenario: a school project. It’s a lot of extra hassle to schedule time together and argue over exactly what should be done next! Instead, group members will often assign tasks amongst themselves, work independently on their tasks, and reunite to bring it all together as a final report. Git branches let us emulate this workflow for code: you can make a copy of what’s been done so far, complete a task on your new branch, and merge that branch back into the shared repository for others to use.
By default, Git repos begin on the master branch. To create a new branch, use git branch <name-of-your-branch>. This will create a named reference to your current commit and let you add commits without affecting the master branch. Here's what a branch looks like:
Notice how your refs help to identify branches here: `master` stays to itself and can have changes added to it independently of your new branch (`footer`). `HEAD`, Git's special ref, follows us around, so you know that in the above diagram you're working on the `footer` branch.
You can create a new branch or visit an existing branch in your repository. This is especially helpful for returning the master branch or for projects you've received from teammates. To open an existing branch, use git checkout <name-of-branch>.
Bringing it back together
Once you’re happy with the code in the branch you’ve been working on, you’ll likely want to integrate the code into the master branch. You can do this via git merge. Merging will bring the changes in from another branch and integrate them into yours. Here's an example workflow:
Following these steps will integrate the commit from my-changes over to master. Boom! Now you have your new-file.js on your default branch.
As you can imagine, branching can get very complicated. Your repository’s history may look more like a shrub than a beautiful tree! You’ll discuss advanced merging and other options in an upcoming lesson.
Connect-W-Github
Git can act as a great history tool and source code backup for your local projects, but it can also help you work with a team! Git is classified as a “DVCS”, or “Distributed Version Control System”. This means it has built-in support for managing code both locally and from a distant source.
You can refer to a repository source that’s not local as a remote. Your Git repository can have any number of remotes, but you’ll usually only have one. By default you’ll refer to the primary remote of a repo as the origin.
You can add a remote to an existing repository on your computer, or you can retrieve a repository from a remote source. You can refer to this as cloning the repo. Once you have a repository with a remote, you can update your local code from the remote by pulling code down, and you can push up your own code so others have access to it.
I ❤️ Open Source
While a remote Git server can be run anywhere, there are a few places online that have become industry standards for hosting remote Git repositories. The best-known and most widely-used Git source is a website called GitHub. As the name suggests, GitHub is a global hub for Git repositories. It’s free to make a Github account, and you’ll find literally millions of public repositories you can browse.
GitHub takes a lot of work out of managing remote Git repositories. Instead of having to manage your own server, GitHub provides managed hosting and even includes some helpful graphical tools for complicated tasks like deployment, branch merging, and code review.
Let’s look at a typical workflow using Git and GitHub. Imagine it’s your first day on the job. How do you get access to your team’s codebase? By cloning the repository!
Using the git clone command will create a new folder in your current directory named after the repo you're cloning (in this case, your-codebase). Inside that folder will be a git repository of your very own, containing the repo's entire commit history.
You’ll likely start on the master branch, but remember that this is the default branch and it's unlikely you want to make changes to it. Since you're working on a team now, it's important to think of how your changes to the repository might affect others.
The safest way to make changes is to create a new branch, make your changes there, and then push your branch up to the remote repository for review. You'll use the git push command to do this. Let's look at an example:
Notice how you used the -u flag with git push. This flag, shorthand for --set-upstream, lets Git know that you want your local branch to follow a remote branch. You've passed the same name in, so you'll now have two branches in your local repository: add-my-new-file, which is where your changes live after being committed, and origin/add-my-new-file, which keeps up with your remote branch and updates it after you use git push.
You only need to use the-uflag the first time you push each new branch - Git will know what to do with a simplegit pushfrom then on.
You now know how to push your changes up, but what about getting the changes your teammates have made? For this, you’ll use git pull. Pulling from the remote repo will update all of your local branches with the code from each branch's remote counterpart.
Behind the scenes, Git is running two separate commands: git fetch and git merge.
Fetching retrieves the repository code and updates any remote tracking branches in your local repo, and merge does just you've already explored: integrates changes into the local branches. Here's a graphic to explain this a little better:
It’s important to remember to use `git pull` often. A dynamic team may commit and push code many times during the day, and it's easy to fall behind. The more often you `pull`, the more certain you can be that your own code is based on the "latest and greatest".
Merging your code on GitHub
If you’re paying close attention, you may have noticed that there’s a missing step in your workflows so far: how do you get your code merged into your default branch? This is done by a process called a Pull Request.
A pull request (or “PR”) is a feature specific to GitHub, not a feature of Git. It’s a safety net to prevent bugs, and it’s a critical part of the collaboration workflow. Here’s a high-level of overview of how it works:
You push your code up to GitHub in its own branch.
You open a pull request against a base branch.
GitHub creates a comparison page just for your code, detailing the changes you’ve made.
Other members of the team can review your code for errors.
You make changes to your branch based on feedback and push the new commits up.
The PR automatically updates with your changes.
Once everyone is satisfied, a repo maintainer on GitHub can merge your branch.
Huzzah! Your code is in the main branch and ready for everyone else to git pull.
You’ll create and manage your pull requests via GitHub’s web portal, instead of the command line. You’ll walk through the process of creating, reviewing, and merging a pull request in an upcoming project.
Browsing Your Git Repository
Repositories can feel intimidating at first, but it won’t take you long to navigate code like you own the place — because you do! Let’s discuss a few tools native to Git that help us browse our changes over time.
We’ll be covering:
Comparing changes with git diff
Browsing through our code “checkpoints” with git checkout
Seeing changes in real time
Git is all about change tracking, so it makes sense that it would include a utility for visualizing a set of changes. We refer to a list of differences between two files (or the same file over time) as a diff, and we can use git diff to visualize diffs in our repo!
When run with no extra options, git diff will return any tracked changes in our working directory since the last commit. Tracked is a key word here; git diff won't show us changes to files that haven't been included in our repo via git add. This is helpful for seeing what you've changed before committing! Here's an example of a small change:
Let’s break down some of the new syntax in this output.
The diff opens with some Git-specific data, including the branch/files we’re checking, and some unique hashes that Git uses to track each diff. You can skip past this to get to the important bits.
--- & +++ let us know that there are both additions and subtractions in the file "App.js". A diff doesn't have a concept of inline changes - it treats a single change as removing something old and replacing it with something new.
@@ lets us know that we're starting a single "chunk" of the diff. A diff could have multiple chunks for a single file (for example: if you made changes far apart, like the header & footer). The numbers in between tell us how many lines we're seeing and where they start. For example: @@ +1,3 -1,3 @@ means we'll see three lines of significant content, including both addition & removal, beginning at line one.
In the code itself, lines that were removed are prefixed with a - and lines that were added are prefixed with a +. Remember that you won't see these on the same lines. Even if you only changed a few words, Git will still treat it like the whole line was replaced.
Diff options
Remember that, by default, git diff compares the current working directory to the last commit. You can compare the staging area instead of the working directory with git diff --staged. This is another great way to double-check your work before pushing up to a remote branch.
You’re also not limited to your current branch — or even your current commit! You can pass a base & target branch to compare, and you can use some special characters to help you browse faster! Here are a few examples:
# See differences between the 'feature'
# branch and the 'master' branch.
> git diff master feature
# Compare two different commits
> git diff 1fc345a 2e3dff
# Compare a specific file across separate commits
> git diff 1fc345a 2e3dff my-file.js
Time travel
git diff gives us the opportunity to explore our code's current state, but what if we wanted to see its state at a different point in time? We can use checkout! git checkout lets us take control of our HEAD to bounce around our timeline as we please.
Remember that HEAD is a special Git reference that usually follows the latest commit on our current branch. We can use git checkout to point our HEAD reference at a different commit, letting us travel to any commit in our repository's history. By reading the commit message and exploring the code at the time of the commit, we can see not only what changed but also why it changed! This can be great for debugging a problem or understanding how an app evolved.
Let’s look at a diagram to understand what checkout does a little better:
Notice that we haven’t lost any commits, commit messages, or code changes. Using `git checkout` is entirely non-destructive.
To browse to a different commit, simply pass in a reference or hash for the commit you’d like to explore. git checkout also supports a few special characters & reserved references:
# You can checkout a branch name.
# You'll be using this particular branch a lot!
> git checkout master
# You can also use commit hashes directly
> git checkout 7d3e2f1
# Using a hyphen instead of a hash will take
# you to the last branch you checked out
> git checkout -
# You can use "HEAD~N" to move N commits prior
# to the current HEAD
> git checkout HEAD~3
Once you’re done browsing the repo’s history, you can use git checkout <your-branch-name> to move HEAD back to the front of the line (your most recent commit). For example, in our diagram above, we could use git checkout master to take our HEAD reference back to commit 42ffa1.
Why checkout?
Most of Git’s power comes from a simple ability: viewing commits in the past and understanding how they connect. This is why mastering the git checkout command is so important: it lets you think more like Git and gives you full freedom of navigation without risking damage to the repo's contents.
That said, you’ll likely use shortcuts like git checkout - far more often than specifically checking out commit hashes. Especially with the advent of user-friendly tools like GitHub, it's much easier to visualize changes outside the command line. We'll demonstrate browsing commit histories on GitHub in a future lesson.
Git ‘Do-Overs’: Reset & Rebase
Git is designed to protect you — not only from others, but also from yourself! Of course, there are times where you’d like to exercise your own judgement, even if it may not be the best thing to do. For this, Git provides some helpful tools to change commits and “time travel”.
Before we talk about these, a warning: The commands in this lesson are destructive! If used improperly, you could lose work, damage a teammate’s branch, or even rewrite the history of your entire project. You should exercise caution when using these on production code, and don’t hesitate to ask for help if you’re unsure what a command might do.
After this lesson, you should:
Be able to roll back changes to particular commit.
Have an understanding of how rebasing affects your commit history.
Know when to rebase/reset and when not to.
Resetting the past
Remember how our commits form a timeline? We can see the state of our project at any point using git checkout. What if we want to travel back in time to a point before we caused a new bug or chose a terrible font? git reset is the answer!
Resetting involves moving our HEAD ref back to a different commit.
No matter how we reset, HEAD will move with us. Unlike git checkout, this will also destroy intermediate commits. We can use some additional flags to determine how our code changes are handled.
Soft resets
The least-dangerous reset of all is git reset --soft.
A soft reset will move our HEAD ref to the commit we've specified, and will leave any intermediate changes in the staging area.
This means you won't lose any code, though you will lose commit messages.
A practical example of when a soft reset would be handy is joining some small commits into a larger one. We’ll pretend we’ve been struggling with “their”, “there”, and “they’re” in our app. Here’s our commit history:Those commit messages aren’t great: they’re not very explanatory, and they don’t provide a lot of value in our commit history. We’ll fix them with a soft reset:
git reset --soft 9c5e2fc
This moves our HEAD ref back to our first commit. Looking at our commit log now, we might be worried we've lost our changes:
Our changes are still present in the staging area, ready to be re-committed when we’re ready! We can use `git commit` to re-apply those changes to our commit history with a new, more helpful message instead:
Notice that the new commit has a totally new hash. The old commit messages (and their associated hashes) have been lost, but our code changes are safe and sound!
Risky Business: Mixed resets
If soft resets are the safest form of git reset, mixed resets are the most average! This is exactly why they're the default: running git reset without adding a flag is the same as running git reset --mixed.
In a mixed reset, your changes are preserved, but they’re moved from the commit history directly to the working directory. This means you’ll have to use git add to choose everything you want in future commits.
Mixed resets are a good option when you want to alter a change in a previous commit. Let’s use a mixed reset with our “their”, “there”, “they’re” example again.
We’ll start with “they’re”:
Notice again that you don’t lose your code with a mixed reset, but you do lose your commit messages & hashes. The difference between `--soft` and `--mixed` comes down to whether you'll be keeping the code exactly the same before re-committing it or making changes.
Hard resets
Hard resets are the most dangerous type of reset in Git. Hard resets adjust your HEAD ref and totally destroy any interim code changes. Poof. Gone forever.
There are very few good uses for a hard reset, but one is to get yourself out of a tight spot. Let’s say you’ve made a few changes to your repository but you now realize those changes were unnecessary. You’d like to move back in time so that your code looks exactly as it did before any changes were made. git reset --hard can take you there.
It’s our last round with “their”, “there”, and “they’re”. We’ve tried it all three ways and decided we don’t need to use that word at all! Let’s walk through a hard reset to get rid of our changes.
We’ll start in the same place we began for our soft reset:
It turns out that we’ll be using a video on our homepage and don’t need text at all! Let’s step back in time:
git reset --hard 9c5e2fc
Our Git log output is much simpler now:
It’s empty — no changes in your working directory and no changes in your staging area. This is major difference between a hard reset and a soft/mixed reset: you will lose *all your changes* back to the commit you’ve reset to.
If your teammate came rushing in to tell you that the boss has changed their mind and wants that homepage text after all, you’re going to be re-doing all that work! Be very confident that the changes you’re losing are unimportant before embarking on a hard reset.
Rebase: ‘Alt-time travel’
Sometimes we want to change more than a few commits on a linear timeline. What if we want to move multiple commits across branches? `git rebase` is the tool for us!
Rebasing involves changing your current branch’s base branch. We might do this if we accidentally started our branch from the wrong commit or if we’d like to incorporate changes from another branch into our own.
Isn’t that the same as git merge?
git merge?" In almost all cases, you'd be right. Rebasing is a dangerous process that effectively rewrites history.
I see you too like to live life Dangerously… tell me about Rebase..
Let’s look at a situation where we might be tempted to rebase. We’ve added a couple commits to a feature branch while other team members have been merging their code into the master branch. Once we're ready to merge our own branch, we probably want to follow a tried-and-true procedure:
> git pull origin master
This will fetch our remote master branch and merge its changes into our own feature branch, so it's safe to pull request or git push. However, every time we do that, a merge commit will be created! This can make a big mess of our Git commit history, especially if lots of people are making small changes.
We can use git rebase to move our changes silently onto the latest version of master. Here's what the git log history of our two example branches looks like:
Notice that both branches start at `9c5e2fc`. That's our common ancestor commit, and is where `git merge` would start stitching these branches together! We're going to avoid that entirely with a rebase. We'll run this command while we have `working-on-the-header` checked out:
git rebase master
Here’s our new commit history:
### `working-on-the-header`
See how we changed the color of our commits after the rebase? Take a close look at the commit history changes as well. Even though our commits have the same content, they have a new hash assigned, meaning they’re entirely new commits! This is what we mean by “rewriting history”: we’ve actually changed how Git refers to these changes now.
“Golden Rule of Git”
These tools can all feel pretty nifty, but be very wary of using them too much! While they can augment your Git skills from good to great, they can also have catastrophic side effects.
There’s a “Golden Rule of Git” you should know that directly relates to both git reset and git rebase:
Never change the history of a branch that’s shared with others.
That’s it! It’s simple and to the point. If you’re resetting or rebasing your own code and you make a mistake, your worst case scenario is losing your own changes. However, if you start changing the history of code that others have contributed or are relying on, your accidental loss could affect many others!
How to check your Git configuration:
The command below returns a list of information about your git configuration including user name and email:
git config -l
How to setup your Git username:
With the command below you can configure your user name:
git config --global user.name "Fabio"
How to setup your Git user email:
This command lets you setup the user email address you’ll use in your commits.
You can store login credentials in the cache so you don’t have to type them in each time. Just use this command:
git config --global credential.helper cache
How to initialize a Git repo:
Everything starts from here. The first step is to initialize a new Git repo locally in your project root. You can do so with the command below:
git init
How to add a file to the staging area in Git:
The command below will add a file to the staging area. Just replace filename_here with the name of the file you want to add to the staging area.
git add filename_here
How to add all files in the staging area in Git
If you want to add all files in your project to the staging area, you can use a wildcard . and every file will be added for you.
git add .
How to add only certain files to the staging area in Git
With the asterisk in the command below, you can add all files starting with ‘fil’ in the staging area.
git add fil*
How to check a repository’s status in Git:
This command will show the status of the current repository including staged, unstaged, and untracked files.
git status
How to commit changes in the editor in Git:
This command will open a text editor in the terminal where you can write a full commit message.
A commit message is made up of a short summary of changes, an empty line, and a full description of the changes after it.
git commit
How to commit changes with a message in Git:
You can add a commit message without opening the editor. This command lets you only specify a short summary for your commit message.
git commit -m "your commit message here"
How to commit changes (and skip the staging area) in Git:
You can add and commit tracked files with a single command by using the -a and -m options.
git commit -a -m"your commit message here"
How to see your commit history in Git:
This command shows the commit history for the current repository:
git log
How to see your commit history including changes in Git:
This command shows the commit’s history including all files and their changes:
git log -p
How to see a specific commit in Git:
This command shows a specific commit.
Replace commit-id with the id of the commit that you find in the commit log after the word commit.
git show commit-id
How to see log stats in Git:
This command will cause the Git log to show some statistics about the changes in each commit, including line(s) changed and file names.
git log --stat
How to see changes made before committing them using “diff” in Git:
You can pass a file as a parameter to only see changes on a specific file. git diff shows only unstaged changes by default.
We can call diff with the --staged flag to see any staged changes.
git diff
git diff all_checks.py
git diff --staged
How to see changes using “git add -p”:
This command opens a prompt and asks if you want to stage changes or not, and includes other options.
git add -p
How to remove tracked files from the current working tree in Git:
This command expects a commit message to explain why the file was deleted.
git rm filename
How to rename files in Git:
This command stages the changes, then it expects a commit message.
git mv oldfile newfile
How to ignore files in Git:
Create a .gitignore file and commit it.
How to revert unstaged changes in Git:
git checkout filename
How to revert staged changes in Git:
You can use the -p option flag to specify the changes you want to reset.
git reset HEAD filename
git reset HEAD -p
How to amend the most recent commit in Git:
git commit --amend allows you to modify and add changes to the most recent commit.
git commit --amend
!!Note!!: fixing up a local commit with amend is great and you can push it to a shared repository after you’ve fixed it. But you should avoid amending commits that have already been made public.
How to rollback the last commit in Git:
git revert will create a new commit that is the opposite of everything in the given commit.
We can revert the latest commit by using the head alias like this:
git revert HEAD
How to rollback an old commit in Git:
You can revert an old commit using its commit id. This opens the editor so you can add a commit message.
git revert comit_id_here
How to create a new branch in Git:
By default, you have one branch, the main branch. With this command, you can create a new branch. Git won’t switch to it automatically — you will need to do it manually with the next command.
git branch branch_name
How to switch to a newly created branch in Git:
When you want to use a different or a newly created branch you can use this command:
git checkout branch_name
How to list branches in Git:
You can view all created branches using the git branch command. It will show a list of all branches and mark the current branch with an asterisk and highlight it in green.
git branch
How to create a branch in Git and switch to it immediately:
In a single command, you can create and switch to a new branch right away.
git checkout -b branch_name
How to delete a branch in Git:
When you are done working with a branch and have merged it, you can delete it using the command below:
git branch -d branch_name
How to merge two branches in Git:
To merge the history of the branch you are currently in with the branch_name, you will need to use the command below:
git merge branch_name
How to show the commit log as a graph in Git:
We can use --graph to get the commit log to show as a graph. Also, --oneline will limit commit messages to a single line.
git log --graph --oneline
How to show the commit log as a graph of all branches in Git:
Does the same as the command above, but for all branches.
git log --graph --online --all
How to abort a conflicting merge in Git:
If you want to throw a merge away and start over, you can run the following command:
git merge --abort
How to add a remote repository in Git
This command adds a remote repository to your local repository (just replace https://repo_here with your remote repo URL).
git add remote https://repo_here
How to see remote URLs in Git:
You can see all remote repositories for your local repository with this command:
git remote -v
How to get more info about a remote repo in Git:
Just replace origin with the name of the remote obtained by
running the git remote -v command.
git remote show origin
How to push changes to a remote repo in Git:
When all your work is ready to be saved on a remote repository, you can push all changes using the command below:
git push
How to pull changes from a remote repo in Git:
If other team members are working on your repository, you can retrieve the latest changes made to the remote repository with the command below:
git pull
How to check remote branches that Git is tracking:
This command shows the name of all remote branches that Git is tracking for the current repository:
git branch -r
How to fetch remote repo changes in Git:
This command will download the changes from a remote repo but will not perform a merge on your local branch (as git pull does that instead).
git fetch
How to check the current commits log of a remote repo in Git
Commit after commit, Git builds up a log. You can find out the remote repository log by using this command:
git log origin/main
How to merge a remote repo with your local repo in Git:
If the remote repository has changes you want to merge with your local, then this command will do that for you:
git merge origin/main
How to get the contents of remote branches in Git without automatically merging:
This lets you update the remote without merging any content into the
local branches. You can call git merge or git checkout to do the merge.
git remote update
How to push a new branch to a remote repo in Git:
If you want to push a branch to a remote repository you can use the command below. Just remember to add -u to create the branch upstream:
git push -u origin branch_name
How to remove a remote branch in Git:
If you no longer need a remote branch you can remove it using the command below:
git push --delete origin branch_name_here
How to use Git rebase:
You can transfer completed work from one branch to another using git rebase.
git rebase branch_name_here
Git Rebase can get really messy if you don’t do it properly. Before using this command I suggest that you re-read the official documentation here
How to run rebase interactively in Git:
You can run git rebase interactively using the -i flag.
It will open the editor and present a set of commands you can use.
git rebase -i master
# p, pick = use commit
# r, reword = use commit, but edit the commit message
# e, edit = use commit, but stop for amending
# s, squash = use commit, but meld into previous commit
# f, fixup = like "squash", but discard this commit's log message
# x, exec = run command (the rest of the line) using shell
# d, drop = remove commit
How to force a push request in Git:
This command will force a push request. This is usually fine for pull request branches because nobody else should have cloned them.
But this isn’t something that you want to do with public repos.
git push -f
Git Alias Overview
It is important to note that there is no direct git alias command. Aliases are created through the use of the git config command and the Git configuration files. As with other configuration values, aliases can be created in a local or global scope.
To better understand Git aliases let us create some examples.
The previous code example creates globally stored shortcuts for common git commands. Creating the aliases will not modify the source commands. So git checkout will still be available even though we now have the git co alias. These aliases were created with the --global flag which means they will be stored in Git's global operating system level configuration file. On linux systems, the global config file is located in the User home directory at /.gitconfig.
[alias]
co = checkout
br = branch
ci = commit
st = status
This demonstrates that the aliases are now equivalent to the source commands.
Usage
Git aliasing is enabled through the use of git config, For command-line option and usage examples please review the git config documentation.
Examples
Using aliases to create new Git commands
A common Git pattern is to remove recently added files from the staging area. This is achieved by leveraging options to the git reset command. A new alias can be created to encapsulate this behavior and create a new alias-command-keyword which is easy to remember:
git config --global alias.unstage 'reset HEAD --'
The preceding code example creates a new alias unstage. This now enables the invocation of git unstage. git unstage which will perform a reset on the staging area. This makes the following two commands equivalent.
git unstage fileA
$ git reset HEAD -- fileA
My Default Gitignore:
Troubleshooting Git
### Here are some tips on troubleshooting and resolving issues with Git.
Broken pipe errors on git push
‘Broken pipe’ errors can occur when attempting to push to a remote repository. When pushing you usually see:
Write failed: Broken pipe
fatal: The remote end hung up unexpectedly
To fix this issue, here are some possible solutions.
Increase the POST buffer size in Git
If you’re using Git over HTTP instead of SSH, you can try increasing the POST buffer size in Git’s configuration.
Example of an error during a clone: fatal: pack has bad object at offset XXXXXXXXX: inflate returned -5
Open a terminal and enter:
git config http.postBuffer 52428800
The value is specified in bytes, so in the above case the buffer size has been set to 50MB. The default is 1MB.
Check your SSH configuration
If pushing over SSH, first check your SSH configuration as ‘Broken pipe’ errors can sometimes be caused by underlying issues with SSH (such as authentication). Make sure that SSH is correctly configured by following the instructions in the SSH troubleshooting documentation.
If you’re a GitLab administrator and have access to the server, you can also prevent session timeouts by configuring SSH keep alive either on the client or on the server.
Configuring both the client and the server is unnecessary.
To configure SSH on the client side:
On UNIX, edit ~/.ssh/config (create the file if it doesn’t exist) and add or edit:
On Windows, if you are using PuTTY, go to your session properties, then navigate to “Connection” and under “Sending of null packets to keep session active”, set Seconds between keepalives (0 to turn off) to 60.
To configure SSH on the server side, edit /etc/ssh/sshd_config and add:
ClientAliveInterval 60
ClientAliveCountMax 5
Running a git repack
If ‘pack-objects’ type errors are also being displayed, you can try to run a git repack before attempting to push to the remote repository again:
Users may experience the following error when attempting to push or pull using Git over SSH:
Please make sure you have the correct access rights
and the repository exists.
...
ssh_exchange_identification: read: Connection reset by peer
fatal: Could not read from remote repository.
or
ssh_exchange_identification: Connection closed by remote host
fatal: The remote end hung up unexpectedly
This error usually indicates that SSH daemon’s MaxStartups value is throttling SSH connections. This setting specifies the maximum number of concurrent, unauthenticated connections to the SSH daemon. This affects users with proper authentication credentials (SSH keys) because every connection is ‘unauthenticated’ in the beginning. The default value is 10.
Increase MaxStartups on the GitLab server by adding or modifying the value in /etc/ssh/sshd_config:
MaxStartups 100:30:200
100:30:200 means up to 100 SSH sessions are allowed without restriction, after which 30% of connections are dropped until reaching an absolute maximum of 200.
Once configured, restart the SSH daemon for the change to take effect.
If pulling/pushing from/to your repository ends up taking more than 50 seconds, a timeout is issued. It contains a log of the number of operations performed and their respective timings, like the example below:
remote: Running checks for branch: master
remote: Scanning for LFS objects... (153ms)
remote: Calculating new repository size... (cancelled after 729ms)
This could be used to further investigate what operation is performing poorly and provide GitLab with more information on how to improve the service.
git clone over HTTP fails with transfer closed with outstanding read data remaining error
If the buffer size is lower than what is allowed in the request, the action fails with an error similar to the one below:
error: RPC failed; curl 18 transfer closed with outstanding read data remaining
fatal: The remote end hung up unexpectedly
fatal: early EOF
fatal: index-pack failed
This can be fixed by increasing the existing http.postBuffer value to one greater than the repository size. For example, if git clone fails when cloning a 500M repository, you should set http.postBuffer to 524288000. That setting ensures the request only starts buffering after the first 524288000 bytes.
The default value of http.postBuffer, 1 MiB, is applied if the setting is not configured.
git config http.postBuffer 524288000
Further Reading:
If you found this guide helpful feel free to checkout my GitHub/gists where I host similar content:
Everything You Need To Know About Relational Databases, SQL, PostgreSQL and Sequelize To Build Your Backend!
**For Front end developers who like myself struggle with making the jump to fullstack.**
You can access and query the data using the findByPk, findOne, and findAll methods.
Terminology:
NodeJS We re going to use this to run JavaScript code on the server. I ve decided to use the latest version of Node, v6.3.0 at the time of writing, so that we ll have access to most of the new features introduced in ES6.
Express As per their website, Express is a Fast, unopinionated, minimalist web framework for Node.js , that we re going to be building our Todo list application on.
PostgreSQL This is a powerful open-source database that we re going to use. I ve attached an article I published on the setup below!
However, if you face issues while installing PostgreSQL, or you don t want to dive into installing it, you can opt for a version of PostgreSQL hosted online. I recommend ElephantSQL. I found it s pretty easy to get started with. However, the free version will only give you a 20MB allowance.
Sequelize In addition, we re going to use Sequelize, which is a database ORM that will interface with the Postgres database for us.
RDBMS and Database Entities
Define what a relational database management system is
RDBMS stands for Relational Database Management System
A software application that you run that your programs can connect to so that they can store, modify, and retrieve data.
An RDBMS can track many databases. We will use PostgreSQL, or postgres , primarily for our RDBMS and it will be able to create individual databases for each of our projects.
Describe what relational data is
In general, relational data is information that is connected to other pieces of information.
When working with relational databases, we can connect two entries together utilizing foreign keys (explained below).
In a pets database, we could be keeping track of dogs and cats as well as the toys that each of them own. That ownership of a cat to a toy is the relational aspect of relational data. Two pieces of information that can be connected together to show some sort of meaning.
Define what a database is
The actual location that data is stored.
A database can be made up of many tables that each store specific kinds of information.
We could have a pets database that stores information about many different types of animals. Each animal type could potentially be represented by a different table.
Define what a database table is
Within a database, a table stores one specific kind of information.
The records (entries) on these tables can be connected to records on other tables through the use of foreign keys
In our pets database, we could have a dogs table, with individual records
Describe the purpose of a primary key
A primary key is used in the database as a unique identifier for the table.
We often use an id field that simply increments with each entry. The incrementing ensures that each record has a unique identifier, even if their are other fields of the record that are repeated (two people with the same name would still need to have a unique identifier, for example).
With a unique identifier, we can easily connect records within the table to records from other tables.
Describe the purpose of a foreign key
A foreign key is used as the connector from this record to the primary key of another table s record.
In our pets example, we can imagine two tables to demonstrate: a table to represent cats and a table to represent toys. Each of these tables has a primary key of id that is used as the unique identifier. In order to make a connection between a toy and a cat, we can add another field to the cat table called owner_id , indicating that it is a foreign key for the cat table. By setting a toy s owner_id to the same value as a particular cat s id , we can indicate that the cat is the owner of that toy.
Describe how to properly name things in PostgreSQL
Names within postgres should generally consist of only lowercase letters, numbers, and underscores.
Tables within a database are plural by convention, so a table for cats would typically be cats and office locations would be office_locations (all lowercase, underscores to replace spaces, plural)
Connect to an instance of PostgreSQL with the command line tool psql
The psql command by default will try to connect to a database and username that matches your system s username
We connect to a different database by providing an argument to the psql command
psql pets
To connect with a different username we can use the -U flag followed by the username we would like to use. To connect to the pets database as pets_user
psql -U pets_user pets
If there is a password for the user, we can tell psql that we would like a prompt for the password to show up by using the -W flag.
psql -U pets_user -W pets (the order of our flags doesn t matter, as long as any arguments associated with them are together, such as pets_user directly following -U in this example)
Identify whether a user is a normal user or a superuser by the prompt in the psql shell
You can tell if you are logged in as a superuser or normal user by the prompt in the terminal.
If the prompt shows =>, the user is a normal user
If the prompt show =#, the user is a superuser
Create a user for the relational database management system
Within psql, we can create a user with the CREATE USER {username} {WITH options} command.
The most common options we ll want to use are WITH PASSWORD ‘mypassword’ to provide a password for the user we are creating, CREATEDB to allow the user to create new databases, or SUPERUSER to create a user with all elevated permissions.
Create a database in the database management system
We can use the command CREATE DATABASE {database name} {options} inside psql to create a new database.
A popular option we may utilize is WITH OWNER {owner name} to set another user as the owner of the database we are making.
Configure a database so that only the owner (and superusers) can connect to it
We can GRANT and REVOKE privileges from a database to users or categories of users.
In order to remove connection privileges to a database from the public we can use REVOKE CONNECT ON DATABASE {db_name} FROM PUBLIC;, removing all public connection access.
If we wanted to grant it back, or to a specific user, we could similarly do GRANT CONNECT ON DATABASE {db_name} FROM {specific user, PUBLIC, etc.};
View a list of databases in an installation of PostgreSQL
To list all databases we can use the \l or \list command in psql.
The whitespace does not matter. Creating the SQL statements on multiple lines is easier to read, but just like JavaScript, they can be presented differently.
One common issue is that SQL does not like trailing commas, so the last column cannot have a comma after its type in this example.
View a list of tables in a database
To list all database tables, use the \dt command.
Identify and describe the common data types used in PostgreSQL
There are many different data types that we can use in our tables, here are some common examples:
SERIAL: autoincrementing, very useful for IDs
VARCHAR(n): a string with a character limit of n
TEXT: doesn t have character limit, but less performant
BOOLEAN: true/false
SMALLINT: signed two-byte integer (-32768 to 32767)
INTEGER: signed four-byte integer (standard)
BIGINT: signed eight-byte integer (very large numbers)
NUMERIC: or DECIMAL, can store exact decimal values
TIMESTAMP: date and time
Describe the purpose of the UNIQUE and NOT NULL constraints, and create columns in database tables that have them
In addition to the data type, we can provide flags for constraints to place on our column data.
The UNIQUE flag indicates that the data for the column must not be repeated.
By default we can create entries in our tables that are missing data from columns. When creating a pet, maybe we don t provide an age because we don t know it, for example. If we want to require that the data be present in order to create a new record, we can indicate that column must be NOT NULL.
In the example below, we are requiring our pets to have unique names and for them to be present (both UNIQUE and NOT NULL). We have no such constraints on the age column, allowing repetition of ages or their complete absence.
CREATE TABLE pets (
id SERIAL PRIMARY KEY,
name VARCHAR(255) UNIQUE NOT NULL,
age SMALLINT
);
Create a primary key for a table
When creating a table we can indicate the primary key by passing in the column name to parentheses like so:
CREATE TABLE people (
id SERIAL,
first_name VARCHAR(50),
last_name VARCHAR(50),
PRIMARY KEY (id)
);
We could have also used the PRIMARY KEY flag on the column definition itself:
CREATE TABLE people (
id SERIAL PRIMARY KEY,
first_name VARCHAR(50),
last_name VARCHAR(50)
);
Create foreign key constraints to relate tables
In our table definition, we can use the line FOREIGN KEY (foreign_key_stored_in_this_table) REFERENCE {other table} ({other_tables_key_name}) to connect two tables.
This is probably easier to see in an example:
CREATE TABLE people (
id SERIAL PRIMARY KEY,
first_name VARCHAR(50),
last_name VARCHAR(50)
);
CREATE TABLE pets (
id SERIAL PRIMARY KEY,
name VARCHAR(255),
age SMALLINT,
person_id INTEGER,
FOREIGN KEY (person_id) REFERENCES people (id)
);
SQL is not case sensitive for its keywords but is for its entity names
Exactly as the LO states, CREATE TABLE and create table are interpreted the same way. Using capitalization is a good convention in order to distinguish your keywords.
The entity names that we use ARE case-sensitive, however. So a table named pets is unique from a table named Pets. In general, we prefer to use all lowercase for our entities to avoid any of this confusion.
SQL
How to use the SELECT … FROM … statement to select data from a single table
Supply the column names in the SELECT clause. If we want all columns, we can also use *
Supply the table names in the FROM clause
— Selects all columns from the friends table
SELECT
*
FROM
friends;
— Selects the first_name column from the friends table (remember whitespace is ignored)
SELECT name
FROM friends;
Sometimes we may need to specify what table we are selecting a column from, particulurly if we had joined multiple tables together.
— Notice here we are indicating that we want the “name” field from the “friends” table as well as the “name” field from the “puppies” table. We indicate the table name by table.column
— We are also aliasing these fields with the AS keyword so that our returned results have friend_name and puppy_name as field headers
SELECT
friends.name AS friend_name , puppies.name AS puppy_name
FROM
friends
JOIN
puppies ON friends.puppy_id = puppies.id
How to use the WHERE clause on SELECT, UPDATE, and DELETE statements to narrow the scope of the command
The WHERE clause allows us to select or apply actions to records that match specific criteria instead of to a whole table.
We can use WHERE with a couple of different operators when making our comparison
WHERE {column} = {value} provides an exact comparison
WHERE {column} IN ({value1}, {value2}, {value3}, etc.) matches any provided value in the IN statement. We can make this more complex by having a subquery inside of the parentheses, having our column match any values within the returned results.
WHERE {column} BETWEEN {value1} AND {value2} can check for matches between two values (numeric ranges)
WHERE {column} LIKE {pattern} can check for matches to a string. This is most useful when we use the wildcard %, such as WHERE breed LIKE ‘%Shepherd’, which will match any breed that ends in Shepherd
The NOT operator can also be used for negation in the checks.
Mathematical operators can be used when performing calculations or comparisons within a query as well, such as
SELECT name, breed, weight_lbs FROM puppies WHERE weight_lbs > 50; — OR SELECT name, breed, age_yrs FROM puppies WHERE age_yrs * 10 = 5;
How to use the JOIN keyword to join two (or more) tables together into a single virtual table
When we want to get information from a related table or do querying based on related table values, we can join the connected table by comparing the foreign key to where it lines up on the other table:
— Here we are joining the puppies table on to the friends table. We are specifying that the comparison we should make is the foreign key puppy_id on the friends table should line up with the primary key id on the puppies table.
SELECT
*
FROM
friends
JOIN
puppies ON friends.puppy_id = puppies.id
How to use the INSERT statement to insert data into a table
When a table is already created we can then insert records into it using the INSERT INTO keywords.
We provide the name of the table that we would like to add records to, followed by the VALUES keyword and each record we are adding. Here s an example:
— We are providing the table name, then multiple records to insert
— The values are listed in the order that they are defined on the table
We can also specify columns when we are inserting data. This makes it clear which fields we are providing data for and allows us to provide them out of order, skip null or default values, etc.
— In this example, we want to use the default value for id since it is autoincremented, so we provide DEFAULT for this field
INSERT INTO friends (id, first_name, last_name)
VALUES
(DEFAULT, ‘Amy’, ‘Pond’);
— Alternatively, we can leave it out completely, since the default value will be used if none is provided
How to use an UPDATE statement to update data in a table
The UPDATE keyword can be used to find records and change their values in our database.
We generally follow the pattern of UPDATE {table} SET {column} = {new value} WHERE {match condition};.
Without a condition to narrow our records down, we will update every record in the table, so this is an important thing to double check!
We can update multiple fields as well by specifying each column in parentheses and their associated new values: UPDATE {table} SET ({column1}, {column2}) = ({value1}, {value2}) WHERE {match condition};
— Updates the pet with id of 4 to change their name and breed
UPDATE
pets
SET
(name, breed) = (‘Floofy’, ‘Fluffy Dog Breed’) WHERE id = 4;
How to use a DELETE statement to remove data from a table
Similar to selecting records, we can delete records from a table by specifying what table we are deleting from and what criteria we would like to match in order to delete.
We follow the general structure DELETE FROM {table} WHERE {condition};
The condition here is also very important! Without a condition, all records match and will be deleted.
— Deletes from the pets table any record that either has a name Floofy, a name Doggo, or an id of 3.
DELETE FROM
pets
WHERE
name IN (‘Floofy’, ‘Doggo’) OR id = 3;
How to use a seed file to populate data in a database
Seed files are a great way for us to create records that we want to start our database out with.
Instead of having to individually add records to our tables or manually entering them in psql or postbird, we can create a file that has all of these records and then just pass this file to psql to run.
Seed files are also great if we ever need to reset our database. We can clear out any records that we have by dropping all of our tables, then just run our seed files to get it into a predetermined starting point. This is great for our personal projects, testing environments, starting values for new tables we create, etc.
There are two main ways we can use a seed file with psql, the < and the | operators. They perform the same function for us, just in slightly different orders, taking the content of a .sql file and executing in within the psql environment:
psql -d {database} < {sql filepath}
cat {sql filepath} | psql -d {database}
SQL (continued)
How to perform relational database design
Steps to Designing the Database:
Define the entities. What data are are you storing, what are the fields for each entity?
You can think of this in similar ways to OOP (object oriented programming).
If you wanted to model this information using classes, what classes would you make? Those are generally going to be the tables that are created in your database.
The attributes of your classes are generally going to be the fields/columns that we need for each table.
Identify primary keys. Most of the time these will be ids that you can generate as a serial field, incrementing with each addition to the database.
Establish table relationships. Connect related data together with foreign keys. Know how we store these keys in a one-to-one, one-to-many, or many-to-many relationship.
With a one-to-one or one-to-many relationship, we are able to use a foreign key on the table to indicate the other specific record that it is connected to.
With a many-to-many relationship, each record could be connected to multiple records, so we have to create a join table to connect these entities. A record on this join table connects a record from one table to a record from another table.
How to use transactions to group multiple SQL commands into one succeed or fail operation
We can define an explicit transaction using BEGIN and ending with either COMMIT or ROLLBACK.
If any command inside the block fails, everything will be rolled back. We can also specify that we want to roll back at the end of the block instead of committing. We saw that this can be useful when analyzing operations that would manipulate our database.
BEGIN;
UPDATE accounts SET balance = balance — 100.00
WHERE name = ‘Alice’;
UPDATE branches SET balance = balance — 100.00
WHERE name = (SELECT branch_name FROM accounts WHERE name = ‘Alice’);
UPDATE accounts SET balance = balance + 100.00
WHERE name = ‘Bob’;
UPDATE branches SET balance = balance + 100.00
WHERE name = (SELECT branch_name FROM accounts WHERE name = ‘Bob’);
COMMIT;
BEGIN;
EXPLAIN ANALYZE
UPDATE cities
SET city = ‘New York City’
WHERE city = ‘New York’;
ROLLBACK;
How to apply indexes to tables to improve performance
An index can help optimize queries that we have to run regularly. If we are constantly looking up records in a table by a particular field (such as username or phone number), we can add an index in order to speed up this process.
An index maintains a sorted version of the field with a reference to the record that it points to in the table (via primary key). If we want to find a record based on a field that we have an index for, we can look through this index in a more efficient manner than having to scan through the entire table (generally O(log n) since the index is sorted, instead of O(n) for a sequential scan).
To add an index to a field we can use the following syntax:
CREATE INDEX index_name ON table_name (column_name);
To drop an index we can do the following:
DROP INDEX index_name
Making an index is not always the best approach. Indices allow for faster lookup, but slow down record insertion and the updating of associated fields, since we not only have to add the information to the table, but also manipulate the index.
We generally wouldn t care about adding an index if:
The tables are small
We are updating the table frequently, especially the associated columns
The column has many NULL values
Explain what the EXPLAIN command is used for:
EXPLAIN gives us information about how a query will run (the query plan)
It gives us an idea of how our database will search for data as well as a qualitative comparitor for how expensive that operation will be. Comparing the cost of two queries will tell us which one is more efficient (lower cost).
We can also use the ANALYZE command with EXPLAIN, which will actually run the specified query. Doing so gives us more detailed information, such as the milliseconds it took our query to execute as well as specifics like the exact number of rows filtered and returned.
Demonstrate how to install and use the node-postgres library and its Pool class to query a PostgreSQL-managed database
We can add the node-postgres library to our application with npm install pg. From there we will typically use the Pool class associated with this library. That way we can run many SQL queries with one database connection (as opposed to Client, which closes the connection after a query).
const { Pool } = require(‘pg’);
// If we need to specify a username, password, or database, we can do so when we create a Pool instance, otherwise the default values for logging in to psql are used:
const pool = new Pool({ username: ‘<<username>>’, password: ‘<<password>>’, database: ‘<<database>>’})
The query method on the Pool instance will allow us to execute a SQL query on our database. We can pass in a string that represents the query we want to run
const allAirportsSql = `
SELECT id, city_id, faa_id, name
FROM airports;
`;
async function selectAllAirports() {
const results = await pool.query(allAirportsSql);
console.log(results.rows);
pool.end(); // invoking end() will close our connection to the database
}
selectAllAirports();
The return value of this asynchronous function is an object with a rows key that points to an array of objects, each object representing a record with field names as keys.
Explain how to write prepared statements with placeholders for parameters of the form $1 , $2 , and so on
The prepared statement (SQL string that we wrote) can also be made more dynamic by allowing for parameters to be passed in.
The Pool instance s query function allows us to pass a second argument, an array of parameters to be used in the query string. The location of the parameter substitutions are designated with $1, $2, etc., to signify the first, second, etc., arguments.
const airportsByNameSql = `
SELECT name, faa_id
FROM airports
WHERE UPPER(name) LIKE UPPER($1)
`;
async function selectAirportsByName(name) {
const results = await pool.query(airportsByNameSql, [ `%${name}%` ]);
console.log(results.rows);
pool.end(); // invoking end() will close our connection to the database
}
// Get the airport name from the command line and store it
// in the variable “name”. Pass that value to the
// selectAirportsByName function.
const name = process.argv[2];
// console.log(name);
selectAirportsByName(name);
ORM
How to install, configure, and use Sequelize, an ORM for JavaScript
To start a new project we use our standard npm initialize statement
npm init -y
Add in the packages we will need (sequelize, sequelize-cli, and pg)
Create a database user with credentials we will use for the project
psql
CREATE USER example_user WITH PASSWORD ‘badpassword’
Here we can also create databases since we are already in postgres
CREATE DATABASE example_app_development WITH OWNER example_user
CREATE DATABASE example_app_test WITH OWNER example_user
CREATE DATABASE example_app_production WITH OWNER example_user
If we don t create these databases now, we could also create them after we make our changes to our config file. If we take this approach, we need to make sure our user that we created has the CREATEDB option when we make them, since sequelize will attempt to make the databases with this user. This other approach would look like:
In psql: CREATE USER example_user WITH PASSWORD ‘badpassword’ CREATEDB
In terminal: npx sequelize-cli db:create
Double check that our configuration file matches our username, password, database, dialect, and seederStorage (these will be filled out for you in an assessment scenario):
How to use database migrations to make your database grow with your application in a source-control enabled way
Migrations
In order to make new database tables and sequelize models that reflect them, we want to generate a migration file and model file using model:generate
npx sequelize-cli model:generate — name Cat — attributes “firstName:string,specialSkill:string”
Here we are creating a migration file and a model file for a Cat. We are specifying that we want this table to have fields for firstName and specialSkill. Sequelize will automatically make fields for an id, createdAt, and updatedAt, as well, so we do not need to specify these.
Once our migration file is created, we can go in and edit any details that we need to. Most often we will want to add in database constraints such as allowNull: false, adding a uniqueness constraint with unique: true, adding in character limits to fields such as type: Sequelize.STRING(100), or specifying a foreign key with references to another table references: { model: ‘Categories’ }.
After we make any necessary changes to our migration file, we need to perform the migration, which will run the SQL commands to actually create the table.
npx sequelize-cli db:migrate
This command runs any migration files that have not been previously run, in the order that they were created (this is why the timestamp in the file name is important)
If we realize that we made a mistake after migrating, we can undo our previous migration, or all of our migrations. After undoing them, we can make any changes necessary to our migration files (They won t be deleted from the undo, so we don t need to generate anything! Just make the necessary changes to the files that already exist and save the files.). Running the migrations again will make the tables with the updates reflected.
In addition to the migration files, our model:generate command also created a model file for us. This file is what allows sequelize to transform the results of its SQL queries into useful JavaScript objects for us.
The model is where we can specify a validation that we want to perform before trying to run a SQL query. If the validation fails, we can respond with a message instead of running the query, which can be an expensive operation that we know won t work.
// Before we make changes, sequelize generates the type that this field represents specification:
DataTypes.TEXT
// We can replace the generated format with an object to specify not only the type, but the validations that we want to implement. The validations can also take in messages the respond with on failure and arguments.
specification: {
type: DataTypes.TEXT,
validate: {
notEmpty: {
msg: 'The specification cannot be empty'
},
len: {
args: [10, 100]
msg: 'The specifcation must be between 10 and 100 characters'
}
}
}
Another key part of the model file is setting up our associations. We can use the belongsTo, hasMany, and belongsToMany methods to set up model-level associations. Doing so is what creates the helpful functionality like addOwner that we saw in the pets example, a function that automatically generates the SQL necessary to create a petOwner record and supplies the appropriate petId and ownerId.
In a one-to-many association, we need to have a belongsTo association on the many side, and a hasMany association on the one side:
In a many-to-many association, we need to have a belongsToMany on each side of the association. We generally specify a columnMapping object to show the association more clearly:
// In our Owner model
// To connect this Owner to a Pet through the PetOwner
const columnMapping = {
through: ‘PetOwner’,
// joins table
otherKey: ‘petId’,
// key that connects to other table we have a many association with foreignKey: ‘ownerId’
// our foreign key in the joins table
}
Owner.belongsToMany( models.Pet, columnMapping );
// In our Pet model
// To connect this Pet to an Owner through the PetOwner
const columnMapping = { through: ‘PetOwner’,
// joins table
otherKey: ‘ownerId’,
// key that connects to other table we have a many association with
foreignKey: ‘petId’
// our foreign key in the joins table
}
Pet.belongsToMany( models.Owner, columnMapping );
How to perform CRUD operations with Sequelize
Seed Files
Seed files can be used to populate our database with starter data.
npx sequelize-cli seed:generate — name add-cats
up indicates what to create when we seed our database, down indicates what to delete if we want to unseed the database.
For our up, we use the queryInterface.bulkInsert() method, which takes in the name of the table to seed and an array of objects representing the records we want to create:
For our down, we use the queryInterface.bulkDelete() method, which takes in the name of the table and an object representing our WHERE clause. Unseeding will delete all records from the specified table that match the WHERE clause.
// If we want to specify what to remove:
down: (queryInterface, Sequelize) => {
return queryInterface.bulkDelete(‘<<TableName>>’, {
field1: [value1a, value1b, value1c], //…etc.
});
};
// If we want to remove everything from the table:
down: (queryInterface, Sequelize) => {
return queryInterface.bulkDelete(‘<<TableName>>’, null, {});
};
Running npx sequelize-cli db:seed:all will run all of our seeder files.
npx sequelize-cli db:seed:undo:all will undo all of our seeding.
If we omit the :all we can run specific seed files
Inserting with Build and Create
In addition to seed files, which we generally use for starter data, we can create new records in our database by using build and save, or the combined create
Use the .build method of the Cat model to create a new Cat instance in index.js
// Constructs an instance of the JavaScript `Cat` class. **Does not
// save anything to the database yet**. Attributes are passed in as a
// POJO.
const newCat = Cat.build({
firstName: 'Markov',
specialSkill: 'sleeping',
age: 5
});
// This actually creates a new `Cats` record in the database. We must
// wait for this asynchronous operation to succeed.
await newCat.save();
// This builds and saves all in one step. If we don't need to perform any operations on the instance before saving it, this can optimize our code.
const newerCat = await Cat.create({
firstName: 'Whiskers',
specialSkill: 'sleeping',
age: 2
})
Updating Records
When we have a reference to an instance of a model (i.e. after we have queried for it or created it), we can update values by simply reassigning those fields and using the save method
Deleting Records
When we have a reference to an instance of a model, we can delete that record by using destroy
const cats = await Cat.findAll();
// Log the fetched cats.
// The extra arguments to stringify are a replacer and a space respectively
// Here we're specifying a space of 2 in order to print more legibly
// We don't want a replacer, so we pass null just so that we can pass a 3rd argument
console.log(JSON.stringify(cats, null, 2));
WHERE clause
Passing an object to findAll can add on clauses to our query
The where key takes an object as a value to indicate what we are filtering by
{ where: { field: value } } => WHERE field = value
Providing additional key/value pairs to the where object indicates all filters must match
{ where: { field1: value1, field2: value2 } } => WHERE field1 = value1 AND field2 = value2
Sequelize Op operator
By requiring Op from the sequelize library we can provide more advanced comparison operators
const { Op } = require(“sequelize”);
Op.ne: Not equal operator
const cats = await Cat.findAll({
where: {
firstName: {
// All cats where the name is not equal to "Markov"
// We use brackets in order to evaluate Op.ne and use the value as the key
[Op.ne]: "Markov"
},
},
});
console.log(JSON.stringify(cats, null, 2));
Op.and: and operator
const cats = await Cat.findAll({
where: {
// The array that Op.and points to must all be true
// Here, we find cats where the name is not "Markov" and the age is 4
[Op.and]: [{
firstName: {
[Op.ne]: "Markov"
}
}, {
age: 4
}, ],
},
});
console.log(JSON.stringify(cats, null, 2));
Op.or: or operator
const cats = await Cat.findAll({
where: {
// One condition in the array that Op.or points to must be true
// Here, we find cats where the name is "Markov" or where the age is 4
[Op.or]: [{
firstName: "Markov"
}, {
age: 4
}, ],
},
});
console.log(JSON.stringify(cats, null, 2));
Op.gt and Op.lt: greater than and less than operators
const cats = await Cat.findAll({ where: { // Find all cats where the age is greater than 4 age: { [Op.gt]: 4 }, } }, }); console.log(JSON.stringify(cats, null, 2));
Ordering results
Just like the where clause, we can pass an order key to specify we want our results ordered
The key order points to an array with the fields that we want to order by
By default, the order is ascending, just like standard SQL. If we want to specify descending, we can instead use a nested array with the field name as the first element and DESC as the second element. (We could also specify ASC as a second element in a nested array, but it is unnecessary as it is default)
const cats = await Cat.findAll({ // Order by age descending, then by firstName ascending if cats have the same age order: [[“age”, “DESC”], “firstName”], }); console.log(JSON.stringify(cats, null, 2));
// Get a reference to the cat record that we want to update (here just the cat with primary key of 1)
const cat = await Cat.findByPk(1);
// Change cat's attributes.
cat.firstName = "Curie";
cat.specialSkill = "jumping";
cat.age = 123;
// Save the new name to the database.
await cat.save();
Limiting results
We can provide a limit key in order to limit our results to a specified number
const cats = await Cat.findAll({
order: [
["age", "DESC"]
],
// Here we are limiting our results to one record. It will still return an array, just with one object inside. We could have said any number here, the result is always an array.
limit: 1,
});
console.log(JSON.stringify(cats, null, 2));
findOne
If we only want one record to be returned we can use findOne instead of findAll
If multiple records would have matched our findOne query, it will return the first record
Unlike findAll, findOne will return the object directly instead of an array. If no records matched the query it will return null.
We can get nested associations by having include point to an object that specifies which model we have an association with, then chaining an association on with another include
How to perform data validations with Sequelize
See the database migrations section above.
In general, we add in a validate key to each field that we want validations for. This key points to an object that specifies all of the validations we want to make on that field, such as notEmpty, notNull, len, isIn, etc.
specification: {
type: DataTypes.TEXT,
validate: {
notEmpty: {
msg: 'The specification cannot be empty'
},
len: {
args: [10, 100]
msg: 'The specifcation must be between 10 and 100 characters'
}
}
}
How to use transactions with Sequelize
We can create a transaction block in order to make sure either all operations are performed or none of them are
We use the .transaction method in order to create our block. The method takes in a callback with an argument to track our transaction id (typically just a simple tx variable).
All of our sequelize operations can be passed a transaction key on their options argument which points to our transaction id. This indicates that this operation is part of the transaction block and should only be executed in the database when the whole block executes without error.
async function main() {
try {
// Do all database access within the transaction.
await sequelize.transaction(async (tx) => {
// Fetch Markov and Curie's accounts.
const markovAccount = await BankAccount.findByPk(
1, {
transaction: tx
},
);
const curieAccount = await BankAccount.findByPk(
2, {
transaction: tx
}
);
// No one can mess with Markov or Curie's accounts until the
// transaction completes! The account data has been locked!
// Increment Curie's balance by $5,000.
curieAccount.balance += 5000;
await curieAccount.save({
transaction: tx
});
// Decrement Markov's balance by $5,000.
markovAccount.balance -= 5000;
await markovAccount.save({
transaction: tx
});
});
} catch (err) {
// Report if anything goes wrong.
console.log("Error!");
for (const e of err.errors) {
console.log(
`${e.instance.clientName}: ${e.message}`
);
}
}
await sequelize.close();
}
main();
Sequelize Cheatsheet
Command Line
Sequelize provides utilities for generating migrations, models, and seed files. They are exposed through the sequelize-cli command.
Init Project
$ npx sequelize-cli init
You must create a database user, and update the config/config.json file to match your database settings to complete the initialization process.
// This uses the short form for references
return queryInterface.createTable(<TableName>, {
<columnName>: {
type: Sequelize.<type>,
allowNull: <true|false>,
unique: <true|false>,
references: { model: <TableName> }, // This is the plural table name
// that the column references.
}
});
// This the longer form for references that is less confusing
return queryInterface.createTable(<TableName>, {
<columnName>: {
type: Sequelize.<type>,
allowNull: <true|false>,
unique: <true|false>,
references: {
model: {
tableName: <TableName> // This is the plural table name
}
}
}
});
Delete Table (usually used in the down() function)
return queryInterface.dropTable(<TableName>);
Adding a column
return queryInteface.addColumn(<TableName>, <columnName>: {
type: Sequelize.<type>,
allowNull: <true|false>,
unique: <true|false>,
references: { model: <TableName> }, // This is the plural table name
// that the column references.
});
Many to Many between Student and Lesson through StudentLessons table
student.js
const columnMapping = {
through: 'StudentLesson', // This is the model name referencing the join table.
otherKey: 'lessonId',
foreignKey: 'studentId'
}
Student.belongsToMany(models.Lesson, columnMapping);
lesson.js
const columnMapping = {
through: 'StudentLesson', // This is the model name referencing the join table.
otherKey: 'studentId',
foreignKey: 'lessonId'
}
Lesson.belongsToMany(models.Student, columnMapping);
Inserting a new item
// Way 1 - With build and save
const pet = Pet.build({
name: "Fido",
petTypeId: 1
});
await pet.save();
// Way 2 - With create
const pet = await Pet.create({
name: "Fido",
petTypeId: 1
});
Updating an item
// Find the pet with id = 1
const pet = await Pet.findByPk(1);
// Way 1
pet.name = "Fido, Sr."
await pet.save;
// Way 2
await pet.update({
name: "Fido, Sr."
});
Deleting a single item
// Find the pet with id = 1
const pet = await Pet.findByPk(1);
// Notice this is an instance method
pet.destroy();
Deleting multiple items
// Notice this is a static class method
await Pet.destroy({
where: {
petTypeId: 1 // Destorys all the pets where the petType is 1
}
});
Include can take an array of models if you need to include more than one.
await Pet.findByPk(1, {
include: [Pet, Owner]
})
Include can also take an object with keys model and include.
This is in case you have nested associations.
In this case Owner doesn't have an association with PetType, but
Pet does, so we want to include PetType onto the Pet Model.
The confusingly named toJSON() method does not return a JSON string but instead
returns a POJO for the instance.
// pet is an instance of the Pet class
const pet = await Pet.findByPk(1);
console.log(pet) // prints a giant object with
// tons of properties and methods
// petPOJO is now just a plain old Javascript Object
const petPOJO = pet.toJSON();
console.log(petPOJO); // { name: "Fido", petTypeId: 1 }
Common Where Operators
const Op = Sequelize.Op
[Op.and]: [{a: 5}, {b: 6}] // (a = 5) AND (b = 6)
[Op.or]: [{a: 5}, {a: 6}] // (a = 5 OR a = 6)
[Op.gt]: 6, // > 6
[Op.gte]: 6, // >= 6
[Op.lt]: 10, // < 10
[Op.lte]: 10, // <= 10
[Op.ne]: 20, // != 20
[Op.eq]: 3, // = 3
[Op.is]: null // IS NULL
[Op.not]: true, // IS NOT TRUE
[Op.between]: [6, 10], // BETWEEN 6 AND 10
[Op.notBetween]: [11, 15], // NOT BETWEEN 11 AND 15
[Op.in]: [1, 2], // IN [1, 2]
[Op.notIn]: [1, 2], // NOT IN [1, 2]
[Op.like]: '%hat', // LIKE '%hat'
[Op.notLike]: '%hat' // NOT LIKE '%hat'
[Op.iLike]: '%hat' // ILIKE '%hat' (case insensitive) (PG only)
[Op.notILike]: '%hat' // NOT ILIKE '%hat' (PG only)
[Op.startsWith]: 'hat' // LIKE 'hat%'
[Op.endsWith]: 'hat' // LIKE '%hat'
[Op.substring]: 'hat' // LIKE '%hat%'
[Op.regexp]: '^[h|a|t]' // REGEXP/~ '^[h|a|t]' (MySQL/PG only)
[Op.notRegexp]: '^[h|a|t]' // NOT REGEXP/!~ '^[h|a|t]' (MySQL/PG only)
[Op.iRegexp]: '^[h|a|t]' // ~* '^[h|a|t]' (PG only)
[Op.notIRegexp]: '^[h|a|t]' // !~* '^[h|a|t]' (PG only)
[Op.like]: { [Op.any]: ['cat', 'hat']}
Accessing the Data
You can access and query the data using the findByPk, findOne, and findAll methods. First, make sure you import the models in your JavaScript file. In this case, we are assuming your JavaScript file is in the root of your project and so is the models folder.
The models folder exports each of the models that you have created. We have these four in our data model, so we will destructure the models to access each table individually. The associations that you have defined in each of your models will allow you to access data of related tables when you query your database using the include option.
If you want to find all recipes, for the recipe list, you would use the findAll method. You need to await this, so make sure your function is async.
async function findAllRecipes() {
return await Recipe.findAll();
}
If you would like to include all the ingredients so you can create a shopping list for all the recipes, you would use include. This is possible because of the association you have defined in your Recipe and Ingredient models.
You have two options when you want to create a row in a table (where you are saving one record into the table). You can either .build the row and then .save it, or you can .create it. Either way it does the same thing. Here are some examples:
Let’s say we have a form that accepts the name of the recipe (for simplicity). When we get the results of the form, we can:
If you want to modify an item in your table, you can use update. Let's say we want to change the chicken noodle soup to chicken noodle soup with extra veggies, first we need to get the recipe, then we can update it.
To delete an item from your table, you will do the same kind of process. Find the recipe you want to delete and destroy it, like this:
const deleteThis = await Recipe.findOne({ where: { title: 'Chicken Noodle Soup with Extra Veggies' } });
await deleteThis.destroy();
NOTE: If you do not await these, you will receive a promise, so you will need to use .then and .catch to do more with the items you are accessing and modifying.
Documentation
For the data types and validations in your models, here are the official docs. The sequelize docs are hard to look at, so these are the specific sections with just the lists: Sequelize Data Types:https://sequelize.org/v5/manual/data-types.html Validations:https://sequelize.org/v5/manual/models-definition.html#validations
When you access the data in your queries, here are the operators available, again because the docs are hard to navigate, this is the specific section with the list of operators. Operators:https://sequelize.org/v5/manual/querying.html#operators
The documentation for building, saving, creating, updating and destroying is linked here, it does a pretty good job of explaining in my opinion, it just has a title that we have not been using in this course. When they talk about an instance, they mean an item stored in your table. Create/Update/Destroy:https://sequelize.org/v5/manual/instances.html
If you found this guide helpful feel free to checkout my GitHub/gists where I host similar content:
What is HTML, CSS & JS and why do we need all three?
Super Simple Intro To HTML
What is HTML, CSS & JS and why do we need all three?
HTML stands for “Hypertext Markup Language”. Basically, HTML is the structure for the website, words, bullet points, data tables, etc. CSS stands for “Cascading Style Sheets” which means it’s the “Style” it’s how to make your website look professional, and look visually appealing. JS is how to make your website actually \*\*work\*\*.
For example, if you created something like YouTube and one of the options you can watch videos, you used HTML for the title, you used CSS for the color/s, and you have to make it actually work! So when you click on it it will run the video. This is an example of the three programming languages working in unison to form an experience you’re already familiar with if you’re reading this…
I mean most likely… unless you printed it because you hate trees.
— — — — — — — — — — -
What are Tags and Attributes?
Tags and attributes are the basis of HTML.
They work together but perform different functions — it is worth investing 2 minutes in differentiating the two.
What Are HTML Tags?
Tags are used to mark up the start of an HTML element and they are usually enclosed in angle brackets. An example of a tag is: <h1>.
Most tags must be opened <h1> and closed </h1> in order to function.
What are HTML Attributes?
Attributes contain additional pieces of information. Attributes take the form of an opening tag and additional info is placed inside.
An example of an attribute is:
<img src="mydog.jpg" alt="A photo of my dog.">
In this instance, the image source (src) and the alt text (alt) are attributes of the <img> tag.
Golden Rules To Remember
The vast majority of tags must be opened (<tag>) and closed (</tag>) with the element information such as a title or text resting between the tags.
When using multiple tags, the tags must be closed in the order in which they were opened. For example:
<strong><em>This is really important!</em></strong>
Let’s have a look at how CodePen works, firstly, you need to go to their website. After that, you must create an account. After you do that, You will see something like this
How to get started
If you’re using Visual Studio Code, congrats! There is Emmet support built into VSCode, so you won’t need to install any extensions. If you’re working in Atom you’ll need to install the Emmet plugin, which can be found here.
Basic Syntax
HTML Boilerplate
If you’ve been working in VSCode, you’ve probably seen Emmet syntax highlighting when working in HTML documents. In my opinion, the most convenient Emmet shortcut is html:5. This will create an HTML boilerplate, and fill out metadata tags in the head of your document.
html:5
Emmet Abbreviation for different HTML boilerplates.
When you see the auto complete as pictured above you can hit tab to auto fill the boilerplate html document.
That one small shortcut autogenerates all this metadata and head and body tags:
#### Here’s some slightly more advanced boilerplate for you to use as a starting point in your projects.
HTML Language
Chapter 1: Formatting text
Tags in HTML: Tags are one of the most important parts in an HTML document. (We will get to what HTML document is after we know what tags are). HTML uses some predefined tags which tells the browser about content display property, that is how to display a particular given content. For Example, to create a paragraph, one must use the paragraph tags(<p> </p>) and to insert an image one must use the img tags(<img />).
There are generally two types of tags in HTML:
Paired tags: These tags come in pairs. That is they have both opening (< >) and closing(</ >) tags.
Singular tags: These tags do not required to be closed
i.e.
<hr>
<p> The tag above me is a horizontal line that doesn't need a closing tag </p>
HTML tags have two main types: block-level and inline tags.
Block-level elements take up the full available space and always start a new line in the document. Headings and paragraphs are a great example of block tags.
Inline elements only take up as much space as they need and don’t start a new line on the page. They usually serve to format the inner contents of block-level elements. Links and emphasized strings are good examples of inline tags.
Block-Level Tags
The three block level tags every HTML document needs to contain are <html>, <head>, and <body>.
The <html></html> tag is the highest level element that encloses every HTML page.
The <head></head> tag holds meta information such as the page’s title and charset.
Finally, the <body></body> tag encloses all the content that appears on the page.
Paragraphs are enclosed by <p></p>, while blockquotes use the <blockquote></blockquote> tag.
Divisions are bigger content sections that typically contain several paragraphs, images, sometimes blockquotes, and other smaller elements. We can mark them up using the <div></div> tag. A div element can contain another div tag inside it as well.
You may also use <ol></ol> tags for ordered lists and <ul></ul> for unordered ones. Individual list items must be enclosed by the <li></li> tag. For example, this is how a basic unordered list looks like in HTML:
<ul>
<li>List item 1</li>
<li>List item 2</li>
<li>List item 3</li>
</ul>
Structure of an HTML Document
An HTML Document is mainly divided into two parts:
HEAD: This contains the information about the HTML document. For Example, Title of the page, version of HTML, Meta-Data etc.
HTML TAG Specifies an html document. The HTML element (or HTML root element) represents the root of an HTML document. All other elements must be descendants of this element. Since the element is the first in a document, it is called the root element.
Although this tag can be implied, or not required, with HTML, it is required to be opened and closed in XHTML.
Divisions are bigger content sections that typically contain several paragraphs, images, sometimes blockquotes, and other smaller elements. We can mark them up using the <div></div> tag. A div element can contain another div tag inside it as well.
You may also use <ol></ol> tags for ordered lists and <ul></ul> for unordered ones. Individual list items must be enclosed by the <li></li> tag. For example, this is how a basic unordered list looks like in HTML:
<ul>
<li>List item 1</li>
<li>List item 2</li>
<li>List item 3</li>
</ul>
Inline Tags
Many inline tags are used to format text. For example, a <strong></strong> tag would render an element in bold, whereas <em></em> tags would show it in italics.
Hyperlinks are also inline elements that require <a></a> tags and href attributes to indicate the link’s destination:
Images are inline elements too. You can add one using <img> without any closing tag. But you will also need to use the src attribute to specify the image path, for example:
BODY: This contains everything you want to display on the Web Page.
<body>
<! — Everything the user sees on the webpage goes here! — ps… this is a comment →
</body>
Let us now have a look on the basic structure of HTML. That is the code which is must for every webpage to have:
<!DOCTYPE html>
Here is some boilerplate html you can use as a starting point:!!Every Webpage must contain this code.!!
<!DOCTYPE html>
Below is the complete explanation of each of the tags used in the above piece of HTML code:
<!DOCTYPE html>: This tag is used to tells the HTML version. This currently tells that the version is HTML 5.
<html>: This is called HTML root element and used to wrap all the code.
<head>: Head tag contains metadata, title, page CSS etc. All the HTML elements that can be used inside the <head> element are:
<body>: Body tag is used to enclosed all the data which a web page has from texts to links. All of the content that you see rendered in the browser is contained within this element.
Bold Text:
<b> this is bold </b>
<strong> ⇐ this is for strong, emergency emotions.
___________
HEADING/S:
6 types from largest(h1) to smallest (h6)
<h1> <h2> <h3> <h4> <h5> <h6>
___________
ITALICS: There are two ways to use it, the first one is the <i> tag and the second one is the <em> tag. They both italicize the text🤷
<i> this is fancy text that’s too good to for us</i>
___________
PARAGRAPHS: In order to make Paragraphs, just add <p>.
<p> Hi there my name is Jason. </p>
___________
TITLES: not the same thing as a heading (which renders on the html page) but instead the title element represents the title of the page as shown in the tab of the browser.
<head>
As such <title>This is the title</title> it is always found between <head> tags and not in the body of the page where all the content that gets rendered on the page is contained.
### Here’s a handy Cheat Sheet:
Below I am going to Include a gist that contains html code that uses pretty much every tag I could think of off the top of my head…
If it’s not included here I promise you it’s seldom used by most webpages.
Below that I will embed an image of the webpage that it renders too….
that super small text at the bottom is actually one giant button:
If you found this guide helpful feel free to checkout my GitHub/gists where I host similar content:
Write a function rotateRight(array, num) that takes in an array and a number as arguments.
The function should return a new array where the elements of the array are rotated to the right number times.
The function should not mutate the original array and instead return a new array.
Define this function using function expression syntax.
HINT: you can use Array#slice to create a copy of an array
JavaScript gives us four methods to add or remove items from the beginning or end of arrays:
pop(): Remove an item from the end of an array
let cats = ['Bob', 'Willy', 'Mini'];
cats.pop(); // ['Bob', 'Willy']
The mechanism that puts behavior and data together behind methods that hide the specific implementation of a class.
How can a CommonJS Module import functionality from another module?
Through the use of the require function.
How can an ES6 module import functionality from another module?
Through the use of the import-from syntax that looks like this:
import SymbolName from './relative-path.js';
How do CommonJS Modules allow other modules to access exported symbols?
Through the use of the module.exports property.
How do ES6 Modules export functionality so other modules can use them?
Through the use of the export keyword.
Implementation inheritance
The data and methods defined on a parent class are available on objects created from classes that inherit from those parent classes
Inheritance
The mechanism that passes traits of a parent class to its descendants.
Prototypal inheritance
A method of realizing implementation inheritance through process of finding missing properties on an object by delegating the resolution to a prototype object.
The constructor method
The special method of a class that is called to initialize an object when code uses the new keyword to instantiate an object from that class.
The Dependency Inversion Principle
Functionality that your class depends on should be provided as parameters to methods rather than using new in the class to create a new instance of a dependency.
The extends keyword
The keyword in JavaScript that allows one class to inherit from another.
The Interface Segregation Principle
Method names should be grouped together into granular collections called “interfaces”
The Law Of Demeter
Don’t use more than one dot (not counting the one after “this”).
A method of an object can only invoke the methods (or use the properties) of the following kinds of objects: Methods on the object itself Any of the objects passed in as parameters to the method And object created in the method Any values stored in the instance variables of the object Any values stored in global variables
The Liskov Substitution Principle
You can substitute child class objects for parent class objects and not cause errors.
The Open-Close Principle
A class is open for extension and closed for modification.
The Single-Responsibility Principle
Any one of the following:
A class should do one thing and do it well.
A class should have only one reason to change.
Gather together the things that change for the same reasons. Separate those things that change for different reasons.
Background:
Constructor Functions
Defining a constructor function Example of an object using object initialization
const fellowshipOfTheRing = {
title: "The Fellowship of the Ring",
series: "The Lord of the Rings",
author: "J.R.R. Tolkien",
};
The above literal is a “Book” object type.
Object Type is defined by it's attributes and behaviors.
Behaviorsare represented by methods.
Constructor Functions : Handle the creation of an object - it's a factory for creating objects of a specific type.
There are a few specific things to constructors worth noting:
The name of the constructor function is capitalized
The Function does not explicitly return a value
Within the body, the this keyword references the newly created object
We can invoke a constructor function using the new keyword.
function Book(title, series, author) {
this.title = title;
this.series = series;
this.author = author;
}
const fellowshipOfTheRing = new Book(
"The Fellowship of the Ring",
"The Lord of the Rings",
"J.R.R. Tolkien"
);
console.log(fellowshipOfTheRing); // Book { title: 'The Fellowship of the Ring', ... }
Four Things will happen when invoking a constructor function
A new empty object is created {};
The new obj’s prototype is set to the object referenced by the constructors prototype property.
This is bound to the new object.
The new object is returned after the constructor function has completed.
Understanding New Object Instances
Instance : term to describe an objected created from a constructor function.
Every instance created is a unique object and therefore not equal to each other.
Using the instanceof operator to check an object’s type
By using the instanceof operator we can verify that an object was created from a certain object type.
The instanceOf operator works by checking to see if the prototype object of the left side of the operator is the same as the prototype object of the right side of the operator.
Invoking a constructor function without the new keyword
If we invoke a constructor function without the new keyword, we may result in one of two unexpected outcomes:
In non-strict mode, this will be bound to the global object instead.
In strict mode, this will become undefined.
You can enable strict mode by typing "use strict" at the top of your file.
Defining Sharable Methods
Avoid the temptation to store an object method inside a constructor function, it is inefficient with computer memory usage b/c each object instance would have it’s own method definition.
Prototype : An object that is delegated to when a reference to an object property or method can't be resolved.
Every instance created by a constructor function shares the same prototype.
Object.setPrototypeOf() and Object.getPrototypeOf() are just used to set a prototype of one object to another object; and also the verify a prototype.
proto : aka "dunder proto" is a property used to gain easy access to an object's prototype - it is widely supported by browsers but is considered deprecated.
function Book(title, series, author) {
this.title = title;
this.series = series;
this.author = author;
}
// Any method defined on the `Book.prototype` property
// will be shared across all `Book` instances.
Book.prototype.getInformation = function () {
return `${this.title} by ${this.author}`;
};
const fellowshipOfTheRing = new Book(
"The Fellowship of the Ring",
"The Lord of the Rings",
"J.R.R. Tolkien"
);
console.log(fellowshipOfTheRing.getInformation());
Every method we define on a constructor function’s prototype property will be shared across all instances of that object type.
The Problem with Arrow Functions
We cannot use arrow functions when defining methods on a constructor function’s prototype property.
Arrow functions don’t include their own this binding; therefore it will not reference the current instance — always stick with the function () keyword.
Putting the Class in JavaScript Classes
In ES2015, JS gained the class keyword - replacing the need to use only constructor functions & prototypes to mimic classes!
class : keyword that gives developers a formal way to create a class definition to specify an object type's attributes and behavior; also used to create objects of that specific type.
Defining a ES2015 class
class Book {
constructor(title, series, author) {
this.title = title;
this.series = series;
this.author = author;
}
}
Class names also begin only with capital letters.
Although not required, class definitions can include a class constructor function - these are similar to regular constructors in that:
They don’t explicitly return a value.
The this keyword references the newly created object instance.
Instantiating an instance of a class
We can also use the new.
Four things occur when instantiating an instance of a class:
New empty object is created {};
The new obj’s prototype is set to the class prototype’s property value.
This is bound to the new object.
After the constructor method has completed, the new obj is returned.
Don’t try to instatiate a class object without the new keyword.
Class Definitions are NOT hoisted
test();
function test() {
console.log("This works!");
}
In JS you can call a function before it’s declared — this is known as hoisting.
Class definitions are NOT hoisted, so just get in the habit of declaring them before you use them.
Defining Methods
A class can contain two types of methods:
Instance Method : Methods that are invoked on an instance of the class - useful for performing an action on a specific instance.
Instance methods are also sometimes referred to as prototype methods because they are defined on a shared prototype object.
Static Method : Methods that invoked directly on a class, not on an instance.
Important: Invoking a static method on an instance will result in a runtime error.
Prepending the static keyword at the beginning on the method name will make it static.
class Book {
constructor(title, series, author) {
this.title = title;
this.series = series;
this.author = author;
}
// Notice the use of a rest parameter (...books)
// to capture the passed parameters as an array of values.
static getTitles(...books) {
return books.map((book) => book.title);
}
getInformation() {
return `${this.title} by ${this.author}`;
}
}
const fellowshipOfTheRing = new Book(
"The Fellowship of the Ring",
"The Lord of the Rings",
"J.R.R. Tolkien"
);
const theTwoTowers = new Book(
"The Two Towers",
"The Lord of the Rings",
"J.R.R. Tolkien"
);
const bookTitles = Book.getTitles(fellowshipOfTheRing, theTwoTowers);
console.log(bookTitles.join(", ")); // The Fellowship of the Ring, The Two Towers
If we go back to an example of how constructor functions also use static methods — we see that static methods are defined directly on the constructor function — whereas instance methods need to be defined on the prototype object.
function Book(title, series, author) {
this.title = title;
this.series = series;
this.author = author;
}
// Static methods are defined
// directly on the constructor function.
Book.getTitles = function (...books) {
return books.map((book) => book.title);
};
// Instance methods are defined
// on the constructor function's `prototype` property.
Book.prototype.getInformation = function () {
return `${this.title} by ${this.author}`;
};
const fellowshipOfTheRing = new Book(
"The Fellowship of the Ring",
"The Lord of the Rings",
"J.R.R. Tolkien"
);
const theTwoTowers = new Book(
"The Two Towers",
"The Lord of the Rings",
"J.R.R. Tolkien"
);
console.log(fellowshipOfTheRing.getInformation()); // The Fellowship of the Ring by J.R.R. Tolkien
console.log(theTwoTowers.getInformation()); // The Two Towers by J.R.R. Tolkien
// Call the static `Book.getTitles()` method
// to get an array of the book titles.
const bookTitles = Book.getTitles(fellowshipOfTheRing, theTwoTowers);
console.log(bookTitles.join(", ")); // The Fellowship of the Ring, The Two Towers
Comparing Classes to Constructor Functions
ES2015 Classes are essentiallysyntactic sugarover traditional constructor functions and prototypes.
Javascript Inheritance
Child Class : Class that is based upon another class and inherits properties and methods from that other class.
Parent Class : Class that is being inherited downwards.
Inheritance : The process of basing a class upon another class.
class CatalogItem {
constructor(title, series) {
this.title = title;
this.series = series;
}
getInformation() {
if (this.series) {
return `${this.title} (${this.series})`;
} else {
return this.title;
}
}
}
class Book extends CatalogItem {
constructor(title, series, author) {
super(title, series);
this.author = author;
}
}
class Movie extends CatalogItem {
constructor(title, series, director) {
super(title, series);
this.director = director;
}
}
const theGrapesOfWrath = new Book(
"The Grapes of Wrath",
null,
"John Steinbeck"
);
const aNewHope = new Movie(
"Episode 4: A New Hope",
"Star Wars",
"George Lucas"
);
console.log(theGrapesOfWrath.getInformation()); // The Grapes of Wrath
console.log(aNewHope.getInformation()); // Episode 4: A New Hope (Star Wars)
console.log(Catalogitem instanceof Function); // true
console.log(Book instanceof Function); // true
A prototype chain defines a series of prototype objects that are delegated to one by one, when a property or method can't be found on an instance object.
console.log(theGrapesOfWrath.getInformation()); // The Grapes of Wrath
When the getInformation() method is invoked:
JS looks for get() on the current object.
If it isn’t found, the method call is delegated to the object’s prototype.
It continues up the prototype chain until the method is found.
Overriding a method in a parent class
Method Overriding : when a child class provides an implementation of a method that's already defined in a parent class.
class Movie extends CatalogItem {
constructor(title, series, director) {
super(title, series);
this.director = director;
}
getInformation() {
let result = super.getInformation();
if (this.director) {
result += ` [directed by ${this.director}]`;
}
return result;
}
}
We can simply declare our own method of the same name in our child class to override our parent’s version of getInformation()
JavaScript Modules
Introducing Node.js modules
In Node.js, each JS file in a project defines a module.
Module’s contents are private by default.
Local Modules : Modules defined within your project.
Core Modules : Native modules contained within Node.js that you can use to perform tasks or to add functionality to your application.
CommonJS : A legacy module system.
ES Modules : Newer module sysem that will eventually replace CommonJS.
Entry Point : JS File that is passed to Node for access to the entire application.
Following the convention of a single exported item per module helps to keep modules focused and less likely to become bloted with too much code.
Understanding Module Loading
When loading a module, Node will examine the identifier passed to the require() function to determine if our module is local, core, or third-party:
Local Module: identifier starts with ./ ../ or /
Node.js Core: identifier matches name
Third-Party: identifier matches a module in the node modules folder (installed package)
Encapsulation
Puts the behavior and data together behind methods that hide the specific implementation so that code that uses it doesn’t need to worry about the details of it.
Inheritance
Implementation Inheritance** :** Means that data and methods defined on a parent class are available on objects created from classes that inherit from those parent classes.
Prototypal Inheritance : Means that JS uses prototype objects to make its implementation inheritance actually work.
Parent Class === Prototype === Super Class === Base Class
Inheritance === Subtyping
class MyClass {}
// is the same as
class MyClass extends Object {}
When you declare a class with no explicit parent class, JS will make it a child of Object.
class Charity {}
class Business {
toString() {
return "Give us your money.";
}
}
class Restaurant extends Business {
toString() {
return "Eat at Joe's!";
}
}
class AutoRepairShop extends Business {}
class Retail extends Business {
toString() {
return "Buy some stuff!";
}
}
class ClothingStore extends Retail {}
class PhoneStore extends Retail {
toString() {
return "Upgrade your perfectly good phone, now!";
}
}
console.log(new PhoneStore().toString()); // 'Upgrade your perfectly good phone, now!'
console.log(new ClothingStore().toString()); // 'Buy some stuff!';
console.log(new Restaurant().toString()); // 'Eat at Joe\'s!'
console.log(new AutoRepairShop().toString()); // 'Give us your money.'
console.log(new Charity().toString()); // [object object]
The nuts and bolts of prototypal inheritance
- When JavaScript uses a property (or method) from a prototype that it found through prototypal inheritance, then the this property points to the original object on which the first call was made.
class Parent {
constructor() {
this.name = "PARENT";
}
toString() {
return `My name is ${this.name}`;
}
}
class Child extends Parent {
constructor() {
super();
this.name = "CHILD";
}
}
const parent = new Parent();
console.log(parent.toString()); // my name is Parent
const child = new Child();
console.log(child.toString()); // my name is Child
Polymorphism
The ability to treat an object as if it were an instance of one of its parent classes.
The SOLID Principles Explained
SOLID is an anagram for:
The Single-Responsibility Principle
The Open-Close Principle
The Liskov Substitution Principle
The Interface Segregation Principle
The Dependency Inversion Principle
Single-Responsibility Principle
A class should do one thing and do it well
This principle is about limiting the impact of change.
The Liskov Substitution Principle:
Subtype Requirement: Let ϕ(x) be a property provable about objects x of type T. Then ϕ(y) should be true for objects y of type S where S is a subtype of T.
You can substitute child class objects for parent class objects and not cause errors.
The Other Three
The remaining three principles are important for languages that have static typing - which means a variable can have only one kind of thing in it.
Open-Close Principle
A class is open for extension and closed for modification.
Creating new functionality can happen in child classes, and not the original class.
Interface Segregation Principle
Method names should be grouped together into granular collections called “interfaces”.
Dependency Inversion Principle
Functionality that your class depends on should be provided as parameters to methods rather than using new in the class to create a new instance.
Controlling Coupling with The Law of Demeter
Coupling : The degree of interdependence between two or more classes.
The fewer the connections between classes, the less chance there is for the ripple effect.
Here is the formal definition:
A method of an object can only invoke the methods (or use the properties) of the following kind of objects:
Methods on the object itself.
Any of the objects passed in as parameters to the method.
Any object created in the method.
Any values stores in the instance variables of the object.
Any values stored in global variables.
Law of Demeter is more so of a guideline than a law.
Easiest way to implement it is to not us more than one dot
You cannot cheat by separating extra calls onto different lines.
When to ignore the Law of Demeter
When you work with objects that come from code that you didn’t create — you will often have to break the LoD.
F5Start⇧F5Stop⇧⌘F5Restart^F5Start without debuggingF9Toggle breakpointF10Step overF11Step into⇧F11Step out⇧⌘DDebug sidebar⇧⌘YDebug panel
Tips-N-Tricks:
Here is a selection of common features for editing code. If the keyboard shortcuts aren’t comfortable for you, consider installing a keymap extension for your old editor.
Tip: You can see recommended keymap extensions in the Extensions view with Ctrl+K Ctrl+M which filters the search to @recommended:keymaps.
Multi cursor selection
To add cursors at arbitrary positions, select a position with your mouse and use Alt+Click (Option+click on macOS).
To set cursors above or below the current position use:
Keyboard Shortcut: Ctrl+Alt+Up or Ctrl+Alt+Down
You can add additional cursors to all occurrences of the current selection with Ctrl+Shift+L.
*Note: You can also change the modifier to Ctrl/Cmd for applying multiple cursors with the* `editor.multiCursorModifier` setting* . See* Multi-cursor Modifier *for details.*
If you do not want to add all occurrences of the current selection, you can use Ctrl+D instead. This only selects the next occurrence after the one you selected so you can add selections one by one.
### Column (box) selection
You can select blocks of text by holding Shift+Alt (Shift+Option on macOS) while you drag your mouse. A separate cursor will be added to the end of each selected line.
Clangd — Provides C/C++ language IDE features for VS Code using clangd: code completion, compile errors and warnings, go-to-definition and cross references, include management, code formatting, simple refactorings.
gnu-global-tags — Provide Intellisense for C/C++ with the help of the GNU Global tool.
YouCompleteMe — Provides semantic completions for C/C++ (and TypeScript, JavaScript, Objective-C, Golang, Rust) using YouCompleteMe.
CQuery — C/C++ language server supporting multi-million line code base, powered by libclang. Cross references, completion, diagnostics, semantic highlighting and more.
Peek or Jump to a CSS definition directly from HTML, just like in Brackets!
- stylelint — Lint CSS/SCSS.
- Autoprefixer Parse CSS,SCSS, LESS and add vendor prefixes automatically.
- Intellisense for CSS class names — Provides CSS class name completion for the HTML class attribute based on the CSS files in your workspace. Also supports React’s className attribute.
Visual Studio IntelliCode — This extension provides AI-assisted development features including autocomplete and other insights based on understanding your code context.
Adds emoji syntax support to VS Code’s built-in Markdown preview
PHP
IntelliSense
These extensions provide slightly different sets of features. While the first one offers better autocompletion support, the second one seems to have more features overall.
Displays a graphical preview of Azure Resource Manager (ARM) templates. The view will show all resources with the official Azure icons and also linkage between the resources.
Everything you need for the Azure IoT development: Interact with Azure IoT Hub, manage devices connected to Azure IoT Hub, and develop with code snippets for Azure IoT Hub
Allows you to manage GitHub Gists entirely within the editor. You can open, create, delete, fork, star and clone gists, and then seamlessly begin editing files as if they were local. It’s like your very own developer library for building and referencing code snippets, commonly used config/scripts, programming-related notes/documentation, and interactive samples.
Provides Git CodeLens information (most recent commit, # of authors), on-demand inline blame annotations, status bar blame information, file and blame history explorers, and commands to compare changes with the working tree or previous versions.
Provides GitHub workflow support. For example browse project, issues, file (the current line), create and manage pull request. Support for other providers (e.g. gitlab or bitbucket) is planned. Have a look at theREADME.mdon how to get started with the setup for this extension.
This extension uses the GitHub api to monitor the state of your pull requests and let you know when it’s time to merge or if someone requested changes.
Adds a GitLab sidebar icon to view issues, merge requests and other GitLab resources. You can also view the results of your GitLab CI/CD pipeline and check the syntax of your .gitlab-ci.yml.
This extension will display inline in the editor the size of the imported package. The extension utilizes webpack with babili-webpack-plugin in order to detect the imported size.
Bringing the power of Jira and Bitbucket to VS Code — With Atlassian for VS Code you can create and view issues, start work on issues, create pull requests, do code reviews, start builds, get build statuses and more!
ngrok allows you to expose a web server running on your local machine to the internet. Just tell ngrok what port your web server is listening on. This extension allows you to controlngrokfrom the VSCode command palette
VSCode Project Dashboard is a Visual Studio Code extension that lets you organize your projects in a speed-dial like manner. Pin your frequently visited folders, files, and SSH remotes onto a dashboard to access them quickly.
Highlight columns in comma, tab, semicolon and pipe separated files, consistency check and linting with CSVLint, multi-cursor column editing, column trimming and realignment, and SQL-style querying with RBQL.
Allows users to open any folder in a container, on a remote machine, container or in Windows Subsystem for Linux(WSL) and take advantage of VS Code’s full feature set.
All-in-one extension for text manipulation: filtering (grep), remove lines, insert number sequences and GUIDs, format content as table, change case, converting numbers and more. Great for finding information in logs and manipulating text.
Browser Preview for VS Code enables you to open a real browser preview inside your editor that you can debug. Browser Preview is powered by Chrome Headless, and works by starting a headless Chrome instance in a new process. This enables a secure way to render web content inside VS Code, and enables interesting features such as in-editor debugging and more!
FYI:… I HAVE TRIED ENDLESSLEY TO GET THE DEBUGGER TO WORK IN VSCODE BUT IT DOES NOT… I SUSPECT THAT’S WHY IT HAS A 3 STAR RATING FOR AN OTHERWISE PHENOMINAL EXTENSION.
An open source ecosystem for IoT development: supports 350+ embedded boards, 20+ development platforms, 10+ frameworks. Arduino and ARM mbed compatible.
Rapid prototyping playground for JavaScript and TypeScript in VS Code, with access to your project’s files, inline reporting, code coverage and rich output formatting.
Send messages and code snippets, upload files to Slack
Personally I found this extension to slow down my editor in addition to confliction with other extensions: (I have over 200 as of this writing)….. yes I have been made fully aware that I have a problem and need to get help
No real advantage over just using Spotify normally… it’s problematic enough in implementation that you won’t save any time using it. Further, it’s a bit tricky to configure … or at least it was the last time I tried syncing it with my spotify account.
Provides integration with Spotify Desktop client. Shows the currently playing song in status bar, search lyrics and provides commands for controlling Spotify with buttons and hotkeys.
Highlight multiple text patterns with different colors at the same time. Highlighting a single text pattern can be done with the editor’s search functionality, but it cannot highlight multiple patterns at the same time, and this is where this extension comes handy.
Quickly bring up helpful MDN documentation in the editor
### Themes:
In the interest of not making the reader scroll endlessly as I often do… I’ve made a separate post for that here. If you’ve made it this far, I thank you!
“If you want to build a ship, don’t drum up the men and women to gather wood, divide the work, and give orders. Instead, teach them to…
HTTP Basics
“If you want to build a ship, don’t drum up the men and women to gather wood, divide the work, and give orders. Instead, teach them to yearn for the vast and endless sea.” — Antoine de Saint-Exupery;
- `HTTP` : Hypertext Transfer Protocol.
- `HT` : Hypertext - content with references to other content.
- Term used to refer to content in computing.
- What makes the Web a “web”.
- Most fundamental part of how we interact.
- `Hyperlinks` : Links; references between HT resources.
- `TP` : Transfer Protocol - set of guidelines surrounding the transmission of data.
- Defines the expectations for both ends of the transer.
- Defines some ways the transfer might fail.
- HTTP is a `request/response` protocol.
- HTTP works between `clients` & `servers`.
- `Clients` : User Agent - the data consumer.
- `Servers` : Origin - Data provider & where the application is running.
HTTP is a client-server protocol: requests are sent by one entity, the user-agent (or a proxy on behalf of it). Most of the time the user-agent is a Web browser, but it can be anything, for example a robot that crawls the Web to populate and maintain a search engine index.
Each individual request is sent to a server, which handles it and provides an answer, called the response. Between the client and the server there are numerous entities, collectively called proxies, which perform different operations and act as gateways or caches, for example.
**Properties of HTTP**
Reliable Connections : Messages passed between a client & server sacrifice a little speed for the sake of trust.
TCP is HTTP’s preferred connection type.
Stateless Transfer : HTTP is a stateless protocol - meaning it does not store any kind of information.
HTTP supports cookies.
Intermediaries : Servers or devices that pass your request along which come in three types:
Proxies : Modify your request so it appears to come from a different source.
Gateways : Pretend to be the resource server you requested.
Tunnels : Simply passes your request along.
HTTP Requests
Structure of an HTTP Request
GET / HTTP/1.1
Host: appacademy.io
Connection: keep-alive
Upgrade-Insecure-Requests: 1
User-Agent: Mozilla/5.0 (Macintosh; Intel Mac OS X 10_14_5) AppleWebKit/537.36 (KHTML, like Gecko) Chrome/76.0.3809.132 Safari/537.36
Accept: text/html,application/xhtml+xml,application/xml;q=0.9,image/webp,image/apng,*/*;q=0.8,application/signed-exchange;v=b3
Accept-Encoding: gzip, deflate
Accept-Language: en-US,en;q=0.9
Example of a request:
Request-line & HTTP verbs
The first line of an HTTP Request made up of three parts:
The Method : Indicated by an HTTP Verb.
The URI : Uniform Resource Indicator that ID’s our request.
THe HTTPVersion : Version we expect to use.
HTTP Verbs are a simply way of declaring our intention to the server.
GET : Used for direct requests.
POST: Used for creating new resources on the server.
PUT: Used to updated a resource on the server.
PATCH : Similar to PUT, but do not require the whole resource to perform the update.
DELETE : Used to destroy resources on the server.
Headers
Key-Value pairs that come after the request line — they appear on sep. lines and define metadata needed to process the request.
Some common headers:
Host : Root path for our URI.
User-Agent : Displays information about which browser the request originated from.
Referer : Defines the URL you’re coming from.
Accept : Indicates what the client will receive.
Content- : Define Details about the body of the request.
Body
For when we need to send data that doesn’t fit into the header & is too complex for the URI we can use the body.
URL encoding : Most common way form data is formatted.
name=claire&age=29&iceCream=vanilla
We can also format using JSON or XML.
Sending an HTTP request from the command line
netcat : (nc) A Utility that comes as part of Unix-line environments such as Ubuntu and macOS.
Allows us to open a direct connection with a URL and manually send HTTP requests.
First line of an HTTP response — gives us a high level overview of the server’s intentions. (status line)
HTTP/1.1 200 OK
HTTP status codes : numeric way of representing a server’s response.
Follow the structure: x: xxx — xxx;
Status codes 100 - 199: Informational
Allow the clinet to know that a req. was received, and provides extra info from the server.
Status codes 200 - 299: Successful
Indicate that the request has succeeded and the server is handling it.
Common Examples: 200 OK (req received and fulfilled) & 201 Created (received and new record was created)
Status codes 300 - 399: Redirection
Let the client know if there has been a change.
Common Examples: 301 Moved Permanently (resource you requested is in a totally new location) & 302 Found (indicates a temporary move)
Status codes 400 - 499: Client Error
Indicate problem with client’s request.
Common Examples: 400 Bad Request (received, but could not understand) & 401 Unauthorized (resource exists but you’re not allowed to see w/o authentication) & 403 Forbidden (resource exists but you’re not allowed to see it at all ) & 404 Not Found (resource requested does not exist);
Status codes 500 - 599: Server Error
Indicates request was formatted correctly, but the server couldn’t do what you asked due to an internal problem.
Common Examples: 500 Internal Server Error (Server had trouble processing) & 504 Gateway Timeout (Server timeout);
Headers : Work just like HTTP requests.
Common Examples:
Location : Used by client for redirection responses.
Content-Type : Let’s client know what format the body is in.
Expires : When response is no longer valid
Content-Disposition : Let’s client know how to display the response.
Set-Cookie : Sends data back to the client to set on the cookie.
Data : If the request is successful, the body of the response will contain the resource you have requested.
If you found this guide helpful feel free to checkout my GitHub/gists where I host similar content:
· Phenomic — Modular website compiler (React, Webpack, Reason and whatever you want).
· Halfmoon — Front-end framework with a built-in dark mode and full customizability using CSS variables; great for building dashboards and tools. (Docs)
· Sinuous — Low-level UI library with a tiny footprint. (Docs)
· Overture — Powerful JS library for building really slick web applications, with performance at, or surpassing, native apps.
· Glimmer — Fast and light-weight UI components for the web. (Code)
· Glimmer VM — Flexible, low-level rendering pipeline for building a “live” DOM from Handlebars templates that can subsequently be updated cheaply when data changes.
· frint — Modular JavaScript framework for building scalable and reactive applications.
· Nano Router — Framework agnostic minimalistic router with a focus on named routes.
· tiny-request-router — Fast, generic and type safe router (match request method and path).
· Synergy — Tiny runtime library for building web user interfaces. (HN)
· dflex — JavaScript Project to Manipulate DOM Elements.
· morphdom — Fast and lightweight DOM diffing/patching (no virtual DOM needed).
· Forgo — Ultra-light UI runtime. Makes it super easy to create modern web apps using JSX (like React).
· Whats Up — Front-end framework based on ideas of streams and fractals.
· Boost — Collection of type-safe cross-platform packages for building robust server-side and client-side systems.
· Nostalgie — Opinionated, full-stack, runtime-agnostic framework for building web apps and web pages using react. (Web)
· Lumino — Library for building interactive web applications.
sortablejs — Sortable — is a JavaScript library for reorderable drag-and-drop lists on modern browsers and touch devices. No jQuery. Supports Meteor, AngularJS, React, Polymer, Knockout and any CSS library, e.g. Bootstrap.
react-anything-sortable — A ReactJS component that can sort any children with touch support and IE8 compatibility.
react-sortable-hoc — A set of higher-order components to turn any list into an animated, touch-friendly, sortable list.
react-sortable — A sortable list component built with React.
· virtual-scroller — Maps a provided set of JavaScript objects onto DOM nodes, and renders only the DOM nodes that are currently visible, leaving the rest “virtualized”.
· jSPDF — Client-side JavaScript PDF generation for everyone.
· color2k — Color parsing and manipulation lib served in 2kB or less.
· Sandstorm — Open source platform for self-hosting web apps. (Code)
· transformation-matrix — JS isomorphic 2D affine transformations written in ES6 syntax.
· Muuri — JavaScript layout engine that allows you to build all kinds of layouts and make them responsive, sortable, filterable, draggable and/or animated.
· Split — Unopinionated utilities for resizeable split views.
· Parallax Engine — Reacts to the orientation of a smart device.
· bpmn-js — BPMN 2.0 rendering toolkit and web modeler.
· fit-curve — JavaScript implementation of Philip J. Schneider’s “Algorithm for Automatically Fitting Digitized Curves” from the book “Graphics Gems”.
· clean-deep — Remove falsy, empty or nullable values from objects.
· regular-table — Regular library, for async and virtual data models.
· Stimulus — Modest JavaScript framework for the HTML you already have. (Web)
· bigpicture.js — Library that allows infinite panning and infinite zooming in HTML pages. (Web)
· Graphlib — JavaScript library that provides data structures for undirected and directed multi-graphs along with algorithms that can be used with them.
· Dagre — JavaScript library that makes it easy to lay out directed graphs on the client-side.
· ecsy — Highly experimental Entity Component System framework implemented in javascript, aiming to be lightweight, easy to use and with good performance. (Docs)

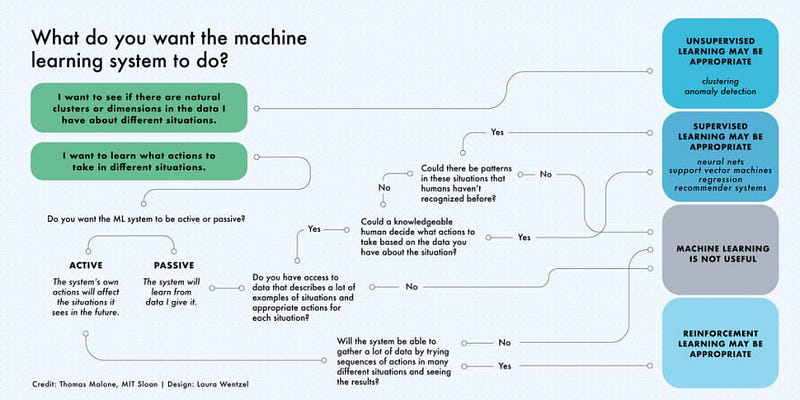
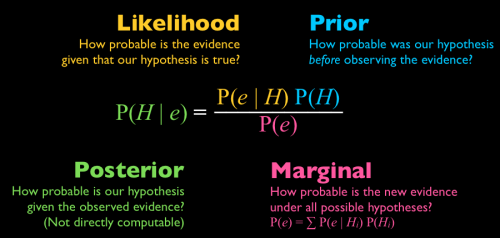

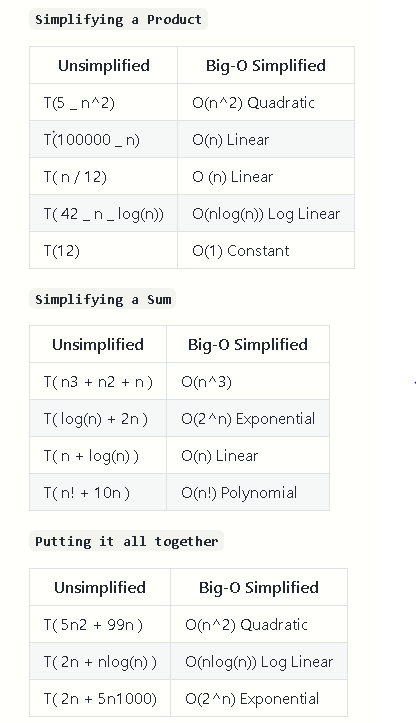
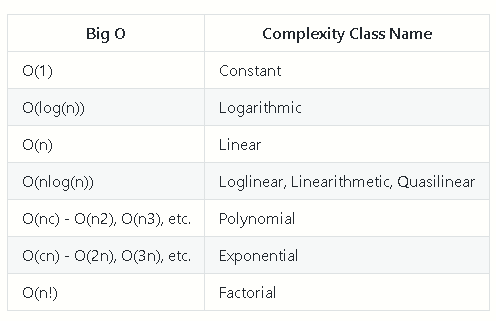
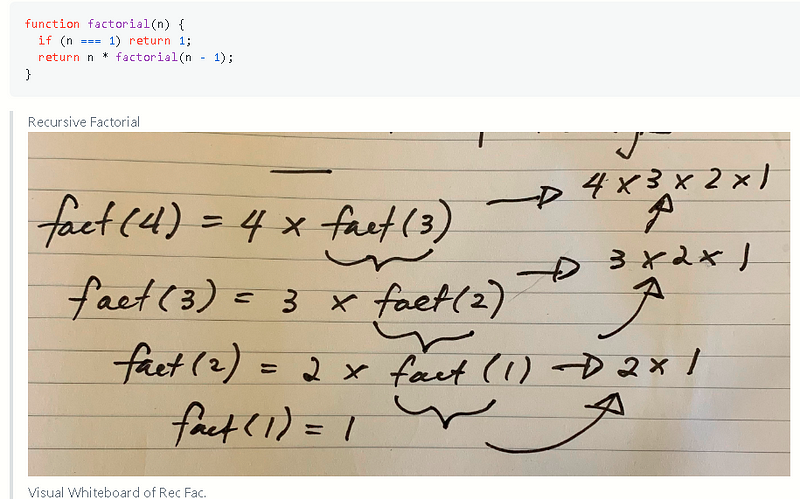
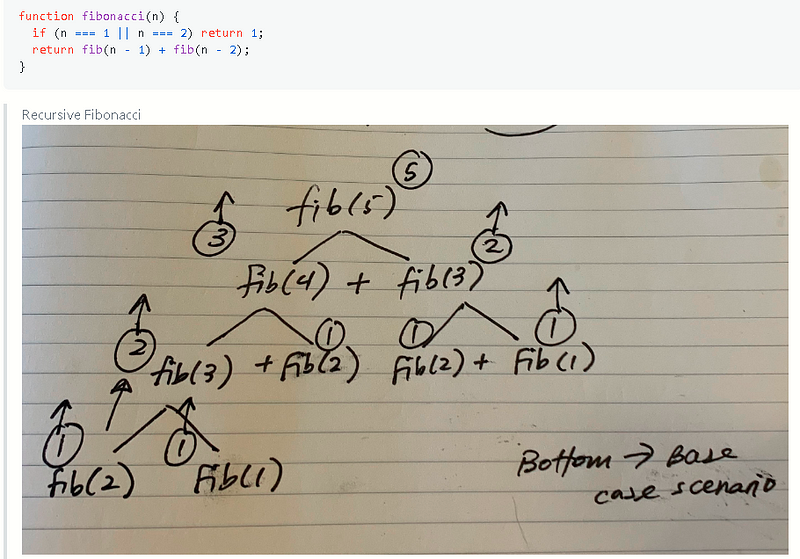

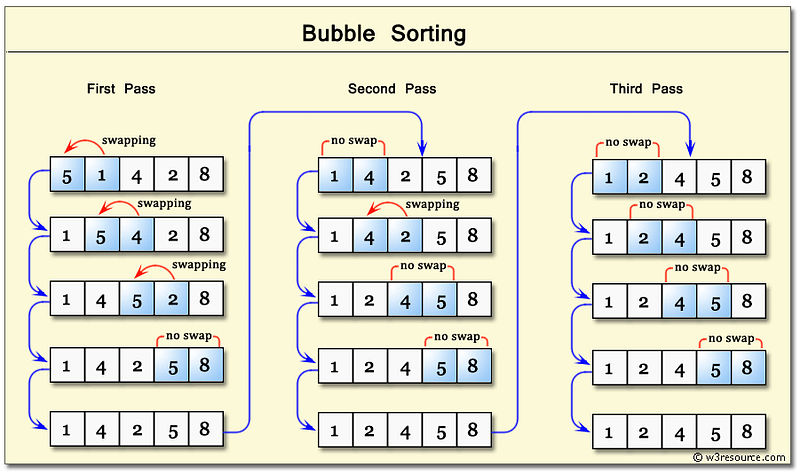
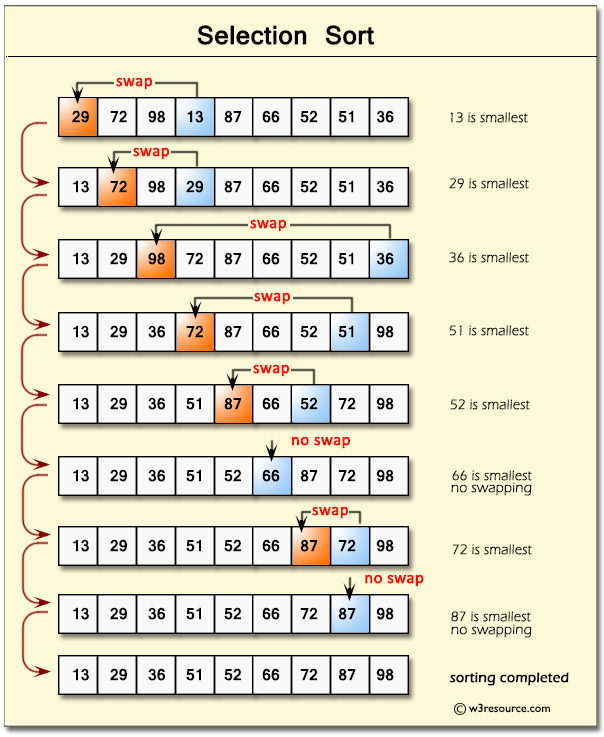

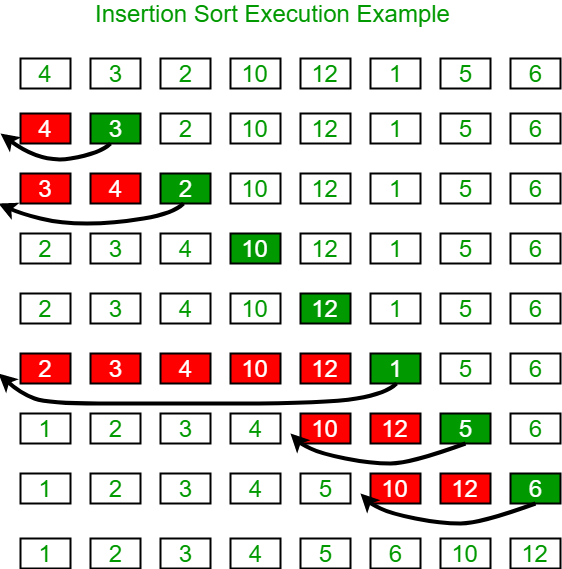
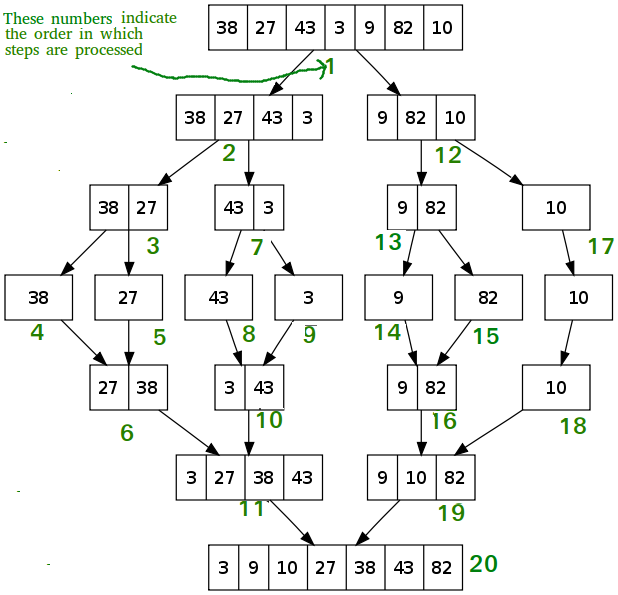

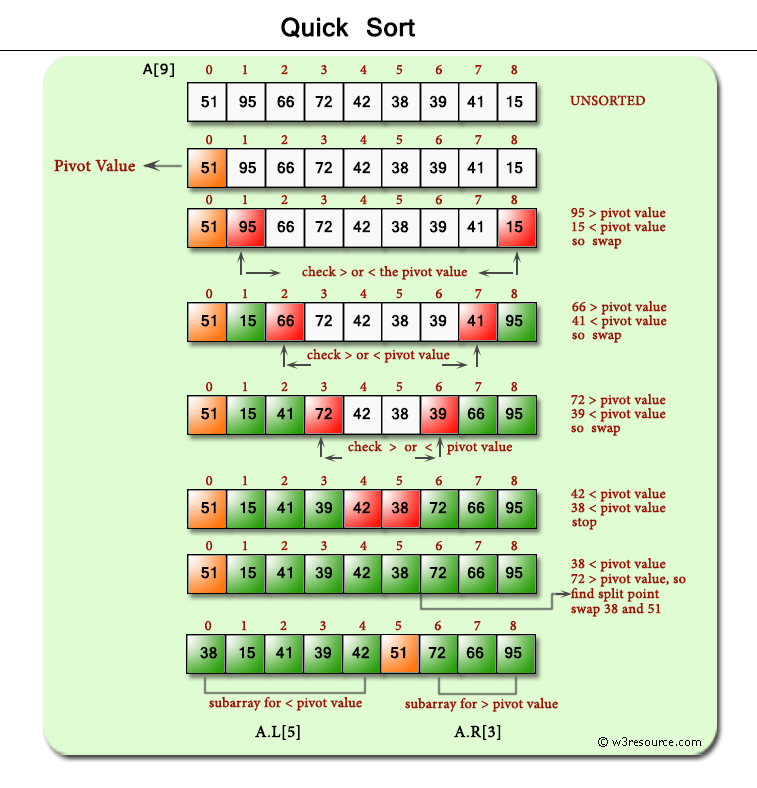
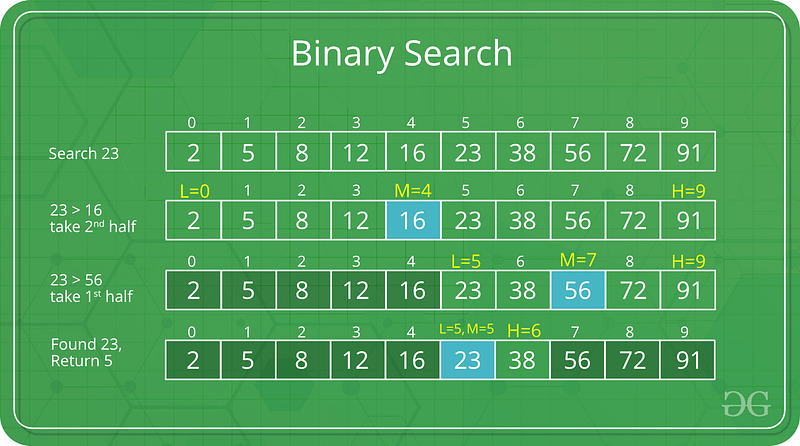
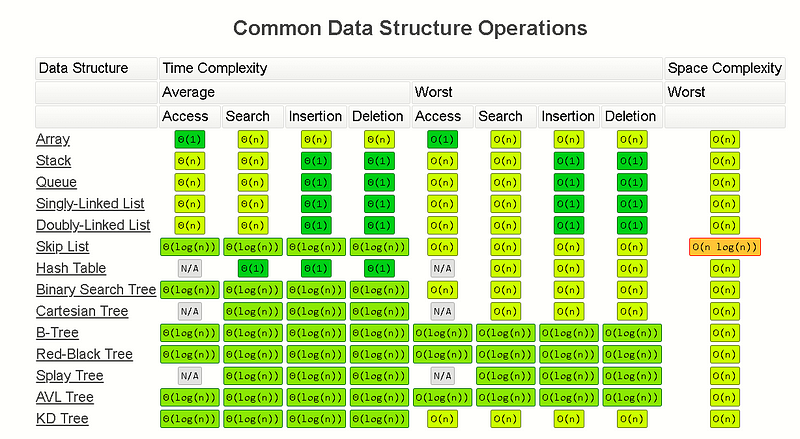
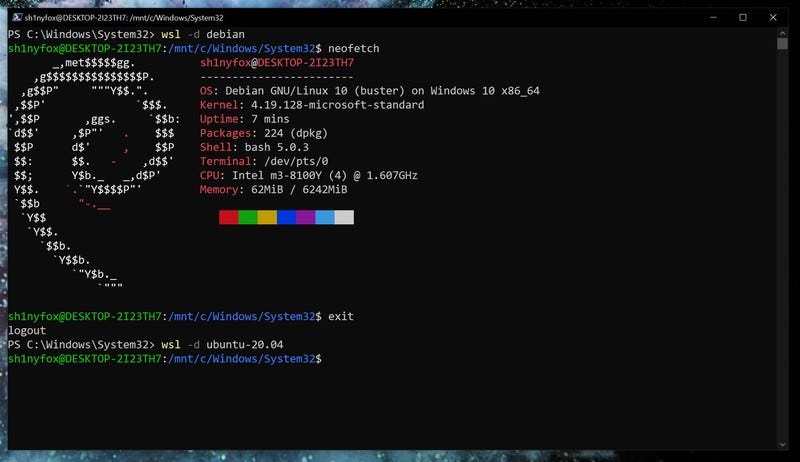
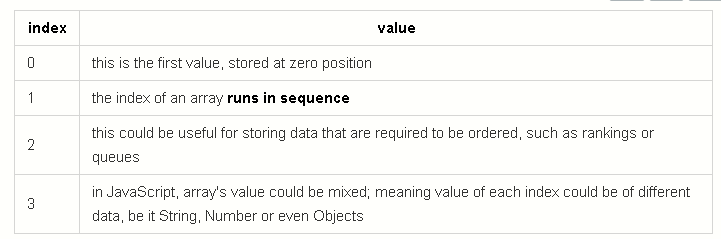

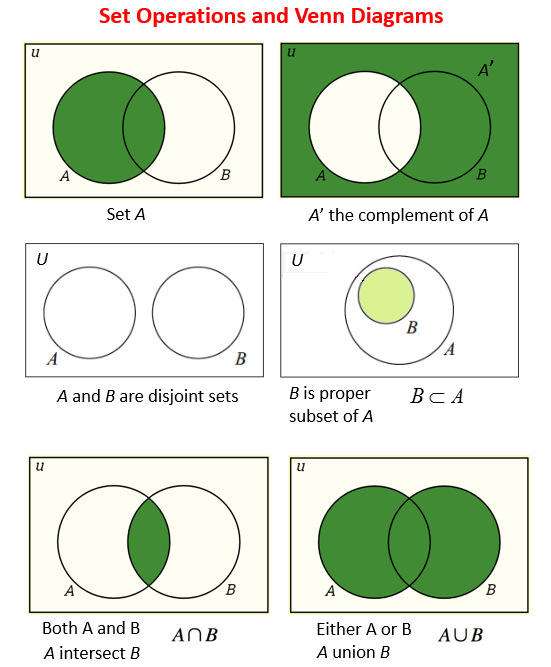
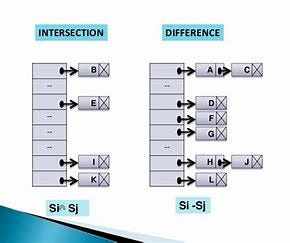
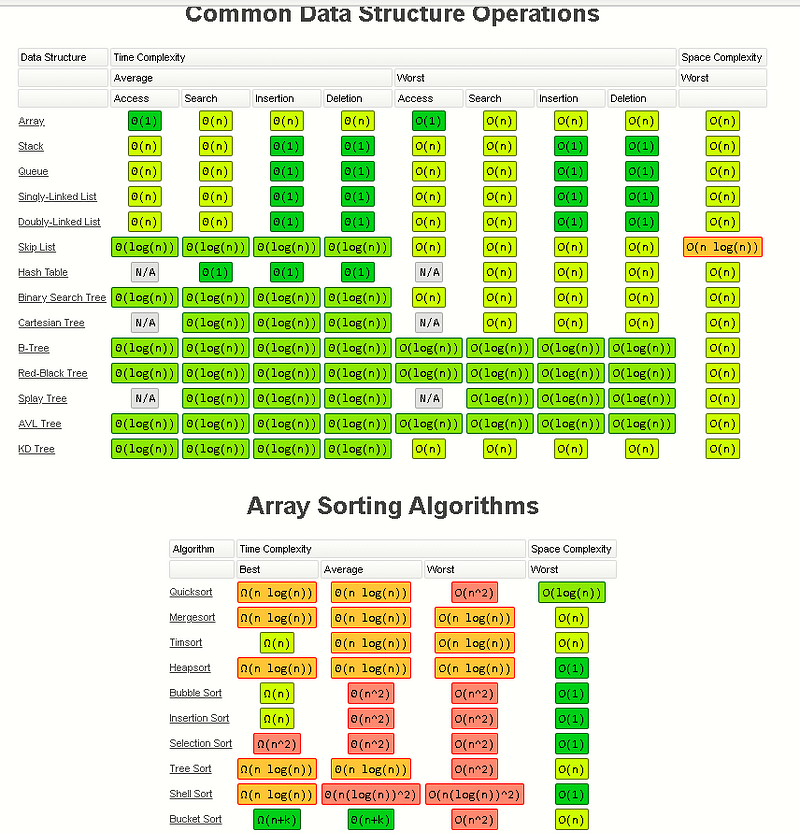
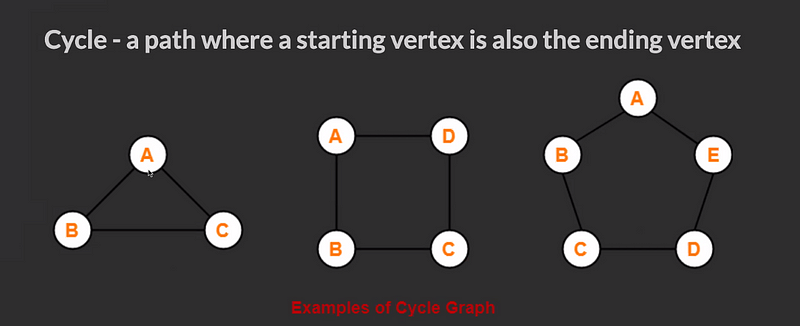


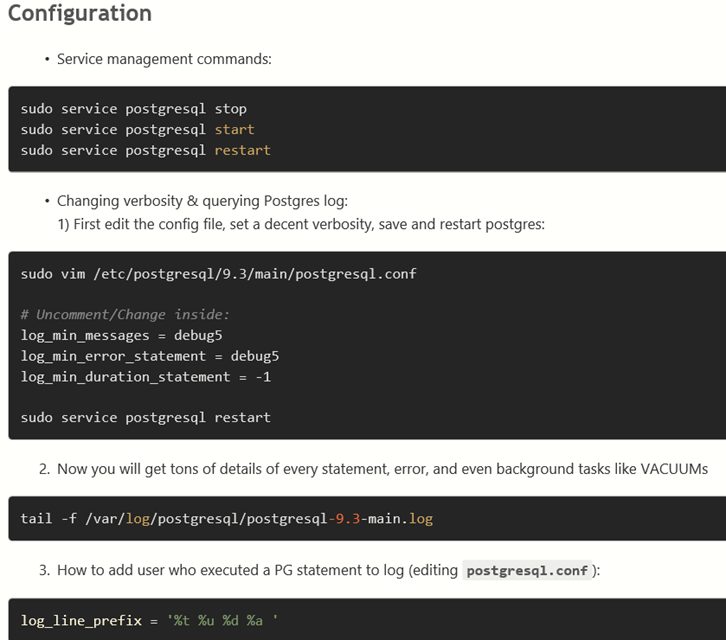
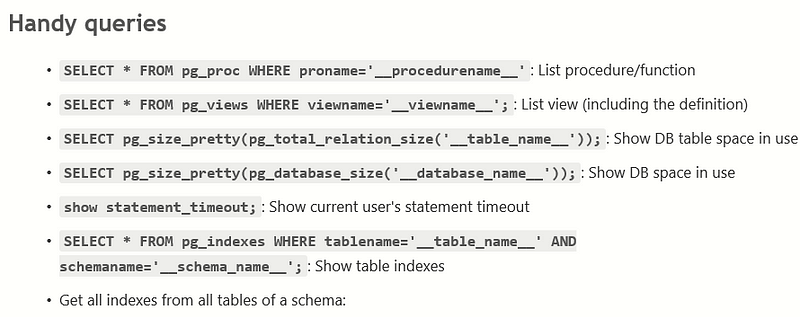
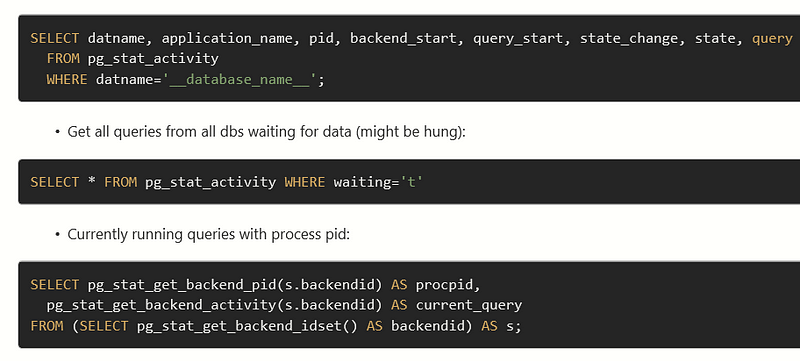

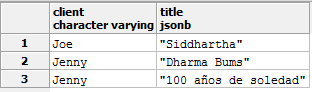

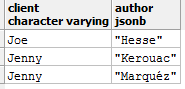
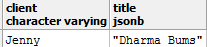


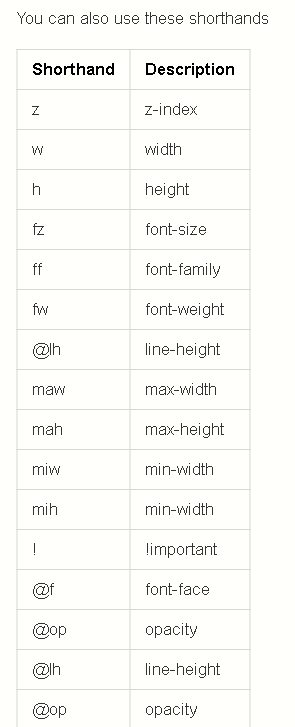


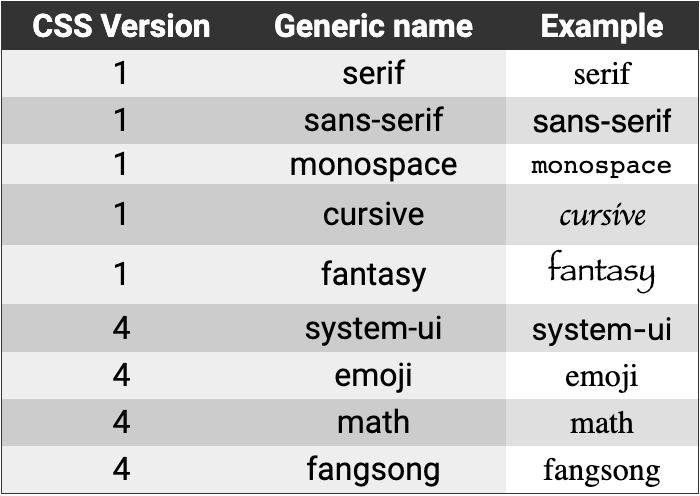


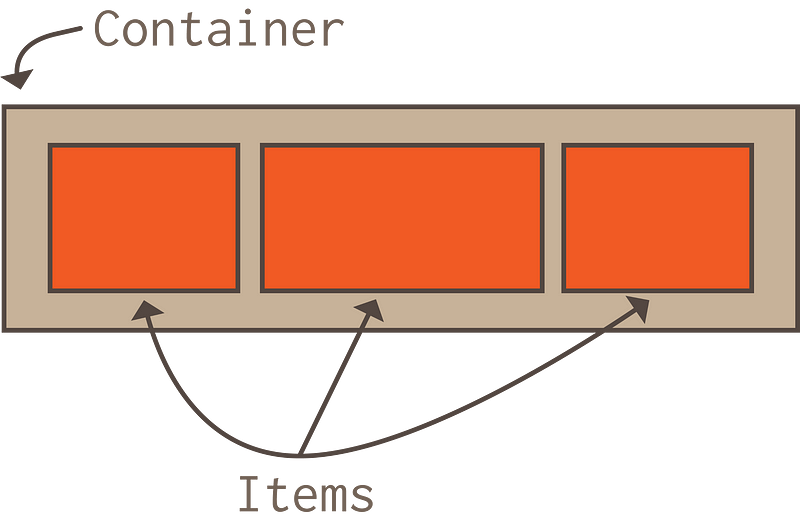


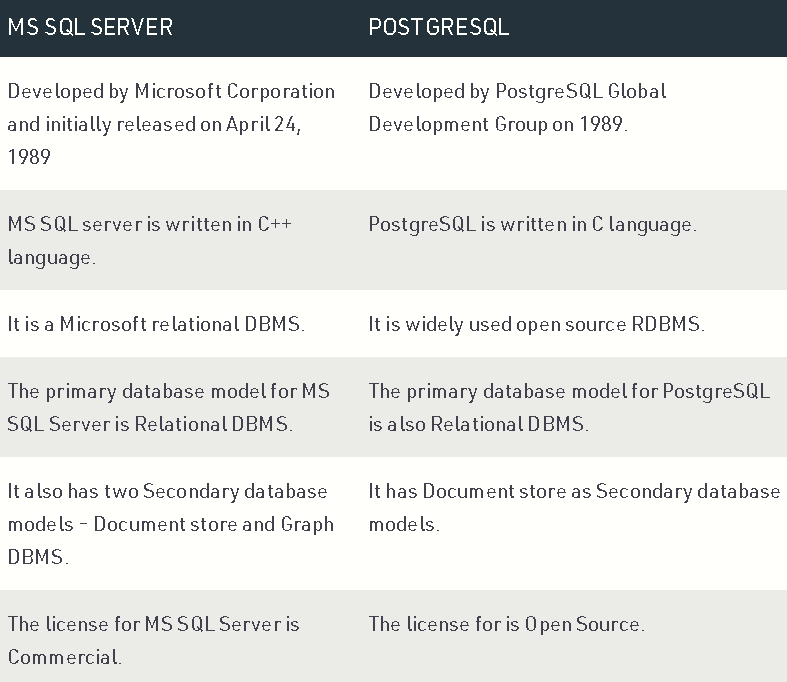
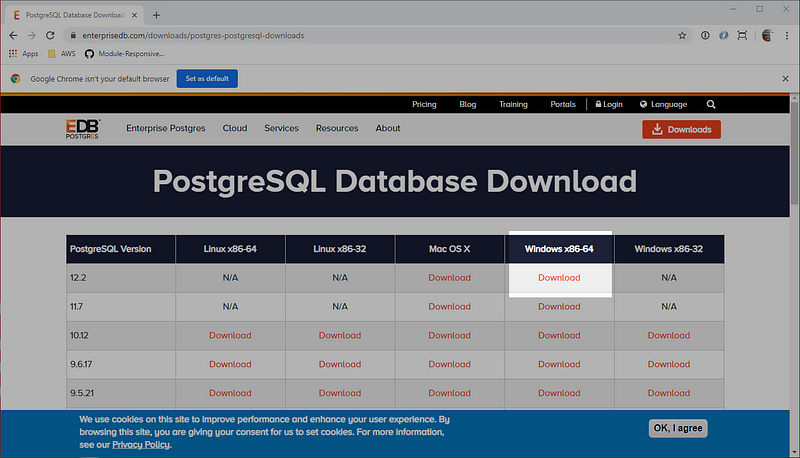
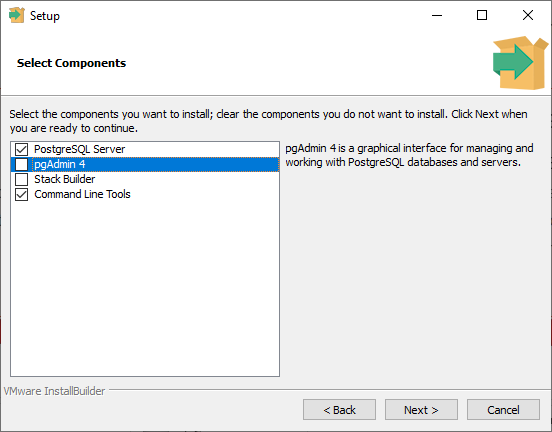
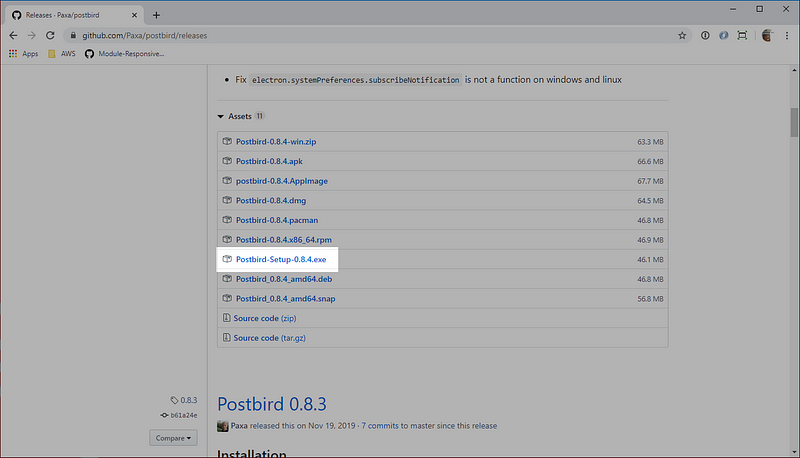


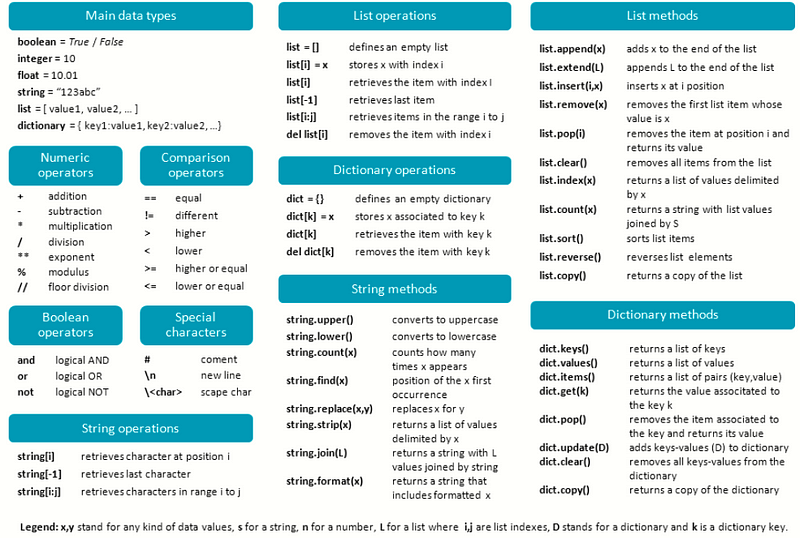
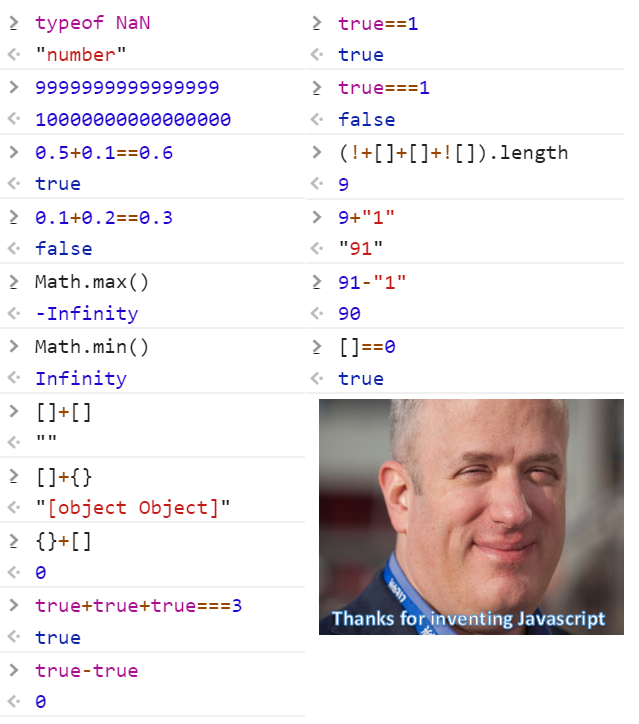
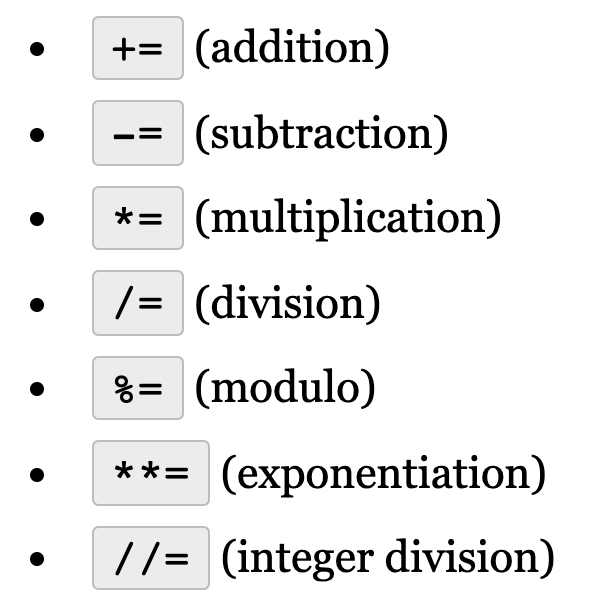
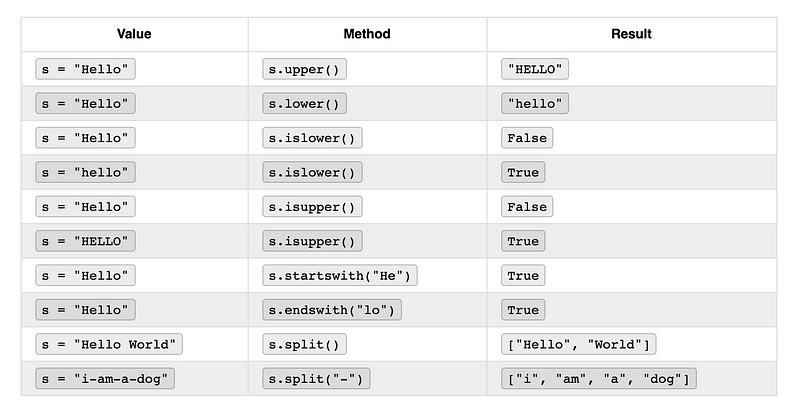
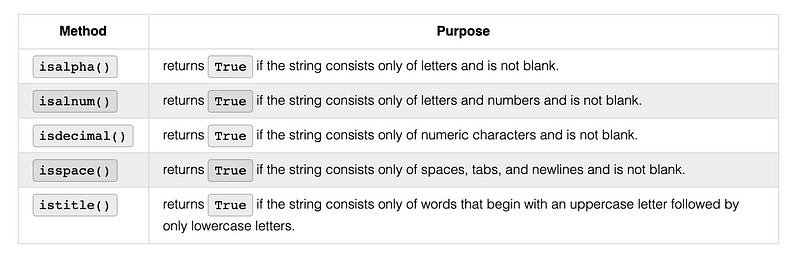

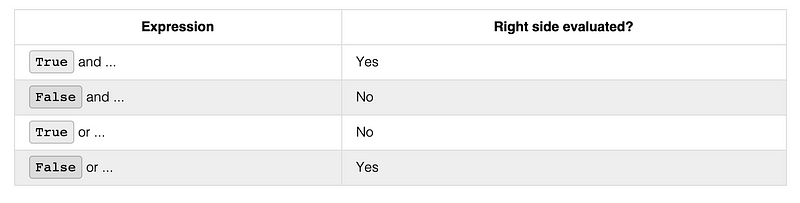

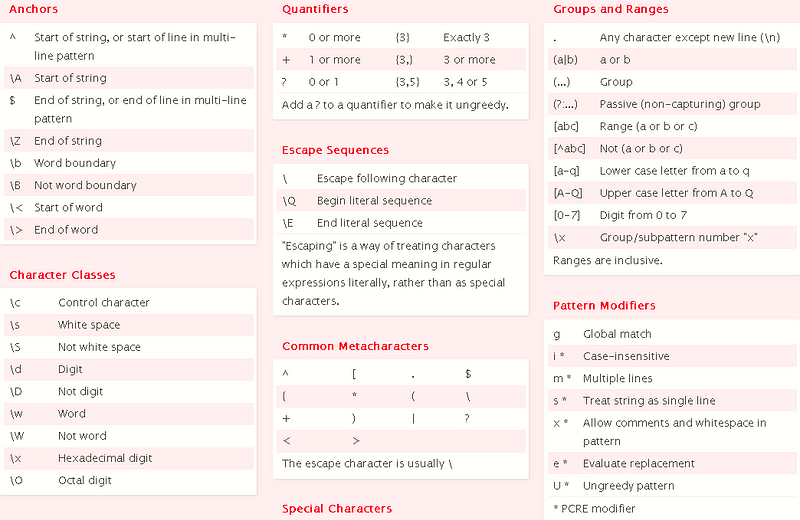

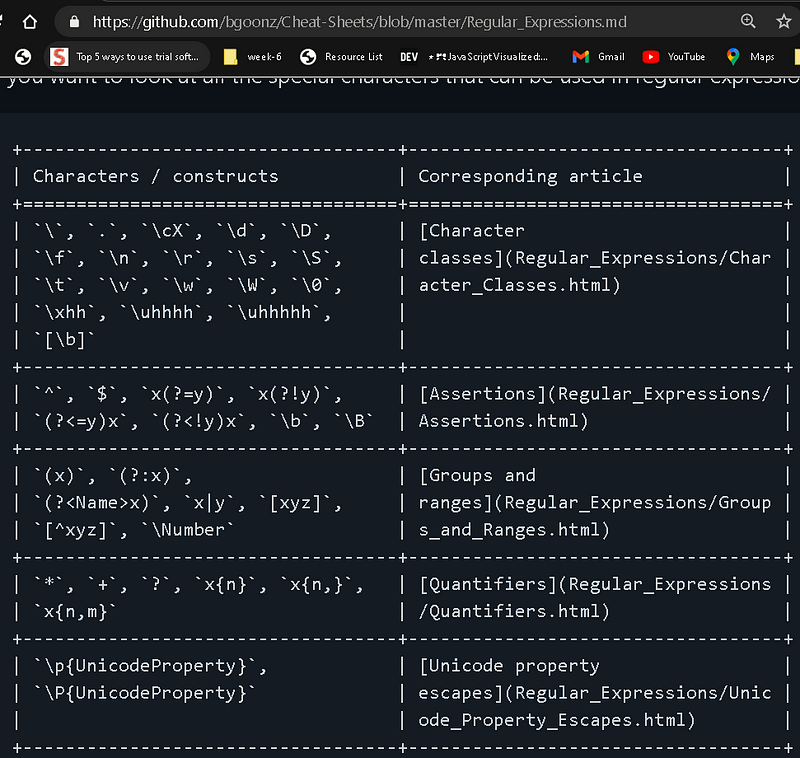


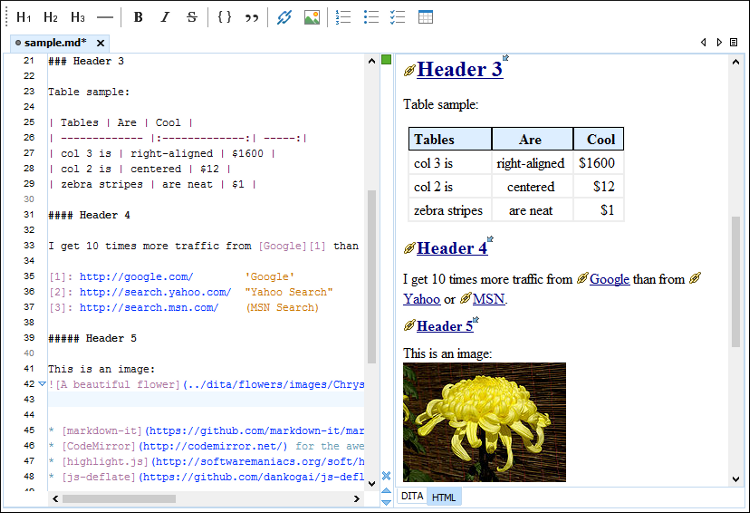


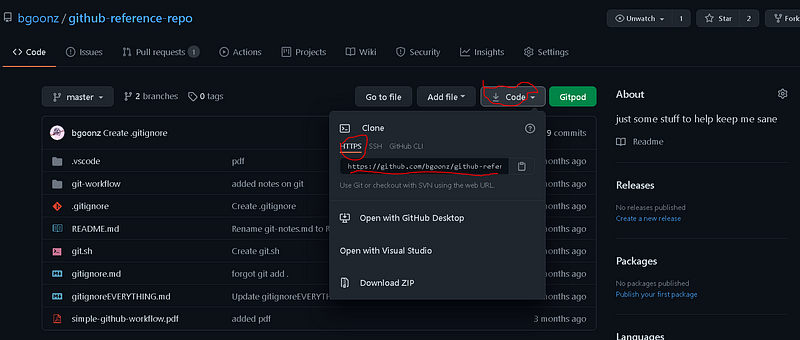

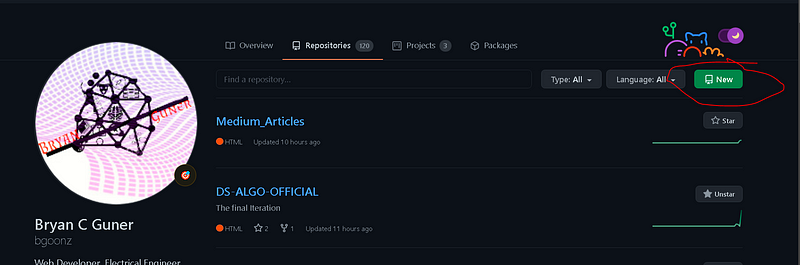
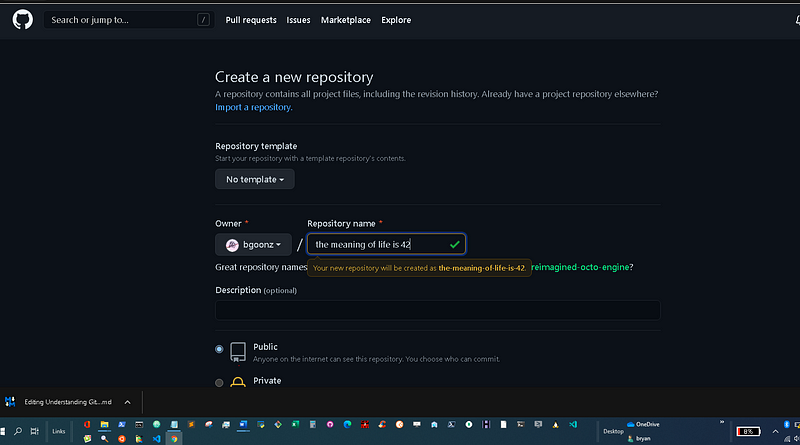


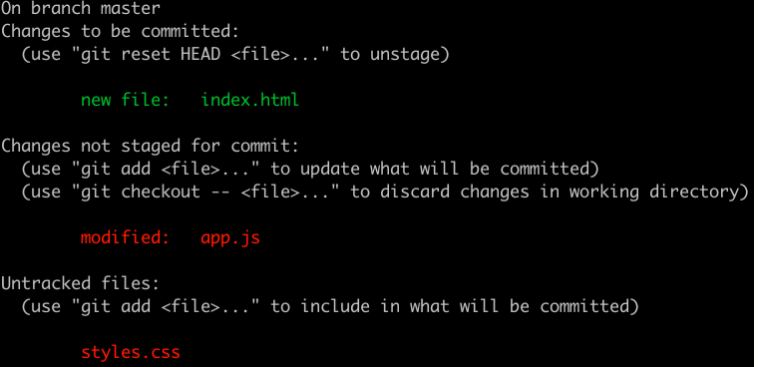
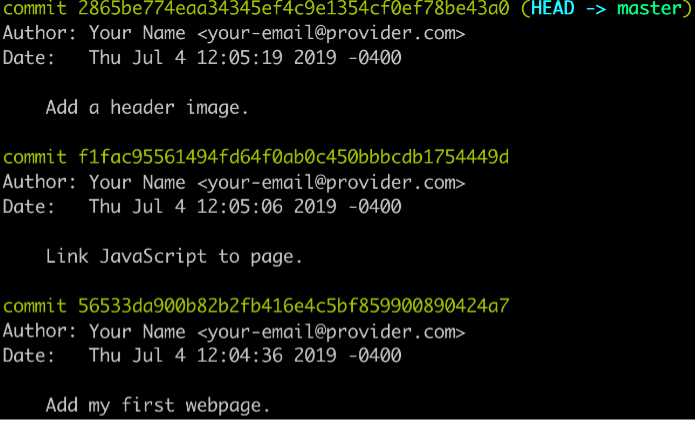

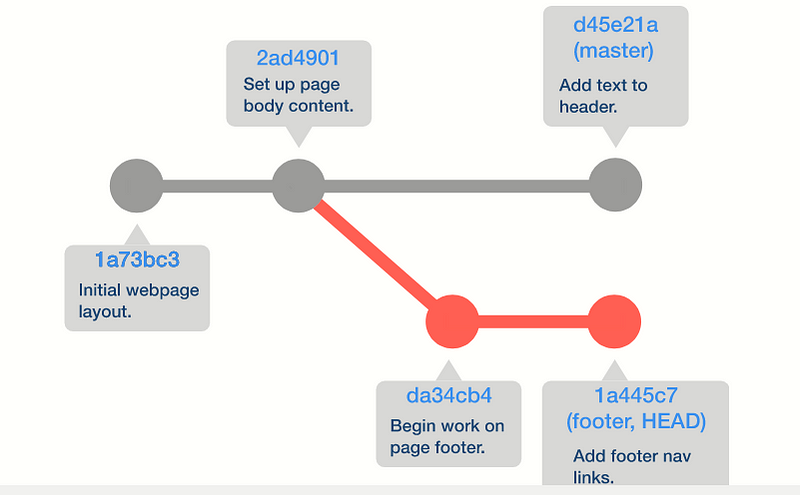
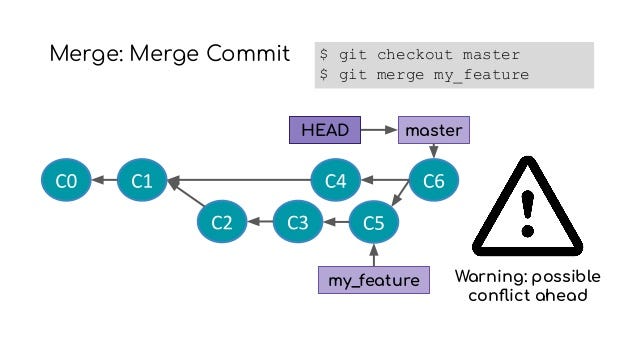
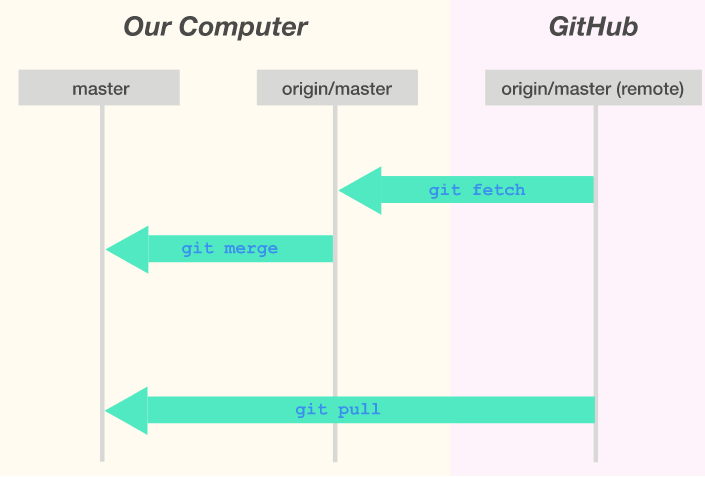
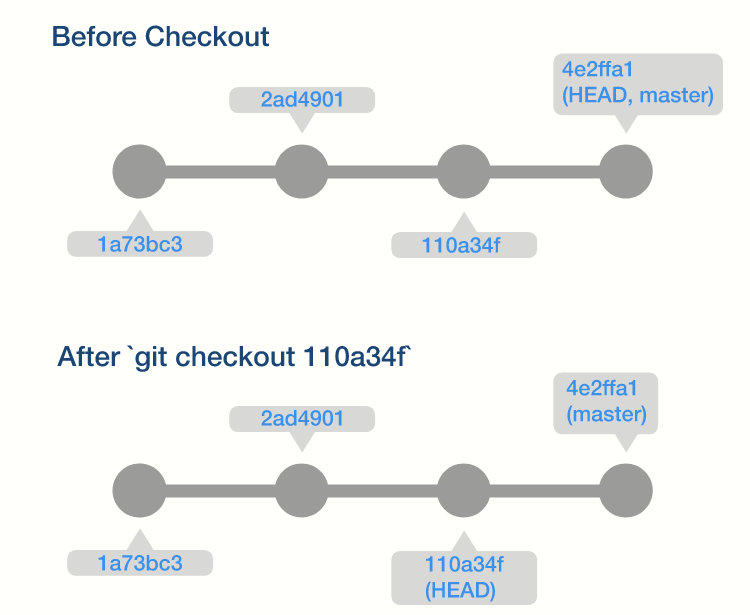
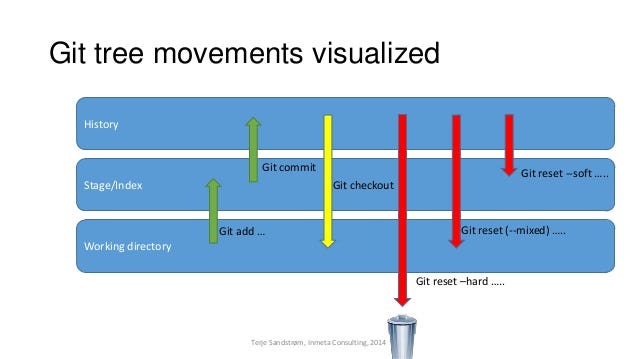
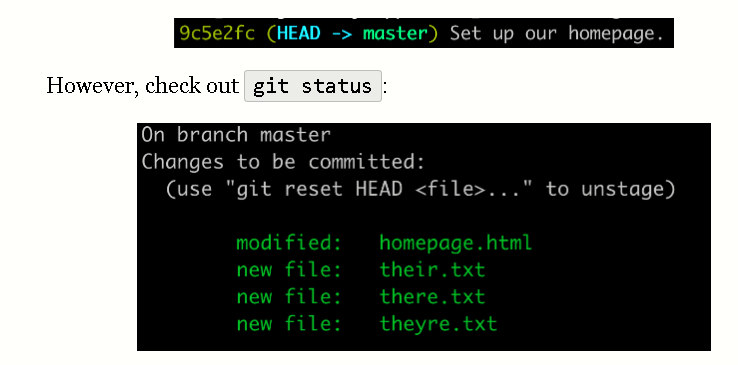

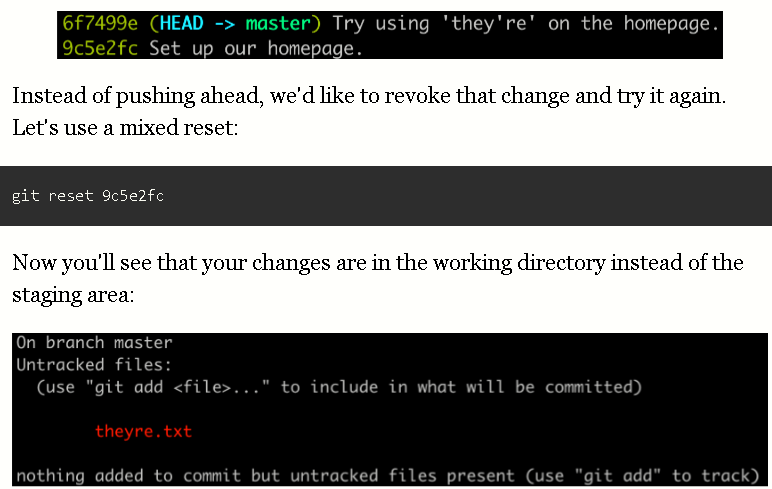

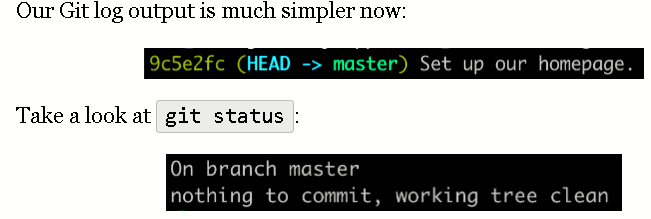
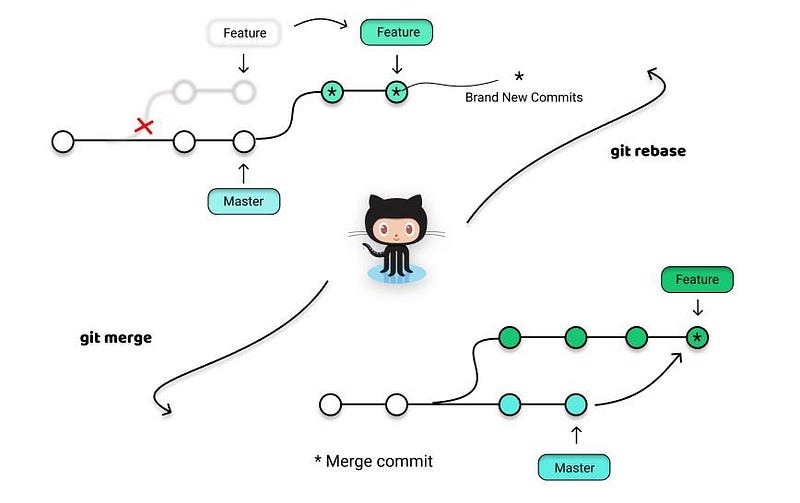
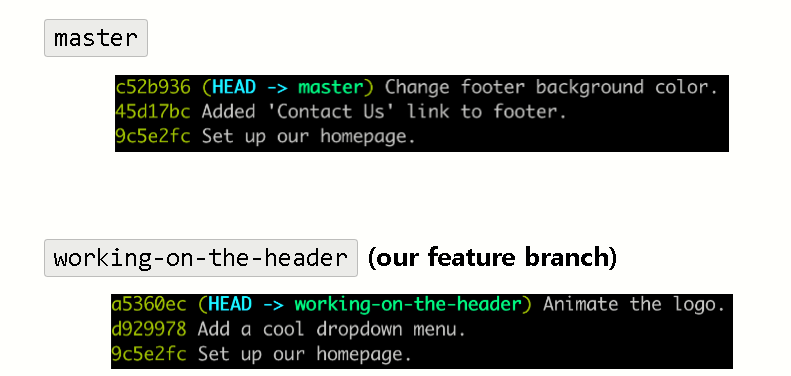
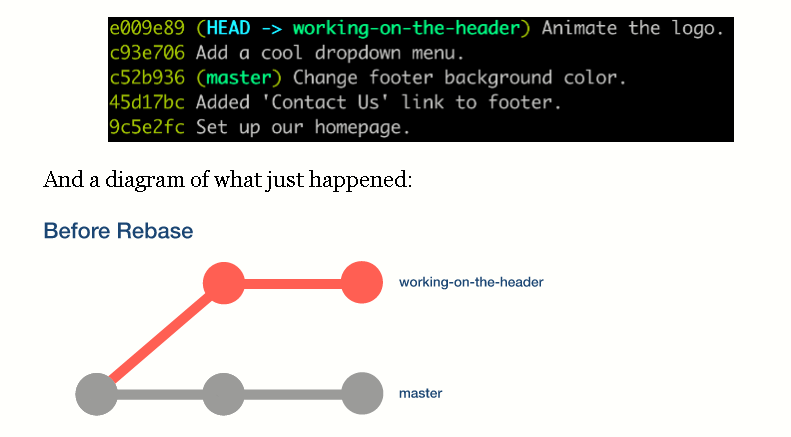
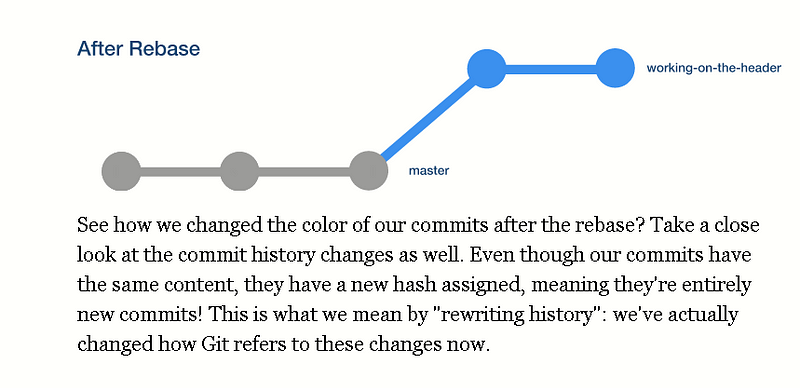


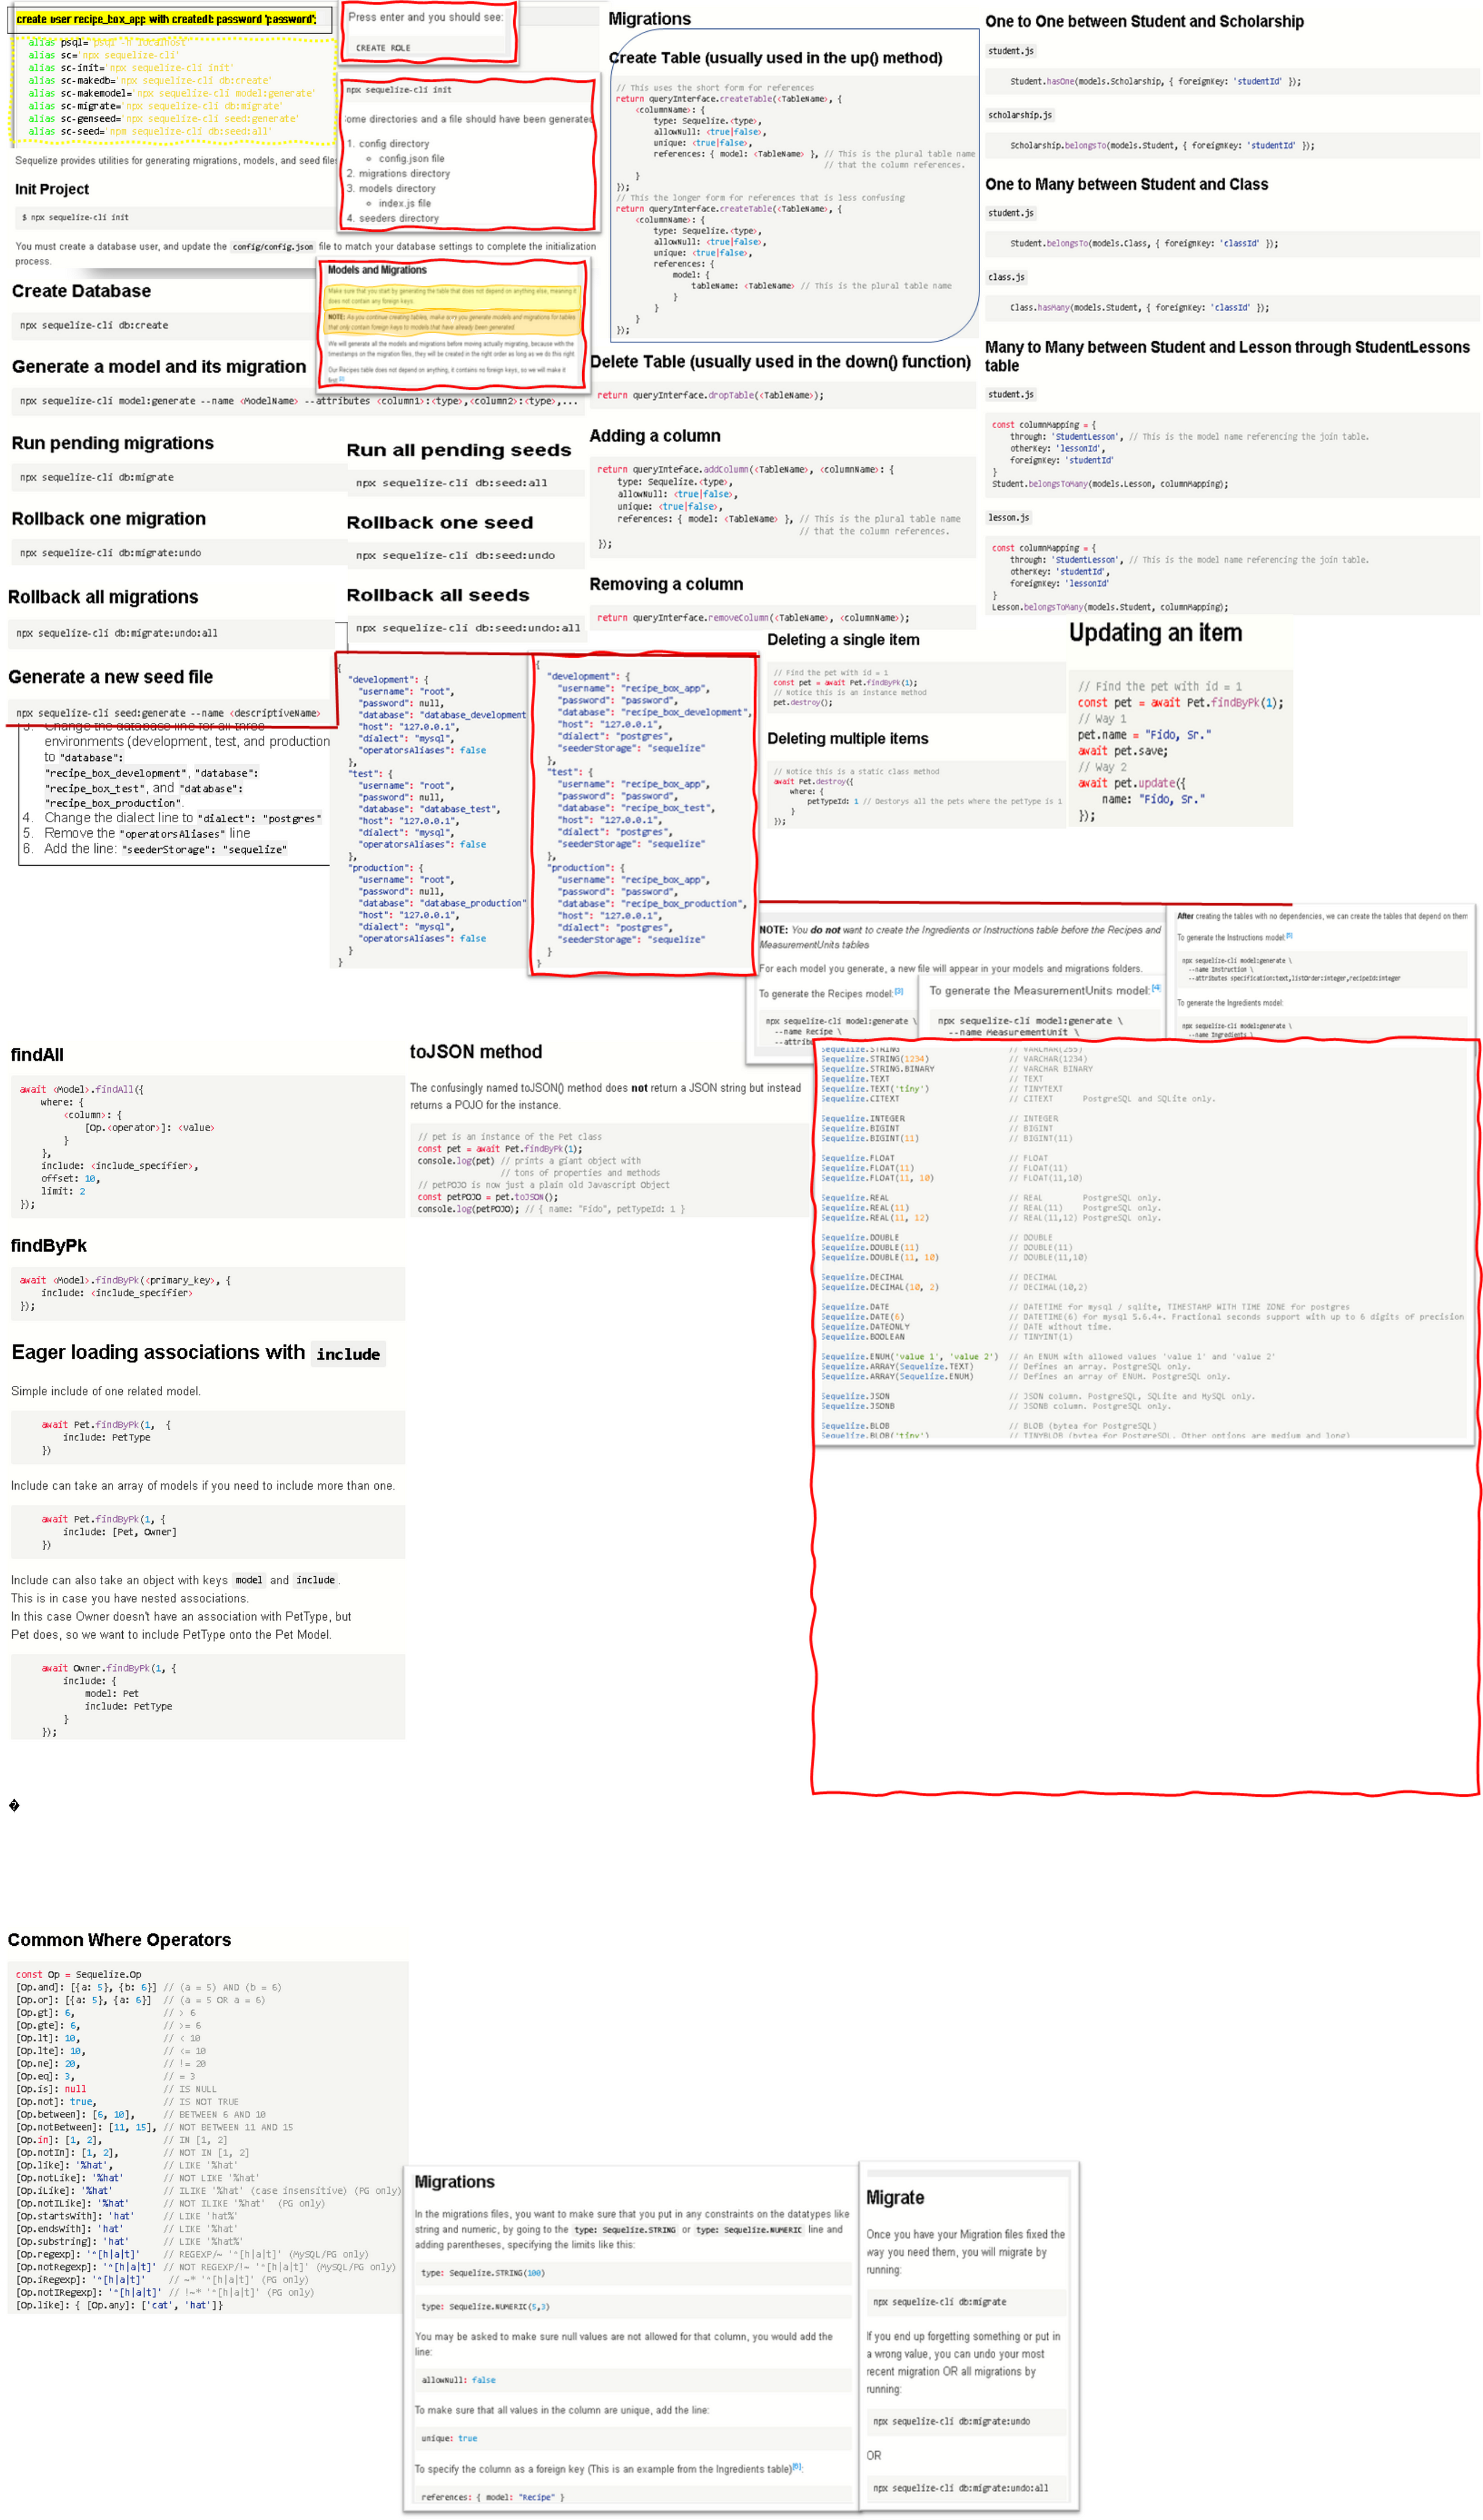
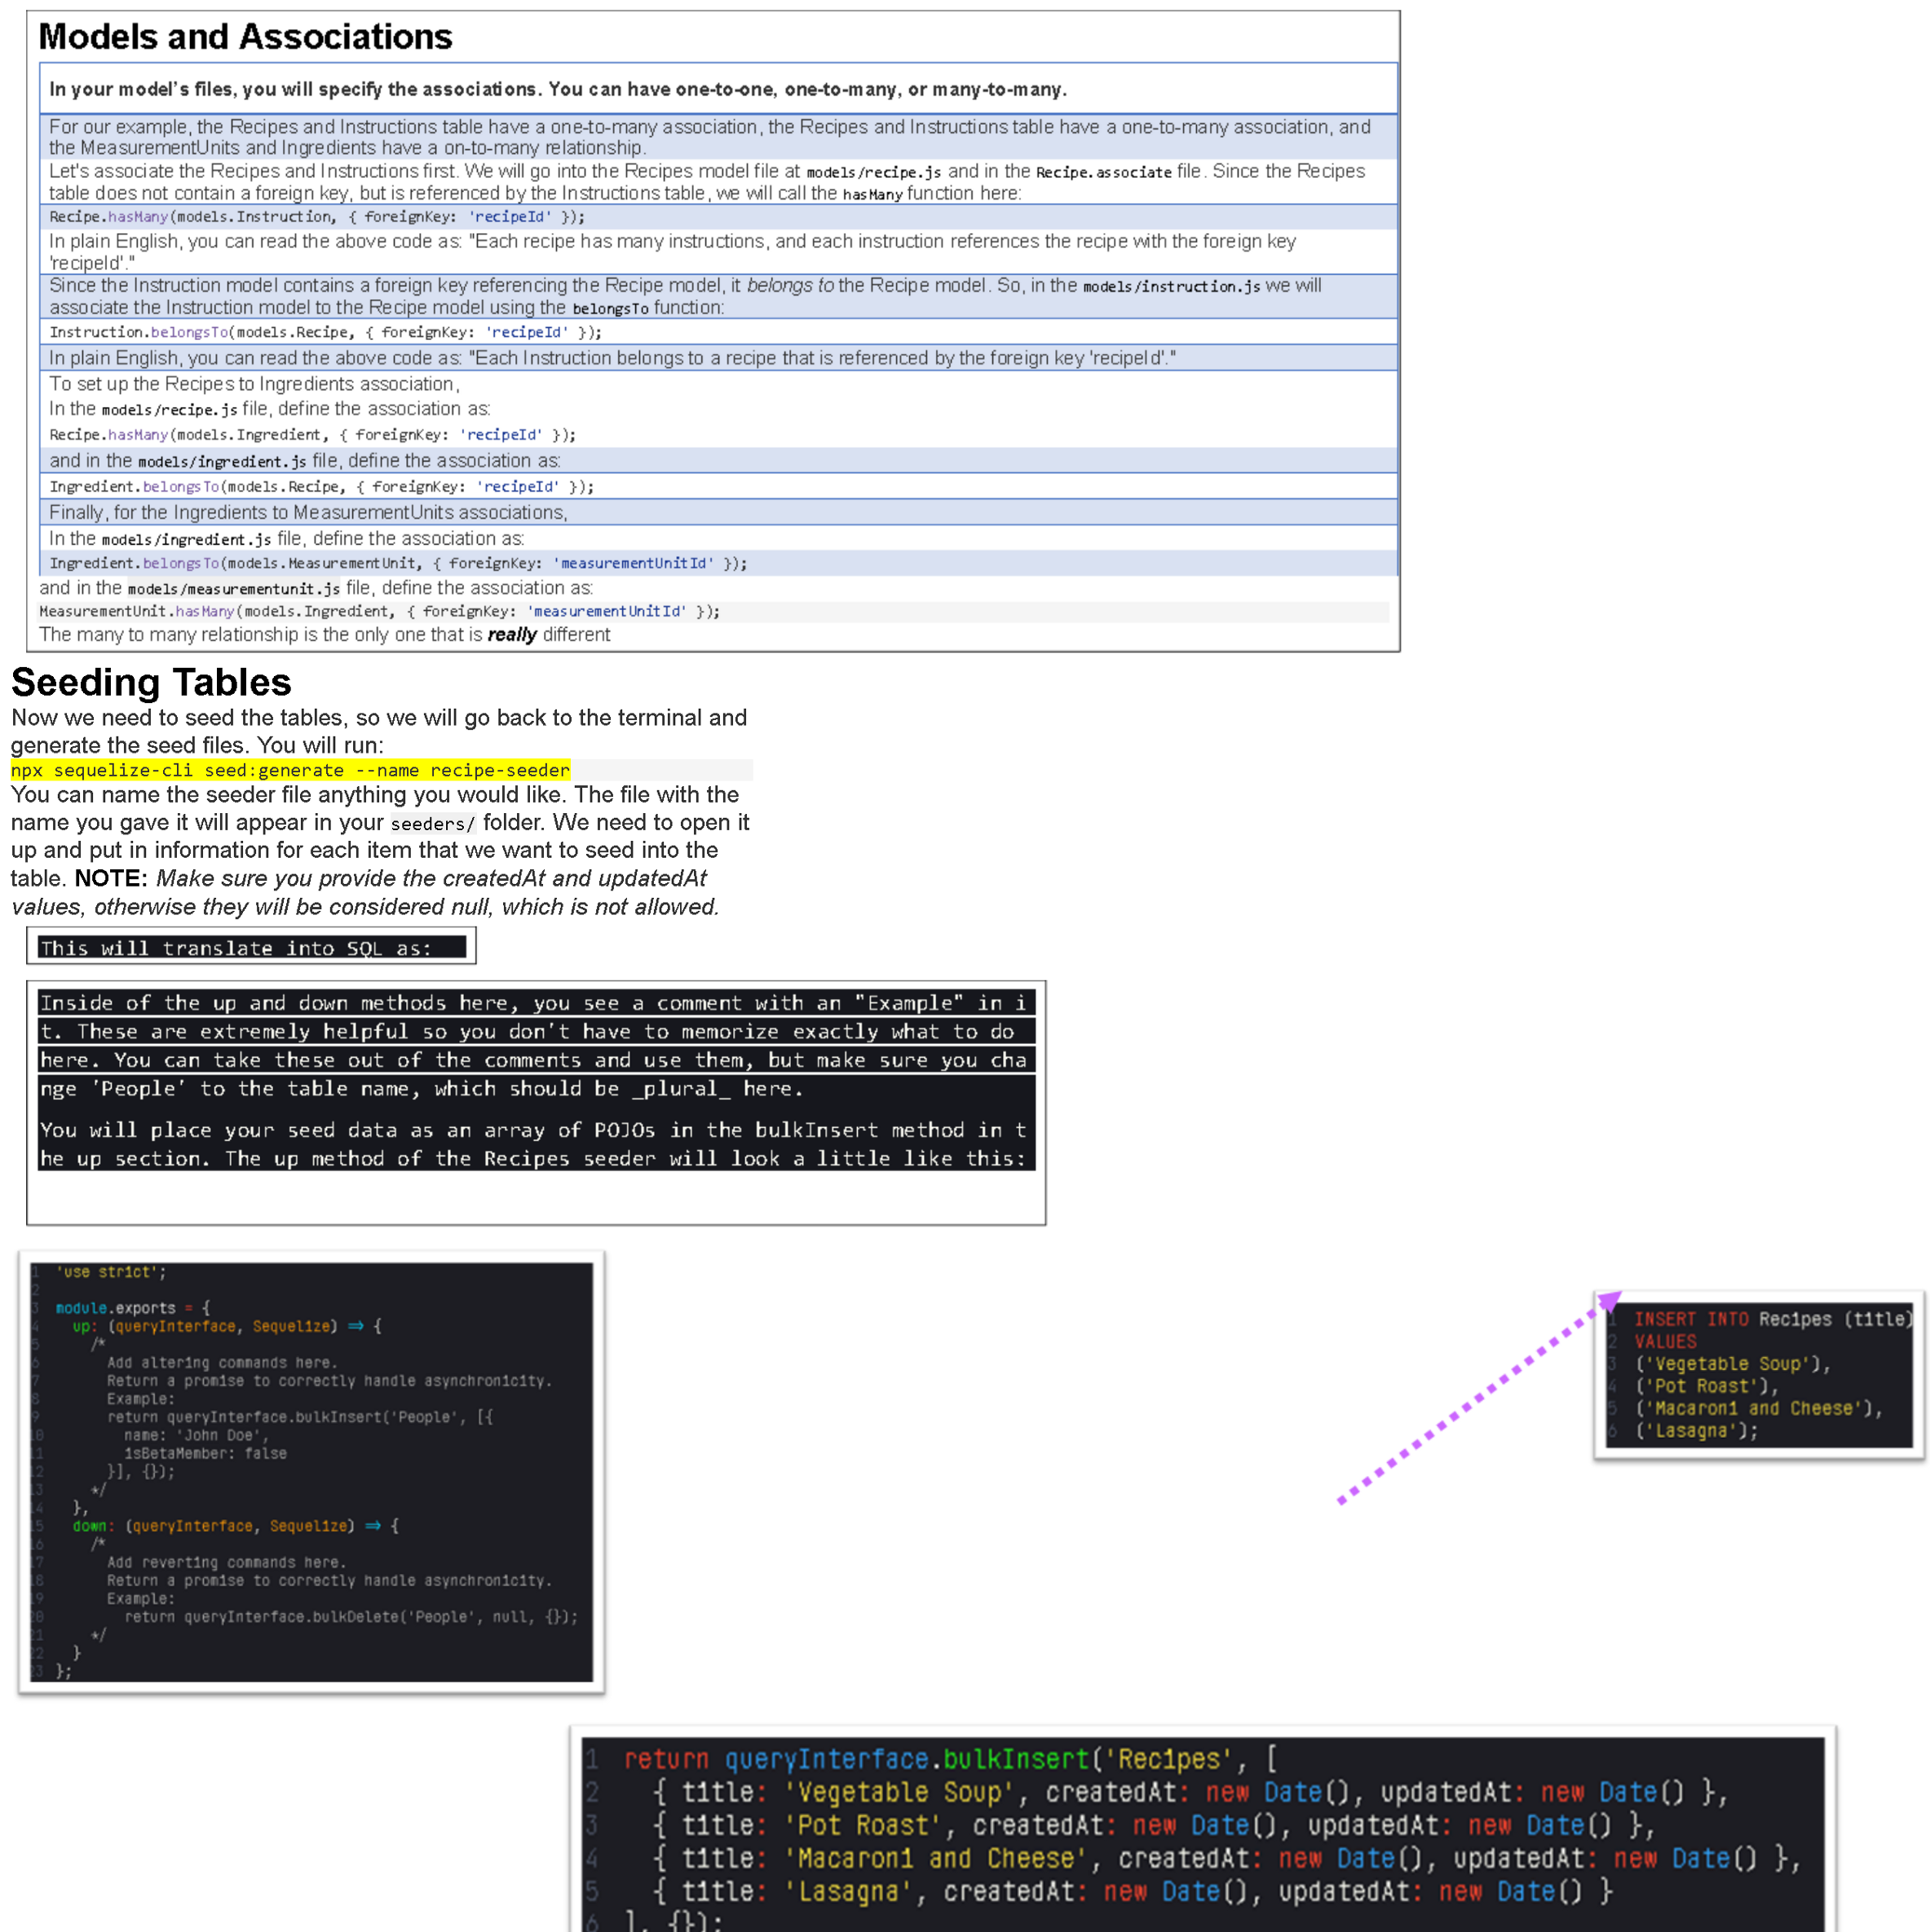

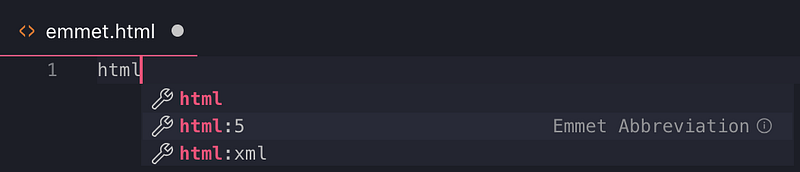


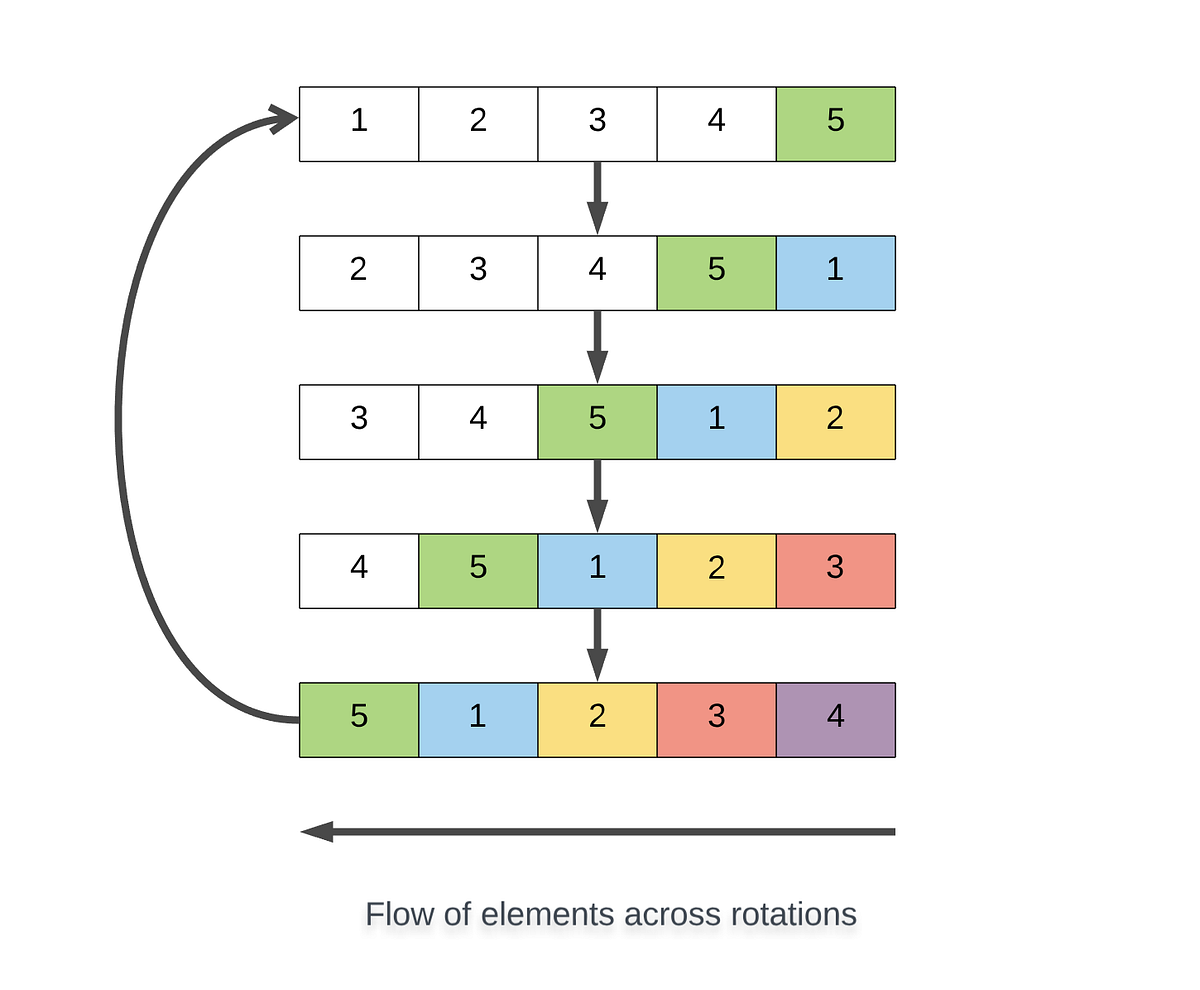


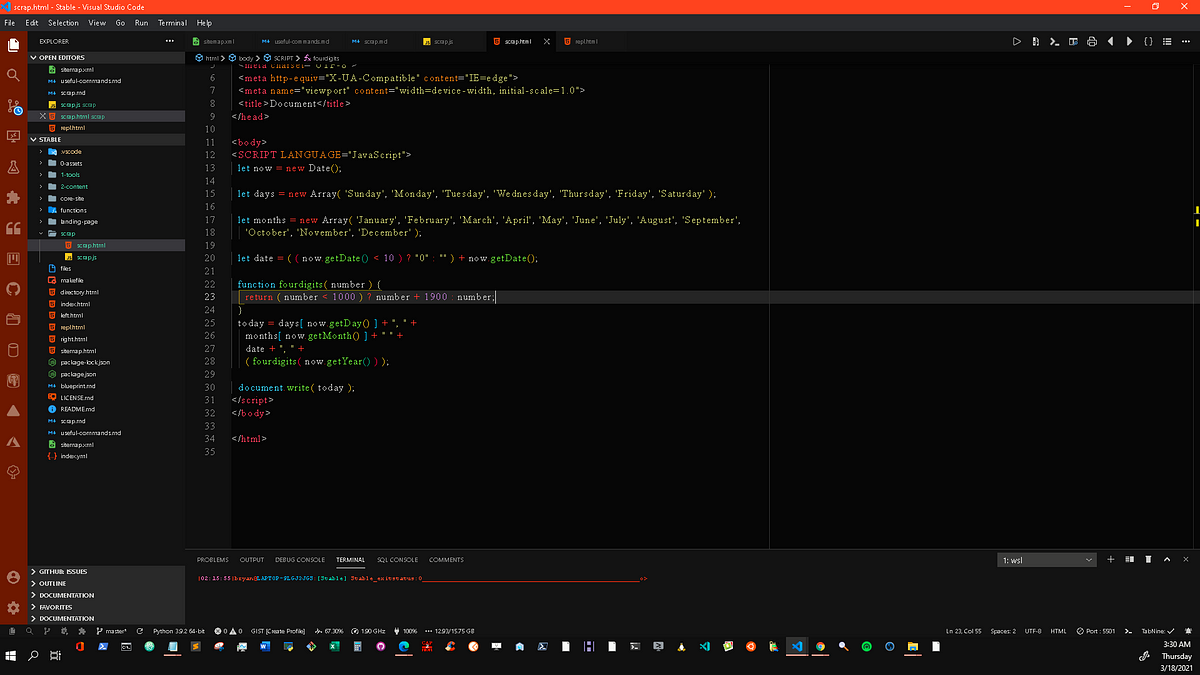
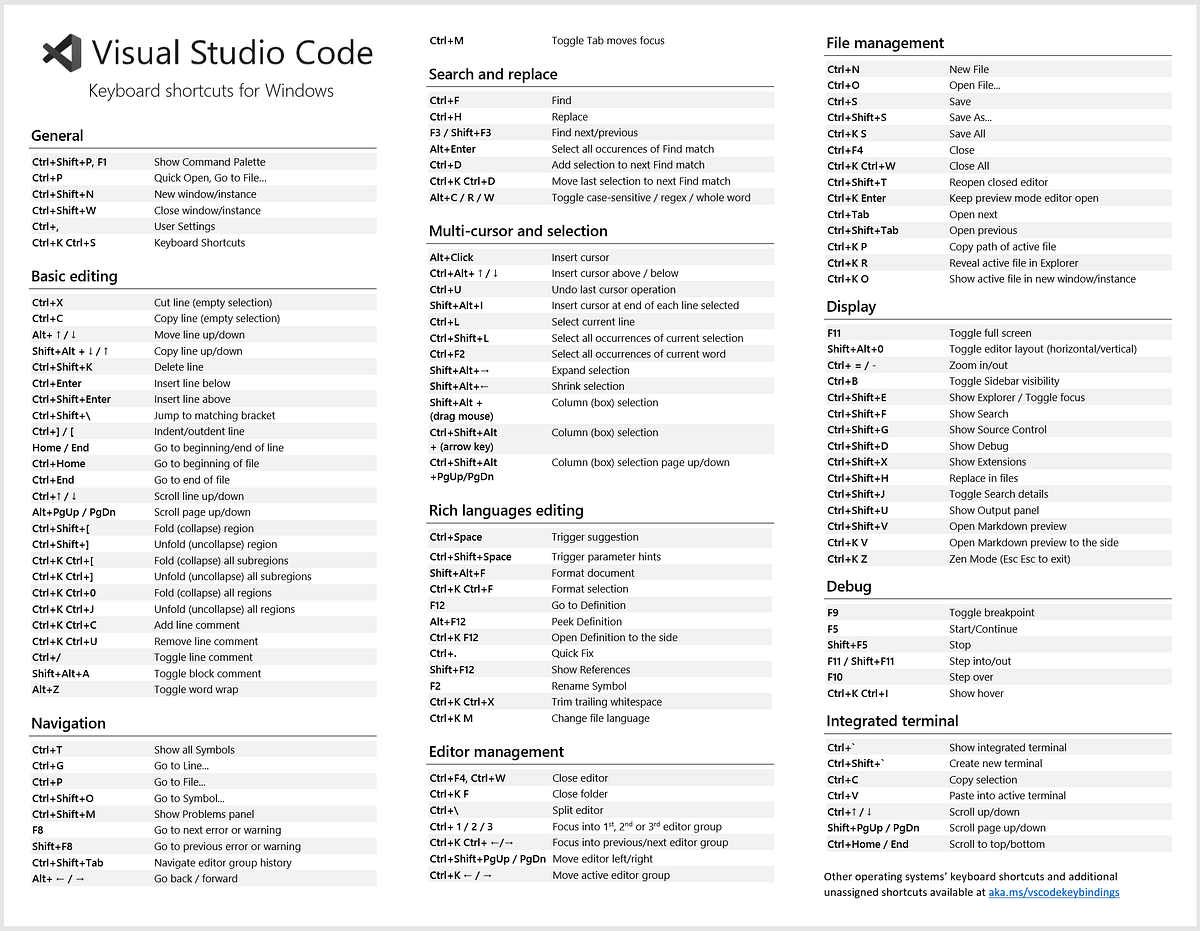


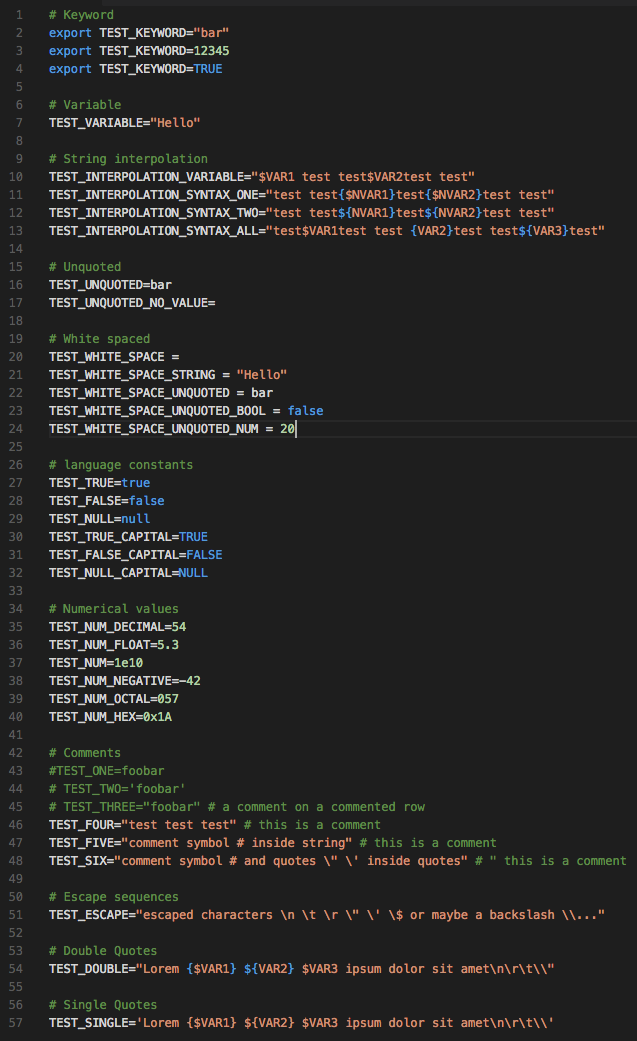
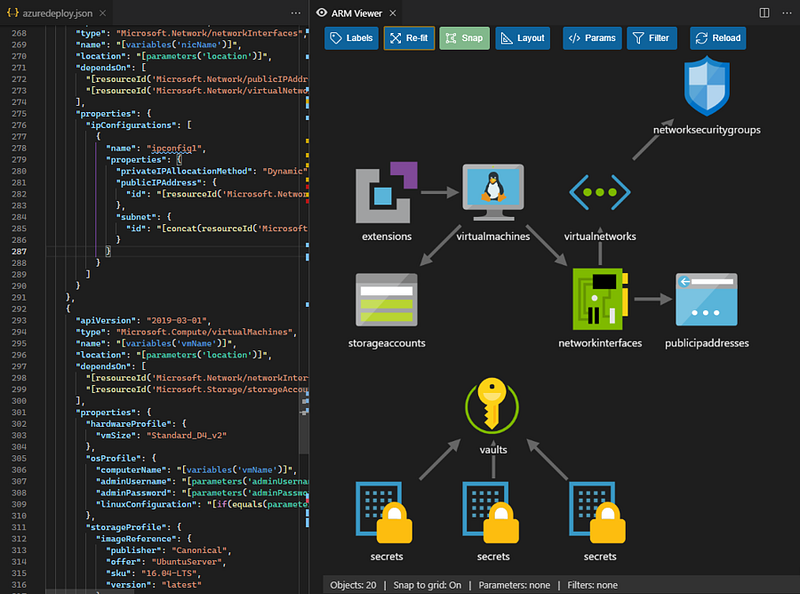


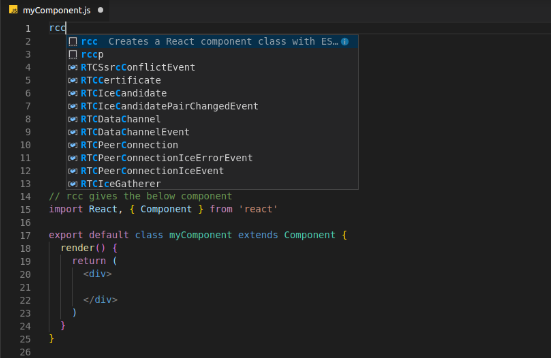


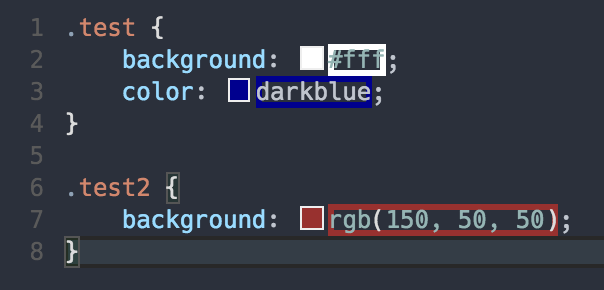
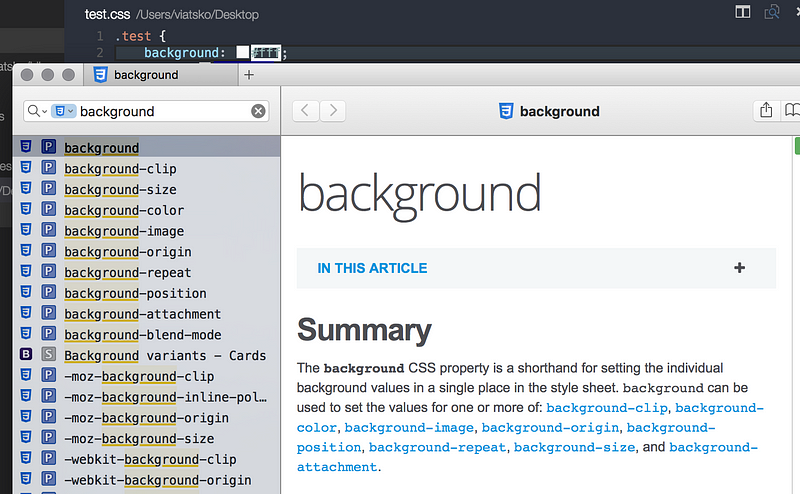
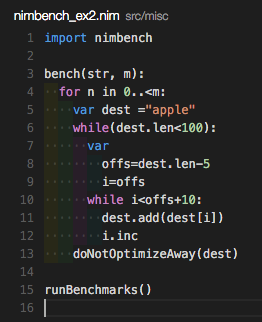


