This was not written by me. All credit belongs to user piyush on the Home Assistant forums.
- Link to post: https://community.home-assistant.io/t/absolute-beginners-guide-to-installing-ha-on-intel-nuc-using-docker/98412
Hello everyone, this is a first guide I’m writing which should help people looking to upgrade from a Raspberry Pi to Intel NUC to run their Home Assistant instances.
At this point, I assume the following
- You have a fair understanding of how Home Assistant works.
- You should know Docker to a certain extent.
- If you are new, then I would request you to stop here and go to their official getting started guide here, go through to at least Part 3 and only then come back to this thread. -- I used this video as well, Learn Docker in 12 minutes
- You have an Intel NUC available for use
- Willing to learn a little bit of Linux (I started it 3 days before writing this article)
- Does not get scared with commands 😉
There are multiple ways of running HA, and this is a place where I was confused the most as to which route to take and why? To save you a little trouble, here are the possible options
Hass.io via HassOS Image for Intel NUC
You can get the official image from here and proceed as per the installation article, i.e. burn SD card, configure the network, so on and so forth.
Pro’s
- Familiar Hass.io interface
- Add-ons support
- Widely used and most common installation with RPi
Cons
- Nothing specific here other than the fact that if you choose this path, then you would not be able to do anything else on your NUC. I would personally not recommend this because NUC is a powerhouse and you should utilize it like one.
Steps described here 4 but trust me don’t choose this path either. Even the articles say getting a virtual environment.
This is the way to go and is described in this guide. Docker works best with Linux systems, don’t even bother with Windows 😉, I have been there and the experience sucks.
Pro’s
- You get a full Operating System (Ubuntu) which you can utilize for anything, its like having an extra computer with you.
- Docker ensures all of your HA needs are fulfilled without you worrying of setting up the environment
- Anything goes wrong with docker, destroy the containers and rebuild, just takes max a minute to come up.
- A whole community supporting this setup, so anything goes wrong, do a little google and trust me someone might have faced and fixed that problem already.
Cons
- Nothing I can think of at this point, please let me know in the comments if you find one.
There are other options as well but we will stick to the most talked about. Alright, now that we decided the path to go, let’s start setting up the system.
- Ensure you have a keyboard and mouse connected with your NUC, you would need it initially.
- Ensure your internet is working, NUC should be connected to WiFi or Ethernet.
- Ensure that your NUC gets a static IP address from your router.
- NUC should be on the latest BIOS, see instructions here
- Create a bootable Ubuntu installation USB stick
- Follow the official guide from Ubuntu website here, https://www.ubuntu.com/download/iot/intel-nuc-desktop
- It details out instructions on how to download and create a bootable USB stick. PS: I used Ether to create the bootable drive
- NUC has SSD and RAM connected, explaining this is beyond the scope of this guide but should not be difficult to do with a simple google search or watching a youtube video.
Attach the bootable USB stick which you created previously and Power up the NUC. It should directly take you to the Ubuntu installation, it’s essentially a next, next, finish dialog. Nothing complicated here.
- Ubuntu getting started links - https://help.ubuntu.com/stable/ubuntu-help/index.html.en 3
- A very simple youtube video showcasing the installation, just focus on the installation part and ignore which device he is working on, the process shall remain the same for you. https://youtu.be/2djTPJ02xK0?t=143 7
Open Terminal on your system and execute the commands in series as they are mentioned. These will basically add docker repository on your machine and finally install Docker. For more information, go here to know what each of these commands does
sudo apt-get updatesudo apt-get install \
apt-transport-https \
ca-certificates \
curl \
gnupg-agent \
software-properties-commoncurl -fsSL https://download.docker.com/linux/ubuntu/gpg | sudo apt-key add -sudo add-apt-repository \
"deb [arch=amd64] https://download.docker.com/linux/ubuntu \
$(lsb_release -cs) \
stable"sudo apt-get updatesudo apt-get install docker-ce docker-ce-cli containerd.ioBy now, you should have a working Docker system ready on your machine. The first thing that we are going to do is installing Portainer via a Docker container. This will allow us to work with our local containers.
Installing Portainer (GUI for managing Docker containers)
In your terminal, execute the commands below
- Create a volume for Portainer Data
sudo docker create volume portainer_data- Run Portainer in detach mode
docker run -d -p 9000:9000 --restart always -v /var/run/docker.sock:/var/run/docker.sock -v portainer_data:/data portainer/portainerBy now, you will have the Portainer GUI setup and running which you can access at http://localhost:9000 or http://:9000
The first time you log-in, it will ask you to create your user account, please go ahead and do that and after successful login, it will showcase a screen to choose which docker environment you want to choose, select Local from that list and you should finally see a screen like below
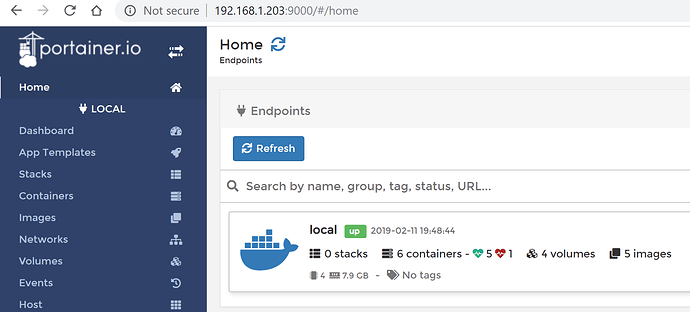
Alright, we are all set with Portainer, let proceed onto installing Home Assistant
We are going to take the official path of the installation here and use the following docker command.
Note, we are using /srv/homeautomation to store all of our docker containers, because typically in linux /srv folder is used to serve any content like website pages, etc. Also, it is not mandatory to use this folder.
docker run -d --name="home-assistant" --restart unless-stopped -v /srv/homeautomation/hass-config:/config -v /etc/localtime:/etc/localtime:ro --net=host homeassistant/home-assistantIt is going to download the docker image for you, this might take some time depending on your internet connection. Once done, you should be able to access your instance on http://localhost:8123 or http://your-nuc-ip-address:8123
From here on, things are pretty simple because you have already done this before. Just create a new user, login to HA and your Home Assistant is now working.
Note: This is not a hass.io installation, so no add-ons will work. If you were previously using any add-ons, those will have to be installed in separate docker containers
The most common requirement is to have an MQTT broker installed. For this, again, we are going to create another docker container which will connect to the local HA instance which we created above.
- Create volume for Mosquitto data
docker create volume mosquitto_data- Create a blank file in the location where you want MQTT config to reside. Since I mentioned that all of our docker containers are residing under /srv/homeautomation/ folder, we will choose the same path.
- Create a folder called mosquitto under /srv/homeautomation/. Next, you need to create a blank mosquitto.conf file, this is the file which contains all the configuration related to your MQTT instance
sudo mkdir /srv/homeautomation/mosquittosudo touch /srv/homeautomation/mosquitto/mosquitto.conf- Now we are ready to execute the docker run command and create a new container for Mosquitto
sudo docker run -itd \
--name="mosquitto" \
--restart on-failure \
-p 1883:1883 \
-p 9001:9001 \
-v /srv/homeautomation/mosquitto/mosquitto.conf:/mosquitto/config/mosquitto.conf \
-v mosquitto_data:/mosquitto/data \
-v mosquitto_data:/mosquitto/log \
eclipse-mosquitto- This will create and run the MQTT container, check the portainer and you should see a new container running. The next thing we have to do is create an MQTT user which will be used to connect to our broker. This needs to be done inside the container where the broker is installed. In order to execute commands inside the container, we use the following:
sudo docker exec -it mosquitto shThis will put us right back into the container’s shell and we’ll execute another command there
mosquitto_passwd -c /mosquitto.config/pwfile hasswhere hass is the username. This command will prompt to enter credentials twice, please do that and you are done. Just exit the container’s shell by typing exit and hitting enter, this should put you back onto your Ubuntu’s terminal.
- The final thing that we have to do is to tell the broker about using the password file pwfile we just created. This is where we will modify the mosquitto.conf file which we created earlier. The problem with updating this file is that as a normal Ubuntu user, you would not have the required permissions to modify the file and that is where we are going to use sudo
sudo gedit /srv/homeautomation/mosquitto/mosquitto.confGo ahead and append the following line and save the file
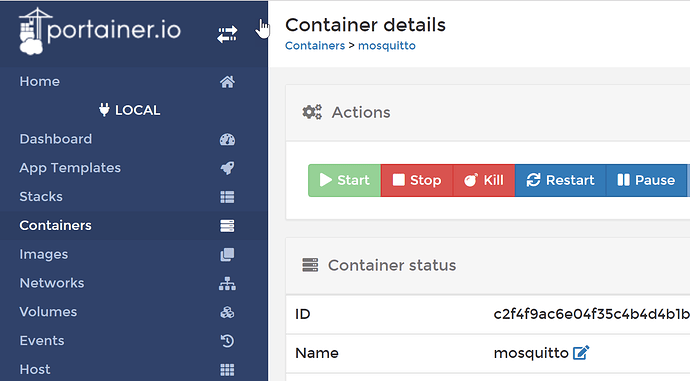
password_file /mosquitto/config/pwfile- Once this is done, you need to restart your mosquitto container for the changes to take effect. This can easily be done by going on Portainer >> Containers >> mosquitto and pressing the restart button at the top.
This concludes our MQTT installation. Just configure MQTT component by modifying the configuration.yaml file as usual.
Alright, now that your HA is ready, MQTT is ready, we can go ahead and configure our entities. At this point, I would either install vscode (my preferred code editor) or work with syncthing (this is something very new that I have learned) or use the sudo gedit <file-name> to update the configurations.
To ensure that your Ubuntu is never going in sleep mode and always running, here is the command that you need to execute in your terminal
systemctl mask sleep.target suspend.target hibernate.target hybrid-sleep.targetIn case, at a later stage, if you wish to enable sleeping then just modify the above command and replace mask with unmask
At this point, we have come to an end of this long guide. However there are a few todo items that I will potentially add if you guys are really interested but so far you should have a working HA instance on your NUC along with MQTT.
- TODO: Update this post with SyncThing setup
- TODO: Add AppDaemon setup
It a tool which will allow you to keep your configurations in sync across devices. Since your NUC will mostly be running without a keyboard, mouse and a screen, it is going to be very difficult for you to modify the configurations. With this tool, you will be able to make changes from a different machine, like your laptop and those changes will sync to your NUC’s HA container.