Skip to content

Instantly share code, notes, and snippets.

@brianlamb
Last active August 26, 2021 21:10
Show Gist options
  • Star 0 You must be signed in to star a gist
  • Fork 0 You must be signed in to fork a gist
  • Save brianlamb/fcde2ace6fda5dc3eb9f4a83076ad35f to your computer and use it in GitHub Desktop.
Save brianlamb/fcde2ace6fda5dc3eb9f4a83076ad35f to your computer and use it in GitHub Desktop.
Hackintosh setup - Overview and System specific steps
PCPartPicker Part List: https://pcpartpicker.com/list/CkfJZf
CPU: Intel Core i5-9600K 3.7 GHz 6-Core Processor ($198.99 @ Amazon)
Motherboard: Gigabyte Z390 AORUS PRO WIFI ATX LGA1151 Motherboard ($199.99 @ Newegg)
Memory: Corsair Vengeance LPX 16 GB (2 x 8 GB) DDR4-3200 Memory ($74.98 @ Amazon)
Video Card: Sapphire Radeon RX 580 8 GB PULSE Video Card ($183.98 @ Newegg)
Power Supply: Thermaltake Smart 500 W 80+ Certified ATX Power Supply ($49.99 @ Amazon)
CPU Cooler: Thermaltake Slim X3 Low Profile CPU Fan for Intel LGA775/LGA1156 (CLP0534) $23.72
Case: NZXT H510 - CA-H510B-W1 - Compact ATX Mid-Tower White $69.99
Total~~~~~~~: $730
https://github.com/the0neyouseek/MonitorControl
From AudioGod's Guide:
@texem Has kindly made this bios profile for you all to use that will unlock CFG on your motherboard making it play alot more friendly with the NVRam.
It also has all the bios settings listed on this guide pre done and saved onto the profile.
F12d_UNLOCK.zip - Use with Z390 PRO Bios Revision F12d ONLY
F12c Unlock.zip - Use with Z390 Pro WIFI Bios Revision F12c ONLY
1 - Download the profile and save it to a USB Key
2 - Go into the bios,
3 - Load the profile,
4 - Save and exit
5 - Go straight back into the bios and save your bios to a new profile and name it Default CFG Unlocked or something like that.
6 - Boot back into Catalina go into your clover config and under Kernal and Kext Patches Uncheck KernalPM
7 - Save the changes and then restart and your done, your motherboard will now be CFG (MSR) Unlocked
If you want to use Bios F11 instead then use this profile
MSR Unlocked - Use with Bios Revision F11 ONLY
PLEASE NOTE - If you reset the bios or load bios defaults it will clear the Unlock making CFG Locked again.
Clover and OpenCore EFI Updates (10.15.5 Ready), 4th May 2020
(Use With Bios Revision F12d)
The EFIs and DSDTs have now been updated to the my latest versions.
Changes made include,
AppleALC 1.4.9
Lilu 1.4.4
WhateverGreen 1.3.9
VirtualSMC 1.1.3
AirportBrcmFixup 2.0.7
OcQuirks Revision 22 (I have made some changes to the plist that should make it play a lot more friendly now with the IGPU enabled) (Clover)
Clover Updated to Revision 5115 
"Clover Z390 Pro Polaris EFI 040520.zip" - RX500 Polaris Series (RX590, 580, 570 etc) DSDT EFI
OpenCore Updated to Revision 0.5.8 
Plus other major tweaks and changes to all of the configs 

First off, understand there's a lot to be done, or at least understand that this is not totally out of the box functionality!

--Primarily there are two camps or methods-- effectively they do the same thing but the first attempts to hide some of the details - Hey, if you're a Mac lover that might seem like a good thing - but if you're a true-blue Hackintosher you will possibly want to review at least what the second camp is explaining is happening - and you may ultimately get better results depending on your particular setup.

A) tonymacx86 - UniBeast/MultiBeast + Clover + WhatEverGreen " [https://www.tonymacx86.com/threads/unibeast-install-macos-catalina-on-any-supported-intel-based-pc.285366/] Jan 6, 2020 "UniBeast is a tool that creates a bootable installer out of your downloaded version of macOS.

 "Drag MultiBeast to your completed USB drive." Used post-install* install kexts(drivers), setup the bootloader for the HDD/SSD

UniBeast-Clover Note: UniBeast delivers basic bootloader support based on our testing on recommended CustoMac systems. For further bootloader customization, download and run the official Clover package. Advanced users may also compile Clover by downloading the full source.

-- UniBeast - Contains Clover 5.0 r5107 (May 2020) UniBeast and MultiBeast contain and deliver files from the Clover EFI Bootloader project. Clover is an open source bootloader project based on different projects: Clover, rEFIt, XNU, VirtualBox. Copyright © 2019 CloverHackyColor.

=============================================================================================================

=============================================================================================================

=============================================================================================================

=============================================================================================================

B) 'Vanilla' install - manual edit / setup Clover EFI + DSDT, kexts, etc {sites used} reddit/r/Hackintosh Hackintosh.gitbook.io
e.g. "You MUST NOT use Unibeast or Multibeast or any of that crap, if you do that you are 100% of the time going to have a bad time."

**(I can't vouch for the accuracy of "100% of the time" comment as I was able to get a good working install drive USB without delving into the Clover/EFI details using Unibeast on a first try - but the sentiment is clearly one of 'if you want any hope of diving in and fixing anything you probably should go down the road of figuring out all the details of what is happening')

B1 - Download 'Install macOS Catalina.app' (gibMacOS)

B2 - Create install media - $sudo /Applications/Install\ macOS\ Catalina.app/Contents/Resources/createinstallmedia --volume [your volume here /Volumes/U-S-B-Name]

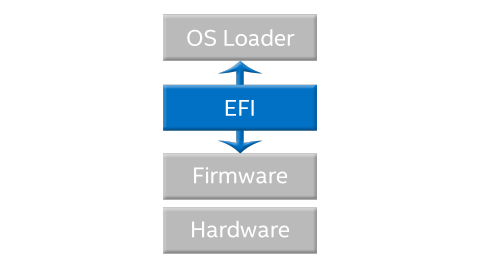
B3 - Clover Bootloader (this is the thing that helps 'fake' the booting process and provides the injection of necessary kernel extensions and a custom EFI to get the macOS to think its running on Apple Hardware.)

NOTE: Clover configuration is a two part process. You'll have to do it once on the USB Drive and then again on the install drive post-install.

Get Clover and your kexts(drivers for mac) Minimum Clover Bootloader FakeSMC.kext USBInjectAll.kext Lilu.kext WhateverGreen.kext

[Clover] Clover is confusing and there are multiple releases and old abandoned versions around (ever think you hate how buttoned up the Apple Store is and unable to get old versions is almost impossible? -- well this is the flip side! To have digital detritus littered all over and have to sort to find the current hosted site/updated codebase.) ---- Thank you to all who continue to update and work on this!!!

e.g. - https://sourceforge.net/projects/cloverefiboot/ (seems old) e.g. - Vanilla install references https://github.com/Dids/clover-builder/releases which seems old also (?) You are in the wrong place, go here https://github.com/CloverHackyColor/CloverBootloader/releases

** VirtualSMC or FakeSMC is vital to booting our Hackintosh. Without one of them, we'd never boot.

[COMMON - OR GENERAL PURPOSE STEPS] 1.Get macOS from Apple Guide/Tool: gibMacOS by /u/corpnewt Summary: $ ./gibMacOS.command (choose latest version and wait for it to download) $ ./BuildmacOSInstallApp.command (then copy it your /Applications)

  1. Create the USB. (this is where UniBeast does everything quietly vs "createinstallmedia" + Clover to do custome EFI + kext(driver) install

  2. Boot from USB a. Format destination HD/SSD APFS b. Install macOS c. reboot and run the "Install macOS from 'SSD/partition just installed into'" (this should show up as an additional option in the bootloader screen --- similar to what it looks like when you do an "option" boot to bring up other boot volumes on a regular Mac. This is the second half of the installation after macOS installs itself partially on the destination drive.

  3. After install you will still need to boot from the USB's bootloader to properly enter OS X. In order to address this the Clover bootloader needs to be properly embedded in the drives EFI partition.

Guides Referenced: https://hackintosher.com/guides/guide-to-fresh-installing-macos-catalina-on-a-hackintosh/ https://github.com/cmer/gigabyte-z390-aorus-master-hackintosh https://www.tonymacx86.com/threads/unibeast-install-macos-catalina-on-any-supported-intel-based-pc.285366/ https://www.reddit.com/r/hackintosh/comments/dpu4by/general_z390_catalina_guide_or_why_you_should/ ("don't use unibeast")

Resources:

https://github.com/headkaze/Hackintool https://github.com/corpnewt/gibMacOS

https://www.intel.com/content/dam/www/public/us/en/images/diagrams/rwd/efi-block-diagram-rwd.png.rendition.intel.web.480.270.png

2021 [OpenCore + Big Sur]
Updated to i9-9900K so let's update(fresh install) for Big Sur + OpenCore
Did this via configurator (eeek!) but reviewed the relevant plist changes (ProperList) and manual addition of SSDTs.
Tools: mountEFI, ProperList, OpenCore,
OS: Install done with BigSur (11.2.3) [Mac App Store successfully done to 11.4 post install! yay!]
+++
Additional
https://www.tonymacx86.com/attachments/ssdt-z390-rp21-slot4-tb3hp-aml.393582/
PCPartPicker Part List: https://pcpartpicker.com/list/CkfJZf
-- CPU: Intel Core i5-9600K 3.7 GHz 6-Core Processor ($198.99 @ Amazon)
-- CPU Cooler: Thermaltake Slim X3 Low Profile CPU Fan for Intel LGA775/LGA1156 (CLP0534) $23.72
CPU: Intel i9-9900K
CPU: Cooler: Arctic Freezer Sport 34 (air cool, dual-fan, exhaust)
Motherboard: Gigabyte Z390 AORUS PRO WIFI ATX LGA1151 Motherboard ($199.99 @ Newegg)
Memory: Corsair Vengeance LPX 16 GB (2 x 8 GB) DDR4-3200 Memory ($74.98 @ Amazon)
Video Card: Sapphire Radeon RX 580 8 GB PULSE Video Card ($183.98 @ Newegg)
Power Supply: Thermaltake Smart 500 W 80+ Certified ATX Power Supply ($49.99 @ Amazon)
Case: NZXT H510 - CA-H510B-W1 - Compact ATX Mid-Tower White $69.99
-- Old Total~~~~~~~: $730
+ GC Titan-Ridge 2.0 (TB3 add on card PCIeX4)
** EFI Stuff
:EFI: "Extensible Firmware Interface"
:UEFI: adds "Universal" to the acronym when used to describe the method embedded on the motherboard BIOS.
"The difference between UEFI Boot and Legacy boot is the process that the firmware uses to find the boot target.
Legacy Boot is the boot process used by BIOS firmware. The firmware maintains a list of installed storage devices that may be bootable, allowing one with appropriate Master Boot Record(MBR) that contains information on where the Operating System boot code is located to be selected."
In UEFI, The firmware enumerates all of the bootable storage devices and scans them for partition tables(GPT) to find an EFI Service Partition to boot from."
Very similar idea, different implementation, with UEFI more modern and flexible with certain advantages. Legacy BIOS is still valid in some cases though not for our Hackintosh install.
[https://www.intel.com/content/www/us/en/architecture-and-technology/unified-extensible-firmware-interface/efi-homepage-general-technology.html|See Intel's Page on EFI]
**memory fix drivers
EDIT2: You should try using memory fix drivers in this order, AptioMemoryFix, OsxAptioFix3Drv, OsxAptioFix2Drv, OsxAptioFixDrv. The first three try without and with slide calculation, the last always uses slide=0 (and must to work) so no need to provide slide. Most likely you only need to calculate the slide once as the largest available region is always the largest available region. How to calculate your slide from my comment below.
@brianlamb
Copy link
Author

Had been seeing OCS errors upon return from vacation - system running 11.4 no activity and then reboot with these OCS error....

SO -> Previous attempt: Update to latest OC, Vanilla Install. Went through guide step by step. Manual editing of OC config.plist. Updated to 11.5.1 via app store after rebooting.
Problems began to appear. USB ports not mapped. USB 2.0 didn't work.
Tried to add TB3 card and more problems, seemed like USB conflict errors --- not clear where the problem was but random freeze(hard freeze of system) or problems booting.

Tested system in Windows, Handbrake, Memtest, Geekbench - system stable. Tested access to TB3 card with existing ThunderBay with USB2-USB3 apple addapter - works.

So, last attempt was to boot from UPDATED OC(0.7.2) EFI w/ TB3 SSDTs to old 11.4 install and things seemed to be working -- hallelujah!!
System stability returned - boot success and TB3 working (shows up in PCI device list and hotplug is working!)

Now, try to fix USB3/2 ports via custom map.

@brianlamb
Copy link
Author

brianlamb commented Aug 25, 2021

OK, so now UTB (USBToolBox - recreated and hand edited USBMap kext)
USBs mapped and seem to be correct.

BUT return to freeze events. cloned WD1 to Sab256 and thought "OK, Sab256EFI + Sab256 11.4 should be good"
Still intermitted freeze --- can't seem to figure cause.
Tried to run certify on SanDisk1TB(sata) but froze in middle of night
Tried to boot WD1EFI+WD1-11.4 and freeze after a few hours. weird random freezes.

Currently booted from SAB256 EFI and booted to Kingston120 External 11.4 which I then upgraded to 11.5.2 via Software Update. Everything went smoothly. System is now up for 24 hours. various load applied (handbrake, network use, USB devices - OBS+hdmi+Yeti mic) all working. don't trust freeze issue is gone.... more troubleshooting

Investigating enabling iGPU (unrelated to freezes.... just checking that has advantages for system --- DRM enable, offloading certain tasks???)

07009B3E

Tried to mountefi and it claimed boot partition is SanDisk1TB - but that disk is wiped clean and "There is no EFI partition associated with disk *********"
GITHUB: File issue for corpnewt/mountefi
leads down to issue with finding boot drive - apparently through 'nvram' in macOS.

side note: boot-args
-v keepsyms=1 debug=0x100 keepsyms=1 alcid=11

@brianlamb
Copy link
Author

Attempt to move to GUI OC is OK

Support for integrated GPU did not go so well, stuck at errors on boot. No framebuffer properties applied and used the headless igpu platform id 0300913E


Update ----
Added framebuffer entries and changed to
00009B3E

--
let's try A: test the igpu fix... and B: maybe try full fress reinstall 11.5.2.
Then further test. freeze? When. Need to reboot from warm Windows 10 full boot?

Why freezes!!!!????

Sign up for free to join this conversation on GitHub. Already have an account? Sign in to comment