How To Do Analytics in Your React Native App with Firebase
You're building two mobile apps (iOS and Android) using React Native. The apps get approved in their stores. How do you know if your customers are enjoying your creation and find it useful? You don't unless you find a way to get insights and understand how your apps are used.
Choices First, one has to decide what library should be used. Fortunately, there are some great ones that make it easy to integrate, like:
- AWS Amplify's Analytics
- Segment
- Firebase Analytics In this post, I'll be focusing on Firebase Analytics as it's one of the most popular. Especially because of its easy integration with Google Analytics. Love it or hate it, Google services are still (arguably) the most popular ones for many valid reasons.
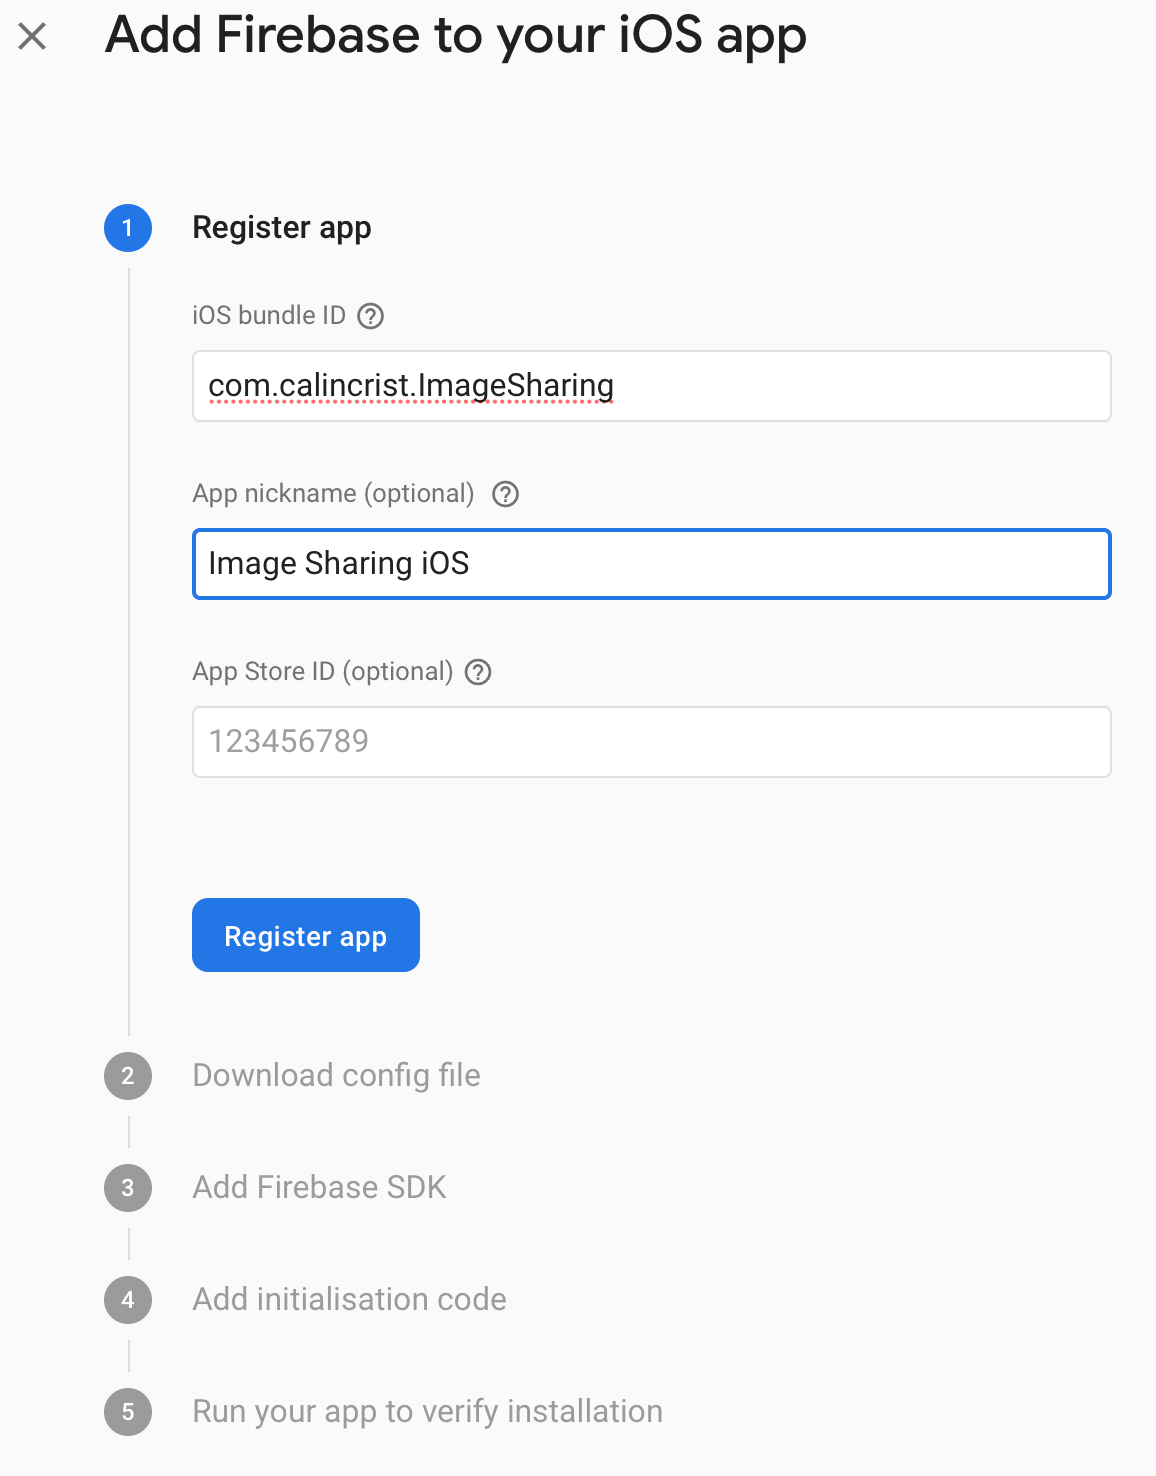
Before integrating Firebase for React Native, you need a Firebase project in the console (link).
This project will hold information for both iOS and Android apps.
In my case, I named the project "tutorial-demo".


After getting through the wizard, select the newly created project.


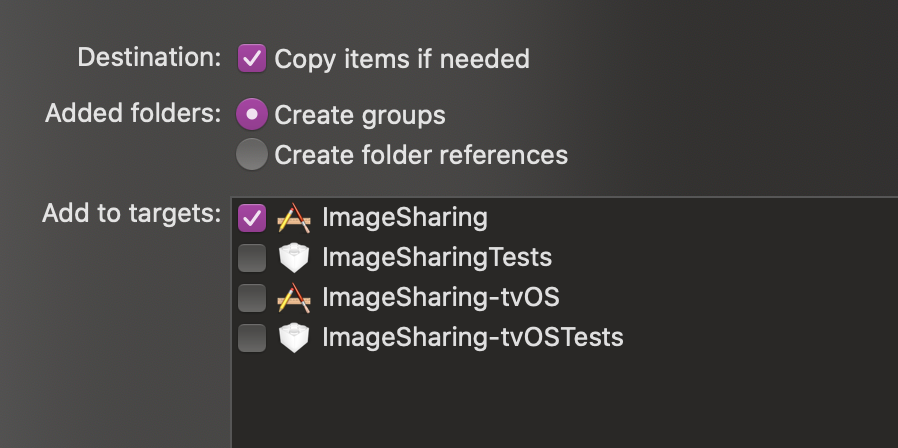
GoogleService-Info.plist file.
This contains a set of credentials for iOS devices to use when authenticating with your Firebase project.
Download the "GoogleService-Info.plist" presented in the second step and add it to the iOS native project.
Don't forget to select the correct target if you're having multiple targets. Also, don't forget to select "Copy items if needed".

The android side of things is very similar.
Go to the project homepage and select the "Android" icon.


For React Native, there is the official Firebase package: https://invertase.io/oss/react-native-firebase/ It contains all the Firebase services and we'll be installing and using the Analytics one. Install the core and analytics packages: https://gist.github.com/5b47446012666496ccceef937f794856
Assuming the React Native version is >= 0.60, the module should be automatically linked to your project.
If not, you need to manually integrate the app module into your project. See the following steps for Android and iOS for more information on manual linking.
Install the pods for the iOS app:
cd ios && pod install && cd ..
iOS: I noticed that after integrating the firebase package I needed to do some extra steps to make it work:
- clear the "Derived Data"
- clean the project
- remove the existing app from the simulator/testing device Android: In case the build or the gradle syncing is failing - it happened to me in one occasion, this is what I modified. I think it has to do with auto-linking failing for some reason. android/build.gradle https://gist.github.com/940649832e0edb7fe07d5e55dc17e785
android/app/build.gradle https://gist.github.com/2c4a3e192209c6dce81a13bdb6f47aeb
Just by integrating the Analytics package there are some events that are collected automatically like: first_open, user_engagement, app_clear_data . More details are provided here: https://support.google.com/firebase/answer/6317485
What's cool about this package is that it provides predefined methods for different use cases depending on the nature of your app (e-commerce, games, etc.), but also bare-bones functions to customize your own event loggings. Long story short, what we can do using react-native-firebase is:
-
Log custom events https://gist.github.com/31dad6fd4e1f242164a92b777cd929e0
-
Log the opening of the app https://gist.github.com/29cb23c0059f52961929b2e342e17dc9
-
Log the sign in/sign up event https://gist.github.com/dab35e34778e6377ea38a2ce91569155
Behind the scenes, these specific events (logAppOpen, logLogin, logSignUp) are using the logEvent method specifying the key and some properties for you.
- Set user properties https://gist.github.com/f4834609d1b3ea6bf725e56ad4f5b1da
It is highly recommended not to send any fragile and secret data to firebase (emails, passwords, names, etc.) - not even hashed.
- Tracking screens https://gist.github.com/575e2a7cb739251140e10f831d22b51a
And these are just a bunch of them. Here are all the supported methods.
Now, to demo these events, let's do an old-fashioned class that we will be used to centralize the analytics code. An advantage of this approach would be that we can use multiple analytics solutions/packages by updating just one file. (Of course, it doesn't need to be a class but here we are :) ) https://gist.github.com/2569f979bcde2f34f8b837a3b0b4b14c
What's left is to use our Analytics static methods where they belong in the code https://gist.github.com/a40ddb5dce09773713bde422eefa82c1
Here we have multiple options depending on what do we need. Either track them separately in each component after they're being mounted or making use of events other packages we might have in our project. One example could be the beloved and frequently used react-navigation.
-
useEffect hook inside the components. https://gist.github.com/35e29b1705f9e5a18895a9d5c3e05df6
-
navigation state changes directly on the app container. https://gist.github.com/5a0c86a1f7323038b34cbe06a03543b6
An example would be to track in an image sharing app either the users are more inclined to use the camera or the camera roll. https://gist.github.com/404619fb72bc56905147d0cbe4a94ea4
Everything is installed, configured and implemented. Let's see if we get something from the app to the Firebase Console. Nothing?… Well, there is a delay of about 1 hour between logging and seeing the events on the dashboard. The good news is that there is something we can do to test it quickly - with a latency of about 1 second. It is called DebugView.
For the iOS project, we can pass an argument on the Run process by editing the scheme.
The argument is called -FIRDebugEnabled

To enable Debug mode on Android, just run:
adb shell setprop debug.firebase.analytics.app package_name
This behaviour persists until you explicitly disable Debug mode by specifying the following command-line argument:
adb shell setprop debug.firebase.analytics.app .none.
Now run the apps again and you should see some action in the Firebase console:

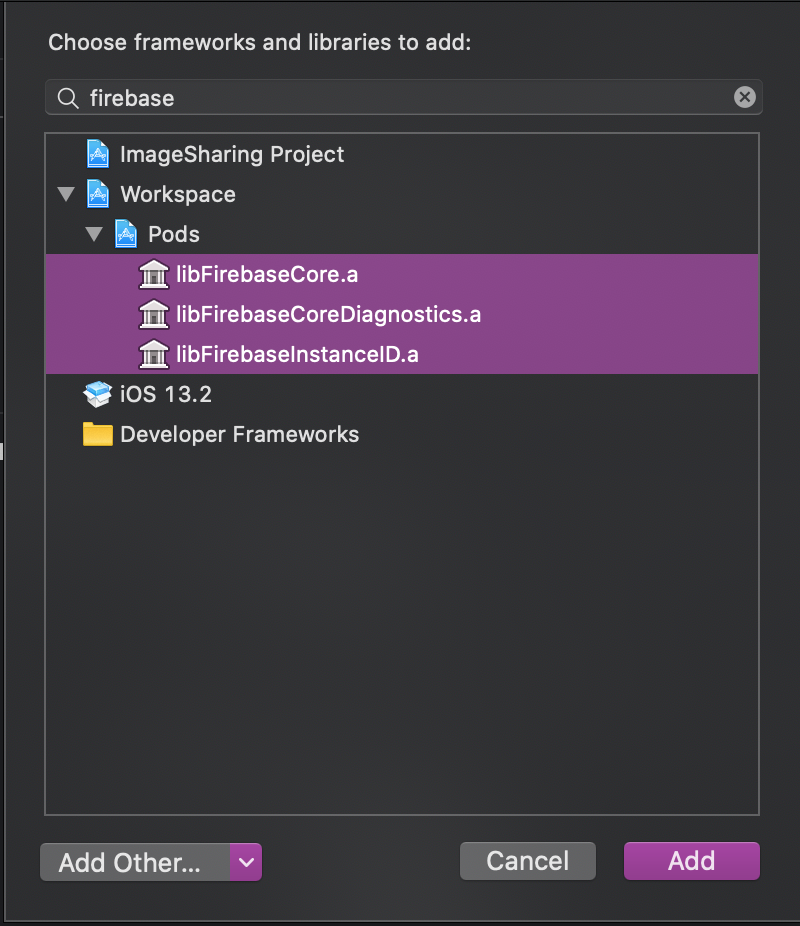
From my experience: if for some mystical reason it doesn't work on iOS, what did the trick for me is to manually link the libraries in Xcode, like in the picture below.

And that's pretty much it. What you can do from here is release your app and gather valuable information. Pair it with data from Google Analytics and you have the power (and the data to back it up) to decide what's the best next move. For the full code here's the Github link: https://github.com/calincrist/imageSharingApp.