Installing and switching node versions is best done using nvm-windows.
This tool normally requires administrator access to use (particularly the nvm use ... command) but it can be installed in a certain way so that it doesn't require admin privileges.
Unfortunately this installation process still requires admin access temporarily to enable Windows 'Developer Mode' and to run the installer.
Here are the steps for how to properly install nvm-windows so that it can be used without administrator privileges:
- Download the nvm-windows installer:
- Go here and download the
nvm-setup.exefrom the latest release. - Don't attempt to run it just yet. You'll do that later with a CSR.
- Leave your downloads folder open in the background so you can quickly navigate to it later.
- Go here and download the
- Find your PC Name. You'll need this so a CSR can remote into your computer and install nvm-windows for you.
- Hit Win and type 'PC Name'. Hit Enter on the first result.
- Copy the 'Full device name'. It should look something like
APENG-STU##.byu.localorITB-2###-##.byu.local.
- Get a settings window open so you are ready for a CSR to help:
- Hit Win and type 'Developer Settings'. Select the first result.
- An administrator password prompt will pop up twice. Just hit 'Esc' or 'Cancel' to get rid of it both times.
- You should see the settings screen appear with a toggle at the top. Later, you'll click that toggle and have a CSR enter a password to turn it on. For now, don't click it, but keep the settings window open.
- Finally, ask a CSR for help:
- Start drafting a message in the IT Collaboration > Technology Support Teams channel. You may have to click on the '40ish hidden channels' button below the visible channels to find this one.
- In your message, tag
@CSRs ITB, ask them to help you install nvm-windows on your computer remotely, and provide your PC name (from the previous step). - Within a couple minutes they should reply to your message and eventually remote into your computer via Splashtop.
- With the CSRs help, do the following:
- If you are installing nvm-windows for the first time, skip to step 5.ii. If you already installed nvm-windows and want to re-install it, do the following to uninstall nvm-windows first:
- Use Win+R to open up 'Run'.
- Enter in
%USERPROFILE%/AppData/Roaming/nvm/unins000.exe - Let the CSR enter their password in the prompt that appears
- Enable 'Developer Mode':
- Go to the settings window you opened previously
- Attempt to click the 'Developer Mode (Install apps from any source, including loose files)' toggle.
- When a password prompt appears, the CSR will have to enter their username and password.
- Next, open the nvm-windows installer:
- Open up your Downloads folder and double click on
nvm-setup.exe. - When a password prompt appears, the CSR will have to enter their username and password.
- That's all you need the CSR for! There are additional steps for finishing the installation that you'll have to follow carefully, but at this point you can DM the CSR on teams to tell them that that is all that you need (unless you still need them to install WSL2 and AWS CLI).
- Open up your Downloads folder and double click on
Note If you're a brand-new student with nothing else on your computer you might as well take advantage of the CSR's help to also install AWS CLI (AWS CLI Installer here) and WSL2 (WSL2 Installation Instructions here).
- If you are installing nvm-windows for the first time, skip to step 5.ii. If you already installed nvm-windows and want to re-install it, do the following to uninstall nvm-windows first:
- Finish the nvm-windows installation process (you no longer need the CSR at this point):
- Click 'I accept the agreement' and 'Next'.

- This step is important: Change the username in the file path from the CSRs net id to your own net id.
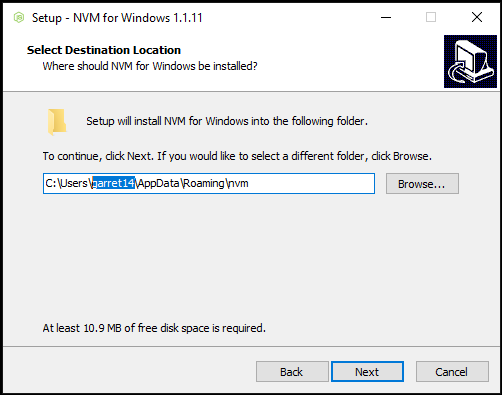
Then click 'Next'. - This step is also important: The default Symlink directory is in
C:\Program Files(as shown in the first screenshot below). You need to change this to your own user directory (as shown in the second screenshot below:
ReplaceProgram Filesin the box withUsers/YOUR NET ID.
The finished path should look likeC:\Users\YOUR NET ID\nodejs, as shown in the screenshot below:
Then click 'Next'. - On the last step click 'Install'.
- Click 'I accept the agreement' and 'Next'.
- That's it! You should be able to open up a terminal now and run
nvmto see if it is installed. If it is, runnvm install --ltsto install the latest version, and thennvm use <that version>to use it. Then runnode -vto see if node is correctly installed.
If you are a student that has already been using node and are completing these instructions, your IDE will likely complain that you've changed where it expects to find the node executable. You can fix that by following these steps:
- Open up the IDE that is complaining about Node. For these instructions we'll use Webstorm.
- Open up your preferences. In webstorm this is done by clicking on the gear button in the top-right of the window and then clicking 'Settings'.
- Expand the 'Languages & Frameworks' list in the left sidebar. Click on 'Node.js'.
- Open the 'Node interpreter' dropdown at the top, and click 'Add', then 'Add Local'.
- Locate the
C:/Users/YOUR NET ID/nodejs/node.exefile and select it. Click 'Ok'. - Click 'Apply'. That's it, you should be good!