Help and tips to configure Windows server WSUS role with SSL
Open server manager > Add role and features
Install wizard opens, click next and select the following settings
- Role-based or feature based installation
- Select a server from the server pool (leave it defalut)
- Select "Active directory certificate service" and accept prequeties
- After completing the wizard, you will see the notification to configure the CA.
- Configure with default settings.
Open server manager > Add role and features
Install wizard opens, click next and select the following settings
- Role-based or feature based installation
- Select a server from the server pool (leave it defalut)
- Select "Windows server update service" and accept prequeties
- After completing the wizard, you will see the notification to configure the WSUS.
- Configure role with default settings.
- Run "certlm.msc" to open the MMC (Certificate - Local Computer)
- Right click the "Personal" and goto > All Tasks > Advanced Options > Create Custom Request
- Certificate enrollment wizard opens, follow steps below
- Before you begin -> click next to proceed
- Select Certificate Enrollment Policy -> Click next to "proceed without enrollment policy"
- Custom Request -> Leave default (No Template)CNG Key, PKCS#10 and click Next
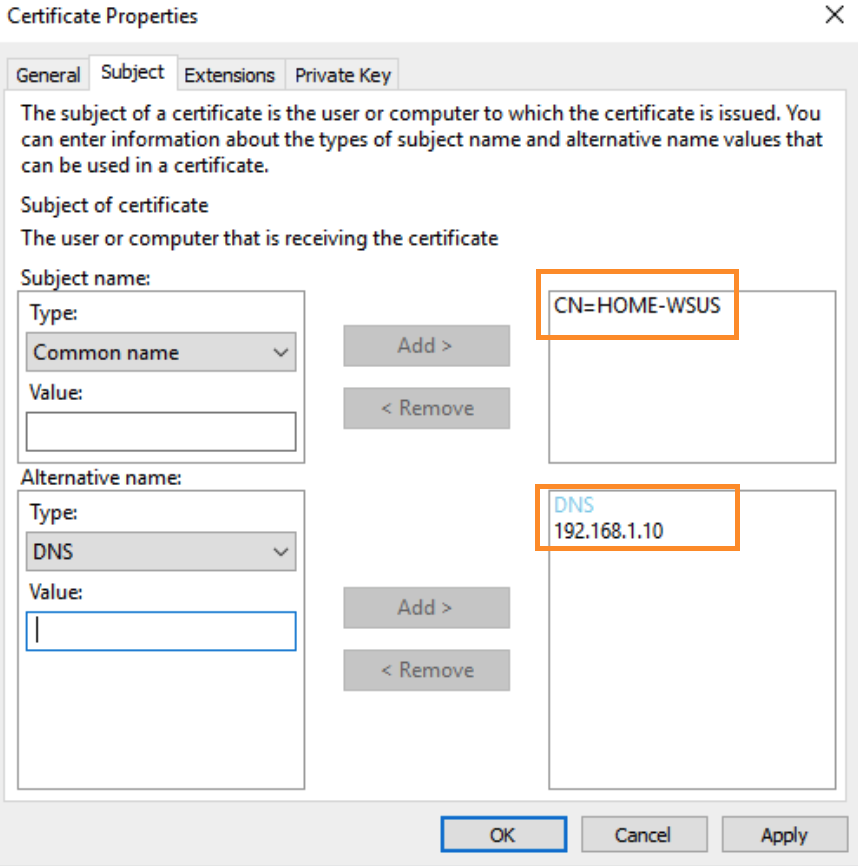
- Certification Information -> Click the tiny down arrow near details and click properties and fill-in the following information
General Fridenly name: HOME-WSUS
Subject Subject name: Type > Common Name > Value: e.g., Hostname/FQDN > click Add button
Subject Alternative name: Type > DNS -> Value: e.g., 192.168.1.10 > click Add button
NOTE: DNS is required if you are going to be configuring client machines to connect to WSUS using IP address instead of Hostname/FQDN. Without the alternate name (dns) entry windows update will fail with ssl error if clients are configured to communicate using servers IP address
Private Key Key options > expand and select 2048 > tick "Make private key exportable" and click ok
Where do you want to save the offline request File format: Base64 and browse to a location, give it a name (e.g., my-offline-cert.req) and click save
- Open server manager > click Tools > open Certificate authority
- Certsrv MMC window will open. Right click on root CA name and goto All tasks > submit new request and select the *.req file that you saved in the previous step.
- Now goto Pending requests folder and right click > All tasks and select issue certificate
- Goto issed certificate folder and you will see the new issued certificate in the list. Right click the certificate and open > go to details tab and select copy to file > use the default settings and save the SSL certificate someware (e.g., my-cert-resp.cer).
- Open server manager > click Tools > open IIS
- Select the IIS server name and click on "Server Certificates" under IIS section
- From the Actions pane on the right slect "Complete Certificate Request"
- Browse and select the *.cer file from the previous step and give a friendly name and save as a personal certificate
Note: While you are here, export the CA servers main certificate (not the new one just created) by rightclick view the certificate and copy to a *.cer file and keep somewhere safe.
-
Open server manager > click Tools > open IIS
-
Navigate and select "WSUS Administration" page
-
From the Actions section on the right select "Bindings" > https > and under SSL certificate assign the new certificate that you imported from the last step then click okay to save.
-
Navigate to subfolders and set SSL settings to "require SSL" and Apply
- Api Remoting30
- ClientWebService
- DSS AuthWebService
- ServerSyncWebService
- SImpleAuthWebService
-
open command prompt as admin and run the following command
    cd "c:\Program Files\Update Services\Tools"
    WsusUtil.exe configuressl HOME-WSUS
Ref https://learn.microsoft.com/en-us/mem/configmgr/sum/get-started/software-update-point-ssl
-
Open WSUS by going to server manager > tools > windows update service

- Now you should see connection port: 8531
- Goto computers > all computers > and right click to create a computer group e.g., Home-PCs
- Goto options > computers > and select "Use Grop Policy ore registry settings on computers" and click ok to save
- Goto the root folder and click "Synchronize now" to sync the logs from microsoft servers
- copy the servers main root CA certificate that was saved in step 3.2 to the client computer
- use the following windows batch script to install the certificate on client PC and enroll to WSUS server
::  //
::  // WSUS Enroll Script
::  //
@ECHO OFF &SETLOCAL disableDelayedExpansion
reg.exe add "HKLM\SOFTWARE\Policies\Microsoft\Windows\WindowsUpdate" /v "WUServer" /D "https://192.168.1.10:8531/" /f
reg.exe add "HKLM\SOFTWARE\Policies\Microsoft\Windows\WindowsUpdate" /v "WUStatusServer" /D "https://192.168.1.10:8531/" /f
reg.exe add "HKLM\SOFTWARE\Policies\Microsoft\Windows\WindowsUpdate" /v "TargetGroup" /D "HOME-PCs" /f
reg.exe add "HKLM\SOFTWARE\Policies\Microsoft\Windows\WindowsUpdate" /v "TargetGroupEnabled" /D 1 /t reg_dword /f
reg.exe add "HKLM\SOFTWARE\Policies\Microsoft\Windows\WindowsUpdate\AU" /v "AUOptions" /D 3 /t reg_dword /f
reg.exe add "HKLM\SOFTWARE\Policies\Microsoft\Windows\WindowsUpdate\AU" /v "NoAutoRebootWithLoggedOnUsers" /D 1 /t reg_dword /f
reg.exe add "HKLM\SOFTWARE\Policies\Microsoft\Windows\WindowsUpdate\AU" /v "NoAutoUpdate" /D 0 /t reg_dword /f
reg.exe add "HKLM\SOFTWARE\Policies\Microsoft\Windows\WindowsUpdate\AU" /v "UseWUServer" /D 1 /t reg_dword /f
certutil -addstore root wsus-root-ca.cer
wuauclt.exe /resetauthorization /detectnow
wuauclt.exe /detectnow /reportnow
Echo ****
Echo *********
Echo DO YOU SEE ANY ERROR? IF NOT SYSTEM IS SUCCESSFULLY ENROLLED FOR UPDATES!
Echo *********
Echo ****
PAUSE- Now client pc is enrolled to WSUS server and should be able to receive updates
- If you want to force the client pc to report to WSUS server immediately then run the following PowerShell script in the client machine
# PS Script to force send info to WSUS
$updateSession = new-object -com "Microsoft.Update.Session";
$updates=$updateSession.CreateupdateSearcher().Search($criteria).Updates
USOClient scannow
wuauclt.exe /detectnow /reportnow