Wordpress resources.
- Wordpress Structure
- Plug-in Development
- Theme Development
- The Future of Wordpress
- Installing Wordpress on Ubuntu 16.04
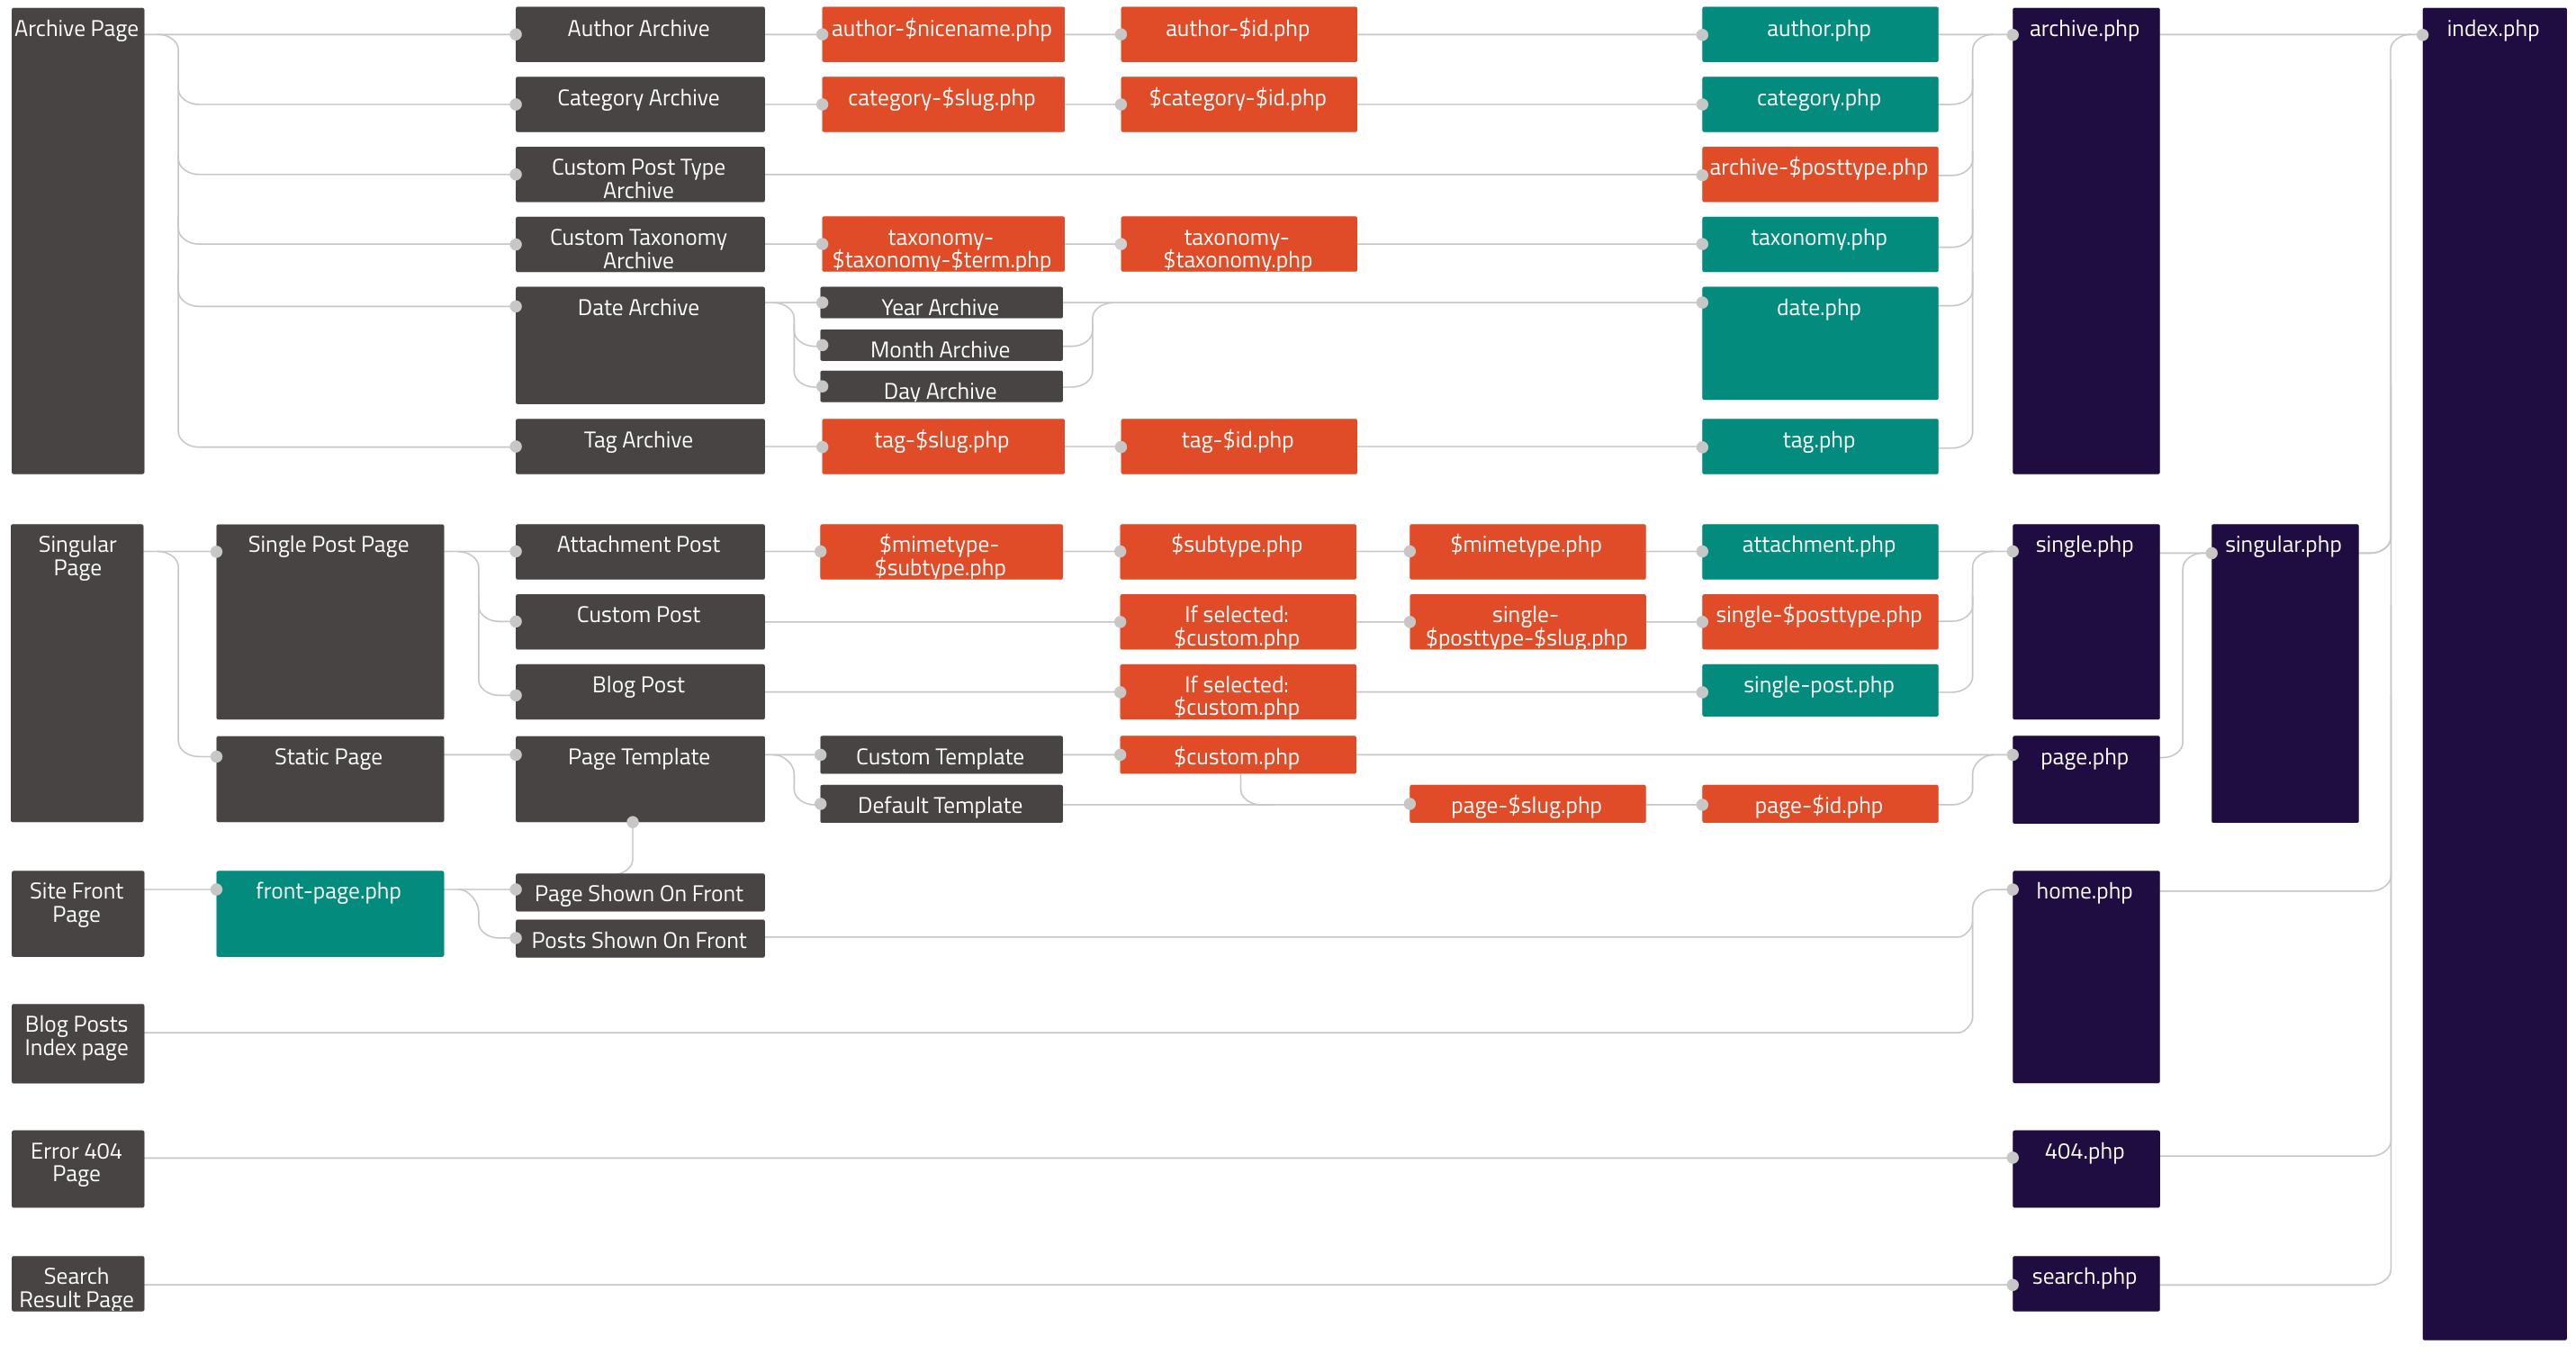
Template Hierarchy
Theme Template Data Flow
URI Routing
The Loop (Fundamental Concept)
WP Query (Fundamental Concept)
- Plug-in Api
- Wordpress Coding Standards
- Starter Plug-in (Skeleton exhibiting basic structure)
- Documentation for Developing Themes
- Starter Theme (Skeleton exhibiting basic structure)
- "Introducing a new way to WordPress"
- Plug-in version of new editor/publisher "Gutenberg"
Compiled From:
- https://www.digitalocean.com/community/tutorials/how-to-install-linux-nginx-mysql-php-lemp-stack-in-ubuntu-16-04
- https://www.digitalocean.com/community/tutorials/how-to-install-wordpress-with-lemp-on-ubuntu-16-04
sudo apt-get update
sudo apt-get install nginxType in bash:
sudo vim /etc/nginx/sites-available/defaultand modify the location block to look like:
server {
    ...
    location / {
        # try_files $uri $uri/ =404;
        try_files $uri $uri/ /index.php$is_args$args;
    }
    ...
}
sudo nginx -t
sudo systemctl reload nginxMySQL serves as the central repository for all the data your Wordpress application will show your user. Request for pages or posts will be realized as queries on a MySQL database.
sudo apt-get install mysql-serverA prompt will appear asking you to input a password. This will be the password for the root mysql user who has full access to the database.
To see your new "mysql" user that manages the MySQL server:
cat /etc/passwdTo log-in to your MySQL server as the root user, invoke the MySQL CLI and input the password specified upon install. This will start the SQL server's shell interface.
mysql -u root -pNow create a database that wordpress will control. Then specify a user for wordpress who has full access to the database (replace 'password' with a strong password). In the MySQL shell type
CREATE DATABASE wordpress DEFAULT CHARACTERS SET utf8 COLLATE utf8_unicode_ci;
GRANT ALL ON wordpress.* TO 'wpuser'@'localhost' IDENTIFIED BY 'password';
FLUSH PRIVILIGES;
Once you're in the mysql server shell, you can list all the users registered in the MySQL database. The user "root" has the password you specified upon install, and the user "wpuser" has the password you specified after "IDENTIFIED BY" in the previous command.
SELECT user, host FROM mysql.userTo exit the MySQL shell, type 'EXIT' or 'exit';
sudo apt-get update
sudo apt-get install php-fpm php-mysql
sudo apt-get install php-curl php-gd php-mbstring php-mcrypt php-xml php-xmlrpcModify the configuration file /etc/php/7.0/fpm/php.ini to secure the setup by uncommenting the line:
;cgi.fix_pathinfo=1
cgi.fix_pathinfo=1
(In vim execute the command :%s/;cgi.fix_pathinfo/cgi.fix_pathinfo/)
Now restart the PHP processor
sudo systemctl restart php7.0-fpmModify your nginx configuration to use fastcgi.
In /etc/nginx/sites-available/default pre-pend index.php to the list of index pages in the nginx configuration.
index index.html index.htm index.nginx-debian.html;
to
index index.php index.html index.htm index.nginx-debian.html;
Within the server block, add
server {
    ...
    location ~ \.php$ {
        include snippets/fastcgi-php.conf;
        fastcgi_pass unix:/run/php/php7.0-fpm.sock;
    }

    location ~ /\.ht {
        deny all;
    }
    ...
}
Now test your configuration and reload in bash.
sudo nginx -t
sudo systemctl reload nginxcd /tmp
curl -O https://wordpress.org/latest.tar.gz
tar xzvf latest.tar.gz
cp /tmp/wordpress/wp-config-sample.php /tmp/wordpress/wp-config.php
mkdir /tmp/wordpress/wp-content/upgrade
sudo cp -a /tmp/wordpress/. /var/www/htmlsudo chown -R ubuntu:www-data /var/www/html
sudo find /var/www/html -type d -exec chmod g+s {} \;
sudo chmod g+w /var/www/html/wp-content
sudo chmod -R g+w /var/www/html/wp-content/themes
sudo chmod -R g+w /var/www/html/wp-content/pluginsGet a series of random strings ("salt keys") from the WordPress API and modify /var/www/html/wp-config.php to include them.
curl -s https://api.wordpress.org/secret-key/1.1/salt/
# Replace the values in wp-config.php with the values from the curl command.
# Also add the line "define('FS_METHOD', 'direct');" <-- indicates a trusted filesystem is being used.
vim /var/www/html/wp-config.phpNow navigate to your website's public IP.
You will encounter the WordPress Initialization Wizard.
Fill in the form and Wordpress will be fully installed on your machine.
You will then be brought to WordPress's Admin Interface.
Using the plug-in interface, I installed WP ERP, an open-source HR WordPress plug-in. (They have extensions available for purchase)
and Brizy, a modern "What You See Is What You Get" visual editor for WordPress pages.
Using the Admin interface is equivalent to downloading the .zip files and unzipping them into your WordPress installation's /wp-contents/plugins/ directory.
Example using the WP ERP Plug-in.
sudo apt-get update
sudo apt-get install unzip curl
cd /tmp
curl -O https://downloads.wordpress.org/plugin/erp.zip
unzip erp.zip -d /var/www/html/wp-content/plugins/
If you navigate to the "Plugins" page in the Admin Console, you should see the plug-in available to activate.
The same process applies to themes, which are located in the /var/www/html/wp-content/themes/ folder.