| title | published | description | tags | cover_image |
|---|---|---|---|---|
Building a Full Stack NFT Marketplace on Ethereum with Polygon |
true |
Building a digital marketplace with Next.js, Tailwind, Solidity, and Polygon |
webdev, react, blockchain, ethereum |
Building a digital marketplace with Polygon, Next.js, Tailwind, Solidity, Hardhat, Ethers.js, and IPFS
To view the video course for this tutorial, click here
In my last end to end Ethereum tutorial, The Complete Guide to Full Stack Ethereum Development I introduced how to build a basic app on Ethereum using modern tooling like Hardhat and Ethers.js.
In this guide you'll learn how to build, deploy, and test out a full stack NFT marketplace on Ethereum. We'll also look at how to deploy to Polygon.
One thing that has become apparent over the past few months is how quickly Ethereum scaling solutions like Polygon, Arbitrum, and Optimism are gaining momentum and adoption. These technologies enable developers to build the same applications they would directly on Ethereum with the added benefits of lower gas costs and faster transaction speeds among other things.
Because of the value proposition that these solutions offer combined with the general lack of existing content, I will be building out various example projects and tutorials for full stack applications using these various Ethereum scaling solutions, starting with this one on Polygon.
To view the final source code for this project, visit this repo
To be successful in this guide, you must have the following:
- Node.js installed on your machine
- Metamask wallet extension installed as a browser extension
In this guide, we will build out a full stack application using:
Web application framework - Next.js Solidity development environment - Hardhat File Storage - IPFS Ethereum Web Client Library - Ethers.js
Though it will not be part of this guide (coming in a separate post), we will look at how to build a more robust API layer using The Graph Protocol to get around limitations in the data access patterns provided by the native blockchain layer.
The project that we will be building will be Metaverse Marketplace - a digital marketplace.

When a user puts an item for sale, the ownership of the item will be transferred from the creator to the marketplace.
When a user purchases an item, the purchase price will be transferred from the buyer to the seller and the item will be transferred from the marketplace to the buyer.
The marketplace owner will be able to set a listing fee. This fee will be taken from the seller and transferred to the contract owner upon completion of any sale, enabling the owner of the marketplace to earn recurring revenue from any sale transacted in the marketplace.
The marketplace logic will consist of two smart contracts:
NFT Contract - This contract allows users to mint unique digital assets.
Marketplace Contract - This contract allows users to put their digital assets for sale on an open market.
I believe this is a good project because the tools, techniques, and ideas we will be working with lay the foundation for many other types of applications on this stack – dealing with things like payments, commissions, and transfers of ownership on the contract level as well as how a client-side application would use this smart contract to build a performant and nice-looking user interface.
In addition to the smart contract, I'll also show you how to build a subgraph to make the querying of data from the smart contract more flexible and efficient. As you will see, creating views on data sets and enabling various and performant data access patterns is hard to do directly from a smart contract. The Graph makes this much easier.
From the docs:
"Polygon is a protocol and a framework for building and connecting Ethereum-compatible blockchain networks. Aggregating scalable solutions on Ethereum supporting a multi-chain Ethereum ecosystem."
Polygon is about 10x faster than Ethereum & yet transactions are more than 10x cheaper.
Ok cool, but what does all that mean?
To me it means that I can use the same knowledge, tools, and technologies I have been using to build apps on Ethereum to build apps that are faster and cheaper for users, providing not only a better user experience but also opening the door for many types of applications that just would not be feasible to be built directly on Ethereum.
As mentioned before, there are many other Ethereum scaling solutions such as Arbitrumand Optimism that are also in a similar space. Most of these scaling solutions have technical differences and fall into various categories like sidechains , layer 2s, and state channels.
Polygon recently rebranded from Matic so you will also see the word Matic used interchangeably when referring to various parts of their ecosystem because the name still is being used in various places, like their token and network names.
To learn more about Polygon, check out this post as well as their documentation here.
Now that we have an overview of the project and related technologies, let's start building!
To get started, we'll create a new Next.js app. To do so, open your terminal. Create or change into a new empty directory and run the following command:
npx create-next-app digital-marketplaceNext, change into the new directory and install the dependencies:
cd digital-marketplace

npm install ethers hardhat @nomiclabs/hardhat-waffle \
ethereum-waffle chai @nomiclabs/hardhat-ethers \
web3modal @openzeppelin/contracts ipfs-http-client@50.1.2 \
axiosWe'll be using Tailwind CSS for styling, we we will set that up in this step.
Tailwind is a utility-first CSS framework that makes it easy to add styling and create good looking websites without a lot of work.
Next, install the Tailwind dependencies:
npm install -D tailwindcss@latest postcss@latest autoprefixer@latestNext, we will create the configuration files needed for Tailwind to work with Next.js (tailwind.config.js and postcss.config.js) by running the following command:
npx tailwindcss init -pNext, configure your template content paths in tailwind.config.js:
/* tailwind.config.js */
module.exports = {
  content: [
    "./pages/**/*.{js,ts,jsx,tsx}",
    "./components/**/*.{js,ts,jsx,tsx}",
  ],
  theme: {
    extend: {},
  },
  plugins: [],
}
Finally, delete the code in styles/globals.css and update it with the following:
@tailwind base;
@tailwind components;
@tailwind utilities;Next, initialize a new Hardhat development environment from the root of your project:
npx hardhat

? What do you want to do? Create a basic sample project
? Hardhat project root: <Choose default path>
Now you should see the following files and folders created for you in your root directory:
hardhat.config.js - The entirety of your Hardhat setup (i.e. your config, plugins, and custom tasks) is contained in this file. scripts - A folder containing a script named sample-script.js that will deploy your smart contract when executed test - A folder containing an example testing script contracts - A folder holding an example Solidity smart contract
Next, update the configuration at hardhat.config.js with the following:
View the gist here
/* hardhat.config.js */
require("@nomiclabs/hardhat-waffle")
const fs = require('fs')
const privateKey = fs.readFileSync(".secret").toString().trim() || "01234567890123456789"

module.exports = {
  defaultNetwork: "hardhat",
  networks: {
    hardhat: {
      chainId: 1337
    },
//  mumbai: {
//    url: "https://rpc-mumbai.maticvigil.com",
//    accounts: [privateKey]
//  }
  },
  solidity: {
    version: "0.8.4",
    settings: {
      optimizer: {
        enabled: true,
        runs: 200
      }
    }
  }
}
In this configuration, we've configured the local Hardhat development environment as well as the Mumbai testnet.
You can read more about both Matic networks here.
Next, create a file named .secret at the root of your project. For now, we will leave this file empty. Later on, we will populate it with a test wallet private key that will hold some Matic tokens that we will get from the Matic testnet faucet.
Be sure to never commit any private keys to Git. To be extra safe, consider storing these values in temporary environment variables when working with wallets that contain real tokens. To omit from Git, add .secret to your .gitignore file.
Next, we'll create our smart contracts! We'll start with the NFT contract for the unique digital assets.
Create a new file in the contracts directory named NFT.sol. Here, add the following code:
View the gist here
// contracts/NFT.sol
// SPDX-License-Identifier: MIT OR Apache-2.0
pragma solidity ^0.8.3;

import "@openzeppelin/contracts/utils/Counters.sol";
import "@openzeppelin/contracts/token/ERC721/extensions/ERC721URIStorage.sol";
import "@openzeppelin/contracts/token/ERC721/ERC721.sol";

import "hardhat/console.sol";

contract NFT is ERC721URIStorage {
    using Counters for Counters.Counter;
    Counters.Counter private _tokenIds;
    address contractAddress;

    constructor(address marketplaceAddress) ERC721("Metaverse Tokens", "METT") {
        contractAddress = marketplaceAddress;
    }

    function createToken(string memory tokenURI) public returns (uint) {
        _tokenIds.increment();
        uint256 newItemId = _tokenIds.current();

        _mint(msg.sender, newItemId);
        _setTokenURI(newItemId, tokenURI);
        setApprovalForAll(contractAddress, true);
        return newItemId;
    }
}
This is a pretty straightforward NFT smart contract that allows users to mint unique digital assets and have ownership of them.
In this contract we are inheriting from the ERC721 standard implemented by OpenZepplin
Next, we'll create the contract for the Marketplace. This is a much larger smart contract. I've done my best to document what each function is doing.
Create a new file in the contracts directory named Market.sol:
View the gist here
// contracts/Market.sol
// SPDX-License-Identifier: MIT OR Apache-2.0
pragma solidity ^0.8.3;

import "@openzeppelin/contracts/utils/Counters.sol";
import "@openzeppelin/contracts/security/ReentrancyGuard.sol";
import "@openzeppelin/contracts/token/ERC721/ERC721.sol";

import "hardhat/console.sol";

contract NFTMarket is ReentrancyGuard {
  using Counters for Counters.Counter;
  Counters.Counter private _itemIds;
  Counters.Counter private _itemsSold;

  address payable owner;
  uint256 listingPrice = 0.025 ether;

  constructor() {
    owner = payable(msg.sender);
  }

  struct MarketItem {
    uint itemId;
    address nftContract;
    uint256 tokenId;
    address payable seller;
    address payable owner;
    uint256 price;
    bool sold;
  }

  mapping(uint256 => MarketItem) private idToMarketItem;

  event MarketItemCreated (
    uint indexed itemId,
    address indexed nftContract,
    uint256 indexed tokenId,
    address seller,
    address owner,
    uint256 price,
    bool sold
  );

  /* Returns the listing price of the contract */
  function getListingPrice() public view returns (uint256) {
    return listingPrice;
  }

  /* Places an item for sale on the marketplace */
  function createMarketItem(
    address nftContract,
    uint256 tokenId,
    uint256 price
  ) public payable nonReentrant {
    require(price > 0, "Price must be at least 1 wei");
    require(msg.value == listingPrice, "Price must be equal to listing price");

    _itemIds.increment();
    uint256 itemId = _itemIds.current();

    idToMarketItem[itemId] =  MarketItem(
      itemId,
      nftContract,
      tokenId,
      payable(msg.sender),
      payable(address(0)),
      price,
      false
    );

    IERC721(nftContract).transferFrom(msg.sender, address(this), tokenId);

    emit MarketItemCreated(
      itemId,
      nftContract,
      tokenId,
      msg.sender,
      address(0),
      price,
      false
    );
  }

  /* Creates the sale of a marketplace item */
  /* Transfers ownership of the item, as well as funds between parties */
  function createMarketSale(
    address nftContract,
    uint256 itemId
    ) public payable nonReentrant {
    uint price = idToMarketItem[itemId].price;
    uint tokenId = idToMarketItem[itemId].tokenId;
    require(msg.value == price, "Please submit the asking price in order to complete the purchase");

    idToMarketItem[itemId].seller.transfer(msg.value);
    IERC721(nftContract).transferFrom(address(this), msg.sender, tokenId);
    idToMarketItem[itemId].owner = payable(msg.sender);
    idToMarketItem[itemId].sold = true;
    _itemsSold.increment();
    payable(owner).transfer(listingPrice);
  }

  /* Returns all unsold market items */
  function fetchMarketItems() public view returns (MarketItem[] memory) {
    uint itemCount = _itemIds.current();
    uint unsoldItemCount = _itemIds.current() - _itemsSold.current();
    uint currentIndex = 0;

    MarketItem[] memory items = new MarketItem[](unsoldItemCount);
    for (uint i = 0; i < itemCount; i++) {
      if (idToMarketItem[i + 1].owner == address(0)) {
        uint currentId = i + 1;
        MarketItem storage currentItem = idToMarketItem[currentId];
        items[currentIndex] = currentItem;
        currentIndex += 1;
      }
    }
    return items;
  }

  /* Returns only items that a user has purchased */
  function fetchMyNFTs() public view returns (MarketItem[] memory) {
    uint totalItemCount = _itemIds.current();
    uint itemCount = 0;
    uint currentIndex = 0;

    for (uint i = 0; i < totalItemCount; i++) {
      if (idToMarketItem[i + 1].owner == msg.sender) {
        itemCount += 1;
      }
    }

    MarketItem[] memory items = new MarketItem[](itemCount);
    for (uint i = 0; i < totalItemCount; i++) {
      if (idToMarketItem[i + 1].owner == msg.sender) {
        uint currentId = i + 1;
        MarketItem storage currentItem = idToMarketItem[currentId];
        items[currentIndex] = currentItem;
        currentIndex += 1;
      }
    }
    return items;
  }

  /* Returns only items a user has created */
  function fetchItemsCreated() public view returns (MarketItem[] memory) {
    uint totalItemCount = _itemIds.current();
    uint itemCount = 0;
    uint currentIndex = 0;

    for (uint i = 0; i < totalItemCount; i++) {
      if (idToMarketItem[i + 1].seller == msg.sender) {
        itemCount += 1;
      }
    }

    MarketItem[] memory items = new MarketItem[](itemCount);
    for (uint i = 0; i < totalItemCount; i++) {
      if (idToMarketItem[i + 1].seller == msg.sender) {
        uint currentId = i + 1;
        MarketItem storage currentItem = idToMarketItem[currentId];
        items[currentIndex] = currentItem;
        currentIndex += 1;
      }
    }
    return items;
  }
}
Now the smart contract code and environment is complete and we can try testing it out.
To do so, we can create a local test to run through much of the functionality, like minting a token, putting it up for sale, selling it to a user, and querying for tokens.
To create the test, open test/sample-test.js and update it with the following code:
View the gist here
/* test/sample-test.js */
describe("NFTMarket", function() {
  it("Should create and execute market sales", async function() {
    /* deploy the marketplace */
    const Market = await ethers.getContractFactory("NFTMarket")
    const market = await Market.deploy()
    await market.deployed()
    const marketAddress = market.address

    /* deploy the NFT contract */
    const NFT = await ethers.getContractFactory("NFT")
    const nft = await NFT.deploy(marketAddress)
    await nft.deployed()
    const nftContractAddress = nft.address

    let listingPrice = await market.getListingPrice()
    listingPrice = listingPrice.toString()

    const auctionPrice = ethers.utils.parseUnits('1', 'ether')

    /* create two tokens */
    await nft.createToken("https://www.mytokenlocation.com")
    await nft.createToken("https://www.mytokenlocation2.com")

    /* put both tokens for sale */
    await market.createMarketItem(nftContractAddress, 1, auctionPrice, { value: listingPrice })
    await market.createMarketItem(nftContractAddress, 2, auctionPrice, { value: listingPrice })

    const [_, buyerAddress] = await ethers.getSigners()

    /* execute sale of token to another user */
    await market.connect(buyerAddress).createMarketSale(nftContractAddress, 1, { value: auctionPrice})

    /* query for and return the unsold items */
    items = await market.fetchMarketItems()
    items = await Promise.all(items.map(async i => {
      const tokenUri = await nft.tokenURI(i.tokenId)
      let item = {
        price: i.price.toString(),
        tokenId: i.tokenId.toString(),
        seller: i.seller,
        owner: i.owner,
        tokenUri
      }
      return item
    }))
    console.log('items: ', items)
  })
})
To run the test, run npx hardhat test from your command line:
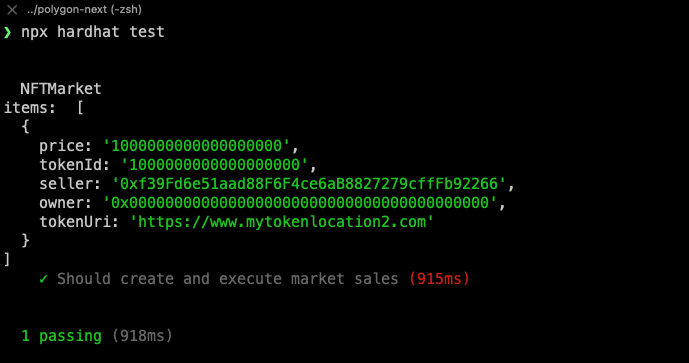
If the test runs successfully, it should log out an array containing a single marketplace item.
Now that the smart contract is working and ready to go, we can start building out the UI.
The first thing we might think about is setting up a layout so that we can enable some navigation that will persist across all pages.
To set this up, open _pages/app.js and update it with the following code:
View the gist here
/* pages/_app.js */
import '../styles/globals.css'
import Link from 'next/link'

function MyApp({ Component, pageProps }) {
  return (
    <div>
      <nav className="border-b p-6">
        <p className="text-4xl font-bold">Metaverse Marketplace</p>
        <div className="flex mt-4">
          <Link href="/">
            <a className="mr-4 text-pink-500">
              Home
            </a>
          </Link>
          <Link href="/create-item">
            <a className="mr-6 text-pink-500">
              Sell Digital Asset
            </a>
          </Link>
          <Link href="/my-assets">
            <a className="mr-6 text-pink-500">
              My Digital Assets
            </a>
          </Link>
          <Link href="/creator-dashboard">
            <a className="mr-6 text-pink-500">
              Creator Dashboard
            </a>
          </Link>
        </div>
      </nav>
      <Component {...pageProps} />
    </div>
  )
}

export default MyApp
The navigation has links for the home route as well as a page to sell a digital asset, view the assets you have purchased, and a creator dashboard to see the assets you've created as well as the assets you've sold.
The next page we'll update is pages/index.js. This is the main entry-point of the app, and will be the view where we query for the digital assets for sale and render them to the screen.
View the gist here
/* pages/index.js */
import { ethers } from 'ethers'
import { useEffect, useState } from 'react'
import axios from 'axios'
import Web3Modal from "web3modal"

import {
  nftaddress, nftmarketaddress
} from '../config'

import NFT from '../artifacts/contracts/NFT.sol/NFT.json'
import Market from '../artifacts/contracts/Market.sol/NFTMarket.json'

export default function Home() {
  const [nfts, setNfts] = useState([])
  const [loadingState, setLoadingState] = useState('not-loaded')
  useEffect(() => {
    loadNFTs()
  }, [])
  async function loadNFTs() {
    /* create a generic provider and query for unsold market items */
    const provider = new ethers.providers.JsonRpcProvider()
    const tokenContract = new ethers.Contract(nftaddress, NFT.abi, provider)
    const marketContract = new ethers.Contract(nftmarketaddress, Market.abi, provider)
    const data = await marketContract.fetchMarketItems()

    /*
    *  map over items returned from smart contract and format
    *  them as well as fetch their token metadata
    */
    const items = await Promise.all(data.map(async i => {
      const tokenUri = await tokenContract.tokenURI(i.tokenId)
      const meta = await axios.get(tokenUri)
      let price = ethers.utils.formatUnits(i.price.toString(), 'ether')
      let item = {
        price,
        tokenId: i.tokenId.toNumber(),
        seller: i.seller,
        owner: i.owner,
        image: meta.data.image,
        name: meta.data.name,
        description: meta.data.description,
      }
      return item
    }))
    setNfts(items)
    setLoadingState('loaded')
  }
  async function buyNft(nft) {
    /* needs the user to sign the transaction, so will use Web3Provider and sign it */
    const web3Modal = new Web3Modal()
    const connection = await web3Modal.connect()
    const provider = new ethers.providers.Web3Provider(connection)
    const signer = provider.getSigner()
    const contract = new ethers.Contract(nftmarketaddress, Market.abi, signer)

    /* user will be prompted to pay the asking proces to complete the transaction */
    const price = ethers.utils.parseUnits(nft.price.toString(), 'ether')
    const transaction = await contract.createMarketSale(nftaddress, nft.tokenId, {
      value: price
    })
    await transaction.wait()
    loadNFTs()
  }
  if (loadingState === 'loaded' && !nfts.length) return (<h1 className="px-20 py-10 text-3xl">No items in marketplace</h1>)
  return (
    <div className="flex justify-center">
      <div className="px-4" style={{ maxWidth: '1600px' }}>
        <div className="grid grid-cols-1 sm:grid-cols-2 lg:grid-cols-4 gap-4 pt-4">
          {
            nfts.map((nft, i) => (
              <div key={i} className="border shadow rounded-xl overflow-hidden">
                <img src={nft.image} />
                <div className="p-4">
                  <p style={{ height: '64px' }} className="text-2xl font-semibold">{nft.name}</p>
                  <div style={{ height: '70px', overflow: 'hidden' }}>
                    <p className="text-gray-400">{nft.description}</p>
                  </div>
                </div>
                <div className="p-4 bg-black">
                  <p className="text-2xl mb-4 font-bold text-white">{nft.price} ETH</p>
                  <button className="w-full bg-pink-500 text-white font-bold py-2 px-12 rounded" onClick={() => buyNft(nft)}>Buy</button>
                </div>
              </div>
            ))
          }
        </div>
      </div>
    </div>
  )
}
When the page loads, we query the smart contract for any items that are still for sale and render them to the screen along with metadata about the items and a button for purchasing them.
Next, let's create the page that allows users to create and list digital assets.
There are a few things happening in this page:
- The user is able to upload and save files to IPFS
- The user is able to create a new unique digital item (NFT)
- The user is able to set metadata and price of item and list it for sale on the marketplace
After the user creates and lists an item, they are re-routed to the main page to view all of the items for sale.
View the gist here
/* pages/create-item.js */
import { useState } from 'react'
import { ethers } from 'ethers'
import { create as ipfsHttpClient } from 'ipfs-http-client'
import { useRouter } from 'next/router'
import Web3Modal from 'web3modal'

const client = ipfsHttpClient('https://ipfs.infura.io:5001/api/v0')

import {
  nftaddress, nftmarketaddress
} from '../config'

import NFT from '../artifacts/contracts/NFT.sol/NFT.json'
import Market from '../artifacts/contracts/Market.sol/NFTMarket.json'

export default function CreateItem() {
  const [fileUrl, setFileUrl] = useState(null)
  const [formInput, updateFormInput] = useState({ price: '', name: '', description: '' })
  const router = useRouter()

  async function onChange(e) {
    const file = e.target.files[0]
    try {
      const added = await client.add(
        file,
        {
          progress: (prog) => console.log(`received: ${prog}`)
        }
      )
      const url = `https://ipfs.infura.io/ipfs/${added.path}`
      setFileUrl(url)
    } catch (error) {
      console.log('Error uploading file: ', error)
    }
  }
  async function createMarket() {
    const { name, description, price } = formInput
    if (!name || !description || !price || !fileUrl) return
    /* first, upload to IPFS */
    const data = JSON.stringify({
      name, description, image: fileUrl
    })
    try {
      const added = await client.add(data)
      const url = `https://ipfs.infura.io/ipfs/${added.path}`
      /* after file is uploaded to IPFS, pass the URL to save it on Polygon */
      createSale(url)
    } catch (error) {
      console.log('Error uploading file: ', error)
    }
  }

  async function createSale(url) {
    const web3Modal = new Web3Modal()
    const connection = await web3Modal.connect()
    const provider = new ethers.providers.Web3Provider(connection)
    const signer = provider.getSigner()

    /* next, create the item */
    let contract = new ethers.Contract(nftaddress, NFT.abi, signer)
    let transaction = await contract.createToken(url)
    let tx = await transaction.wait()
    let event = tx.events[0]
    let value = event.args[2]
    let tokenId = value.toNumber()
    const price = ethers.utils.parseUnits(formInput.price, 'ether')

    /* then list the item for sale on the marketplace */
    contract = new ethers.Contract(nftmarketaddress, Market.abi, signer)
    let listingPrice = await contract.getListingPrice()
    listingPrice = listingPrice.toString()

    transaction = await contract.createMarketItem(nftaddress, tokenId, price, { value: listingPrice })
    await transaction.wait()
    router.push('/')
  }

  return (
    <div className="flex justify-center">
      <div className="w-1/2 flex flex-col pb-12">
        <input
          placeholder="Asset Name"
          className="mt-8 border rounded p-4"
          onChange={e => updateFormInput({ ...formInput, name: e.target.value })}
        />
        <textarea
          placeholder="Asset Description"
          className="mt-2 border rounded p-4"
          onChange={e => updateFormInput({ ...formInput, description: e.target.value })}
        />
        <input
          placeholder="Asset Price in Eth"
          className="mt-2 border rounded p-4"
          onChange={e => updateFormInput({ ...formInput, price: e.target.value })}
        />
        <input
          type="file"
          name="Asset"
          className="my-4"
          onChange={onChange}
        />
        {
          fileUrl && (
            <img className="rounded mt-4" width="350" src={fileUrl} />
          )
        }
        <button onClick={createMarket} className="font-bold mt-4 bg-pink-500 text-white rounded p-4 shadow-lg">
          Create Digital Asset
        </button>
      </div>
    </div>
  )
}In the Market.sol smart contract, we created a function named fetchMyNFTs that only returns the items owned by the user.
In pages/my-assets.js, we will use that function to fetch and render them.
This functionality is different than the query main pages/index.js page because we need to ask the user for their address and use it in the contract, so the user will have to sign the transaction for it to be able to fetch them properly.
View the gist here
/* pages/my-assets.js */
import { ethers } from 'ethers'
import { useEffect, useState } from 'react'
import axios from 'axios'
import Web3Modal from "web3modal"

import {
  nftmarketaddress, nftaddress
} from '../config'

import Market from '../artifacts/contracts/Market.sol/NFTMarket.json'
import NFT from '../artifacts/contracts/NFT.sol/NFT.json'

export default function MyAssets() {
  const [nfts, setNfts] = useState([])
  const [loadingState, setLoadingState] = useState('not-loaded')
  useEffect(() => {
    loadNFTs()
  }, [])
  async function loadNFTs() {
    const web3Modal = new Web3Modal({
      network: "mainnet",
      cacheProvider: true,
    })
    const connection = await web3Modal.connect()
    const provider = new ethers.providers.Web3Provider(connection)
    const signer = provider.getSigner()

    const marketContract = new ethers.Contract(nftmarketaddress, Market.abi, signer)
    const tokenContract = new ethers.Contract(nftaddress, NFT.abi, provider)
    const data = await marketContract.fetchMyNFTs()

    const items = await Promise.all(data.map(async i => {
      const tokenUri = await tokenContract.tokenURI(i.tokenId)
      const meta = await axios.get(tokenUri)
      let price = ethers.utils.formatUnits(i.price.toString(), 'ether')
      let item = {
        price,
        tokenId: i.tokenId.toNumber(),
        seller: i.seller,
        owner: i.owner,
        image: meta.data.image,
      }
      return item
    }))
    setNfts(items)
    setLoadingState('loaded')
  }
  if (loadingState === 'loaded' && !nfts.length) return (<h1 className="py-10 px-20 text-3xl">No assets owned</h1>)
  return (
    <div className="flex justify-center">
      <div className="p-4">
        <div className="grid grid-cols-1 sm:grid-cols-2 lg:grid-cols-4 gap-4 pt-4">
          {
            nfts.map((nft, i) => (
              <div key={i} className="border shadow rounded-xl overflow-hidden">
                <img src={nft.image} className="rounded" />
                <div className="p-4 bg-black">
                  <p className="text-2xl font-bold text-white">Price - {nft.price} Eth</p>
                </div>
              </div>
            ))
          }
        </div>
      </div>
    </div>
  )
}The final page we will be creating is the creator dashboard that will allow them to view both all of the items they have created as well as the items they have sold.
This page will be using the fetchItemsCreated function from the Market.sol smart contract which returns only the items that match the address of the user making the function call.
On the client, we use the sold boolean to filter the items into another separate array to show the user only the items that have been sold.
Create a new file called creator-dashboard.js in the pages directory with the following code:
View the gist here
/* pages/creator-dashboard.js */
import { ethers } from 'ethers'
import { useEffect, useState } from 'react'
import axios from 'axios'
import Web3Modal from "web3modal"

import {
  nftmarketaddress, nftaddress
} from '../config'

import Market from '../artifacts/contracts/Market.sol/NFTMarket.json'
import NFT from '../artifacts/contracts/NFT.sol/NFT.json'

export default function CreatorDashboard() {
  const [nfts, setNfts] = useState([])
  const [sold, setSold] = useState([])
  const [loadingState, setLoadingState] = useState('not-loaded')
  useEffect(() => {
    loadNFTs()
  }, [])
  async function loadNFTs() {
    const web3Modal = new Web3Modal({
      network: "mainnet",
      cacheProvider: true,
    })
    const connection = await web3Modal.connect()
    const provider = new ethers.providers.Web3Provider(connection)
    const signer = provider.getSigner()

    const marketContract = new ethers.Contract(nftmarketaddress, Market.abi, signer)
    const tokenContract = new ethers.Contract(nftaddress, NFT.abi, provider)
    const data = await marketContract.fetchItemsCreated()

    const items = await Promise.all(data.map(async i => {
      const tokenUri = await tokenContract.tokenURI(i.tokenId)
      const meta = await axios.get(tokenUri)
      let price = ethers.utils.formatUnits(i.price.toString(), 'ether')
      let item = {
        price,
        tokenId: i.tokenId.toNumber(),
        seller: i.seller,
        owner: i.owner,
        sold: i.sold,
        image: meta.data.image,
      }
      return item
    }))
    /* create a filtered array of items that have been sold */
    const soldItems = items.filter(i => i.sold)
    setSold(soldItems)
    setNfts(items)
    setLoadingState('loaded')
  }
  if (loadingState === 'loaded' && !nfts.length) return (<h1 className="py-10 px-20 text-3xl">No assets created</h1>)
  return (
    <div>
      <div className="p-4">
        <h2 className="text-2xl py-2">Items Created</h2>
          <div className="grid grid-cols-1 sm:grid-cols-2 lg:grid-cols-4 gap-4 pt-4">
          {
            nfts.map((nft, i) => (
              <div key={i} className="border shadow rounded-xl overflow-hidden">
                <img src={nft.image} className="rounded" />
                <div className="p-4 bg-black">
                  <p className="text-2xl font-bold text-white">Price - {nft.price} Eth</p>
                </div>
              </div>
            ))
          }
        </div>
      </div>
        <div className="px-4">
        {
          Boolean(sold.length) && (
            <div>
              <h2 className="text-2xl py-2">Items sold</h2>
              <div className="grid grid-cols-1 sm:grid-cols-2 lg:grid-cols-4 gap-4 pt-4">
                {
                  sold.map((nft, i) => (
                    <div key={i} className="border shadow rounded-xl overflow-hidden">
                      <img src={nft.image} className="rounded" />
                      <div className="p-4 bg-black">
                        <p className="text-2xl font-bold text-white">Price - {nft.price} Eth</p>
                      </div>
                    </div>
                  ))
                }
              </div>
            </div>
          )
        }
        </div>
    </div>
  )
}To run the project, we will need to have a deploy script to deploy the smart contracts to the blockchain network.
When we created the project, Hardhat created an example deployment script at scripts/sample-script.js.
To make the purpose of this script more clear, update the name of scripts/sample-script.js to scripts/deploy.js.
Next, update the main function in scripts/deploy.js with the following code:
async function main() {
  const NFTMarket = await hre.ethers.getContractFactory("NFTMarket");
  const nftMarket = await NFTMarket.deploy();
  await nftMarket.deployed();
  console.log("nftMarket deployed to:", nftMarket.address);

  const NFT = await hre.ethers.getContractFactory("NFT");
  const nft = await NFT.deploy(nftMarket.address);
  await nft.deployed();
  console.log("nft deployed to:", nft.address);
}
This script will deploy both contracts to the blockchain network.
We will first test this on a local network, then deploy it to the Mumbai testnet.
To spin up a local network, open your terminal and run the following command:
npx hardhat nodeThis should create a local network with 19 accounts.

Next, keep the node running and open a separate terminal window to deploy the contract.
In a separate window, run the following command:
npx hardhat run scripts/deploy.js --network localhostWhen the deployment is complete, the CLI should print out the addresses of the contracts that were deployed:

Using these addresses, create a new file at the root of the project named config.js and add the following code, replacing the placeholder with the contract addresses printed out by the CLI:
export const nftmarketaddress = "market-contract-address"
export const nftaddress = "nft-contract-address"You can import the accounts created by the node into your Metamask wallet to try out in the app.
Each of these accounts is seeded with 10000 ETH.
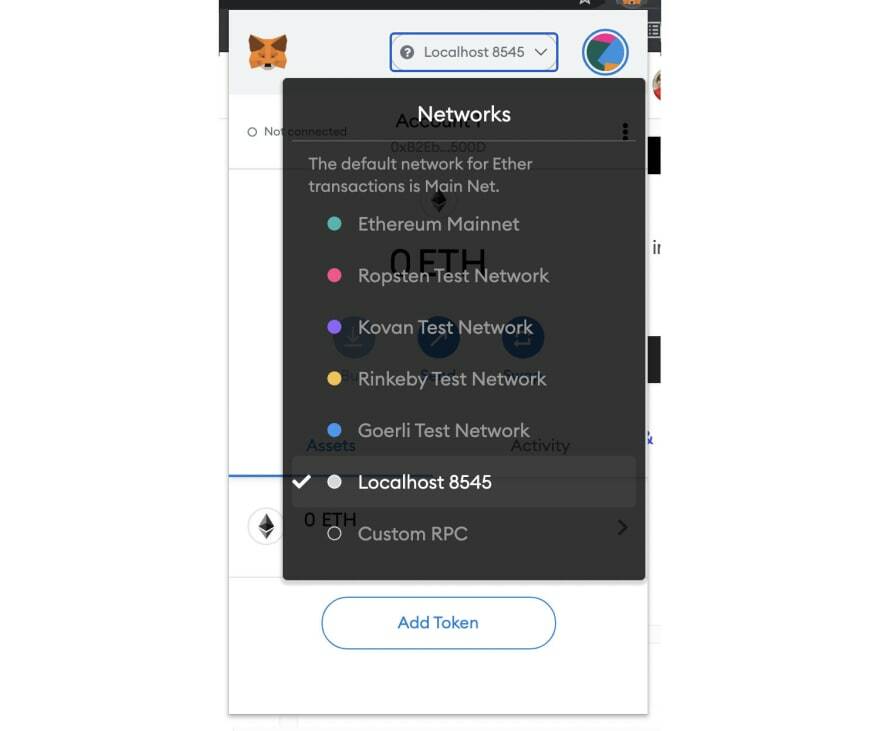
To import one of these accounts, first switch your MetaMask wallet network to Localhost 8545.
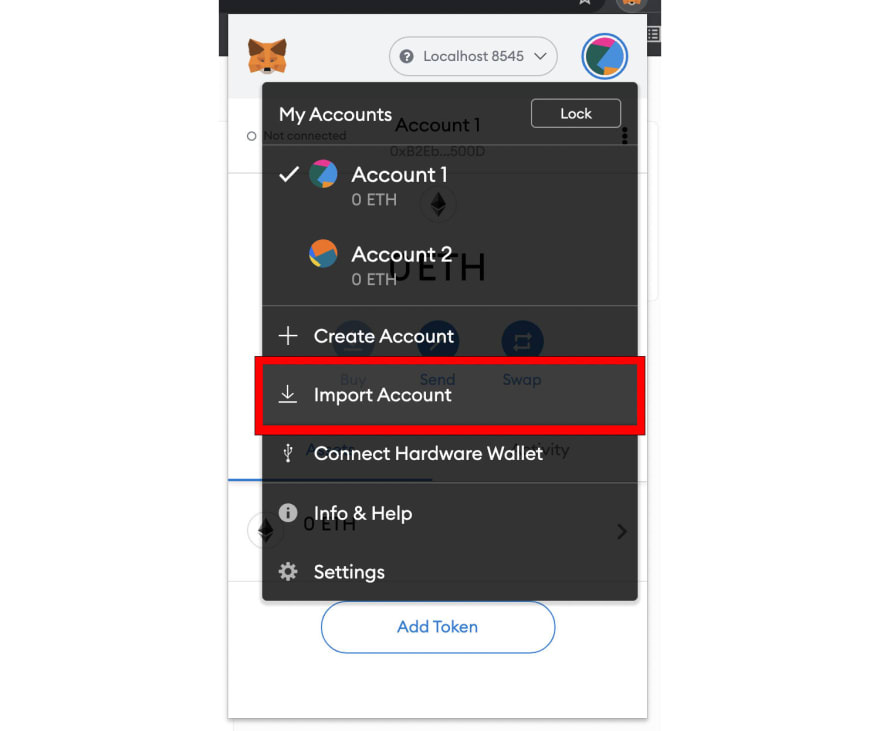
Next, in MetaMask click on Import Account from the accounts menu:
Copy then paste one of the Private Keys logged out by the CLI and click Import. Once the account is imported, you should see some the Eth in the account:
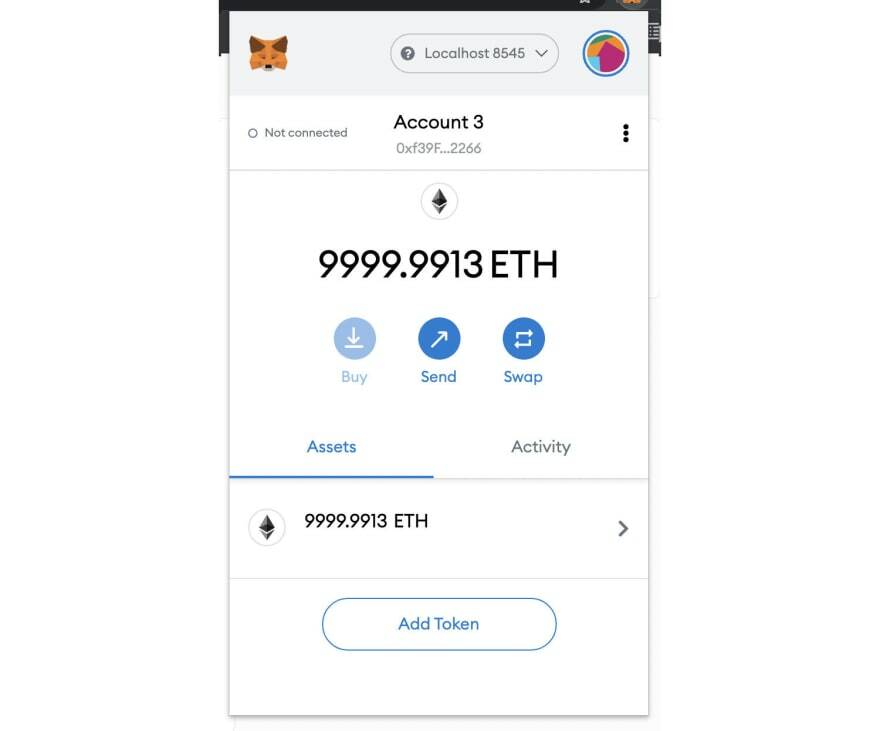
I'd suggest doing this with 2 or 3 accounts so that you have the ability to test out the various functionality between users.
Now we can test out the app!
To start the app, run the following command in your CLI:
npm run devTo test everything out, try listing an item for sale, then switching to another account and purchasing it.
Now that we have the project up and running and tested locally, let's deploy to Polygon. We'll start by deploying to Mumbai, the Polygon test network.
The first thing we will need to do is save one of our private keys from our wallet to the .secrets file.
To get the private key, you can use one of the private keys given to you by Hardhat or you can export them directly from MetaMask.
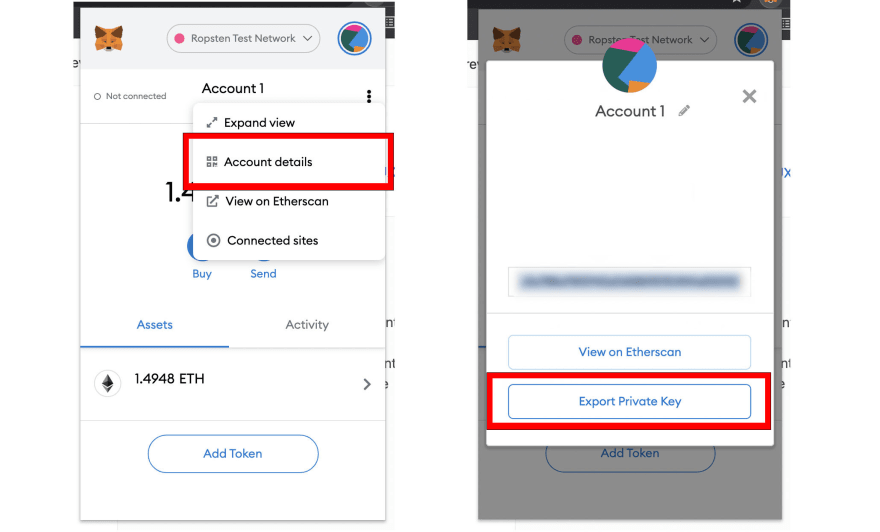
In the real world I suggest never hardcoding private key values in your files as we are doing here, but instead setting it as a local environment variable. If you understand how environment variables work, then use that route instead. Also remember to never push secrets files to Git.
Next, we need to switch from the local test network to the Mumbai Testnet.
To do so, we need to create and set the network configuration.
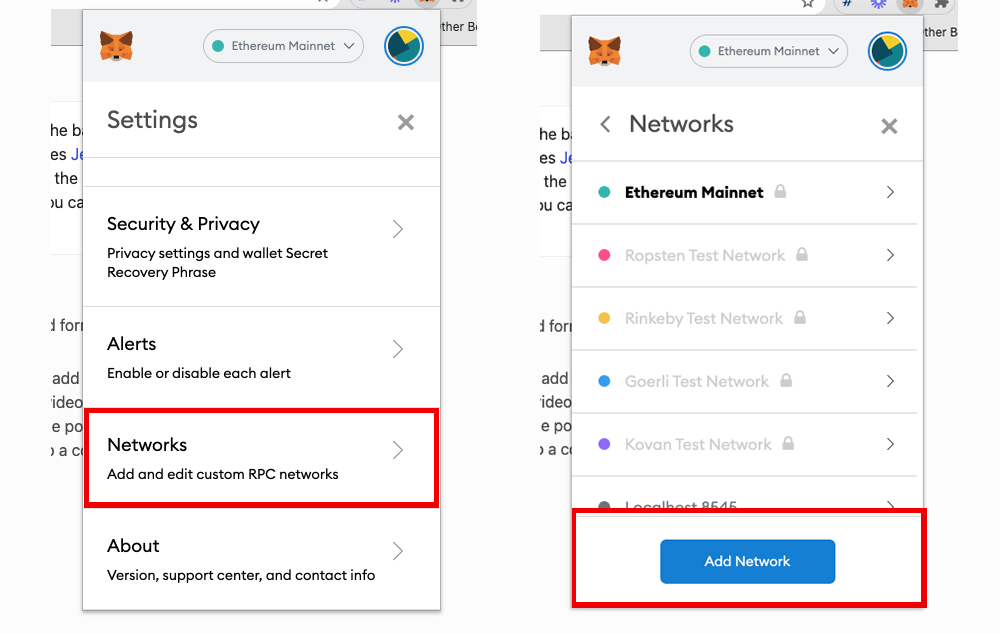
First, open MetaMask and click on Settings.
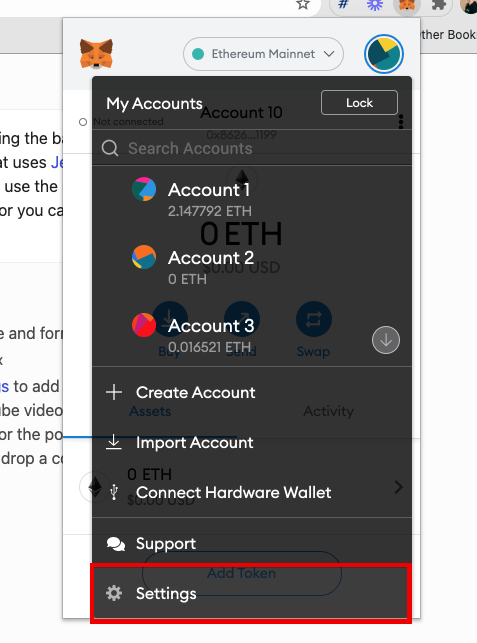
Next, click on Networks and then Add Network:
Here, we will add the following configurations for the Mumbai test network as listed here:
Network Name: Mumbai TestNet New RPC URL: https://rpc-mumbai.maticvigil.com Chain ID: 80001 Currency Symbol: Matic
Save this, then you should be able to switch to and use the new network!
Finally, you will need some testnet Matic tokens in order to interact with the applications.
To get these, you can visit the Matic Faucet, inputting the address of the wallets that you would like to request the tokens.
Now that you have some Matic tokens, you can deploy to the Polygon network!
To do so, be sure that the address associated with the private key you are deploying your contract with has received some Matic tokens in order to pay the gas fees for the transaction.
Also, be sure to uncomment the mumbai configuration in hardhat.config.js:
    mumbai: {
      url: "https://rpc-mumbai.maticvigil.com",
      accounts: [privateKey]
    }
To deploy to Matic, run the following command:
npx hardhat run scripts/deploy.js --network mumbaiOnce the contracts have been deployed, update the loadNFTs function call in pages/index.js to include the new RPC endpoint:
/* pages/index.js */

/* old provider */
const provider = new ethers.providers.JsonRpcProvider()

/* new provider */
const provider = new ethers.providers.JsonRpcProvider("https://rpc-mumbai.maticvigil.com")
You should now be able to update the contract addresses in your project and test on the new network 🎉!
npm run devIf you run into an error, the contract address printed out to the console by hardhat could be incorrect due to a bug I've run into recently. You can get the correct contract addresses by visiting https://mumbai.polygonscan.com/ and pasting in the address from which the contracts were deployed to see the most recent transactions and getting the contract addresses from the transaction data.
To deploy to the main Matic / Polygon network, you can use the same steps we set up for the Mumbai test network.
The main difference is that you'll need to use an endpoint for Matic as well as import the network into your MetaMask wallet as listed here.
An example update in your project to make this happen might look like this:
/* hardhat.config.js */

/* adding Matic main network config to existing config */
...
matic: {
  url: "https://rpc-mainnet.maticvigil.com",
  accounts: [privateKey]
}
...
Public RPCs like the one listed above may have traffic or rate-limits depending on usage. You can sign up for a dedicated free RPC URL using services like Infura, MaticVigil, QuickNode, Alchemy, Chainstack, or Ankr.
For example, using something like Infura:
url: `https://polygon-mainnet.infura.io/v3/${infuraId}`To view the final source code for this project, visit this repo
Congratulations! You've deployed a non-trivial app to Polygon.
The coolest thing about working with solutions like Polygon is how little extra work or learning I had to do compared to building directly on Ethereum. Almost all of the APIs and tooling in these layer 2's and sidechains remain the same, making any skills transferable across various platforms like Polygon.
For the next steps, I'd suggest porting over the queries implemented in this app using The Graph. The Graph will open up many more data access patterns including things like pagination, filtering, and sorting which are necessary for any real-world application.
I will also be publishing a tutorial showing how to use Polygon with The Graph in the coming weeks.