Recommended snack and song:
220ml of dark roasted full bodied coffee brewed in french press accompanied by a banana while listening to Liquid Tension Experiment
tl;dr: You can go ahead and clone this repo, it's got the end result of this in-depth tutorial bellow.
Here's what we will be doing for becoming smart-contract heroes! - Install the dev environment plus MetaMask. - Develop a very simple voting smart contract. - Develop a front-end for our DAPP using React and Redux. - Configure and deploy our contract to Ropsten
If you don't know what Solidity is, please go check it out. There's an awesome video library you can watch to get a firm grasp on developing smart contracts with Solidity. This is not a requisite for this blogpost, just thought it was important to share the videos, since their content is pretty solid.
We need to install our dev environment, for which we're going to install truffle which will help us get started quickly:
$ npm install -g truffleAnd now, for running a local blockchain for our development environment, there are several ways of doing it, but the easiest is to download Ganache, once you download it and execute it, you'll have a fully functional blockchain ethereum network for you to deploy and test your contracts.
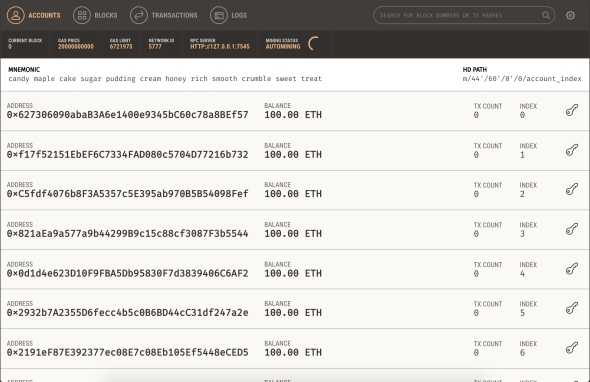
Note your network ID and RPC Server Port, typically the network ID is 5777 and the server hosted in 127.0.0.1:7545.
We don't have to start from scratch to develop our app, we're going to use truffle boxes, which are boilerplate projects that include a bunch of functionalities already built in to bootstrap our DAPP ideas:
$ mkdir voting-dapp && cd $_
$ truffle unbox react
$ npm install --save env-cmd history material-ui@next material-ui-icons react react-dom react-redux react-router-dom react-router-redux@next redux redux-promise-middleware truffle-hdwallet-provider
In order to get the environment started the right way, add a file to the root of the application folder called .env:
NODE_PATH=src/
REACT_APP_LOCAL_BLOCKCHAIN_PORT=7545
The first bit, will allow our React application to import modules using an absolute path instead relative, this will avoid the typical import foo from '../../../../foo'; which are hard to read and maintain. And the second one, lets you configure which local network blockchain port to use, it's set up to use the default Ganache network port.
Now, to the package.json file, let's edit the scripts section so it looks like this:
  "scripts": {
    "start": "env-cmd ./.env node scripts/start.js",
    "build": "env-cmd ./.env node scripts/build.js",
    "test": "env-cmd ./.env node scripts/test.js --env=jsdom"
  },
Once we've set up the dependencies and scripts, go ahead and delete contracts/SimpleStorage.sol file and create our own contracts/Voting.sol:
pragma solidity ^0.4.18;

contract Voting {
  mapping (bytes32 => uint8) public votes;
  bytes32[] private candidateList;

  event UpdateCandidates();

  function getCandidateVotes(bytes32 candidate) public view returns (uint8) {
    assert(doesCandidateExist(candidate));

    return votes[candidate];
  }

  function listCandidates() public view returns (bytes32[]) {
    return candidateList;
  }

  function postulateCandidate(bytes32 candidate) public {
    assert(!doesCandidateExist(candidate));

    candidateList.push(candidate);
    UpdateCandidates();
  }

  function voteForCandidate(bytes32 candidate) public {
    assert(doesCandidateExist(candidate));

    votes[candidate] += 1;
    UpdateCandidates();
  }

  function doesCandidateExist(bytes32 candidate) internal view returns (bool) {
    for (uint i = 0; i < candidateList.length; i++) {
      if (candidateList[i] == candidate) {
        return true;
      }
    }
    return false;
  }
}
This is just a sample solidity contract, not the best solidity code out there, but will do the trick.
Now open up migrations/2_deploy_contract.js and replace it's contents with:
var Voting = artifacts.require("./Voting.sol");

module.exports = function(deployer) {
  deployer.deploy(Voting);
};
This will instruct the migrate command to always look for our contract and deploy it.
And for testing of our smart contract, delete all files in test/ folder and place test/voting.js file in there:
const Voting = artifacts.require('./Voting.sol');

const toAscii = function(hex) {
    let str = '',
        i = 0,
        l = hex.length;
    if (hex.substring(0, 2) === '0x') {
        i = 2;
    }
    for (; i < l; i+=2) {
        const code = parseInt(hex.substr(i, 2), 16);
        if (code === 0) continue; // this is added
        str += String.fromCharCode(code);
    }
    return str;
};

contract('Voting', (accounts) => {
  it('...should start with an empty candidates list', () => {
    let votingInstance;
    return Voting.deployed()
      .then(instance => {
        votingInstance = instance;

        return votingInstance.listCandidates.call({from: accounts[0]});
      })
      .then(candidateList => assert.equal(candidateList.length, 0, 'The candidate list is not empty.'))
  });

  it('...should postulate a new candidate', () => {
    let votingInstance;
    const candidate = 'John Doe';
    return Voting.deployed()
      .then(instance => {
        votingInstance = instance;
        return votingInstance.postulateCandidate(candidate, {from: accounts[0]})
      })
      .then(() => votingInstance.listCandidates.call({from: accounts[0]}))
      .then(candidateList => candidateList.map(toAscii))
      .then(candidateList => {
        assert.include(candidateList, candidate, 'Candidate is not on the list');
      });
  });

  it('...should vote for candidate', () => {
    let votingInstance;
    const candidate = 'John Doe';

    return Voting.deployed()
      .then(instance => {
        votingInstance = instance;
        return votingInstance.voteForCandidate(candidate, {from: accounts[0]});
      })
      .then(() => votingInstance.getCandidateVotes.call(candidate, {from: accounts[0]}))
      .then(response => response.c[0])
      .then((votes) => {
        assert.equal(votes, 1, 'Candidate does not have votes');
      })
  });

  it('...should get votes for the candidate', () => {
    let votingInstance;
    const candidate = 'John Doe';

    return Voting.deployed()
      .then(instance => {
        votingInstance = instance;
        return votingInstance.votes.call(candidate, {from: accounts[0]});
      })
      .then(() => votingInstance.getCandidateVotes.call(candidate, {from: accounts[0]}))
      .then(response => response.c[0])
      .then((votes) => {
        assert.equal(votes, 1, 'Candidate does not have votes');
      })
  })
});
We also need to configure our deployment scripts by replacing the contents of truffle.js file:
var HDWalletProvider = require('truffle-hdwallet-provider');

var infuraApiKey = 'YOUR GENERATED INFURA API KEY';

var mnemonic = 'YOUR 12 WORDS MNEMONIC';

module.exports = {
  // See <http://truffleframework.com/docs/advanced/configuration>
  // to customize your Truffle configuration!
  networks: {
    development: {
      host: "127.0.0.1",
      port: 7545,
      network_id: '5777'
    },
    ropsten: {
      provider: function() {
        return new HDWalletProvider(mnemonic, 'https://ropsten.infura.io/' + infuraApiKey);
      },
      network_id: 3,
      gas: 4612388
    }
  }
};
Note: lines 3 and 5 we'll configure later on when we're preparing for Ropsten deployment.
Cool! Now we can start testing our smart contract:
$ truffle test
Since our tests are passing flawlessly, let's push them to our Ganache local blockchain network (make sure Ganache is running first):
$ truffle compile
$ truffle migrate
The next part is developing the front-end app, and because it's an app with React + Redux + React-Router, there's a whole bunch of files, so instead of copying/pasting every file, type these commands in the terminal (inside your project root of course):
$ mv src src-backup
$ curl -L https://www.dropbox.com/s/zx16pkwyp1u86eq/src.zip\?dl\=1 | bsdtar -xvf-
That should create a backup of the src folder, and then download and unzip the source code of the voting-dapp front-end.
However, I'm going to explain some key files so you understand how to communicate with your smart contracts. For instance, in the build/contracts/ folder, you'll find several .json files, one per contract, those files are known as ABI which stands for Application Binary Interface, and they hold all of the information about each contract.
This ABI files, are made when you truffle compile, and if you open src/contracts-api/VotingContract.js:
import { toAsciiFromByte32, getWeb3 } from 'utils'
import VotingContractMeta from '../../build/contracts/Voting.json'
import contract from 'truffle-contract'


let instance = null

export default class VotingContract {
  constructor() {
    if (!instance) {
      instance = this
      this.web3 = getWeb3()
      this.contract = contract(VotingContractMeta)
      this.contract.setProvider(this.web3.currentProvider)
    }

    return instance
  }

  async updateCandidatesEventListener(callback) {
    const contractInstance = await this.contract.deployed()
    const updateCandidatesEvent = contractInstance.UpdateCandidates()
    return updateCandidatesEvent.watch(callback)
  }

  async getVotes() {
    const contractInstance = await this.contract.deployed()
    return contractInstance.votes();
  }

  async proposeCandidate() {
    // TODO: This could receive a candidate's name as a parameter
    const getRandomUserURL = 'https://randomuser.me/api/?nat=us'
    const { eth: { accounts: [ account ] } } = this.web3
    const contractInstance = await this.contract.deployed()
    const {
      results: [{
        name: { first, last },
        id: { value: id },
      }]
    } = await fetch(getRandomUserURL)
      .then(response => response.json())

    return contractInstance
      .postulateCandidate(`${first} ${last} ${id}`, { from: account })
  }

  async castVote(candidateName) {
    const { eth: { accounts: [ account ] } } = this.web3
    const contractInstance = await this.contract.deployed()
    return contractInstance.voteForCandidate(candidateName, { from: account })
  }

  async getAllCandidates() {
    const contractInstance = await this.contract.deployed()
    const candidateList = (await contractInstance.listCandidates())
      .map(candidate => toAsciiFromByte32(candidate))

    return Promise.all(candidateList.map(
        (candidate) => contractInstance.getCandidateVotes.call(candidate)
      ))
      .then(allVotes => allVotes.map((votes, index) => ({
        name: candidateList[index],
        votes: Number(votes.toString()),
      })))
  }

  async getCandidateVotes(candidate) {
    const contractInstance = await this.contract.deployed()
    const result = await contractInstance.getCandidateVotes.call(candidate.name)
    return {
      candidate: candidate.name,
      votes: Number(result.toString())
    }
  }
}
You can see in the constructor (from lines 11 to 14) where we're getting a reference to the Web3 provider instance, then we create a contract using the ABI file and set it's provider.
After that, it becomes super easy to operate on the contract, we get an instance reference of the deployed contract using async/await and then just call the function we're interested in, then return the value of said function. truffle-contract already abstracts all of the complexity for you and gives you a nice API to use.
This file acts as an abstraction layer for custom behavior for each function.
This leads me to the other important aspect, the src/modules/candidates/candidates.actions.js file:
import {
  GET_CANDIDATES,
  VOTE,
  NEW_CANDIDATE,
} from './candidates.constants'
import { VotingContract } from 'contracts-api'

export const getCandidates = () => {
  return {
    type: GET_CANDIDATES,
    payload: (new VotingContract()).getAllCandidates(),
  }
}

export const postulateNewCandidate = () => {
  return {
    type: NEW_CANDIDATE,
    payload: (new VotingContract())
      .proposeCandidate({ type: 'random' })
      .then(() => (new VotingContract()).getAllCandidates()),
  }
}

export const vote = (candidateName) => {
  return {
    type: VOTE,
    payload: (new VotingContract())
      .castVote(candidateName)
      .then(() => (new VotingContract()).getAllCandidates()),
  }
}
These are pretty standard redux action creator functions, but they're using redux-promise-middleware, which makes the actions look a lot simpler. You can see how easy it is to call each contract function using our custom abstraction layer.
Also, you can listen to events being published by your contract, there's an event called UpdateCandidates and if you take a peek at src/modules/candidates/candidates.event-listeners.js file:
import { getCandidates } from 'modules/candidates'
import { VotingContract } from 'contracts-api'

export default async (dispatch, getState) => {
  await (new VotingContract())
    .updateCandidatesEventListener((error, candidateList) => {
      dispatch(getCandidates())
    })
}
This is a very simple function which is called from the src/store.js file, in line 36:
applyCandidatesEventListeners(store.dispatch, store.getState);It gets the dispatch and getState functions passed from the store instance, and that's how it dispatches actions when events are called.
And that's about it, everything else is a pretty standard react application. Now we can go ahead and start our brand new front-end:
$ npm start_Note: While on development mode, it's better to deactivate MetaMask if you already have it installed, it has some nasty bugs regarding events and synchronization with local RPC servers (like Ganache) _
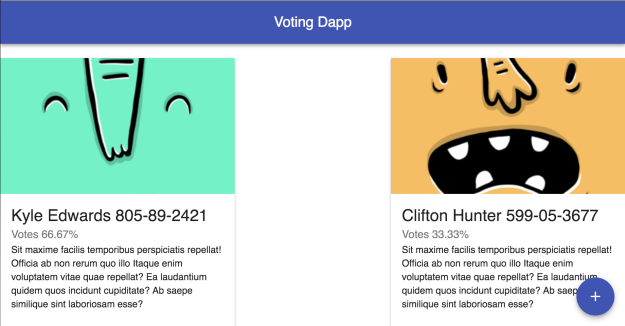
Success! You should have been presented with something like the picture above, you should be able to hit the plus fab button and the app should be creating new "candidates" each time. While you're at it, go ahead and take a look at the Transactions and Blocks tabs in Ganache, you'll see that each time you either vote or create a new candidate, a transaction is made and a block is added.
We will need MetaMask installed, this will keep things nice and easy. We'll use MetaMask to create ourselves an Ethereum account and fill it with free ETH (using a faucet) so we can deploy our smart contracts to the Ropsten network (that's a testing network, so that's why we can get ETH for free).
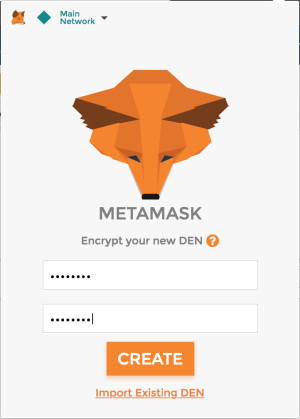
First, create yourself a secure password:
Then, copy the 12 word mnemonic you've been given somewhere safe:

Copy them somewhere safe, seriously, they're important. Now you can go to Infura.io to get your API key by signing up. Once you do, put those 12 words and the Infura API key in their respective places in your truffle.js file:
//...
var infuraApiKey = 'YOUR GENERATED INFURA API KEY';
var mnemonic = 'YOUR 12 WORDS MNEMONIC';
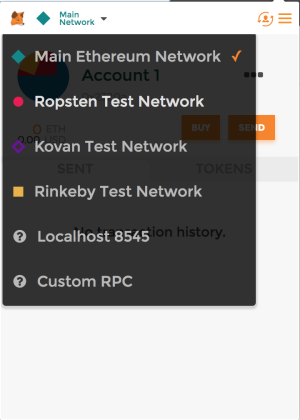
//...Then, on your MetaMask UI, select the Ropsten network:
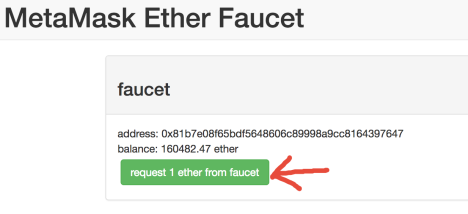
Last thing, go to the MetaMask faucet and request some ether for your account, you'll need it to deploy your contracts:
Wait for the transaction to finish and then that's it! Now, let's deploy to Ropsten:
$ truffle compile
$ truffle migrate --network ropsten
Done. You're now officially on Ropsten, now you only need your MetaMask pointing at Ropsten Network (like you already have) and you can interact with your deployed smart contract using your local react app (at least while your MetaMask is pointing to the Ropsten Network).
If you want to deploy your app as a real distributed application, you can use IPFS.io, which will help you deploy your application in a P2P protocol static hosting. In case you want to deploy your front-end on a typical centralized way, surge.sh is pretty good for that, and super easy to use.
That's it for this tutorial, hope you enjoyed the music and the snack. The source code for this application is at this repo, should you have any questions about implementations or the code in general, feel free to create issues on the Github repo or post them as comments bellow.