You signed in with another tab or window. Reload to refresh your session.You signed out in another tab or window. Reload to refresh your session.You switched accounts on another tab or window. Reload to refresh your session.Dismiss alert
This file contains bidirectional Unicode text that may be interpreted or compiled differently than what appears below. To review, open the file in an editor that reveals hidden Unicode characters.
Learn more about bidirectional Unicode characters
This gist describes how to switch Xcode schemes and run destinations using keybindings and Xcode behaviors.
How to Switch Xcode Schemes Quickly Using Keybindings
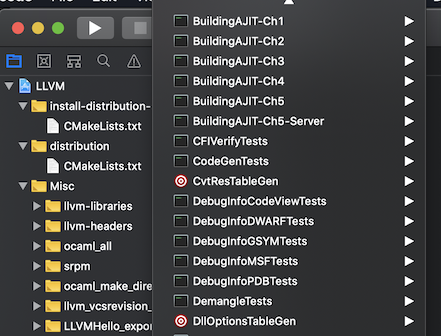
If you have a lot of schemes in your Xcode project, searching for the
one you want to run may be slow, even if you use the “search as you
type” feature. Because of this, you may choose to hide or not generate
schemes that you don’t regularly use. Here’s an example of an Xcode project
with a lot of schemes:
Press "h" in a Magit interactive rebase to change the commit author of some commits. Username completion is provided by the git shortlog.
This file contains bidirectional Unicode text that may be interpreted or compiled differently than what appears below. To review, open the file in an editor that reveals hidden Unicode characters.
Learn more about bidirectional Unicode characters
Emacs function to kill added/removed lines of diff output, removing the diff markers
This file contains bidirectional Unicode text that may be interpreted or compiled differently than what appears below. To review, open the file in an editor that reveals hidden Unicode characters.
Learn more about bidirectional Unicode characters
Most people is familiar with Xcode theme support for the text editor. You simply open Preferences, Fonts & Colors and duplicate
an existing theme (or create a new one from scratch). Xcode editor themes have the .dvtcolortheme extension.
However, there's some support for themeing Xcode itself (fonts, gradients, colors). Xcode loads the default theme from
/Applications/Xcode.app/Contents/SharedFrameworks/DVTKit.framework/Versions/A/Resources/Default.dvttheme.
.dvttheme files are simply XML files that conform to an undocumented schema. If you want to modify any of the settings in
Default.dvttheme, instead of modifying the bundle resource file you can instruct Xcode to load your custom .dvttheme from
wherever you want:
Export an Org region to RTF and copy it to the clipboard. Ideal for copying source code blocks to Google Docs and preserve syntax highlighting and indentation.
This file contains bidirectional Unicode text that may be interpreted or compiled differently than what appears below. To review, open the file in an editor that reveals hidden Unicode characters.
Learn more about bidirectional Unicode characters
This file contains bidirectional Unicode text that may be interpreted or compiled differently than what appears below. To review, open the file in an editor that reveals hidden Unicode characters.
Learn more about bidirectional Unicode characters
Add support for a better Xcode's Jump to Next Counterpart in Swift
If you work on a Swift project that follows the Model-View-ViewModel (MVVM) architecture or similar, you may want to
jump to counterpart in Xcode from your view to your model, and then to your view model. (ie. by using Ctrl+Cmd+Up and Ctrl+Cmd+Down).
You can do this in recent versions of Xcode by setting a configuration default.
From a terminal, just type this command and press Enter: